Page 2 - Installation; Unpacking and levelling; Unpacking; Levelling; see figure; Connecting the electricity and; Connecting the water inlet hose
2 GB Installation ! This instruction manual should be kept in a safe place for future reference. If the washer-dryer is sold, transferred or moved, make sure that the instruction manual remains with the machine so that the new owner is able to familiarise himself/ herself with its operation and feat...
Page 3 - Connecting the drain hose; see; Electrical connections; • the socket is earthed and complies with all; The first wash cycle; Wash
GB 3 Connecting the drain hose Connect the drain hose, without bending it, to a drain duct or a wall drain situated between 65 and 100 cm from the floor; alternatively, placed it over the edge of a basin, sink or tub, fa- stening the duct sup- plied to the tap ( see figure ). The free end of the hos...
Page 4 - Care and maintenance; • Turn off the water tap after every wash cycle.
4 GB Cleaning the pump The washer-dryer is fitted with a self-cleaning pump which does not require any maintenan- ce. Sometimes, small items (such as coins or buttons) may fall into the pre-chamber which protects the pump, situated in its bottom part. ! Make sure the wash cycle has finished and unpl...
Page 5 - Precautions and tips; General safety; • This appliance can be used by children aged; Disposal; Opening the porthole door manually
GB 5 Precautions and tips ! This washer-dryer was designed and constructed in accordance with international safety regulations. The fol- lowing information is provided for safety reasons and must therefore be read carefully. General safety • This appliance was designed for domestic use only. • This ...
Page 6 - Description of the washer-dryer; Control panel
6 GB Detergent dispenser drawer : used to dispense detergents and washing additives (see “Detergents and laundry”) . Programme Key: the Programme Key inside the deter- gent dispenser shows all the available programmes toge- ther with a graphical guide on how to use the individual dispenser compartme...
Page 7 - Display; COTONE
GB 7 The display is useful when programming the machine and provides a great deal of information. The following will appear in area A : the icon and programme selected, the washing and drying phases and time remaining to the end of the cycle. Area B will include the two intensity levels relative to ...
Page 9 - Wash cycles and functions; Table of wash cycles
GB 9 Wash cycles and functions Table of wash cycles Wash functions ! If the selected function is incompatible with the set pro- gramme, the relevant indicator light will appear dimly lit; in addition, the incompatibility will be signalled by a buzzer (3 beeps) and the wording “ No Selection ” will a...
Page 10 - Special wash cycles; Load balancing system; Detergents and laundry
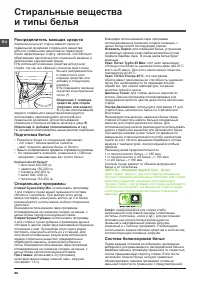
10 GB Detergent dispenser drawer Good washing results also depend on the correct dose of detergent: adding too much detergent will not necessarily result in a more efficient wash, and may in fact cause a build up on the inside of your appliance and contribute to environmental pollution. ! Use powder...
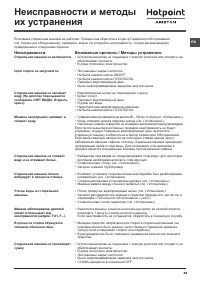
Page 11 - Troubleshooting
GB 11 Troubleshooting Your washer-dryer could fail to work. Before contacting the Technical Assistance Centre (see “Assistance”) , make sure that the problem cannot be solved easily using the following list. Problem: The washer-dryer does not switch on. The wash cycle does not start. The washer-drye...
Page 12 - Service
12 GB Before calling for Assistance: • Check whether you can solve the problem alone ( see “Troubleshooting” ); • Restart the programme to check whether the problem has been solved;• If this is not the case, contact an authorised Technical Assistance Centre using the telephone number provided on the...
Page 13 - Содержание; Руководство по
RU 13 Русский ! Содержание Установка 14-15 Распаковка и выравнивание Подключение к водопроводной и электрической сети Первый цикл стирки Технические характеристики Техническое обслуживание и уход, 16 Отключение...
Page 14 - Установка; Распаковка и выравнивание; Распаковка; Подключение к водопроводной и; Подсоединение заливного шланга
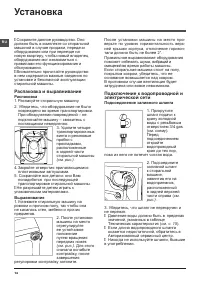
14 RU Установка ! Сохраните данное руководство. Оно должно быть в комплекте со стиральной машиной в случае продажи, передачи оборудования или при переезде на новую квартиру, чтобы новый владелец оборудования мог ознакомиться с правилами его функционирования и обслуживания. ! Внимательно прочитайте р...
Page 15 - Первый цикл стирки
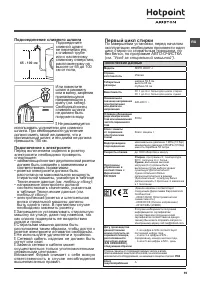
RU 15 Подсоединение сливного шланга Подсоедините сливной шланг, не перегибая его, к сливной трубе или к настенному сливному отверстию, распложенному на высоте от 65 до 100 см от пола, Или поместите шланг в раковину или в ванну, закрепив прилагающуюся направляющую к крану ( см. схему). Свободный коне...
Page 16 - Техническое обслуживание
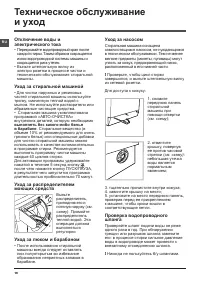
16 RU Отключение воды и электрического тока • Перекрывайте водопроводный кран после каждой стирки. Таким образом сокращается износ водопроводной системы машины и сокращается риск утечек. • Выньте штепсельную вилку из электро розетки в процессе чистки и технического обслуживания стиральной машины. Ух...
Page 17 - Условия хранения и транспортировки
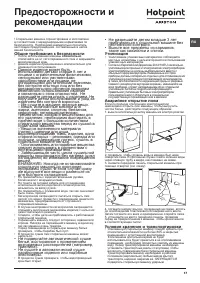
RU 17 Предосторожности и рекомендации • После использовани...
Page 18 - Описание стиральной машины; Панель управления; Дисплей
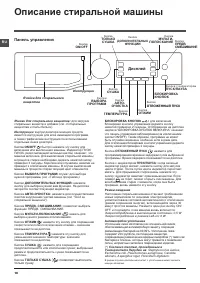
18 RU Ячейки для стирального вещества: для загрузки стиральных веществ и добавок ( см. «Стиральные вещества и типы белья» ). Инструкции: внутри дозатора моющих средств имеются инструкции для всех имеющихся программ, а также графические инструкции по использованию отдельных ячеек дозатора.Кнопка ON/O...
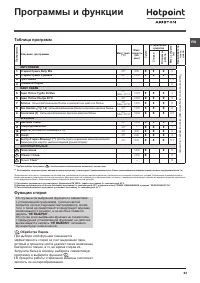
Page 21 - Программы и функции; Функции стирки; Таблица программ
RU 21 Программы и функции Функции стирки ! В случае если выбранная функция не совместима с установленной программой, тусклым светом загорится соответствующий светоиндикатор, кроме того, о такой несовместимости предупредит звуковая сигнализация (3 сигнала), а на дисплее появится надпись “ НЕ ВЫБРАН ”...
Page 22 - Система балансировки белья; Стиральные вещества; Распределитель моющих средств; Подготовка белья; Специальные программы
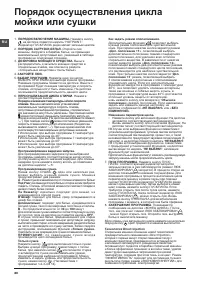
22 RU Благодаря использованию пара программа оптимизирована на снижение складок на вещах, с целью более легкой последующей глажки. Освежить Паром: для освежения белья, устранения неприятных запахов и расслабления волокон путем подачи в барабан пара. В конце цикла белье будет влажным. Удал. Пятен Тур...
Page 25 - Бұл таңба осы пайдаланушы; Мазмұны; Күтім және пайдалану, 28; Пайдалану нұсқаулығы; КІР ЖУҒЫШ МАШИНА
KZ 25 Қазақша ! Бұл таңба осы пайдаланушы нұсқаулығын оқуды еске салады. Мазмұны Орнату, 26-27 Қаптамадан алу және түзулеу Ток пен суды қосу Бірінші жуу циклы Техникалық деректері Күтім және пайдалану, 28 Су мен токты өшіру Кір жуғыш машинаны тазалау Жуғыш зат тартпасын тазалау Құрылғының есігі мен ...
Page 26 - Ток пен суды қосу; Судың кіріс түтігін жалғау; болуы тиіс (келесі бетті; Қаптамадан алу және түзулеу; Қаптамадан алу; суретті қараңыз; Түзулеу; Орнату
26 KZ 2. Еден түзу болмаса, алдыңғы аяқтарды қатайту немесе босату арқылы құрылғыны түзулеңіз ( суретті қараңыз ); құрылғының үстіңгі жағымен салыстырып өлшенген еңкею бұрышы 2°-тан аспауы керек.Құрылғы дұрыс түзулеу оған тұрақтылық береді, дірілдеу мен шамадан тыс шуылдың болмауына көмектеседі және...
Page 27 - Бірінші жуу циклы
KZ 27 Ағызу түтігін жалғау Ағызу түтігін майыстырмай, еденнен 65- 100 см жоғары орналасқан ағызу құбырына немесе қабырғадағы канализация құбырына жалғаңыз; немесе, оны ваннаға салып, берілген түтікті шүмекке бекітіңіз ( суретті қараңыз ). Түтіктің шеті су астында болмауы тиіс. ! Түтікті ұзартуға қар...
Page 28 - барабанға ешбір; Күтім көрсету және техникалық
28 KZ Сорғыны тазалау Кір жуғыш машина ешбір техникалық қызмет көрсетуді қажет етпейтін, өзін-өзі тазалайтын сорғымен жабдықталған. Кейде кіші заттар (тиындар немесе түймелер сияқты) сорғының төменгі жағындағы, оны қорғайтын алдыңғы камераға түсіп кетуі мүмкін. ! Жуу циклы аяқталғанына көз жеткізіңі...
Page 29 - Жалпы қауіпсіздік
KZ 29 Сақтандырулар мен кеңестер ! Б ұ л к і р ж у ғ ы ш м а ш и н а ха л ы қ а р а л ы қ қ ау і п с і зд і к ережелеріне сай өңделіп шығарылған. Төмендегі ақпарат қауіпсіздік ережелерін ескерту мақсатында берілген және оны мұқият оқып шығу қажет. Жалпы қауіпсіздік • Бұл құрылғыны қауіпсіз түрде қол...
Page 30 - Кір жуғыш машина сипаттамасы; Басқару тақтасы
30 KZ Жуғыш зат тартпасы: жуғыш заттар мен жуғыш қосындыларды енгізу үшін пайдаланылады ( «Жуғыш заттар мен кірлер» тарауын қараңыз ). Бағдарламалар анықтамасы: жуғыш зат диспенсерінің ішіндегі Бағдарламалар анықтамасында қолдануға болатын барлық бағдарламалар және диспенсердің бөліктерін қолдану жө...
Page 33 - Жуу функциялары; Жуу циклдарының кестесі
KZ 33 Жуу циклдары мен функциялары Жуу функциялары ! Таңдалған функция орнатылған бағдарламамен үйлесімді болмаса, тиісті индикатор шамы күңгірт болып жанады; оған қоса үйлесімді емес екенін білдіру үшін сигнал беріліп (3 рет), дисплейде « No Selection » (Таңдау мүмкін емес) жазуы көрсетіледі. ! Таң...
Page 34 - Жуғыш заттар мен кірлер; Арнайы жуу циклдары; Жүкті теңестіру жүйесі
34 KZ Жуғыш заттар мен кірлер Жуғыш зат тартпасы Ойдағыдай жуу нәтижесіне қол жеткізу жуғыш заттың дұрыс мөлшеріне де байланысты болады: тым көп жуғыш зат қосылса, жуу міндетті түрде тиімдірек болмайды және шынында құрылғы ішінде қалдықтардың түзілуіне және қоршаған ортаны ластауға әкелуі мүмкін. ! ...
Page 35 - Ақаулықтарды жою
KZ 35 Ақаулықтарды жою Кір жуғыш машина жұмыс істемей қалуы мүмкін. Техникалық көмек көрсету орталығына хабарласпас бұрын ( «Көмек» тарауын қараңыз ), төмендегі тізімді қолдана отырып ақаулықты оңай шешу мүмкін емес екендігіне көз жеткізіңіз. Ақаулық: Кір жуғыш машина қосылмайды. Жуу циклы басталмай...
Page 36 - Қызмет көрсету
36 KZ Қызмет көрсету Техникалық қолдау орталығына хабарласпас бұрын: • Ақаулықты өзіңіз шеше алатыныңызды тексеріңіз («Ақаулықтарды жою» тарауын қараңыз); • Ақаулық шешілгенін тексеру үшін бағдарламаны қайтадан бастаңыз; • Олай болмаса, кепілдік куәлігінде берілген телефон нөмірі бойынша өкілетті Те...
Page 37 - ԼՎԱՑՔԻ ՄԵՔԵՆԱ; Բովանդակություն; Շահագործման ուղեցույց; AM
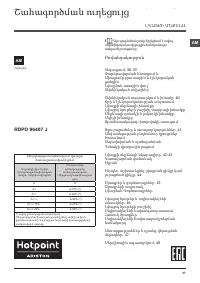
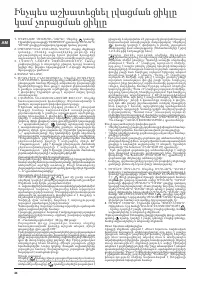
37 AM ԼՎԱՑՔԻ ՄԵՔԵՆԱ ! Այս պայմանանշանը հիշեցնում է տվյալ տեխնիկական ուղեցույցին ծանոթանալու անհրաժեշտությունը: Բովանդակություն Տեղադրում, 38-39 Փաթեթավորման հեռացում և Միացումը ջրատարին և էլեկտրական ցանցին Լվացման առաջին փուլ` Տեխնիկական տվյալներ Տեխնիկական սպասարկում և խնամք, 40 Ջրի և էլեկտրականութ...
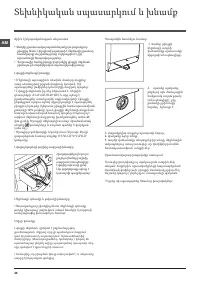
Page 38 - Տեղադրում
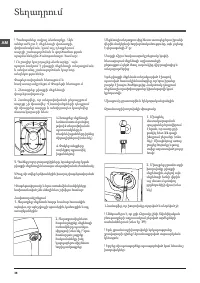
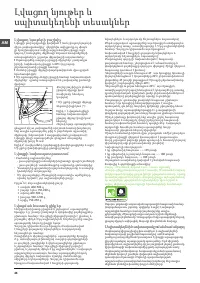
38 AM Տեղադրում ! Պահպանեք տվյալ ձեռնարկը. Այն անհրաժեշտ է մեքենայի վաճառքի, փոխանակման, կամ այլ դեպքերում սարքի շահագործման և գործառնության պայմաններին ծանոթանալու համար: ! Ուշադիր կարդացեք ձեռնարկը` այն պարունակում է լվացքի մեքենայի տեղադրման և անվտանգ շահագործման կարևոր տեղեկություններ: Փաթեթավոր...
Page 40 - Տեխնիկական սպասարկում եւ խնամք
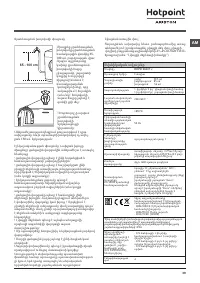
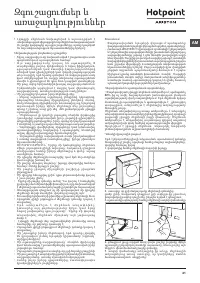
40 AM Տեխնիկական սպասարկում և խնամք Ջրի և էլեկտրականության անջատում • Փակեք ջրամատակարարման ծորակը յուրաքանչյուր լվացքից հետո: Այդպիսով կպակասի է մեքենայի ջրատար համակարգի մաշվածությունը և վերացվում է ջրի արտահոսքի հնարավորությունը: • Պարտադիր հանեք խրոցը վարդակից լվացքի մեքենան լվանալուց և տեխնիկակ...
Page 41 - Զգուշացումներ եւ
41 AM Զգուշացումներ և առաջարկություններ ! Լ վ ա ց ք ի մ ե ք ե ն ա ն ն ա խ ա գ ծ վ ա ծ և ա ր տ ա դ ր վ ա ծ է անվտանգության միջազգային նորմերին համապատասխան: Ուշադիր կարդացեք այս զգուշացումները, որոնք կազմված են ձեր անվտանգության նկատառումներից ելնելով: Անվտանգության ընդհանուր դրույթներ• Տվյալ սարքավո...
Page 42 - Լվացքի մեքենայի նկարագիրը; Կառավարման վահանակ; Էկրան
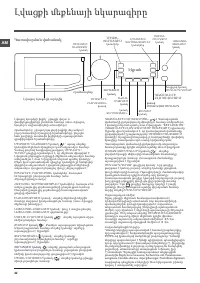
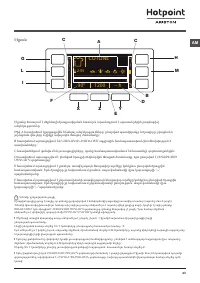
42 AM Լվացքի մեքենայի նկարագիրը Կառավարման վահանակ Լվացող նյութերի խցիկ` լվացքի փոշու և փափկեցուցիչների բեռնման համար (տես «Լվացող նյութեր և սպիտակեղենի տեսակներ»):Հրահանգներ` լվացող նյութերի խցիկի մեջ առկա է բոլոր հասանելի ծրագրերի հրահանգները, ինչպես նաև բաշխիչի առանձին խցիկների օգտագործման գրաֆիկ...
Page 44 - Ինչպես աշխատեցնել լվացման ցիկլը
44 AM Ինչպես աշխատեցնել լվացման ցիկլը կամ չորացման ցիկլը 1. ՄԵՔԵՆԱՅԻ ՄԻԱՑՄԱՆ ԿԱՐԳԸ. Սեղմեք կոճակը: Էկրանին կարտացոլվի “HOTPOINT” գրառումը: ՄԵԿՆԱՐԿ/ ԴԱԴԱՐ ցուցիչը հազվադեպ կթարթի կանաչ լույսով: 2. ՍՊԻՏԱԿԵՂԵՆԻ ԲԵՌՆՄԱՆ ԿԱՐԳԸ. Բացեք մեքենայի դ ռ ն ա կ ը , : Բ ե ռ ն ե ք ս պ ի տ ա կ ե ղ ե ն ը թ մ բ ո ւ կ ...
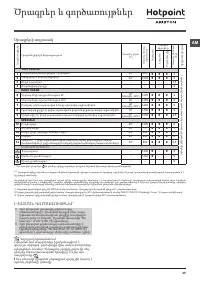
Page 45 - Ծրագրեր եւ գործառույթներ; Ծրագրերի աղյուսակ
45 AM Ծրագրեր և գործառույթներ Ծրագրերի աղյուսակ ԼՎԱՑՄԱՆ ԳՈՐԾԱՌՈՒՅԹՆԵՐ ! Եթե ընտրված լրացուցիչ գործառույթը անհամատեղելի է ընտրված ծրագրի հետ, ապա կմիանա համապատասխան ցուցիչը և ձայնային ազդանշանը (3 անգամ), էկրանին կհայտնվի “No Selection” (ԸՆՏՐՎԱԾ ՉԷ) գրառումը: ! Եթե ընտրված գործառույթը անհամատեղելի է...
Page 46 - Լվացող նյութեր եւ; Լվացող նյութերի բաշխիչ
46 AM Լվացող նյութեր և սպիտակեղենի տեսակներ Լվացող նյութերի բաշխիչ Լվացքի լավ արդյունքը կախված է նաև լվացող նյութերի ճիշտ չափաքանակից` վերջինիս ավելցուկը ոչ միայն չի երաշխավորում ավելի արդյունավետ լվացք, այլև կարող է հանգեցնել մեքենայի ներսում նստվածքների առաջացմանը և շրջակա միջավայրի աղտոտմանը: ! Օ...
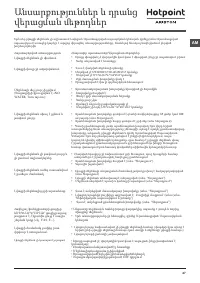
Page 47 - Անսարքություններ եւ դրանց
47 AM Անսարքություններ և դրանց վերացման մեթոդներ Եթե ձեր լվացքի մեքենան չի աշխատում:Նախքան Արտոնագրրված սպաարկման կենտրոն դիմելը(տես.Արտոնագրված սպասարկում) ստուգեք կարելի է արդյոք վերացնել անսարքությունները, հետևելով հետևյալ հավելվածում բերված խորհուրդներին Հայտնաբերված անսարքությունԼվացքի մեքենան ...
Page 48 - Սերվիսային սպասարկում
48 AM Սերվիսային սպասարկում Մենք հոգ ենք տանում մեր գնորդների մաին և աշխատում ենք սերվիսային սպասարկումը դարձնել առավել որոկյալ: Մենք մշտապես կատարելագործում ենք մեր ապրանքը, որպեսզի Ձեր շփումը տեխնիկայի հետ դարձնենք պարզ և հաճելի: Տեխնիկայի նկատմամբ խնամք Երկարացրեք շահագործման ժամկետը և իջեցրեք տե...
Page 49 - Кир жуугуч машина; Бул символ Сизге бул техникалык; Мазмуну; Пайдалануу боюнча нускама; KGZ
49 KGZ Кир жуугуч машина ! Бул символ Сизге бул техникалык колдонмону пайдалануу зарылчылыгы жөнүндө эскертет. Мазмуну Орнотуу, 50-51 Таңгагын чечүү жана тегиздөө Суу түтүк жана электр тармагына туташтыруу Жуунун биринчи циклы Техникалык маалыматтар Техникалык тейлөө жана кам көрүү, 52 Сууну жана э...
Page 50 - Орнотуу; Таңгагын чечүү жана тегиздөө; Суу түтүк жана электр тармагына
50 KGZ Орнотуу ! Бул колдонмону сактап коюңуз. Ал жабдууну сатуу, берүү же жаңы батирге көчүү учурунда, жабдуунун жаңы ээси анын иштөөсүнүн жана тейлөөнүн эрежелери менен тааныша алуусу үчүн, кир жуугуч машина менен бирге комплектте болушу керек. ! Колдонмону жакшылап окуңуз: анда кир жуугуч машинан...
Page 51 - Жуунун биринчи циклы
51 KGZ Суу төгүүчү ийкем түтүктү туташтыруу Суу төгүүчү ийкем түтүктү ийбей туруп, полдон 65-100 см бийиктикте жайгашкан суу төгүүчү кубур түтүккө каарта же дубалдагы суу төккүчкө туташтырыңыз, же ийкем түтүктүн учун кранга багыттагычты бекитип, раковинанын же ваннанын четине илиңиз (схеманы кара). ...
Page 52 - Техникалык тейлөө жана кам көрүү
52 KGZ Техникалык тейлөө жана кам көрүү Сууну жана электр тогун өчүрүү • Ар бир жолу кир жуугандан кийин суу түтүк кранын жабыңыз. Мындай жол менен машинанын суу түтүк тутутумун эскириши кыскарат жана агып калуу тобокелдиги азаят. • Кир жуугуч машинаны тазалоо жана техникалык тейлөө процессинде штеп...
Page 53 - Сактык жана сунуштар; Коопсуздукка карата жалпы талаптар
53 KGZ Сактык жана сунуштар ! Кир жуугуч машина коопсуздук боюнча эл аралык нормативдерге ылайык долбоорлонгон жана даярдалган. Сиздин коопсуздугуңуз максатында түзүлгөн ушул эскертүүлөрдү көңүл коюп окуу керек. Коопсуздукка карата жалпы талаптар • Бул шайман үйдө колдонууга гана арналган. • Бул шай...
Page 54 - Кир жуугуч машинаны сүрөттөө; Башкаруу панели
54 KGZ Кир жуугуч машинаны сүрөттөө Башкаруу панели ТЕМПЕРАТУРА баскычы ПРОГРАММАЛАРДЫ ТАНДОО баскычы Жуугуч заттар үчүн чөнөкчө КОШУМЧА ФУНКЦИЯЛАР баскычтары ON/OFF баскычы СЫГУУ баскычы ИШТЕТҮҮ/ТЫНЫГУУ индикатор менен баскыч БАСКЫЧТАРДЫ ТОСМОЛОО ИШТЕТҮҮНҮН КИЙИНКИГЕ ЖЫЛДЫРУУ баскычы Дисплей АВТО-Т...
Page 56 - Жуу циклин же кургатуу циклин
56 KGZ Жуу циклин же кургатуу циклин кантип иштетиш керек 1. МАШИНАНЫ КҮЙГҮЗҮҮ ТАРТИБИ , ба с к ы ч ы н басыңыз; ИШТЕТҮҮ/ТЫНЫГУУ индикатору сейрек жашыл түс менен бүлбүлдөйт. 2. КИРДИ ЖҮКТӨӨ . Машинанын люгун ачыңыз. Кийинки беттеги программалардын таблицасында көрсөтүлгөн, максималдуу уруксат берил...
Page 57 - Программалар жана; Программалардын таблицасы
57 KGZ Программалар жана кошумча функциялар Программалардын таблицасы Кир жуу функциялары ! Эгерде тандалган функция тапшырылган программа менен шайкеш келбесе, күңүрт түс менен тийиштүү жарык индикатору бүлбүлдөйт, мындан тышкары мындай шайкеш келбестик жөнүндө үн сигналы (3 сигнал) эскертет, ал эм...
Page 58 - Жуугуч заттар жана кирдин; Детергент диспенсеринин суурмасы; Атайын жуу циклдери; Жүктү тең салмактоо системи
58 KGZ Жуугуч заттар жана кирдин түрлөрү Детергент диспенсеринин суурмасы Жуугандын жакшы натыйжа бериши детергенттин туура дозасына да көз каранды: детергентти өтө көп кошуу сөзсүз жакшыраак жууганга алып келбейт, ал эмес шайманыңыздын ичинде кебээр топтолушуна алып келиши мүмкүн жана жаратылыштын ...
Page 59 - Бузуктар жана аларды; Мүмкүн болуучу себептери / Жоюу методдору:
59 KGZ Бузуктар жана аларды жоюу методдору Эгерде сиздин кир жуугуч машина иштебесе, сервистик тейлөө борборуна кайрылуудан мурда (Сервистик тейлөө кара.), төмөндөгү тизмеде берилген сунуштарды сактоо менен, бузуктарды жоюуга болоорун текшериңиз. Бузуктар: Кир жуугуч машина күйбөйт Кир жуу циклы ишт...
Page 60 - Сервистик тейлөө
60 KGZ Сервистик тейлөө Биз өз сатып алуучуларыбыз жөнүндө кам көрөбүз жана сервистик тейлөөнү сапаттуу кылууга аракет кылабыз. Сиздин техника менен мамилеңиз жөнөкөй жана жагымдуу болушу үчүн, биз продукттарды туруктуу өркүндөтөбүз. Техникага кам көрүү Пайдалануу мөөнөтүн узартыңыз жана техниканын ...