Page 2 - Installation; Unpacking and levelling; Unpacking; Electric and water connections; Connecting the water inlet hose
2 GB Installation ! Keep this instruction manual in a safe place for future reference. Should the appliance be sold, transferred or moved, make sure the instruction manual accompanies the washing machine to inform the new owner as to its operation and features. ! Read these instructions carefully: t...
Page 3 - Technical details; The first wash cycle
GB 3 Technical details Model ECOT7F 1292 Dimensions 40 cm wide 85 cm high 60 cm deep Capacity from 1 to 7 kg Electric connections Please refer to the technical data plate fixed to the ma- chine. Water connections maximum pressure 1 MPa (10 bar) minimum pressure 0.05 MPa (0.5 bar) drum capacity 42 li...
Page 4 - Care and maintenance
4 GB To access the pre-chamber: 1. using a screwdriver, remove the cover pa- nel on the lower front part of the washing machine ( see figure ) ; 2. unscrew the lid by rotating it anti-clockwi- se ( see figure ) : a little water may trickle out. This is perfectly nor- mal; 3. clean the inside tho- ro...
Page 5 - Precautions and tips; General safety
GB 5 Precautions and tips ! This washing machine was designed and constructed in accordance with international safety regulations. The fol-lowing information is provided for safety reasons and must therefore be read carefully. General safety • This appliance was designed for domestic use only. • Thi...
Page 6 - Control panel; Indicator lights
6 GB Wash Rinse Spin Drain End of wash cycle Description of the washing machine and starting a wash cycle TEMPERATURE button WASH CYCLE PROGRESS FUNCTION buttons with indicator lights ON/OFF button with indicator light SPIN SPEED button LID LOCKED indicator light START/PAUSE button with indicator li...
Page 7 - Starting a wash cycle; How to open and to close the drum
GB 7 Fig. 1 Fig. 2 Fig. 3 Fig. 4 A) Opening (Fig. 1): Lift the external lid and open it completely. B) Opening the drum (Soft opening): With one finger, push the button indicated in fig. 2 and the drum will open delicately. C) Loading the washing machine (Fig. 3) . D) Shutting (Fig. 4): - close the ...
Page 8 - Wash cycles; Table of wash cycles
8 GB Wash cycles Table of wash cycles Mix 15’ (wash cycle 5) this wash cycle was designed to wash lightly soiled garments quickly: it lasts just 15 minutes and therefore saves both energy and time. By selecting this wash cycle (5 at 30°C), it is possible to wash different fabrics together (except fo...
Page 9 - Setting the temperature; Setting the spin speed; Functions; Personalisation
GB 9 Setting the temperature By pressing the TEMPERATURE button to set the wash temperature (see Table of wash cycles ). The temperature may be lowered, or even set to a cold wash ( ).The washing machine will automatically prevent you from selecting a temperature which is higher than the maximum val...
Page 10 - Detergents and laundry; Detergent dispenser drawer; Bleach cycle; Garments requiring special care
10 GB Detergents and laundry Detergent dispenser drawer Good washing results also depend on the correct dose of detergent: adding too much detergent won’t necessarily make for a more efficient wash, and may in fact cause build up on the interior of your appliance and even pollute the environment. ! ...
Page 11 - Troubleshooting
GB 11 Troubleshooting Your washing machine could fail to work. Before contacting the Technical Assistance Centre ( see “Assistance” ), make sure that the problem cannot be not solved easily using the following list. Problem: The washing machine does not switch on. The wash cycle does not start. The ...
Page 12 - Service
12 GB Service Before calling for Assistance: • Check whether you can solve the problem alone ( see “Troubleshooting” ); • Restart the programme to check whether the problem has been solved;• If this is not the case, contact an authorised Technical Assistance Centre using the telephone number provide...
Page 13 - Sommaire; Mode d’emploi
FR 13 Français Sommaire Installation, 14-15 Déballage et mise à niveauRaccordements eau et électricitéPremier cycle de lavageCaractéristiques techniques Entretien et soin, 16 Coupure de l’arrivée d’eau et du courantNettoyage du lave-lingeEntretien du couvercle et du tambourNettoyage de la pompeContr...
Page 14 - Déballage et mise à niveau; Déballage: enlever les 4 vis; Raccordements hydrauliques et; Raccordement du tuyau d’arrivée de l’eau
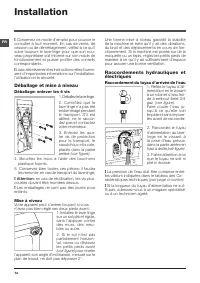
14 FR Installation ! Conservez ce mode d’emploi pour pouvoir le consulter à tout moment. En cas de vente, de cession ou de déménagement, veillez à ce qu’il suive toujours le lave-linge pour que son nou- veau propriétaire soit informé sur son mode de fonctionnement et puisse profiter des conseils cor...
Page 15 - Caractéristiques techniques; Premier cycle de lavage
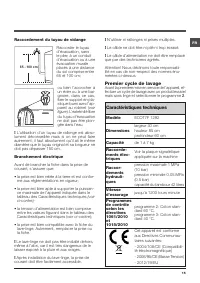
FR 15 Caractéristiques techniques Modèle ECOT7F 1292 Dimensions largeur 40 cm hauteur 85 cm profondeur 60 cm Capacité de 1 à 7 kg Raccorde-ments élec-triques Voir la plaque signalétique appliquée sur la machine Raccor-dements hydrauli-ques pression maximale 1 MPa (10 bar) pression minimale 0,05 MPa ...
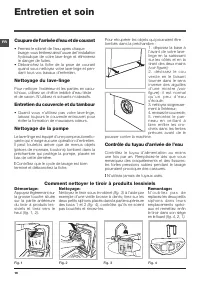
Page 16 - Entretien et soin
16 FR Entretien et soin Comment nettoyer le tiroir à produits lessiviels Nettoyage: Nettoyez le tiroir sous le robinet (fig. 3) à l’aide par exemple d’une vieille brosse à dents; tirez sur les deux petits siphons placés dans la partie supérieure des bacs 1 et 2 (fig. 4) , contrôlez qu’ils ne soient ...
Page 17 - Précautions et conseils; Sécurité générale
FR 17 Précautions et conseils ! Ce lave-linge a été conçu et fabriqué conformément aux normes internationales de sécurité. Ces consignes sont fournies pour des raisons de sécurité, il faut les lire attenti-vement. Sécurité générale • Cet appareil est conçu pour un usage domestique. • Cet appareil pe...
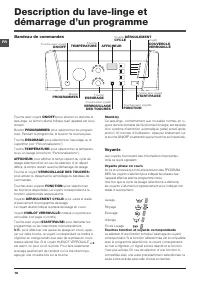
Page 18 - Bandeau de commandes
18 FR Essorage Vidange Fin de Lavage Description du lave-linge et démarrage d’un programme Touche TEMPÉRATURE Voyants DÉROULEMENT CYCLE Touches avec voyants FONCTION Touche ESSORAGE Voyant COUVERCLE VERROUILLÉ Touche avec voyant START/PAUSE Bandeau de commandes Bouton PROGRAMMES Touche avec voyant O...
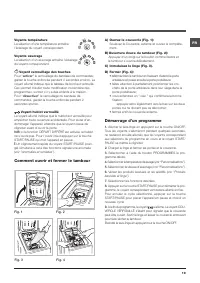
Page 19 - Démarrage d’un programme; Comment ouvrir et fermer le tambour
FR 19 Fig. 1 Fig. 2 Fig. 3 Fig. 4 A) Ouvrez le couvercle (Fig. 1): Soulevez le Couvercle externe et ouvrez le complète-ment. B) Ouverture douce du tambour (Fig. 2): Appuyez d’un doigt sur le bouton comme illustré et le tambour s’ouvrira délicatement. C) Introduisez le linge (Fig. 3). D) Fermer (Fig....
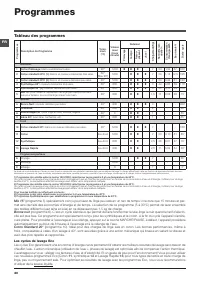
Page 20 - Programmes
20 FR Programmes Tableau des programmes Mix 15’ (programme 5) spécialement conçu pour laver du linge peu sale en un rien de temps: il ne dure que 15 minutes et per- met ainsi de faire des économies d’énergie et de temps. La sélection de ce programme (5 à 30°C) permet de laver ensemble des textiles d...
Page 21 - Sélection de la température; Sélection de l’essorage; Fonctions; Personnalisations
FR 21 Sélection de la température Appuyer sur la touche TEMPÉRATURE pour sélectionner la température de lavage (voir Tableau des programmes ). La température peut être abaissée jusqu’au lavage à froid ( ).La machine interdira automatiquement toute sélection d’une température supérieure à la températ...
Page 22 - Produits lessiviels et linge; Tiroir à produits lessiviels; Linge ou vêtements particuliers
22 FR Produits lessiviels et linge Tiroir à produits lessiviels Un bon résultat de lavage dépend aussi d’un bon dosage de produit lessiviel: un excès de lessive ne lave pas mieux, il in-cruste l’intérieur de votre lave-linge et pollue l’environnement. ! Utiliser des lessives en poudre pour du linge ...
Page 23 - Anomalies et remèdes
FR 23 Anomalies et remèdes Il peut arriver que le lave-linge ne fonctionne pas bien. Avant d’appeler le Service de dépannage ( voir “Assistance” ), contrôler s’il ne s’agit pas par hasard d’un problème facile à résoudre à l’aide de la liste suivante. Anomalies: Le lave-linge ne s’allume pas. Le cycl...
Page 24 - Assistance; Consultation à tout moment
24 FR Assistance Avant d’appeler le service après-vente: • Vérifier si on ne peut pas résoudre l’anomalie par ses propres moyens ( voir “Anomalies et Remèdes” ); • Remettre le programme en marche pour contrôler si l’inconvénient a disparu;• Autrement, contacter le Centre d’Assistance technique agréé...
Page 25 - Sommario; LAVABIANCHERIA; Istruzioni per l’uso
25 I Italiano,1 Sommario Installazione, 26-27 Disimballo e livellamentoCollegamenti idraulici ed elettriciPrimo ciclo di lavaggioDati tecnici Manutenzione e cura, 28 Escludere acqua e corrente elettricaPulire la lavabiancheriaCurare coperchio e cestelloPulire la pompaControllare il tubo di alimentaz...
Page 26 - Installazione; Disimballo e livellamento; Disimballo; Livellamento; Collegamenti idraulici ed elettrici; Collegamento del tubo di alimentazione
26 I Installazione ! È importante conservare questo libretto per poter- lo consultare in ogni momento. In caso di vendita, di cessione o di trasloco, assicurarsi che resti insieme alla lavabiancheria per informare il nuovo proprie- tario sul funzionamento e sui relativi avvertimenti. ! Leggere atten...
Page 27 - Primo ciclo di lavaggio
27 I Collegamento del tubo di scarico Collegare il tubo di scarico, senza piegar- lo, a una conduttura di scarico o a uno scarico a muro posti tra 65 e 100 cm da terra; oppure appoggiarlo al bordo di un lavan- dino o di una vasca, legando la guida in dotazione al rubinetto ( vedi figu- ra ). L’estre...
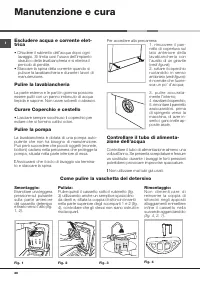
Page 28 - Manutenzione e cura
28 I Per accedere alla precamera: 1. rimuovere il pan- nello di copertura sul lato anteriore della lavabiancheria con l’ausilio di un giravite ( vedi figura ) ; 2. svitare il coperchio ruotandolo in senso antiorario ( vedi figura ) : è normale che fuorie- sca un po’ d’acqua; 3. pulire accurata- ment...
Page 29 - Precauzioni e consigli; Sicurezza generale
29 I Precauzioni e consigli ! La lavabiancheria è stata progettata e costruita in conformità alle norme internazionali di sicurezza. Queste avvertenze sono fornite per ragioni di sicurezza e devono essere lette attentamente. Sicurezza generale • Questo apparecchio è stato concepito esclusivamente pe...
Page 30 - Pannello di controllo; Spie
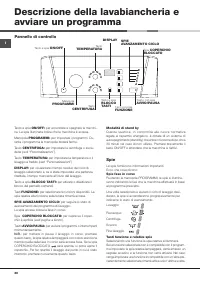
30 I Descrizione della lavabiancheria e avviare un programma Pannello di controllo DISPLAY Manopola PROGRAMMI Tasti con spie FUNZIONE Tasto e spia ON/OFF Tasto TEMPERATURA Spia COPERCHIO BLOCCATO Tasto con spia AVVIO/PAUSA Tasto CENTRIFUGA Tasto e spia BLOCCO TASTI Tasto e spia ON/OFF: per accendere...
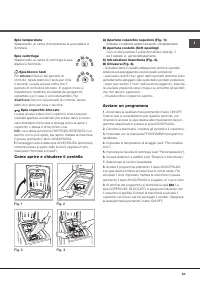
Page 31 - Avviare un programma; Come aprire e chiudere il cestello
31 I A) Apertura coperchio superiore (Fig. 1): Sollevare il coperchio esterno ed aprirlo completamente. B) Apertura cestello (Soft opening): Con un dito premere il pulsante indicato nella fig. 2 ed il cestello si aprirà delicatamente. C) Introduzione biancheria (Fig. 3). D) Chiusura (Fig. 4). - rich...
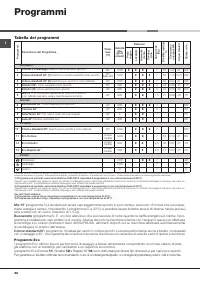
Page 32 - Programmi
32 I Programmi Tabella dei programmi Pr ogrammi Descrizione del Programma Temp. max. (°C) Velocità max. (giri al minuto) Detersivi Carico max. (Kg) Umidità r esidua % Consummo energia kWh Acqua totale lt Durata ciclo Pr ela vaggio Lavaggio Ammorbi- dente Candeg- gina Giornalieri 1 Cotone + Prelavagg...
Page 33 - Personalizzazioni; Impostare la temperatura; Impostare la centrifuga; Funzioni
33 I Personalizzazioni Impostare la temperatura Ruotando la manopola TEMPERATURA si imposta la temperatura di lavaggio (vedi Tabella programmi ). La temperatura si può ridurre sino al lavaggio a freddo ( ).La macchina impedirà automaticamente di impostare una temperatura maggiore a quella massima pr...
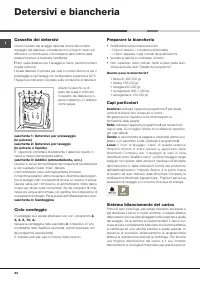
Page 34 - Cassetto dei detersivi; Ciclo candeggio; Capi particolari; Detersivi e biancheria
34 I Cassetto dei detersivi Il buon risultato del lavaggio dipende anche dal corretto dosaggio del detersivo: eccedendo non si lava in modo più efficace e si contribuisce a incrostare le parti interne della lavabiancheria e a inquinare l’ambiente. ! Non usare detersivi per il lavaggio a mano, perché...
Page 35 - Anomalie e rimedi; Anomalie:
35 I Anomalie e rimedi Può accadere che la lavabiancheria non funzioni. Prima di telefonare all’Assistenza ( vedi “Assistenza” ), controllare che non si tratti di un problema facilmente risolvibile aiutandosi con il seguente elenco. Anomalie: La lavabiancheria non si accende. Il ciclo di lavaggio no...
Page 36 - Assistenza; Assistenza Attiva 7 giorni su 7
36 I Assistenza Prima di contattare l’Assistenza: • Verificare se l’anomalia può essere risolta da soli ( vedi “Anomalie e rimedi” ). • Riavviare il programma per controllare se l’inconveniente è stato ovviato;• In caso negativo, contattare il Numero Unico 199.199.199*. ! Non ricorrere mai a tecnici...
Page 37 - Sumario; Manual de instrucciones; LAVADORA
ES 37 Español Sumario Instalación, 38-39 Desembalaje y nivelaciónConexiones hidráulicas y eléctricasPrimer ciclo de lavadoDatos técnicos Mantenimiento y cuidados, 40 Interrumpir el agua y la corriente eléctricaLimpiar la lavadoraCuidar la puerta y el cestoLimpiar la bombaControlar el tubo de aliment...
Page 38 - Instalación; Desembalaje y nivelación; Desembalaje; Nivelación; Conexiones hidráulicas y eléctricas; Conexión del tubo de alimentación de agua
38 ES Instalación ! Es importante conservar este manual para po- der consultarlo en cualquier momento. En caso de venta, de cesión o de traslado, verifique que permanezca junto con la lavadora para informar al nuevo propietario sobre el funcionamiento y brindar las correspondientes advertencias. ! L...
Page 39 - Datos técnicos; Primer ciclo de lavado
ES 39 Datos técnicos Modelo ECOT7F 1292 Dimensio- nes ancho 40 cm. altura 85 cm. profundidad 60 cm. Capacidad de 1 a 7 kg. Conexiones eléctricas ver la placa de características técnicas aplicada en la máquina Conexiones hídricas presión máxima 1 MPa (10 bar) presión mínima 0,05 MPa (0,5 bar) capacid...
Page 40 - Mantenimiento y cuidados
40 ES Mantenimiento y cuidados Para acceder a la precámara: 1. quite el panel que cubre la parte delan- tera de la lavadora con la ayuda de un destor- nillador ( ver la figura ) ; 2. desenrosque la tapa girándola en sentido antihorario ( ver la figura ) : es normal que se vue- lque un poco de agua; ...
Page 41 - Precauciones y consejos; Seguridad general
ES 41 Precauciones y consejos ! La lavadora fue proyectada y fabricada en conformidad con las normas internacionales de seguridad. Estas adver-tencias se suministran por razones de seguridad y deben ser leídas atentamente. Seguridad general • Este aparato ha sido fabricado para un uso de tipo do- mé...
Page 42 - Panel de control; Pilotos
42 ES Descripción de la lavadora y comienzo de un programa Botón TEMPERATURA Pilotos DE AVANCE DEL CICLO Botones con pilotos FUNCIÓN Botón CENTRIFUGADO Piloto PUERTA BLOQUEADA Botón con piloto START/PAUSE Panel de control Mando de PROGRAMAS Botón y piloto de ON/OFF PANTALLA Botón y piloto de BLOQUEO...
Page 43 - Poner en marcha un programa; Cómo abrir y cerrar el cesto
ES 43 Fig. 1 Fig. 2 Fig. 3 Fig. 4 A) Abertura (Fig. 1): Levante la tapa externa y ábrala completamente. B) Abertura del cesto (Soft opening): Pulse el botón indicado en la fig. 2 con un dedo y el cesto se abrirá delicadamente. C) IntroduccIón de la ropa (Fig. 3). D) Cierre (Fig. 4): - cierre bien el...
Page 44 - Programas
44 ES Programas Tabla de programas Mix 15’ (programa 5) fue estudiado para lavar prendas ligeramente sucias y en poco tiempo: dura sólo 15 minutos y de esa manera permite ahorrar energía y tiempo. Seleccionando el programa (5 a 30ºC) es posible lavar conjuntamente tejidos de distinto tipo (excluidas...
Page 45 - Seleccionar la temperatura; Seleccionar el centrifugado; Funciones; Personalizaciones
ES 45 Seleccionar la temperatura Presionando el botón TEMPERATURA se selecciona la temperatura de lavado (ver la Tabla de programas ). La temperatura se puede disminuir hasta el lavado en frío ( ).La máquina impedirá automáticamente seleccionar una temperatura mayor que la máxima prevista para cada ...
Page 46 - Detergentes y ropa; Cajón de detergentes; Ciclo de blanqueo; Prendas especiales
46 ES Detergentes y ropa Cajón de detergentes El buen resultado del lavado depende también de la correcta dosificación del detergente: si se excede la cantidad, no se lava de manera más eficaz, sino que se contribuye a encostrar las partes internas de la lavadora y a contaminar el ambiente. ! Utilic...
Page 47 - Anomalías y soluciones
ES 47 Anomalías y soluciones Puede suceder que la lavadora no funcione. Antes de llamar al Servicio de Asistencia Técnica ( ver “Asistencia” ),controle que no se trate de un problema de fácil solución utilizando la siguiente lista. Anomalías: La lavadora no se enciende. El ciclo de lavado no comienz...
Page 48 - Asistencia
48 ES Asistencia Antes de llamar al Servicio de Asistencia Técnica: • Verifique si la anomalía la puede resolver Ud. solo (ver “Anomalías y soluciones” ); • Vuelva a poner en marcha el programa para controlar si el inconveniente fue resuelto;• Si no es así, llame al Servicio de Asistencia técnica au...
Page 49 - Ïäçãßåò ÷ñÞóçò; ÐËÕÍÔÇÑÉÏ ÑÏÕ×ÙÍ
49 GR ÅëëçíéêÜ Ðåñéå÷üìåíá ÅãêáôÜóôáóç, 50-51 Áðïóõóêåõáóßá êáé ïñéæïíôßùóçÕäñáõëéêÝò êáé çëåêôñéêÝò óõíäÝóåéòÐñþôïò êýêëïò ðëõóßìáôïòÔå÷íéêÜ óôïé÷åßá ÓõíôÞñçóç êáé öñïíôßäá, 52 Êëåßóéìï ðáñï÷þí íåñïý êáé çëåêôñéêïý ñåýìáôïòÊáèáñéóìüò ôïõ ðëõíôçñßïõÖñïíôßäá ôçò ðüñôáò êáé ôïõ êÜäïõÊáèáñéóìüò ôçò áíô...
Page 50 - ÅãêáôÜóôáóç; Áðïóõóêåõáóßá êáé ïñéæïíôßùóç; Áðïóõóêåõáóßá; ÕäñáõëéêÝò êáé çëåêôñéêÝò óõíäÝóåéò; Óýíäåóç ôïõ óùëÞíá ôñïöïäïóßáò íåñïý
50 GR ÅãêáôÜóôáóç ! Åßíáé óçìáíôéêü íá öõëÜîåôå ôï åã÷åéñßäéï áõôü ãéá íá ìðïñåßôå íá ôï óõìâïõëåýåóôå ïðïéáäÞðïôå óôéãìÞ. Óå ðåñßðôùóç ðþëçóçò, ðáñá÷ þñçóçò Þ ìåôáêüìéóçò, âåâáéùèåßôå üôé ðáñáìÝíåé ìáæß ìå ôï ðëõíôÞñéï ãéá íá ðëçñïöïñåß ôïí íÝï éäéïêôÞôç ãéá ôç ëåéôïõñãßá êáé ôéò ó÷åôéêÝò ðñïåéäïðï...
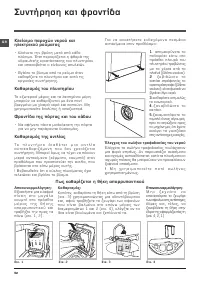
Page 52 - ÓõíôÞñçóç êáé öñïíôßäá; ̧ëåã÷ïò ôïõ óùëÞíá ôñïöïäïóßáò ôïõ íåñïý
52 GR ÓõíôÞñçóç êáé öñïíôßäá Êëåßóéìï ðáñï÷þí íåñïý êáé çëåêôñéêïý ñåýìáôïò • Êëåßíåôå ôçí âñýóç ìåôÜ áðü êÜèå ðëýóéìï. ¸ôóé ðåñéïñßæåôáé ç öèïñÜ ôçò õäñáõëéêÞò åãêáôÜóôáóçò ôïõ ðëõíôçñßïõ êáé áðïóïâåßôáé ï êßíäõíïò áðùëåéþí. • ÂãÜëôå ôï âýóìá áðü ôï ñåýìá üôáí êáèáñßæåôå ôï ðëõíôÞñéï êáé êáôÜ ôéò å...
Page 53 - ÃåíéêÞ áóöÜëåéá; Åîïéêïíüìçóç åíÝñãåéáò êáé óåâáóìüò ôïõ
53 GR ÐñïöõëÜîåéò êáé óõìâïõëÝò ! Ôï ð ë õ í ô Þ ñ é ï ó ÷ å ä é Ü ó ô ç ê å ê á é ê á ô á ó ê å õ Ü ó ô ç ê å óýìöùíá ìå ôïõò äéåèíåßò êáíüíåò áóöáëåßáò. ÁõôÝò ïé ðñïåéäïðïéÞóåéò ðáñÝ÷ïíôáé ãéá ëüãïõò áóöáëåßáò êáé ðñÝðåé íá äéáâÜæïíôáé ðñïóåêôéêÜ. ÃåíéêÞ áóöÜëåéá • Ç óõóêåõÞ áõôÞ ó÷åäéÜóôçêå áðïêë...
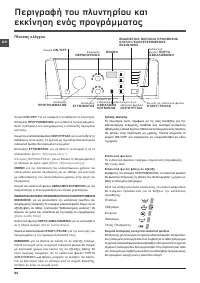
Page 54 - ÐåñéãñáöÞ ôïõ ðëõíôçñßïõ êáé; Ðßíáêáò åëÝã÷ïõ
54 GR Êïõìðß ON/OFF: Ãéá íá áíÜøåôå Þ íá óâÞóåôå ôï ðëõíôÞñéï. ÅðéëïãÝáò ÐÑÏÃÑÁÌÌÁÔÙÍ: ãéá íá èÝóåôå ôá ðñïãñÜììáôá. ÊáôÜ ôç äéÜñêåéá ôïõ ðñïãñÜììáôïò ï åðéëïãÝáò ðáñáìÝíåé áêßíçôïò. Êïõìðé Ü ìå åíäåéêôéêÜ öùôÜêéá ËÅÉÔÏÕÑÃÉÁÓ: ãéá íá åðéëÝîåôå ôéò äéáèÝóéìåò ëåéôïõñãßåò. Ôï ó÷åôéêü ìå ôçí åðéëåãåßóá...
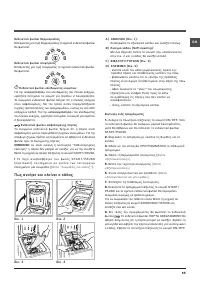
Page 55 - Ðùò áíïßãåé êáé êëåßíåé ï êÜäïò
55 GR Ðùò áíïßãåé êáé êëåßíåé ï êÜäïò Åéê. 1 Åéê. 2 Åéê. 3 Åéê. 4 A) ÁÍÏÉÃÌÁ (Åéê. 1): Áíáóçêþóôå ôï åîùôåñéêü êáðÜêé êáé áíïßîôå ôåëåßùò. B) ¢íïéãìá êÜäïõ (Soft opening): Ìå Ýíá äÜ÷ôõëï ðéÝóôå ôï êïõìðß ðïõ õðïäåéêíýåôáé óôçí åéê. 2 êáé ï êÜäïò èá áíïßîåé áðáëÜ. C) ÅÉÓÁÃÙÃÇ ÑÏÕ×ÙÍ (Åéê. 3). D) ÊËÅÉ...
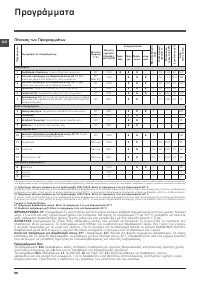
Page 56 - ÐñïãñÜììáôá
56 GR ÐñïãñÜììáôá Ðßíáêáò ôùí ÐñïãñáììÜôùí ÖÑÅÓKÁÑÉÓÌÁ 15’ (ðñüãñáììá 5) ìåëåôÞèçêå ãéá ôï ðëýóéìï ñïý÷ùí åëáöñÜ ëåñùìÝíùí óå óýíôïìï ÷ñüíï: äéáñêåß ìüíï 15 ëåðôÜ êáé óáò åîïéêïíïìåß ÷ñüíï êáé åíÝñãåéá. ÈÝôïíôáò ôï ðñüãñáììá (5 óå 30°C) ìðïñåßôå íá ðëýíåôå ìáæß õöÜóìáôá äéáöïñåôéêÞò öýóçò (åêôüò ìÜë...
Page 57 - Åîáôïìéêåýóåéò; ÈÝóôå ôç èåñìïêñáóßá; ÈÝóôå ôï óôýøéìï
57 GR Åîáôïìéêåýóåéò ÈÝóôå ôç èåñìïêñáóßá ÓôñÝöïíôáò ôïí åðéëïãÝá ÈÅÑÌÏÊÑÁÓÉÁ ôßèåôáé ç èåñìïêñáóßá ðëõóßìáôïò (âëÝðå Ðßíáêá ðñïãñáììÜôùí ). Ç èåñìïêñáóßá ìðïñåß íá ìåéùèåß ìÝ÷ñé ôï ðëýóéìï óå êñýï íåñü ( ).Ôï ìç÷ Üíçìá èá ðáñåìðïäßóåé áõôüìáôá ôç èÝóç èåñìïêñáóßáò ìåãáëýôåñçò ôçò ìÝãéóôçò ðñïâëåðüì...
Page 58 - ÁðïññõðáíôéêÜ êáé ìðïõãÜäá; ÈÞêç áðïññõðáíôéêþí; ÅéäéêÜ ñïý÷á
58 GR ÁðïññõðáíôéêÜ êáé ìðïõãÜäá ÈÞêç áðïññõðáíôéêþí Ôï êáëü áðïôÝëåóìá ôïõ ðëõóßìáôïò åîáñôÜôáé åðßóçò êáé áðü ôç óùóôÞ äïóïëïãßá ôïõ áðïññõðáíôéêïý: õðåñâÜëëïíôáò äåí ðëÝíïõìå áðïôåëåóìáôéêüôåñá êáé åðéðëÝïí óõíôåëïýìå óôç äçìéïõñãßá êñïýóôáò óôá åóùôåñéêÜ ìÝñç ôïõ ðëõíôçñßïõ êáé óôç ìüëõíóç ôïõ ð...
Page 59 - Áíùìáëßåò êáé ëýóåéò
59 GR Áíùìáëßåò êáé ëýóåéò Ìðïñåß íá óõìâåß ôï ðëõíôÞñéï íá ìç ëåéôïõñãåß. Ðñéí ôçëåöùíÞóåôå óôçí ÕðïóôÞñéîç (âëÝðå “ÕðïóôÞñéîç” ), åëÝãîôå áí äåí ðñüêåéôáé ãéá ðñüâëçìá ðïõ åðéëýåôáé åýêïëá ìå ôç âïÞèåéá ôïõ áêüëïõèïõ êáôáëüãïõ. Áíùìáëßåò: Ôï ðëõíôÞñéï äåí áíÜâåé. Ï êýêëïò ðëõóßìáôïò äåí îåêéíÜåé. ...
Page 60 - ÕðïóôÞñéîç
60 GR ÕðïóôÞñéîç Ðñéí åðéêïéíùíÞóåôå ìå ôçí ÕðïóôÞñéîç: • ÅëÝãîôå áí ç áíùìáëßá ìðïñåßôå íá ôçí áíôéìåôùðßóåôå ìüíïé óáò ( âëÝðå “Áíùìáëßåò êáé ëýóåéò”); • ÅðáíåêêéíÞóôå ôï ðñüãñáììá ãéá íá åëÝãîåôå áí ôï ðñüâëçìá áíôéìåôùðßóôçêå;• Óå áñíçôéêÞ ðåñßðôùóç, åðéêïéíùíÞóôå ìå ôçí åîïõóéïäïôçìÝíç Ôå÷íéêÞ ...
Page 61 - CIS; Содержание; Руководство по
CIS 61 Русский CIS ECOT7F 1292 Содержание Установка, 62-63 Распаковка и нивелировка Подключение к водопроводу и электричеству Первый цикл стирки Описание стиральной машины и порядка запуска программы, 64-65 Панель управления Индикаторы Как открыть и закрыть барабан Порядок запуска программы Программ...
Page 62 - П о д к л юч е н и е к в о д о п р о в о д н о й и; Установка; Распаковка и выравнивание
62 CIS Правильное выравнивание оборудования поможет избежать шума, вибраций и смещений во время работы машины. Если стиральная машина стоит на полу, покрытом ковром, убедитесь, что ее основание возвышается над ковром. В противном случае вентиляция будет затруднена или вовсе невозможна. П о д к л юч ...
Page 63 - Первый цикл стирки
CIS 63 65 - 100 cm Подсоединение сливного шланга Повесьте загнутый конец сливного шланга на край раковины, ванны, или поместите в специальный вывод канализации. Шланг не должен переги баться. Верхняя точка сливного шланга должна находиться на высоте 65100 см от пола. Расположение сливного шланга д...
Page 64 - Описание стиральной машины и; Панель управления; Индикаторы
64 CIS Описание стиральной машины и порядка запуска программы Регулятор ТЕМПЕРАТУРЫ Индикаторы ВЫПОЛНЕНИЯ ФАЗ ЦИКЛА Кнопки с индикаторами дополнительных ФУНКЦИЙ Скорости ОТЖИМА Индикатор БЛОКИРОВКИ ЛЮКA Кнопка с индикатором START/PAUSE Панель управления Рукоятка выбора ПРОГРАММА Кнопка и индикатор O...
Page 65 - Как открыть и закрыть барабан
CIS 65 рис. 1 рис. 2 Как открыть и закрыть барабан A) ОТКРЫВАНИЕ (рис. 1): Поднимите внешнюю крышку и полностью ее откройте. B) Открывание барабана (Soft opening – Плавное открывание): Нажмите кнопку, показанную на рис. 2 , крышка барабана плавно откроется. C) ЗАГРУЗКА СТИРАЛЬНОЙ МАШИНЫ (рис. 3).D) ...
Page 66 - Программы; Таблица программ
66 CIS Программы Таблица программ Специальные программы MИKС 15’ (программа 5) предназначена для быстрой стирки слабозагрязненного белья цикл длится всего 15 минут, что позволяет сэкономить время и электроэнергию. По этой программе (5, 30°C) можно стирать вместе белье из разных тканей (за исключение...
Page 67 - Регулировка температуры; Выбор скорости отжима; Персонализированные
CIS 67 Регулировка температуры Настройка температуры стирки производится при помощи регулятора ТЕМПЕРАТУРЫ (см. Таблицу программ ). Значение температуры может быть уменьшено вплоть до стирки в холодной воде ( ). Машина автоматически не допускает выбор температуры, превышающийs максимальное значение,...
Page 68 - Моющие средства и; Распределитель моющих средств; Отбеливание
68 CIS Моющие средства и типы белья Распределитель моющих средств Хороший результат стирки зависит также от правильной дозировки моющего средства: его избыток не гарантирует более эффективную стирку, напротив может привести к образованию налетов внутри машины и загрязнению окружающей среды. Выдвиньт...
Page 69 - Предосторожности и; Общие требования к безопасности
CIS 69 Предосторожности и рекомендации ! Стиральная машина спроектирована и изготовлена в соответствии с международными нормативами по безопасности. Необходимо внимательно прочитать настоящие предупреждения, составленные в целях вашей безопасности. Общие требования к безопасности • Данное изделие пр...
Page 70 - Техническое обслуживание
70 CIS Техническое обслуживание и уход Как достать предметы, упавшие в пространство между барабаном и кожухом машины: 1. снимите нижний плинтус в передней части стиральной машины, потянув обеими руками за его края ( смотрите рисунок ); 2. выверните крышку фильтра, вращая ее против часовой стрелки ( ...
Page 71 - Поиск неисправностей и
CIS 71 Поиск неисправностей и методы их устранения Если ваша стиральная машина не работает. Прежде чем обратиться в Центр Сервисного обслуживания ( см. Сервисное обслуживание ), проверьте, можно ли устранить неисправность, следуя рекомендациям, приведенным в следующем перечне. Неисправности: Стираль...
Page 72 - Сервисное
72 CIS Сервисное обслуживание Перед тем как обратиться в Службу Сервиса: • Проверьте, нельзя ли устранить неисправность самостоятельно ( см. «Неисправности и методы их устранения» ); • Вновь запустите программу для проверки исправности машины; • В протвном случае обратиться в Авторизованный Сервисны...
Page 73 - Iнструкцiї з експлуатацiї; ПРАЛЬНА МАШИНА; Опис пральної машини та запуск
73 UA Українська UA ECOT7F 1292 Iнструкцiї з експлуатацiї ПРАЛЬНА МАШИНА ЗмістУстановка, 74-75 Розпакування та встановлення по рівню Підключення електричного живлення та подачі води Перший цикл прання Технічні дані Опис пральної машини та запуск циклу прання, 76-77 Панель керування Світлові індикато...
Page 74 - Встановлення; Розпакування й вирівнювання; Підключення води й електроенергії
74 UA Встановлення ! Зберігайте це довідник, щоб мати нагоду звернутися до нього у будь-який момент. У разi продажу, передачі іншій особі або переїзду переконайтеся в тому, що інструкція перебуває разом із пральною машиною й новий власник може ознайомитися з її принципами роботи й відповідними запоб...
Page 75 - Перший цикл прання
75 UA Пiд’єднання шлангу злива води П i д ’ є д н а й т е з л и в н и й шланг, не згинаючи його, до каналізації або до злив- ного отвору у стіні на ви- соті від 65 до 100 см від підлоги. Або пок ладіть його на край вмивальник а або ванни; прив’язавши на- правляючу з комплекту постачання до крана ( д...
Page 76 - Індикаторнi лампи; Опис пральної машини та; Панель керування
76 UA Прання Полоскання ВiджимЗливКiнець прання Кнопка з індикаторною лампою УВIМКНЕННЯ/ВИМКНЕННЯ: для увiмкнення й вимкнення пральної машини. Запалена індикаторна лампа означає, що машину ввімкнено.Ручка ПРОГРАМИ: для задання бажаних програм. Під час програми ручка залишається нерухомою.Кнопка ВIДЖ...
Page 77 - Як відкривати та закривати барабан
77 UA Iндикаторна лампа температури Пiсля вибору значення температури iндикаторна лампа запалюється. Iндикаторна лампа вiджиму Пiсля вибору значення вiджиму iндикаторна лампа запалюється. Iндикаторна лампа блокування кнопок Щ о б “ а к ти ву ва ти ” бл о к у ва н н я к е ру юч о ї п а н ел i натиснi...
Page 78 - Програми; Таблиця програм
78 UA Програми Таблиця програм Для всiх Установ з проведення випробувань: 1) Програма керування згiдно до норми EN 60456: встановiть програму 3 з температурою 60°C. Тривалість циклу, вказана на дисплеї або в керівництві, разрахована на основі стандартних умов роботи. Фактичний час може залежати від ...
Page 79 - Функцiї; Налаштування пiд
79 UA Встановлення темепратури Натиснiть кнопку ТЕМПЕРАТУРА ви можете задати температуру прання (див. Таблицю програм). Ви можете знижувати температуру аж до прання в холоднiй водi ( ). Машина перешкоджатиме встановленню температури, яка перевищує максимально дозволену для кожної конкретної програми...
Page 80 - Миючі засоби і білизна; Дозатор миючого засобу; Підготовка білизни; Речі, що потребують спеціального догляду
80 UA Миючі засоби і білизна Дозатор миючого засобу Хороші результати прання залежать також від правильного дозування миючого засобу. Додавання занадто великої кількості миючого засобу не обов’язково приводить до більш ефективного прання, але може викликати появу відкладень на внутрішніх поверхнях м...
Page 81 - Охорона і дбайливе відношення до довкілля; Загальна безпека
81 UA Запобіжні заходи та поради • Вивід з експлуатації електропобутової техніки Європейська директива 2012/19/EU з відходів від електричної й електронної апаратури (RAEE), пе- редбачає, що побутові електроприлади не можуть перероблятися у звичайному порядку для твердих міських відходів. Зняті з екс...
Page 84 - Допомога
84 UA Допомога Перш ніж телефонувати у Сервiсний центр: • Перевірте, чи можна самостійно вирішити проблему (див. “Несправності і засоби їх усунення”); • Запустіть програму повторно, щоб перевірити чи усунено несправність; • Якщо нi, зв’яжiться з авторизованим Сервiсним Центром, зателефонувавши за но...