Honeywell CT51N1007/E1 - User Manual
Honeywell CT51N1007/E1 Thermostat – User Manual, read for free online in PDF format. We hope this helps you resolve any issues you may have. If you have further questions, please contact us through the contact form.


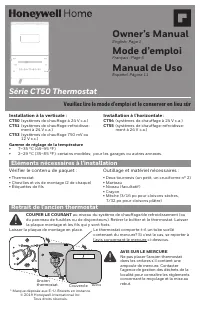
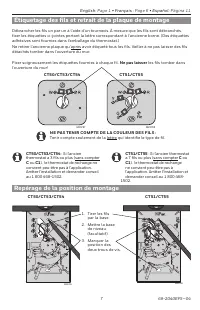
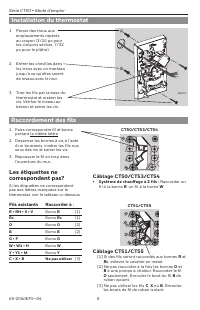

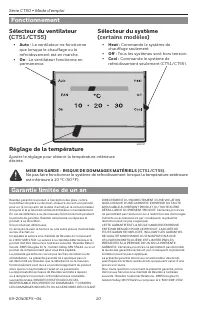


Table of Contents:
- Page 2 – Label wires and remove old wallplate
- Page 3 – Mount thermostat base; Existing wires Connect to:; Connect wires
- Page 4 – UP; Finish installation
- Page 5 – select models
- Page 6 – Read and save these instructions; Série CT50 Thermostat; Owner’s Manual; Retrait de l’ancien thermostat; Vérifier le contenu de paquet :; Veuillez lire le mode d’emploi et le conserver en lieu sûr
- Page 7 – Étiquetage des fils et retrait de la plaque de montage; Repérage de la position de montage
- Page 8 – Les étiquettes ne; Fils existants; Installation du thermostat
- Page 9 – Fin de l'installation
- Page 10 – Garantie limitée de un an; Sélecteur du ventilateur; Fonctionnement
- Page 11 – Compruebe el contenido del paquete:; Lista de comprobación previa a la instalación; CT50 Serie Termostato; Remueva su viejo termostato; Lea y guarde estas instrucciones
- Page 12 – Rotule los cables y retire la vieja placa de montaje; Marque la posición para el montaje
- Page 13 – ¿Los rótulos no coinciden?; Cables existentes; Instalación de placa de montaje
- Page 14 – Finalice la instalación; Ajuste el anticipador del calor (algunos modelos)
- Page 15 – Interruptor del ventilador; Interruptor del sistema; Instrucciones de manejo; peratura; Poliza De Garantia
Owner’s Manual
English: Page 1
Mode d’emploi
Français : Page 6
Manual de Uso
Español: Página 11
CT50 Series Thermostat
® U.S. Registered Trademark. Patents pending.
Copyright © 2019 Honeywell International Inc.
All rights reserved.
Read and save these instructions
M23786
MERCURY NOTICE
If your old thermostat contains
mercury, contact your local waste
management authority for proper
disposal instructions.
TURN OFF POWER
at heating/cooling system (or fuse/circuit-breaker panel).
Remove cover and thermostat, but leave wallplate with wires attached.
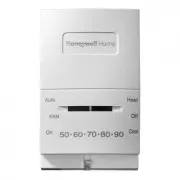
Temperature Control Range
•
45°–95°F (7°–35°C)
•
35°–85°F (2°–29°C); select models; for garages or other outbuildings.
Is there a sealed tube containing mercury?
If so, see mercury notice below.
Leave wallplate in place.
Old thermostat
Cover
Check package contents:
• Thermostat
•
Wall anchors & screws (2 each)
•
Wire labels
Before you begin, make sure you have:
•
No. 2 Phillips & small pocket
screwdrivers
• Hammer
•
Level (optional)
• Pencil
•
Drill and bit (3/16” for drywall, 7/32” for
plaster)
Getting started
Remove your old thermostat
Vertical Mount:
CT50
(24 Vac heating systems)
CT51
(24 Vac heating and cooling systems)
CT53
(750 mV or 12Vdc heating systems)
Horizontal Mount:
CT54
(24 Vac heating systems)
CT55
(24 Vac heating and cooling systems)
69-2040EFS-04
"Loading the manual" means you need to wait until the file loads and becomes available for online reading. Some manuals are very large, and the time they take to appear depends on your internet speed.
Other Manuals for Honeywell CT51N1007/E1
Summary
CT50 Series • Owner's Manual 69-2040EFS—04 2 M23789 M23787 M23790 M23788 Wrap supplied labels securely around each wire. Do not let wires fall into wall opening! IGNORE WIRE COLORS: Use only letter designations to identify wire types. For CT51/CT55 : If your old thermostat has 7 or more wires (not c...
English: Page 1 • Français : Page 6 • Español: Página 11 3 69-2040EFS—04 M23793 Wiring CT50/CT53/CT54 • 2-wire heat-only system: Connect one wire to R terminal, one wire to W terminal. M23791 Wiring CT51/CT55 [1] If wires will be connected to both R and Rc terminals, remove the metal jumper. [2] Do ...
CT50 Series • Owner's Manual 69-2040EFS—04 4 UP VERT. UP HORIZ . M27308A M23794 1. Align the slots on the cover with tabs on the sides of the base, then push gently until the cover snaps into place. 2. Restore power at the heating/cooling sys- tem, or at the fuse/circuit-breaker panel. Move the swit...