Page 3 - Security screw
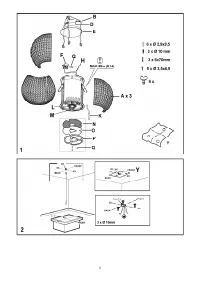
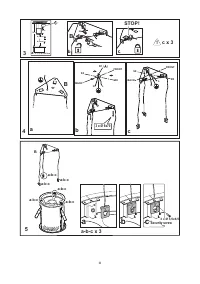
STOP! c b 3 4 c x 3 II B B a-b-c x 3 FRONT BACK RX SX L N c FRONT BACK RX SX R1 ( ) L N b 3 x Ø 6x70 a 5 B H (65cm) H (50cm) X cm Y cm L cm L ( @ ) = X-Y-H+3cm ! a a-b-c a-b-c a-b-c a 3 x Ø 3,5x6,5 b c a-b-c a-b-c a-b-c Security screw
Page 10 - Funzione di accensione automatica
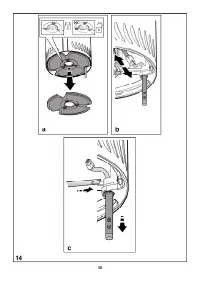
10 Montaggio Questo tipo di cappa deve essere fissata al soffitto. Prodotto dal peso eccessivo, la movimentazione e installazione della cappa deve essere fatta da almeno due o più persone. La cappa è dotata di tasselli di fissaggio adatti alla maggior parte di pareti/soffitti. E’ tuttavia necessario...
Page 11 - Smontaggio stelo di controllo
11 Nota: la 4a velocità (potenza) di aspirazione rimane accesa per 5 minuti, dopodichè il motore di aspirazione si posiziona sulla 2a velocità. Premendo ancora il motore di aspirazione si spegne (Stand by). Necessità di lavare i filtri antigrasso: led VERDE LAMPEGGIANTE (leggere le istruzioni relati...
Page 12 - Manutenzione del telecomando; Richiudere il vano della batteria.; Smaltimento delle batterie; Manutenzione; NON UTILIZZARE; L’inosservanza delle norme di pulizia; Filtro antigrasso
12 Reset e configurazione della segnalazione di saturazione dei filtri Accendere la cappa ad una qualsiasi velocità (vedi paragrafo sopra “Selezione delle velocità (potenze) di aspirazione”) Premere il tasto " ◄ " o il tasto " ► " sino a visualizzare sul telecomando il simbolo relati...
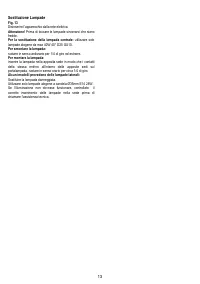
Page 13 - Sostituzione Lampade; Disinserire l’apparecchio dalla rete elettrica.; Per la sostituzione della lampada centrale:; utilizzare solo; Per smontare la lampada:; ruotare in senso antiorario per 1/4 di giro ed estrarre.; Per montare la lampada:
13 Sostituzione Lampade Fig. 13 Disinserire l’apparecchio dalla rete elettrica. Attenzione! Prima di toccare le lampade sincerarsi che siano fredde. Per la sostituzione della lampada centrale: utilizzare solo lampade alogene da max 40W 40° D25 GU10. Per smontare la lampada: ruotare in senso antiorar...
Page 14 - EN - Instruction on mounting and use; Closely follow the instructions set out in this manual.; Caution; Additional Installation Specifications:; Use
14 EN - Instruction on mounting and use Closely follow the instructions set out in this manual. All responsibility, for any eventual inconveniences, damages or fires caused by not complying with the instructions in this manual, is declined. The hood is conceived for the suction of cooking fumes and ...
Page 15 - Mounting; Do not tile, grout or silicone; Description of the hood; “TOUCH”
15 ensures complete disconnection from the mains in the conditions of category III over-tension, conforming to the installation rules. Warning! Detail B (fixing bracket to the ceiling - Fig. 1) is equipped with a conductor (yellow-green) that must be connected to the earth of the domestic electrical...
Page 18 - Es wird; Warnung; Das Gerät nicht an das Stromnetz anschließen,; Betriebsart; cm im Fall von Gas- oder
18 DE - Montage- und Gebrauchsanweisung Die Instruktionen, die in diesem Handbuch gegeben werden, müssen strikt eingehalten werden. Es wird keinerlei Haftung übernommen für mögliche Mängel, Schäden oder Brände der Dunstabzugshaube, die auf die Nichtbeachtung der Vorschriften in diesem Handbuch zurüc...
Page 21 - Reset und Konfiguration der Sättigungsanzeige der Filter; Die Reset-Funktion der Sättigungsanzeige des; Wartung der Fernbedienung; • Das Batteriefach öffnen, indem Sie einen kleinen; Entsorgung der Batterien; Wartung; Nichtbeachtung dieser Anweisungen zur Reinigung; Fettfilter
21 Beleuchtung zu verringern, bis zum Ausschalten. Die Taste “+” drücken, um die Intensität der seitlichen Beleuchtung zu erhöhen. Reset und Konfiguration der Sättigungsanzeige der Filter Die Dunstabzugshaube bei irgendeiner Geschwindigkeit einschalten (siehe Abschnitt oben "Auswahl der Absaugge...
Page 22 - Ersetzen der Lampen; Das Gerät vom Stromnetz nehmen.; Für das Ersetzen der zentralen Lampen:; nur; Um die Lampe zu entfernen:
22 in warmem Wasser und geeigneten Waschmitteln oder in der Spülmaschine bei 65°C gewaschen (in diesem Fall den vollständigen Spülzyklus – ohne zusätzliches Geschirr im Inneren der Geschirrspülmaschine - einschalten). Das überschüssige Wasser entfernen, ohne dabei den Filter zu beschädigen; danach d...
Page 23 - FR - Prescriptions de montage et mode d’emploi; Suivre impérativement les instructions de cette notice.; Le; Attention; Ne pas raccorder l’appareil au circuit électrique; Utilisation; cm dans le cas de; Branchement électrique
23 FR - Prescriptions de montage et mode d’emploi Suivre impérativement les instructions de cette notice. Le constructeur décline toute responsabilité pour tous les inconvénients, dommages ou incendies provoqués à l’appareil et dûs à la non observation des instructions de la présente notice. Cette h...
Page 24 - Fonction d’allumage automatique
24 sous-tension III, conformément aux règlements en matière d’installation. ATTENTION! L’élément B (support de fixation au plafond - FIg. 1), est doté d’un fil conducteur (jaune – vert) qui doit être relié à la terre de l’installation électrique. Fig. 4 ATTENTION! Faire particulièrement attention au...
Page 26 - Reset et configuration du signal de saturation des filtres; Le reset du signal de saturation du filtre à charbon est; Entretien de la télécommande; • Ouvrir le compartiment contenant les piles en faisant; Elimination des piles; Entretien; Il y a risque d’incendie si vous ne respectez pas
26 Appuyer sur la touche “+” pour augmenter l’intensité des lampes latérales. Reset et configuration du signal de saturation des filtres Allumer la hotte à n’importe quelle vitesse (voir paragraphe ci-dessus “Sélection de la vitesse (puissance) d’aspiration”). Appuyer sur la touche " ◄ " ou ...
Page 27 - Remplacement des lampes; Débrancher l’appareil du réseau électrique; Pour la substitution de la lampe centrale:; utiliser seulement; Pour enlever l’ampoule:
27 coussinet tous les 3 ans et chaque fois que le filtre sera abîmé. Remplacement des lampes Fig. 13 Débrancher l’appareil du réseau électrique Attention! Avant de toucher les lampes, assurez-vous qu’elles soient froides. Pour la substitution de la lampe centrale: utiliser seulement des ampoules hal...
Page 28 - NL - Montagevoorschriften en gebruiksaanwijzing; Zich strikt aan de aanwijzingen uit deze tekst houden.; Waarschuwing; Het apparaat niet aan het stroomnet aansluiten; Het gebruik; ATTENTIE! De detail B (beugel voor de bevestiging aan
28 NL - Montagevoorschriften en gebruiksaanwijzing Zich strikt aan de aanwijzingen uit deze tekst houden. Iedere aansprakelijkheid voor eventuele schade of brand aan het apparaat veroorzaakt door het niet in acht nemen van de aanwijzingen in deze handleiding weergegeven wordt afgewezen. De wasemkap ...
Page 29 - TOUCH
29 het plafond - afb. 1), is voorzien van een geleider (geel-groen) die aan een geaard stopcontact van de woning aangesloten moet worden. afb. 4 ATTENTIE! Let bijzonder goed op de positionering van de kabel, het niet in acht nemen van deze aanwijzing kan ernstige schade aan het toestel veroorzaken e...
Page 31 - Reset en configuratie van de filter verzadiging indicatie; De koolstoffilter verzadiging indicatie is; Onderhoud van de afstandsbediening; Doe de batterijruimte weer dicht.; Afdanking van de batterijen; Onderhoud
31 Reset en configuratie van de filter verzadiging indicatie Zet de kap op een willekeurige snelheid aan, zie paragraaf “Zuigkracht (snelheid) selectie” Druk op de toets " ◄ " of " ► " totdat, op de afstandsbediening, het symbool van de functie “Reset en configuratie van de filter ve...
Page 32 - Vervanging lampjes; Alvorens de lampjes aan te raken controleer eerst of; Voor de vervanging van de centrale lamp:; gebruik alleen; De lamp verwijderen:; draai de lamp voor 1/4 tegen de klok in en verwijder de lamp.; Enkele modellen zijn tevens voorzien van zijlampen:
32 Vervanging lampjes afb. 13 Sluit de stroom af. Attentie! Alvorens de lampjes aan te raken controleer eerst of ze koud zijn. Voor de vervanging van de centrale lamp: gebruik alleen halogeen lampen van max 40W 40° D25 GU10. De lamp verwijderen: draai de lamp voor 1/4 tegen de klok in en verwijder d...
Page 33 - El particolar B (estribo de fijación al techo -
33 ES - Montaje y modo de empleo Aténgase estrictamente a las instrucciones del presente manual. Se declina cada responsabilidad por eventuales inconvenientes, daños o incendios provocados al aparato originados por la inobservancia de las instrucciones colocadas en este manual. La campana extractora...
Page 37 - PT - Instruções para montagem e utilização; Declina-se qualquer responsabilidade por eventuais; Advertências; Não conectar o aparelho à rede elétrica enquanto a; Uso; Conexão elétrica
37 PT - Instruções para montagem e utilização Siga especificamente as instruções indicadas neste manual. Declina-se qualquer responsabilidade por eventuais inconvenientes, danos ou incêndios provocados ao aparelho, derivantes da inobservância das instruções indicadas neste manual. A coifa foi conceb...
Page 38 - Função de ligação automática
38 ATENÇÃO! Prestar muita atenção no posicionamento do cabo em excesso, a inobservância desta indicação pode vir a provocar graves danos ao aparelho e/ou um choque eléctrico no usuário ou no instalador. Para maiores detalhes ver a Fig. 7 Atenção! A substituição do cabo de interconexão deve ser efect...
Page 40 - Normalmente o reset de sinalização saturação filtro de; Manutenção do controlo remoto; Manutenção; O não cumprimento das instruções fornecidas para; Filtro antigordura
40 Reset e configuração da sinalização de saturação dos filtros Ligar a coifa a qualquer velocidade (ver parágrafo acima “Selecção das velocidades (potências) de aspiração”) Pressionar a tecla " ◄ " ou a tecla " ► " até visualizar no controlo remoto o símbolo relativo à função “Reset...
Page 41 - Substituição das lâmpadas; Desligar o aparelho da rede elétrica; Para a substituição da lâmpada central:; utilizar somente; Para desmontar a lâmpada:; Girar por 1⁄4 de volta em sentido anti-horário e extrair.; Para montar a lâmpada:
41 Substituição das lâmpadas Fig. 13 Desligar o aparelho da rede elétrica; Atenção! Antes de tocar as lâmpadas, certificar-se que estejam frias. Para a substituição da lâmpada central: utilizar somente lâmpadas alógenas com no máx. 40W 40° D25 GU10. Para desmontar a lâmpada: Girar por ¼ de volta em ...
Page 43 - kit
43 Εγκατασταση Η ηλεκτρονική και μηχανική εγκατάσταση πρέπει να γίνεται αποκλειστικά από εξειδικευμένα άτομα . Η ελάχιστη απόσταση μεταξύ της επιφάνειας της βάσης εστιών και του κατώτερου μέρους του απορροφητήρα κουζίνας δεν πρέπει να είναι μικρότερη των 50 εκ . στην περίπτωση ηλεκτρικών κουζινών κα...
Page 44 - Ξεμοντάρισμα; Εικ
44 Έλεγχος των ταχυτήτων απορρόφησης Ο επιλογέας της ταχύτητας απορρόφησης είναι κυκλικής δομής , σύμφωνα με το σχέδιο "stand-by - 1-2-3-4- Stand by - 1-2-...", γι ’ αυτό σε κάθε πίεση του πλήκτρου T1 του μοχλού ελέγχου ταχύτητας απορρόφησης αυτή μεγαλώνει ένα επίπεδο ενώ σβήνει ( φτάνει σε ...
Page 45 - Συντηρηση
45 Ελεγχος του κεντρικού φωτός : Πατήστε το πλήκτρο “ ◄ “ ή το πλήκτρο “ ► “ μέχρι να εμφανιστεί στο τηλεχειριστήριο το σύμβολο σχετικό με την λειτουργία “ Ελεγχος του κεντρικού φωτός ” Το κεντρικό φώς μπορεί να ανάψει ή να σβήσει με δύο τρόπους : 1. Πατήστε το πλήκτρο “ + ” ή το πλήκτρο “-” αντίστο...
Page 47 - Följ noga instruktionerna i denna manual; Varningsföreskrifter; Minsta tillåtna avstånd mellan kokkärlens stödyta på; Elektrisk anslutning
47 SV - Monterings- och bruksanvisningar Följ noga instruktionerna i denna manual . Tillverkaren frånsäger sig allt ansvar för eventuella funktionsfel, skador eller bränder som uppstår på apparaten på grund av att instruktionerna i denna manual inte har respekterats. Fläkten har tillverkats för utsu...
Page 49 - Nedmontering av manöverstaget.; Användning av fjärrkontrollen; GRÖND LYSDIOD på manöverstaget
49 Återställning av signalen för fettfiltrets mättning (BLINKANDE GRÖN LYSDIOD på manöverstaget) Utför inledningsvis ett underhåll av filtret enligt beskrivningen i den aktuella paragrafen. Tryck ner tangenten T1 på manöverstaget under en längre tid (mer än 3 sekunder), LYSDIODEN upphör att blinka v...
Page 51 - Noudata käyttöohjetta huolellisesti.; Turvallisuustietoa; Kuva 7; Asennus
51 FI - Asennus- ja käyttöohjeet Noudata käyttöohjetta huolellisesti. Valmistaja ei vastaa käyttöohjeen noudattamattajättämisestä aiheutuneista haitoista, vahingoista tai tulipaloista. Tuuletin imee savun ja höyryn ja se on tarkoitettu ainoastaan kotitalouskäyttöön. Turvallisuustietoa Huomio ! Älä y...
Page 53 - Ohjaustaulun purkaminen; Kaukosäätimen käyttö
53 Hiilisuodattimen kyllästyksen merkkivalon resetointi (ORANSSI (ruskea) VILKKUVA LED) Huolla ensin suodatin aiheeseen liittyvä kappaleen ohjeiden mukaisesti. Pidä ohjaustaulun näppäintä T1 alaspainettuna (yli 3 sekuntia), LED lakkaa vilkkumasta ja merkkivalo on resetoitu, tuuletin sammuu. Hiilisuo...
Page 54 - Akkujen hävittäminen; Huolto; ÄLÄ KÄYTÄ ALKOHOLIPITOISIA PUHDISTUSAINEITA!; Rasvasuodatin; Lampun irrottaminen:
54 Huomioi uutta paristoa asentaessasi paristotilassa näkyvät polariteetit! • Sulje paristotila. Akkujen hävittäminen Akut on hävitettävä kussakin maassa voimassaolevien määräysten ja lakien mukaisesti. Akkuja ei saa hävittää normaalijätteen mukana. Akut on hävitettävä turvallisesti. Ympäristönsuoje...
Page 55 - NO - Instrukser for montering og bruk; Instruksjonene i denne håndboken må følges nøye.; Advarsel
55 NO - Instrukser for montering og bruk Instruksjonene i denne håndboken må følges nøye. Produsenten fraskriver seg ethvert ansvar for eventuelle uhell, skader eller brann på apparatet som skyldes at bruksanvisningen i denne håndboken ikke har blitt overholdt. Ventilatoren er ment for avtrekk av rø...
Page 56 - Automatisk påslåing
56 Montering Denne typen avtrekk skal festes i taket. Dette produktet er svært tungt. Flytting og installasjon av kjøkkenventilatoren må derfor utføres av to eller flere personer. Ventilatorhetten er utstyrt med festeplugger som passer til de fleste vegger/tak. Allikevel er det nødvendig å la en kva...
Page 57 - Demontering av kontrollstaven.
57 sekunder. LED-lyset vil slutte å blinke, og viser dermed at tilbakestillingen av signalet er utført, deretter vil ventilatoren slå seg av. Tilbakestillingen av signalet for mettet kullfilter (ORANSJE (ravfarget) BLINKENDE LED-LYS) Foreta først vedlikehold av filteret som beskrevet i tilsvarende a...
Page 59 - Overhold venligst alle instruktioner i denne vejledning; Advarsler; apparatet må ikke tilsluttes elnettet før installeringen; Brug; Elektrisk tilslutning; Vær specielt omhyggelig under anbringelse af
59 DA - Bruger- og monteringsvejledning Overhold venligst alle instruktioner i denne vejledning . Fabrikanten frasiger sig ethvert ansvar for eventuelle fejl, skader eller brande forårsaget af apparatet, men afledt af manglende overholdelse af instruktionerne i denne vejledning. Emhætten er beregnet...
Page 61 - Reset og konfiguration af signaleringen for filtermætning; Afmontering af betjeningspinden.; Brug af fjernbetjeningen
61 Reset og konfiguration af signaleringen for filtermætning Tænd emhætten på en vilkårlig hastighed (læs venligst ovenstående afsnit “Valg af udsugningshastighederne (effekterne)”) Reset af signalering for mætning af fedtfilteret (BLINKENDE GRØN LYSDIODE på betjeningspinden) Udfør først vedligehold...
Page 62 - Luk batterirummet igen.; Vedligeholdelse; Manglende overholdelse af vejledningen til rengøring; Fedtfilter; Sørg for at pærerne er kolde før de berøres.
62 funktionen “Reset og konfiguration af signaleringen for filtermætning” fremkommer på fjernbetjeningen. Tryk samtidigt i cirka 3 sekunder på tasterne “+” og “-”, lysdioden blinker med GRØNT lys til angivelse af, at signaleringen for mætning af kulfilteret er blevet afbrudt. For at tilslutte signal...
Page 63 - łą
63 PL - Instrukcja monta ż u i obs ł ugi Przy przeprowadzaniu instalacji urz ą dzenia nale ż y post ę powa ć wed ł ug wskazówek podanych w niniejszej instrukcji. Producent uchyla si ę od wszelkiej odpowiedzialno ś ci za uszkodzenia wynik ł e na skutek instalacji niezgodnej z informacjami podanymi w ...
Page 65 - dr; ąż
65 Nota: Kasowanie mo ż e by ć wykonane za pomoc ą dr ąż ka sterowniczego lub za po ś rednictwem pilota. Kontrola centralnego o ś wietlenia Centralne o ś wietlenie mo ż e by ć za łą czone lub wy łą czone naciskaj ą c klawisz T2 dr ąż ka sterowniczego. Kontrola bocznego o ś wietlenia, (je ż eli na wy...
Page 68 - řů
68 CS - Návod na montáž a používání Výrobce odmítá p ř evzít jakoukoliv odpov ě dnost za p ř ípadné závady, škody nebo vznícení digesto ř e, které byly zp ů sobeny nedodržením t ě chto p ř edpis ů . Digesto ř je projektován pro odsávání dým ů a par p ř i va ř ení a je ur č en pouze k domácím ú č el ...
Page 69 - čů; Provoz
69 Instalace Tento typ digesto ř musí být upevn ě n na strop ě . Výrobek o velké hmotnosti, manipulace a instalace digesto ř e by m ě la být provád ě na alespo ň dv ě ma nebo více osobami. Digesto ř je dodávána se speciálními hmoždinkami, které jsou vhodné pro zav ě šení do v ě tšiny stropních konst...
Page 73 - Montáž; dve alebo viac osôb.; Opis odsáva; Funkcia automatického zapínania
73 UPOZORNENIE! Venova ť osobitnú pozornos ť umiestneniu prebyto č ného kábla, nedodržanie sa tohto upozornenia by mohlo spôsobi ť vážne poškodenie zariadenia a/alebo úraz používate ľ a alebo inštalára elektrickým prúdom. Pre viac informácie pozri Obr. 7 Upozornenie! Nahradenie káblového prepojenia ...
Page 74 - Odmontovanie kontrolnej ty
74 Potreba umývania protitukových filtrov: BLIKAJÚCI ZELENÝ led (pre č íta ť si návody týkajúce sa "Reset a konfigurácia signalizácie nasýte ľ nosti filtrov") Potreba umývania alebo výmeny uhlíkových filtrov: BLIKAJÚCI ORANŽOVÝ led (pre č íta ť si návody týkajúce sa "Reset a konfigurácia...
Page 76 - Niektoré modely poskytujú bo; Vymeni
76 Niektoré modely poskytujú bo č né lampy: Vymeni ť poškodenú žiarovku. Používa ť len halogénové žiarovky v tvare svie č ky Ø35mm E14 28W. Ak by osvetlenie nefungovalo, skôr ako zavoláte technickú asistenciu, overi ť správne nasadenie žiaroviek do sedla.
Page 77 - tt fel kell; Felszerelés; FIGYELEM! A B részletrajz (mennyezeti rögzít
77 HU - Felszerelési és használati utasítás Ezen kézikönyv utasításait szigorúan be kell tartani. Az itt feltüntetett utasítások be nem tartásából származó bármilyen hiba, kár vagy t ű zesettel kapcsolatban a gyártó felel ő sséget nem vállal. A páraelszívó a f ő zési pára és füst elszívására szolgál...
Page 78 - ábra 7
78 kárt okozhat a készülékben és/vagy a felhasználó vagy a beszerel ő áramütést szenvedhet miatta. További részletekért lásd ábra 7 Figyelem! Figyelem! az összeköt ő kábel cseréjét csak az engedéllyel rendelkez ő m ű szaki szervízszolgálat végezheti!. Felszerelés Ezt az elszívó típust a plafonhoz ke...
Page 79 - ábra
79 szabályozására is szolgál. Megjegyzés: a be- és kikapcsolás (valamint a szabályozás) funkciók váltakoznak. Neon lámpával rendelkez ő elszívók esetében a fényintenzitás szabályozása nem lehetséges. Sz ű r ő telítettség jelz ő beállítás konfiguráció és reset Állítsa az elszívót bármely sebesség fok...
Page 87 - ăş
87 Aten ţ ie! Face ţ i aten ţ ie la pozi ţ ionarea cablului care r ă mâne, nerespectarea acestei indica ţ ii poate provoca mari daune hotei ş i/sau rischul de electrocutari pentru utilizator sau instalatori. Pentru informa ţ ii mai aprofundate, vezi Fig. 7 Aten ţ ie! Înlocuirea cablului de intercone...
Page 88 - Demontarea suportului de control.; ăţ
88 5 minute, dup ă care motorul de aspirare se pozi ţ ioneaz ă în viteza a 2a. Ap ă sând din nou se opre ş te motorul de aspirare (Stand by). Este necesar ă sp ă larea filtrelor anti-gr ă sime: led VERDE INTERMITENT (citi ţ i instruc ţ iunile referitoare la "Resetarea ş i configurarea semnaliz ă...
Page 92 - Установка; Рис; Функционирование
92 надлежащий двухполюсный выключатель , который обеспечил бы полное прерывание питания при возникновении условий перенапржения 3- ей категории , в соответствии с правилами по установке . ВНИМАНИЕ ! Деталь В ( кронштейн для крепления к потолку - Рис . 1) снабжена проводником ( желто - зеленым ), под...
Page 101 - Järgige täpselt käesolevas juhendis antud juhiseid.; Ohuabinõud; Joonis 7; Paigaldamine
101 ET - Paigaldus- ja kasutusjuhend Järgige täpselt käesolevas juhendis antud juhiseid. Seadme valmistaja keeldub igasugusest vastutusest seadmega seotud võimalike ebameeldivuste, rikete või tulekahjude eest, mis tulenevad selles juhendis antud juhiste eiramisest. Õhupuhasti on ette nähtud küpsetus...
Page 102 - Stand by
102 Õhupuhastiga on kaasas tüüblid, mis sobivad enamikule seintele/lagedele. Kui tahate kindel olla, et need seinte/lae materjaliga sobivad, tuleb siiski pöörduda kvalifitseeritud tehniku poole. Sein/lagi peab olema küllalt tugev, et õhupuhasti raskust kanda. Õhupuhasti kirjeldus Joonis 1 H. Ühendus...
Page 103 - Kaugjuhtimispuldi kasutamine; stand by; Keskmise lambi juhtimine
103 vilkumise, mis tähendab, et märguande lähtestamine on sooritatud, ja õhupuhasti lülitub välja. Söefiltri küllastumise märguande lähtestamine (pulkpaneeli LED ORANŽ (merevaikkollane) ja VILGUB) Esmalt viige läbi vastavas lõigus kirjeldatud filtri hooldustoimingud. Hoidke üle 3 sekundi all pulkpan...
Page 110 - ēļ
110 Gaisa noš ū c ē js ir apr ī kots ar fiks ē šanas kor ķ iem, kas ir piem ē roti sienu/griestu liel ā kai da ļ ai. Jebkur ā gad ī jum ā , ir nepieciešams griezties pie kvalific ē ta tehni ķ a, lai p ā rliecin ā tos par materi ā lu der ī gumu sienu/griestu veidam. Sienai/griestiem ir j ā b ū t piet...
Page 111 - ļā; Kontroles stie; ĻĀ
111 stie ņ a taustu T1 , LED p ā rtrauc mirgu ļ ošanu, nor ā dot, ka pazi ņ ojuma reset tika veikts, gaisa nos ū c ē js izsl ē dzas. Ogles filtra pies ā tin ā šan ā s reset (ORANŽS (dzintara kr ā s ā ) LED MIRGU Ļ O) No s ā kuma veikt filtra tehnisko apkopi, k ā tas ir aprakst ī ts atbilstošaj ā par...
Page 114 - Funkcija automatskog uklju
114 Upozorenje! Samo Autorizovani Tehni č ki servis može obaviti zamenu kabla za me đ upovezivanje. Montaža Ova vrsta kuhinjske nape treba da da se pri č vrsti na plafon. Radi se o proizvodu koji ima iznimno veliku težinu, kuhinjsku napu treba da pomeraju i instališu bar dva ili ako je mogu ć e i vi...
Page 115 - Razmontaža komandne table.
115 NARANDŽASTE BOJE( ć ilibar) 3a brzina (ja č ina) usisavanja - indikaciono svetlo CRVENE BOJE 4a brzina (ja č ina) usisavanja - indikaciono svetlo CRVENE BOJE (KOJA BLEŠTI) Napomena: 4a brzina (ja č ina) usisavanja ostaje uklju č enom u trajanju od 5 minuta ,posle č ega se usisavanje postavlja na...
Page 117 - Zamenjivanje Lampe
117 Zamenjivanje Lampe Sl. 13 Iskop č ajte aparat sa elektri č ne mreže. Upozorenje! Pre nego što dotaknete lampe budite sigurni da su se ohladile. Što se ti č e zamene centralne lampe: koristite samo halogene lampe od maksimalno 40W 40° D25 GU10. Kada treba da razmontirate lampu: okrenite u smeru s...
Page 124 - Razmontiranje komandne plo
124 3a brzina (ja č ina) usisavanja - indikaciono svjetlo CRVENE BOJE 4a brzina (ja č ina) usisavanja - indikaciono svjetlo CRVENE BOJE (KOJA BLIJEŠTI) Napomena: 4a brzina (ja č ina) usisavanja ostaje uklju č enom u trajanju od 5 minuta ,posle č ega se usisavanje postavlja na 2-u brzinu. Pritiskaju ...
Page 126 - Zamjena Lampe; Za zamjenu centralne lampe:
126 Zamjena Lampe Slika 13 Iskop č ajte aparat s elektri č ne mreže. Pozor! Prije nego što dodirnete lampe provjerite jesu li se ohladile. Za zamjenu centralne lampe: koristite samo halogene lampe od maks. 40W 40° D25 GU10. Za uklanjanje lampe: Okrenite je u smjeru kazaljki na satu 1/4 kruga i izvad...
Page 128 - Şİ
128 Montaj Bu tip davlumbazlar tavana sabitlenmelidirler. Bu ürüün a ğ ı rl ı ğ ı çok fazlad ı r. Ta ş ı nmas ı ve kurulmas ı i ş leri en az iki yada faha fazla say ı da ki ş i taraf ı ndan yap ı lmal ı d ı r. Davlumbaz ı n birçok duvar/tavan tipinde s ı k ı lmas ı n ı sa ğ lamak üzere geni ş dübell...
Page 129 - Kumanda panelinin sökülmesi.
129 Dördüncü aspirasyon h ı z ı (gücü) - led KIRMIZI ( YANIP SÖNEREK) Not: Dördüncü aspirasyon h ı z ı nda (gücünde) davlumbaz 5 dakika çal ı ş t ı ktan sonra ikinci h ı z seviyesine dönerek çal ı ş maya devam eder. Dü ğ meye biraz daha bas ı lmaya devam edilirse motor durur. (Stand by). Ya ğ Filtre...
Page 133 - رضخلأاب; تايراطبلا
133 ﺪﻴﻀﻨﺗ رﻮﻬﻇو ةرﺎﺷإ ﺒﻌﺗ ﺌ ﺔ ﻲﻓﺎﺼﻤﻟا . ﻞﻌﺷأ ءﺎﻄﻏ ﻂﻔﺸﻟا يﺄﺑ ﺔﻋﺮﺳ ) ﺮﻈﻧا ةﺮﻘﻔﻟا قﻮﻓ " ﺘﻧا ءﺎﻘ ﺔﻋﺮﺳ ) ةﻮﻗ ( ﻂﻔﺸﻟا .(" ﺪﻴﻀﻨﺗ رﻮﻬﻇو ةرﺎﺷإ ﺔﺌﺒﻌﺗ ةﺎﻔﺼﻤﻟا ةدﺎﻀﻤﻟا نﻮهﺪﻠﻟ ) led ﺮﻀﺧأ ﻊﺸﻣ ﻰﻠﻋ ﺎﺼﻋ ﻢﻜﺤﺘﻟا ( أﺪﺑا ﻞﺒﻗ ﺔﻧﺎﻴﺼﺑ ةﺎﻔﺼﻤﻟا ﺎﻤآ ﻒﺻﻮﻳ ﻚﻟذ ﻲﻓ ةﺮﻘﻔﻟا ﺔﻘﻠﻌﺘﻤﻟا اﺬﻬﺑ . ﻂﻐﺿا ﺔﻘﻳﺮﻄﺑ ﺔﻟّﻮﻄﻣ ) ﺮﺜآأ ﻦﻣ 3 ناﻮ...
Page 135 - Waste; بيآرتلا; III
135 - AR - قﺮﻃ ﺐﻴآﺮﺘﻟا لﺎﻤﻌﺘﺳﻻو ُﺗ ﻞﻴﻟﺪ ﻟا اﺬ ه ﻲ ﻓ ةدراﻮ ﻟا تﺎ ﻤﻴﻠﻌﺘﻟا ﺐ ﺜآ ﻦ ﻋ ﻊﺑﺎ ﺘ . ﺎﻨﺴ ﻟ ﻦ ﺤﻧ ﻤﺟﺎﻧ ﻖ ﻳﺮﺣ وا ﻒ ﻠﺗ ضاﺮ ﻋا يا ﻦ ﻋ ﻦﻴﻟﺆﺴ ﻣ ﺔ ءﻮ ﺳ ﻦ ﻋ ﺠﻟا لﺎﻤﻌﺘ ﺳا ﻲ ﻓ ةدراﻮ ﻟا تﺎ ﻈﺣﻼﻤﻟا ةﺎ ﻋاﺮﻣ مﺪ ﻋ ﺐﺒﺴ ﺑ زﺎ ﻬ ﻞﻴﻟﺪ ﻟا اﺬ ه . ﻂﻔﺸ ﻟا ءﺎ ﻄﻏ نإ نﺎ ﺧدو ةﺮ ﺨﺑأ ﻂﻔﺸ ﻟ ﻢّﻤﺼ ﻣ ﻂﻘﻓ ﻲﻟﺰﻨﻤﻟا لﺎﻤﻌﺘﺳﻼﻟ ﺔﻟﻮﻌﺠﻣ ﻮه...