Page 2 - CUSTOMER CARE AND SERVICE; SAFETY INFORMATION; Before the installation and use of the appliance, carefully
CONTENTS 1. SAFETY INFORMATION....................................................................................2 2. CONDITIONS OF USE....................................................................................... 4 3. SAFETY INSTRUCTIONS.......................................................
Page 3 - Children and vulnerable people safety
result of incorrect installation or usage. Always keep the instructions in a safe and accessible location for future reference. 1.1 Children and vulnerable people safety • This appliance can be used by children aged 8 years and above and by persons with reduced capabilities provided that they have b...
Page 4 - SAFETY INSTRUCTIONS
• CAUTION: The cooking process has to be supervised. A short term cooking process has to be supervised continuously. • WARNING: Danger of fire: Do not store items on the cooking surfaces. • Metallic objects such as knives, forks, spoons and lids should not be placed on the hob surface since they can...
Page 5 - Electrical Connection
• Protect the bottom of the appliance from steam and moisture. • Do not install the appliance adjacent to a door or under a window. This prevents hot cookware to fall from the appliance when the door or the window is opened. • If the appliance is installed above drawers make sure that the space, bet...
Page 6 - Care and cleaning
• Do not put cutlery or saucepan lids on the cooking zones. They can become hot. • Do not operate the appliance with wet hands or when it has contact with water. • Do not use the appliance as a work surface or as a storage surface. • If the surface of the appliance is cracked, disconnect immediately...
Page 7 - PRODUCT DESCRIPTION; Cooking surface layout
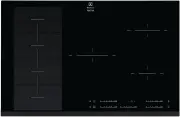
4. PRODUCT DESCRIPTION 4.1 Cooking surface layout 3 2 1 1 1 1 Induction cooking zone 2 Control panel 3 Flexible induction cooking area consisting of four sections 4.2 Control panel layout 12 13 7 8 2 3 4 1 14 11 5 9 10 6 Use the sensor fields to operate the appliance. The displays, indicators and so...
Page 8 - Heat setting displays
Sen‐ sor field Function Comment 8 Hob²Hood To activate and deactivate the manual mode of the function. 9 STOP+GO To activate and deactivate the function. 10 Power function To activate and deactivate the function. 11 - Control bar To set a heat setting. 12 - To select the cooking zone. 13 / - To incr...
Page 9 - Residual heat indicator); Activating and deactivating
4.4 OptiHeat Control (3 step Residual heat indicator) WARNING! / / There is a risk of burns from residual heat. The indicator shows the level of the residual heat. The induction cooking zones make the heat necessary for cooking process directly in the bottom of the cookware. The glass ceramic is hea...
Page 10 - Automatic Heat Up
5.5 Automatic Heat Up Activate this function to get a desired heat setting in a shorter time. When it is on, the zone operates on the highest setting in the beginning and then continues to cook at the desired heating setting. To activate the function the cooking zone must be cold. To activate the fu...
Page 11 - The Child Safety Device; OffSound Control; (Deactivating and activating the; Power management; function
time. When the time comes to an end, the sound operates and 00 flashes. To stop the sound: touch . The function has no effect on the operation of the cooking zones. 5.8 STOP+GO This function sets all cooking zones that operate to the lowest heat setting.When the function operates, you cannot change ...
Page 13 - FLEXIBLE INDUCTION COOKING AREA; FlexiBridge function
Operating the fan speed manually You can also operate the functionmanually. To do that touch when the hob is active. This deactivates automatic operation of the function and allows you to change the fan speed manually. Whenyou press you raise the fan speed by one. When you reach an intensive levelan...
Page 14 - FlexiBridge Standard mode; FlexiBridge Big Bridge; mode
> 160 mm 6.2 FlexiBridge Standard mode This mode is active when you activate the hob. It connects the sections into two separate cooking zones. You can set the heat setting for each zone separately. Use two left side control bars. Correct cookware position: Incorrect cookware position: 6.3 FlexiB...
Page 15 - FlexiBridge Max Bridge; PowerSlide function
Incorrect cookware position: 6.4 FlexiBridge Max Bridge mode To activate the mode press until you see the correct mode indicator. This mode connects all sections into one cooking zone. To set the heat setting use one of the left side control bars. Correct cookware position:To use this mode you have ...
Page 17 - The noises during operation; Examples of cooking; applications
Cookware dimensionsInduction cooking zones adapt to the dimension of the bottom of the cookware automatically to some limit.The cooking zone efficiency is related to the diameter of the cookware. The cookware with a smaller diameter than the minimum receives only a part of the power generated by the...
Page 18 - Hints and Tips for; Hob2Hood function; General information
Heat setting Use to: Time (min) Hints 9 - 12 Gentle fry: escalope, veal cordon bleu, cutlets, rissoles, sausages, liver, roux, eggs, pancakes, doughnuts. as nec‐ essary Turn halfway through. 12 - 13 Heavy fry, hash browns, loin steaks, steaks. 5 - 15 Turn halfway through. 14 Boil water, cook pasta, ...
Page 24 - Cooking zones specification
10.5 Protection box If you use a protection box (an additional accessory), the front airflow space of 2 mm and the protective floor directly below the hob are not necessary. The protection box accessory may not be available in some countries. Please contact your local supplier. You can not use the p...
Page 25 - ENERGY EFFICIENCY
12. ENERGY EFFICIENCY 12.1 Product information according to EU 66/2014 Model identification EHX8575FHK Type of hob Built-In Hob Number of cooking zones 3 Number of cooking areas 1 Heating technology Induction Diameter of circular cook‐ ing zones (Ø) Middle front Right front Right rear 21.0 cm 14.5 c...
Page 28 - ENVIRONMENT CONCERNS
FOR SERVICE or to find the address of your nearest state service centre in Australia Please call 13 13 4 9 For the cost of a local call (Australiaonly) SERVICE AUSTRALIA ELECTROLUX HOME PRODUCTS www.electrolux.com.au FOR SPARE PARTS or to find the address of your nearest state spare parts centre in ...