Page 2 - will help you solve common problems that may occur.; Welcome; Visit
1 Model Number: ________________________________________________ Serial Number: ________________________________________________ Date of Purchase: ______________________________________________ Need Help? Before you call for service, here are a few things you can do to help us serve you better. Read...
Page 3 - Do not connect your appliance to extension; Important Safety Information; READ AND FOLLOW ALL SAFETY INSTRUCTIONS; SAVE THESE INSTRUCTIONS!
2 SAFETY REQUIREMENTS DANGER: Risk of fi re or explosion. Flammable refrigerant used. Do not puncture refrigerant tubing. • Do not use mechanical devices to defrost refrigerator. • Ensure that servicing is done by factory authorized service personnel, to minimize product damage or safety issues. • If...
Page 4 - INSTALLATION INSTRUCTIONS; LOCATION
3 INSTALLATION INSTRUCTIONS LOCATION • Two people should be used when moving the appliance. • Remove interior and exterior packaging prior to installation. Wipe the outside of the appliance with a soft, dry cloth and the inside with a lukewarm wet cloth. • Place the appliance on a fl oor that is stro...
Page 5 - PREPARING THE ENCLOSURE
4 INSTALLATION INSTRUCTIONS Electrical Access Electrical Access *If electrical outlet in adjacent cabinetry 70 in (177.9 cm) 2 in (5 cm) 6 in(15.2 cm) 1.5 in (3.8 cm) diameter 24 in (61 cm) 90° 28.1 in(71.3 cm) PREPARING THE ENCLOSURE Gloves and safety goggles should be worn during installation. It ...
Page 6 - ACCESSORIES
INSTALLATION INSTRUCTIONS ANTI-TIP BRACKET This appliance may tip when shelves are extended, causing damage, injury or loss of contents. If this appliance is being used in a free standing application, the anti-tip bracket must be installed on both sides of the cabinet. ACCESSORIES 1. Anti-tip bracke...
Page 8 - OPERATING INSTRUCTIONS; CONTROL PANEL; INTERIOR LIGHT
7 OPERATING INSTRUCTIONS CONTROL PANEL 1. Standard mode indicator 2. Energy saving mode indicator 3. Sabbath mode indicator 4. Demo mode indicator 5. Interior light colour setting indicator 6. Alarm indicator 7. Disable door alarm indicator 8. Upper display panel: Shows the set temperature of the up...
Page 9 - FUNCTION INSTRUCTION; Energy saving mode will turn off the interior light,; SABBATH MODE
8 OPERATING INSTRUCTIONS FUNCTION INSTRUCTION The default temperature setting is 54°F (12°C). The default temperature scale is °F. To switch the display between °F and °C, press and hold the increase and decrease buttons simultaneously for approximately 3-5 seconds. The temperature can be set as low...
Page 10 - STORAGE INSTRUCTIONS
OPERATING INSTRUCTIONS 9 STORAGE INSTRUCTIONS The maximum capacity of this unit is 135 wine bottles. The upper zone will hold 60 bottles and the lower zone will hold 75 bottles. This capacity is based on a standard 750 ml Bordeaux style bottle. Actual storage capacity may vary if different bottle si...
Page 11 - DOOR REVERSAL INSTRUCTIONS
10 OPERATING INSTRUCTIONS DOOR REVERSAL INSTRUCTIONS If the appliance is placed on its back or side for any length of time during this process, it must be allowed to remain upright for 6 hours before plugging it in to avoid damage to the internal components. 1. Remove the upper right hinge from the ...
Page 12 - DEFROST; This unit is equipped with an automatic defrost; • Short
11 CARE & MAINTENANCE CLEANING Ensure the appliance is unplugged before cleaning. • To clean the inside of the appliance, use a soft cloth and a solution of a tablespoon of baking soda to one quart of water or a mild soap solution or some mild detergent. • Wash removable shelves in a mild deterg...
Page 13 - TROUBLESHOOTING; PROBLEM
12 Silhouette Consumer Care: 1-844-455-6097 Hours of operation: Monday to Thursday 8:30 am - 6:00 pm Eastern Standard Time Friday 8:30 am - 4:00 pm Eastern Standard Time Information in this manual is subject to change without notice. TROUBLESHOOTING PROBLEM POSSIBLE CAUSE No power • A fuse may be bl...
Page 14 - LIMITED IN-HOME APPLIANCE WARRANTY; LIMITED “IN HOME” WARRANTY
LIMITED IN-HOME APPLIANCE WARRANTY This quality product is warranted to be free from manufacturer’s defects in material and workmanship, provided that the unit is used under the normal operating conditions intended by the manufacturer.This warranty is available only to the person to whom the unit wa...
Page 15 - aider à mieux vous servir.; Lire ce manuel du propriétaire:; Bienvenue; Visitez; ser vice sous garantie.
14 Numéro de modèle: ____________________________________________ Numéro de serie: ______________________________________________ Date d’achat: __________________________________________________ Besoin d’assistance? Avant d’appeler pour service, voici quelques choses que vous pouvez faire pour nous ...
Page 16 - Ne branchez pas votre appareil à des rallonges; Consignes de sécurité importantes; LIRE ET SUIVRE TOUTES LES INSTRUCTIONS DE SÉCURITÉ; GARDEZ CES INSTRUCTIONS!
15 EXIGENCES DE SÉCURITÉ DANGER : Risque d’incendie ou d’explosion. Liquide frigorigène infl ammable utilisé. Ne pas percer les tubes de réfrigérant. • N’utilisez pas de dispositifs mécaniques pour dégivrer le réfrigérateur. • Assurez-vous que l’entretien est effectué par le personnel de service auto...
Page 17 - INSTRUCTIONS D’INSTALLATION; EMPLACEMENT
16 INSTRUCTIONS D’INSTALLATION EMPLACEMENT • Deux personnes doivent être utilisées pour déplacer l’appareil. • Retirer l‘emballage intérieur et extérieur avant l’installation. Essuyez l’extérieur de l’appareil avec un chiffon doux et sec et à l’intérieur avec un chiffon humide tiède. • Placez votre ...
Page 18 - PRÉPARER L’ENCEINTE
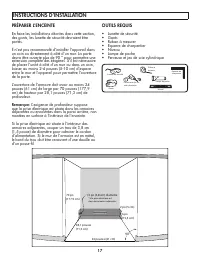
Accès électrique Accès électrique *Si la prise électrique est dans des armoires adjacentes 2 po (5 cm) 6 po(15,3 cm) 1,5 po (3,8 cm) diamètre 24 pouces (61 cm) 90° 70 po(177,9 cm) 28,1 pouces(71,3 cm) 17 INSTRUCTIONS D’INSTALLATION PRÉPARER L’ENCEINTE En faire les installations décrites dans cette s...
Page 19 - ACCESSOIRES
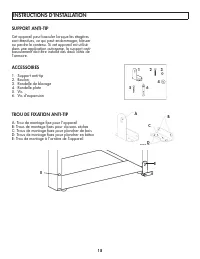
INSTRUCTIONS D’INSTALLATION 18 SUPPORT ANTI-TIP Cet appareil peut basculer lorsque les étagères sont étendues, ce qui peut endommager, blesser ou perdre le contenu. Si cet appareil est utilisé dans une application autonome, le support anti- basculement doit être installé des deux côtés de l’armoire....
Page 20 - Installation contre la cloison sèche:
INSTRUCTIONS D’INSTALLATION 19 Installation contre la cloison sèche: 1. Placez le support sur le sol avec le trou de montage B contre le mur. 2. Utilisez deux vis pour fi xer le support au mur. 3. Assurez-vous qu’au moins une vis est fi xée à un poteau mural. 4. Placez l‘appareil de sorte que le trou ...
Page 21 - CONSIGNES D’UTILISATION; LUMIÈRE INTÉRIEURE; PANNEAU DE CONTRÔLE
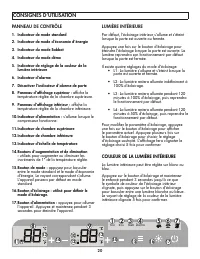
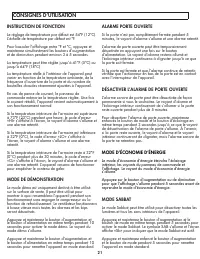
20 CONSIGNES D’UTILISATION LUMIÈRE INTÉRIEURE Par défaut, l’éclairage intérieur s’allume et s’éteint lorsque la porte est ouverte ou fermée. Appuyez une fois sur le bouton d’éclairage pour éteindre l’éclairage lorsque la porte est ouverte. La lumière reprendra son fonctionnement par défaut lorsque l...
Page 22 - INSTRUCTION DE FONCTION
CONSIGNES D’UTILISATION 21 INSTRUCTION DE FONCTION Le réglage de température par défaut est 54°F (12°C). L’échelle de température par défaut est °F. Pour basculer l’affi chage entre °F et °C, appuyez et maintenez simultanément les boutons d’augmentation et de diminution pendant environ 3 à 5 secondes...
Page 23 - INSTRUCTIONS DE STOCKAGE
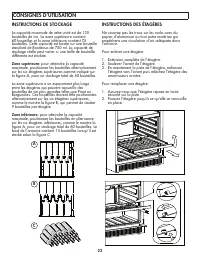
CONSIGNES D’UTILISATION 22 INSTRUCTIONS DE STOCKAGE La capacité maximale de cette unité est de 135 bouteilles de vin. La zone supérieure contient 60 bouteilles et la zone inférieure contient 75 bouteilles. Cette capacité est basée sur une bouteille standard de Bordeaux de 750 ml. La capacité de stoc...
Page 24 - INSTRUCTIONS D’INVERSION DE PORTE
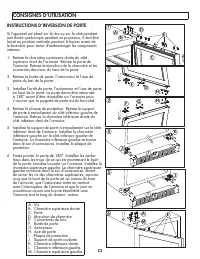
CONSIGNES D’UTILISATION 23 INSTRUCTIONS D’INVERSION DE PORTE Si l’appareil est placé sur le dos ou sur le côté pendant une durée quelconque pendant ce processus, il doit être laissé en position verticale pendant 6 heures avant de le brancher pour éviter d’endommager les composants internes. 1. Retir...
Page 25 - SOINS ET ENTRETIEN; DÉGIVRER; • Courtes
24 SOINS ET ENTRETIEN NETTOYAGE Assurez-vous que l’appareil est débranché avant de nettoyer une partie de l’appareil. • Pour nettoyer l’intérieur de l’appareil, utilisez un chiffon doux et une solution d’une cuillère à soupe de bicarbonate de soude à un quart d’eau ou une solution de savon doux ou u...
Page 26 - DÉPANNAGE; PROBLÈME
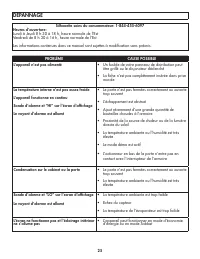
25 DÉPANNAGE Silhouette soins du consommateur: 1-844-455-6097 Heures d’ouverture: Lundi à Jeudi 8 h 30 à 18 h, heure normale de l’Est Vendredi de 8 h 30 à 16 h, heure normale de l’Est Les informations contenues dans ce manuel sont sujettes à modifi cation sans préavis. PROBLÈME CAUSE POSSIBLE L’appar...
Page 27 - GARANTIE LIMITÉE “À DOMICILE”
LIMITED IN-HOME APPLIANCE WARRANTY This quality product is warranted to be free from manufacturer’s defects in material and workmanship, provided that the unit is used under the normal operating conditions intended by the manufacturer.This warranty is available only to the person to whom the unit wa...
Page 28 - Bienvenido; longevidad de su electrodoméstico.
27 Número de modelo: ____________________________________________ Número de serie: ______________________________________________ Fecha de compra: ______________________________________________ Necesitas ayuda? Antes de llamar al servicio, aquí hay algunas cosas que puede hacer para ayudarnos a serv...
Page 29 - No conecte el aparato a los cables de extensión ni; Importantes Instrucciones de Seguridad; LEA Y SIGA TODAS LAS INSTRUCCIONES DE SEGURIDAD; ¡GUARDE ESTAS INSTRUCCIONES!
28 REQUERIMIENTOS DE SEGURIDAD PELIGRO: Riesgo de incendio o explosión. Refrigerante infl amable usado. No perforar la tubería del refrigerante. • No utilice dispositivos mecánicos para descongelar el refrigerador. • Asegúrese de que el personal de mantenimiento autorizado por la fábrica haga el mant...
Page 30 - INSTRUCCIONES DE INSTALACIÓN; UBICACIÓN
29 INSTRUCCIONES DE INSTALACIÓN UBICACIÓN • Se deben utilizar dos personas al mover el aparato. • Retire el embalaje interior y exterior antes de la instalación. Limpie el exterior del aparato con un paño suave y seco y el interior con un paño húmedo tibio. • Coloque el aparato en un piso que sea lo...
Page 31 - PREPARAR EL RECINTO
Acceso eléctrico Acceso eléctrico *Si el enchufe eléctrico está en gabinetes adyacentes 35 pulg(88.9 cm) 2 pulg (5 cm) 6 pulg(15.3 cm) 1.5 pulg (3.8 cm) diámetro 24 pulgadas (61 cm) 90° 28.1 pulgadas(71.3 cm) 30 INSTRUCCIONES DE INSTALACIÓN PREPARAR EL RECINTO Se deben usar guantes y gafas de seguri...
Page 32 - SOPORTE ANTIVUELCO
31 INSTRUCCIONES DE INSTALACIÓN SOPORTE ANTIVUELCO Este aparato puede volcarse cuando los estantes están extendidos, causando daños, lesiones o pérdida de contenido. Si este aparato se utiliza en una aplicación independiente, el soporte antivuelco debe instalarse en ambos lados del gabinete. ACCESOR...
Page 33 - Instalación de paneles de yeso:; reinstale el soporte de manera más segura.
32 INSTRUCCIONES DE INSTALACIÓN Instalación de paneles de yeso: 1. Coloque el soporte en el piso con el orifi cio de montaje B contra la pared. 2. Use dos tornillos para asegurar el soporte a la pared. 3. Asegúrese de que al menos un tornillo esté asegurado a un montante de pared. 4. Coloque la unida...
Page 34 - INSTRUCCIONES DE OPERACIÓN; LUZ INTERIOR; PANEL DE CONTROL
INSTRUCCIONES DE OPERACIÓN 33 LUZ INTERIOR La luz interior se encenderá y apagará por defecto cuando la puerta se abra o se cierre. Presione el botón de luz una vez para apagar la luz mientras la puerta está abierta. La luz reanudará el funcionamiento predeterminado cuando la puerta esté cerrada. Ha...
Page 35 - INSTRUCCIÓN DE LA FUNCIÓN
INSTRUCCIONES DE OPERACIÓN 34 INSTRUCCIÓN DE LA FUNCIÓN La confi guración de temperatura predeterminada es 54°F (12°C). La escala de temperatura predeterminada es °F. Para cambiar la visualización entre °F y °C, presione y mantenga presionados los botones de aumento y disminución simultáneamente dura...
Page 37 - INSTRUCCIONES DE INVERSIÓN DE PUERTA
INSTRUCCIONES DE OPERACIÓN 36 INSTRUCCIONES DE INVERSIÓN DE PUERTA Si el electrodoméstico se coloca sobre su parte posterior o lateral durante un período de tiempo prolongado durante este proceso, se debe permitir que permanezca en posición vertical durante 6 horas antes de enchufarlo para evitar da...
Page 38 - CUIDADO Y MANTENIMIENTO; • Vacaciones
37 CUIDADO Y MANTENIMIENTO LIMPIEZA Asegúrese de que la unidad esté desenchufada antes de limpiar cualquier parte del aparato. • Para limpiar el interior del aparato, utilice un paño suave y una solución de una cucharada de bicarbonato de sodio a un litro de agua o una solución de jabón suave o algú...
Page 39 - SOLUCIÓN SUGERIDA; PROBLEMA
38 SOLUCIÓN SUGERIDA Silhouette cuidado del consumidor: 1-844-455-6097 Horas de operación: Lunes a Jueves 8:30 am - 6:00 pm Hora estándar del este Viernes 8:30 am - 4:00 pm Hora estándar del este La información de este manual está sujeta a cambios sin previo aviso. PROBLEMA POSSIBLE CAUSA No funcion...
Page 40 - GARANTÍA LIMITADA “A DOMICILIO”
LIMITED IN-HOME APPLIANCE WARRANTY This quality product is warranted to be free from manufacturer’s defects in material and workmanship, provided that the unit is used under the normal operating conditions intended by the manufacturer.This warranty is available only to the person to whom the unit wa...
Page 42 - MODEL • MODÈLE • MODELO
MODEL • MODÈLE • MODELO Printed in ChinaImprimé en Chine Impreso en China Danby Products Limited, Guelph, ON, Canada N1H 6Z9 Danby Products Inc., Findlay, Ohio, USA 45840 SPRWC140D1SS