Page 2 - Welcome to the Danby family.; You must keep the original proof
1 Welcome to the Danby family. We are proud of our quality products and we believe in dependable service. We suggest that you read this owner’s manual before plugging in your new appliance as it contains important operation information, safety information, troubleshooting, and maintenance tips to en...
Page 3 - soil or cleaner residue to accumulate on sealing surfaces.
IMPORTANT SAFETY INSTRUCTIONS READ AND FOLLOW ALL SAFETY INSTRUCTIONS SAVE THESE INSTRUCTIONS! PRECAUTIONS TO AVOID POSSIBLE EXPOSURE TO EXCESSIVE MICROWAVE ENERGY 1. Do not attempt to operate this oven with the door open since open-door operation can result in harmful exposure to microwave energy. ...
Page 4 - WARNING; SAVE THESE INSTRUCTIONS!
WARNING - To reduce the risk of burns, electric shock, fi re, injury to persons or exposure to excessive microwave energy: 1. Read all instructions before using the appliance. 2. Read and follow the specifi c “PRECAUTIONS TO AVOID POSSIBLE EXPOSURE TO EXCESSIVE MICROWAVE ENERGY” found on page 2. 3. Th...
Page 5 - To reduce the risk of fi re in the oven cavity:
IMPORTANT SAFETY INSTRUCTIONS READ AND FOLLOW ALL SAFETY INSTRUCTIONS SAVE THESE INSTRUCTIONS! 4 9. To reduce the risk of fi re in the oven cavity: a) Do not overcook food. Carefully attend appliance when paper, plastic, or other combustible materials are placed inside the oven to facilitate cooking....
Page 6 - properly or if it has been damaged or dropped.
IMPORTANT SAFETY INSTRUCTIONS READ AND FOLLOW ALL SAFETY INSTRUCTIONS SAVE THESE INSTRUCTIONS! 5 14. Do not operate this appliance if it has a damaged cord or plug, it if is not working properly or if it has been damaged or dropped. 15. Do not immerse cord or plug in water. Keep cord away from heate...
Page 9 - INSTALLATION; INSTALLATION INSTRUCTIONS
INSTALLATION • Remove all packing materials from the inside and outside of the microwave. Do not remove the cardboard mica sheet covering the magnetron. • Check the microwave for damage before using, such as a misaligned or bent door, damaged door seals, broken or loose door hinges or latches, or de...
Page 11 - COOKING TECHNIQUES; OPERATING INSTRUCTIONS
10 COOKING TECHNIQUES To achieve the best results when cooking in this microwave, follow the suggestions below. STIRRING Stir foods while cooking to distribute heat evenly. Food at the outside of the dish absorbs more energy and will heat more quickly so stir from the outside of the dish toward the ...
Page 12 - COOKING UTENSILS GUIDE
11 COOKING UTENSILS GUIDE Certain utensils are inappropriate for use in a microwave. See below for more information on which utensils are recommended, which should only have limited use and which are not recommended. RECOMMENDED Microwave Browning Dish: Used to brown the exterior of small food items...
Page 13 - FEATURES; Do Not Remove; CONTROL PANEL
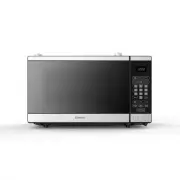
12 OPERATING INSTRUCTIONS FEATURES 1. Door Lock System2. Oven Window3. Roller Ring4. Shaft5. Door Release Button6. Control Panel7. Mica Sheet ( Do Not Remove ) 8. Glass Tray CONTROL PANEL 1. Display: Shows cooking time, power level and clock time. 2. Auto Cook Menus: Instant settings to cook popular...
Page 14 - FIRST TIME USE
13 OPERATING INSTRUCTIONS FIRST TIME USE When the microwave is plugged in for the fi rst time it will beep and the display will show “ENTER CLOCK TIME”. Use the number pad to enter the current time and then press the clock button to confi rm. When setting the cook timer, the microwave will return to s...
Page 15 - TIMER
14 OPERATING INSTRUCTIONS TIMER To set the timer function:1. Press the Timer button. 2. Use the number pad to enter the desired time to run the timer. The maximum time is 99 minutes and 99 seconds. 3. Press the Start/Stop button to begin timer operation. Note: The buzzer will beep at the end of the ...
Page 16 - COOK BY WEIGHT
15 OPERATING INSTRUCTIONS COOK BY WEIGHT 1. Press the Cook by Weight button. 2. Use the number pad to enter the desired food code. 3. Use the number pad to enter the food weight in pounds and ounces. 4. Press the Start/Stop button to confi rm. Food Code Type Maximum Weight 1 Beef 5 lb. 16 oz. 2 Mutto...
Page 17 - CLEANING; CARE AND MAINTENANCE; MAINTENANCE; MICA SHEET
16 CLEANING Turn off and unplug the microwave before performing any cleaning. The inside of the microwave should be cleaned with a warm, damp cloth and mild detergents. Do not allow food splatters to build up on the inside of the microwave as this can affect the effi ciency of the microwave and if su...
Page 18 - TROUBLESHOOTING
PROBLEM POSSIBLE CAUSE No power • A fuse may be blown or the circuit breaker tripped • Plug not fully inserted into the wall outlet Arcing or sparking during operation • Metallic items were left in the appliance during operation • The appliance is being operated while empty • Spilled food has built ...
Page 19 - LIMITED IN-HOME APPLIANCE WARRANTY; LIMITED “CARRY IN” WARRANTY
LIMITED IN-HOME APPLIANCE WARRANTY This quality product is warranted to be free from manufacturer’s defects in material and workmanship, provided that the unit is used under the normal operating conditions intended by the manufacturer.This warranty is available only to the person to whom the unit wa...
Page 20 - Bienvenue dans la famille Danby.; Vous devez
19 Bienvenue dans la famille Danby. Nous sommes fi ers de nos produits de qualité et nous croyons en un service fi able. Nous vous suggérons de lire ce manuel du propriétaire avant de brancher votre nouvel appareil car il contient des informations de fonctionnement importantes, des informations de séc...
Page 21 - du four se ferme correctement et que :; CONSIGNES DE SÉCURITÉ IMPORTANTES
GARDEZ CES INSTRUCTIONS! PRÉCAUTIONS POUR ÉVITER UNE POSSIBLE EXPOSITION À UNE ÉNERGIE MICRO-ONDES EXCESSIVE 1. N’essayez pas de faire fonctionner ce four avec la porte ouverte car le fonctionnement de la porte ouverte peut entraîner une exposition nocive à l’énergie des micro-ondes. Il est importan...
Page 23 - Pour réduire le risque d’incendie dans la cavité du four:
CONSIGNES DE SÉCURITÉ IMPORTANTES LIRE ET SUIVRE TOUTES LES INSTRUCTIONS DE SÉCURITÉ 22 GARDEZ CES INSTRUCTIONS! 9. Pour réduire le risque d’incendie dans la cavité du four: a) Ne pas trop cuire les aliments. Surveillez attentivement l’appareil lorsque du papier, du plastique ou d’autres matériaux c...
Page 24 - récepteur est connecté.
23 GARDEZ CES INSTRUCTIONS! CONSIGNES DE SÉCURITÉ IMPORTANTES LIRE ET SUIVRE TOUTES LES INSTRUCTIONS DE SÉCURITÉ 14. N’utilisez pas cet appareil s’il a un cordon ou une fi che endommagé, s’il ne fonctionne pas correctement ou s’il a été endommagé ou s’il est tombé. 15. Ne plongez pas le cordon ou la ...
Page 26 - SÉCURITÉ - LIQUIDE SURCHAUFFÉ; une accumulation de vapeur.; GARDEZ CES INSTRUCTIONS!
SÉCURITÉ - LIQUIDE SURCHAUFFÉ Les liquides peuvent être surchauffés au-delà du point d’ébullition sans sembler bouillir en raison de la tension superfi cielle du liquide. Des bulles visibles ne seront pas toujours présentes lorsque le liquide est retiré de l’appareil. Cela pourrait entraîner une ébul...
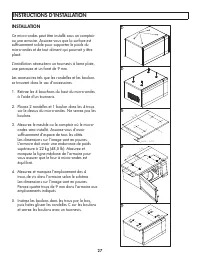
Page 27 - INSTRUCTIONS D’INSTALLATION
26 INSTALLATION • Retirez tous les matériaux d’emballage de l’intérieur et de l’extérieur de l’appareil. Ne retirez pas la feuille de mica en carton couvrant le magnétron. • Vérifi ez si l’appareil est endommagé avant de l’utiliser, comme une porte mal alignée ou pliée, des joints d’étanchéité endomm...
Page 29 - CONSIGNES D’UTILISATION; TECHNIQUES DE CUISSON
CONSIGNES D’UTILISATION TECHNIQUES DE CUISSON Pour obtenir les meilleurs résultats lors de la cuisson dans cet appareil, suivez les suggestions ci-dessous. MÉLANGER Mélanger les aliments pendant la cuisson pour répartir uniformément la chaleur. La nourriture à l’extérieur du plat absorbe plus d’éner...
Page 30 - GUIDE DES USTENSILES DE CUISINE; Récipients en plastique et pots de nourriture
29 CONSIGNES D’UTILISATION GUIDE DES USTENSILES DE CUISINE Certains ustensiles sont inappropriés pour une utilisation dans un micro-ondes. Voir ci-dessous pour plus d’informations sur les ustensiles recommandés, qui ne devraient avoir qu’une utilisation limitée et qui ne sont pas recommandés. RECOMM...
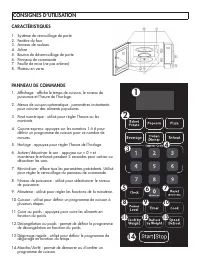
Page 31 - CARACTÉRISTIQUES
CONSIGNES D’UTILISATION 1 2 3 4 5 6 7 8 9 10 11 12 14 13 CARACTÉRISTIQUES 1. Système de verrouillage de porte2. Fenêtre du four3. Anneau de rouleau4. Arbre5. Bouton de déverrouillage de porte6. Panneau de commande7. Feuille de mica (ne pas enlever)8. Plateau en verre PANNEAU DE COMMANDE 1. Affi chage...
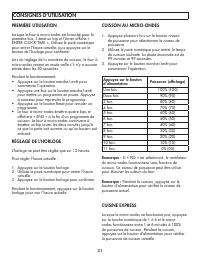
Page 32 - PREMIÈRE UTILISATION
31 CONSIGNES D’UTILISATION PREMIÈRE UTILISATION Lorsque le four à micro-ondes est branché pour la première fois, il émet un bip et l’écran affi che « ENTER CLOCK TIME ». Utilisez le pavé numérique pour entrer l’heure actuelle, puis appuyez sur le bouton de l’horloge pour confi rmer. Lors du réglage de...
Page 33 - MINUTEUR
32 CONSIGNES D’UTILISATION MINUTEUR Pour régler la fonction de minuterie :1. Appuyez sur le bouton minuterie.2. Utilisez le pavé numérique pour entrer l’heure souhaitée pour exécuter la minuterie. La durée maximale est de 99 minutes et 99 secondes. 3. Appuyez sur le bouton marche/arrêt pour lancer l...
Page 34 - CUISINER AU POIDS
33 CONSIGNES D’UTILISATION CUISINER AU POIDS 1. Appuyez sur le bouton cuisson par poids.2. Utilisez le pavé numérique pour entrer le code de l’aliment souhaité. 3. Utilisez le pavé numérique pour entrer le poids des aliments en livres et en onces. 4. Appuyez sur le bouton marche/arrêt pour confi rmer...
Page 35 - NETTOYAGE; ENTRETIEN ET MAINTENANCE; FEUILLE DE MICA
34 NETTOYAGE Éteignez et débranchez le micro-ondes avant d’effectuer tout nettoyage. L’intérieur du micro-ondes doit être nettoyé avec un chiffon chaud et humide et des détergents doux. Ne laissez pas les éclaboussures d’aliments s’accumuler à l’intérieur du micro-ondes car cela peut affecter l’effi ...
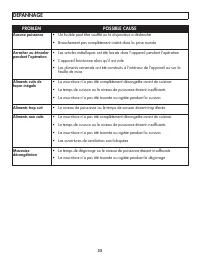
Page 36 - DÉPANNAGE
35 PROBLEM POSSIBLE CAUSE Aucune puissance • Un fusible peut être souffl é ou le disjoncteur a déclenché • Branchement pas complètement inséré dans la prise murale Arracher ou étinceler pendant l’opération • Les articles métalliques ont été laissés dans l’appareil pendant l’opération • L’appareil fon...
Page 37 - GARANTIE LIMITÉE « EN ATELIER »
LIMITED IN-HOME APPLIANCE WARRANTY This quality product is warranted to be free from manufacturer’s defects in material and workmanship, provided that the unit is used under the normal operating conditions intended by the manufacturer.This warranty is available only to the person to whom the unit wa...
Page 38 - Bienvenido a la familia Danby.; Debe conser var el comprobante
37 Bienvenido a la familia Danby. Estamos orgullosos de nuestros productos de calidad y creemos en un servicio confi able. Le sugerimos que lea este manual del propietario antes de enchufar su nuevo electrodoméstico, ya que contiene información importante de funcionamiento, información de seguridad, ...
Page 39 - horno se cierre correctamente y que no haya daños en:; ¡GUARDE ESTAS INSTRUCCIONES!
INSTRUCCIONES DE SEGURIDAD IMPORTANTES LEA Y SIGA TODAS LAS INSTRUCCIONES DE SEGURIDAD PRECAUCIONES PARA EVITAR UNA POSIBLE EXPOSICIÓN A EXCESIVA ENERGÍA DE MICROONDAS 1. No intente operar este horno con la puerta abierta ya que la operación con la puerta abierta puede resultar en una exposición dañ...
Page 41 - Para reducir el riesgo de incendio en la cavidad del horno:
40 ¡GUARDE ESTAS INSTRUCCIONES! INSTRUCCIONES DE SEGURIDAD IMPORTANTES LEA Y SIGA TODAS LAS INSTRUCCIONES DE SEGURIDAD 9. Para reducir el riesgo de incendio en la cavidad del horno: a) No cocine demasiado los alimentos. Preste atención al aparato cuando se coloquen papel, plástico u otros materiales...
Page 42 - correctamente o si se ha dañado o se ha caído.
41 ¡GUARDE ESTAS INSTRUCCIONES! INSTRUCCIONES DE SEGURIDAD IMPORTANTES LEA Y SIGA TODAS LAS INSTRUCCIONES DE SEGURIDAD 14. No utilice este aparato si tiene un cable o enchufe dañado, si no funciona correctamente o si se ha dañado o se ha caído. 15. No sumerja el cable ni el enchufe en agua. Mantenga...
Page 44 - SEGURIDAD - LÍQUIDO SOBRECALENTADO; la acumulación de vapor.
SEGURIDAD - LÍQUIDO SOBRECALENTADO Los líquidos pueden sobrecalentarse más allá del punto de ebullición sin que parezca que están hirviendo debido a la tensión superfi cial del líquido. No siempre habrá burbujas visibles cuando se extraiga el líquido del aparato. Esto puede provocar que los líquidos ...
Page 45 - INSTRUCCIONES DE INSTALACIÓN; INSTALACIÓN
INSTRUCCIONES DE INSTALACIÓN INSTALACIÓN • Retire todos los materiales de embalaje del interior y del exterior del aparato. No retire la hoja de mica de cartón que cubre el magnetrón. • Compruebe si el aparato está dañado antes de usarlo, como una puerta desalineada o doblada, sellos dañados de la p...
Page 46 - INSTRUCCIONES DE OPERACIÓN
45 INSTRUCCIONES DE OPERACIÓN INSTALACIÓN Este microondas se puede instalar debajo de un mostrador o armario. Asegúrese de que la superfi cie sea lo sufi cientemente resistente para soportar el peso del microondas y cualquier alimento que pueda introducirse en él. La instalación requerirá un destornil...
Page 47 - TÉCNICAS DE COCCIÓN
INSTRUCCIONES DE OPERACIÓN 46 TÉCNICAS DE COCCIÓN Para obtener los mejores resultados al cocinar en este aparato, siga las siguientes sugerencias. REVOLVIENDO Revuelva los alimentos mientras cocina para distribuir el calor uniformemente. Alimentos en el exterior de la antena absorbe más energía y se...
Page 48 - GUÍA DE UTENSILIOS DE COCINA
47 INSTRUCCIONES DE OPERACIÓN GUÍA DE UTENSILIOS DE COCINA Ciertos utensilios son inadecuados para su uso en un microondas. Vea a continuación para más información sobre qué utensilios se recomiendan, que sólo deben tener un uso limitado y que no se recomiendan. RECOMENDADO Plato para dorar en el mi...
Page 49 - CARACTERÍSTICAS
INSTRUCCIONES DE OPERACIÓN 1 2 3 4 5 6 7 8 9 10 11 12 14 13 CARACTERÍSTICAS 1. Sistema de cerradura de puerta2. Ventana del horno3. Anillo de rodillo4. Eje5. Botón de apertura de puerta6. Panel de control7. Hoja de mica (no quitar)8. Bandeja de cristal PANEL DE CONTROL 1. Pantalla: muestra el tiempo...
Page 50 - USO POR PRIMERA VEZ
49 INSTRUCCIONES DE OPERACIÓN USO POR PRIMERA VEZ Cuando se enchufa el microondas por primera vez, sonará un pitido y la pantalla mostrará “ENTER CLOCK TIME”. Use el teclado numérico para ingresar la hora actual y luego presione el botón del reloj para confi rmar. Al confi gurar el temporizador de coc...
Page 51 - TEMPORIZADOR
INSTRUCCIONES DE OPERACIÓN TEMPORIZADOR Para confi gurar la función del temporizador:1. Presione el botón temporizador.2. Use el teclado numérico para ingresar el tiempo deseado para ejecutar el temporizador. El tiempo máximo es de 99 minutos y 99 segundos. 3. Presione el botón encendido/apagado para...
Page 52 - COCINAR POR PESO; Type; AUTO COOK; Comida; PROTECCIÓN DE ADHESIÓN DE BOTONES
INSTRUCCIONES DE OPERACIÓN COCINAR POR PESO 1. Presione el botón Cocinar por peso.2. Use el teclado numérico para ingresar el código de comida deseado. 3. Use el teclado numérico para ingresar el peso de los alimentos en libras y onzas. 4. Presione el botón encendido/apagado para confi rmar. Código d...
Page 53 - LIMPIEZA; CUIDADO Y MANTENIMIENTO; MANTENIMIENTO; HOJA MICA
52 LIMPIEZA Apague y desenchufe el microondas antes de realizar cualquier limpieza. El interior del microondas debe limpiarse con un paño húmedo y tibio y detergentes suaves. No permita que se acumulen salpicaduras de alimentos en el interior del microondas, ya que esto puede afectar la efi ciencia d...
Page 54 - SOLUCIÓN SUGERIDA
53 PROBLEM POSSIBLE CAUSE Ninguna energía • Se puede quemar un fusible o disparar el disyuntor • El enchufe no está completamente insertado en la toma de corriente Arco o chispas durante la operación • Se dejaron artículos metálicos en el aparato durante el funcionamiento • El aparato está funcionan...
Page 55 - GARANTÍA LIMITADA “ACARREADO SOLAMENTE”
LIMITED IN-HOME APPLIANCE WARRANTY This quality product is warranted to be free from manufacturer’s defects in material and workmanship, provided that the unit is used under the normal operating conditions intended by the manufacturer.This warranty is available only to the person to whom the unit wa...