Page 11 - Bedienungsanleitung: Allgemeines; Informationen zu dieser Anleitung
11 1 Bedienungsanleitung: Allgemeines Lesen Sie die hier enthaltenen Informationen, damit Sie mit Ihrem Gerät schnell vertraut werden und seine Funktionen in vollem Umfang nutzen können. Ihr Gerät dient Ihnen viele Jahre lang, wenn Sie ihn sachgerecht behandeln und pflegen. Wir wünschen Ihnen viel F...
Page 12 - Haftungsbeschränkung; Sicherheit; Bestimmungsgemäße Verwendung
12 1.3 Haftungsbeschränkung Alle in dieser Anleitung enthaltenen technischen Informationen, Daten und Hinweise für die Installation, Betrieb und Pflege entsprechen dem letzten Stand bei Drucklegung und erfolgen unter Berücksichtigung unserer bisherigen Erfahrungen und Erkenntnisse nach bestem Wissen...
Page 13 - Allgemeine Sicherheitshinweise
13 2.2 Allgemeine Sicherheitshinweise Beachten Sie für einen sicheren Umgang mit dem Gerät die folgenden allgemeinen Sicherheitshinweise: ► Kontrollieren Sie das Gerät vor der Verwendung auf äußere sichtbare Schäden. Nehmen Sie ein beschädigtes Gerät nicht in Betrieb. ► Bei Beschädigung der Anschlus...
Page 14 - ► Defekte Bauteile dürfen nur gegen Original-Ersatzteile; Gefahrenquellen; ► Lagern Sie keine explosiven Substanzen wie
14 ► Defekte Bauteile dürfen nur gegen Original-Ersatzteile ausgetauscht werden. Nur bei diesen Teilen ist gewährleistet, dass sie die Sicherheitsanforderungen erfüllen werden. ► Das Gerät ist nicht zum Räuchern geeignet. ► Das Gerät reguliert die gewünschte Luftfeuchtigkeit aktiv. Im Gerät dürfen k...
Page 15 - Lebensgefahr durch elektrischen Strom!
15 ► Verwenden Sie keine mechanischen Vorrichtungen, um den Abtauvorgang zu beschleunigen. ► Reinigen Sie Gerät und Geräteteile nie mit leicht entzündbaren Flüssigkeiten. Die daraus entstehenden Gase können eine Brandgefahr darstellen oder explodieren. ► Lagern oder verwenden Sie kein Benzin oder an...
Page 16 - Inbetriebnahme; Sicherheitshinweise
16 3 Inbetriebnahme In diesem Kapitel erhalten Sie wichtige Hinweise zur Inbetriebnahme des Gerätes. Beachten Sie die Hinweise um Gefahren und Beschädigungen zu vermeiden. 3.1 Sicherheitshinweise ► Verpackungsmaterialien dürfen nicht zum Spielen verwendet werden. Es besteht Erstickungsgefahr. ► Auf ...
Page 17 - Entsorgung der Verpackung
17 3.4 Entsorgung der Verpackung Die Verpackung schützt das Gerät vor Transportschäden. Die Verpackungsmaterialien sind nach umweltverträglichen und entsorgungstechnischen Gesichtspunkten ausgewählt und deshalb recycelbar. Die Rückführung der Verpackung in den Materialkreislauf spart Rohstoffe und v...
Page 18 - Anschluss
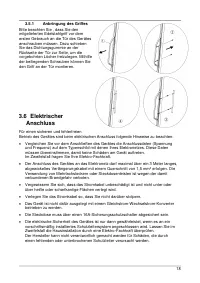
18 3.5.1 Anbringung des Griffes Bitte beachten Sie , dass Sie den mitgelieferten Edelstahlgriff vor dem ersten Gebrauch an die Tür des Gerätes anschrauben müssen. Dazu schieben Sie das Dichtungsgummie an der Rückseite der Tür zur Seite, um die vorgebohrten Löcher freizulegen. Mithilfe der beiliegend...
Page 19 - Aufbau und Funktion; Gesamtübersicht
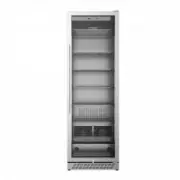
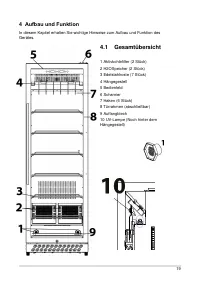
19 4 Aufbau und Funktion In diesem Kapitel erhalten Sie wichtige Hinweise zum Aufbau und Funktion des Gerätes. 4.1 Gesamtübersicht 1 Aktivkohlefilter (2 Stück) 2 H2OSpeicher (2 Stück) 3 Edelstahlroste (7 Stück) 4 Hängegestell 5 Bedienfeld 6 Scharnier 7 Haken (6 Stück) 8 Türrahmen (abschließbar) 9 Au...
Page 20 - Bedienelemente und Betrieb; Bedienelemente und Anzeige
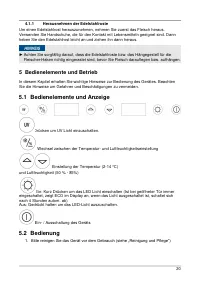
20 4.1.1 Herausnehmen der Edelstahlroste Um einen Edelstahlrost herauszunehmen, nehmen Sie zuerst das Fleisch heraus. Verwenden Sie Handschuhe, die für den Kontakt mit Lebensmitteln geeignet sind. Dann heben Sie den Edelstahlrost leicht an und ziehen ihn dann heraus. ► Achten Sie sorgfältig darauf, ...
Page 22 - Sicherheitshinweise
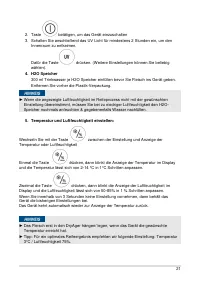
22 ► Tipp: Sie können durch gleichzeitiges Drücken der beiden Tasten und für 3 sec. zwischen der Temperaturanzeige in °C und °F wechseln. 6. LED-Licht- und UV-Licht-Einstellung Drücken Sie , um das LED-Licht einzuschalten, dieses schalten sich automatisch nach 4 Stunden aus. Die Taste drücken, um da...
Page 23 - Reinigung und Pflege
23 ► Die Gefahr beim Dry-Aging ist das Auftreten von sogenanntem „Wildschimmel“. Dieser kann im Gegensatz zum „guten Edelschimmel“ das Fleisch verderben und zu toxischen und allergischen Reaktionen führen. Achten Sie aus diesem Grunde auf eine einwandfreie Hygiene im Umgang mit Gerät und Fleisch und...
Page 24 - Sicherheitshinweise
24 7.1 Sicherheitshinweise Beachten Sie die folgenden Sicherheitshinweise, bevor Sie mit der Reinigung des Gerätes beginnen: ► Reinigen Sie das Gerät gründlich, bevor Sie es in Betrieb nehmen. ► Reinigen Sie das Gerät nach jedem Reife-Prozess gründlich. ► Schalten Sie das Gerät vor dem Reinigen aus ...
Page 25 - Verbrühungsgefahr durch den heißen Topf.
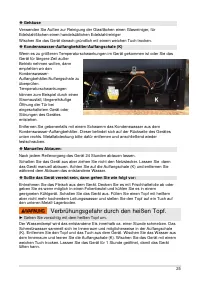
25 ◆ Gehäuse Verwenden Sie Außen zur Reinigung der Glasflächen einen Glasreiniger, für Edelstahlflächen einen handelsüblichen Edelstahlreiniger Wischen Sie das Gerät danach gründlich mit einem weichen Tuch trocken. ◆ Kondenswasser-Auffangbehälter/Auffangschale (K) Wenn es zu größeren Temperaturschwa...
Page 27 - Bewegen Ihres Gerätes; Störungsbehebung; Sicherheitshinweise
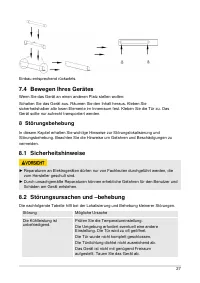
27 Einbau entsprechend rückwärts. 7.4 Bewegen Ihres Gerätes Wenn Sie das Gerät an einen anderen Platz stellen wollen: Schalten Sie das Gerät aus. Räumen Sie den Inhalt heraus. Kleben Sie sicherheitshalber alle losen Elemente im Innenraum fest. Kleben Sie die Tür zu. Das Gerät sollte nur aufrecht tra...
Page 30 - Technische Daten
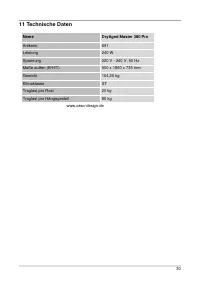
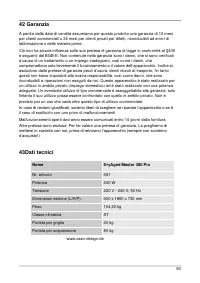
30 11 Technische Daten Name DryAged Master 380 Pro Artikelnr. 691 Leistung 240 W Spannung 220 V - 240 V; 50 Hz Maße außen (B/H/T) 600 x 1860 x 735 mm Gewicht 104,20 kg Klimaklasse ST Traglast pro Rost 20 kg Traglast pro Hängegestell 80 kg www.caso-design.de
Page 32 - Operating Manual; Information on this manual; DANGER; PLEASE NOTE
32 12 Operating Manual 12.1 General Please read the information contained herein so that you can become familiar with your device quickly and take advantage of the full scope of its functions. Your device will serve you for many years if you handle it and care for it properly. We wish you a lot of p...
Page 33 - Safety; WARNING
33 12.4 Limitation of liability All the technical information, data and notices with regard to the installation, operation and care are completely up-to-date at the time of printing and are compiled to the best of our knowledge and belief, taking our past experience and findings into consideration. ...
Page 34 - General Safety information
34 13.2 General Safety information PLEASE NOTE Please observe the following general safety notices with regard to the safe handling of the device. ► Examine the device for any visible external damages prior to using it. Never put a damaged device into operation. ► If the power cable or plug are dama...
Page 36 - ► Do not store or use gasoline or any other flammable vapours; Commissioning; Safety information
36 DANGER ► Do not store or use gasoline or any other flammable vapours and liquids in the vicinity of this or any other appliance. The fumes can create a fire hazard or explosion. 13.3.2 Dangers due to electrical power Mortal danger due to electrical power! Mortal danger exists when coming into con...
Page 37 - Delivery scope and transport inspection; Disposal of the packaging
37 14.2 Delivery scope and transport inspection As a rule, the device is delivered with the following components: • DryAged Master 380 Pro • 7 stainless steel shelves • 2 H2O-reservoir +2 replacement reservoir • holders for the reservoirs with drip tray • Collecting tray • Hanging rack including 6 b...
Page 39 - Electrical connection; Design and Function
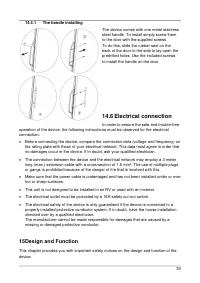
39 14.5.1 The handle installing The device comes with one metal stainless steel handle. To install simply screw them to the door with the supplied screws. To do this, slide the rubber seal on the back of the door to the side to lay open the predrilled holes. Use the included screws to install the ha...
Page 40 - Complete overview
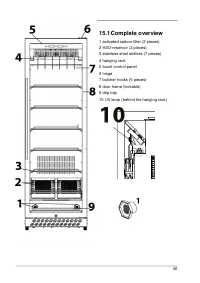
40 15.1 Complete overview 1 activated carbon filter (2 pieces) 2 H2O-reservoir (2 pieces) 3 stainless steel shelves (7 pieces) 4 hanging rack 5 touch control panel 6 hinge 7 butcher hooks (6 pieces) 8 door frame (lockable) 9 drip tray 10 UV lamp (behind the hanging rack)
Page 41 - Operation and Handing; Operating elements and displays
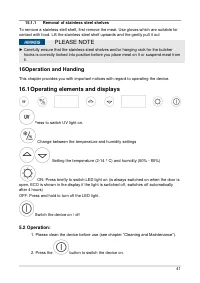
41 15.1.1 Removal of stainless steel shelves To remove a stainless stell shelf, first remove the meat. Use gloves which are suitable for contact with food. Lift the stainless steel shelf upwards and the gently pull it out PLEASE NOTE ► Carefully ensure that the stainless steel shelves and/or hanging...
Page 42 - Please note
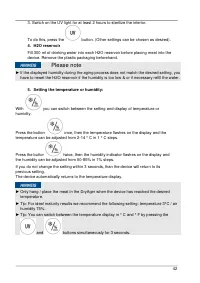
42 3. Switch on the UV light for at least 2 hours to sterilize the interior. To do this, press the button. (Other settings can be chosen as desired). 4. H2O reservoir Fill 300 ml of drinking water into each H2O reservoir before placing meat into the device. Remove the plastic packaging beforehand. P...
Page 43 - Dry ageing; Safety information; Danger
43 6. LED light and UV light setting Press , to switch on the LED light, this switches off automatically after 4 hours. Press to switch the UV light on. Please note ► The door has a safety switch. When you open the door of the device, the UV light switches off automatically. When you close the door,...
Page 44 - Information about dry ageing; Cleaning and Maintenance; Safety information; Attention
44 17.2 Exemption from liability: The manufacturer will not assume any liability for damage to refrigerated products, not even in the event of a fault in the equipment during the guarantee period. The manufacturer will also not accept liability for injury to individuals resulting from improperly sto...
Page 46 - Warning: Risk of scalding due to the hot pot.
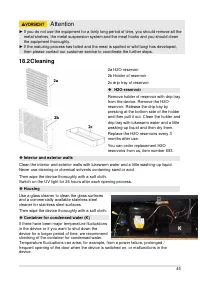
46 If necessary remove the condensed water with a sponge from the container for condensed water. The container is located on the back side of the device at the right bottom. Please remove the metal cover and then screw it back on. ◆ Manual defrosting Defrost the device after each ageing process. Tur...
Page 47 - Changing the UV lamp
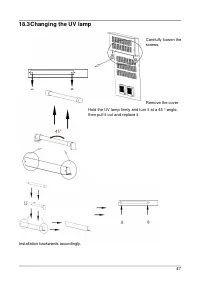
47 18.3 Changing the UV lamp Carefully loosen the screws. Remove the cover Hold the UV lamp firmly and turn it at a 45 ° angle, then pull it out and replace it. Installation backwards accordingly.
Page 48 - Moving the appliance; Troubleshooting; Fault indications and rectification of faults
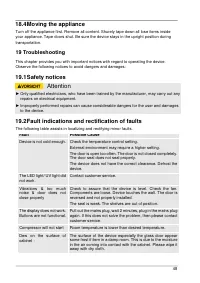
48 18.4 Moving the appliance Turn off the appliance first. Remove all content. Shurely tape down all lose items inside your appliance. Tape doors shut. Be sure the device stays in the upright position during transportation. 19 Troubleshooting This chapter provides you with important notices with reg...
Page 49 - Disposal of the Old Device
49 Liquid sound 1 The sound of compressor when starts or stops working 2 The flowing sound of refrigerant in the refrigeration system 3 The evaporating sound of refrigerant in the evaporator Condensation formed inside the cabinet Under the environment with high level of humidity or the door of devic...
Page 50 - Guarantee
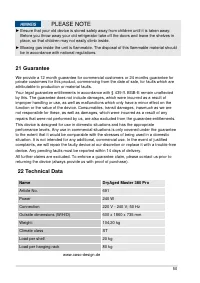
50 PLEASE NOTE ► Ensure that your old device is stored safely away from children until it is taken away: Before you throw away your old refrigerator take off the doors and leave the shelves in place, so that children may not easily climb inside. ► Blowing gas inside the unit is flammable. The dispos...
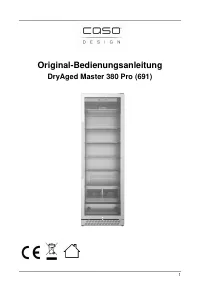
Page 51 - Mode d'emploi original
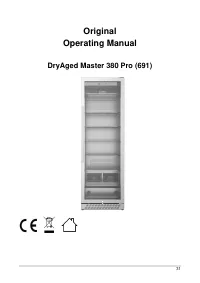
51 Mode d'emploi original DryAged Master 380 Pro (691)
Page 52 - Mode d ́emploi : Généralités; Informations relatives à ce manuel; Remarque
52 23 Mode d´emploi : Généralités Veuillez lire les indications de ce manuel afin de vous familiariser rapidement avec l'appareil et afin de pouvoir utiliser l'ensemble de ses fonctions. Votre appareil vous sera fidèle de nombreuses années si vous l'utilisez et l'entretenez conformément. Nous vous s...
Page 53 - Sécurité; Utilisation conforme
53 23.3 Limite de responsabilités Tous les renseignements techniques, données et instructions d'installation, de fonctionnement et d'entretien contenus dans ce manuel sont parfaitement actuels au moment de la publication et tiennent compte de notre expérience réalisée jusqu'ici et de nos connaissanc...
Page 54 - Consignes de sécurités générales
54 24.2 Consignes de sécurités générales Remarque Pour une utilisation en toute sécurité de l'appareil veuillez observer les consignes générales de sécurités suivantes : ► Avant son utilisation s'assurer qu'il ne comporte pas de défauts visuels. Ne jamais mettre en marche un appareil détérioré. ► Si...
Page 55 - Sources de danger; Pour éviter
55 Remarque ► Les pièces défectueuses doivent être remplacées uniquement par des rechanges d'origine. Ces pièces sont seules capables de répondre aux exigences de sécurité. ► L’appareil régule activement l’humidité de l’air souhaitée. Il ne faut pas introduire des blocs de sel dans l’appareil pour r...
Page 56 - ► Ne nettoyez pas l’appareil ni ses pièces avec des liquides; Danger de mort par électrocution !
56 Danger ► Ne nettoyez pas l’appareil ni ses pièces avec des liquides inflammables. Les gaz qu’ils dégagent peuvent provoquer un incendie ou exploser. ► Ne stockez pas et n’utilisez pas d’essence ou autres liquides risquant de s’enflammer à proximité de cet appareil ou d’autres. Les gaz peuvent pro...
Page 57 - Mise en service; Consignes de sécurité; Inventaire et contrôle de transport
57 25 Mise en service Ce chapitre est consacré à des indications importantes concernant la mise en service de l'appareil. Observez les indications pour éviter les dangers et les détériorations. 25.1 Consignes de sécurité Attention ► Ne pas utiliser les matériaux d'emballage pour jouer. Danger d'étou...
Page 58 - Elimination des emballages
58 25.4 Elimination des emballages L'emballage protège l'appareil contre les dégâts de transport. Les matériaux d'emballage ont été choisis selon des critères environnementaux et de techniques d'élimination, c'est pourquoi ils sont recyclables. Le retour des emballages dans le circuit des matières é...
Page 59 - électrique
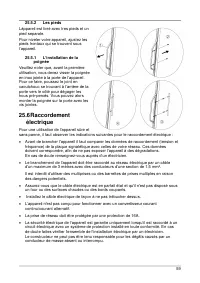
59 25.5.2 Les pieds Láppareil est livré avec tres pieds et un pied separate. Pour niveler votre appareil, ajustez les pieds frontaux qui se trouvent sous l’appareil. 25.5.1 L’installation de la poignée Veuillez noter que, avant la première utilisation, vous devez visser la poignée en inox jointe à l...
Page 60 - Structure et fonctionnement
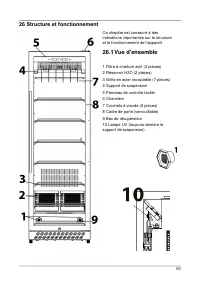
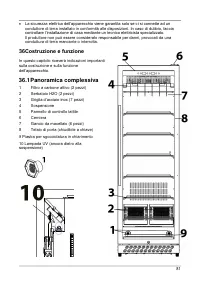
60 26 Structure et fonctionnement Ce chapitre est consacré à des indications importantes sur la structure et le fonctionnement de l'appareil. 26.1 Vue d'ensemble 1 Filtre à charbon actif (2 pièces) 2 Réservoir H2O (2 pièces) 3 Grille en acier inoxydable (7 pièces) 4 Support de suspension 5 Panneau d...
Page 61 - REMARQUE; Commande et fonctionnement
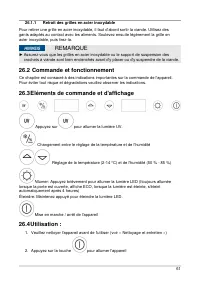
61 26.1.1 Retrait des grilles en acier inoxydable Pour retirer une grille en acier inoxydable, il faut d'abord sortir la viande. Utilisez des gants adaptés au contact avec les aliments. Soulevez ensuite légèrement la grille en acier inoxydable, puis tirez-la. REMARQUE ► Assurez-vous que les grilles ...
Page 63 - Plaque signalétique
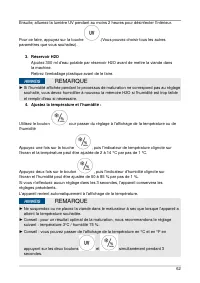
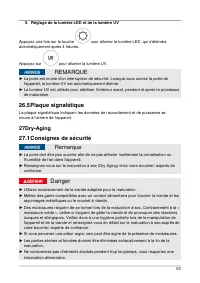
63 5. Réglage de la lumière LED et de la lumière UV Appuyez une fois sur la touche pour allumer la lumière LED, qui s'éteindra automatiquement après 4 heures. Appuyez sur pour allumer la lumière UV. REMARQUE ► La porte est munie d'un interrupteur de sécurité. Lorsque vous ouvrez la porte de l'appare...
Page 64 - Informations concernant la maturation à sec; Nettoyage et entretien; Consignes de sécurité; Prudence
64 27.2 Exclusion de responsabilité : Le fabricant décline toute responsabilité pour les dommages subis par les produits stockés, même en cas de défaut de l'appareil pendant la période de garantie. Le fabricant décline également toute responsabilité pour les dommages aux personnes dus à un stockage ...
Page 66 - Attention: Danger d'ébouillantement avec la
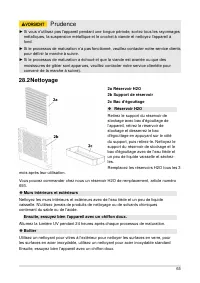
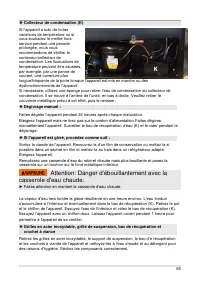
66 ◆ Collecteur de condensation (K) Si l'appareil a subi de fortes variations de température ou si vous souhaitez le mettre hors service pendant une période prolongée, nous vous recommandons de vérifier le conteneur/collecteur de condensation. Les fluctuations de température peuvent être causées, pa...
Page 67 - Changer la lampe UV
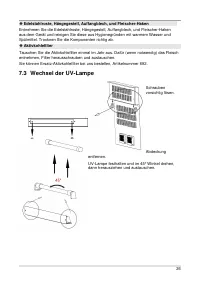
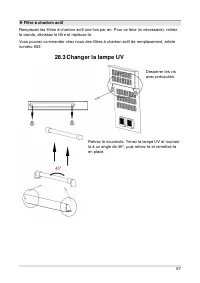
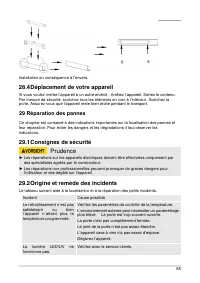
67 ◆ Filtre à charbon actif Remplacez les filtres à charbon actif une fois par an. Pour ce faire (si nécessaire), retirez la viande, dévissez le filtre et replacez-le. Vous pouvez commander chez nous des filtres à charbon actif de remplacement, article numéro 692. 28.3 Changer la lampe UV Desserrer ...
Page 68 - Déplacement de votre appareil; Réparation des pannes; Consignes de sécurité; Origine et remède des incidents
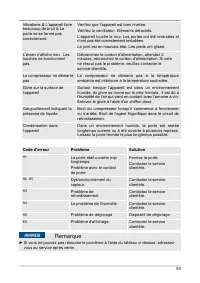
68 Installation en conséquence à l'envers. 28.4 Déplacement de votre appareil Si vous voulez met tre l’appareil à un autre endroit : Arrêtez l’appareil. Sortez le contenu. Par mesure de sécurité, scotchez tous les éléments en vrac à l'intérieur. Scotchez la porte. Assurez- vous que l’appareil reste ...
Page 70 - Elimination des appareils usés; Garantie
70 Remarque ► Nettoyez les grilles en acier inoxydable, bac de récupération et crochets à viande avec du désinfectant et éliminez tous les restes alimentaires dans l'appareil avant de l'expédier. 30 Elimination des appareils usés Les appareils électriques et électroniques contiennent de nombreux mat...
Page 71 - Caractéristiques techniques
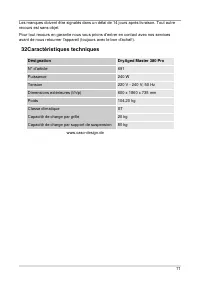
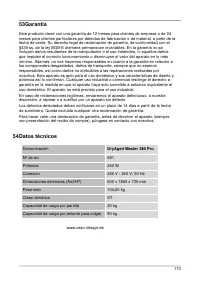
71 Les manques doivent être signalés dans un délai de 14 jours après livraison. Tout autre recours est sans objet. Pour tout recours en garantie nous vous prions d'entrer en contact avec nos services avant de nous retourner l'appareil (toujours avec le bon d'achat!). 32 Caractéristiques techniques D...
Page 73 - Istruzioni d ́uso; Informazioni su queste istruzioni d’uso; Pericolo
73 33 Istruzioni d´uso 33.1 In generale Legga le informazioni qui contenute, affinché acquisti rapidamente familiarità con il suo apparecchio e affinché possa utilizzare appieno le sue funzioni. Il Suo l´apparecchio Le renderà un buon servizio per molti anni, se lo tratterà e lo curerà in modo adegu...
Page 74 - Indicazione; Limitazione della responsabilità; Sicurezza; Utilizzo conforme alle disposizioni
74 Indicazione Un indicazione contrassegna inoltre delle informazioni, che facilitano l’utilizzo della macchina. 33.4 Limitazione della responsabilità Tutte le informazioni tecniche, tutti i dati e le indicazioni per l’installazione, il funzionamento e la cura, contenute in queste istruzioni d’uso, ...
Page 75 - Avviso; Indicazioni generali di sicurezza
75 Avviso Pericolo per un utilizzo non conforme alle disposizioni! Dall’apparecchio possono derivare pericoli, nel caso di un utilizzo non conforme alle disposizioni e/o nel caso di un utilizzo differente. ► Utilizzare l’apparecchio esclusivamente in conformità alle disposizioni. ► Rispettare le pro...
Page 76 - Fonti di pericolo
76 Indicazione ► L’apparecchio non è un frigorifero. Non conservare nell’apparecchio nessun genere alimentare che quello indicato al capitolo „Impiego conforme alla destinazione“. ► Una riparazione dell’apparecchio dovrà essere effettuata soltanto da un servizio Clienti autorizzato dal produttore, a...
Page 77 - Pericolo dovuto a corrente elettrica; Pericolo di vita dovuto a corrente elettrica!
77 Pericolo ► Non conservare sostanze esplosive, come bombolette spray con propellenti infiammabili in questa unità. ► Il propellente all'interno dell'unità è combustibile. ► Non danneggiare il circuito di raffreddamento. ► Non utilizzare nessun apparecchio elettrico all interno dell apparecchio. ► ...
Page 78 - ► Non mettere in funzione l'apparecchio quando il cavo; Messa in funzione; Indicazioni di sicurezza; Insieme della fornitura ed ispezione trasporto
78 Pericolo ► Non mettere in funzione l'apparecchio quando il cavo elettrico o la spina sono danneggiati, se non funziona correttamente oppure è stato fatto cadere o è danneggiato. Nel caso il cavo elettrico o la spina sono stati danneggiati, questi vanno sostituiti solo dal fabbricante oppure dal s...
Page 79 - Smaltimento dell’involucro
79 35.3 Disimballaggio P er il disimballaggio dell’apparecchio, proceda come segue: • Estragga l’apparecchio dal cartone e tolga il materiale d'imballaggio. • Assicurarsi che l ’apparecchio sia in posizione dritta durante il trasporto. • Pulire l’interno con acqua tiepida e un panno morbido. • Colle...
Page 80 - Connessione elettrica
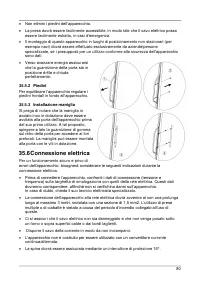
80 • Non elimini i piedini dell’apparecchio. • La presa dovrà essere facilmente accessibile, in modo tale che il cavo elettrico possa essere facilmente estratto, in casi d'emergenza. • Il montaggio di questo apparecchio in luoghi di posizionamento non stazionari (per esempio navi) dovrà essere effet...
Page 81 - Costruzione e funzione; Panoramica complessiva
81 • La sicurezza elettrica dell’apparecchio viene garantita solo se ci si connette ad un conduttore di terra installato in conformità alle disposizioni. In caso di dubbio, faccia controllare l’installazione di casa mediante un tecnico elettricista specializzato. Il produttore non può essere conside...
Page 82 - Utilizzo e funzionamento; Comandi e display
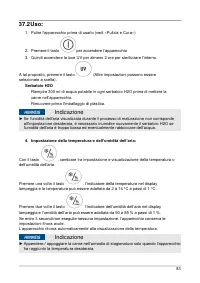
82 36.1.1 Estrazione delle griglie d’acciaio inox Per estrarre una g riglia d’acciaio inox, togliere dapprima la carne. Utilizzare dei guanti adatti al contatto con generi alimentari. Poi alzare leggermente la griglia d’acciaio inox ed estrarla. Indicazione ► Prima di metterci sopra ovvero appendere...
Page 84 - Targhetta di omologazione
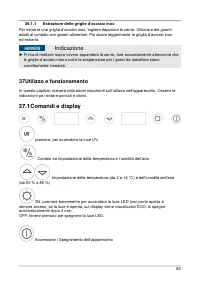
84 Indicazione ► Consiglio: Per ottenere un risultato di stagionatura ottimale consigliamo l’impostazione seguente: temperatura 3 °C / umidità dell’aria 75 %. ► Consiglio: Premendo contemporaneamente i due tasti e per 3 secondi potete cambiare tra la visualizzazione della temperatura in °C e °F. 5. ...
Page 85 - Esclusione dalla responsabilità; Pulizia e cura
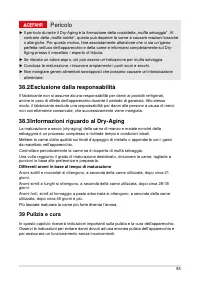
85 Pericolo ► Il pericolo durante il Dry-Aging è la formazione della cosiddetta „muffa selvaggia“. Al contrario della „muffa nobile“, questa può deperire la carne e causare reazioni tossiche o allergiche. Per questo motivo, fare assolutamente attenzione che vi sia un’igiene perfetta nell’uso dell’ap...
Page 86 - Indicazioni di sicurezza; Attenzione
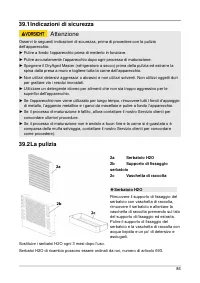
86 39.1 Indicazioni di sicurezza Attenzione Osservi le seguenti indicazioni di sicurezza, prima di procedere con la pulizia dell’apparecchio: ► Pulire a fondo l’apparecchio prima di metterlo in funzione. ► Pulire accuratamente l’apparecchio dopo ogni processo di maturazione. ► Spegnere il DryAged Ma...
Page 87 - Avviso: Pericolo di scottatura dalla pentola
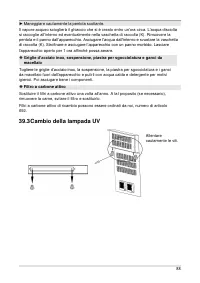
87 ◆ Vano interno e pareti esterne Pulire il vano interno e le pareti esterne con acqua tiepida e un po' di detersivo. In nessun caso utilizzare detergenti o solventi chimici contenenti sabbia o acido. Asciugare poi accuratamente l’apparecchio con un panno morbido. Accendere la luce UV per 24 ore do...
Page 88 - Cambio della lampada UV
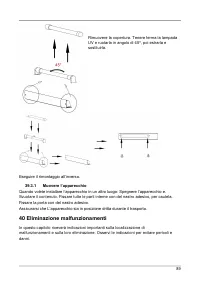
88 ► Maneggiare cautamente la pentola scottante. Il vapore acqueo scioglierà il ghiaccio che si è creato entro un'ora circa. L'acqua disciolta si raccoglie all'interno ed eventualmente nella vaschetta di raccolta (K). Rimuovere la pentola e il panno dall’apparecchio. Asciugare l'acqua dall'interno e...
Page 89 - Eliminazione malfunzionamenti
89 Rimuovere la copertura. Tenere ferma la lampada UV e ruotarla in angolo di 45°, poi estrarla e sostituirla. Eseguire il rimontaggio all’inverso. 39.3.1 Muovere l’apparecchio Quando volete installare l’apparecchio in un altro luogo: Spegnere l’apparecchio e. Svuotare il contenuto. Fissare tutte le...
Page 90 - Indicazioni di sicurezza; Cause malfunzionamenti e risoluzione
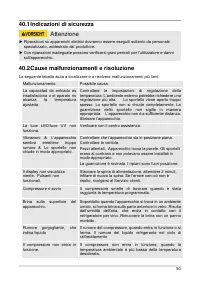
90 40.1 Indicazioni di sicurezza Attenzione ► Riparazioni su apparecchi elettrici dovranno essere eseguiti soltanto da personale specializzato, addestrato dal produttore. ► Con riparazioni inadeguate possono verificarsi gravi pericoli per l’utilizzatore e danni sull’apparecchio. 40.2 Cause malfunzio...
Page 91 - Smaltimento dell’apparecchio obsoleto
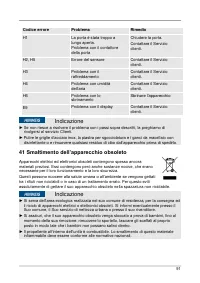
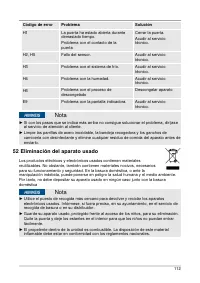
91 Codice errore Problema Rimedio H1 La porta è stata troppo a lungo aperta. Problema con il contattore della porta Chiudere la porta. Contattare il Servizio clienti. H2, H5 Errore del sensore Contattare il Servizio clienti. H3 Problema con il raffreddamento Contattare il Servizio clienti. H4 Proble...
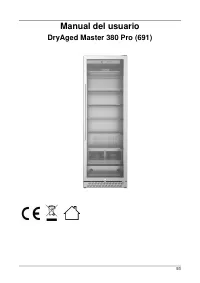
Page 93 - Manual del usuario
Page 94 - Información acerca de este manual; Peligro; Advertencia; Nota
94 44 Manual del usuario 44.1 Generalidades Lea atentamente la información contenida en este manual para familiarizarse rápidamente con el aparato y poder utilizar sus funciones en toda su capacidad. Su DryAged Master 380 le servirá durante muchos años si lo trata y conserva adecuadamente. Le deseam...
Page 95 - Limitación de responsabilidad; Seguridad
95 44.4 Limitación de responsabilidad La información técnica contenida, datos e indicaciones contenidos en el presente manual para la instalación, operación y conservación se corresponden con los últimos avances técnicos en el momento de la impresión y se publican teniendo en cuenta nuestra experien...
Page 96 - Instrucciones generales de seguridad
96 45.2 Instrucciones generales de seguridad Nota Para una manipulación segura del aparato, observe las siguientes instrucciones generales de seguridad: ► Antes de utilizar el aparato debe revisarlo para detectar posibles daños. Si el aparato presenta daños, no lo ponga en marcha. ► Si el cable de a...
Page 98 - Peligro de muerte por electrocución; Tener en cuenta las precauciones; Puesta en marcha; Instrucciones de seguridad
98 Peligro ► No almacene gasolina ni cualquier otro gas o fluido inflamable cerca de éste u otro aparato(s). Los vapores constituyen peligro de incendio o explosión. 45.3.2 Peligro de electrocución Peligro Peligro de muerte por electrocución El contacto con cables o componentes energizados implica p...
Page 99 - Ámbito de suministro e inspección de transporte; Eliminación del embalaje
99 46.2 Ámbito de suministro e inspección de transporte El DryAged Master 380 Pro incluye los siguientes componentes de fábrica • DryAged Master 380 Pro • 7 parrillas de acero inoxidable • 2 acumuladores H2O + 2 acumuladores de repuesto • soportes de acumulador con bandeja de goteo • Bandeja recoged...
Page 101 - Conexión eléctrica; Estructura y funciones
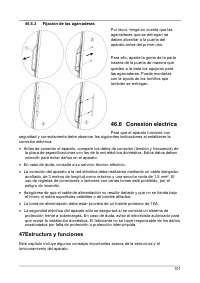
101 46.5.3 Fijación de las agarraderas Por favor, tenga en cuenta que las agarraderas que se entregan se deben atornillar a la puerta del aparato antes del primer uso. Para ello, aparte la goma de la parte trasera de la puerta de manera que queden a la vista los agujeros para las agarraderas. Puede ...
Page 102 - Descripción general
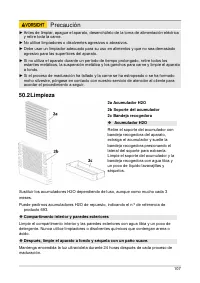
102 47.1 Descripción general 1 Filtro de carbón activo (2 unidades) 2 Acumulador H2O (2 unidades) 3 Parrilla de acero inoxidable (7 unidades) 4 Bastidor para colgar 5 Panel táctil 6 Bisagra 7 Ganchos para carne (6 unidades) 8 Marco de puerta (con posibilidad de cierre) 9 Bandeja recogedora 10 Lámpar...
Page 103 - Operación y funcionamiento
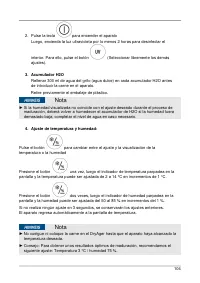
103 47.1.1 Extracción de la parrilla de acero inoxidable Para quitar una rejilla de acero inoxidable, primero saque la carne. Usar guantes que sean adecuados para el contacto con la comida. A continuación, levante la rejilla de acero inoxidable ligeramente y luego tire de ella. Nota ► Asegúrese de q...
Page 105 - Placa de especificaciones; Maduración; Instrucciones de seguridad
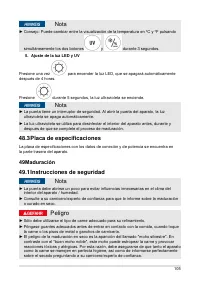
105 Nota ► Consejo: Puede cambiar entre la visualización de la temperatura en °C y °F pulsando simultáneamente los dos botones y durante 3 segundos. 5. Ajuste de la luz LED y UV Presione una vez para encender la luz LED, que se apagará automáticamente después de 4 horas. Presione durante 5 segundos,...
Page 106 - Información sobre el curado; Limpieza y conservación; Instrucciones de seguridad; Precaución
106 Peligro ► Si nota un olor ácido, esto podría ser una indicación de moho salvaje. ► Después de que el proceso de maduración se haya completado, las áreas oscuras y secas deben ser retiradas generosamente. ► No consuma ningún alimento superpuesto, pueden conducir a una intoxicación alimentaria. 49...
Page 108 - Peligro de escaldamiento por la olla caliente.
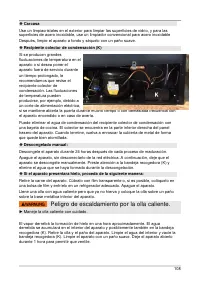
108 ◆ Carcasa Use un limpiacristales en el exterior para limpiar las superficies de vidrio, y para las superficies de acero inoxidable, use un limpiador convencional para acero inoxidable Después, limpie el aparato a fondo y séquelo con un paño suave. ◆ Recipiente colector de condensación (K) Si se ...
Page 109 - Sustitución de la bombilla de la lámpara
109 ◆ Parrilla de acero inoxidable, bastidor para colgar, bandeja recogedora y ganchos de carnicería. Retire la parrilla de acero inoxidable, el bastidor de colgar, la bandeja recogedora y los ganchos de carnicería del aparato y límpielos con agua caliente y lavavajillas por razones de higiene. Sequ...
Page 110 - Transporte del aparato; Resolución de fallas
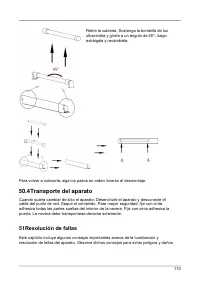
110 Retire la cubierta. Sostenga la bombilla de luz ultravioleta y gírela a un ángulo de 45°, luego extráigala y recámbiela. Para volver a colocarla, siga los pasos en orden inverso al desmontaje. 50.4 Transporte del aparato Cuando quiera cambiar de sitio el aparato: Desenchufe el aparato y desconec...
Page 111 - Instrucciones de seguridad; Indicaciones de avería
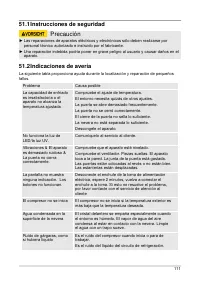
111 51.1 Instrucciones de seguridad Precaución ► Las reparaciones de aparatos eléctricos y electrónicos sólo deben realizarse por personal técnico autorizado e instruido por el fabricante. ► Una reparación indebida podría poner en grave peligro al usuario y causar daños en el aparato. 51.2 Indicacio...
Page 112 - Eliminación del aparato usado
112 Código de error Problema Solución H1 La puerta ha estado abierta durante demasiado tiempo. Problema con el contacto de la puerta Cerrar la puerta. Acudir al servicio técnico. H2, H5 Fallo del sensor. Acudir al servicio técnico. H3 Problema con el sistema de frío. Acudir al servicio técnico. H4 P...
Page 115 - Gebruiksaanwijzing; Informatie over deze gebruiksaanwijzing; GEVAAR; TIP
115 55 Gebruiksaanwijzing 55.1 Algemeen Lees de hier vermelde informatie, zodat u snel vertrouwd raakt met uw apparaat en al zijn functies in volle omvang kunt gebruiken. U heeft jaren lang plezier van uw DryAged Master 380 Pro als u hem vakkundig behandelt en onderhoudt. Wij wensen u veel plezier m...
Page 116 - Aansprakelijkheid; Veiligheid; Gebruik volgens de voorschriften; WAARSCHUWING
116 55.4 Aansprakelijkheid Alle in deze gebruiksaanwijzing aanwezige technische informatie, gegevens en instructies voor installatie, ingebruikname en onderhoud beantwoorden aan de laatste stand bij het in druk gaan en vinden plaats met inachtneming van onze tot nu toe opgedane ervaringen en kennis ...
Page 117 - Algemene veiligheidsinstructies
117 56.2 Algemene veiligheidsinstructies TIP Houdt u zich voor een veilige omgang met het apparaat aan de volgende algemene veiligheidsinstructies: ► Controleer het apparaat voor de ingebruikname op aan de buitenkant zichtbare schaden. Neem een beschadigd apparaat niet in gebruik. ► Indien de aanslu...
Page 118 - materialen / Explosiegevaar; Het drijfgas in het apparaat is brandbaar.
118 TIP ► Het apparaaat is geen koelkast. Beweer geen andere levensmiddelen in het apparaat dan onder „bedoeld gebruik“ vermeld. ► Het apparaat is niet geschikt voor roken. ► Het apparaat reguleert de gewenste luchtvochtigheid actief. In het apparaat mogen geen blokken zout voor regeling van de luch...
Page 119 - Gebruik geen elektrische apparaten in het toestel.; Levensgevaar door elektrische stroom!; Ingebruikname
119 GEVAAR ► Bewaar of gebruik geen benzine of andere vuurgevaarlijke gassen en vloeistoffen in de buurt van dit apparaat of andere apparaten. De gassen kunnen brandgevaar opleveren of ontploffen. ► Gebruik geen mechanische inrichtingen om het ontdooien te versnellen. ► Gebruik geen elektrische appa...
Page 120 - Veiligheidsvoorschriften; Leveringsomvang en transportinspectie
120 57.1 Veiligheidsvoorschriften WAARSCHUWING ► Verpakkingsmateriaal mag niet als speelgoed gebruikt worden. Er bestaat kans op verstikking. ► Vanwege het hoge gewicht van het apparaat het transport als ook het uitpakken en plaatsen met twee personen uitvoeren. 57.2 Leveringsomvang en transportinsp...
Page 121 - Verwijderen van de verpakking
121 57.4 Verwijderen van de verpakking De verpakking beschermt het apparaat tegen transportschade. De verpakkingsmaterialen zijn uitgezocht vanuit milieuvriendelijke en verwijderingtechnische gezichtspunten en daarom recyclebaar. Het terugbrengen van de verpakking in de materiaalkringloop bespaart g...
Page 122 - Elektrische aansluiting
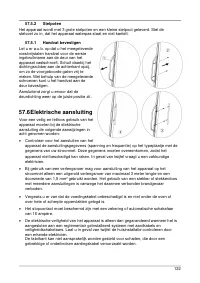
122 57.5.2 Stelpoten Het apparaat wordt met 3 grote stelpoten en een kleine stelpoot geleverd. Stel de stelvoet zo in, dat het apparaat waterpas staat en niet kantelt. 57.5.1 Handvat bevestigen Let u er a.u.b. op dat u het meegeleverde roestvrijstalen handvat voor de eerste ingebruikname aan de deur...
Page 123 - Opbouw en functie; Algemeen overzicht
123 58 Opbouw en functie In dit hoofdstuk krijgt u belangrijke aanwijzingen m.b.t. de opbouw en het functioneren van het apparaat. 58.1 Algemeen overzicht 1 Actief koolfilter (2 stuks) 2 H2O-opslagtank (2 stuks) 3 Roestvrijstalen roosters (7 stuks) 4 Ophanging 5 Touch bedieningsveld 6 Scharnier 7 Vl...
Page 124 - Bediening en gebruik
124 58.1.1 Verwijderen van het roestvrijstalen rooster Om een roestvrijstalen rooster te verwijderen, haalt u eerst het vlees eruit. Gebruik handschoenen die geschikt zijn voor werken met voedsel. Til vervolgens het roestvrijstalen rooster een beetje op en trek het er dan uit. TIP ► Zorg ervoor dat ...
Page 126 - Veiligheidstips; Tip
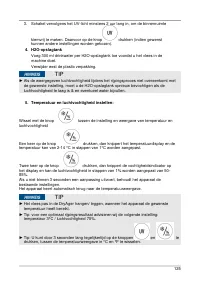
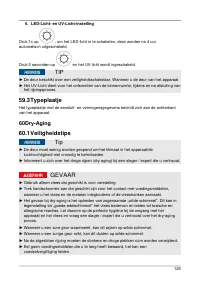
126 6. LED-Licht- en UV-Licht-instelling Druk 1x op , om het LED-licht in te schakelen, deze worden na 4 uur automatisch uitgeschakeld. Druk 5 seconden op en het UV-licht wordt ingeschakeld. TIP ► De deur beschikt over een veiligheidsschakelaar. Wanneer u de deur van het apparaat ► Het UV-Licht dien...
Page 127 - Reiniging en onderhoud; Veiligheidsvoorschriften; VOORZICHTIG
127 60.2 Afwijzing van aansprakelijkheid: De producent is niet aansprakelijk voor schade aan het gekoelde product, ook niet bij defecte van het apparaat binnen de garantieperiode. De fabrikant is ook niet aansprakelijk voor persoonlijk letsel, door incorrect bewaard voedsel dat wordt geconsumeerd. 6...
Page 129 - Verbrandingsgevaar door de hete pan
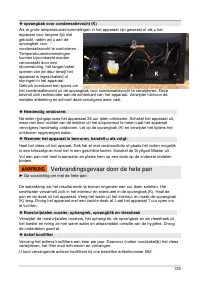
129 ◆ opvangbak voor condensatievocht (K) Als er grote temperatuurschommelingen in het apparaat zijn geweest of als u het apparaat voor langere tijd niet gebruikt, raden wij u aan de opvangbak voor condensatievocht te controleren. Temperatuurschommelingen kunnen bijvoorbeeld worden veroorzaakt door ...
Page 131 - Bewegen van het apparaat; Storingen verhelpen; Veiligheidsvoorschriften; Oorzaken van de storingen en het verhelpen
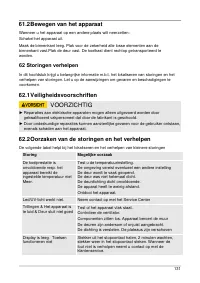
131 61.2 Bewegen van het apparaat Wanneer u het apparaat op een andere plaats wilt neerzetten: Schakel het apparaat uit. Maak de binnenkant leeg. Plak voor de zekerheid alle losse elementen aan de binnenkant vast.Plak de deur vast. De koelkast dient rechtop getransporteerd te worden. 62 Storingen ve...
Page 132 - Afvoer van het oude apparaat
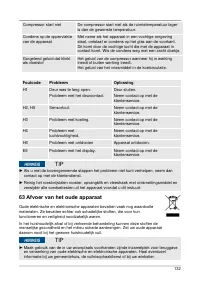
132 Compressor start niet De compressor start niet als de ruimtetemperatuur lager is dan de gewenste temperatuur. Condens op de oppervlakte van de apparaat Met name als het apparaat in een vochtige omgeving staat, ontstaat er condens op het glas aan de voorkant. Dit komt door de vochtige lucht die m...
Page 134 - Инструкция по эксплуатации; Холодильник для сухого вызревания мяса
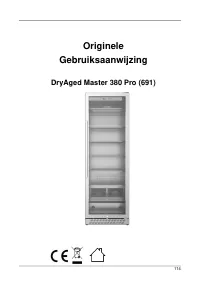
134 Инструкция по эксплуатации DryAged Master 380 Pro (691) Холодильник для сухого вызревания мяса
Page 135 - Общая информация; ОПАСНОСТЬ
135 66 Инструкция по эксплуатации 66.1 Общая информация Прочитайте содержащуюся здесь информацию для быстрого ознакомления с прибором, чтобы Вы могли использовать его функции в полном объеме. Ваш прибор прослужит Вам многие годы, если Вы будете обращаться с ним и ухаживать за ним надлежащим образом....
Page 136 - ПРИМЕЧАНИЕ; Ограничение ответственности; Безопасность; Применение по назначению
136 ПРИМЕЧАНИЕ Указание означает дополнительную информацию, которая облегчает работу с прибором. 66.4 Ограничение ответственности Вся техническая информация, все данные и указания по установке, эксплуатации и уходу, содержащиеся в данной инструкции, соответствуют актуальному уровню по состоянию на д...
Page 137 - ПРЕДУПРЕЖДЕНИЕ; Общие указания по безопасности
137 ПРЕДУПРЕЖДЕНИЕ Опасность из-за ненадлежащего применения! При ненадлежащем применении и\или использовании другого рода от прибора может исходить опасность. ► Прибор следует использоваться только в соответствии с назначением. ► Следует соблюдать порядок выполнения действий, описанный в данном руко...
Page 140 - Опасность, связанная с электрическим током; Ввод в эксплуатацию
140 ОПАСНОСТЬ ► Не храните или не используйте бензин или другие пожароопасные газы и жидкости поблизости от этого и других приборов. Газы могут представлять собой опасность возникновения пожара или взрыва. 67.3.2 Опасность, связанная с электрическим током Опасность для жизни от электрического тока! ...
Page 141 - Указания по безопасности; Объем поставки и осмотр после транспортировки; Распаковка; Утилизация упаковки
141 68.1 Указания по безопасности ПРЕДУПРЕЖДЕНИЕ ► Запрещается использовать упаковочные материалы для игры. Существует опасность удушья. ► Из-за большого веса прибора его транспортировку, а также распаковку и установку следует выполнять вдвоем. 68.2 Объем поставки и осмотр после транспортировки Как ...
Page 142 - Установка
142 Возврат упаковки в круговорот материалов экономит сырье и сокращает отходы. Утилизируйте упаковочные материалы, которые больше не используются, в сборных пунктах для системы утилизации "Зеленая точка". ПРИМЕЧАНИЕ ► Если возможно, сохраняйте оригинальную упаковку в течение гарантийного пе...
Page 143 - Электрическое; Конструкция и работа
143 68.5.3 Установка ручки Прибор поставляется с одной металлической ручкой из нержавеющей стали. Для установки просто прикрутите ее к двери прилагаемыми винтами. Для этого сдвиньте резиновую прокладку с обратной стороны дверцы в сторону, чтобы открыть просверленные отверстия. Используйте прилагаемы...
Page 144 - Общий обзор
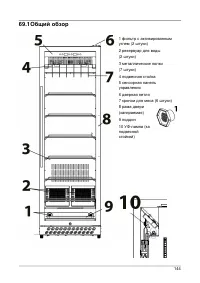
144 69.1 Общий обзор 1 фильтр с активированным углем (2 штуки) 2 резервуар для воды (2 штуки) 3 металлические полки (7 штуки) 4 подвесная стойка 5 сенсорная панель управления 6 дверная петля 7 крючки для мяса (6 штуки) 8 рама двери (запираемая) 9 поддон 10 УФ-лампа (за подвесной стойкой)
Page 145 - Эксплуатация и работа; Элементы управления и дисплей
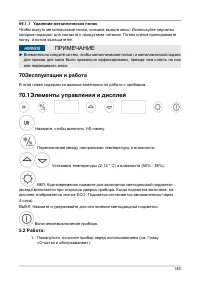
145 69.1.1 Удаление металлических полок Чтобы вынуть металлические полки, сначала выньте мясо. Используйте перчатки, которые подходят для контакта с продуктами питания. Потом слегка приподнимите полку, а потом вытащите ее. ПРИМЕЧАНИЕ ► Внимательно следите за тем, чтобы металлические полки / и металл...
Page 147 - Паспортная табличка; Сухая выдержка; Опасность
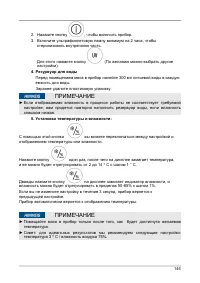
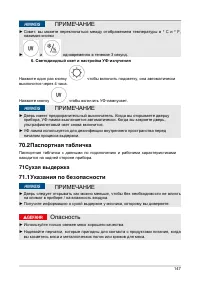
147 ПРИМЕЧАНИЕ ► Совет: вы можете переключаться между отображением температуры в ° C и ° F, нажимая кнопки ► и одновременно в течение 3 секунд. 6. Светодиодный свет и настройка УФ-излучения Нажмите один раз кнопку , чтобы включить подсветку, она автоматически выключится через 4 часа. Нажмите кнопку ...
Page 148 - Исключение ответственности:; Очистка и уход
148 Опасность ► Опасность при сухой выдержке заключается в появлении так называемой "дикой плесени". Она в отличие от "хорошей благородной плесени" может испортить мясо и привести к токсичным и аллергическим реакциям. По этой причине соблюдайте безупречную гигиену при обращении с при...
Page 149 - Осторожно; Очистка
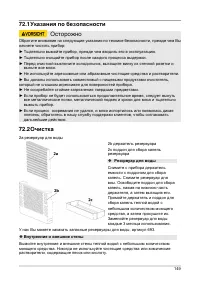
149 72.1 Указания по безопасности Осторожно Обратите внимание на следующие указания по технике безопасности, прежде чем Вы начнете чистить прибор: ► Тщательно вымойте прибор, прежде чем вводить его в эксплуатацию. ► Тщательно очищайте прибор после каждого процесса выдержки. ► Перед очисткой выключит...
Page 150 - Предупреждение: опасность ожога горячей
150 Затем тщательно протрите прибор мягкой тканью. Включайте УФ-лампу на 24 часа после каждого процесса созревания. ◆ Корпус Используйте средство для чистки стекла для очистки стеклянных поверхностей и имеющееся в продаже средство для чистки нержавеющей стали для поверхностей из нержавеющей стали. З...
Page 151 - Замена
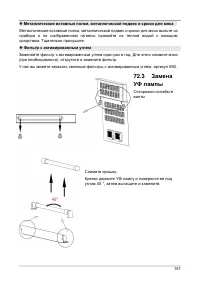
151 ◆ Металлические вставные полки, металлический подвес и крюки для мяса Металлические вставные полки, металлический подвес и крюки для мяса выньте из прибора и по соображениям гигиены промойте их теплой водой с моющим средством. Тщательно просушите. ◆ Фильтр с активированным углем Заменяйте фильтр...
Page 152 - Перемещение прибора; Устранение неисправностей; Причины неисправностей и их устранение
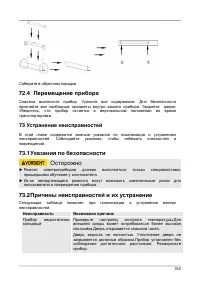
152 Соберите в обратном порядке. 72.4 Перемещение прибора Сначала выключите прибор. Удалите все содержимое. Для безопасности приклейте все свободные предметы внутри вашего прибора. Закройте двери. Убедитесь, что прибор остается в вертикальном положении во время транспортировки. 73 Устранение неиспра...
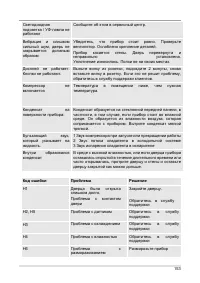
Page 154 - Примечание; Утилизация старого прибора; Гарантия
154 E9 Техническая неисправность Обратитесь в службу поддержки Примечание ► Если вы не можете решить проблему с помощью описанных выше шагов, обратитесь в службу поддержки. ► Очистите металлические полки, подвес и крючки для мяса с помощью дезинфицирующего средства и удалите остатки мяса с прибора, ...
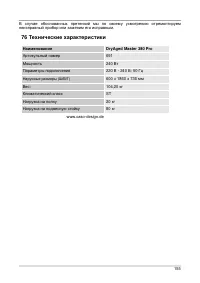
Page 155 - Технические характеристики
155 В случае обоснованных претензий мы по своему усмотрению отремонтируем неисправный прибор или заменим его исправным. 76 Технические характеристики Наименование DryAged Master 380 Pro Артикульный номер 691 Мощность 240 Вт Параметры подключения 220 В - 240 В; 50 Гц Наружные размеры (Ш/В/Г) 600 x 18...