Page 2 - Braukmann GmbH
2 Braukmann GmbH Raiffeisenstraße 9 D-59757 Arnsberg Service-Hotline International: Tel.: +49 (0) 29 32 / 80 55 4 – 99 Fax: +49 (0) 29 32 / 80 55 4 – 77 eMail: [email protected] Sie finden die aktuellste Version der Bedienungsanleitung auch auf unserer Homepage: www.caso-germany.de Dokument-Nr.: 006...
Page 3 - Störungsursachen und
3 4 Aufbau und Funktion .......................................................................................... 19 4.1 Gesamtübersicht ................................................................................................. 19 4.1.1 Herausnehmen der Edelstahlroste ..........................
Page 11 - Bedienungsanleitung: Allgemeines; Informationen zu dieser Anleitung
11 1 Bedienungsanleitung: Allgemeines Lesen Sie die hier enthaltenen Informationen, damit Sie mit Ihrem Gerät schnell vertraut werden und seine Funktionen in vollem Umfang nutzen können. Ihr Gerät dient Ihnen viele Jahre lang, wenn Sie ihn sachgerecht behandeln und pflegen. Wir wünschen Ihnen viel F...
Page 12 - Haftungsbeschränkung; Sicherheit; Bestimmungsgemäße Verwendung; Gefahr durch nicht bestimmungsgemäße Verwendung!
12 1.3 Haftungsbeschränkung Alle in dieser Anleitung enthaltenen technischen Informationen, Daten und Hinweise für die Installation, Betrieb und Pflege entsprechen dem letzten Stand bei Drucklegung und erfolgen unter Berücksichtigung unserer bisherigen Erfahrungen und Erkenntnisse nach bestem Wissen...
Page 13 - Allgemeine Sicherheitshinweise
13 2.2 Allgemeine Sicherheitshinweise Beachten Sie für einen sicheren Umgang mit dem Gerät die folgenden allgemeinen Sicherheitshinweise: ► Kontrollieren Sie das Gerät vor der Verwendung auf äußere sichtbare Schäden. Nehmen Sie ein beschädigtes Gerät nicht in Betrieb. ► Bei Beschädigung der Anschlus...
Page 14 - ► Defekte Bauteile dürfen nur gegen Original-Ersatzteile; Gefahrenquellen; ► Lagern Sie keine explosiven Substanzen wie
14 ► Defekte Bauteile dürfen nur gegen Original-Ersatzteile ausgetauscht werden. Nur bei diesen Teilen ist gewährleistet, dass sie die Sicherheitsanforderungen erfüllen werden. ► Das Gerät ist nicht zum Räuchern geeignet. ► Das Gerät reguliert die gewünschte Luftfeuchtigkeit aktiv. Im Gerät dürfen k...
Page 15 - Lebensgefahr durch elektrischen Strom!; Inbetriebnahme
15 ► Verwenden Sie keine mechanischen Vorrichtungen, um den Abtauvorgang zu beschleunigen. ► Reinigen Sie Gerät und Geräteteile nie mit leicht entzündbaren Flüssigkeiten. Die daraus entstehenden Gase können eine Brandgefahr darstellen oder explodieren. ► Lagern oder verwenden Sie kein Benzin oder an...
Page 18 - Anbringung des Griffes; Elektrischer Anschluss
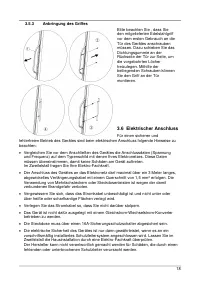
18 3.5.3 Anbringung des Griffes Bitte beachten Sie , dass Sie den mitgelieferten Edelstahlgriff vor dem ersten Gebrauch an die Tür des Gerätes anschrauben müssen. Dazu schieben Sie das Dichtungsgummie an der Rückseite der Tür zur Seite, um die vorgebohrten Löcher freizulegen. Mithilfe der beiliegend...
Page 19 - Aufbau und Funktion
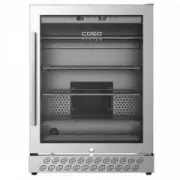
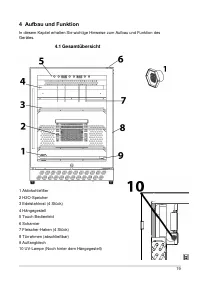
19 4 Aufbau und Funktion In diesem Kapitel erhalten Sie wichtige Hinweise zum Aufbau und Funktion des Gerätes. 4.1 Gesamtübersicht 1 Aktivkohlefilter 2 H2O-Speicher 3 Edelstahlrost (4 Stück) 4 Hängegestell 5 Touch Bedienfeld 6 Scharnier 7 Fleischer-Haken (4 Stück) 8 Türrahmen (abschließbar) 9 Auffan...
Page 20 - Herausnehmen der Edelstahlroste; Bedienelemente und Betrieb; Bedienelemente und Anzeige
20 4.1.1 Herausnehmen der Edelstahlroste Um einen Edelstahlrost herauszunehmen, nehmen Sie zuerst das Fleisch heraus. Verwenden Sie Handschuhe, die für den Kontakt mit Lebensmitteln geeignet sind. Dann heben Sie den Edelstahlrost leicht an und ziehen ihn dann heraus. ► Achten Sie sorgfältig darauf, ...
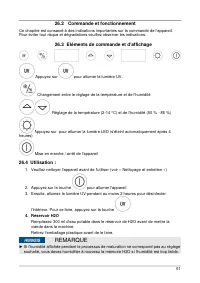
Page 21 - Temperatur und Luftfeuchtigkeit einstellen:
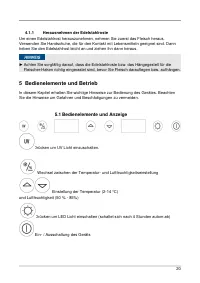
21 5.2 Bedienung 1. Bitte reinigen Sie das Gerät vor dem Gebrauch (siehe „Reinigung und Pflege“) 2. Taste betätigen, um das Gerät einzuschalten 3. Schalten Sie anschließend das UV Licht für mindestens 2 Stunden ein, um den Innenraum zu entkeimen. Dafür die Taste drücken. 4. H2O Speicher 300 ml Trink...
Page 22 - Sicherheitshinweise
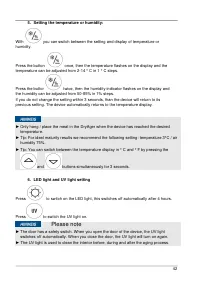
22 ► Tipp: Für ein optimales Reifeergebnis empfehlen wir folgende Einstellung: Temperatur 3°C / Luftfeuchtigkeit 75%. ► Tipp: Sie können durch gleichzeitiges Drücken der beiden Tasten und für 3 sec. zwischen der Temperaturanzeige in °C und °F wechseln. 6. LED-Licht- und UV-Licht-Einstellung Drücken ...
Page 23 - Unterschiedliche Aromen je nach Reifezeit
23 ► Verwenden Sie ausschließlich zum Veredeln geeignetes Fleisch. ► Ziehen Sie Handschuhe, die für den Kontakt mit Lebensmittel geeignet sind, an, wenn Sie das Fleisch und die Metallböden oder Fleischer-Haken berühren. ► Die Gefahr beim Dry-Aging ist das Auftreten von sogenanntem „Wildschimmel“. Di...
Page 24 - Reinigung und Pflege; Sicherheitshinweise; b Speicherhalterung
24 7 Reinigung und Pflege In diesem Kapitel erhalten Sie wichtige Hinweise zur Reinigung und Pflege des Gerätes. Beachten Sie die Hinweise um Beschädigungen durch falsche Reinigung des Gerätes zu vermeiden und den störungsfreien Betrieb sicherzustellen. 7.1 Sicherheitshinweise Beachten Sie die folge...
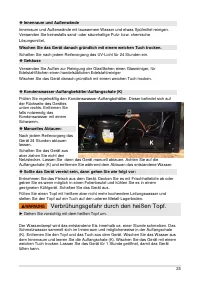
Page 25 - Verbrühungsgefahr durch den heißen Topf.
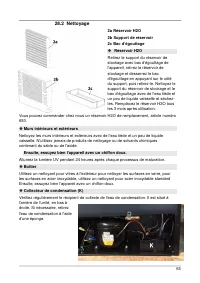
25 ◆ Innenraum und Außenwände Innenraum und Außenwände mit lauwarmem Wasser und etwas Spülmittel reinigen. Verwenden Sie keinesfalls sand- oder säurehaltige Putz- bzw. chemische Lösungsmittel. Wischen Sie das Gerät danach gründlich mit einem weichen Tuch trocken. Schalten Sie nach jedem Reifevorgang...
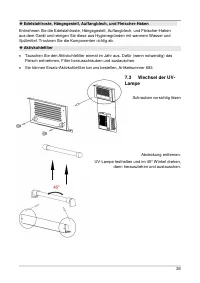
Page 26 - Aktivkohlefilter; Lampe
26 ◆ Edelstahlroste, Hängegestell, Auffangblech, und Fleischer-Haken Entnehmen Sie die Edelstahlroste, Hängegestell, Auffangblech, und Fleischer-Haken aus dem Gerät und reinigen Sie diese aus Hygienegründen mit warmem Wasser und Spülmittel. Trocknen Sie die Komponenten richtig ab. ◆ Aktivkohlefilter...
Page 27 - Bewegen Ihres Gerätes; Störungsbehebung; Sicherheitshinweise
27 Einbau entsprechend rückwärts. 7.4 Bewegen Ihres Gerätes Wenn Sie das Gerät an einen anderen Platz stellen wollen: Schalten Sie das Gerät aus. Räumen Sie den Inhalt heraus. Kleben Sie sicherheitshalber alle losen Elemente im Innenraum fest. Kleben Sie die Tür zu. Das Gerät sollte nur aufrecht tra...
Page 29 - Entsorgung des Altgerätes
29 ► Wenn Sie mit den oben genannten Schritten das Problem nicht lösen können, wenden Sie sich bitte an den Kundendienst. ► Reinigen Sie Edelstahlroste, Auffangblech und Fleischer-Haken mit Desinfektionsmittel und entfernen sie jegliche Speisereste aus dem Gerät, bevor Sie dieses einschicken. 9 Ents...
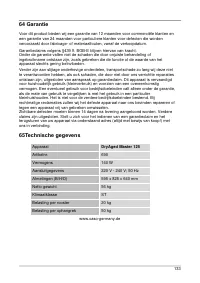
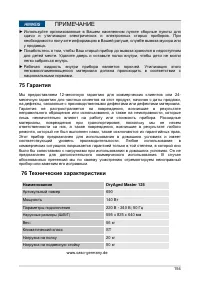
Page 30 - Technische Daten; Name
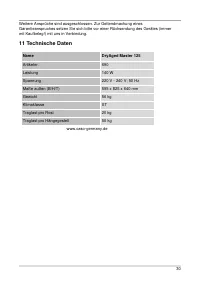
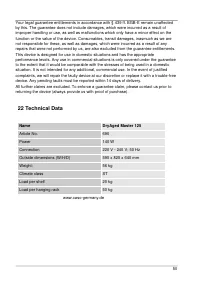
30 Weitere Ansprüche sind ausgeschlossen. Zur Geltendmachung eines Garantieanspruches setzen Sie sich bitte vor einer Rücksendung des Gerätes (immer mit Kaufbeleg!) mit uns in Verbindung. 11 Technische Daten Name DryAged Master 125 Artikelnr. 690 Leistung 140 W Spannung 220 V - 240 V; 50 Hz Maße auß...
Page 32 - Operating Manual; Information on this manual; DANGER; PLEASE NOTE
32 12 Operating Manual 12.1 General Please read the information contained herein so that you can become familiar with your device quickly and take advantage of the full scope of its functions. Your device will serve you for many years if you handle it and care for it properly. We wish you a lot of p...
Page 33 - Safety; WARNING
33 12.4 Limitation of liability All the technical information, data and notices with regard to the installation, operation and care are completely up-to-date at the time of printing and are compiled to the best of our knowledge and belief, taking our past experience and findings into consideration. ...
Page 34 - General Safety information
34 13.2 General Safety information PLEASE NOTE Please observe the following general safety notices with regard to the safe handling of the device. ► Examine the device for any visible external damages prior to using it. Never put a damaged device into operation. ► If the power cable or plug are dama...
Page 36 - ► Do not store or use gasoline or any other flammable vapours; Commissioning; Safety information
36 DANGER ► Do not store or use gasoline or any other flammable vapours and liquids in the vicinity of this or any other appliance. The fumes can create a fire hazard or explosion. 13.3.2 Dangers due to electrical power Mortal danger due to electrical power! Mortal danger exists when coming into con...
Page 37 - Delivery scope and transport inspection; Disposal of the packaging
37 14.2 Delivery scope and transport inspection As a rule, the device is delivered with the following components: • DryAged Master 125 • 4 stainless steel shelves • 1 H2O-reservoir + 1 replacement reservoir • holder for the reservoirs with drip tray • collecting tray • hanging rack including 4 butch...
Page 38 - Setup location requirements:; Feet
38 14.5 Setup 14.5.1 Setup location requirements: In order to ensure the safe and trouble-free operation of the device, the setup location must fulfil the following prerequisites: • Place your appliance on a floor that is strong enough to support the appliance when it is fully loaded. • Locate the a...
Page 39 - The handle installing; Electrical connection; Design and Function
39 14.5.1 The handle installing The device comes with one metal stainless steel handle. To install simply screw them to the door with the supplied screws. To do this, slide the rubber seal on the back of the door to the side to lay open the predrilled holes. Use the included screws to install the ha...
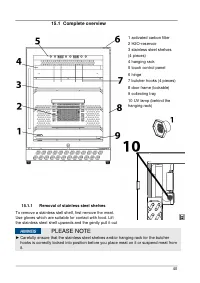
Page 40 - Complete overview; Removal of stainless steel shelves
40 15.1 Complete overview 1 activated carbon filter 2 H2O-reservoir 3 stainless steel shelves (4 pieces) 4 hanging rack 5 touch control panel 6 hinge 7 butcher hooks (4 pieces) 8 door frame (lockable) 9 collecting tray 10 UV lamp (behind the hanging rack) 15.1.1 Removal of stainless steel shelves To...
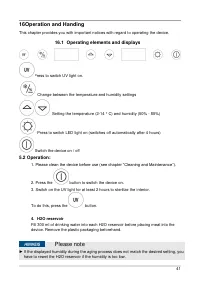
Page 41 - Operation and Handing; Operating elements and displays; Please note
41 16 Operation and Handing This chapter provides you with important notices with regard to operating the device. 16.1 Operating elements and displays Press to switch UV light on. Change between the temperature and humidity settings Setting the temperature (2-14 ° C) and humidity (50% - 85%) Press t...
Page 43 - Dry ageing; Safety information; Danger; Information about dry ageing
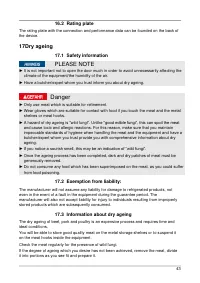
43 16.2 Rating plate The rating plate with the connection and performance data can be founded on the back of the device. 17 Dry ageing 17.1 Safety information PLEASE NOTE ► It is not important not to open the door much in order to avoid unnecessarily affecting the climate of the equipment/the humidi...
Page 44 - Various aromas, depending on the amount of ageing; Cleaning and Maintenance; Safety information; Attention
44 Various aromas, depending on the amount of ageing Depending on the meat used, you will be able to obtain subtle, nutty aromas after around 21 days. Depending on the meat, you will obtain aromas similar to those of fungi after around 28-35 days. Depending on the meat used, you will be able to obta...
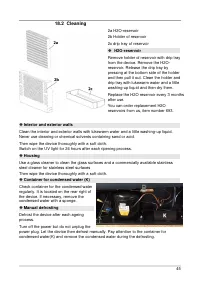
Page 45 - Interior and exterior walls; Manual defrosting
45 18.2 Cleaning 2a H2O-reservoir 2b Holder of reservoir 2c drip tray of reservoir ◆ H2O-reservoir Remove holder of reservoir with drip tray from the device. Remove the H2O-reservoir. Release the drip tray by pressing at the bottom side of the holder and then pull it out. Clean the holder and drip t...
Page 46 - If the device is iced up, proceed as follows:; Warning: Risk of scalding due to the hot pot.; Activated carbon filter
46 ◆ If the device is iced up, proceed as follows: Remove the meat from the device. Cover it with cling film or, if possible, place it in a foil bag and refrigerate it in a suitable refrigerator. Switch off the device. Fill the pot with hot tap water but water which is no longer boiling and place th...
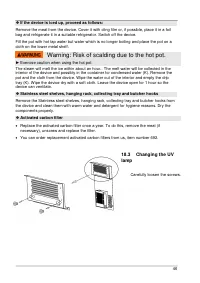
Page 47 - Moving the appliance; Troubleshooting
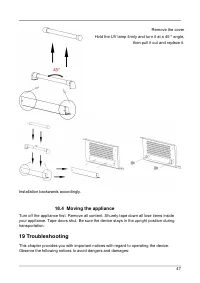
47 Remove the cover Hold the UV lamp firmly and turn it at a 45 ° angle, then pull it out and replace it. Installation backwards accordingly. 18.4 Moving the appliance Turn off the appliance first. Remove all content. Shurely tape down all lose items inside your appliance. Tape doors shut. Be sure t...
Page 48 - Safety notices; Fault indications and rectification of faults; Fault
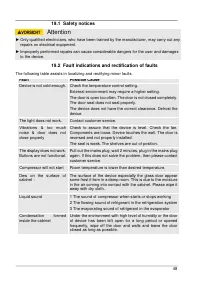
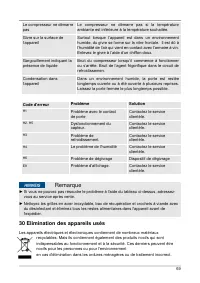
48 19.1 Safety notices Attention ► Only qualified electricians, who have been trained by the manufacturer, may carry out any repairs on electrical equipment. ► Improperly performed repairs can cause considerable dangers for the user and damages to the device. 19.2 Fault indications and rectification...
Page 49 - Disposal of the Old Device; Guarantee
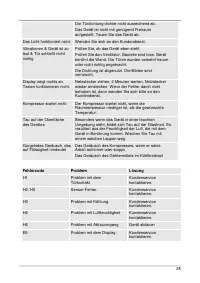
49 Error code Problem Solution H1 Problem with contact of door. Contact customer service H2, H5 Problem with sensor Contact customer service H3 Problem with cooling Contact customer service H4 Problem with humidity Contact customer service H6 Problem with defrosting Defrost the device E9 Problem wit...
Page 50 - Technical Data
50 Your legal guarantee entitlements in accordance with § 439 ff. BGB-E remain unaffected by this. The guarantee does not include damages, which were incurred as a result of improper handling or use, as well as malfunctions which only have a minor effect on the function or the value of the device. C...
Page 51 - Mode d'emploi original
Page 52 - Mode d ́emploi : Généralités; Informations relatives à ce manuel; Remarque
52 23 Mode d´emploi : Généralités Veuillez lire les indications de ce manuel afin de vous familiariser rapidement avec l'appareil et afin de pouvoir utiliser l'ensemble de ses fonctions. Votre appareil vous sera fidèle de nombreuses années si vous l'utilisez et l'entretenez conformément. Nous vous s...
Page 53 - Sécurité; Utilisation conforme
53 23.3 Limite de responsabilités Tous les renseignements techniques, données et instructions d'installation, de fonctionnement et d'entretien contenus dans ce manuel sont parfaitement actuels au moment de la publication et tiennent compte de notre expérience réalisée jusqu'ici et de nos connaissanc...
Page 54 - Consignes de sécurités générales
54 24.2 Consignes de sécurités générales Remarque Pour une utilisation en toute sécurité de l'appareil veuillez observer les consignes générales de sécurités suivantes : ► Avant son utilisation s'assurer qu'il ne comporte pas de défauts visuels. Ne jamais mettre en marche un appareil détérioré. ► Si...
Page 55 - Sources de danger; Pour éviter
55 Remarque ► Les pièces défectueuses doivent être remplacées uniquement par des rechanges d'origine. Ces pièces sont seules capables de répondre aux exigences de sécurité. ► L’appareil régule activement l’humidité de l’air souhaitée. Il ne faut pas introduire des blocs de sel dans l’appareil pour r...
Page 57 - Mise en service; Consignes de sécurité; Inventaire et contrôle de transport
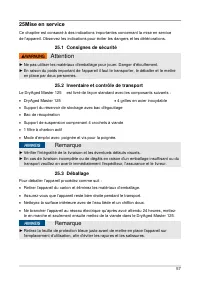
57 25 Mise en service Ce chapitre est consacré à des indications importantes concernant la mise en service de l'appareil. Observez les indications pour éviter les dangers et les détériorations. 25.1 Consignes de sécurité Attention ► Ne pas utiliser les matériaux d'emballage pour jouer. Danger d'étou...
Page 58 - Elimination des emballages; Exigences pour l'emplacement d'utilisation
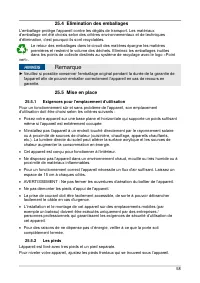
58 25.4 Elimination des emballages L'emballage protège l'appareil contre les dégâts de transport. Les matériaux d'emballage ont été choisis selon des critères environnementaux et de techniques d'élimination, c'est pourquoi ils sont recyclables. Le retour des emballages dans le circuit des matières é...
Page 59 - L’installation de la poignée; Raccordement
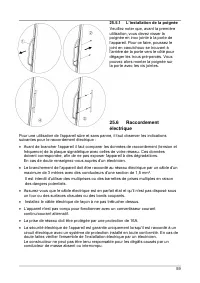
59 25.5.1 L’installation de la poignée Veuillez noter que, avant la première utilisation, vous devez visser la poignée en inox jointe à la porte de l’appareil. Pour ce faire, poussez le joint en caoutchouc se trouvant à l’arrière de la porte vers le côté pour dégager les trous pré-percés. Vous pouve...
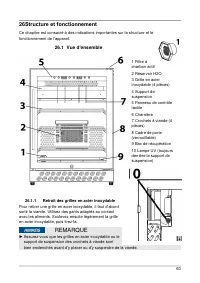
Page 60 - Structure et fonctionnement; Retrait des grilles en acier inoxydable; REMARQUE
60 26 Structure et fonctionnement Ce chapitre est consacré à des indications importantes sur la structure et le fonctionnement de l'appareil. 26.1 Vue d'ensemble 1 Filtre à charbon actif 2 Réservoir H2O 3 Grille en acier inoxydable (4 pièces) 4 Support de suspension 5 Panneau de contrôle tactile 6 C...
Page 62 - Réglage de la lumière LED et de la lumière UV
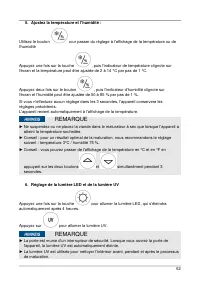
62 5. Ajustez la température et l'humidité : Utilisez le bouton pour passer du réglage à l'affichage de la température ou de l'humidité Appuyez une fois sur la touche , puis l'indicateur de température clignote sur l'écran et la température peut être ajustée de 2 à 14 °C par pas de 1 °C. Appuyez deu...
Page 63 - Informations concernant la maturation à sec
63 26.1 Plaque signalétique La plaque signalétique indiquant les données de raccordement et de puissance se trouve à l'arrière de l'appareil. 27 Dry-Aging 27.1 Consignes de sécurité Remarque ► La porte doit être peu ouverte afin de ne pas affecter inutilement la climatisation ou l'humidité de l'air ...
Page 64 - Arômes différents en fonction de la durée de maturation; Nettoyage et entretien; Consignes de sécurité; Prudence
64 Arômes différents en fonction de la durée de maturation Vous obtiendrez des arômes subtils de noix au bout d'environ 21 jours en fonction de la viande utilisée. Vous obtiendrez des arômes de champignon au bout d'environ 28 à 35 jours en fonction de la viande utilisée. Vous obtiendrez des arômes p...
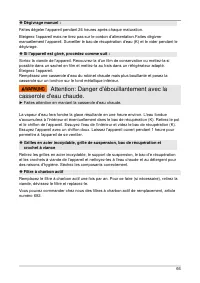
Page 66 - Attention: Danger d'ébouillantement avec la; Filtre à charbon actif
66 ◆ Dégivrage manuel : Faites dégeler l'appareil pendant 24 heures après chaque maturation. Eteignez l’appareil mais ne tirez pas sur le cordon d’alimentation.Faites dégivrer manuellement l’appareil. Surveiller le bac de récupération d’eau (K) et le vider pendant le dégivrage. ◆ Si l'appareil est g...
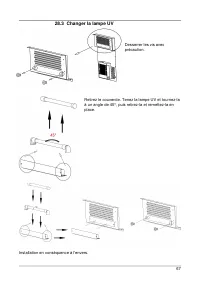
Page 67 - Changer la lampe UV
67 28.3 Changer la lampe UV Desserrer les vis avec précaution. Retirez le couvercle. Tenez la lampe UV et tournez-la à un angle de 45°, puis retirez-la et remettez-la en place. Installation en conséquence à l'envers.
Page 68 - Déplacement de votre appareil; Réparation des pannes; Consignes de sécurité; Origine et remède des incidents
68 28.3.1 Déplacement de votre appareil Si vous voulez mettre l’appareil à un autre endroit : Arrêtez l’appareil. Sortez le contenu. Par mesure de sécurité, scotchez tous les éléments en vrac à l'intérieur. Scotchez la porte. Assurez- vous que l’appareil reste bien droite pendant le transport. 29 Ré...
Page 69 - Elimination des appareils usés
69 Le compresseur ne démarre pas Le compresseur ne démarre pas si la température ambiante est inférieure à la température souhaitée. Givre sur la surface de l’appareil Surtout lorsque l’appareil est dans un environnement humide, du givre se forme sur la vitre frontale. Il est dû à l’humidité de l’ai...
Page 70 - Garantie
70 Ne jamais jeter les anciens appareils avec les ordures ménagères. Remarque ► Portez les vieux appareils électriques et électroniques dans les points de collecte et de recyclage près de chez vous. Le cas échéant informez-vous auprès de la mairie, des services des ordures ou de votre concessionnair...
Page 71 - Caractéristiques techniques; Désignation
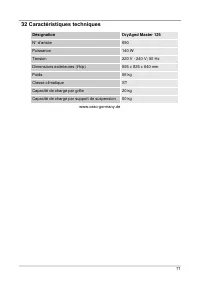
71 32 Caractéristiques techniques Désignation DryAged Master 125 N° d’article 690 Puissance 140 W Tension 220 V - 240 V; 50 Hz Dimensions extérieures (l/h/p) 595 x 825 x 640 mm Poids 56 kg Classe climatique ST Capacité de charge par grille 20 kg Capacité de charge par support de suspension 50 kg www...
Page 73 - Istruzioni d ́uso; Informazioni su queste istruzioni d’uso; Pericolo; Indicazione
73 33 Istruzioni d´uso 33.1 In generale Legga le informazioni qui contenute, affinché acquisti rapidamente familiarità con il suo apparecchio e affinché possa utilizzare appieno le sue funzioni. Il Suo l´apparecchio Le renderà un buon servizio per molti anni, se lo tratterà e lo curerà in modo adegu...
Page 74 - Sicurezza; Utilizzo conforme alle disposizioni
74 33.4 Limitazione della responsabilità Tutte le informazioni tecniche, tutti i dati e le indicazioni per l’installazione, il funzionamento e la cura, contenute in queste istruzioni d’uso, corrispondono all’ultimo stato dell’arte al momento della messa in stampa e sono forniti in considerazione del...
Page 75 - Avviso; Pericolo per un utilizzo non conforme alle disposizioni!; Indicazioni generali di sicurezza
75 Avviso Pericolo per un utilizzo non conforme alle disposizioni! Dall’apparecchio possono derivare pericoli, nel caso di un utilizzo non conforme alle disposizioni e/o nel caso di un utilizzo differente. ► Utilizzare l’apparecchio esclusivamente in conformità alle disposizioni. ► Rispettare le pro...
Page 77 - Pericolo dovuto a corrente elettrica; Pericolo di vita dovuto a corrente elettrica!
77 Pericolo ► Non conservare sostanze esplosive, come bombolette spray con propellenti infiammabili in questa unità. ► Il propellente all'interno dell'unità è combustibile. ► Non danneggiare il circuito di raffreddamento. ► Non utilizzare nessun apparecchio elettrico all interno dell apparecchio. ► ...
Page 78 - ► Non mettere in funzione l'apparecchio quando il cavo; Messa in funzione; Indicazioni di sicurezza; Insieme della fornitura ed ispezione trasporto
78 Pericolo ► Non mettere in funzione l'apparecchio quando il cavo elettrico o la spina sono danneggiati, se non funziona correttamente oppure è stato fatto cadere o è danneggiato. Nel caso il cavo elettrico o la spina sono stati danneggiati, questi vanno sostituiti solo dal fabbricante oppure dal s...
Page 79 - Disimballaggio; Smaltimento dell’involucro; Posizionamento; Requisiti del luogo di posizionamento
79 35.3 Disimballaggio Per il disimballaggio dell’apparecchio, proceda come segue: • Estragga l’apparecchio dal cartone e tolga il materiale d'imballaggio. • Assicurarsi che l ’apparecchio sia in posizione dritta durante il trasporto. • Pulire l’interno con acqua tiepida e un panno morbido. • Colleg...
Page 80 - elettrica
80 • La presa dovrà essere facilmente accessibile, in modo tale che il cavo elettrico possa essere facilmente estratto, in casi d'emergenza. • Il montaggio di questo apparecchio in luoghi di posizionamento non stazionari (per esempio navi) dovrà essere effettuato esclusivamente da aziende/persone sp...
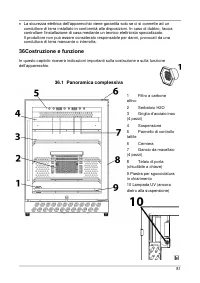
Page 81 - Costruzione e funzione; Panoramica complessiva
81 • La sicurezza elettrica dell’apparecchio viene garantita solo se ci si connette ad un conduttore di terra installato in conformità alle disposizioni. In caso di dubbio, faccia controllare l’installazione di casa mediante un tecnico elettricista specializzato. Il produttore non può essere conside...
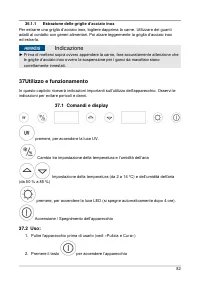
Page 82 - trazione delle griglie d’acciaio inox; Utilizzo e funzionamento; Comandi e display
82 36.1.1 Es trazione delle griglie d’acciaio inox Per estrarre una griglia d’acciaio inox, togliere dapprima la carne. Utilizzare dei guanti adatti al contatto con generi alimentari. Poi alzare leggermente la griglia d’acciaio inox ed estrarla. Indicazione ► Prima di metterci sopra ovvero appendere...
Page 83 - tazione della temperatura e dell’umidità dell’aria:
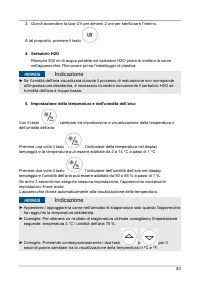
83 3. Quindi accendere la luce UV per almeno 2 ore per sterilizzare l'interno. A tal proposito, premere il tasto . 4. Serbatoio H2O Riempire 300 ml di acqua potabile nel serbatoio H2O prima di mettere la carne nell'apparecchio. Rimuovere prima l'imballaggio di plastica. Indicazione ► Se l'umidità de...
Page 84 - Impostazione della luce LED e luce UV; Targhetta di omologazione
84 6. Impostazione della luce LED e luce UV Premere 1 volta , per accendere la luce LED. Questa poi si spegne automaticamente dopo 4 ore. Premere per 5 secondi, si accende la luce UV. Indicazione ► Lo sportello dispone di un interruttore di sicurezza. Con l’apertura dello sportello dell’apparecchio,...
Page 85 - Differenti aromi in base al tempo di maturazione; Pulizia e cura; Indicazioni di sicurezza; Attenzione
85 38.2 Esclusione dalla responsabilità Il fabbricante non si assume alcuna responsabilità per danni ai prodotti refrigerati, anche in caso di difetto dell’apparecchio durante il periodo di garanzia. Allo stesso modo, il fabbricante esclude una responsabilità per danni alle persone a causa di merci ...
Page 87 - Se l’apparecchio è ghiacciato, allora procedere come segue:; Avviso: Pericolo di scottatura dalla pentola
87 ◆ Contenitore di raccolta per la condensa (K) Verificare regolarmente il contenitore di raccolta per la condensa. Questo si trova sul retro dell'apparecchio in basso a destra. Se necessario, rimuovere l'acqua di condensa con una spugna. ◆ Sbrinamento manuale: Lasciare sbrinare l'apparecchio per 2...
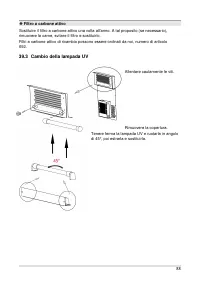
Page 88 - Filtro a carbone attivo; Cambio della lampada UV
88 ◆ Filtro a carbone attivo Sostituire il filtro a carbone attivo una volta all'anno. A tal proposito (se necessario), rimuovere la carne, svitare il filtro e sostituirlo. Filtri a carbone attivo di ricambio possono essere ordinati da noi, numero di articolo 692. 39.3 Cambio della lampada UV Allent...
Page 89 - Muovere l’apparecchio; Eliminazione malfunzionamenti; Indicazioni di sicurezza; Cause malfunzionamenti e risoluzione
89 Eseguire il rimontaggio all’inverso. 39.3.1 Muovere l’apparecchio Quando volete inst allare l’apparecchio in un altro luogo: Spegnere l’apparecchio e. Svuotare il contenuto. Fissare tutte le parti interne con del nastro adesivo, per cautela. Fissare la porta con del nastro adesivo. Assicurarsi ch...
Page 91 - Smaltimento dell’apparecchio obsoleto; Garanzia
91 41 Smaltimento dell’apparecchio obsoleto Apparecchi elettrici ed elettronici obsoleti contengono spesso ancora materiali preziosi. Essi contengono però anche sostanze nocive, che erano necessarie per il loro funzionamento e la loro sicurezza. Questi possono nuocere alla salute umana o all’ambient...
Page 92 - Dati tecnici; Nome
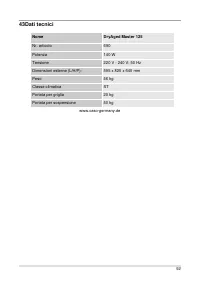
92 43 Dati tecnici Nome DryAged Master 125 Nr. articolo 690 Potenza 140 W Tensione 220 V - 240 V; 50 Hz Dimensioni esterne (L/H/P): 595 x 825 x 640 mm Peso 56 kg Classe climatica ST Portata per griglia 20 kg Portata per sospensione 50 kg www.caso-germany.de
Page 93 - Manual del usuario
Page 94 - Información acerca de este manual; Peligro; Advertencia; Nota
94 44 Manual del usuario 44.1 Generalidades Lea atentamente la información contenida en este manual para familiarizarse rápidamente con el aparato y poder utilizar sus funciones en toda su capacidad. Su DryAged Master 125 le servirá durante muchos años si lo trata y conserva adecuadamente. Le deseam...
Page 95 - Limitación de responsabilidad; Seguridad; Peligro ante el uso no conforme a lo previsto.
95 44.4 Limitación de responsabilidad La información técnica contenida, datos e indicaciones contenidos en el presente manual para la instalación, operación y conservación se corresponden con los últimos avances técnicos en el momento de la impresión y se publican teniendo en cuenta nuestra experien...
Page 96 - Instrucciones generales de seguridad
96 45.2 Instrucciones generales de seguridad Nota Para una manipulación segura del aparato, observe las siguientes instrucciones generales de seguridad: ► Antes de utilizar el aparato debe revisarlo para detectar posibles daños. Si el aparato presenta daños, no lo ponga en marcha. ► Si el cable de a...
Page 98 - Peligro de muerte por electrocución; Tener en cuenta las precauciones; Puesta en marcha; Instrucciones de seguridad
98 Peligro ► No almacene gasolina ni cualquier otro gas o fluido inflamable cerca de éste u otro aparato(s). Los vapores constituyen peligro de incendio o explosión. 45.3.2 Peligro de electrocución Peligro Peligro de muerte por electrocución El contacto con cables o componentes energizados implica p...
Page 99 - Ámbito de suministro e inspección de transporte; Eliminación del embalaje
99 46.2 Ámbito de suministro e inspección de transporte El DryAged Master 125 incluye los siguientes componentes de fábrica • DryAged Master 125 • 4 parrillas de acero inoxidable • 1 Acumulador H2O +1 acumulador de repuesto • Soporte del acumulador con bandeja de goteo Bandeja recogedora • Bastido...
Page 100 - Requisitos que debe reunir el lugar de montaje; Soportes del aparato
100 46.5 Colocación 46.5.1 Requisitos que debe reunir el lugar de montaje Para garantizar el funcionamiento seguro y correcto del aparato, el lugar de colocación debe cumplir los siguientes requisitos: • El aparato debe colocarse sobre una superficie sólida, plana, horizontal y resistente al calor, ...
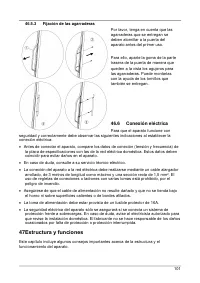
Page 101 - Fijación de las agarraderas; Conexión eléctrica; Estructura y funciones
101 46.5.3 Fijación de las agarraderas Por favor, tenga en cuenta que las agarraderas que se entregan se deben atornillar a la puerta del aparato antes del primer uso. Para ello, aparte la goma de la parte trasera de la puerta de manera que queden a la vista los agujeros para las agarraderas. Puede ...
Page 102 - Descripción general; Extracción de la parrilla de acero
102 47.1 Descripción general 1 Filtro de carbón activo 2 Acumulador H2O 3 Parrilla de acero inoxidable (4 unidades) 4 Bastidor para colgar 5 Panel táctil 6 Bisagra 7 Ganchos para carne (4 unidades) 8 Marco de puerta (con posibilidad de cierre) 9 Bandeja recogedora 10 Lámpara UV (detrás del bastidor ...
Page 103 - Operación y funcionamiento
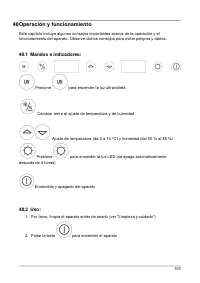
103 48 Operación y funcionamiento Este capítulo incluye algunos consejos importantes acerca de la operación y el funcionamiento del aparato. Observe dichos consejos para evitar peligros y daños. 48.1 Mandos e indicadores: Presione para encender la luz ultravioleta. Cambiar entre el ajuste de tempera...
Page 105 - Ajuste de la luz LED y UV; Placa de especificaciones; Maduración; Instrucciones de seguridad
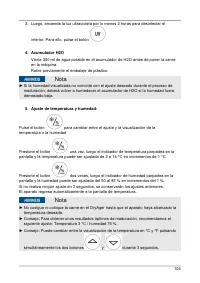
105 6. Ajuste de la luz LED y UV Presione una vez para encender la luz LED, que se apagará automáticamente después de 4 horas. Presione durante 5 segundos, la luz ultravioleta se enciende. Nota ► La puerta tiene un interruptor de seguridad. Al abrir la puerta del aparato, la luz ultravioleta se apag...
Page 106 - Información sobre el curado; Aromas distintos en función del tiempo de curado; Limpieza y conservación; Instrucciones de seguridad; Precaución
106 ► No consuma ningún alimento superpuesto, pueden conducir a una intoxicación alimentaria. 49.2 Descargo de responsabilidad: El fabricante no se hace responsable de los daños que puedan sufrir los productos refrigerados, aunque el aparato esté defectuoso dentro del período de garantía. El fabrica...
Page 108 - Peligro de escaldamiento por la olla caliente.
108 ◆ Recipiente colector de condensación (K) Revise la bandeja recogedora con regularidad para extraer la condensación acumulada. Esta se encuentra en la parte trasera del aparato, en su parte inferior derecha. Si fuera necesario, retire el agua de condensación con una bayeta o esponja de cocina. ◆...
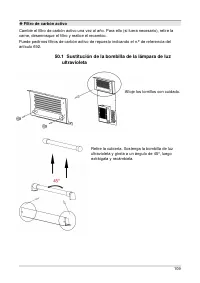
Page 109 - Filtro de carbón activo; Sustitución de la bombilla de la lámpara de luz
109 ◆ Filtro de carbón activo Cambie el filtro de carbón activo una vez al año. Para ello (si fuera necesario), retire la carne, desenrosque el filtro y realice el recambio. Puede pedirnos filtros de carbón activo de repuesto indicando el n.º de referencia del artículo 692. 50.1 Sustitución de la bo...
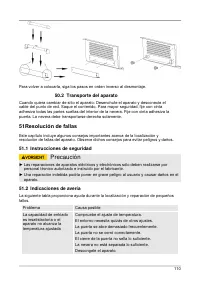
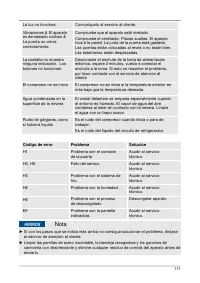
Page 110 - Transporte del aparato; Resolución de fallas; Instrucciones de seguridad; Indicaciones de avería
110 Para volver a colocarla, siga los pasos en orden inverso al desmontaje. 50.2 Transporte del aparato Cuando quiera cambiar de sitio el aparato: Desenchufe el aparato y desconecte el cable del punto de red. Saque el contenido. Para mayor seguridad, fije con cinta adhesiva todas las partes sueltas ...
Page 112 - Eliminación del aparato usado; Garantia
112 52 Eliminación del aparato usado Los productos eléctricos y electrónicos usados contienen materiales reutilizables. No obstante, también contienen materiales nocivos, necesarios para su funcionamiento y seguridad. En la basura doméstica, o ante la manipulación indebida, puede ponerse en peligro ...
Page 113 - Datos técnicos
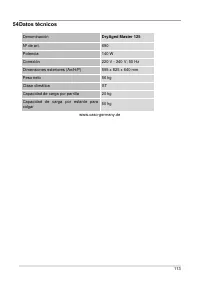
113 54 Datos técnicos Denominación DryAged Master 125 Nº de art. 690 Potencia 140 W Conexión 220 V - 240 V; 50 Hz Dimensiones exteriores (An/H/P) 595 x 825 x 640 mm Peso neto 56 kg Clase climática ST Capacidad de carga por parrilla 20 kg Capacidad de carga por estante para colgar 50 kg www.caso-germ...
Page 115 - Gebruiksaanwijzing; Informatie over deze gebruiksaanwijzing; GEVAAR; TIP
115 55 Gebruiksaanwijzing 55.1 Algemeen Lees de hier vermelde informatie, zodat u snel vertrouwd raakt met uw apparaat en al zijn functies in volle omvang kunt gebruiken. U heeft jaren lang plezier van uw DryAged Master als u hem vakkundig behandelt en onderhoudt. Wij wensen u veel plezier met het g...
Page 116 - Aansprakelijkheid; Veiligheid; Gebruik volgens de voorschriften; WAARSCHUWING
116 55.4 Aansprakelijkheid Alle in deze gebruiksaanwijzing aanwezige technische informatie, gegevens en instructies voor installatie, ingebruikname en onderhoud beantwoorden aan de laatste stand bij het in druk gaan en vinden plaats met inachtneming van onze tot nu toe opgedane ervaringen en kennis ...
Page 117 - Algemene veiligheidsinstructies
117 56.2 Algemene veiligheidsinstructies TIP Houdt u zich voor een veilige omgang met het apparaat aan de volgende algemene veiligheidsinstructies: ► Controleer het apparaat voor de ingebruikname op aan de buitenkant zichtbare schaden. Neem een beschadigd apparaat niet in gebruik. ► Indien de aanslu...
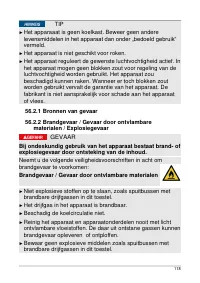
Page 118 - materialen / Explosiegevaar; Het drijfgas in het apparaat is brandbaar.
118 TIP ► Het apparaaat is geen koelkast. Beweer geen andere levensmiddelen in het apparaat dan onder „bedoeld gebruik“ vermeld. ► Het apparaat is niet geschikt voor roken. ► Het apparaat reguleert de gewenste luchtvochtigheid actief. In het apparaat mogen geen blokken zout voor regeling van de luch...
Page 119 - Gebruik geen elektrische apparaten in het toestel.; Levensgevaar door elektrische stroom!; Ingebruikname
119 GEVAAR ► Bewaar of gebruik geen benzine of andere vuurgevaarlijke gassen en vloeistoffen in de buurt van dit apparaat of andere apparaten. De gassen kunnen brandgevaar opleveren of ontploffen. ► Gebruik geen mechanische inrichtingen om het ontdooien te versnellen. ► Gebruik geen elektrische appa...
Page 120 - Veiligheidsvoorschriften; Leveringsomvang en transportinspectie; Verwijderen van de verpakking
120 57.1 Veiligheidsvoorschriften WAARSCHUWING ► Verpakkingsmateriaal mag niet als speelgoed gebruikt worden. Er bestaat kans op verstikking. ► Vanwege het hoge gewicht van het apparaat het transport als ook het uitpakken en plaatsen met twee personen uitvoeren. 57.2 Leveringsomvang en transportinsp...
Page 121 - Eisen aan de plek van plaatsing
121 Het terugbrengen van de verpakking in de materiaalkringloop bespaart grondstoffen en verkleint de afvalhoop. Lever niet meer benodigd verpakkingsmateriaal in bij een afvalbrengstation, dat zorgdraagt voor de recycling. TIP ► Bewaar indien mogelijk het originele verpakkingsmateriaal gedurende de ...
Page 122 - Handvat bevestigen; aansluiting; Opbouw en functie
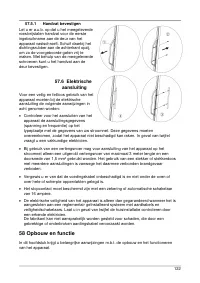
122 57.5.1 Handvat bevestigen Let u er a.u.b. op dat u het meegeleverde roestvrijstalen handvat voor de eerste ingebruikname aan de deur van het apparaat vastschroeft. Schuif daarbij het dichtingsrubber aan de achterkant opzij, om zo de voorgeboorde gaten vrij te maken. Met behulp van de meegeleverd...
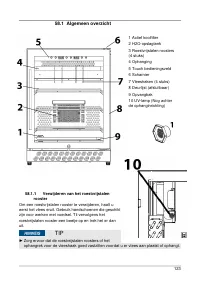
Page 123 - Algemeen overzicht; Verwijderen van het roestvrijstalen
123 58.1 Algemeen overzicht 1 Actief koolfilter 2 H2O-opslagtank 3 Roestvrijstalen roosters (4 stuks) 4 Ophanging 5 Touch bedieningsveld 6 Scharnier 7 Vleeshaken (4 stuks) 8 Deurlijst (afsluitbaar) 9 Opvangbak 10 UV-lamp (Nog achter de ophanginrichting) 58.1.1 Verwijderen van het roestvrijstalen roo...
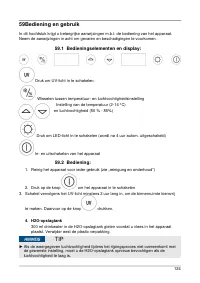
Page 124 - Bediening en gebruik
124 59 Bediening en gebruik In dit hoofdstuk krijgt u belangrijke aanwijzingen m.b.t. de bediening van het apparaat. Neem de aanwijzingen in acht om gevaren en beschadigingen te voorkomen. 59.1 Bedieningselementen en display: Druk om UV-licht in te schakelen. Wisselen tussen temperatuur- en luchtvoc...
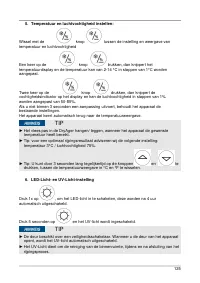
Page 125 - Temperatuur en luchtvochtigheid instellen:
125 5. Temperatuur en luchtvochtigheid instellen: knop tussen de instelling en weergave van Wissel met de temperatuur en luchtvochtigheid knop drukken, dan knippert het Een keer op de temperatuurdisplay en de temperatuur kan van 2-14 °C in stappen van 1°C worden aangepast. knop drukken, dan knippert...
Page 126 - Veiligheidstips; Tip
126 59.3 Typeplaatje Het typeplaatje met de aansluit- en vermogensgegevens bevindt zich aan de achterkant van het apparaat. 60 Dry-Aging 60.1 Veiligheidstips Tip ► De deur moet weinig worden geopend om het klimaat in het apparaat/de luchtvochtigheid niet onnodig te beïnvloeden. ► Informeert u zich o...
Page 127 - Verschillende aromas afhankelijk van de rijpingstijd; Reiniging en onderhoud; Veiligheidsvoorschriften; VOORZICHTIG
127 Wanneer de door u gewenste rijpinggraad is bereikt, haalt u het vlees uit het apparaat en portioneert u het volgens uw eigen voorkeur. Verschillende aromas afhankelijk van de rijpingstijd U bereikt een subtiel, nootachtig aroma, afhankelijk van het gebruikte vlees, na ca. 21 dagen. Paddestoelaro...
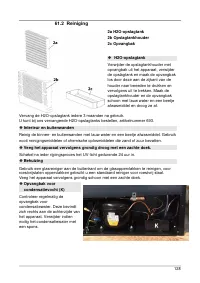
Page 128 - Behuizing
128 61.2 Reiniging 2a H2O-opslagtank 2b Opslagtankhouder 2c Opvangbak ◆ H2O-opslagtank Verwijder de opslagtankhouder met opvangbak uit het apparaat, verwijder de opslagtank en maak de opvangbak los door deze aan de zijkant van de houder naar beneden te drukken en vervolgens uit te trekken. Maak de o...
Page 129 - Handmatig ontdooien:; Wanneer het apparaat is bevroren, handelt u als volgt:; Verbrandingsgevaar door de hete pan; Roestvrijstalen rooster, ophangrek, opvangblik en vleeshaak
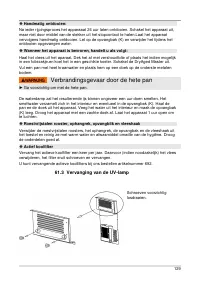
129 ◆ Handmatig ontdooien: Na ieder rijpingsproces het apparaaat 24 uur laten ontdooien. Schakel het apparaat uit, maar niet door middel van de stekker uit het stopcontact te halen . Laat het apparaat vervolgens handmatig ontdooien. Let op de opvangbak (K) en verwijder het tijdens het ontdooien opge...
Page 130 - Bewegen van het apparaat
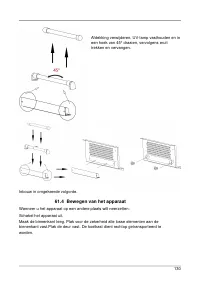
130 Afdekking verwijderen. UV-lamp vasthouden en in een hoek van 45° draaien, vervolgens eruit trekken en vervangen. Inbouw in omgekeerde volgorde. 61.4 Bewegen van het apparaat Wanneer u het apparaat op een andere plaats wilt neerzetten: Schakel het apparaat uit. Maak de binnenkant leeg. Plak voor ...
Page 131 - Storingen verhelpen; Veiligheidsvoorschriften; Oorzaken van de storingen en het verhelpen; Storing
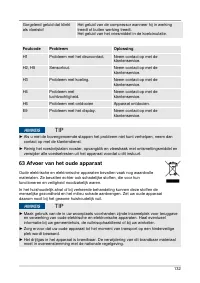
131 62 Storingen verhelpen In dit hoofdstuk krijgt u belangrijke informatie m.b.t. het lokaliseren van storingen en het verhelpen van storingen. Let u op de aanwijzingen om gevaren en beschadigingen te voorkomen . 62.1 Veiligheidsvoorschriften VOORZICHTIG ► Reparaties aan elektrische apparaten mogen...
Page 132 - Afvoer van het oude apparaat
132 Gorgelend geluid dat klinkt als vloeistof Het geluid van de compressor wanneer hij in werking treedt of buiten werking treedt. Het geluid van het vriesmiddel in de koelcirculatie. Foutcode Probleem Oplossing H1 Probleem met het deurcontact. Neem contact op met de klantenservice. H2, H5 Sensorfou...
Page 134 - Инструкция по эксплуатации; Холодильник для сухого вызревания мяса
134 Инструкция по эксплуатации DryAged Master 125 (690) Холодильник для сухого вызревания мяса
Page 135 - Общая информация; ОПАСНОСТЬ
135 66 Инструкция по эксплуатации 66.1 Общая информация Прочитайте содержащуюся здесь информацию для быстрого ознакомления с прибором, чтобы Вы могли использовать его функции в полном объеме. Ваш прибор прослужит Вам многие годы, если Вы будете обращаться с ним и ухаживать за ним надлежащим образом....
Page 136 - ПРИМЕЧАНИЕ; Ограничение ответственности; Безопасность; Применение по назначению
136 ПРИМЕЧАНИЕ Указание означает дополнительную информацию, которая облегчает работу с прибором. 66.4 Ограничение ответственности Вся техническая информация, все данные и указания по установке, эксплуатации и уходу, содержащиеся в данной инструкции, соответствуют актуальному уровню по состоянию на д...
Page 137 - ПРЕДУПРЕЖДЕНИЕ; Общие указания по безопасности
137 ПРЕДУПРЕЖДЕНИЕ Опасность из-за ненадлежащего применения! При ненадлежащем применении и\или использовании другого рода от прибора может исходить опасность. ► Прибор следует использоваться только в соответствии с назначением. ► Следует соблюдать порядок выполнения действий, описанный в данном руко...
Page 140 - Опасность, связанная с электрическим током; Ввод в эксплуатацию
140 ОПАСНОСТЬ ► Не храните или не используйте бензин или другие пожароопасные газы и жидкости поблизости от этого и других приборов. Газы могут представлять собой опасность возникновения пожара или взрыва. 67.3.2 Опасность, связанная с электрическим током Опасность для жизни от электрического тока! ...
Page 141 - Указания по безопасности; Объем поставки и осмотр после транспортировки; Распаковка
141 68.1 Указания по безопасности ПРЕДУПРЕЖДЕНИЕ ► Запрещается использовать упаковочные материалы для игры. Существует опасность удушья. ► Из-за большого веса прибора его транспортировку, а также распаковку и установку следует выполнять вдвоем. 68.2 Объем поставки и осмотр после транспортировки Как ...
Page 142 - Утилизация упаковки; Установка; Требования к месту установки:
142 68.4 Утилизация упаковки Упаковка защищает прибор от повреждений при транспортировке. Упаковочные материалы выбираются с учетом экологичности и техники утилизации и поэтому могут подвергаться вторичному использованию. Возврат упаковки в круговорот материалов экономит сырье и сокращает отходы. Ут...
Page 143 - Электрическое
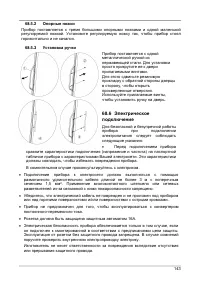
143 68.5.2 Опорные ножки Прибор поставляется с тремя большими опорными ножками и одной маленькой регулируемой ножкой. Установите регулируемую ножку так, чтобы прибор стоял горизонтально и не качался. 68.5.3 Установка ручки Прибор поставляется с одной металлической ручкой из нержавеющей стали. Для ус...
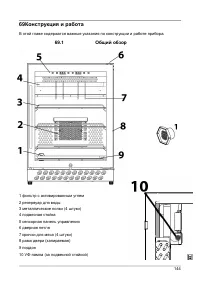
Page 144 - Конструкция и работа; Общий обзор
144 69 Конструкция и работа В этой главе содержатся важные указания по конструкции и работе прибора. 69.1 Общий обзор 1 фильтр с активированным углем 2 резервуар для воды 3 металлические полки (4 штуки) 4 подвесная стойка 5 сенсорная панель управления 6 дверная петля 7 крючки для мяса (4 штуки) 8 ра...
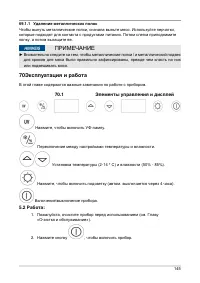
Page 145 - Удаление металлических полок; Эксплуатация и работа; Элементы управления и дисплей
145 69.1.1 Удаление металлических полок Чтобы вынуть металлические полки, сначала выньте мясо. Используйте перчатки, которые подходят для контакта с продуктами питания. Потом слегка приподнимите полку, а потом вытащите ее. ПРИМЕЧАНИЕ ► Внимательно следите за тем, чтобы металлические полки / и металл...
Page 146 - Резурвуар для воды; Установка температуры и влажности:
146 3. Включите ультрафиолетовую лампу минимум на 2 часа, чтобы стерилизовать внутреннюю часть. Для этого нажмите кнопку . 4. Резурвуар для воды Залейте 300 мл питьевой воды в каждую емкость с водой перед тем, как поместить мясо в прибор. Заранее удалите пластиковую упаковку. ПРИМЕЧАНИЕ ► Если отобр...
Page 147 - Светодиодный свет и настройка УФ-излучения; Паспортная табличка; Сухая выдержка; Опасность
147 6. Светодиодный свет и настройка УФ-излучения Нажмите один раз кнопку , чтобы включить подсветку, она автоматически выключится через 4 часа. Нажмите кнопку , чтобы включить УФ-лампусвет. ПРИМЕЧАНИЕ ► Дверь имеет предохранительный выключатель. Когда вы открываете дверцу прибора, УФ-лампа выключае...
Page 148 - Различные ароматы в зависимости от времени выдержки; Очистка и уход; Осторожно
148 71.2 Исключение ответственности: Изготовитель не берет на себя ответственность за повреждения охлаждаемого продукта, также при дефекте прибора в течение гарантийного периода. Также изготовитель исключает ответственность за нанесение ущерба людям из-за товара, который хранился ненадлежащим образо...
Page 149 - Очистка; Резкрвуар для воды
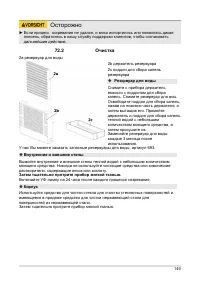
149 Осторожно ► Если процесс созревания не удался, и мясо испортилось или появилась дикая плесень, обратитесь в нашу службу поддержки клиентов, чтобы согласовать дальнейшие действия. 72.2 Очистка 2a резервуар для воды 2b держатель резервуара 2c поддон для сбора капель резервуара ◆ Резкрвуар для воды...
Page 150 - Предупреждение: опасность ожога горячей; Фильтр с активированным углем
150 ◆ Емкость для водяного конденсата (K) Регулярно проверяйте емкость для конденсата. Она расположена сзади справа на приборе. При необходимости удалите конденсат губкой. ◆ Ручное размораживание Разморозьте прибор после каждого процесса созревания. Выключите питание, но не вынимайте вилку из розетк...
Page 151 - Замена УФ лампы
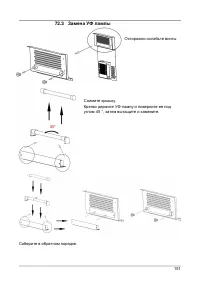
151 72.3 Замена УФ лампы Осторожно ослабьте винты Снимите крышку. Крепко держите УФ-лампу и поверните ее под углом 45 °, затем вытащите и замените. Соберите в обратном порядке.
Page 152 - Перемещение прибора; Устранение неисправностей; Причины неисправностей и их; Неисправность
152 72.4 Перемещение прибора Сначала выключите прибор. Удалите все содержимое. Для безопасности приклейте все свободные предметы внутри вашего прибора. Закройте двери. Убедитесь, что прибор остается в вертикальном положении во время транспортировки. 73 Устранение неисправностей В этой главе содержат...
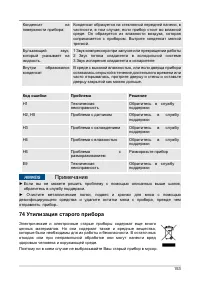
Page 153 - Примечание; Утилизация старого прибора
153 Конденсат на поверхности прибора: Конденсат образуется на стеклянной передней панели, в частности, в том случае, если прибор стоит во влажной среде. Он образуется из влажности воздуха, которая соприкасается с прибором. Вытрите конденсат мягкой тряпкой. Булькающий звук, который указывает на жидко...
Page 154 - Гарантия; Наименование
154 ПРИМЕЧАНИЕ ► Используйте организованные в Вашем населенном пункте сборные пункты для сдачи и утилизации электрических и электронных старых приборов. При необходимости получите информацию в Вашей ратуше, службе вывоза мусора или у продавца. ► Позаботьтесь о том, чтобы Ваш старый прибор до вывоза ...