Page 2 - See this fold-out section for all of the figures; Consulter l’encart à volets afin d’examiner toutes
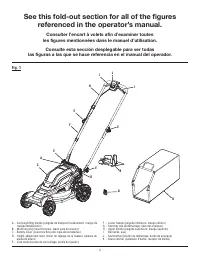
ii Fig. 1 See this fold-out section for all of the figures referenced in the operator’s manual. Consulter l’encart à volets afin d’examiner toutes les figures mentionnées dans le manuel d’utilisation. Consulte esta sección desplegable para ver todas las figuras a las que se hace referencia en el man...
Page 6 - READ ALL INSTRUCTIONS; IMPORTANT SAFETY INSTRUCTIONS
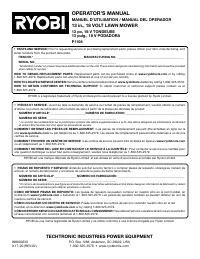
2 — English WARNING: READ AND UNDERSTAND ALL INSTRUCTIONS. Failure to follow all instructions listed below and on the machine may result in electric shock, fire, and/or serious personal injury. READ ALL INSTRUCTIONS This cutting machine is capable of amputating hands and feet and throwing objects....
Page 9 - SYMBOLS
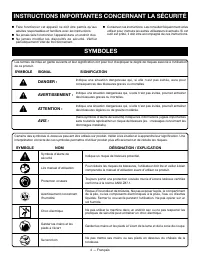
5 — English Some of the following symbols may be used on this product. Please study them and learn their meaning. Proper interpretation of these symbols will allow you to operate the product better and safer. SYMBOL NAME DESIGNATION/EXPLANATION MAX 15˚ No Slope Do not operate on inclines greater tha...
Page 10 - ASSEMBLY; UNPACKING; PACKING LIST
6 — English ASSEMBLY UNPACKING This product requires assembly. Carefully remove the product and any accessories from the box. Make sure that all items listed in the Packing List are included. WARNING: Do not use this product if any parts in the Packing List are already assembled to your product wh...
Page 11 - SETTING BLADE HEIGHT
7 — English ASSEMBLY NOTICE: Do not allow the starter cable to become pinched or trapped when raising the handle. To secure the upper handle in place, tighten the upper handle lock knobs. NOTE: If the upper handle is loose or separated from the lower handles, tighten the lock knobs on the upper ha...
Page 12 - STARTING/STOPPING THE MOWER; OPERATION
8 — English WARNING: Do not allow familiarity with products to make you careless. Remember that a careless fraction of a second is sufficient to inflict serious injury. WARNING: Always wear eye protection with side shields marked to comply with ANSI Z87.1. Failure to do so could result in objects be...
Page 13 - SLOPE OPERATION; MAINTENANCE
9 — English WARNING: Never use a hose, water, or any liquids to clean or rinse off the lawn mower. Corrosive liquids, water, fer- tilizers, and chemicals used to treat lawns can enter the lawn mower and/or battery compartment and damage electronic components and/or the battery pack, which can result...
Page 14 - STORING THE MOWER; GENERAL MAINTENANCE
10 — English Remove the blade nut, spacer, and blade. Place the new blade on the shaft against the blade posts. Ensure blade is properly seated with shaft going through center blade hole and the two blade posts inserted into their respective holes on the blade. Make sure it is installed with the...
Page 15 - TROUBLESHOOTING; PROBLEM; MAKE THE MOST OF YOUR PURCHASE!; This product has a Three-year Limited Warranty for personal,
11 — English TROUBLESHOOTING IF THESE SOLUTIONS DO NOT SOLVE THE PROBLEM CONTACT YOUR AUTHORIZED SERVICE DEALER. PROBLEM POSSIBLE CAUSE SOLUTION Handle not in position. Lock knobs not locked. Lock upper and lower handle lock knobs. Mower not starting. Battery is low in charge. Start key not installe...
Page 16 - LIRE TOUTES LES INSTRUCTIONS; INSTRUCTIONS IMPORTANTES CONCERNANT LA SÉCURITÉ
2 — Français AVERTISSEMENT : LISEZ ET VEILLEZ À COMPRENDRE TOUTES LES INSTRUCTIONS. Le non respect des instructions énumérées ci-dessous et sur la machine pourrait résulter en un choc électrique, un incendie, et/ou des blessures sérieuses. LIRE TOUTES LES INSTRUCTIONS Cet outil coupant est capable...
Page 18 - SYMBOLES
4 — Français Certains des symboles ci-dessous peuvent être utilisés sur produit. Veiller à les étudier et à apprendre leur signification. Une interprétation correcte de ces symboles permettra d’utiliser produit plus efficacement et de réduire les risques. SYMBOLE NOM DÉSIGNATION / EXPLICATION Symbol...
Page 19 - CARACTÉRISTIQUES; SYMBOLE
5 — Français CARACTÉRISTIQUES APPRENEZ À CONNAÎTRE VOTRE TONDEUSE Voir la figure 1. L’ u t i l i s a t i o n s é c u r i t a i r e d e c e p r o d u i t n é c e s s i t e u n e compréhension de l’information sur le produit et dans le manuel de l’utilisation ainsi que la connaissance du projet à effe...
Page 20 - ASSEMBLAGE; DÉBALLAGE
6 — Français ASSEMBLAGE DÉBALLAGE Ce produit nécessite l’assemblage. Retirez prudemment l’outil et les accessoires de la boîte. Assurez-vous que tous les articles énumérés dans la Liste d’expédition sont inclus. AVERTISSEMENT : Ne pas utiliser le produit si, en le déballant, vous constatez que des...
Page 21 - RÉGLAGE DE LA HAUTEUR DE LA LAME
7 — Français ASSEMBLAGE AVIS : Veiller à ne pas pincer ou d’attraper le câble de démarreur lors du levage du poignée. Serrer les boutons de verrouillage de la poignée supérieure pour fixer solidement la poignée en place. NOTE : Si la poignée supérieure est lâche ou se sépare de la poignées inférie...
Page 22 - APPLICATIONS; UTILISATION; DÉMARRAGE / ARRÊT DE LA TONDEUSE; CONSEILS DE TONDAISON
8 — Français AVERTISSEMENT : Ne laissez pas la familiarité tirée d’une utilisation fréquente de ce type de produit atténuer votre vigilance. Souvenez- vous qu’une fraction de seconde d’inattention suffit à infliger des blessures graves. AVERTISSEMENT : Toujours porter une protection oculaire munie d...
Page 23 - UTILISATION SUR LES PENTES; ENTRETIEN
9 — Français AVERTISSEMENT : Avant d’effectuer de l’entretien ou de nettoyer la tondeuse, s’assurer que les lames de la tondeuse sont complètement immobiles et que les piles et la clé de démarrage sont enlevées pour empêcher un démarrage accidentel ou des possibles blessures corporelles graves. AVER...
Page 25 - DÉPANNAGE; PROBLÈME; TIREZ LE MEILLEUR PARTI DE VOTRE ACHAT!; Ce produit est accompagné d’une garantie limitée de
11 — Français APPELER L E 1-800-525-2579 BESOIN D'A IDE? ¿NECESITA AYUDA? LLAME AL www.ryobit ools.com DÉPANNAGE SI LES PRÉSENTES SOLUTIONS NE RÉSOLVENT PAS LE PROBLÈME, CONTACTER LE CENTRE DE RÉPARATIONS AGRÉÉ. PROBLÈME CAUSE POSSIBLE SOLUTION Poignée en mauvaise position. Verrouiller les boutons n...
Page 26 - LEA TODAS LAS INSTRUCCIONES; INSTRUCCIONES DE SEGURIDAD IMPORTANTES
2 — Español ADVERTENCIA: LEA Y COMPRENDA TODAS LAS INSTRUCCIONES. El incumplimiento de las instrucciones señaladas abajo y en la máquina puede causar descargas eléctricas, incendios y/o lesiones serias. LEA TODAS LAS INSTRUCCIONES Esta máquina de corte es capaz de amputar manos y pies, y de lanzar...
Page 28 - SÍMBOLOS
4 — Español Las siguientes palabras de señalización y sus significados tienen el objeto de explicar los niveles de riesgo relacionados con este producto. SÍMBOLO SEÑAL SIGNIFICADO PELIGRO: Indica una situación peligrosa, la cual, si no se evita, causará la muerte o le-siones serias. ADVERTENCIA: Ind...
Page 29 - CARACTERÍSTICAS; SÍMBOLO
5 — Español CARACTERÍSTICAS FAMILIARÍCESE CON SU PODADORA DE PASTO Vea la figura 1. Para usar este producto con la debida seguridad se debe comprender la información indicada en el producto mismo y en este manual, y se debe comprender también el trabajo que intenta realizar. Antes de usar este produ...
Page 30 - ARMADO; DESEMPAQUETADO; LISTA DE EMPAQUETADO
6 — Español ARMADO DESEMPAQUETADO Este producto requiere armarse. Extraiga cuidadosamente de la caja la herramienta y los accesorios. Asegúrese de que estén presentes todos los artículos enumerados en la Lista de empaquetado . ADVERTENCIA: No utilice este producto si alguna pieza incluida en la Li...
Page 31 - AJUSTE DE LA ALTURA DE LA CUCHILLA
7 — Español ARMADO AVISO: No permita que se pellizque o se enreden el cable del arrancador al subir el mango. Para fijar el mango superior en su posición, apretar las perillas del seguro del mango superior. NOTA: Si el mango superior está flojo o separado del mangos inferior, apriete las perillas ...
Page 32 - ENCENDIDO Y APAGADO DE LA PODADORA; SUGERENCIAS PARA EL PODADO; FUNCIONAMIENTO
8 — Español ADVERTENCIA: Asegúrese de que los pestillos del paquete de baterías entre adecuadamente en su lugar y que el paquete de baterías esté bien colocado y asegurado en el puerto de batería antes de que encenderla. No asentar el paquete de baterías correctamente podría provocar que el paquete ...
Page 33 - MANEJO EN PENDIENTES; VACIADO DEL RECEPTOR DE HIERBA; MANTENIMIENTO
9 — Español ADVERTENCIA: Nunca use una manguera, agua ni otros líquidos para limpiar o enjuagar la podadora. Los líquidos corrosivos, el agua, los fertilizantes y los productos químicos utilizados con las podadoras pueden ingresar a la unidad o al compartimiento de la batería y dañar los componentes...
Page 35 - CORRECCIÓN DE PROBLEMAS; PROBLEMA; APROVECHE AL MÁXIMO SU COMPRA!; Este producto tiene una garantía limitada de tres años para fines
11 — Español APPELER L E 1-800-525-2579 BESOIN D'A IDE? ¿NECESITA AYUDA? LLAME AL www.ryobit ools.com CORRECCIÓN DE PROBLEMAS SI CON ESTAS SOLUCIONES NO SE RESUELVE EL PROBLEMA, COMUNÍQUESE CON EL CONCESIONARIO DE SERVICIO AUTORIZADO DE SU PREFERENCIA. PROBLEMA CAUSA POSIBLE SOLUCIÓN El mango no est...
Page 36 - OPERATOR’S MANUAL; MANUEL D’UTILISATION / MANUAL DEL OPERADOR; TECHTRONIC INDUSTRIES POWER EQUIPMENT
9980003309-17-20 (REV:02) OPERATOR’S MANUAL MANUEL D’UTILISATION / MANUAL DEL OPERADOR 13 in., 18 VOLT LAWN MOWER 13 po, 18 V TONDEUSE 13 pulg., 18 V PODADORA P1108 TECHTRONIC INDUSTRIES POWER EQUIPMENT P.O. Box 1288, Anderson, SC 29622, USA 1-800-525-2579 • www.ryobitools.com RYOBI is a registered ...