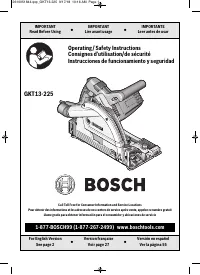
Page 2 - General Power Tool Safety Warnings
2 Work area safety K e e p w o r k a r e a c l e a n a n d w e l l l i t . Cluttered or dark areas invite accidents. Do not operate power tools in explosive atmospheres, such as in the presence of flammable liquids, gases or dust. Power tools create sparks which may ignite the dust or fumes. Keep ch...
Page 4 - Safety Rules for Circular Saws
4 K e e p h a n d s a w a y f r o m cutting area and the blade. K e e p y o u r s e c o n d h a n d o n a u x i l i a r y handle, or motor housing. If both hands are holding the saw, they cannot be cut by the blade. Do not reach underneath the workpiece. T h e g u a r d c a n n o t p r o t e c t y o...
Page 5 - Guard function
5 Support large panels to minimize the risk o f b l a d e p i n c h i n g a n d k i c k b a c k . L a r g e panels tend to sag under their own weight. Supports must be placed under the panel on both sides, near the line of cut and near the edge of the panel. D o n o t u s e d u l l o r d a m a g e d...
Page 7 - Symbols; Symbol
7 Symbols Symbol Designation / Explanation V Volts (voltage) A Amperes (current) Hz Hertz (frequency, cycles per second) W Watt (power) kg Kilograms (weight) min Minutes (time) s Seconds (time) ⌀ Diameter (size of drill bits, grinding wheels, etc.) n 0 No load speed (rotational speed at no load) n R...
Page 9 - Getting to Know Your Saw; D i s c o n n e c t t h e p l u g f r o m t h e p o w e r s o u r c e b e f o r e m a k i n g a n y; Track Saw; Insulated gripping
9 4 19 7 6 8 9 11 27 12 32 15 18 17 16 1 3 24 4 2 13 5 Getting to Know Your Saw D i s c o n n e c t t h e p l u g f r o m t h e p o w e r s o u r c e b e f o r e m a k i n g a n y assembly, adjustments or changing accessories. Such preventive safety measures reduce the risk of starting the tool acci...
Page 10 - Getting to Know Your Track; Certified to; Specifications
10 Getting to Know Your Track NOTE: For tool specifications refer to the nameplate on your tool. Certified to CAN/CSA C22.2 No. 62841-2-5-16 UL 62841-2-5 (Ed.1) in conjunction with CAN/CSA C22.2 No. 62841-1-15 UL 62841-1 (Ed.1) Including CSA Initial factory evaluation Model number GKT13-225 Blade 6-...
Page 11 - Saw Assembly; ▶ Replacing The Blade; ▼ REMOVING THE BLADE
11 Saw Assembly ▶ Replacing The Blade D i s c o n n e c t t h e p l u g from the power source b e f o r e m a k i n g a n y a s s e m b l y , adjustments or changing accessories. Such preventive safety measures reduce the risk of starting the tool accidentally. Use only 6-1/2" blade rated 6250/m...
Page 12 - ▼ ADAPTING THE FOOT PLATE TO; Track Assembly
12 Saw Assembly B l a d e ” ) , t h e b l a d e w i l l s l i p w h e n i t encounters ex cessive resistance, thus reducing saw’s tendency to kickback. O n e s e t t i n g m a y n o t b e s u f f i c i e n t f o r cutting all materials. If ex cessive blade slippage occurs, tighten the blade stud a f...
Page 13 - ▼ SECURING TRACKS; T o a v o i d t h e r i s k o f; ▼ PROTECTIVE END CAPS
13 F. A d j u s t t h e s a w ’ s c u t t i n g d e p t h t o approximately 0.36” (9 mm) and the bevel angle to 0°. This will result in t h e b l a d e e x t e n d i n g 1 / 8 ” ( 3 m m ) below the anti-splinter edge. G. F o l l o w i n g t h e i n s t r u c t i o n s i n t h e “SWITCHIN ON AND OFF”...
Page 14 - ▼ MITER GUIDE
14 ▼ MITER GUIDE The miter guide 43 (sold separately) can b e u s e d t o p r e c i s e l y p o s i t i o n a t r a c k from 60° left to 45° right. The miter guide must be positioned at the front end of track. A. Loosen the knob 48 on the bottom of the miter guide (Fig. 10). B. Follow instructions i...
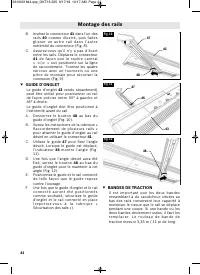
Page 15 - ▼ TRACTION STRIPS
15 Track Assembly ▼ TRACTION STRIPS It is important that the two rubberlike s t r i p s o n t h e b o t t o m o f t h e t r a c k s m a i n t a i n t h e i r a b i l i t y t o m i n i m i z e t h e possibility of the track shifting during a cut. If one or both of the strips become w o r n , t h e y ...
Page 16 - ▼ CARRY BAG
16 ▼ ANTI-SPLINTER EDGE T o m i n i m i z e s p l i n t e r i n g o f t h e w o r k p i e c e , a w o r n e d g e s h o u l d b e replaced. The anti-splinter edge comes in a roll that is 11 feet (3.35m) long and can be cut to size for any given track. A. Pull out both end caps 44 and 45 and r e m o ...
Page 17 - Operating Instructions
17 ▶ Bevel Adjustment B e c a u s e o f t h e i n - c r e a s e d a m o u n t o f b l a d e e n g a g e m e n t i n t h e w o r k a n d decreased stability of the foot, blade b i n d i n g m a y o c c u r . K e e p t h e s a w s t e a d y a n d t h e f o o t f i r m l y o n t h e workpiece. - Loosen...
Page 18 - ▶ Cutting line guides; ▼ DUST ExTRACTION
18 Operating Instructions 28 29 34 18 35 36 Fig. 23 ▶ Cutting line guides The 0° cutting line guide 28 indicates the position of the saw blade for straight c u t s w h e t h e r o r n o t a t r a c k i s u s e d . When a track is used, it indicates the position of the blade at any bevel angle. T h e...
Page 19 - ▶ Basic operations; ▼ SPEED SELECTION; ▶ General Cutting Instructions
19 Operating Instructions ▶ Basic operations When starting the tool, h o l d i t w i t h b o t h hands. The torque from the motor can cause the tool to twist. ▼ SPEED SELECTION The required speed can be preselected w i t h t h e s p e e d d i a l 2 4 b e f o r e t h e operation (Fig. 1). The require...
Page 20 - ▼ CUTTING WITHOUT PLUNGE ACTION; ▶ Working Advice; ▼ SAWING WOOD
20 ▼ CUTTING WITHOUT PLUNGE ACTION H o l d t h e t o o l f i r m l y w i t h b o t h h a n d s (one hand on the main handle 19 and the other on the auxiliary handle 4 ). Set the front of footplate on the workpiece to be cut without the blade making any contact (ensure the blade will not make contact...
Page 21 - ▼ SAWING OTHER MATERIALS; ▶ Precision Sawing With Track
21 ▼ SAWING OTHER MATERIALS The instructions for cutting wood can a l s o b e u s e d f o r c u t t i n g s t r u c t u r a l l y stable plastic materials. When cutting plastic materials, always make a test cut to see if the saw causes the material to m e l t . I f n e c e s s a r y , a d j u s t t ...
Page 23 - ▶ Plunge Cuts; Do not perform plunge
23 B Operating Instructions ▶ Plunge Cuts Do not perform plunge c u t w i t h o u t u s i n g track. Plunge cuts without track increase the risk of injury. Install track to workpiece to be cut (See “Securing Tracks” section for details). P l a c e t h e s a w o n t h e t r a c k 4 0 a t t h e d e s ...
Page 24 - Extension Cords; ▶ Tool Lubrication; Maintenance
24 If an extension cord is necessary, a cord with a d e q u a t e s i z e c o n d u c t o r s t h a t i s c a p a b l e o f c a r r y i n g t h e c u r r e n t necessary for your tool must be used. This will prevent excessive voltage drop, loss of power or overheating. Grounded tools must use 3-wire...
Page 25 - Attachments and Accessories
25 Attachments and Accessories The use of any other attachments or acces so ries not specified in this manual may create a hazard. Store accessories in a dry and temperate environment to avoid corrosion and deterioration. Bosch No. Description Included Sold Separately Accessories PRO648TS 48-tooth b...
Page 26 - Troubleshooting; Read instruction manual first! Remove plug from the power source
26 Troubleshooting Read instruction manual first! Remove plug from the power source before making adjustments or assembling the blade. PROBLEM CAUSE CORRECTIVE ACTION Saw will not start 1. Power cord is not plugged in. 2. Power source fuse or circuit breaker tripped. 3. Cord damaged. 4. Burned out s...
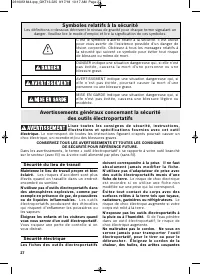
Page 27 - Sécurité du lieu de travail; Symboles relatifs à la sécurité
27 L i s e z t o u t e s l e s c o n s i g n e s d e s é c u r i t é , i n s t r u c t i o n s , i l l u s t r a t i o n s e t s p é c i f i c a t i o n s f o u r n i e s a v e c c e t o u t i l électrique. Le non-respect de toutes les instructions figurant ci-après pourrait causer un choc électriqu...
Page 28 - Sécurité personnelle; Avertissements généraux concernant la sécurité
28 ou des pièces mobiles. Les cordons abîmés ou emmêlés augmentent les risques de choc électrique. Si vous utilisez un outil électroportatif à l’extérieur, employez une rallonge conçue pour l’extérieur. Ces rallonges sont faites pour l’extérieur et réduisent le risque de choc électrique. S'il est ab...
Page 29 - Entretien; Consignes de sécurité pour scies circulaires
29 R a n g e z l e s o u t i l s é l e c t r o p o r t a t i f s d o n t vous ne vous servez pas hors de portée d e s e n f a n t s e t n e p e r m e t t e z p a s à d e s personnes qui ne connaissent pas l’outil é l e c t r o p o r t a t i f o u q u i i g n o r e n t c e s c o n s i g n e s d e s ’...
Page 33 - Symboles; Symbole
33 Symboles Important : Certains des symboles suivants peuvent être utilisés sur votre outil. Veuillez les étudier et apprendre leur signification. Une interprétation appropriée de ces symboles vous permettra d'utiliser l'outil de façon plus efficace et plus sûre. Symbole Désignation / Explication V...
Page 35 - Familiarisez-vous avec votre scie; Surfaces isolées de
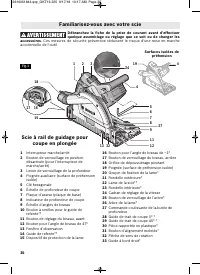
35 Débranchez la fiche de la prise de courant avant d'effectuer quelque assemblage ou réglage que ce soit ou de changer les accessoires. Ces mesures de sécurité préventive réduisent le risque d'une mise en marche accidentelle de l'outil. Familiarisez-vous avec votre scie 4 19 7 6 8 9 11 27 12 32 15 ...
Page 36 - R E M A R Q U E :; Spécifications
36 Familiarisez-vous avec votre scie R E M A R Q U E : P o u r s p é c i f i c a t i o n s d e l ' o u t i l , r e p o r t e z - v o u s à l a p l a q u e signalétique de votre outil. Certifiée conforme à CAN/CSA C22.2 N° 62841-2-5-16 UL 62841-2-5 (Éd. 1) conjointement avec CAN/CSA C22.2 N° 62841-1-...
Page 37 - Montage de la scie; ▶ Remplacement de la lame; Familiarisez-vous avec votre scie à rail de guidage
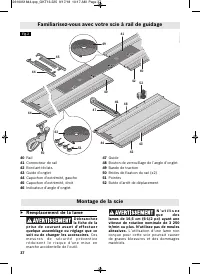
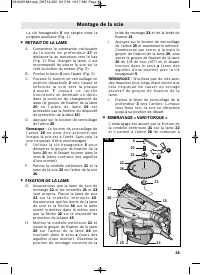
Montage de la scie ▶ Remplacement de la lame D é b r a n c h e z la fiche de la p r i s e d e c o u r a n t a v a n t d ' e f f e c t u e r quelque assemblage ou réglage que ce soit ou de changer les accessoires. Ces m e s u r e s d e s é c u r i t é p r é v e n t i v e r é d u i s e n t l e r i s q...
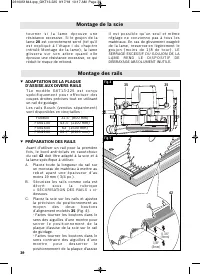
Page 39 - ▼ ADAPTATION DE LA PLAQUE; Montage des rails
39 Montage de la scie t o u r n e r s i l a l a m e é p r o u v e u n e résistance excessive. Si le goujon de la lame 20 est correctement serré (tel qu’il e s t e x p l i q u é à l ’ é t a p e I d u c h a p i t r e i n t i t u l é M o n t a g e d e l a l a m e ) , l a l a m e g l i s s e r a s u r s...
Page 40 - ▼ SÉCURISATION DES RAILS; P o u r é v i t e r; ▼ CAPUCHONS D’ExTRÉMITÉ
40 de la scie sur le rail de guidage. D. Déplacez l’indicateur de profondeur d e c o u p e 8 j u s q u ’ à s a p o s i t i o n l a plus élevée possible (voir Fig. 21). E. A s s u r e z - v o u s q u e l ’ i n d i c a t e u r d e profondeur de coupe 8 est dans la position b (Fig. 21) F. Réglez la pro...
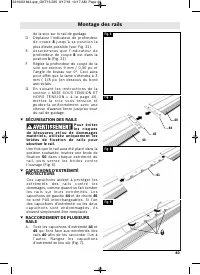
Page 42 - ▼ BUTÉE DE FIN DE COURSE
42 Montage des rails A. T i r e z s u r l e s d e u x c a p u c h o n s d’extrémité 44 et 45 pour les faire sortir, puis retirez les bandes usées (Fig. 13). B. Déroulez et coupez deux longueurs de bande de traction 49 qui sont plus longues de 1 % que la longueur du rail. P. ex., pour le modèle FSN80...
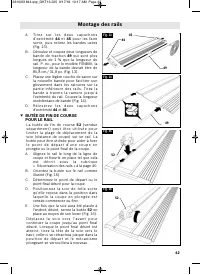
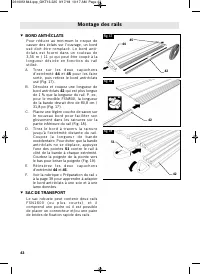
Page 43 - ▼ SAC DE TRANSPORT
43 ▼ BORD ANTI-ÉCLATS Pour réduire au minimum le risque de causer des éclats sur l’ouvrage, un bord u s é d o i t ê t r e r e m p l a c é . L e b o r d a n t i - é c l a t s e s t f o u r n i d a n s u n r o u l e a u d e 3,35 m / 11 pi qui peut être coupé à la l o n g u e u r d é s i r é e e n f o ...
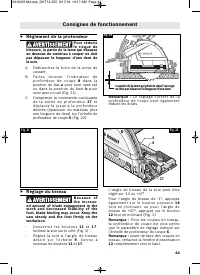
Page 44 - Consignes de fonctionnement; ▶ Réglage du biseau; B e c a u s e o f; ▶ Règlement de la profondeur; Pour réduire
44 Consignes de fonctionnement ▶ Réglage du biseau B e c a u s e o f t h e i n c r e a s - ed amount of blade engagement in thew o r k a n d d e c r e a s e d s t a b i l i t y o f t h efoot, blade binding may occur. Keep thesaw steady and the foot firmly on theworkpiece. - D e s s e r r e z l e s b...
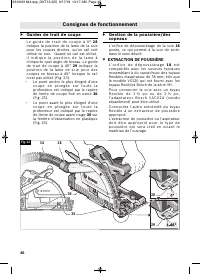
Page 45 - ▶ Guides de trait de coupe; ▼ ExTRACTION DE POUSSIÈRE
45 Consignes de fonctionnement 28 29 34 18 35 36 Fig. 23 ▶ Guides de trait de coupe L e g u i d e d e t r a i t d e c o u p e à 0 ° 2 8 indique la position de la lame de la scie pour les coupes droites, qu’un rail soit utilisé ou non. Quand un rail est utilisé, i l i n d i q u e l a p o s i t i o n ...
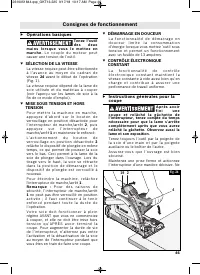
Page 46 - ▶ Opérations basiques; d e u x; ▶ Instructions générales pour la; A p r è s a v o i r
46 Consignes de fonctionnement ▶ Opérations basiques T e n e z l ’ o u t i ld e s d e u x m a i n s l o r s q u e v o u s l e m e t t e z e nm a r c h e . L e c o u p l e d u m o t e u r p e u t causer une torsion de l’outil. ▼ SÉLECTION DE LA VITESSE La vitesse requise peut être sélectionnée à l ’ ...
Page 47 - ▼ COUPE SANS ACTION DE PLONGÉE
47 Consignes de fonctionnement f o r c e z j a m a i s l a s c i e . A p p l i q u e z u n e légère pression continuellement. Attendez toujours que la lame tourne à p l e i n r é g i m e ( t e l q u ’ i n d i q u é s u r l e cadran de vitesse) avant de la mettre en contact avec l’ouvrage. À moins qu...
Page 48 - ▶ Conseils pour l’utilisation; ▼ SCIAGE DE BOIS; ▶ Sciage de précision avec un rail
48 Consignes de fonctionnement p o s s i b l e s . R e l â c h e z l ’ i n t e r r u p t e u r d e m a r c h e / a r r ê t e t a t t e n d e z q u e l a l a m e s ' a r r ê t e c o m p l è t e m e n t , p u i s r e t i r e z l a l a m e . A l i g n e z à n o u v e a u l a s c i e s u r l a nouvelle ...
Page 50 - ▶ Coupes en plongée; N ’ e f f e c t u e z
50 B f a ç o n d o n t i l s s o n t s o u t e n u s . S i v o u s essayez de les couper sans les avoir mise au niveau et soutenus par des supports au préalable, la lame aura tendance à gripper provoquant des REBONDS et la surcharge du moteur (Fig. 29). Q u ’ u n r a i l s o i t u t i l i s é o u n ...
Page 51 - DIMENSIONS DE RALLONGES; Cordons de rallonge
51 Consignes de fonctionnement (Fig. 31, A ). Si vous ne voulez pas utiliser la butée de fin de course, fabriquez une b u t é e f i x e o u é q u i v a l e n t e q u i s e r a assujettie au rail (Fig. 31, B ). Tirez la fenêtre d’observation 13 vers le bas jusqu'à ce qu'elle entre en contact avec l'o...
Page 53 - Attachements et accessoires
53 Attachements et accessoires L ’ u t i l i s a t i o n d ’ a u t r e s a c c e s s o i r e s o u a t t a c h e m e n t s n o n spécifiés dans ce mode d’emploi pourrait être dangereuse. Ranger les accessoires dans un environnement sec et tempéré pour éviter les risques de corrosion et de détériorat...
Page 54 - Guide de diagnostic; Commencer par lire le mode d'emploi ! Débranchez le cordon
54 Guide de diagnostic Commencer par lire le mode d'emploi ! Débranchez le cordon d'alimentation de la prise de courant avant d'effectuer des réglages ou d'assembler la lame. PROBLÈME CAUSE ACTION CORRECTIVE La scie ne démarre pas. 1. Le cordon d'alimenta tion n'est pas branché. 2. L e f u s i b l e...
Page 55 - Seguridad del área de trabajo; Símbolos de seguridad
55 L e a t o d a s l a s a d v e r t e n c i a s d e s e g u r i d a d , i n s t r u c c i o n e s , i l u s t r a c i o n e s y e s p e c i f i c a c i o n e s s u m i n i s t r a d a s c o n e s t a h e r r a m i e n t a e l é c t r i c a . S i n o s e s i g u e n t o d a s l a s i n s t r u c c i...
Page 56 - Seguridad personal; Advertencias generales de seguridad para
56 h e r r a m i e n t a m e c á n i c a , t i r a r d e e l l a o desenchufarla. Mantenga el cordón alejado del calor, el aceite, los bordes afilados o las piezas móviles. Los cordones dañados o enganchados aumentan el riesgo de que se produzcan sacudidas eléctricas. Cuando utilice una herramienta ...
Page 58 - Normas de seguridad para sierras circulares
dañados o incorrectos. Las arandelas y el perno de la hoja se diseñaron especialmente p a r a l a s i e r r a c o n o b j e t o d e l o g r a r u n r e n d i m i e n t o ó p t i m o y u n f u n c i o n a m i e n t o con seguridad. Inspeccione el estado y la calidad de la madera y quítele todos los c...
Page 59 - Función del protector
59 q u e s o b r e s a l e p u e d e c o r t a r o b j e t o s q u e pueden causar retroceso. Las arandelas y el perno de la hoja de la s i e r r a s e h a n d i s e ñ a d o p a r a f u n c i o n a r c o m o u n e m b r a g u e p a r a r e d u c i r l a i n t e n s i d a d d e u n r e t r o c e s o ...
Page 61 - Símbolos
61 Símbolos Importante: Es posible que algunos de los símbolos siguientes se usen en su herramienta. Por favor, estúdielos y aprenda su significado. La interpretación adecuada de estos símbolos le permitirá utilizar la herramienta mejor y con más seguridad. Símbolo Désignación / Explicación V Volt (...
Page 63 - Familiarización con la sierra; Superficies de agarre
63 Desconecte el enchufe de la fuente de energía antes de realizar c u a l q u i e r e n s a m b l a j e o a j u s t e , o c a m b i a r a c c e s o r i o s . E s t a s m e d i d a s d e s e g u r i d a d p r e v e n t i v a s r e d u c e n e l r i e s g o d e a r r a n c a r l a h e r r a m i e n t...
Page 64 - Certificada conforme a; Especificaciones
64 NOTA: Para obtener las especifica - ciones de la herramienta, consulte la p l a c a d e l f a b r i c a n t e c o l o c a d a e n l a herramienta. Certificada conforme a CAN/CSA C22.2 No. 62841-2-5-16 UL 62841-2-5 (Ed.1) en combinación con CAN/CSA C22.2 No. 62841-1-15 UL 62841-1 (Ed.1) Incluyendo...
Page 65 - Ensamblaje de la sierra; ▶ Remplazo de la hoja; Familiarización con el carril guía
Ensamblaje de la sierra ▶ Remplazo de la hoja D e s c o n e c t e e l e n c h u f e d e l a f u e n t e d e e n e r g í a a n t e s d e r e a l i z a r c u a l q u i e r e n s a m b l a j e o a j u s t e , o cambiar accesorios. Estas medidas de seguridad preventivas reducen el riesgo d e a r r a n c...
Page 67 - ▼ ADAPTACIÓN DE LA PLACA-BASE A; Ensamblaje del carril guía
67 Ensamblaje de la sierra a l e n c o n t r a r u n a r e s i s t e n c i a e x c e s i v a , por lo que reducirá la tendencia de la sierra al retroceso. U n a p o s i c i ó n d e a j u s t e p u e d e n o s e r s u f i c i e n t e p a r a c o r t a r t o d o s l o s m a - t e r i a l e s . S i l a...
Page 70 - ▼ TOPE DE RECORRIDO PARA EL
70 Ensamblaje del carril guía extremo alejado del carril guía. Corte y retire las franjas que sobren (Fig. 14). D. Reinserte ambas tapas de extremo 44 y 45 . ▼ TOPE DE RECORRIDO PARA EL CARRIL GUÍA E l t o p e d e r e c o r r i d o 5 2 ( v e n d i d o p o r separado) se puede utilizar para limitar e...
Page 71 - ▼ BOLSA DE TRANSPORTE
71 e x t r e m o 4 4 y 4 5 y r e t i r e e l b o r d e antiastillas desgastado (Fig. 17). B. Desenrolle y corte un tramo del borde antiastillas 42 que sea un 1 % más largo que la longitud del carril guía. P. ej., para el FSN800 la longitud de la franja deberá ser de 80,8 cm/31,8 pulgadas (Fig. 17). ...
Page 72 - Instrucciones de funcionamiento; ▶ Ajuste de bisel
72 Instrucciones de funcionamiento ▶ Ajuste de bisel D e b i d o a l a u m e n t o e n l a cantidad de acoplamiento de la hoja en la pieza de trabajo y a la disminución en l a e s t a b i l i d a d d e l a b a s e , s e p u e d e producir atasco de la hoja. Mantenga la sierra estable y la base firme...
Page 73 - ▼ ExTRACCIÓN DE POLVO; ▶ Operaciones básicas; C u a n d o p o n g a; ▼ SELECCIÓN DE VELOCIDAD
73 28 29 34 18 35 36 Fig. 23 ▶ Guías de línea de corte La guía de línea de corte de 0° 28 indica la posición de la hoja de sierra para realizar cortes rectos tanto si se utiliza un carril g u í a c o m o s e n o s e u t i l i z a . C u a n d o s e utiliza un carril guía, dicha guía indica la posició...
Page 74 - ▼ ENCENDIDO Y APAGADO; ▶ Instrucciones generales de
74 Instrucciones de funcionamiento (consulte la información general sobre hojas de sierra que se encuentra al final de estas instrucciones de uso). ▼ ENCENDIDO Y APAGADO P a r a p o n e r e n m a r c h a l a m á q u i n a , presione el botón de fijación en apagado p a r a e l i n t e r r u p t o r d...
Page 75 - ▼ CORTE SIN ACCIÓN DE INMERSIÓN; ▶ Consejos para trabajar
75 e s t e e f e c t o . P a r a r e a l i z a r u n c o r t e d e a c a b a d o , s e r e c o m i e n d a u n a h o j a d e corte transversal o una hoja ingletadora. ▼ CORTE SIN ACCIÓN DE INMERSIÓN Agarre firmemente la herramienta con las dos manos (una mano en el asa principal 19 y la otra mano en...
Page 76 - ▶ Aserrado de precisión con carril
76 estado y el perfil de los dientes de la h o j a d e s i e r r a . P o r l o t a n t o , u t i l i c e únicamente hojas de sierra afiladas que sean adecuadas para el material que se vaya a cortar. ▼ ASERRADO DE MADERA La selección correcta de la hoja de sierra d e p e n d e d e l t i p o y l a c a...
Page 78 - ▶ Cortes por inmersión; N o r e a l i c e u n
78 Instrucciones de funcionamiento B demasiado grande para una mesa o un banco de trabajo, utilice los tablas de apoyo de dos por cuatro pulgadas sobre el suelo y fije la pieza de trabajo. ▶ Cortes por inmersión N o r e a l i c e u n c o r t e p o r inmersión sin usar el carril guía. Los cortes por ...
Page 79 - Mantenimiento
79 E l m a n t e n i - m i e n t o p r e - v e n t i v o r e a l i z a d o p o r p e r s o n a l n o autorizado pude dar lugar a la colocación i n c o r r e c t a d e c a b l e s y c o m p o n e n t e s internos que podría constituir un peligro serio. Recomendamos que todo el servicio de las herrami...
Page 80 - Cordones de extensión
80 S i e s n e c e s a r i o u n c o r d ó n d e extensión, se debe usar un cordón con conductores de tamaño adecuado que sea capaz de transportar la corriente n e c e s a r i a p a r a l a h e r r a m i e n t a . E s t o e v i t a r á c a í d a s d e t e n s i ó n e x c e s i v a s , pérdida de pot...
Page 81 - Resolución de problemas; Lea primero el manual de instrucciones! Saque el enchufe de la
81 Resolución de problemas Lea primero el manual de instrucciones! Saque el enchufe de la fuente de energía antes de hacer ajustes o ensamblar la hoja. PROBLEMA CAUSA MEDIDA CORRECTIVA La sierra no arranca 1. El cordón de energía no está enchufado. 2. El fusible o el cortacircuitos de la fuente de e...
Page 82 - PROBLEMA
82 Resolución de problemas PROBLEMA CAUSA MEDIDA CORRECTIVA E l c o r t e s e a t o r a , quema o detiene el m o t o r a l c o r t a r a l hilo 1. La hoja está desafilada y tiene un triscado inadecuado de los dientes. 2. La tabla está combada. 3. La hoja se atora. 4. Soporte inapropiado de la pieza ...
Page 83 - Notes • Remarques • Notas
83 Notes • Remarques • Notas This page was intentionally left blank Cette page a été laissée vierge intentionnellement. Esta página se dejó intencionalmente en blanco 2610051844.qxp_GKT13-225 9/17/18 10:18 AM Page 83


 Bosch CCS180B
User Manual
Bosch CCS180B
User Manual
 Bosch CS10
User Manual
Bosch CS10
User Manual
 Bosch CS5
User Manual
Bosch CS5
User Manual
 Bosch CSW41
User Manual
Bosch CSW41
User Manual
 Bosch GKS 10,8 V-LI
User Manual
Bosch GKS 10,8 V-LI
User Manual
 Bosch GKS 18V-57
User Manual
Bosch GKS 18V-57
User Manual
 Bosch GKS 18V-57 G
User Manual
Bosch GKS 18V-57 G
User Manual
 Bosch GKS 235 Turbo Professional
User Manual
Bosch GKS 235 Turbo Professional
User Manual
 Bosch GKS 55+ GCE
User Manual
Bosch GKS 55+ GCE
User Manual
 Bosch GKS 600
User Manual
Bosch GKS 600
User Manual
 Bosch GKS 65 G
User Manual
Bosch GKS 65 G
User Manual
 Bosch GTS 10 J
User Manual
Bosch GTS 10 J
User Manual
 Bosch PKS 55 A
Manual
Bosch PKS 55 A
Manual
 Bosch UniversalCirc 12
User Manual
Bosch UniversalCirc 12
User Manual