Page 2 - CONTENTS
2 BEFORE USING YOUR MACHINE FOR THE FIRST TIME 3 Language selection 3 Laundry labels 3 SAFETY INSTRUCTIONS 4 General 4Safety 4Installation 4Transport/winter storage 4 Packing material 4 Recycling 4Child safety 6 Child-safe start 6 Activating/deactivating child-safe start 6 To deactivate child-safe s...
Page 3 - BEFORE USING YOUR MACHINE FOR THE FIRST TIME
3 LANGUAGE SELECTION You will be prompted to select the display language when you have connected your machine and start it for the first time. Do as follows: 1. Turn the programme selector to choose from: US English, English, Svenska, Dansk, Norsk, Suomi, Français, Deutsch, Italiano, Espanol, Русски...
Page 4 - SAFETY INSTRUCTIONS
4 GENERAL Read the operating instructions and keep them in a safe place! • The machine may be used in public areas. • Electrical installation, if required, should be carried out by a qualifi ed electrician. • The machine should only be used for tumble-drying as described in these instructions. • Rep...
Page 5 - Vented dryers
5 To minimize the risk of fi re in a tumble dryer, the following should be observed: • Items that have been spotted or soaked with vegetable or cooking oil constitute a fi re hazard and should not be placed in a tumble dryer.Oil-aff ected items can ignite spontaneously, especially when exposed to he...
Page 6 - CHILD SAFETY; TO DEACTIVATE CHILD-SAFE START
6 SAFETY INSTRUCTIONS CHILD SAFETY WARNING! DO NOT ALLOW CHILDREN TO PLAY WITH THE TUMBLE DRYER. • If the door is opened when a programme is running the garments may be very hot, with a risk of burn injuries. • The tumble dryer does not start automatically when the door is closed (if a child pulls t...
Page 7 - DESCRIPTION OF THE TUMBLE DRYER
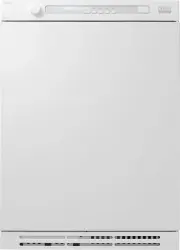
7 DESCRIPTION OF THE TUMBLE DRYER 1. Main power switch2. Condensed water container3. Panel4. Serial Number 5. Lint filter 6. Outer door 7. Steamer and filter 1 7 2 3 4 5 6
Page 8 - ADVICE AND TIPS BEFORE YOU TUMBLE-DRY; HAVE THE CLOTHES BEEN SPUN?
8 ADVICE AND TIPS BEFORE YOU TUMBLE-DRY Here are some tips that may help you before you begin tumble-drying. HAVE THE CLOTHES BEEN SPUN? Items to be tumble-dried should be spun at 1000 rpm or faster. Higher spin speeds save energy and reduce drying time. MATERIALS THAT CAN BE TUMBLE- DRIED This symb...
Page 9 - SELECT THE PROGRAMME; TUMBLE DRYING; SORT YOUR FABRICS
9 Auto extra dry This program is for items that are particularly difficult to dry. NOTE! Knitted fabrics in particular are prone to shrinkage. Use the Auto extra dry, Auto normal dry or Auto Iron dry programs for these items. Stretch clothes back into shape immediately after drying. Auto dry and Aut...
Page 10 - SELECTING OPTIONS; Energy save; PRESS THE START BUTTON
10 TUMBLE DRYING SELECTING OPTIONS By selecting options, you can tailor a drying programme to suit your requirements. The available options depend on the selected programme. Once you have started the programme, the options you selected are saved for the next time you use the same programme. The exce...
Page 11 - DRYING PROGRAMME FINISHED; Backlighting
11 DRYING PROGRAMME FINISHED The text Done appears on the display when the programme is finished. If the Anti crease option has been selected, the drum will rotate for three seconds per minute for two hours after the programme is finished. The compressor’s cooling fan continues to run after the prog...
Page 12 - PROGRAMME CHART
12 TUMBLE DRYING PROGRAMME CHART Here we present the energy and time consumption of a few different programmes. The table shows the effect of using different spin speeds when washing the load. Consumption can vary depending on room temperature, humidity, load, variations in the power supply and sele...
Page 13 - SETTINGS; YOU CAN CARRY OUT THE FOLLOWING
13 SETTINGS YOU CAN CARRY OUT THE FOLLOWING SETTINGS • Language • Child-safe You will be prompted to select the display language when you have connected your machine and start it for the first time. LANGUAGE Do as follows: 1. Turn off the machine using the main power switch. 2. Press and hold the St...
Page 14 - CARE AND CLEANING; CLEANING THE LINT FILTER
14 CARE AND CLEANING CLEANING THE LINT FILTER The lint filter must be cleaned after each load.1. Lift the filter from the holder in the door. 2. Lift the filter from the holder in the door. Open the lint filter. Use your thumb to press on the edge as illustrated and pull it out. 3. Use your hand or ...
Page 15 - CLEANING THE EVAPORATOR FILTER
15 CARE AND CLEANING CLEANING THE EVAPORATOR FILTER AND EVAPORATOR Clean the evaporator and the evaporator filter at the intervals shown on the machine’s display or more often. 1. Turn off the Main power switch and open the outer door. 2. Remove the plinth. 3. Open the heat pump door. 4. Pull out th...
Page 16 - CLEANING THE AUTO FILTER; CLEANING THE OUTSIDE OF THE
16 CARE AND CLEANING CLEANING THE AUTO FILTER Clean the filter at the intervals shown on the machine’s display or more often1. Pull the condensed water container out and up. 2. Unscrew and remove the auto filter. Sealing 3. Rinse the auto filter clean with water.4. Screw the autofilter back into pla...
Page 17 - TROUBLESHOOTING
17 TROUBLESHOOTING NOTE! When starting the tumble dryer for the first time or after a long period without use, you may notice a slight thumping noise. This noise is completely normal and will disappear after a few loads. THE MACHINE WILL NOT START Check: • that the door is properly closed. • that th...
Page 18 - TECHNICAL INFORMATION; TECHNICAL DATA; STANDARD TESTS
18 TECHNICAL INFORMATION TECHNICAL DATA Height: 850 mm Width: 595 mm Depth: 745 mm Weight (net): 59 kg Cylinder volume: 145 l Max. drying capacity: 10 kg Speed: 50-55 rpm Rated power: See type plate. Drum material: Stainless steel Outer casing material: Powder-coated and hot-galvanized sheet steel o...
Page 19 - SERVICE; BEFORE CONTACTING THE SERVICE; TYPE
19 SERVICE BEFORE CONTACTING THE SERVICE DIVISION See the Troubleshooting and Care and cleaning chapters to see whether you can rectify the problem. If you need to contact the service division, make sure that you know the model designation, type designation and serial number.The model designation (1...
Page 20 - POSITIONING THE TUMBLE DRYER; Freestanding; Stacking; INSTALLATION; How to assemble the stack:
20 WARNING! Do not start the machine until it has been in position for 24 hours. If for some reason the tumble dryer needs to be laid down for transport or service, it must be laid on its left side viewed from the front. POSITIONING THE TUMBLE DRYER The tumble dryer can be free-standing or in a stac...
Page 21 - ADJUSTING THE FEET; CONDENSED WATER; Connection on delivery
21 5. Fasten or undo the rear feet of the appliance until it is fully level, either on the floor or on the washing machine. 6. Slide the dryer backward until it reaches the anti- tipping bracket. Make sure the front of the appliance is raised by 50 to 150 mm as you slide it back. ADJUSTING THE FEET ...
Page 22 - DOOR HANGING
22 1. Hinge pins (top and bottom)2. Cover plate3. Plastic plugs (on the upper and lower edges) 4. Locking hook 5. Hinges (left + right side) 6. Plinth DOOR HANGING 2 4 1 3 5 6
Page 23 - Follow these instructions:
23 DOOR HANGING You can choose whether the door is hung on the right or the left. Follow these instructions: 1. Remove the plinth.2. Remove the hinge, two screws 3. Lift the door up and remove it. Support the door at the same time. 4. Remove both door pins (top and bottom). Fit them on the other sid...
Page 24 - QUICK GUIDE; TURN ON THE MAIN POWER SWITCH; SELECT A PROGRAMME AND ANY OPTIONS
3. 2. 4. 1. QUICK GUIDE TURN ON THE MAIN POWER SWITCH Load the garments and close the door. SELECT A PROGRAMME AND ANY OPTIONS Turn the programme selector to the required programme. DRYING PROGRAMME FINISHED The text End appears on the display when the programme is finished.Clean the lint filter aft...