Page 2 - Precautions; WARNING
i En Please read the following operating precautions before use. Yamaha will not be held responsible for any damage and/or injury caused by not following the cautions below. 1. To assure the finest performance, please read this manual carefully. Keep it in a safe place for future reference. 2. Insta...
Page 3 - English; ii
English ii En Precautions • VOLTAGE SELECTOR (For China, Korea, Asia and General models)The voltage selector switch on the rear panel of this unit must be set to your local main voltage BE-FORE plugging this unit into the AC main supply. Voltages are 110-120/220-240 V AC, 50/60 Hz. For U.K. customer...
Page 4 - iii
iii En Precautions Limited Guarantee for European Economic Area (EEA) and Switzerland Thank you for having chosen a Yamaha product. In the unlikely event that your Yamaha product needs guarantee service, please contact the dealer from whom it was purchased. If you experience any difficulty, please c...
Page 5 - Package contents; Installing the front, center, and surround
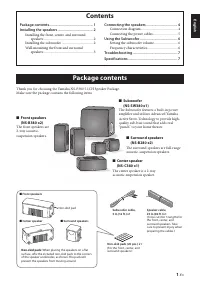
English 1 En Thank you for choosing the Yamaha NS-P380 5.1CH Speaker Package.Make sure the package contains the following items. Package contents Contents Package contents ................................................ 1Installing the speakers ....................................... 2 Installing t...
Page 6 - Note; surround speakers; Installing the speakers
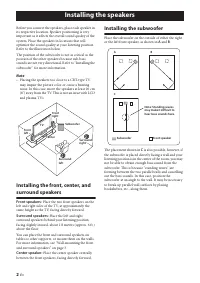
2 En Before you connect the speakers, place each speaker in its respective location. Speaker positioning is very important as it affects the overall sound quality of the system. Place the speakers in locations that will optimize the sound quality at your listening position. Refer to the illustration...
Page 7 - Wall-mounting the front and; • Make sure the shaft of the screw is seated in the; Warnings; • Do not affix the speakers to a wall using nails,
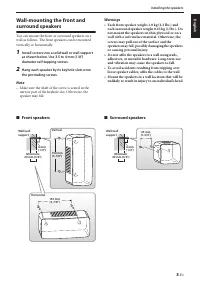
English 3 En Installing the speakers Wall-mounting the front and surround speakers You can mount the front or surround speakers on a wall as follows. The front speakers can be mounted vertically or horizontally. 1 Install screws into a solid wall or wall support as shown below. Use 3.5 to 4 mm (1/8&...
Page 8 - AC wall outlets before making any connections.; Connection diagram; Connecting the speakers
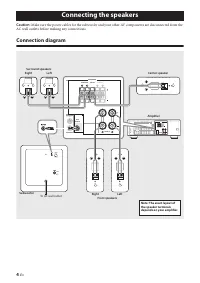
4 En Caution: Make sure the power cables for the subwoofer and your other AV components are disconnected from the AC wall outlets before making any connections. Connection diagram Connecting the speakers DOCK DIGITAL INPUT COMPONENT VIDEO VIDEO AUDIO MULTI CH INPUT HDMI ANTENNA SPEAKERS DVD OPTICAL ...
Page 9 - Preparing the speaker cables; Twist the bare wires tightly.; Operating the speaker terminals; Press and hold the terminal tab.; Notes; Connecting the power cables
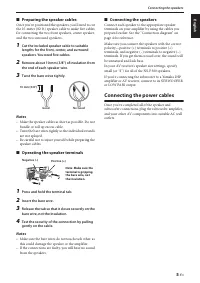
English 5 En Connecting the speakers ■ Preparing the speaker cables Once you’ve positioned the speakers, you’ll need to cut the 25-meter (82 ft.) speaker cable to make five cables for connecting the two front speakers, center speaker, and the two surround speakers. 1 Cut the included speaker cable t...
Page 10 - Power indicator; Setting the subwoofer volume; Turn on your other AV components.; The power indicator on the rear panel lights up.; • Once the subwoofer volume has been set, you can; Frequency characteristics; Using the Subwoofer
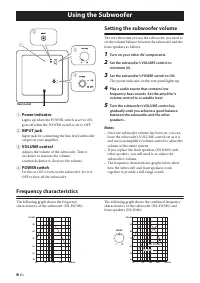
6 En 1 Power indicator Lights up when the POWER switch is set to ON; goes off when the POWER switch is set to OFF. 2 INPUT jack Input jack for connecting the line-level subwoofer output on your amplifier. 3 VOLUME control Adjusts the volume of the subwoofer. Turn it clockwise to increase the volume;...
Page 11 - Specifications are subject to change without notice.; Troubleshooting; Specifications
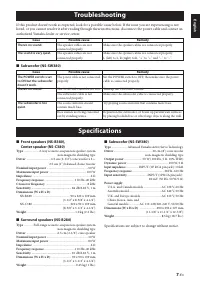
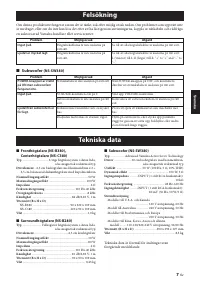
English 7 En If this product doesn’t work as expected, look for a possible cause below. If the issue you are experiencing is not listed, or you cannot resolve it after reading through these instructions, disconnect the power cable and contact an authorized Yamaha dealer or service center. ■ Subwoofe...
Page 12 - En ce qui concerne le NS-SW380; Précautions; AVERTISSEMENT
i Fr Lisez attentivement les précautions d’utilisation suivantes. Yamaha décline toute responsabilité en cas de dommages et/ou de blessures découlant du non respect de ces consignes. 1. Pour profiter au mieux de votre acquisition, lisez attentivement ce mode d’emploi. Conservez-le soigneusement pour...
Page 15 - Français; Contenu de l’emballage; Installation des enceintes avant, centrale et
1 Fr Français Nous vous remercions d’avoir opté pour le système d’enceintes Yamaha NS-P380 5.1CH.Vérifiez que l’emballage contient les éléments suivants: Contenu de l’emballage Sommaire Contenu de l’emballage..................................... 1Installation des enceintes .............................
Page 16 - Remarque; Installation du subwoofer; Installation des enceintes
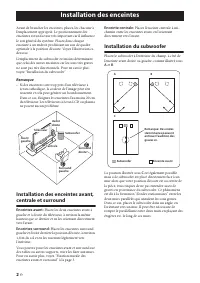
2 Fr Avant de brancher les enceintes, placez-les chacune à l’emplacement approprié. Le positionnement des enceintes est un facteur très important car il influence le son général du système. Placez donc chaque enceinte à un endroit produisant un son de qualité optimale à la position d’écoute. Voyez l...
Page 17 - • Vérifiez que la tige de la vis s’insère bien dans la; Avertissements; • Chaque enceinte avant pèse 1,0 kg et chaque
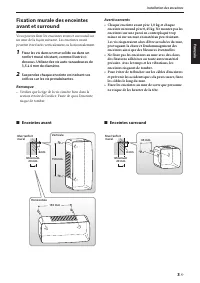
3 Fr Installation des enceintes Français Fixation murale des enceintes avant et surround Vous pouvez fixer les enceintes avant et surround sur un mur de la façon suivante. Les enceintes avant peuvent être fixées verticalement ou horizontalement. 1 Fixez les vis dans un mur solide ou dans un renfort ...
Page 18 - prises secteur avant d’effectuer la moindre connexion.; Schéma des connexions; Connexion des enceintes
4 Fr Attention: Vérifiez que les câbles d’alimentation du subwoofer et de vos autres éléments AV sont débranchés des prises secteur avant d’effectuer la moindre connexion. Schéma des connexions Connexion des enceintes DOCK DIGITAL INPUT COMPONENT VIDEO VIDEO AUDIO MULTI CH INPUT HDMI ANTENNA SPEAKER...
Page 19 - Préparation des câbles d’enceintes; Torsadez la portion dénudée des fils.; Utilisation des bornes d’enceintes; Insérez le fil dénudé.; Remarques
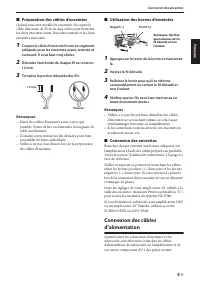
5 Fr Connexion des enceintes Français ■ Préparation des câbles d’enceintes Quand vous avez installé les enceintes, découpez le câble d’enceinte de 25 m en cinq câbles pour brancher les deux enceintes avant, l’enceinte centrale et les deux enceintes surround. 1 Coupez le câble d’enceinte fourni en se...
Page 20 - Témoin d’alimentation; Réglage du volume du subwoofer; Mettez les autres éléments AV sous tension.; Le témoin d’alimentation en face arrière s’allume.; • Quand le volume du subwoofer a été réglé, vous; Réponse en fréquences; Utilisation du subwoofer
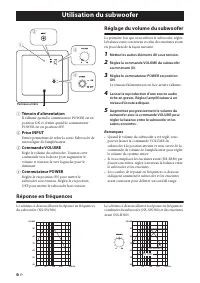
6 Fr 1 Témoin d’alimentation Il s’allume quand le commutateur POWER est en position ON et s’éteint quand le commutateur POWER est en position OFF. 2 Prise INPUT Entrée permettant de relier la sortie Subwoofer de niveau ligne de l’amplificateur. 3 Commande VOLUME Règle le volume du subwoofer. Tournez...
Page 21 - En cas de problème; Fiche technique
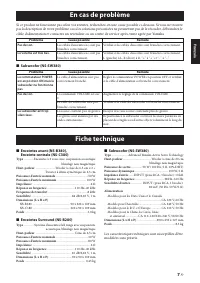
7 Fr Français Si ce produit ne fonctionne pas selon vos attentes, recherchez-en une cause possible ci-dessous. Si vous ne trouvez pas la description de votre problème ou si les solutions préconisées ne permettent pas de le résoudre, débranchez le câble d’alimentation et contactez un revendeur ou un ...
Page 22 - Vorsichtsmaßnahmen; WARNUNG
i De Bitte lesen Sie sich die folgenden Sicherheitshinweise vor der Inbetriebnahme durch. Yamaha kann für etwaige Schäden und/oder Verletzungen, die durch eine Nichtbeachtung der folgenden Sicherheitshinweise entstehen, nicht haftbar gemacht werden. 1. Um optimales Leistungsvermögen sicherzustellen,...
Page 25 - Deutsch; Lieferumfang; Installieren der Front- und Surround-Boxen
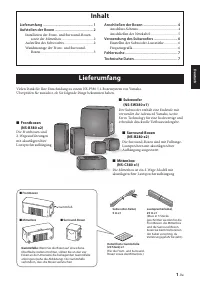
1 De Deutsch Vielen Dank für Ihre Entscheidung zu einem NS-P380 5.1-Boxensystem von Yamaha.Überprüfen Sie zunächst, ob Sie folgende Dinge bekommen haben. Lieferumfang Inhalt Lieferumfang ....................................................... 1Aufstellen der Boxen ......................................
Page 26 - Anmerkung; Aufstellen des Subwoofers; Aufstellen der Boxen
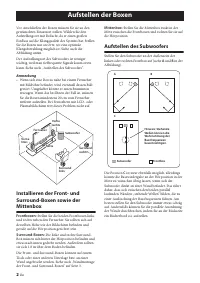
2 De Vor Anschließen der Boxen müssen Sie sie an den gewünschten Einsatzort stellen. Wählen Sie den Aufstellungsort mit Bedacht, da er einen großen Einfluss auf die Klangqualität des Systems hat. Stellen Sie die Boxen nur an Orte, wo eine optimale Klangabstrahlung möglich ist. Siehe auch die Abbildu...
Page 27 - • Die Achse der Schraube muss sich im schmalen Teil; Warnungen; • Versuchen Sie niemals, die Boxen an Nägeln
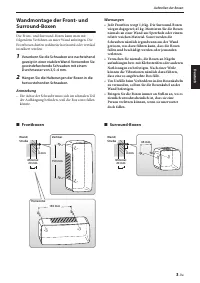
3 De Aufstellen der Boxen Deutsch Wandmontage der Front- und Surround-Boxen Die Front- und Surround-Boxen kann man mit folgendem Verfahren an einer Wand anbringen. Die Frontboxen dürfen wahlweise horizontal oder vertikal installiert werden. 1 Verankern Sie die Schrauben wie nachstehend gezeigt in ei...
Page 28 - Anschließen der Boxen
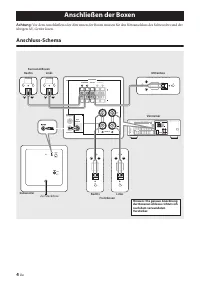
4 De Achtung: Vor dem Anschließen oder Abtrennen der Boxen müssen Sie den Netzanschluss des Subwoofers und der übrigen AV-Geräte lösen. Anschluss-Schema Anschließen der Boxen DOCK DIGITAL INPUT COMPONENT VIDEO VIDEO AUDIO MULTI CH INPUT HDMI ANTENNA SPEAKERS DVD OPTICAL DVD CENTER FRONT B FRONT A DV...
Page 29 - Vorbereiten der Boxenkabel; Bedienung der Kabelklemmen; Schieben Sie die Ader hinein.; Anmerkungen; Anschließen der Netzkabel
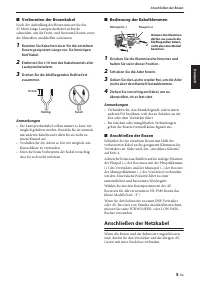
5 De Anschließen der Boxen Deutsch ■ Vorbereiten der Boxenkabel Nach der Aufstellung der Boxen müssen Sie das 25 Meter lange Lautsprecherkabel in Stücke schneiden, um die Front- und Surround-Boxen sowie die Mittenbox anschließen zu können. 1 Bereiten Sie Kabel mit einer für die einzelnen Boxen geeig...
Page 30 - Netzanzeige; Die Netzanzeige an der Rückseite leuchtet.; • Nach diesem Abgleich brauchen Sie die VOLUME-; Frequenzgrafik; Verwendung des Subwoofers
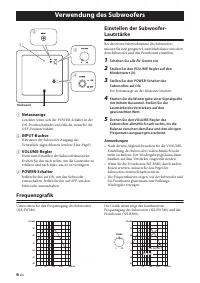
6 De 1 Netzanzeige Leuchtet, wenn sich der POWER-Schalter in der ON-Position befindet und erlischt, wenn Sie die OFF-Position wählen. 2 INPUT-Buchse Hier muss der Subwoofer-Ausgang des Verstärkers angeschlossen werden (Line-Pegel). 3 VOLUME-Regler Dient zum Einstellen der Subwooferlautstärke. Drehen...
Page 31 - Fehlersuche; Technische Daten
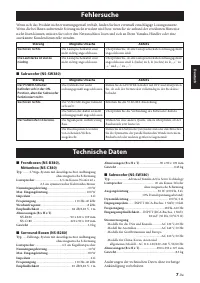
7 De Deutsch Wenn sich das Produkt nicht erwartungsgemäß verhält, finden Sie hier eventuell einschlägige Lösungsansätze. Wenn die bei Ihnen auftretende Störung nicht erwähnt wird bzw. wenn Sie sie anhand der erwähnten Hinweise nicht lösen können, müssen Sie sofort den Netzanschluss lösen und sich an...
Page 32 - Säkerhetsföreskrifter
i Sv Läs igenom följande försiktighetsåtgärder innan användningen. Yamaha kan inte hållas ansvarig för eventuella materiella skador och/eller personskador som uppstår till följd av underlåtenhet att läsa följande försiktighetsåtgärder. 1. Läs noga denna bruksanvisning för att kunna ha största möjlig...
Page 34 - Begränsad garanti inom EES-området och Schweiz
iii Sv Säkerhetsföreskrifter Begränsad garanti inom EES-området och Schweiz Tack för att du har valt en produkt från Yamaha. Var god kontakta återförsäljaren av produkten, om din Yamaha-produkt av någon oförutsedd anledning kräver garantiservice. Var god kontakta Yamahas representantkontor i ditt la...
Page 35 - Svenska; Innehåll
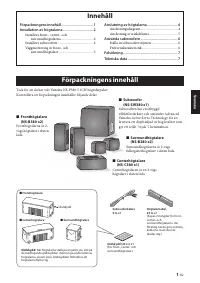
1 Sv Svenska Tack för att du har valt Yamaha NS-P380 5.1CH högtalarpaket.Kontrollera att förpackningen innehåller följande delar. Innehåll Förpackningens innehåll ................................... 1Installation av högtalarna ................................. 2 Installera front-, center- och surrou...
Page 36 - Anmärkning; Installera subwoofern; Installation av högtalarna
2 Sv Innan högtalarna ansluts, placera varje högtalare på dess respektive plats. Högtalarplaceringen är mycket viktig eftersom det påverkar systemets ljudkvalitet totalt sett. Placera högtalarna på platser som ger bästa ljudkvalitet vid lyssningspositionen. Se illustrationen nedan.Placeringen av sub...
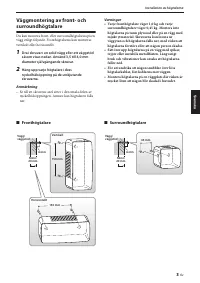
Page 37 - • Se till att skruvens axel sitter i den smala delen av; Varningar
3 Sv Installation av högtalarna Svenska Väggmontering av front- och surroundhögtalare Du kan montera front- eller surroundhögtalarna på en vägg enligt följande. Fronthögtalarna kan monteras vertikalt eller horisontellt. 1 Dra i skruvar i en solid vägg eller ett väggstöd såsom visas nedan. Använd 3,5...
Page 38 - vägguttagen innan några anslutningar görs.; Anslutningsdiagram; Anslutning av högtalarna
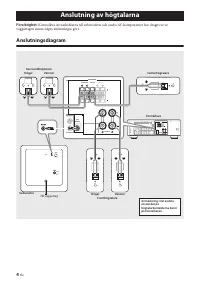
4 Sv Försiktighet: Kontrollera att nätkablarna till subwoofern och andra AV-komponenter har dragits ut ur vägguttagen innan några anslutningar görs. Anslutningsdiagram Anslutning av högtalarna DOCK DIGITAL INPUT COMPONENT VIDEO VIDEO AUDIO MULTI CH INPUT HDMI ANTENNA SPEAKERS DVD OPTICAL DVD CENTER ...
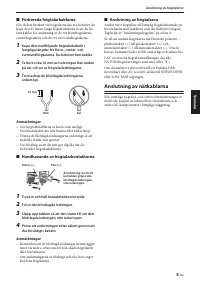
Page 39 - Förbereda högtalarkablarna; Handhavande av högtalarkontakterna; Tryck in och håll kontakttabben intryckt.; Anmärkningar; Anslutning av nätkablarna
5 Sv Anslutning av högtalarna Svenska ■ Förbereda högtalarkablarna När du har bestämt var högtalarna ska stå, behöver du kapa den 25 meter långa högtalarkabeln så att du får fem kablar för anslutning av de två fronthögtalarna, centerhögtalaren och de två surroundhögtalarna. 1 Kapa den medföljande hö...
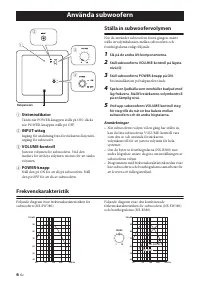
Page 40 - Strömindikator; Ställa in subwoofervolymen; Strömindikatorn på bakpanelen tänds.; • När subwooferns volym väl en gång har ställts in,; Frekvenskarakteristik; Använda subwoofern
6 Sv 1 Strömindikator Tänds när POWER-knappen ställs på ON; släcks när POWER-knappen ställs på OFF. 2 INPUT-uttag Ingång för anslutning från förstärkarens linjenivå-utgång för subwoofer. 3 VOLUME-kontroll Justerar volymen för subwoofern. Vrid den medurs för att höja volymen; moturs för att sänka vol...
Page 41 - Felsökning; Tekniska data
7 Sv Svenska Om denna produkt inte fungerar såsom det är tänkt, sök efter möjlig orsak nedan. Om problemet som uppstått inte är medtaget, eller om du inte kan lösa det efter att ha läst igenom anvisningarna, koppla ur nätkabeln och rådfråga en auktoriserad Yamaha-handlare eller servicecenter. ■ Subw...
Page 42 - Precauzioni; AVVERTENZA
i It Leggere le seguenti precauzioni operative prima dell’uso. Yamaha non sarà ritenuta responsabile per alcun danno e/o lesione causati dal mancato rispetto delle precauzioni riportate di seguito. 1. Per assicurarvi le migliori prestazioni di quest’unità, leggere con attenzione l’intero manuale. Te...
Page 44 - Garanzia limitata per l’Area Economica Europea (AEE) e la Svizzera
iii It Precauzioni Garanzia limitata per l’Area Economica Europea (AEE) e la Svizzera Vi ringraziamo per aver scelto un prodotto Yamaha. Nel caso raro in cui il vostro prodotto abbia bisogno di riparazioni in garanzia, entrare in contatto con il negozio in cui era stato acquistato. Se si avessero di...
Page 45 - Italiano; Contenuto dell’imballo; Installare gli altoparlanti anteriori, centro e
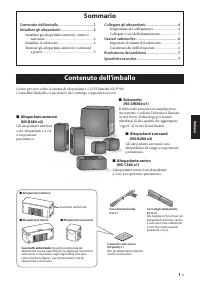
1 It Italiano Grazie per aver scelto il sistema di altoparlanti a 5.1CH Yamaha NS-P380.Controllate l’imballo e assicuratevi che contenga i seguenti accessori. Contenuto dell’imballo Sommario Contenuto dell’imballo ...................................... 1Installare gli altoparlanti .....................
Page 46 - Nota; • Posizionando gli altoparlanti troppo vicini a un; Altoparlanti anteriori:; Posizionate i due altoparlanti; Altoparlanti surround:; Posizionate gli altoparlanti; Installare il subwoofer; Un’altra possibile collocazione è mostrata in; Installare gli altoparlanti
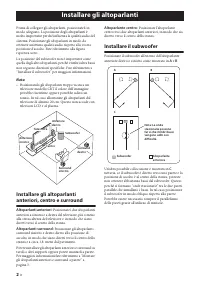
2 It Prima di collegare gli altoparlanti, posizionateli in modo adeguato. La posizione degli altoparlanti è molto importante perché influenza la qualità audio del sistema. Posizionate gli altoparlanti in modo da ottenere un’ottima qualità audio rispetto alla vostra posizione d’ascolto. Fate riferime...
Page 47 - • Accertatevi che il perno della vita sia inserito nella; Avvertenze
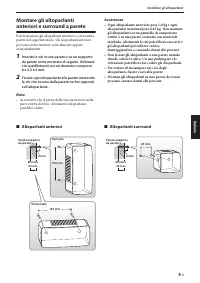
3 It Installare gli altoparlanti Italiano Montare gli altoparlanti anteriori e surround a parete Potete montare gli altoparlanti anteriori o surround a parete nel seguente modo. Gli altoparlanti anteriori possono essere montati verticalmente oppure orizzontalmente. 1 Inserite le viti in una parete o...
Page 48 - dalle prese a muro CA prima di eseguire qualsiasi collegamento.; Diagramma dei collegamenti; Collegare gli altoparlanti
4 It Attenzione: Accertatevi che i cavi dell’alimentazione del subwoofer e degli altri dispositivi AV siano scollegati dalle prese a muro CA prima di eseguire qualsiasi collegamento. Diagramma dei collegamenti Collegare gli altoparlanti DOCK DIGITAL INPUT COMPONENT VIDEO VIDEO AUDIO MULTI CH INPUT H...
Page 49 - Preparare i cavi degli altoparlanti; Attorcigliate i fili.; Utilizzare i terminali degli altoparlanti
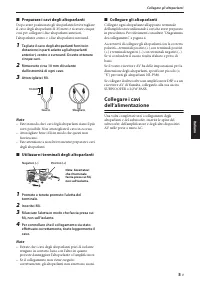
5 It Collegare gli altoparlanti Italiano ■ Preparare i cavi degli altoparlanti Dopo avere posizionato gli altoparlanti dovete tagliare il cavo degli altoparlanti di 25 metri e ricavare cinque cavi per collegare i due altoparlanti anteriori, l’altoparlante centro e i due altoparlanti surround. 1 Tagl...
Page 50 - Indicatore di accensione/spegnimento; Impostare il volume del subwoofer; Accendete gli altri dispositivi AV.; • Dopo avere impostato il volume del subwoofer,; Caratteristiche delle frequenze; Usare il subwoofer
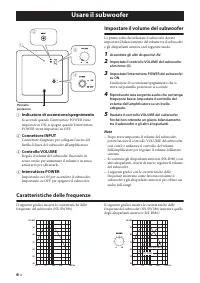
6 It 1 Indicatore di accensione/spegnimento Si accende quando l’interruttore POWER viene impostati su ON, si spegne quando l’interruttore POWER viene impostato su OFF. 2 Connettore INPUT Connettore d’ingresso per collegare l’uscita del livello di linea del subwoofer all’amplificatore. 3 Controllo VO...
Page 51 - Risoluzione dei problemi; Specifiche tecniche
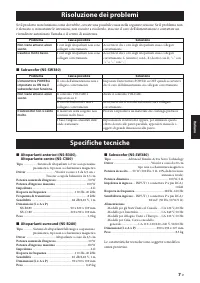
7 It Italiano Se il prodotto non funziona come dovrebbe, cercate una possibile causa nella seguente sezione. Se il problema non è elencato o, nonostante le istruzioni, non riuscite a risolverlo, staccate il cavo dell’alimentazione e contattate un rivenditore autorizzato Yamaha o il centro di assiste...
Page 52 - Precauciones; ADVERTENCIA
i Es Lea las siguientes precauciones de funcionamiento antes de iniciar el uso del aparato. Yamaha no se responsabilizará de cualquier daño o lesión causada por no seguir las precauciones que aparecen a continuación. 1. Para asegurar el mejor rendimiento posible, lea con atención este manual. Guárde...
Page 54 - Garantía limitada para el Área Económica Europea (AEE) y Suiza
iii Es Precauciones Garantía limitada para el Área Económica Europea (AEE) y Suiza Gracias por haber elegido un producto Yamaha. En el caso poco probable de que su producto Yamaha necesite el servicio que concede la garantía, póngase en contacto por favor con el concesionario a quien adquirió el pro...
Page 55 - Español; Contenido del paquete; Instalar los altavoces frontales, central y
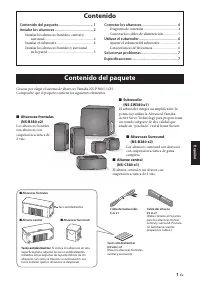
1 Es Español Gracias por elegir el sistema de altavoces Yamaha NS-P380 5.1CH.Compruebe que el paquete contiene los siguientes elementos. Contenido del paquete Contenido Contenido del paquete ...................................... 1Instalar los altavoces .......................................... 2 I...
Page 56 - Instalar el subwoofer; Instalar los altavoces
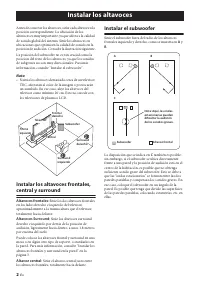
2 Es Antes de conectar los altavoces, sitúe cada altavoz en la posición correspondiente. La ubicación de los altavoces es muy importante, ya que afecta a la calidad de sonido global del sistema. Sitúe los altavoces en ubicaciones que optimicen la calidad de sonido en la posición de audición. Consult...
Page 57 - • Compruebe que el extremo del tornillo encaja en la; Advertencias; • Cada altavoz frontal pesa 1,0 kg y cada altavoz
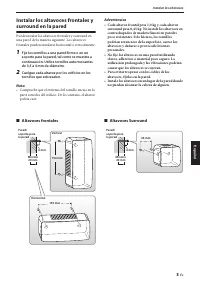
3 Es Instalar los altavoces Español Instalar los altavoces frontales y surround en la pared Puede instalar los altavoces frontales y surround en una pared de la manera siguiente. Los altavoces frontales pueden instalarse horizontal o verticalmente. 1 Fije los tornillos a una pared firme o en un sopo...
Page 58 - otros componentes AV no estén conectados a las tomas de CA.; Diagrama de conexión; Conectar los altavoces
4 Es Precaución: Antes de realizar las conexiones, compruebe que los cables de alimentación para el subwoofer y los otros componentes AV no estén conectados a las tomas de CA. Diagrama de conexión Conectar los altavoces DOCK DIGITAL INPUT COMPONENT VIDEO VIDEO AUDIO MULTI CH INPUT HDMI ANTENNA SPEAK...
Page 59 - Preparar los cables del altavoz; Retuerza y apriete los cables pelados.; Utilizar los terminales del altavoz; Mantenga pulsada la lengüeta del terminal.; Notas
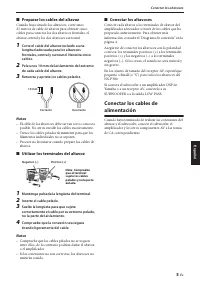
5 Es Conectar los altavoces Español ■ Preparar los cables del altavoz Cuando haya situado los altavoces, corte unos 25 metros de cable de altavoz para obtener cinco cables para conectar los dos altavoces frontales, el altavoz central y los dos altavoces surround. 1 Corte el cable del altavoz incluid...
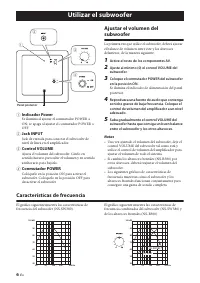
Page 60 - Indicador Power; Active el resto de los componentes AV.; • Una vez ajustado el volumen del subwoofer, deje el; Características de frecuencia; Utilizar el subwoofer
6 Es 1 Indicador Power Se ilumina al ajustar el conmutador POWER a ON; se apaga al ajustar el conmutador POWER a OFF. 2 Jack INPUT Jack de entrada para conectar el subwoofer de nivel de línea en el amplificador. 3 Control VOLUME Ajusta el volumen del subwoofer. Gírelo en sentido horario para subir e...
Page 61 - Solucionar problemas; Especificaciones
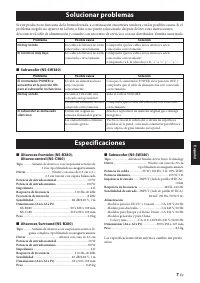
7 Es Español Si este producto no funciona de la forma deseada, a continuación encontrará una lista con las posibles causas. Si el problema surgido no aparece en la lista, o bien si no puede solucionarlo después de leer estas instrucciones, desconecte el cable de alimentación y consulte con un centro...
Page 62 - Voorzorgsmaatregelen; WAARSCHUWING
i Nl Gelieve de volgende voorzorgsmaatregelen te lezen alvorens het toestel te gebruiken. Yamaha is niet aansprakelijk voor schade en/of letsels die zijn veroorzaakt doordat onderstaande voorzorgsmaatregelen niet in acht zijn genomen. 1. Om verzekerd te kunnen zijn van optimale prestaties, dient u d...
Page 63 - • VOLTAGE SELECTOR
ii Nl Voorzorgsmaatregelen Nederlands 9. De zeer lage tonen die door dit toestel geproduceerd worden kunnen leiden tot 'rondzingen' bij gebruik van een draaitafel. Zet dit toestel in voorkomende gevallen verder weg van de draaitafel. 10. Het toestel an schade oplopen wanneer bepaalde geluiden voortd...
Page 65 - Geleverde onderdelen; Installeren van de front- en surroundspeakers
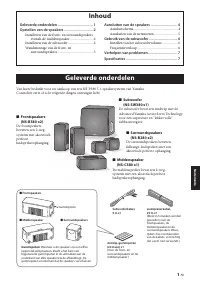
1 Nl Nederlands Van harte bedankt voor uw aankoop van een NS-P380 5.1-speakersysteem van Yamaha.Controleer eerst of u de volgende dingen ontvangen hebt. Geleverde onderdelen Inhoud Geleverde onderdelen ....................................... 1Opstellen van de speakers ..................................
Page 66 - Opmerking; Installeren van de subwoofer; Opstellen van de speakers
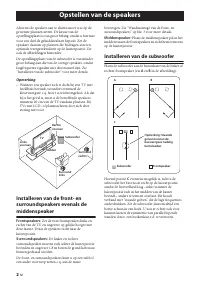
2 Nl Alvorens de speakers aan te sluiten moet u ze op de gewenste plaatsen zetten. De keuze van de opstellingsplaats is van groot belang, omdat u hiermee voor een deel de geluidskwaliteit bepaalt. Zet de speakers daarom op plaatsen die bijdragen aan een optimale weergavekwaliteit op de luisterpositi...
Page 67 - • De as van de schroef moet zich in het smalle; Waarschuwingen; • Gebruik nooit nagels, zelfklevende tape of andere
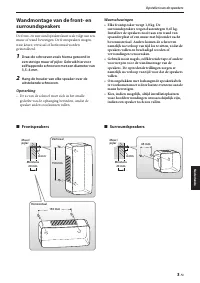
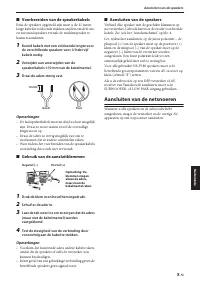
3 Nl Opstellen van de speakers Nederlands Wandmontage van de front- en surroundspeakers De front- en surroundspeakers kunt u als volgt aan een muur of wand bevestigen. De frontspeakers mogen, naar keuze, verticaal of horizontaal worden geïnstalleerd. 1 Draai de schroeven zoals hierna getoond in een ...
Page 68 - overige AV-apparaten op het lichtnet verbreken.; Aansluitschema; Aansluiten van de speakers
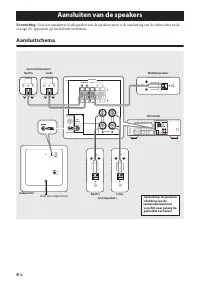
4 Nl Voorzichtig: Vóór het aansluiten of afkoppelen van de speakers moet u de aansluiting van de subwoofers en de overige AV-apparaten op het lichtnet verbreken. Aansluitschema Aansluiten van de speakers DOCK DIGITAL INPUT COMPONENT VIDEO VIDEO AUDIO MULTI CH INPUT HDMI ANTENNA SPEAKERS DVD OPTICAL ...
Page 69 - Voorbereiden van de speakerkabels; Draai de aders stevig vast.; Gebruik van de aansluitklemmen; Druk de klem in en houd hem ingedrukt.; Opmerkingen; Aansluiten van de netsnoeren
5 Nl Aansluiten van de speakers Nederlands ■ Voorbereiden van de speakerkabels Eens de speakers opgesteld zijn moet u de 25 meter lange kabel in voldoende stukken snijden om de front- en surroundspeakers evenals de middenspeaker te kunnen aansluiten. 1 Bereid kabels met een voldoende lengte voor de ...
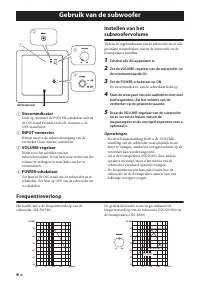
Page 70 - Stroomindicator; De stroomindicator aan de achterkant licht op.; • Na deze balansinstelling hoeft u de VOLUME-; Frequentieverloop; Gebruik van de subwoofer
6 Nl 1 Stroomindicator Licht op, wanneer de POWER-schakelaar zich in de ON-stand bevindt en dooft, wanneer u de OFF-stand kiest. 2 INPUT-connector Hierop moet u de subwooferuitgang van de versterker (Line-niveau) aansluiten. 3 VOLUME-regelaar Dient voor het instellen van het subwoofervolume. Draai h...
Page 71 - Verhelpen van problemen; Specificaties
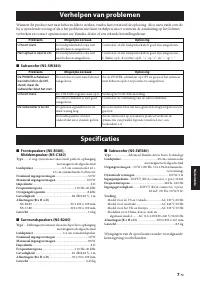
7 Nl Nederlands Wanneer dit product niet naar behoren lijkt te werken, vindt u hier eventueel de oplossing. Als u niets vindt over de bij u optredende storing of als u het probleem niet kunt verhelpen, moet u meteen de aansluiting op het lichtnet verbreken en contact opnemen met uw Yamaha-dealer of ...
Page 72 - Меры предосторожности
i Ru Прочитайте описание следующих мер предосторожности перед использованием аппарата. Yamaha не несет ответственность за любые повреждения и (или) травмы, вызванные несоблюдением приведенных ниже мер предосторожности. 1. Для обеспечения наилучшего результата, пожалуйста, внимательно изучите данную ...
Page 73 - Русский
Русский ii Ru Меры предосторожности 8. Аппарат необходимо использовать при напряжении, соответствующему указанному напряжению на задней панели. Использование аппарата при напряжении, превышающем указанное, опасно и может стать причиной пожара, поломки аппарата и (или) привести к травме. Компания Yam...
Page 75 - Содержимое упаковки
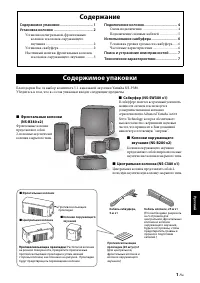
Русский 1 Ru Благодарим Вас за выбор комплекта 5.1-канальной акустики Yamaha NS-P380.Убедитесь в том, что в состав упаковки входят следующие предметы. Содержимое упаковки Содержание Содержимое упаковки .................................... 1 Установка колонок ............................................
Page 76 - Примечание; Установка савбуфера; Установка колонок
2 Ru Прежде чем подключать колонки, поместите каждую колонку в соответствующем месте. Размещение колонок очень важно, поскольку оно влияет на общее качество звучания системы. Разместите колонки таким образом, чтобы оптимизировать качество звука в зоне прослушивания. См. рисунок ниже. Размещение сабв...
Page 77 - Предупреждения; • Каждая фронтальная колонка весит 1,0 кг, а
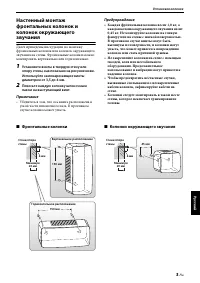
Русский 3 Ru Установка колонок Настенный монтаж фронтальных колонок и колонок окружающего звучания Далее приведены инструкции по монтажу фронтальных колонок или колонок окружающего звучания на стены. Фронтальные колонки можно монтировать вертикально или горизонтально. 1 Установите винты в твердую ст...
Page 78 - Схема подключения; Подключение колонок
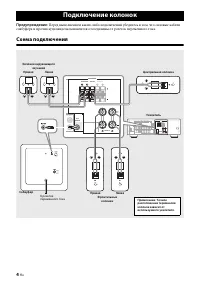
4 Ru Предупреждение: Перед выполнением каких-либо подключений убедитесь в том, что силовые кабели савбуфера и прочих аудиовидеокомпонентов отсоединены от розеток переменного тока. Схема подключения Подключение колонок DOCK DIGITAL INPUT COMPONENT VIDEO VIDEO AUDIO MULTI CH INPUT HDMI ANTENNA SPEAKER...
Page 79 - Подготовка кабелей колонок; Плотно сплетите оголенные провода.; Управление терминалами колонок; Вставьте оголенную часть провода.; Примечания
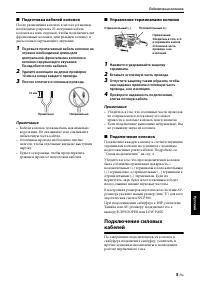
Русский 5 Ru Подключение колонок ■ Подготовка кабелей колонок После размещения колонок в местах установки необходимо разрезать 25-метровый кабель колонок на пять отрезков, чтобы подключить две фронтальные колонки, центральную колонку и две колонки окружающего звучания. 1 Порежьте прилагаемый кабель ...
Page 80 - Индикатор питания; Включите прочие аудиовидеокомпоненты.; Частотные характеристики; Использование савбуфера
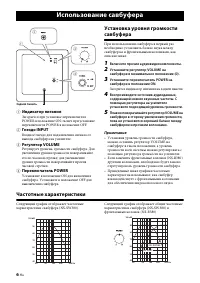
6 Ru 1 Индикатор питания Загорается при установке переключателя POWER в положение ON; гаснет при установке переключателя POWER в положение OFF. 2 Гнездо INPUT Входное гнездо для подключения сигнала от выхода савбуфера на усилителе. 3 Регулятор VOLUME Регулирует уровень громкости савбуфера. Для увели...
Page 81 - Поиск и устранение неисправностей
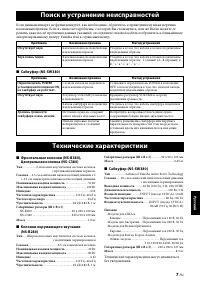
Русский 7 Ru Если данный аппарат не функционирует, как необходимо, обратитесь к приведенному ниже перечню возможных причин. Если в списке нет проблемы, с которой Вы столкнулись, или же Вы не можете ее решить даже после прочтения данных указаний, отсоедините силовой кабель и обратитесь к ближайшему а...