Page 2 - CAUTION: READ THIS BEFORE OPERATING YOUR UNIT.; WARNING
i En 1 To assure the finest performance, please read this manual carefully. Keep it in a safe place for future reference. 2 Install this unit in a well ventilated, cool, dry, clean place - away from direct sunlight, heat sources, vibration, dust, moisture and cold. For proper ventilation, allow the ...
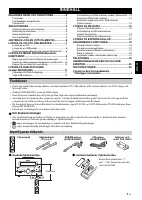
Page 3 - LISTENING TO MUSIC FROM YOUR; Bluetooth; CONTENTS; and listen to the radio.; About this manual; focus on operation using the remote control.; How to use the remote control; Features
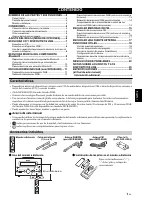
1 En Englis h NAMES OF PARTS AND THEIR FUNCTIONS ........2 Front panel ..................................................................... 2Front panel display ......................................................... 2Remote control ............................................................... ...
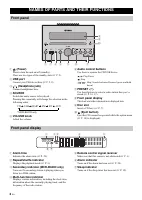
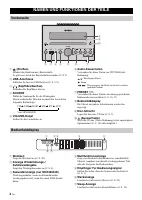
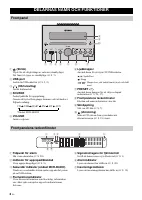
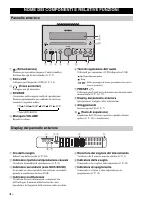
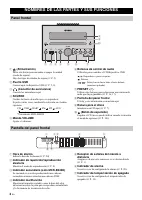
Page 4 - NAMES OF PARTS AND THEIR FUNCTIONS; Front panel; Front panel display
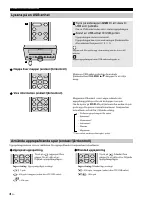
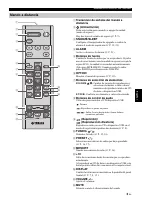
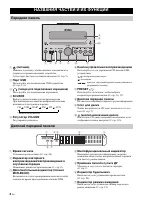
2 En 1 (Power) Press to turn the unit on/off (standby).There are two types of the standby state ( ☞ P. 5). 2 USB port Connect your USB device here ( ☞ P. 5, 8). 3 (Headphone jack) Connect headphones here. 4 SOURCE Switch the audio source to be played.Pressing this repeatedly will change the selectio...
Page 5 - FOLDER; Remote control
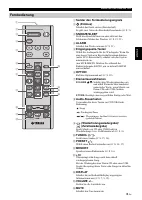
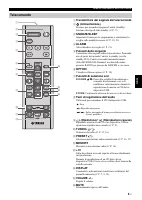
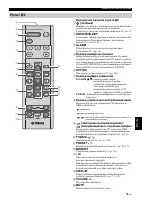
3 En NAMES OF PARTS AND THEIR FUNCTIONS Englis h 1 Remote control signal transmitter 2 (Power) Press to turn the unit on/off (standby).There are two types of the standby state ( ☞ P. 5). 3 SNOOZE/SLEEP Set the sleep timer or switch the alarm to snooze mode ( ☞ P. 19, 21). 4 ALARM Switch the alarm on...
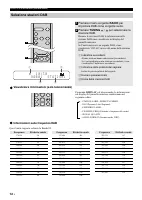
Page 6 - Connect the speakers and antenna.; CONNECTIONS; Connecting the speakers and antenna; Speakers; Supplied antenna
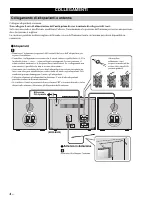
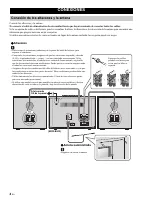
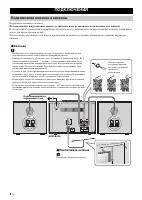
4 En Connect the speakers and antenna. Do not connect this unit’s power cable until you’ve finished connecting all cables. If the radio reception is poor, try changing the height or direction or placement of the antenna to find a location that has better reception.If you use a commercially available...
Page 7 - USB device; Connecting the power cable
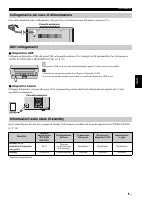
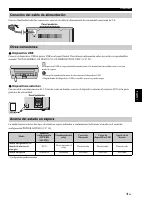
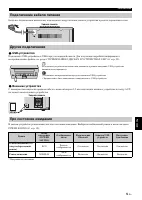
5 En CONNECTIONS Englis h When you’ve completed all connections, connect this unit’s power cable to an AC outlet. USB device Connect your USB device to the USB port on the front panel. For details on playable files, refer to “NOTES ON DISCS AND USB DEVICES” ( ☞ P. 25). External devices Using a c...
Page 8 - ENTER; A p r
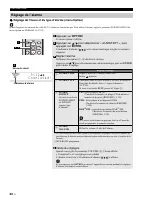
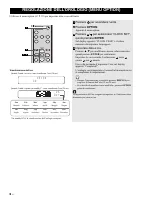
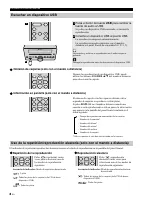
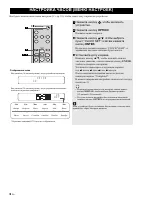
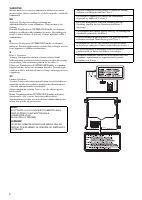
6 En You’ll use the option menu ( ☞ P. 18) to set this unit’s date and time. ADJUSTING THE CLOCK (OPTION MENU) 1 Press to turn the unit on. 2 Press OPTION . The option menu will appear. 3 Press / to select “CLOCK SET,” and then press ENTER . The display will indicate “CLOCK YEAR,” and the numeri...
Page 9 - Display information (remote control only); LISTENING TO CD AND USB DEVICES; track the next time you play.; Listening to a CD; Press the; CD; source button to switch the; If a CD is already inserted, playback will start.; Insert a CD into the disc slot.; While a data CD is playing, you can use the remote control’s; buttons to select the folder.; on the remote control while a song is
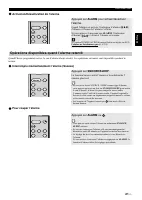
7 En Englis h Skipping folders (remote control only) Display information (remote control only) LISTENING TO CD AND USB DEVICES The unit will operate as follows when playing back tracks/files on CD/USB devices.• If the CD/USB device being played is stopped, the track that you listened will start ...
Page 10 - Listening to a USB device; USB; If a USB device is already connected, playback will start.; Connect a USB device to the USB port.; Press
LISTENING TO CD AND USB DEVICES 8 En Skipping folders (remote control only) Display information (remote control only) The playback status is shown by the repeat/shuffle indicator in the front panel display. Repeat playback Shuffle playback Listening to a USB device 1 Press the USB source but...
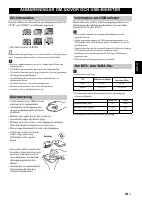
Page 11 - This unit provides; COMPONENT; component; B T
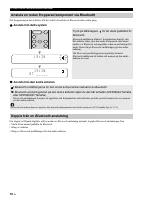
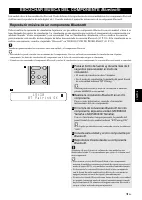
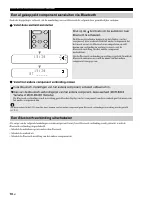
9 En Englis h This unit provides Bluetooth functionality. You can enjoy wireless music playback from your Bluetooth component (mobile phone, digital audio player, etc.). Please also refer to the owner’s manual of your Bluetooth component. You’ll need to perform the pairing operation the first time y...
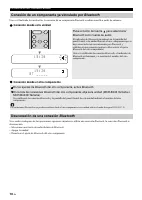
Page 12 - Connecting from this unit; Connecting an already-paired component via; Disconnecting a; connection
LISTENING TO MUSIC FROM YOUR Bluetooth COMPONENT 10 En Once pairing has been completed, connecting a Bluetooth will be easy the next time. Connecting from this unit Connecting from the other component If any of the following operations are performed while a Bluetooth connection is being used, th...
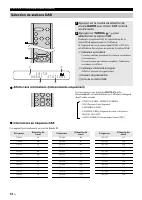
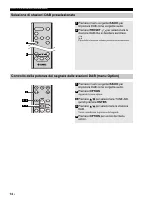
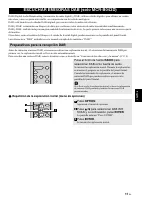
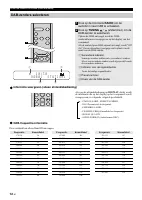
Page 13 - DAB and DAB; Performing the initial scan again (Option menu); Preparing for DAB reception; RADIO; The option menu will appear.; The display will indicate “Press ENTER”.; The initial scan starts.
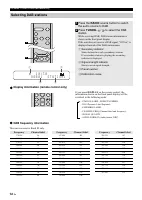
11 En Englis h DAB (Digital Audio Broadcasting) and DAB + use digital signals for clearer sound and more stable reception compared to analog signals.DAB + is based on the original DAB standard but uses a more efficient audio codec. DAB and DAB + are broadcast in blocks of data called “ensembles” con...
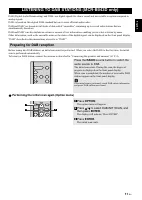
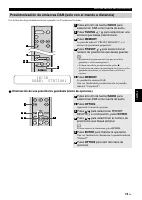
Page 14 - This unit can receive Band III only.; Selecting DAB stations; source button to switch; TUNING; to select the DAB; Signal strength indicator:; Preset number; on the remote control, the
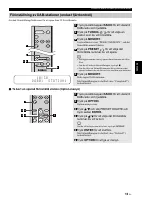
LISTENING TO DAB STATIONS (MCR-B043D only) 12 En Display information (remote control only) DAB frequency information This unit can receive Band III only. Selecting DAB stations 1 Press the RADIO source button to switch the audio source to DAB. 2 Press TUNING / to select the DAB station. While re...
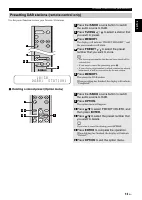
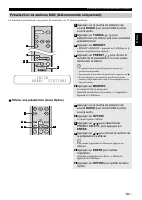
Page 15 - Use the preset function to store your favorite 30 stations.; Presetting DAB stations (remote control only)
13 En LISTENING TO DAB STATIONS (MCR-B043D only) Englis h Use the preset function to store your favorite 30 stations. Deleting a stored preset (Option menu) Presetting DAB stations (remote control only) 1 Press the RADIO source button to switch the audio source to DAB. 2 Press TUNING / to select a...
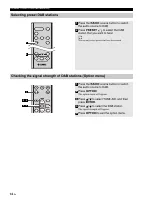
Page 16 - Selecting preset DAB stations; Checking the signal strength of DAB stations (Option menu)
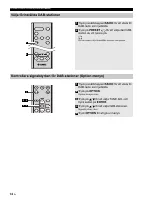
LISTENING TO DAB STATIONS (MCR-B043D only) 14 En Selecting preset DAB stations 1 Press the RADIO source button to switch the audio source to DAB. 2 Press PRESET / to select the DAB station that you want to hear. You can only select presets that have been stored. Checking the signal strength of DAB s...
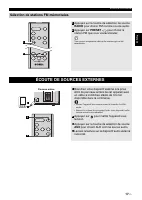
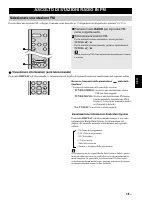
Page 17 - LISTENING TO FM STATIONS; Selecting an FM station; Displaying Radio Data System information
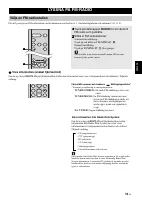
15 En Englis h To listen to the FM station, connect the antenna as described in “Connecting the speakers and antenna” ( ☞ P. 4). Display information (remote control only) If you press DISPLAY on the remote control, the information shown on the front panel display will be switched in the following ...
Page 18 - source button to switch the audio source to FM.; Presetting FM stations (remote control only)
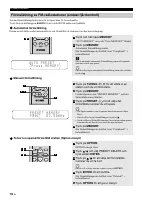
LISTENING TO FM STATIONS 16 En Use the preset function to store your favorite 30 stations.First, press the RADIO source button to switch the audio source to FM. Auto preset This method tunes automatically, and automatically presets only the stations that have good reception. Manual preset Dele...
Page 19 - Selecting preset FM stations; LISTENING TO EXTERNAL SOURCES; AUX
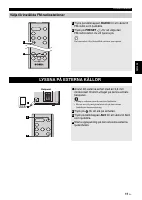
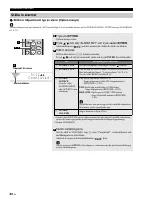
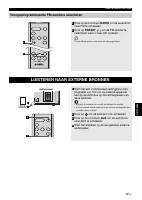
17 En LISTENING TO FM STATIONS Englis h Selecting preset FM stations 1 Press the RADIO source button to switch the audio source to FM. 2 Press PRESET / to select the FM station that you want to hear. You can only select presets that have been stored. LISTENING TO EXTERNAL SOURCES 1 Using a commercia...
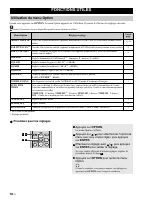
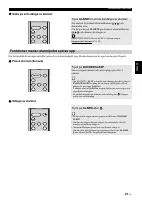
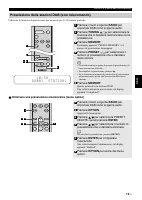
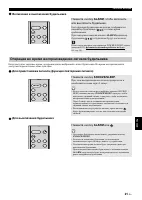
Page 20 - When you press; Procedure for settings; USEFUL FUNCTIONS; Using the Option menu
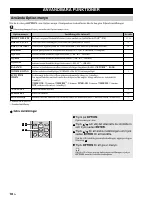
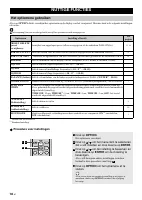
18 En When you press OPTION , the option menu will appear in the front panel display, allowing you to make the following settings. (eject button) cannot be operated while the option menu is displayed. *1 MCR-B043D only *2 Default setting Procedure for settings USEFUL FUNCTIONS Using the Option men...
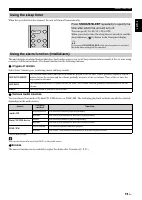
Page 21 - types of alarms; Select from 3 alarm types, combining music and beep sounds.; Various audio sources; /FM. The following playback methods can also be selected; Snooze; Using the sleep timer
19 En USEFUL FUNCTIONS Englis h When the specified time has elapsed, the unit will turn off automatically. The unit includes an alarm function that plays back audio sources or a set of beep (internal alarm sound) at the set time using a variety of different methods. The alarm function has the follow...
Page 22 - Setting the alarm time and alarm type (Option menu); Setting the alarm; Items; ALARM TYPE; ALARM SOURCE; ALARM VOLUME
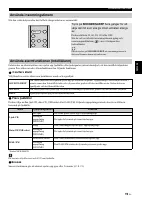
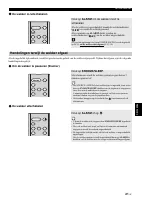
USEFUL FUNCTIONS 20 En Setting the alarm time and alarm type (Option menu) The alarm will not function when the unit is in ECO standby. To use the alarm function, set the Option menu item POWER SAVING to NORMAL ( ☞ P. 18). Setting the alarm 1 Press OPTION . The option menu will appear. 2 Press /...
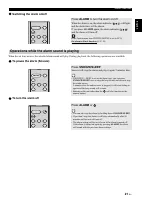
Page 23 - Switching the alarm on/off; When the alarm is on, the alarm indicator (; ALARM; and the alarm will turn off.; Operations while the alarm sound is playing; Snooze will stop the alarm and play it again 5 minutes later.; ALARM; or
21 En USEFUL FUNCTIONS Englis h Switching the alarm on/off When the set time arrives, the selected alarm sound will play. During playback, the following operations are available. To pause the alarm (Snooze) To turn the alarm off Press ALARM to turn the alarm on/off. When the alarm is on, the a...
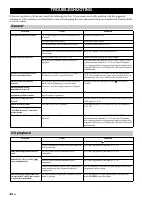
Page 24 - TROUBLESHOOTING; General
22 En If there is a problem with the unit, check the following list first. If you cannot resolve the problem with the suggested solutions or if the problem is not listed below, turn off and unplug the unit, and consult the nearest authorized Yamaha dealer or service center. TROUBLESHOOTING General P...
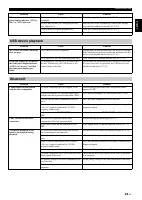
Page 25 - USB device playback
23 En TROUBLESHOOTING Englis h When you insert a disc, the front panel display indicates “CD No Disc” or “CD Unknown.” The disc loaded into the unit may not be compatible. Use a disc supported by the unit ( ☞ P. 25). The disc may be dirty, or a foreign object may have adhered to it. Wipe the disc cl...
Page 26 - FM reception
TROUBLESHOOTING 24 En DAB reception (MCR-B043D only) Problem Cause Solution Cannot tune into any DAB stations. The initial scan operations were not performed. Perform the initial scan operations ( ☞ P. 11). There is no DAB coverage in your area. Check with your dealer or WorldDMB Online at “http://w...
Page 27 - NOTES ON DISCS AND USB DEVICES; CD information; USB device information
25 En Englis h This unit is designed for use with audio CD, CD-R*, and CD-RW* with the logos followings. * ISO 9660 format CD-R/RW This unit can play back discs bearing any of the logo marks above. A disc logo mark is printed on the disc and the disc jacket. • Do not load any other type of disc into...
Page 28 - Tuning range; LASER SAFETY; communications; SPECIFICATIONS
26 En PLAYER SECTION CD • Media ........................................................................... CD, CD-R/RW • Audio format .................................................. Audio CD, MP3, WMA USB • Audio format .....................................................................MP3, ...
Page 29 - CAUTION
27 En Englis h ■ For U.K. customers If the socket outlets in the home are not suitable for the plug supplied with this appliance, it should be cut off and an appropriate 3 pin plug fitted. For details, refer to the instructions described below. The plug severed from the mains lead must be destroyed,...
Page 30 - ATTENTION: VEUILLEZ LIRE CE QUI SUIT AVANT D’UTILISER L’APPAREIL.; AVERTISSEMENT
i Fr 1 Pour utiliser l’appareil au mieux de ses possibilités, lisez attentivement ce mode d’emploi. Conservez-le soigneusement pour référence. 2 Installez cet appareil dans un endroit frais, bien aéré, sec et propre - à l’abri de la lumière du soleil, des sources de chaleur, des vibrations, des pous...
Page 31 - ÉCOUTE DE MUSIQUE D’UN DISPOSITIF; TABLE DES MATIÈRES; raccordés à la prise AUX, et écoute de la radio.; Quelques mots sur ce mode d’emploi; Utilisation de la télécommande; Caractéristiques
1 Fr Franç a is NOMS ET FONCTIONS DES ÉLÉMENTS ...............2 Panneau avant ............................................................... 2Afficheur ......................................................................... 2Télécommande ..............................................................
Page 32 - NOMS ET FONCTIONS DES ÉLÉMENTS; Panneau avant; Afficheur
2 Fr 1 (Alimentation) Appuyez sur cette touche pour mettre le système sous tension/hors tension (veille).Il existe deux types d’état de veille ( ☞ P. 5). 2 Port USB Branchez ici votre dispositif USB ( ☞ P. 5, 8). 3 (Prise casque) Branchez-y votre casque. 4 SOURCE Change de source audio de lecture.Ch...
Page 33 - Télécommande
3 Fr NOMS ET FONCTIONS DES ÉLÉMENTS Franç a is 1 Émetteur de télécommande 2 (Alimentation) Appuyez sur cette touche pour mettre le système sous tension/hors tension (veille).Il existe deux types d’état de veille ( ☞ P. 5). 3 SNOOZE/SLEEP Règle la minuterie ou bascule l’alarme en mode snooze ( ☞ P. 1...
Page 34 - Connectez les haut-parleurs et l’antenne.; CONNEXIONS; Connexion des haut-parleurs et de l’antenne; Antenne fournie
4 Fr Connectez les haut-parleurs et l’antenne. Ne connectez pas le cordon d’alimentation de l’appareil avant d’avoir effectué tous les branchements. Si la réception radio laisse à désirer, améliorez-la en changeant la hauteur, l’orientation ou l’emplacement de l’antenne.Si, au lieu de l’antenne four...
Page 35 - Dispositif USB; Connexion du cordon d’alimentation
5 Fr CONNEXIONS Franç a is Quand toutes les connexions sont effectuées, branchez le cordon d’alimentation de cet appareil à une prise secteur. Dispositif USB Branchez votre dispositif USB au port USB sur le panneau avant. Pour plus de détails sur les types de fichiers compatibles, lisez « REMARQUE...
Page 36 - Le menu Option s’affiche.; Appuyez sur; pour valider le réglage.
6 Fr Le menu Option ( ☞ P. 18) de cet appareil permet de régler la date et l’heure. RÉGLAGE DE L’HORLOGE (MENU OPTION) 1 Appuyez sur pour mettre l’appareil sous tension. 2 Appuyez sur OPTION . Le menu Option s’affiche. 3 Appuyez sur / pour sélectionner « CLOCK SET », puis appuyez sur ENTER . « C...
Page 37 - Sélection de dossiers (télécommande uniquement); ÉCOUTE D’UN CD ET DE DISPOSITIFS USB; Écoute d’un CD; Appuyez sur la touche de sélection de source; pour choisir CD comme source audio.; Si un CD est déjà chargé, la lecture démarre.; Glissez un CD dans la fente prévue à cet effet.; Pendant la lecture d’un CD de données, les touches; de la télécommande permettent de choisir; de la télécommande
7 Fr Franç a is Sélection de dossiers (télécommande uniquement) Afficher des informations (télécommande uniquement) ÉCOUTE D’UN CD ET DE DISPOSITIFS USB Cette section décrit le fonctionnement de l’appareil pour la lecture de plages/fichiers sur CD/dispositifs USB.• Quand vous arrêtez puis relanc...
Page 38 - Écoute d’un dispositif USB; pour choisir USB comme source audio.; Pendant la lecture d’un dispositif USB, les touches; Appuyez plusieurs fois sur
ÉCOUTE D’UN CD ET DE DISPOSITIFS USB 8 Fr Sélection de dossiers (télécommande uniquement) Afficher des informations (télécommande uniquement) Le statut de lecture est signalé sur l’afficheur par l’indicateur de lecture répétée/aléatoire. Lecture répétée Lecture aléatoire Écoute d’un disposit...
Page 39 - Cet appareil bénéficie de la technologie
9 Fr Franç a is Cet appareil bénéficie de la technologie Bluetooth . Cette fonction vous permet d’écouter un dispositif Bluetooth (téléphone portable, lecteur audio numérique, etc.) sans fil. Lisez également les instructions de la notice accompagnant votre dispositif Bluetooth . Le couplage Bluetoot...
Page 40 - Connexion depuis cet appareil; Connexion d’un dispositif déjà couplé via; Rupture d’une connexion
ÉCOUTE DE MUSIQUE D’UN DISPOSITIF Bluetooth 10 Fr Une fois effectué, le couplage initial facilite les connexions Bluetooth ultérieures avec le dispositif en question. Connexion depuis cet appareil Connexion depuis l’autre dispositif Si vous effectuez une des opérations suivantes quand une connex...
Page 41 - DAB et DAB; Répétition de la recherche initiale (menu Option); Préparation de la réception DAB; « Press ENTER » apparaît sur l’afficheur.; La recherche initiale commence.
11 Fr Franç a is DAB (Digital Audio Broadcasting) et DAB + utilisent des signaux numériques pour un son plus net et une réception plus stable, par rapport aux signaux analogiques.DAB + repose sur la norme DAB d’origine, mais utilise un codec audio plus efficace. DAB et DAB + sont diffusés en bloc de...
Page 42 - Cet appareil peut seulement recevoir la Bande III.; Sélection de stations DAB; pour choisir DAB comme; pour; Indicateur secondaire :; Numéro de présélection; de la
ÉCOUTE DES STATIONS DAB (MCR-B043D uniquement) 12 Fr Afficher des informations (télécommande uniquement) Informations de fréquence DAB Cet appareil peut seulement recevoir la Bande III. Sélection de stations DAB 1 Appuyez sur la touche de sélection de source RADIO pour choisir DAB comme source a...
Page 43 - Présélection de stations DAB (télécommande uniquement); apparaît sur l’afficheur.
13 Fr ÉCOUTE DES STATIONS DAB (MCR-B043D uniquement) Franç a is La fonction de présélection vous permet de mémoriser vos 30 stations préférées. Effacer une présélection (menu Option) Présélection de stations DAB (télécommande uniquement) 1 Appuyez sur la touche de sélection de source RADIO pour ch...
Page 44 - Sélection de stations DAB mémorisées
ÉCOUTE DES STATIONS DAB (MCR-B043D uniquement) 14 Fr Sélection de stations DAB mémorisées 1 Appuyez sur la touche de sélection de source RADIO pour choisir DAB comme source audio. 2 Appuyez sur PRESET / pour sélectionner la station DAB que vous voulez écouter. Vous pouvez uniquement choisir des stat...
Page 45 - Afficher des informations (télécommande uniquement); ÉCOUTE DE STATIONS FM; Sélection d’une station FM; pour choisir FM comme source audio.
15 Fr Franç a is Pour la stations FM, vous devez brancher l’antenne comme décrit sous « Connexion des haut-parleurs et de l’antenne » ( ☞ P. 4). Afficher des informations (télécommande uniquement) Si vous appuyez sur la touche DISPLAY de la télécommande, les informations sur l’afficheur changent d...
Page 46 - Présélection de stations FM (télécommande uniquement); « AUTO PRESET » s’affiche et « Press MEMORY » clignote.
ÉCOUTE DE STATIONS FM 16 Fr La fonction de présélection vous permet de mémoriser vos 30 stations préférées.Appuyez d’abord sur la touche de sélection de source RADIO pour choisir FM comme source audio. Présélection automatique Cette méthode accorde et mémorise automatiquement uniquement les statio...
Page 47 - Sélection de stations FM mémorisées; ÉCOUTE DE SOURCES EXTERNES
17 Fr ÉCOUTE DE STATIONS FM Franç a is Sélection de stations FM mémorisées 1 Appuyez sur la touche de sélection de source RADIO pour choisir FM comme source audio. 2 Appuyez sur PRESET / pour choisir la station FM que vous voulez écouter. Vous pouvez uniquement choisir des stations qui ont été mémor...
Page 48 - Quand vous appuyez sur; Procédure pour les réglages; FONCTIONS UTILES; Utilisation du menu Option
18 Fr Quand vous appuyez sur OPTION , le menu Option apparaît sur l’afficheur. Il permet d’effectuer les réglages suivants. (touche d’éjection) n’est pas disponible quand le menu Option est affiché. *1 MCR-B043D uniquement *2 Réglage par défaut Procédure pour les réglages FONCTIONS UTILES Utilisat...
Page 49 - types d’alarmes; choisir une des méthodes de lecture suivantes :; Utilisation de la minuterie; Appuyez plusieurs fois de suite sur; SLEEP; pour régler le délai avant la mise hors; Utilisation de la fonction d’alarme (IntelliAlarm)
19 Fr FONCTIONS UTILES Franç a is L’appareil est mis automatiquement hors tension après l’écoulement de la durée définie. Cet appareil comporte une fonction d’alarme qui vous permet de lire la source audio voulue ou de déclencher une sonnerie (son du système) à l’heure prédéfinie. Voici les particul...
Page 50 - Réglage de l’heure et du type d’alarme (menu Option); Réglage de l’alarme; Paramètres; DAB
FONCTIONS UTILES 20 Fr Réglage de l’heure et du type d’alarme (menu Option) Quand l’appareil est en mode de veille ECO, l’alarme ne fonctionne pas. Pour utiliser l’alarme, réglez le paramètre POWER SAVING du menu Option sur NORMAL ( ☞ P. 18). Réglage de l’alarme 1 Appuyez sur OPTION . Le menu Opti...
Page 51 - Activation/Désactivation de l’alarme; pour activer/désactiver; Quand l’alarme est activée, l’indicateur d’alarme (; Opérations disponibles quand l’alarme retentit; ou
21 Fr FONCTIONS UTILES Franç a is Activation/Désactivation de l’alarme Quand l’heure programmée arrive, le son d’alarme choisi retentit. Les opérations suivantes sont disponibles pendant la lecture. Interrompre momentanément l’alarme (Snooze) Pour couper l’alarme Appuyez sur ALARM pour activer...
Page 52 - GUIDE DE DÉPANNAGE; Généralités
22 Fr Si cet appareil ne semble pas fonctionner normalement, vérifiez les points de la liste suivante. Si l’anomalie constatée n’est pas mentionnée, ou bien si les mesures suggérées sont sans effet, mettez l’appareil hors tension, débranchez le cordon d’alimentation et adressez-vous au revendeur ou ...
Page 53 - Lecture d’un dispositif USB
23 Fr GUIDE DE DÉPANNAGE Franç a is Quand vous chargez un disque, l’afficheur indique « CD No Disc » ou « CD Unknown ». Il se peut que le disque inséré dans l’appareil ne soit pas compatible. Utilisez un disque pris en charge par cet appareil ( ☞ P. 25). Il se pourrait que le disque soit sale ou qu’...
Page 54 - Réception FM
GUIDE DE DÉPANNAGE 24 Fr Réception DAB (MCR-B043D uniquement) Anomalies Causes possibles Solution Impossible de capter aucune station DAB. La recherche initiale n’a pas été effectuée. Exécutez la recherche initiale ( ☞ P. 11). Absence de couverture DAB dans votre région. Consultez votre revendeur ou...
Page 55 - REMARQUES SUR LES DISQUES ET DISPOSITIFS USB; Informations sur les disques; À propos des fichiers MP3 ou WMA
25 Fr Franç a is Cet appareil est conçu pour lire des CD audio, CD-R*, et CD-RW* comportant les logos suivants. * CD-R/RW au format ISO 9660 De façon générale, cet appareil est capable de lire les disques portant les logos ci-dessus. Les logos sont imprimés sur les disques et sur leur pochette. • Ne...
Page 56 - Plage de syntonisation; SÉCURITÉ LASER; Communication; CARACTÉRISTIQUES TECHNIQUES
26 Fr SECTION LECTEUR CD • Supports ....................................................................... CD, CD-R/RW • Format audio ................................................... CD audio, MP3, WMA USB • Format audio .....................................................................MP3,...
Page 58 - VORSICHT: VOR DER BEDIENUNG DIESES GERÄTES DURCHLESEN.
i De 1 Um optimales Leistungsvermögen sicherzustellen, lesen Sie bitte die Anleitung aufmerksam durch. Bewahren Sie die Anleitung danach für spätere Nachschlagzwecke sorgfältig auf. 2 Installieren Sie dieses Gerät an einem gut belüfteten, trockenen, sauberen Ort - entfernt von direktem Sonnenlicht, ...
Page 59 - MUSIK VON IHREM; INHALTSVERZEICHNIS; angeschlossenen Komponenten, wieder oder hören Sie Radio.; Zu dieser Bedienungsanleitung; auf die Verwendung der Fernbedienung.; Verwendung der Fernbedienung; Eigenschaften
1 De Deutsc h NAMEN UND FUNKTIONEN DER TEILE .................2 Vorderseite ..................................................................... 2Bedienfelddisplay ........................................................... 2Fernbedienung ...............................................................
Page 60 - NAMEN UND FUNKTIONEN DER TEILE; Vorderseite; Bedienfelddisplay
2 De 1 (Ein/Aus) Schaltet das Gerät ein/aus (Bereitschaft).Es gibt zwei Arten des Bereitschaftszustandes ( ☞ S. 5). 2 USB-Anschluss Schließen Sie hier ein USB-Gerät an ( ☞ S. 5, 8). 3 (Kopfhörerbuchse) Schließen Sie Kopfhörer hier an. 4 SOURCE Wählt die Audioquelle für die Wiedergabe.Durch wiederhol...
Page 62 - Schließen Sie die Lautsprecher und Antenne an.; ANSCHLÜSSE; Anschließen von Lautsprechern und Antenne; Lautsprecher; Mitgelieferte Antenne
4 De Schließen Sie die Lautsprecher und Antenne an. Schließen Sie das Netzkabel dieses Geräts nicht eher an, bis alle Kabelanschlüsse fertig gestellt worden sind. Bei schlechtem Radioempfang versuchen Sie Höhe, Ausrichtung oder Ort der Antenne zu ändern, um eine Stelle mit besserem Empfang ausfindig...
Page 63 - Externe Geräte; Anschließen des Netzkabels
5 De ANSCHLÜSSE Deutsc h Nach Abschluss aller Anschlüsse verbinden Sie das Netzkabel dieses Geräts mit einer Netzsteckdose. USB-Gerät Verbinden Sie Ihr USB-Gerät mit dem USB-Anschluss an der Vorderseite. Einzelheiten zu abspielbaren Dateien finden Sie unter „HINWEISE ZU DISCS UND USB-GERÄTEN“ ( ☞ ...
Page 64 - Das Optionsmenü wird angezeigt.; Stellen Sie Datum und Uhrzeit ein.; Drücken Sie
6 De Sie können Datum und Uhrzeit dieses Geräts über das Optionsmenü eingegeben ( ☞ S. 18). EINSTELLEN DER UHR (OPTIONSMENÜ) 1 Drücken Sie , um das Gerät einzuschalten. 2 Drücken Sie OPTION . Das Optionsmenü wird angezeigt. 3 Drücken Sie / , um „CLOCK SET“ zu wählen, und drücken Sie dann ENTER ....
Page 65 - Überspringen von Ordnern (nur Fernbedienung); WIEDERGABE VON CDs ODER USB-GERÄTEN; Wiedergabe einer CD; Drücken Sie die Wiedergabequellentaste; um CD als Audioquelle zu wählen.
7 De Deutsc h Überspringen von Ordnern (nur Fernbedienung) Anzeigeinformationen (nur Fernbedienung) WIEDERGABE VON CDs ODER USB-GERÄTEN Titel/Dateien von CDs/USB-Geräten werden folgendermaßen wiedergegeben.• Wenn die Wiedergabe einer CD/eines USB-Geräts gestoppt wird, beginnt die Wiedergabe beim...
Page 66 - Wiedergabe eines USB-Geräts
WIEDERGABE VON CDs ODER USB-GERÄTEN 8 De Überspringen von Ordnern (nur Fernbedienung) Anzeigeinformationen (nur Fernbedienung) Der Wiedergabemodus erscheint in der Wiederholungs-/Zufallswiedergabeanzeige im Bedienfelddisplay. Wiederholungswiedergabe Zufallswiedergabe Wiedergabe eines USB-Ger...
Page 67 - Drücken Sie die Quellentaste; Führen Sie eine
9 De Deutsc h Dieses Gerät bietet Bluetooth -Funktionalität. Sie können drahtlos Musik von Ihrem Bluetooth -Gerät (Mobiltelefon, digitaler Audio-Player usw.) wiedergeben. Schlagen Sie hierzu auch in der Anleitung Ihres Bluetooth -Geräts nach. Koppeln ist nur dann notwendig, wenn Ihr Bluetooth -Gerät...
Page 68 - Verbindung auf diesem Gerät erstellen; Verbinden eines bereits gekoppelten Geräts über
MUSIK VON IHREM Bluetooth-GERÄT WIEDERGEBEN 10 De Wurde bereits eine Kopplung vorgenommen, kann ein Bluetooth -Gerät das nächste Mal bequem verbunden werden. Verbindung auf diesem Gerät erstellen Verbindung vom anderen Gerät herstellen Findet einer der folgenden Bedienungsvorgänge statt, während...
Page 69 - DAB und DAB; Erneutes Durchführen des ersten Suchlaufs (Optionsmenü); Vorbereitung für den DAB-Empfang; „Press ENTER“ wird angezeigt.; Der erste Suchlauf startet.
11 De Deutsc h DAB (Digital Audio Broadcasting) und DAB + verwenden digitale Signale für einen klareren Klang und stabileren Empfang im Vergleich zu Analogsignalen.DAB + basiert auf dem ursprünglichen DAB-Standard, verwendet aber ein effizienteres Audiocodec. DAB und DAB + werden in Datenblöcken ges...
Page 70 - DAB-Frequenzinformationen; Dieses Gerät kann nur das Band III empfangen.; Auswählen von DAB-Sendern; , um DAB als Wiedergabequelle zu; Anzeige der Signalstärke:; Voreinstellungsnummer; auf der Fernbedienung drücken,
WIEDERGABE VON DAB-SENDERN (nur MCR-B043D) 12 De Anzeigeinformationen (nur Fernbedienung) DAB-Frequenzinformationen Dieses Gerät kann nur das Band III empfangen. Auswählen von DAB-Sendern 1 Drücken Sie die Wiedergabequellentaste RADIO , um DAB als Wiedergabequelle zu wählen. 2 Drücken Sie TUNING...
Page 72 - Aufrufen von DAB-Festsendern
WIEDERGABE VON DAB-SENDERN (nur MCR-B043D) 14 De Aufrufen von DAB-Festsendern 1 Drücken Sie die Wiedergabequellentaste RADIO , um DAB als Wiedergabequelle zu wählen. 2 Drücken Sie PRESET / , um die Nummer des DAB-Senders zu wählen, den Sie hören möchten. Sie können nur vorprogrammierte Sender wählen...
Page 73 - WIEDERGABE VON FM-SENDERN; Auswählen eines FM-Senders; , um FM als Wiedergabequelle zu
15 De Deutsc h Zum Wiedergeben eines FM-Senders schließen Sie die Antenne an, wie unter „Anschließen von Lautsprechern und Antenne“ ( ☞ S. 4) beschrieben. Anzeigeinformationen (nur Fernbedienung) Wenn Sie DISPLAY auf der Fernbedienung drücken, werden die Informationen im Bedienfelddisplay in folge...
Page 75 - Aufrufen von FM-Festsendern; WIEDERGABE VON EXTERNEN QUELLEN
17 De WIEDERGABE VON FM-SENDERN Deutsc h Aufrufen von FM-Festsendern 1 Drücken Sie die Wiedergabequellentaste RADIO , um FM als Wiedergabequelle zu wählen. 2 Drücken Sie PRESET / , um die Nummer des Festsenders zu wählen, den Sie hören möchten. Sie können nur vorprogrammierte Sender wählen. WIEDERGA...
Page 76 - Einstellungsmöglichkeiten zu erhalten.; Vorgehensweise für die Einstellung; NÜTZLICHE FUNKTIONEN; Verwendung des Optionsmenüs
18 De Drücken Sie OPTION , um das Optionsmenü im Bedienfelddisplay aufzurufen und Zugang zu den folgenden Einstellungsmöglichkeiten zu erhalten. (Auswurftaste) kann bei angezeigtem Optionsmenü nicht bedient werden. *1 nur MCR-B043D *2 Grundeinstellung Vorgehensweise für die Einstellung NÜTZLICHE F...
Page 77 - Wecktypen; /FM. Je nach Audioquelle können außerdem folgende; Schlummerfunktion; Verwendung des Einschlaftimers; Bedienfelddisplay angezeigt.; Verwendung der Weckfunktion (IntelliAlarm)
19 De NÜTZLICHE FUNKTIONEN Deutsc h Wenn die festgelegte Dauer abgelaufen ist, schaltet sich das Gerät aus. Dieses Gerät verfügt über eine Weckfunktion, die zur eingestellten Uhrzeit auf verschiedene Weisen Audioquellen oder einen Piepton (interner Weckton) wiedergibt. Die Weckfunktion verfügt über ...
Page 78 - Einstellen der Weckzeit und des Weckertyps (Optionsmenü); Einstellen der Weckfunktion; Stellen Sie den Wecker ein.; Stellen Sie die unten beschriebenen Punkte; Nach Abschluss der VOLUME-Einstellung in Punkt; Punkte
NÜTZLICHE FUNKTIONEN 20 De Einstellen der Weckzeit und des Weckertyps (Optionsmenü) Befindet sich das Gerät im ECO-Bereitschaftsmodus, ist die Weckfunktion nicht verfügbar. Stellen Sie den Optionsmenüpunkt POWER SAVING auf NORMAL ein, um die Weckfunktion benutzen zu können ( ☞ S. 18). Einstellen d...
Page 79 - Wecker ausschalten; Bei aktiviertem Wecker leuchtet die Weckanzeige (; erneut drücken, werden die; Bedienungsvorgänge während der Wiedergabe des Wecktons; oder
21 De NÜTZLICHE FUNKTIONEN Deutsc h Ein-/Ausschalten des Weckers Bei Erreichen der eingestellten Weckzeit wird der eingestellte Weckton wiedergegeben. Während der Wiedergabe sind folgende Bedienungsvorgänge verfügbar. Schlummerpause einlegen (Snooze) Wecker ausschalten Drücken Sie ALARM , um d...
Page 80 - FEHLERBEHEBUNG; Allgemeines
22 De Wenn ein Problem mit diesem Gerät auftritt, prüfen Sie als Erstes die folgende Liste. Falls Sie die Störung nicht mithilfe der folgenden Abhilfemaßnahmen beheben können oder die Störung nachfolgend nicht aufgelistet ist, schalten Sie dieses Gerät aus, ziehen Sie den Netzstecker und wenden Sie ...
Page 83 - HINWEISE ZU DISCS UND USB-GERÄTEN; Informationen zu CDs; Informationen zu USB-Geräten
25 De Deutsc h Das Gerät wurde zur Verwendung mit Audio-CDs, CD-R* und CD-RW* mit den folgenden Logos entwickelt. * CD-R/RW mit ISO 9660-Format Dieses Gerät kann Discs wiedergeben, auf denen eines der oben abgebildeten Logos aufgedruckt ist. Die Disc-Logos sind auf der Disc und der Disc-Hülle aufged...
Page 84 - TUNER; Empfangsbereich; ALLGEMEINES; VORSICHT MIT DEM LASER; Umgang mit; TECHNISCHE DATEN
26 De PLAYER-BEREICH CD • Medien ......................................................................... CD, CD-R/RW • Audioformat ................................................... Audio-CD, MP3, WMA USB • Audioformat ......................................................................MP3, W...
Page 85 - VORSICHT
27 De Deutsc h Verbraucherinformation zur Sammlung und Entsorgung alter Elektrogeräte und benutzter Batterien Befinden sich diese Symbole auf den Produkten, der Verpackung und/oder beiliegenden Unterlagen, so sollten benutzte elektrische Geräte und Batterien nicht mit dem normalen Haushaltsabfall en...
Page 86 - OBSERVERA: LÄS DETTA INNAN ENHETEN TAS I BRUK.; VARNING
i Sv 1 Läs noga denna bruksanvisning för att kunna ha största möjliga nöje av enheten. Förvara bruksanvisningen nära till hands för framtida referens. 2 Installera anläggningen på en väl ventilerad plats där det är svalt, torrt, rent och se till att den inte utsätts för direkt solljus, värmekällor, ...
Page 87 - LYSSNA PÅ MUSIK FRÅN DIN; INNEHÅLL; Om bruksanvisningen; instruktionerna att fokusera på användning av fjärrkontrollen.; Använda fjärrkontrollen; Funktioner
1 Sv Svens k a DELARNAS NAMN OCH FUNKTIONER ..................2 Frontpanel ...................................................................... 2Frontpanelens teckenfönster.......................................... 2Fjärrkontroll .......................................................................
Page 88 - DELARNAS NAMN OCH FUNKTIONER; Frontpanel; Frontpanelens teckenfönster
2 Sv 1 (Ström) Tryck för att slå på/stänga av enheten (standbyläge).Det finns två typer av standbyläge ( ☞ S. 5). 2 USB-port Anslut din USB-enhet här ( ☞ S. 5, 8). 3 (Hörlursuttag) Anslut hörlurar här. 4 SOURCE Ändra ljudkälla för uppspelning.Genom att trycka flera gånger kommer valet att ändras i f...
Page 89 - Bekräfta ett valt alternativ eller värde.
3 Sv DELARNAS NAMN OCH FUNKTIONER Svens k a 1 Fjärrkontrollens signalsändare 2 (Ström) Tryck för att slå på/stänga av enheten (standbyläge).Det finns två typer av standbyläge ( ☞ S. 5). 3 SNOOZE/SLEEP Ställer in insomningstimern eller slår över alarmet i snooze-läge ( ☞ S. 19, 21). 4 ALARM Aktivera/...
Page 90 - Anslut högtalarna och antennen.; ANSLUTNINGAR; Ansluta högtalarna och antennen; Högtalare
4 Sv Anslut högtalarna och antennen. Anslut ej enhetens nätkabel förrän du har anslutit alla andra kablar. Om radiomottagningen är dålig, försök att justera höjden, riktningen eller placeringen av antennen för att hitta en plats där mottagningen är bättre.Mottagningen kan bli bättre om du använder e...
Page 91 - Externa enheter; Anslutning av nätkabeln
5 Sv ANSLUTNINGAR Svens k a När alla anslutningar är kopplade, anslut denna enhets nätkabel till vägguttaget. USB-enhet Anslut USB-enheten till USB-porten på frontpanelen. För information om spelbara filer, se ”ANMÄRKNINGAR OM SKIVOR OCH USB-ENHETER” ( ☞ S. 25). Externa enheter Anslut din extern...
Page 92 - Tryck på; för att bekräfta inställningen.
6 Sv Använd Option-menyn ( ☞ S. 18) för att ställa in enhetens datum och tid. JUSTERA KLOCKAN (OPTION-MENYN) 1 Tryck på för att slå på enheten. 2 Tryck på OPTION . Option-menyn visas. 3 Tryck / och välj ”CLOCK SET” och tryck sedan ENTER . I teckenfönstret visas ”CLOCK YEAR” och det numeriska vär...
Page 93 - LYSSNA PÅ CD OCH USB-ENHETER; Lyssna på en CD; Tryck på källknappen; för att växla till CD; Om en CD redan satts i startar uppspelningen.; Sätt i en CD i skivöppningen.; Medan en data-CD spelas kan du använda fjärrkontrollens; på fjärrkontrollen medan ett spår
7 Sv Svens k a Hoppa över mappar (endast fjärrkontroll) Visa information (endast fjärrkontroll) LYSSNA PÅ CD OCH USB-ENHETER Nedan beskrivs hur enheten fungerar vid uppspelning av spår/filer från CD/USB-enhet.• Om CD:n/USB-enheten som spelas upp stoppas kommer spåret du lyssnade på att spelas fr...
Page 94 - Upprepad uppspelning; Lyssna på en USB-enhet; för att växla till; Om en USB-enhet redan satts i startar uppspelningen.; -knappar för att välja
LYSSNA PÅ CD OCH USB-ENHETER 8 Sv Hoppa över mappar (endast fjärrkontroll) Visa information (endast fjärrkontroll) Uppspelningsstatusen visas av indikatorn för upprepa/blanda i frontpanelens teckenfönster. Upprepad uppspelning Blandad uppspelning Lyssna på en USB-enhet 1 Tryck på källknappen...
Page 96 - Ansluta från detta system; Ansluta en redan ihopparad komponent via; Koppla från en
LYSSNA PÅ MUSIK FRÅN DIN Bluetooth-KOMPONENT 10 Sv När ihopparningen har slutförts, blir det enkelt att ansluta en Bluetooth -enhet nästa gång. Ansluta från detta system Ansluta från den andra enheten Om någon av följande åtgärder utförs medan en Bluetooth -anslutning används, kopplas Bluetooth ...
Page 97 - Förbereda för DAB-mottagning; I displayen visas ”Press ENTER”.; Den första sökningen startas.
11 Sv Svens k a DAB (Digital Audio Broadcasting) och DAB + använder digitala signaler för klarare ljud och mer stabil mottagning jämfört med analoga signaler.DAB + är baserat på den ursprungliga DAB-standarden, men använder en mer effektiv ljud-codec. DAB och DAB + sänds i block med data som kallas ...
Page 98 - DAB-frekvensinformation; Den här enheten kan bara ta emot Band III.; Indikator för signalstyrka:; Nummer på förinställningen; på fjärrkontrollen skiftar
LYSSNA PÅ DAB-STATIONER (endast MCR-B043D) 12 Sv Visa information (endast fjärrkontroll) DAB-frekvensinformation Den här enheten kan bara ta emot Band III. Välja DAB-stationer 1 Tryck på källknappen RADIO för att växla till DAB-radio som ljudkälla. 2 Tryck på TUNING / för att välja DAB- statione...
Page 100 - Välja förinställda DAB-stationer
LYSSNA PÅ DAB-STATIONER (endast MCR-B043D) 14 Sv Välja förinställda DAB-stationer 1 Tryck på källknappen RADIO för att växla till DAB-radio som ljudkälla. 2 Tryck på PRESET / för att välja den DAB- station du vill lyssna på. Du kan endast välja förinställda stationer som sparats. Kontrollera signals...
Page 101 - Om du trycker på; Välja en FM-radiostation; En FM-sändning i mono tas emot; på fjärrkontrollen medan
15 Sv Svens k a För att lyssna på en FM-radiostation, anslut antennen som beskrivet i ”Ansluta högtalarna och antennen” ( ☞ S. 4). Visa information (endast fjärrkontroll) Om du trycker på DISPLAY på fjärrkontrollen skiftar den information som visas i frontpanelens teckenfönster i följande ordning:...
Page 102 - för att växla till FM-radio som ljudkälla.
LYSSNA PÅ FM-RADIO 16 Sv Använd förinställningsfunktionen för att spara dina 30 favoritkanaler.Tryck först på källknappen RADIO för att växla till FM-radio som ljudkälla. Automatisk förinställning Denna metod ställer endast automatiskt in och förinställer de stationer som har bra mottagning. Man...
Page 103 - Välja förinställda FM-radiostationer; LYSSNA PÅ EXTERNA KÄLLOR
17 Sv LYSSNA PÅ FM-RADIO Svens k a Välja förinställda FM-radiostationer 1 Tryck på källknappen RADIO för att växla till FM-radio som ljudkälla. 2 Tryck på PRESET / för att välja den FM-radiostation du vill lyssna på. Du kan endast välja förinställda stationer som sparats. LYSSNA PÅ EXTERNA KÄLLOR 1 ...
Page 104 - När du trycker på; Göra inställningar; ANVÄNDBARA FUNKTIONER
18 Sv När du trycker på OPTION visas Option-menyn i frontpanelens teckenfönster där du kan göra följande inställningar: (Utmatningsknappen) kan ej användas när Option-menyn visas. *1 Endast MCR-B043D *2 Standardinställning Göra inställningar ANVÄNDBARA FUNKTIONER Använda Option-menyn Option-menyn ...
Page 105 - sorters alarm; Välj bland tre sorters alarm som kombinerar musik och signalljud.; Flera ljudkällor; /FM. Följande uppspelningsmetoder kan även ställas in; Snooze-funktionen gör att alarmet spelas upp igen efter 5 minuter (; Använda insomningstimern; ) visas i frontpanelens
19 Sv ANVÄNDBARA FUNKTIONER Svens k a När den valda tidsperioden har förflutit stängs enheten av automatiskt. Enheten har en alarmfunktion som spelar upp ljudkällor eller ljudsignaler (internt alarmljud) vid den inställda tidpunkten genom flera olika metoder. Alarmfunktionen har följande funktioner:...
Page 106 - Ställa in alarmet; Tryck; Val
ANVÄNDBARA FUNKTIONER 20 Sv Ställa in tidpunkt och typ av alarm (Option-menyn) Alarmet fungerar inte om enheten är i ECO-standbyläge. För att använda alarmet ställ in POWER SAVING i OPTION-menyn till NORMAL ( ☞ S. 18). Ställa in alarmet 1 Tryck på OPTION . Option-menyn visas. 2 Tryck / och väl...
Page 107 - Sätta på och stänga av alarmet; När alarmet är på tänds alarmindikatorn (; igen kommer alarmindikatorn; Funktioner medan alarmljudet spelas upp; eller
21 Sv ANVÄNDBARA FUNKTIONER Svens k a Sätta på och stänga av alarmet När det inställda klockslaget inträffar spelas det valda alarmljudet upp. Medan alarmet spelas upp kan du göra följande: Pausa alarmet (Snooze) Stänga av alarmet Tryck ALARM för att slå på/stänga av alarmet. När alarmet är på...
Page 108 - FELSÖKNING; Allmänt
22 Sv Kontrollera först följande lista vid problem med enheten. Om du inte kan lösa ditt problem med hjälp av någon av lösningarna här, eller om problemet inte finns med nedan, stänger du av enheten och kopplar ur den. Kontakta sedan närmaste auktoriserade Yamahaåterförsäljare eller servicecenter. F...
Page 109 - Uppspelning av USB-enhet
23 Sv FELSÖKNING Svens k a Frontpanelens teckenfönster visar ”CD No Disc” eller ”CD Unknown” när du sätter i en skiva. Den skiva som satts in i enheten är kanske inte kompatibel. Använd en skiva som stöds av enheten ( ☞ S. 25). Skivan kan vara smutsig eller något främmande föremål kan ha fastnat på ...
Page 111 - ANMÄRKNINGAR OM SKIVOR OCH USB-ENHETER; Skivhantering; Information om USB-enheter
25 Sv Svens k a Den här enheten är utformad för användning med ljud-CD, CD-R* och CD-RW* med följande logotyper: * ISO 9660 format CD-R/RW Denna enhet kan spela upp skivor som är märkta med logotyperna ovan. Logotypen finns tryckt på skivan och på skivfodralet. • Sätt inte i någon annan typ av skiva...
Page 112 - SPELARE; FÖRSTÄRKARE; Mottagningsområde; HÖGTALARE; ALLMÄNT; SPECIFIKATIONER
26 Sv SPELARE CD • Media ........................................................................... CD, CD-R/RW • Ljudformat ....................................................... Ljud-CD, MP3, WMA USB • Ljudformat ........................................................................MP3, WMA ...
Page 113 - LASER; OBSERVERA
27 Sv Svens k a Användarinformation beträffande insamling och kassering av gammal utrustning och använda batterier De symboler, som finns på produkterna, emballaget och/eller bifogade dokument talar om att de använda elektriska och elektroniska produkterna, samt batterierna, inte ska blandas med all...
Page 115 - INDICE; AUX e ascolto della radio.; Nota sul presente manuale; indica spiegazioni aggiuntive per un migliore uso del prodotto.; Come utilizzare il telecomando; Caratteristiche
1 It It alia no NOME DEI COMPONENTI E RELATIVE FUNZIONI ....2 Pannello anteriore .......................................................... 2Display del pannello anteriore ........................................ 2Telecomando ................................................................. 3 COLLEG...
Page 116 - NOME DEI COMPONENTI E RELATIVE FUNZIONI; Pannello anteriore; Display del pannello anteriore
2 It 1 (Alimentazione) Premere per accendere/spegnere l’unità (standby).Esistono due tipi di stati standby ( ☞ P. 5). 2 Porta USB Collegare qui il dispositivo USB ( ☞ P. 5, 8). 3 (Presa auricolari) Collegare qui gli auricolari. 4 SOURCE Commutare sulla sorgente audio di riproduzione.Premere ripetuta...
Page 117 - Telecomando
3 It NOME DEI COMPONENTI E RELATIVE FUNZIONI It alia no 1 Trasmettitore del segnale del telecomando 2 (Alimentazione) Premere per accendere/spegnere l’unità (standby).Esistono due tipi di stati standby ( ☞ P. 5). 3 SNOOZE/SLEEP Impostare il timer per lo spegnimento o commutare la sveglia sulla modal...
Page 118 - Collegare altoparlanti e antenna.; COLLEGAMENTI; Collegamento di altoparlanti e antenna; Altoparlanti; Antenna in dotazione
4 It Collegare altoparlanti e antenna. Non collegare il cavo di alimentazione dell’unità prima di aver terminato di collegare tutti i cavi. Se la ricezione radio è insufficiente, modificare l’altezza, l’orientamento o la posizione dell’antenna per trovare una posizione dove la ricezione è migliore.L...
Page 119 - Dispositivo USB; Collegamento del cavo di alimentazione
5 It COLLEGAMENTI It alia no Una volta completati tutti i collegamenti, collegare il cavo di alimentazione dell’unità a una presa CA. Dispositivo USB Collegare un dispositivo USB alla porta USB sul pannello anteriore. Per i dettagli sui file riproducibili, fare riferimento a “NOTE SUI DISCHI E I D...
Page 121 - Visualizzare informazioni (solo telecomando); ASCOLTO DI CD E DISPOSITIVI USB; dall’inizio alla ripresa della riproduzione.; USB se non vengono eseguite operazioni.; Ascolto di CD; Premere il tasto sorgente; per impostare; Se un CD è già inserito, inizierà la riproduzione.; Inserire un CD nell’alloggiamento del disco.; del telecomando per selezionare la; sul telecomando mentre un brano è in
7 It It alia no Saltare le cartelle (solo telecomando) Visualizzare informazioni (solo telecomando) ASCOLTO DI CD E DISPOSITIVI USB Riproducendo brani/file da CD/dispositivi USB, l’unità funziona nella seguente modalità.• In caso di arresto del CD/del dispositivo USB che viene riprodotto, la tra...
Page 122 - Ascolto di un dispositivo USB; del telecomando per; Nessuna visualizzazione:; Nessuna visualizzazione:
ASCOLTO DI CD E DISPOSITIVI USB 8 It Saltare le cartelle (solo telecomando) Visualizzare informazioni (solo telecomando) Lo stato della riproduzione appare sul display del pannello anteriore con l’indicatore di Ripetizione/Riproduzione casuale. Riproduzione ripetuta Riproduzione casuale Asco...
Page 123 - ASCOLTO DI BRANI MUSICALI DAL COMPONENTE
9 It It alia no L’unità è dotata di funzionalità Bluetooth . È possibile ascoltare musica via wireless dal componente Bluetooth (cellulare, lettore audio digitale, ecc.). Fare riferimento anche al manuale dell’utente del componente Bluetooth . Il cosiddetto pairing deve essere eseguito al primo util...
Page 124 - Collegamento da questa unità; Collegamento di un componente già accoppiato via; Interrompere un collegamento
ASCOLTO DI BRANI MUSICALI DAL COMPONENTE Bluetooth 10 It Una volta completato il pairing, il collegamento Bluetooth successivo sarà facile. Collegamento da questa unità Collegamento dall’altro componente Se una qualsiasi delle seguenti operazioni viene eseguita durante un collegamento Bluetooth ...
Page 125 - Riesecuzione della scansione iniziale (menu Option); Preparazione per la ricezione DAB
11 It It alia no DAB (Digital Audio Broadcasting - Trasmissioni audio digitali) e DAB + utilizzano segnali digitali per garantire un audio più chiaro e una ricezione più stabile rispetto ai segnali analogici.DAB + si basa sullo standard DAB, ma utilizza un codec audio più efficace. DAB e DAB + vengo...
Page 126 - Quest’unità supporta soltanto la Banda III.; Selezione stazioni DAB; per selezionare la; Indicatore secondario:; Numero preselezionato; sul telecomando, le informazioni
ASCOLTO DI STAZIONI DAB (solo MCR-B043D) 12 It Visualizzare informazioni (solo telecomando) Informazioni sulle frequenza DAB Quest’unità supporta soltanto la Banda III. Selezione stazioni DAB 1 Premere il tasto sorgente RADIO per impostare DAB come sorgente audio. 2 Premere TUNING / per selezion...
Page 127 - Preselezione delle stazioni DAB (solo telecomando); Apparirà il menu option.
13 It ASCOLTO DI STAZIONI DAB (solo MCR-B043D) It alia no Utilizzare la funzione di preselezione per memorizzare le 30 stazioni preferite. Eliminare una preselezione memorizzata (menu option) Preselezione delle stazioni DAB (solo telecomando) 1 Premere il tasto sorgente RADIO per impostare DAB com...
Page 128 - Selezione di stazioni DAB preselezionate
ASCOLTO DI STAZIONI DAB (solo MCR-B043D) 14 It Selezione di stazioni DAB preselezionate 1 Premere il tasto sorgente RADIO per impostare DAB come sorgente audio. 2 Premere PRESET / per selezionare la stazione DAB che si desidera ascoltare. È possibile selezionare soltanto preselezioni memorizzate. Co...
Page 129 - ASCOLTO DI STAZIONI RADIO IN FM; Selezionare una stazione FM; Premere il tasto; per impostare FM; Visualizzazione informazioni Radio Data System
15 It It alia no Per ascoltare una stazione FM, collegare l’antenna come descritto in “Collegamento di altoparlanti e antenna” ( ☞ P. 4). Visualizzare informazioni (solo telecomando) Premendo DISPLAY sul telecomando, le informazioni sul display del pannello anteriore cambieranno nel seguente ordin...
Page 130 - per impostare FM come sorgente audio.; Preselezione delle stazioni FM (solo telecomando)
ASCOLTO DI STAZIONI RADIO IN FM 16 It Utilizzare la funzione di preselezione per memorizzare le 30 stazioni preferite.Per prima cosa, premere il tasto sorgente RADIO per impostare FM come sorgente audio. Preselezione automatica Questo metodo sintonizza automaticamente e memorizza automaticamente l...
Page 131 - Selezione di stazioni FM preselezionate; ASCOLTO DI SORGENTI ESTERNE
17 It ASCOLTO DI STAZIONI RADIO IN FM It alia no Selezione di stazioni FM preselezionate 1 Premere il tasto RADIO per impostare FM come sorgente audio. 2 Premere PRESET / per selezionare la stazione FM che si desidera ascoltare. È possibile selezionare soltanto preselezioni memorizzate. ASCOLTO DI S...
Page 132 - Premendo; Procedura per le impostazioni; FUNZIONI UTILI; Uso del menu Option
18 It Premendo OPTION , apparirà il menu option sul display del pannello anteriore e sarà possibile effettuare le seguenti impostazioni. (pulsante d’espulsione) non è operativo quando il menu Option è visualizzato. *1 Solo MCR-B043D *2 Impostazione predefinita Procedura per le impostazioni FUNZION...
Page 133 - tipi di sveglia; Selezionare tra 3 tipi di sveglia, combinando musica e tonalità.; Varie sorgenti audio; È possibile scegliere tra CD audio, CD dati, dispositivo USB o DAB; Uso del timer di spegnimento; Premere ripetutamente; display del pannello anteriore.; Uso della funzione sveglia (IntelliAlarm)
19 It FUNZIONI UTILI It alia no Una volta trascorso il tempo specificato, l’unità si spegnerà automaticamente. L’unità comprende una funzione di sveglia che riproduce sorgenti musicali o una serie di tonalità (allarmi interni) all’ora stabilita con una gamma di metodi diversi. La funzione sveglia ha...
Page 134 - Impostare l’ora e il tipo di sveglia (menu option); Impostazione della sveglia; Premere; Impostare la sveglia.; Voci
FUNZIONI UTILI 20 It Impostare l’ora e il tipo di sveglia (menu option) La funzione sveglia non è disponibile quando l’unità è in modalità standby ECO. Per utilizzare la sveglia, impostare la voce POWER SAVING del menu Option su NORMAL ( ☞ P. 18). Impostazione della sveglia 1 Premere OPTION . Appa...
Page 135 - Attivazione/disattivazione della sveglia; per accendere/spegnere la; Premendo nuovamente; , l’indicatore della sveglia; Operazioni durante la riproduzione del suono della sveglia; Snooze arresta la sveglia per farla riprendere dopo 5 minuti.; oppure
21 It FUNZIONI UTILI It alia no Attivazione/disattivazione della sveglia All’ora della sveglia, viene riprodotto il suono della sveglia selezionato. Durante la riproduzione sono disponibili le seguenti operazioni. Mettere in pausa la sveglia (Snooze) Disattivazione della sveglia Premere ALARM ...
Page 136 - RISOLUZIONE DEI PROBLEMI; Problemi di carattere generale
22 It Se c’è un problema nell’unità, verificare innanzitutto l’elenco che segue. Qualora non si riuscisse a risolvere il problema applicando le soluzioni suggerite, o se il problema non rientra fra quelli elencati qui di seguito, spegnere l’unità e staccare la spina, quindi rivolgersi al più vicino ...
Page 137 - Riproduzione di un dispositivo USB
23 It RISOLUZIONE DEI PROBLEMI It alia no Quando s’inserisce un disco, il display del pannello anteriore indica “CD No Disc” o “CD Unknown”. Il disco caricato nell’unità potrebbe non essere compatibile. Usare un disco supportato da quest’unità ( ☞ P. 25). Il disco potrebbe essere sporco o presentare...
Page 138 - Ricezione FM
RISOLUZIONE DEI PROBLEMI 24 It Ricezione DAB (solo MCR-B043D) Problema Causa Soluzione Impossibile sintonizzare una stazione DAB. Non sono state eseguite le operazioni di scansione iniziale. Eseguire le operazioni di scansione iniziale ( ☞ P. 11). Non esiste copertura DAB in quest’area. Verificare l...
Page 139 - NOTE SUI DISCHI E I DISPOSITIVI USB; Informazioni sui CD; Informazioni sui dispositivi USB
25 It It alia no Questa unità è progettata per l’uso con CD audio, CD-R* e CD-RW* con i seguenti loghi. * CD-R/RW formato ISO 9660 Quest’unità può riprodurre dischi contrassegnati da uno dei loghi sopra riportati. I loghi sono stampati sui dischi e sulla relativa custodia. • Non caricare in quest’un...
Page 140 - Gamma di sintonizzazione; SICUREZZA DEL LASER; Gestione delle comunicazioni; DATI TECNICI
26 It SEZIONE LETTORE CD • Supporti ....................................................................... CD, CD-R/RW • Formato audio ................................................. CD audio, MP3, WMA USB • Formato audio ..................................................................MP3, WM...
Page 141 - ATTENZIONE
27 It It alia no Informazioni per gli utenti sulla raccolta e lo smaltimento di vecchia attrezzatura e batterie usate Questi simboli sui prodotti, sull’imballaggio, e/o sui documenti che li accompagnano significano che i prodotti e le batterie elettriche e elettroniche non dovrebbero essere mischiat...
Page 143 - ESCUCHAR MÚSICA DEL COMPONENTE; CONTENIDO; través del conector AUX y escuche la radio.; Acerca de este manual; centrará en la operación con el mando a distancia.; Uso del mando a distancia; Características
1 Es E s pañol NOMBRES DE LAS PARTES Y SUS FUNCIONES .....2 Panel frontal ................................................................... 2Pantalla del panel frontal................................................ 2Mando a distancia .......................................................... 3 CO...
Page 144 - NOMBRES DE LAS PARTES Y SUS FUNCIONES; Panel frontal; Pantalla del panel frontal
2 Es 1 (Alimentación) Pulse este botón para encender o apagar la unidad (modo de espera).Hay dos tipos de estados de espera ( ☞ P. 5). 2 Puerto USB Conecte aquí su dispositivo USB ( ☞ P. 5, 8). 3 (Conector de auriculares) Conecte los auriculares aquí. 4 SOURCE Cambie la fuente de audio que va a repr...
Page 145 - Mando a distancia
3 Es NOMBRES DE LAS PARTES Y SUS FUNCIONES E s pañol 1 Transmisor de señales del mando a distancia 2 (Alimentación) Pulse este botón para encender o apagar la unidad (modo de espera).Hay dos tipos de estados de espera ( ☞ P. 5). 3 SNOOZE/SLEEP Configure el temporizador de apagado o cambie la alarma ...
Page 146 - Conecte los altavoces y la antena.; CONEXIONES; Conexión de los altavoces y la antena; Altavoces; Antena suministrada
4 Es Conecte los altavoces y la antena. No conecte el cable de alimentación de esta unidad hasta que haya terminado de conectar todos los cables. Si la recepción de radio es deficiente, pruebe a cambiar la altura, la dirección o la colocación de la antena para encontrar una ubicación que proporcione...
Page 147 - Conexión del cable de alimentación
5 Es CONEXIONES E s pañol Una vez finalizadas todas las conexiones, conecte el cable de alimentación de esta unidad a una toma de CA. Dispositivo USB Conecte el dispositivo USB al puerto USB en el panel frontal. Para obtener información sobre los archivos reproducibles, consulte “NOTAS SOBRE LOS D...
Page 148 - Debe utilizar el menú de opciones (; Aparecerá el menú de opciones.; Pulse; para confirmar el ajuste.
6 Es Debe utilizar el menú de opciones ( ☞ P. 18) para establecer la fecha y hora de esta unidad. AJUSTE DEL RELOJ (MENÚ DE OPCIONES) 1 Pulse para encender la unidad. 2 Pulse OPTION . Aparecerá el menú de opciones. 3 Pulse / para seleccionar “CLOCK SET” y, a continuación, pulse ENTER . La pantal...
Page 149 - ESCUCHAR CD Y DISPOSITIVOS USB; Escuchar un CD; Pulse el botón de fuente; para cambiar la
7 Es E s pañol Omisión de carpetas (solo con el mando a distancia) Información en pantalla (solo con el mando a distancia) ESCUCHAR CD Y DISPOSITIVOS USB La unidad funcionará del siguiente modo al reproducir pistas o archivos de CD/dispositivos de USB.• Si se detiene el CD/dispositivo de USB que...
Page 150 - Omisión de carpetas (solo con el mando a distancia); Escuchar un dispositivo USB; del mando a distancia; en el mando a distancia cuando una
ESCUCHAR CD Y DISPOSITIVOS USB 8 Es Omisión de carpetas (solo con el mando a distancia) Información en pantalla (solo con el mando a distancia) El indicador de repetición/reproducción aleatoria muestra el estado de reproducción en la pantalla del panel frontal. Repetición de la reproducción ...
Page 152 - Conexión desde esta unidad; Conexión de un componente ya vinculado por; Desconexión de una conexión
ESCUCHAR MÚSICA DEL COMPONENTE Bluetooth 10 Es Una vez finalizada la vinculación, la conexión de un componente Bluetooth resultará sencilla a partir de entonces. Conexión desde esta unidad Conexión desde el otro componente Si se realiza cualquiera de las operaciones siguientes mientras se utiliz...
Page 153 - Repetición de la exploración inicial (menú de opciones); Preparativos para la recepción DAB
11 Es E s pañol DAB (Digital Audio Broadcasting, transmisión de audio digital) y DAB + utilizan señales digitales para obtener un sonido más claro y una recepción más estable, en comparación con las señales analógicas.DAB + está basado en el estándar DAB original, pero usa un códec de audio más efic...
Page 154 - Esta unidad solo puede recibir la Banda III.; Selección de emisoras DAB; para; para seleccionar la; Indicador secundario:; en el mando a distancia, la
ESCUCHAR EMISORAS DAB (solo MCR-B043D) 12 Es Información en pantalla (solo con el mando a distancia) Información sobre la frecuencia de DAB Esta unidad solo puede recibir la Banda III. Selección de emisoras DAB 1 Pulse el botón de fuente RADIO para seleccionar DAB como fuente de audio. 2 Pulse T...
Page 155 - Presintonización de emisoras DAB (solo con el mando a distancia)
13 Es ESCUCHAR EMISORAS DAB (solo MCR-B043D) E s pañol Use la función de presintonización para guardar sus 30 emisoras favoritas. Eliminación de una presintonía guardada (menú de opciones) Presintonización de emisoras DAB (solo con el mando a distancia) 1 Pulse el botón de fuente RADIO para selecc...
Page 156 - Selección de emisoras DAB presintonizadas
ESCUCHAR EMISORAS DAB (solo MCR-B043D) 14 Es Selección de emisoras DAB presintonizadas 1 Pulse el botón de fuente RADIO para seleccionar DAB como fuente de audio. 2 Pulse PRESET / para seleccionar la emisora DAB que desee escuchar. Solo puede seleccionar presintonías que haya guardado. Comprobación ...
Page 157 - Información en pantalla (solo con el mando a distancia); Si pulsa; ESCUCHAR EMISORAS DE FM; Selección de una emisora FM; para cambiar; No se recibe ninguna emisión.; en el mando a distancia cuando se está
15 Es E s pañol Para escuchar la emisora FM, conecte la antena como se describe en “Conexión de los altavoces y la antena” ( ☞ P. 4). Información en pantalla (solo con el mando a distancia) Si pulsa DISPLAY en el mando a distancia, la información que aparece en la pantalla del panel frontal cambia...
Page 158 - para seleccionar FM como fuente de audio.; Presintonización de emisoras FM (solo con el mando a distancia)
ESCUCHAR EMISORAS DE FM 16 Es Use la función de presintonización para guardar sus 30 emisoras favoritas.Para empezar, pulse el botón de fuente RADIO para seleccionar FM como fuente de audio. Presintonización automática Este método permite sintonizar y presintonizar de forma automática únicamente l...
Page 159 - Selección de emisoras FM presintonizadas; ESCUCHAR UNA FUENTE EXTERNA
17 Es ESCUCHAR EMISORAS DE FM E s pañol Selección de emisoras FM presintonizadas 1 Pulse el botón de fuente RADIO para cambiar la fuente de audio a FM. 2 Pulse PRESET / para seleccionar la emisora FM que desee escuchar. Solo puede seleccionar presintonías que haya guardado. ESCUCHAR UNA FUENTE EXTER...
Page 160 - Al pulsar; Procedimiento de configuración; FUNCIONES ÚTILES; Uso del menú de opciones
18 Es Al pulsar OPTION aparecerá el menú de opciones en la pantalla del panel frontal, que le permite realizar los ajustes siguientes. (botón de expulsión) no se puede utilizar cuando se muestra el menú de opciones. *1 Únicamente MCR-B043D *2 Configuración predeterminada Procedimiento de configura...
Page 161 - tipos de alarmas; Puede elegir entre CD de audio, CD de datos, dispositivo USB o DAB; Repetición; Uso del temporizador de apagado; se muestra en la pantalla del panel frontal.; Uso de la función de alarma (IntelliAlarm)
19 Es FUNCIONES ÚTILES E s pañol Una vez transcurrido el tiempo especificado, la unidad se apagará automáticamente. La unidad incluye una función de alarma que reproduce fuentes de audio o un conjunto de pitidos (sonido de la alarma interna) a la hora programada mediante distintos métodos. La funció...
Page 162 - Ajuste de la hora y del tipo de alarma (menú de opciones); Configuración de la alarma; Elementos
FUNCIONES ÚTILES 20 Es Ajuste de la hora y del tipo de alarma (menú de opciones) Si la unidad se encuentra en el modo de espera ECO, la alarma no funcionará. Para utilizar la función de alarma, configure el elemento del menú de opciones POWER SAVING en NORMAL ( ☞ P. 18). Configuración de la alarma...
Page 163 - Activación/desactivación de la alarma; para encender o apagar la; ) se iluminará y la hora de alarma se mostrará.; de nuevo, se desactivarán el indicador de; Operaciones durante la reproducción del sonido de la alarma
21 Es FUNCIONES ÚTILES E s pañol Activación/desactivación de la alarma A la hora programada, se reproducirá el sonido de alarma seleccionado. Durante la reproducción, las siguientes operaciones son posibles. Para poner la alarma en pausa (repetición) Para desactivar la alarma Pulse ALARM para ...
Page 164 - RESOLUCIÓN DE PROBLEMAS
22 Es Si tiene algún problema con la unidad, compruebe primero la siguiente lista. Si no puede solucionar su problema con las siguientes soluciones o si el problema no está en la lista, apague y desenchufe la unidad y, a continuación, consulte al distribuidor o centro de servicio Yamaha autorizado m...
Page 165 - Reproducción de un dispositivo USB
23 Es RESOLUCIÓN DE PROBLEMAS E s pañol La pantalla del panel frontal indica “no operation” y no se puede insertar ni extraer un disco. Se muestra el menú de opciones. O bien, la alarma se está reproduciendo. Pulse OPTION para salir del menú de opciones. O bien, pulse ALARM para detener la alarma. A...
Page 166 - Recepción de FM
RESOLUCIÓN DE PROBLEMAS 24 Es Recepción DAB (solo MCR-B043D) Problema Causa Solución Imposible sintonizar emisoras DAB. No se han realizado las operaciones de exploración inicial. Realice las operaciones de exploración inicial ( ☞ P. 11). No hay cobertura DAB en su zona. Póngase en contacto con su d...
Page 167 - NOTAS SOBRE LOS DISCOS Y LOS DISPOSITIVOS USB; Información sobre CD; Acerca de los archivos MP3 o WMA
25 Es E s pañol Esta unidad está diseñada para CD, CD-R* y CD-RW* de audio con los siguientes logotipos. * CD-R/RW formato ISO 9660 Esta unidad puede reproducir discos que lleven cualquiera de las marcas de logotipos anteriores. La marca del logotipo del disco se imprime en el disco y en la carátula...
Page 168 - Margen de sintonía; SEGURIDAD CONTRA LA RADIACIÓN LÁSER; Gestión de las comunicaciones; ESPECIFICACIONES
26 Es SECCIÓN DEL REPRODUCTOR CD • Multimedia ................................................................... CD, CD-R/RW • Formato de audio ....................................... CD de audio, MP3, WMA USB • Formato de audio .............................................................MP3, WM...
Page 169 - LÁSER; PRECAUCIÓN
27 Es E s pañol Información para usuarios sobre recolección y disposición de equipamiento viejo y baterías usadas Estos símbolos en los productos, embalaje, y/o documentación que se acompañe significan que los productos electrónicos y eléctricos usados y las baterías usadas no deben ser mezclados co...
Page 170 - LET OP: LEES HET VOLGENDE VOOR U DIT TOESTEL IN GEBRUIK NEEMT.; WAARSCHUWING
i Nl 1 Om er zeker van te kunnen zijn dat u de optimale prestaties uit uw toestel haalt, dient u deze handleiding zorgvuldig door te lezen. Bewaar de handleiding op een veilige plek zodat u er later nog eens iets in kunt opzoeken. 2 Installeer dit toestel op een goed geventileerde, koele, droge en s...
Page 171 - MUZIEK BELUISTEREN VAN UW; INHOUD; achtergrondmuziek af en luister naar de radio.; Over deze handleiding; de aandacht op de handeling middels de afstandsbediening.; Hoe de afstandsbediening gebruiken; Kenmerken
1 Nl Nede rlands DE ONDERDELEN EN DE FUNCTIES ERVAN .......2 Voorpaneel ..................................................................... 2Display van het voorpaneel ............................................ 2Afstandsbediening.......................................................... 3 AANSLU...
Page 172 - DE ONDERDELEN EN DE FUNCTIES ERVAN; Voorpaneel; Display van het voorpaneel
2 Nl 1 (Netvoeding) Druk hierop om het systeem in/uit (Stand-by) te schakelen.Er zijn twee soorten stand-bystanden ( ☞ P. 5). 2 USB-poort Maak hier een verbinding met uw USB-apparaat ( ☞ P. 5, 8). 3 (Hoofdtelefoonbus) Sluit hier de hoofdtelefoon aan. 4 SOURCE (bron) Schakel naar de audiobron die moe...
Page 173 - Geef het optiemenu weer (; Selecteer een zender die u hebt opgeslagen (
3 Nl DE ONDERDELEN EN DE FUNCTIES ERVAN Nede rlands 1 Signaalzender afstandsbediening 2 (Netvoeding) Druk hierop om het systeem in/uit (Stand-by) te schakelen.Er zijn twee soorten stand-bystanden ( ☞ P. 5). 3 SNOOZE/SLEEP Stel de sluimertimer in of schakel de wekker naar de uitstelmodus ( ☞ P. 19, 2...
Page 174 - Sluit de luidsprekers en antenne aan.; AANSLUITINGEN; De luidsprekers en antenne aansluiten; Luidsprekers; Meegeleverde antenne
4 Nl Sluit de luidsprekers en antenne aan. Sluit niet de stroomkabel van deze eenheid aan voordat u alle kabels hebt aangesloten. Als de radio-ontvangst slecht is, moet u proberen de hoogte, richting of plaats van de antenne te wijzigen om een locatie te zoeken die betere ontvangst heeft.Als u een c...
Page 175 - Externe apparaten; De stroomkabel aansluiten
5 Nl AANSLUITINGEN Nede rlands Als u alle aansluitingen hebt voltooid, sluit u de stroomkabel van deze eenheid aan op een wisselstroomstopcontact. USB-apparaat Sluit uw USB-apparaat aan op de USB-poort van het voorpaneel. Raadpleeg "OPMERKINGEN OVER SCHIJVEN EN USB-APPARATEN" ( ☞ P. 25) vo...
Page 177 - Mappen overslaan (alleen afstandsbediening); LUISTEREN NAAR EEN CD EN USB-APPARATEN; Naar een cd luisteren; Druk op de brontoets; om de audiobron; Als al een cd is geplaatst, start het afspelen.; Plaats een cd in de schijflade.; op deze eenheid worden geregeld (; van de afstandsbediening; drukt terwijl
7 Nl Nede rlands Mappen overslaan (alleen afstandsbediening) Informatie weergeven (alleen afstandsbediening) LUISTEREN NAAR EEN CD EN USB-APPARATEN Als op cd/USB-apparaten nummers/bestanden worden afgespeeld, werkt de eenheid als volgt.• Als de cd/het USB-apparaat dat wordt afgespeeld, wordt ges...
Page 178 - Naar een USB-apparaat luisteren
LUISTEREN NAAR EEN CD EN USB-APPARATEN 8 Nl Mappen overslaan (alleen afstandsbediening) Informatie weergeven (alleen afstandsbediening) De indicator van herhalen/willekeurig op het display van het voorpaneel toont de afspeelstatus. Afspelen herhalen Willekeurig afspelen Naar een USB-apparaat...
Page 179 - Deze eenheid biedt
9 Nl Nede rlands Deze eenheid biedt Bluetooth -functionaliteit. U kunt genieten van het draadloos muziekafspelen vanaf uw Bluetooth - componenten (mobiele telefoon, digitale audiospeler, enz.). Raadpleeg ook de gebruiksaanwijzing van uw Bluetooth - component. U moet de koppelingshandeling uitvoeren ...
Page 180 - Vanaf deze aanheid aansluiten; Een al gekoppeld component aansluiten via; Druk op de brontoets om de audiobron naar; Een; -verbinding uitschakelen
MUZIEK BELUISTEREN VAN UW Bluetooth-COMPONENT 10 Nl Zodra de koppeling is voltooid, zal de aansluiting van een Bluetooth de volgende keer gemakkelijker verlopen. Vanaf deze aanheid aansluiten Vanaf het andere component verbinding maken Als enige van de volgende handelingen worden uitgevoerd terw...
Page 181 - gebruiken digitale signalen voor een helderder; Voor het eerst zoeken opnieuw uitvoeren (Optiemenu); Voorbereidingen voor DAB-ontvangst; Het optiemenu verschijnt.; Het zoeken voor de eerste keer begint.
11 Nl Nede rlands DAB (Digital Audio Broadcasting of Digitale audio-uitzending) en DAB + gebruiken digitale signalen voor een helderder geluid en een stabielere ontvangst in vergelijking met analoge signalen.DAB + is gebaseerd op de originele DAB-standaard, maar gebruikt een efficiëntere audiocodec....
Page 182 - Informatie weergeven (alleen afstandsbediening); Deze eenheid kan alleen Band III ontvangen.; DAB-zenders selecteren; om de; Secundaire indicator:; Naam van de DAB-zender
NAAR DAB-ZENDERS LUISTEREN (alleen MCR-B043D) 12 Nl Informatie weergeven (alleen afstandsbediening) DAB-frequentie-informatie Deze eenheid kan alleen Band III ontvangen. DAB-zenders selecteren 1 Druk op de brontoets RADIO om de audiobron naar DAB te schakelen. 2 Druk op TUNING / (afstemmen) om d...
Page 184 - Voorgeprogrammeerde DAB-zenders selecteren
NAAR DAB-ZENDERS LUISTEREN (alleen MCR-B043D) 14 Nl Voorgeprogrammeerde DAB-zenders selecteren 1 Druk op de brontoets RADIO om de audiobron naar DAB te schakelen. 2 Druk op PRESET / om de DAB-zender te selecteren waar u naar wilt luisteren. U kunt alleen presets selecteren die zijn opgeslagen. De si...
Page 185 - Als u op de afstandsbediening op; weergegeven, in volgende volgorde geschakeld.; NAAR FM-ZENDERS LUISTEREN; Een FM-zender selecteren; er wordt geen uitzending ontvangen.; druk terwijl
15 Nl Nede rlands Om naar het FM-station te luisteren, sluit u de antenne aan zoals in "De luidsprekers en antenne aansluiten" ( ☞ P. 4) wordt beschreven. Informatie weergeven (alleen afstandsbediening) Als u op de afstandsbediening op DISPLAY drukt, wordt de informatie die op het display ...
Page 186 - om de audiobron naar FM te schakelen.; Als het verwijderen is voltooid, geeft de display
NAAR FM-ZENDERS LUISTEREN 16 Nl Gebruik de preset-functie om 30 van uw favoriete zenders op te slaan.Druk eerst op de brontoets RADIO om de audiobron naar FM te schakelen. Automatisch voorprogrammeren Deze methode stemt automatisch af en voert automatisch een voorprogrammering uit voor de zenders ...
Page 187 - Voorgeprogrammeerde FM-zenders selecteren; LUISTEREN NAAR EXTERNE BRONNEN
17 Nl NAAR FM-ZENDERS LUISTEREN Nede rlands Voorgeprogrammeerde FM-zenders selecteren 1 Druk op de brontoets RADIO om de audiobron naar FM te schakelen. 2 Druk op PRESET / om de FM-zender te selecteren waar u naar wilt luisteren. U kunt alleen presets selecteren die zijn opgeslagen. LUISTEREN NAAR E...
Page 188 - Als u op; Procedure voor instellingen; NUTTIGE FUNCTIES; Het optiemenu gebruiken
18 Nl Als u op OPTION drukt, verschijnt het optiemenu op de display van het voorpaneel. Hiermee kunt u de volgende instellingen uitvoeren. (uitwerpknop) kan niet worden gebruikt terwijl het optiemenu wordt weergegeven. *1 Alleen voor MCR-B043D *2 Standaardinstelling Procedure voor instellingen NUT...
Page 189 - typen wekkers; Selecteer van 3 wekkertypen en combineer muziek en pieptonen.; Verschillende audiobronnen; /FM. Afhankelijk van de audiobron kunnen ook de; Sluimer; De sluimertimer gebruiken; Druk herhaaldelijk op; ) op het display van het; De wekkerfunctie gebruiken (IntelliAlarm); Bron
19 Nl NUTTIGE FUNCTIES Nede rlands Als de aangegeven tijd is verlopen, zal de eenheid automatisch worden uitgeschakeld. De eenheid bevat een wekkerfunctie die op de ingestelde tijd, via een reeks verschillende methoden, audiobronnen of een reeks pieptonen (intern wekkergeluid) afspeelt. De wekkerfun...
Page 190 - De tijd en het type van de wekker instellen (optiemenu); De wekker instellen
NUTTIGE FUNCTIES 20 Nl De tijd en het type van de wekker instellen (optiemenu) Als de eenheid in ECO-stand-bymodus is, zal de wekker niet afgaan. Stel van het optiemenu het item POWER SAVING in op NORMAL om de wekker te gebruiken ( ☞ P. 18). De wekker instellen 1 Druk op OPTION . Het optiemenu ver...
Page 191 - De wekker uitschakelen; om de wekker in/uit te; Als u opnieuw op; Handelingen terwijl de wekker afgaat; of op
21 Nl NUTTIGE FUNCTIES Nede rlands De wekker in-/uitschakelen Als de ingestelde tijd aankomt, wordt het geselecteerde geluid van de wekker afgespeeld. Tijdens het afgaan, zijn de volgende handelingen mogelijk. Om de wekker te pauzeren (Sluimer) De wekker uitschakelen Druk op ALARM om de wekker...
Page 192 - PROBLEMEN OPLOSSEN; Algemeen
22 Nl Raadpleeg eerst de volgende lijst als u een probleem ondervindt met de eenheid. Als u het probleem niet kunt oplossen met de voorgestelde oplossingen, of als het probleem niet hieronder vermeld wordt, schakelt u de eenheid uit, haalt u de stekker uit het stopcontact en neemt u contact op met d...
Page 193 - Afspelen van USB-apparaat
23 Nl PROBLEMEN OPLOSSEN Nede rlands Als u een schijf plaatst, geeft het display van het voorpaneel "CD No Disc" (cd geen schijf) of "CD Unknow" (cd onbekend) aan. De schijf die in de eenheid is geplaatst, is mogelijk niet compatibel. Gebruik een disk die compatibel is met het toeste...
Page 195 - OPMERKINGEN OVER SCHIJVEN EN USB-APPARATEN; Een schijf behandelen; Informatie over USB-apparaten
25 Nl Nede rlands Deze eenheid is ontworpen voor gebruik met audio-cd's; CD-R's* en CD-RW's* met de volgende logo's. * ISO 9660-indeling CD-R/RW Deze eenheid kan schijven afspelen die van de hierboven getoonde logo's zijn voorzien. Een logo wordt op de schijf en de schijfverpakking afgedrukt. • Prob...
Page 196 - Afstemmingsbereik; EILIGHEIDSINFORMATIE BETREFFENDE DE LASER; -communicaties hanteren; SPECIFICATIES
26 Nl SPELERSECTIE CD • Media ........................................................................... CD, CD-R/RW • Audio-indeling .............................................. Audio-CD, MP3, WMA USB • Audio-indeling ..................................................................MP3, WMA A...
Page 197 - LET OP
27 Nl Nede rlands Informatie voor gebruikers over inzameling en verwijdering van oude apparaten en gebruikte batterijen Deze tekens op de producten, verpakkingen en/of bijgaande documenten betekenen dat gebruikte elektrische en elektronische producten en batterijen niet mogen worden gemengd met alge...
Page 198 - ПРЕДУПРЕЖДЕНИЕ
i Ru 1 Для обеспечения наилучшего результата , пожалуйста , внимательно прочитайте данную инструкцию . Храните ее в безопасном месте для будущих справок . 2 Данный аппарат следует устанавливать в хорошо проветриваемом , прохладном , сухом месте , вдали от прямого воздействия солнечных лучей , источн...
Page 199 - СОДЕРЖАНИЕ; Об этом руководстве; Использование пульта ДУ; Функции
1 Ru Рус с к ий НАЗВАНИЯ ЧАСТЕЙ И ИХ ФУНКЦИИ ..................2 Передняя панель ......................................................... 2Дисплей передней панели........................................... 2Пульт ДУ ....................................................................... 3 ПОДКЛЮЧЕН...
Page 200 - НАЗВАНИЯ ЧАСТЕЙ И ИХ ФУНКЦИИ; Передняя панель
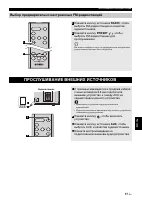
2 Ru 1 (питание) Нажмите эту кнопку , чтобы включить или выключить ( перевести в режим ожидания ) устройство . Существует два типа состояния ожидания ( ☞ стр . 5). 2 Порт USB Используйте для подключения USB- устройства ( ☞ стр . 5, 8). 3 (гнездо для подключения наушников) Используйте для подключения...
Page 202 - ПОДКЛЮЧЕНИЯ; Подключение колонок и антенны; Колонки
4 Ru Подключите колонки и антенну . Не подключайте шнур питания данного устройства , пока не закончите подключение всех кабелей . В случае слабого радиосигнала попробуйте изменить высоту , направление или расположение антенны , чтобы найти место , где прием сигнала лучше . Прием сигнала улучшится , ...
Page 203 - Внешние устройства; Подключение кабеля питания
5 Ru ПОДКЛЮЧЕНИЯ Рус с к ий Когда все подключения выполнены , подсоедините шнур питания данного устройства к розетке переменного тока . USB-устройство Подключите USB- устройство к USB- порту на передней панели . Для получения подробной информации о воспроизводимых файлах см . раздел “ ПРИМЕЧАНИЯ О...
Page 204 - Нажмите кнопку; Установите дату и время.
6 Ru Вы будете использовать меню настроек ( ☞ стр . 18), чтобы задать дату и время на устройстве . НАСТРОЙКА ЧАСОВ (МЕНЮ НАСТРОЕК) 1 Нажмите кнопку , чтобы включить устройство. 2 Нажмите кнопку OPTION . Появится меню настроек . 3 Нажмите кнопку / , чтобы выбрать пункт “CLOCK SET”, а затем нажмит...
Page 205 - Отображение информации на дисплее (только с пульта ДУ); Воспроизведение CD-диска; Нажмите кнопку источника
7 Ru Рус с к ий Пропуск папок (только с пульта ДУ) Отображение информации на дисплее (только с пульта ДУ) ПРОСЛУШИВАНИЕ CD-ДИСКОВ И USB-УСТРОЙСТВ Устройство будет работать следующим образом при воспроизведении дорожек / файлов на CD- дисках / устройствах USB. • Если воспроизведение CD- диска /US...
Page 206 - Воспроизведение с USB-устройства; Нет
ПРОСЛУШИВАНИЕ CD-ДИСКОВ И USB-УСТРОЙСТВ 8 Ru Пропуск папок (только с пульта ДУ) Отображение информации на дисплее (только с пульта ДУ) Статус воспроизведения обозначается индикатором повторного воспроизведения / воспроизведения в случайном порядке на дисплее передней панели . Повторное воспрои...
Page 207 - ПРОСЛУШИВАНИЕ МУЗЫКИ С УСТРОЙСТВА,
9 Ru Рус с к ий Данное устройство поддерживает работу по Bluetooth . Вы можете наслаждаться беспроводным прослушиванием музыки с устройства , поддерживающего функцию Bluetooth ( мобильного телефона , цифрового аудиопроигрывателя и т . п .). Ознакомьтесь также с руководством пользователя для устройст...
Page 208 - Повторное подключение устройства по; Разрыв подключения по
ПРОСЛУШИВАНИЕ МУЗЫКИ С УСТРОЙСТВА, ИМЕЮЩЕГО КОМПОНЕНТ Bluetooth 10 Ru После первой установки соединения все последующие подключения устройства с Bluetooth будут проходить быстро . Подключение с аудиосистемы Подключение с другого устройства Если во время использования подключения по Bluetooth буд...
Page 209 - Повторное выполнение начального сканирования (меню настроек); Подготовка к приему DAB-сигнала; DAB в качестве аудиоисточника.
11 Ru Рус с к ий DAB (Digital Audio Broadcasting, цифровое аудиовещание ) и DAB + используют цифровые сигналы для обеспечения большей четкости звука и большей надежности приема сигнала по сравнению с аналоговыми сигналами . DAB + основывается на стандартной технологии DAB, но использует более эффект...
Page 210 - Дополнительный индикатор.
ПРОСЛУШИВАНИЕ DAB-СТАНЦИЙ (только MCR-B043D) 12 Ru Отображение информации на дисплее (только с пульта ДУ) Информация о частоте DAB Данное устройство принимает только частоту из диапазона III. Выбор DAB-станции 1 Нажмите кнопку RADIO , чтобы выбрать DAB в качестве аудиоисточника. 2 Нажмите кнопку...
Page 211 - “PRESET
13 Ru ПРОСЛУШИВАНИЕ DAB-СТАНЦИЙ (только MCR-B043D) Рус с к ий Используйте функцию предварительной настройки для сохранения 30 любимых радиостанций . Удаление сохраненной предварительно заданной радиостанции (меню настроек) Предварительная настройка DAB-станций (только с пульта ДУ) 1 Нажмите кнопку...
Page 212 - Выбор предварительно заданных DAB-станций
ПРОСЛУШИВАНИЕ DAB-СТАНЦИЙ (только MCR-B043D) 14 Ru Выбор предварительно заданных DAB-станций 1 Нажмите кнопку RADIO , чтобы выбрать DAB в качестве аудиоисточника. 2 Нажмите кнопку PRESET / , чтобы выбрать DAB-станцию для прослушивания. Вы можете выбрать только те предварительно настроенные станции ,...
Page 213 - ПРОСЛУШИВАНИЕ FM-РАДИОСТАНЦИЙ; Выбор FM-радиостанции; Настройте FM-радиостанции
15 Ru Рус с к ий Для прослушивания FM- радиостанции подключите антенну , как описано в разделе “ Подключение колонок и антенны ” ( ☞ стр . 4). Отображение информации на дисплее (только с пульта ДУ) При нажатии кнопки DISPLAY на пульте ДУ информация на дисплее передней панели будет отображаться в с...
Page 214 - Предварительная настройка FM-радиостанций (только с пульта ДУ); “Press MEMORY”
ПРОСЛУШИВАНИЕ FM-РАДИОСТАНЦИЙ 16 Ru Используйте функцию предварительной настройки для сохранения 30 любимых радиостанций . Нажмите кнопку источника RADIO , чтобы выбрать FM- радиостанцию в качестве аудиоисточника . Автоматическая предварительная настройка Данный метод позволяет автоматически настр...
Page 215 - Выбор предварительно настроенных FM-радиостанций; PRESET; ПРОСЛУШИВАНИЕ ВНЕШНИХ ИСТОЧНИКОВ
17 Ru ПРОСЛУШИВАНИЕ FM-РАДИОСТАНЦИЙ Рус с к ий Выбор предварительно настроенных FM-радиостанций 1 Нажмите кнопку источника RADIO , чтобы выбрать FM-радиостанцию в качестве аудиоисточника. 2 Нажмите кнопку PRESET / , чтобы выбрать FM-радиостанцию для прослушивания. Вы можете выбрать только те предвар...
Page 216 - Процедура настройки; ПОЛЕЗНЫЕ ФУНКЦИИ; Использование меню настроек
18 Ru При нажатии кнопки OPTION меню настроек появится на дисплее передней панели , позволяя выполнить следующие настройки . ( кнопка извлечения диска ) — операция невозможна , если отображается меню настроек . *1 Только MCR-B043D *2 Настройка по умолчанию Процедура настройки ПОЛЕЗНЫЕ ФУНКЦИИ Испо...
Page 217 - типа будильников; Повторение сигнала; Использование таймера перехода в режим ожидания; OFF; Использование функции будильника (IntelliAlarm)
19 Ru ПОЛЕЗНЫЕ ФУНКЦИИ Рус с к ий По истечении указанного времени устройство выключится автоматически . Устройство имеет функцию будильника , которая воспроизводит мелодию с аудиоисточников или набор звуковых сигналов ( встроенный звук будильника ) в установленное время различными способами . Функци...
Page 218 - Настройка времени и типа сигнала будильника (меню настроек); Установка сигнала будильника; Задайте сигнал будильника.; VOLUME; Пункты
ПОЛЕЗНЫЕ ФУНКЦИИ 20 Ru Настройка времени и типа сигнала будильника (меню настроек) Если устройство переведено в режим ожидания ECO, функция сигнала будильника работать не будет . Для использования функции будильника в меню настроек для параметра POWER SAVING задайте значение NORMAL ( ☞ стр . 18). ...
Page 219 - Включение и выключение будильника; или выключить будильник.; Операции во время воспроизведения сигнала будильника; или
21 Ru ПОЛЕЗНЫЕ ФУНКЦИИ Рус с к ий Включение и выключение будильника Когда наступает заданное время , воспроизводится выбранный сигнал будильника . Во время воспроизведения доступны перечисленные ниже действия . Для приостановки сигнала (функция повторения сигнала) Для выключения будильника Наж...
Page 220 - УСТРАНЕНИЕ НЕИСПРАВНОСТЕЙ; Общие; Воспроизведение CD-дисков
22 Ru В случае возникновения проблем при использовании устройства сначала обратитесь к следующему списку . Если устранить проблему с помощью предложенных способов не удается , или если проблема не указана в списке , выключите устройство и отсоедините от сети электропитания , затем обратитесь к ближа...
Page 221 - Воспроизведение USB-устройства
23 Ru УСТРАНЕНИЕ НЕИСПРАВНОСТЕЙ Рус с к ий На дисплее передней панели отображается сообщение “no operation”, и невозможно вставить или извлечь диск . Отображается меню настроек . Или воспроизводится сигнал будильника . Нажмите кнопку OPTION , чтобы выйти из меню настроек . Или нажмите кнопку ALARM ,...
Page 222 - Прием FM-радиостанций
УСТРАНЕНИЕ НЕИСПРАВНОСТЕЙ 24 Ru Прием DAB-сигнала (только MCR-B043D) Проблема Причина Решение Не удается настроить ни одну DAB- станцию Не была выполнена процедура начального сканирования . Выполните процедуру начального сканирования ( ☞ стр . 11). В вашем регионе нет DAB- покрытия . Обратитесь к ди...
Page 223 - ПРИМЕЧАНИЯ О ДИСКАХ И УСТРОЙСТВАХ USB; Информация о CD-дисках
25 Ru Рус с к ий Это устройство поддерживает диски аудио CD, CD-R*, CD-RW со следующими логотипами . * ISO 9660 формат CD-R/RW Данное устройство способно воспроизводить диски , имеющие любой из перечисленных выше логотипов . Логотип диска напечатан на диске и обложке диска . • Не загружайте в данное...
Page 224 - БЕЗОПАСНОЕ ИСПОЛЬЗОВАНИЕ ЛАЗЕРА; Описание связи по; ТЕХНИЧЕСКИЕ ХАРАКТЕРИСТИКИ
26 Ru РАЗДЕЛ ПРОИГРЫВАТЕЛЯ CD • Носитель ..................................................................... CD, CD-R/RW • Аудиоформат ................................................. аудио CD, MP3, WMA USB- устройство • Аудиоформат .................................................................
Page 225 - Лазер
27 Ru Рус с к ий Информация для пользователей по сбору и утилизации старой аппаратуры и использованных батареек Эти знаки на аппаратуре , упаковках и в сопроводительных документах указывают на то , что подержанные электрические и электронные приборы и батарейки не должны выбрасываться вместе с обычн...
Page 228 - Micro Component System
G © 2016 Yamaha Corporation Printed in Malaysia ZX72030 English Fr ançais Deutsch OWNER'S MANUAL MODE D'EMPLOI BEDIENUNGSANLEITUNG BRUKSANVISNING MANUALE DI ISTRUZIONI MANUAL DE INSTRUCCIONES GEBRUIKSAANWIJZING ИНСТРУКЦИЯ ПО ЭКСПЛУАТАЦИИ Micro Component System Micro-Chaîne Sv ensk a Italiano Español...