Whirlpool WOS72EC0HV - User Manual
Whirlpool WOS72EC0HV Oven – User Manual, read for free online in PDF format. We hope this helps you resolve any issues you may have. If you have further questions, please contact us through the contact form.


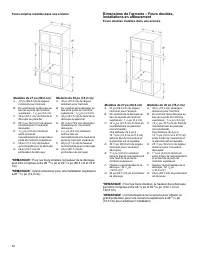
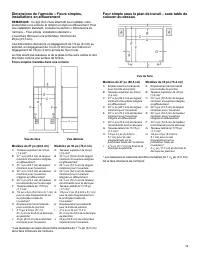
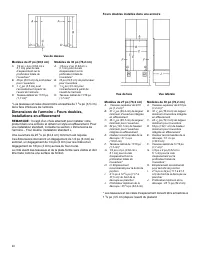
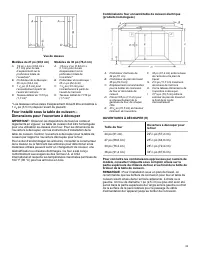
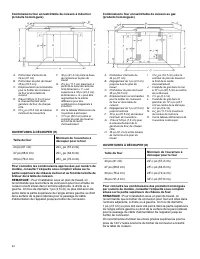
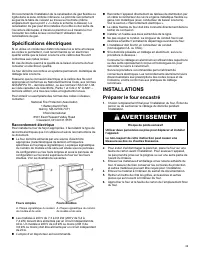
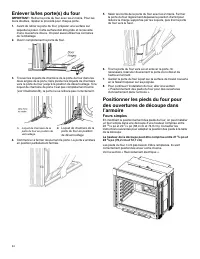
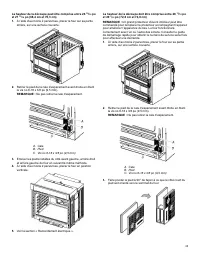
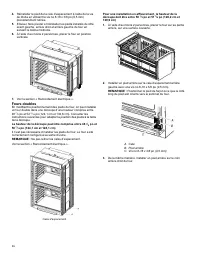
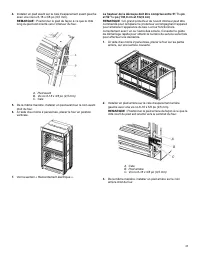
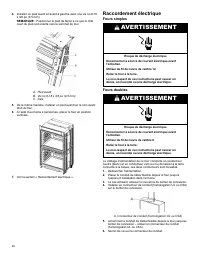
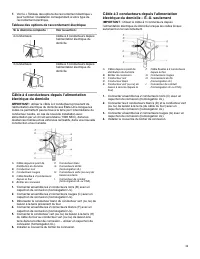


Table of Contents:
- Page 2 – Your safety and the safety of others are very important.; DANGER; IMPORTANT SAFETY INSTRUCTIONS; SAVE THESE INSTRUCTIONS
- Page 3 – Internet Connectivity Guide for Connected Appliances Only; Federal Communications Commission (FCC) Compliance Notice
- Page 4 – OVEN MAINTENANCE AND CARE; General Cleaning; CONTROL PANEL AND OVEN DOOR EXTERIOR; WARNING
- Page 6 – Tools and Parts; Tools Needed; Location Requirements
- Page 11 – Electrical Requirements; Electrical Connection
- Page 12 – INSTALLATIONS; Prepare Built-In Oven
- Page 13 – Single Ovens
- Page 14 – Double Ovens
- Page 17 – Make Electrical Connection; For Single Ovens; For Double Ovens; Electrical Connection Options Chart; -Wire Cable from Home Power Supply
- Page 18 – Install Oven
- Page 20 – Complete Installation
- Page 21 – SÉCURITÉ DU FOUR ENCASTRÉ; Votre sécurité et celle des autres sont très importantes.; IMPORTANTES INSTRUCTIONS DE SÉCURITÉ; CONSERVER CES INSTRUCTIONS
- Page 22 – Guide de connexion Internet pour appareils connectés seulement; Déclaration de conformité d’Industrie Canada (IC)
- Page 23 – Nettoyage général; PEINTURE MÉTALLIQUE (sur certains modèles)
- Page 24 – AVERTISSEMENT; Programme d’autonettoyage
- Page 26 – Outils et pièces; Outils nécessaires
- Page 27 – Exigences d’emplacement; Dimensions
- Page 33 – Spécifications électriques; Raccordement électrique; Préparer le four encastré
- Page 36 – Fours doubles
- Page 39 – Tableau des options de raccordement électrique
- Page 40 – Installation du four
- Page 42 – Achever l’installation
- Page 43 – SEGURIDAD DEL HORNO INTEGRADO; Su seguridad y la de los demás son muy importantes.; PELIGRO; INSTRUCCIONES IMPORTANTES DE SEGURIDAD; GUARDE ESTAS INSTRUCCIONES
- Page 44 – Aviso de conformidad con Industry Canada (IC)
- Page 45 – Limpieza general; PARRILLAS DEL HORNO
- Page 46 – Ciclo de autolimpieza; ADVERTENCIA
- Page 48 – Herramientas y piezas; Herramientas necesarias; Requisitos de ubicación
- Page 54 – Requisitos eléctricos; Conexión eléctrica; INSTALACIONES; Preparación del horno empotrado; Retire las puertas del horno
- Page 57 – Hornos dobles
- Page 59 – Cómo hacer la conexión eléctrica; Para hornos simples; Para hornos dobles
- Page 60 – Cuadro de opciones de conexión eléctrica; Cable de 4 hilos desde el suministro eléctrico
- Page 61 – Para instalar el horno
- Page 63 – Finalización de la instalación
W11340821
C
BUILT-IN ELECTRIC SINGLE AND DOUBLE OVEN
OWNER’S MANUAL
FOURS ENCASTRÉS SIMPLE ET DOUBLE MANUEL DU
PROPRIÉTAIRE
HORNO ELÉCTRICO SIMPLE O DOBLE INTEGRADO
MANUAL DEL PROPIETARIO
Table of Contents/Table des matières/Índice
. . . . . . . . . . . . . . . . . . . . 2
Built-In Oven Safety . . . . . . . . . . . . . . . . . . . . . . . . 2
General Cleaning. . . . . . . . . . . . . . . . . . . . . . . . . . . . 4
Self-Cleaning Cycle. . . . . . . . . . . . . . . . . . . . . . . . . 5
Steam Clean (on some models) . . . . . . . . . 6
. . . . . . . . . . . . . . . . . . . . . . . . . . . . . . 6
Tools and Parts . . . . . . . . . . . . . . . . . . . . . . . . . . . . . . 6
Location Requirements . . . . . . . . . . . . . . . . . . . . 6
Electrical Requirements . . . . . . . . . . . . . . . . . 11
. . . . . . . . . . . . . . . . . . . . . . . . . . . . 12
Prepare Built-In Oven . . . . . . . . . . . . . . . . . . . . 12
Remove Oven Door(s) . . . . . . . . . . . . . . . . . . . 12
Positioning Oven Feet for Multiple
Cabinet Cutout Heights . . . . . . . . . . . . . . . . . . 13
Make Electrical Connection . . . . . . . . . . . . . 17
Install Oven . . . . . . . . . . . . . . . . . . . . . . . . . . . . . . . . . 18
Replace Oven Door(s) . . . . . . . . . . . . . . . . . . . 19
Complete Installation . . . . . . . . . . . . . . . . . . . . . 20
Sécurité du four encastré. . . . . . . . . . . . . . . . 21
ENTRETIEN ET RÉPARATION DU
FOUR
. . . . . . . . . . . . . . . . . . . . . . . . . . . . . . . . . . . . . . . . . . . 23
Nettoyage général . . . . . . . . . . . . . . . . . . . . . . . . 23
Programme d’autonettoyage . . . . . . . . . . . 24
Steam Clean (nettoyage à la vapeur)
(sur certains modèles) . . . . . . . . . . . . . . . . . . . 26
. . . . . . . . . . . . . . . . . . . . . . . . . . . 26
Outils et pièces. . . . . . . . . . . . . . . . . . . . . . . . . . . . . 26
Exigences d’emplacement . . . . . . . . . . . . . . 27
Spécifications électriques . . . . . . . . . . . . . . . 33
. . . . . . . . . . . . . . . . . . . . . . . . . . . . 33
Préparer le four encastré . . . . . . . . . . . . . . . . 33
Enlever la/les porte(s) du four . . . . . . . . . . 34
Positionner les pieds du four pour
des ouvertures de découpe dans
l’armoire . . . . . . . . . . . . . . . . . . . . . . . . . . . . . . . . . . . . . 34
Raccordement électrique. . . . . . . . . . . . . . . . 38
Installation du four. . . . . . . . . . . . . . . . . . . . . . . . . 40
Réinstallation de la/des porte(s) du
four . . . . . . . . . . . . . . . . . . . . . . . . . . . . . . . . . . . . . . . . . . . . 41
Achever l’installation . . . . . . . . . . . . . . . . . . . . . . 42
. . . . . . . . . . . . . . . . . . . . . . . . . . . . . . . . . . 43
Seguridad del horno integrado . . . . . . . . . 43
MANTENIMIENTO Y CUIDADO DEL
HORNO
. . . . . . . . . . . . . . . . . . . . . . . . . . . . . . . . . . . . . . . . . 45
Limpieza general . . . . . . . . . . . . . . . . . . . . . . . . . . 45
Ciclo de autolimpieza. . . . . . . . . . . . . . . . . . . . . 46
Steam Clean (Limpieza con vapor)
(en algunos modelos) . . . . . . . . . . . . . . . . . . . . 47
. . . . . . . . . . . . . . . . . . . . . . . . . . . . . . . . 48
. . . . . . . . . . . . . . . . . . . . . . . . . . . . . . . . . 48
Herramientas y piezas . . . . . . . . . . . . . . . . . . . 48
Requisitos de ubicación . . . . . . . . . . . . . . . . . 48
Requisitos eléctricos . . . . . . . . . . . . . . . . . . . . . 54
. . . . . . . . . . . . . . . . . . . . . . . . . . . . 54
Preparación del horno empotrado . . . . 54
Retire las puertas del horno . . . . . . . . . . . . 54
Ubicación de las patas del horno
para múltiples alturas de corte del
armario . . . . . . . . . . . . . . . . . . . . . . . . . . . . . . . . . . . . . . . 55
Cómo hacer la conexión eléctrica . . . . . 59
Para instalar el horno. . . . . . . . . . . . . . . . . . . . . 61
Vuelva a colocar las puertas del
horno . . . . . . . . . . . . . . . . . . . . . . . . . . . . . . . . . . . . . . . . . 62
Finalización de la instalación . . . . . . . . . . . 63
IMPORTANT:
Save for local electrical inspector's use.
IMPORTANT :
À conserver pour consultation par l'inspecteur local des installations électriques.
IMPORTANTE:
Guarde para tener a disposición del inspector de electricidad local.
"Loading the manual" means you need to wait until the file loads and becomes available for online reading. Some manuals are very large, and the time they take to appear depends on your internet speed.
Other Manuals for Whirlpool WOS72EC0HV
Summary
2 BUILT-IN OVEN SAFETY Your safety and the safety of others are very important. We have provided many important safety messages in this manual and on your appliance. Always read and obey all safetymessages. This is the safety alert symbol. This symbol alerts you to potential hazards that can kill or...
3 IMPORTANT SAFETY INSTRUCTIONS WARNING: To reduce the risk of fire, electric shock, or injury to persons when using the appliance, follow basic precautions, including the following: For self-cleaning ovens: � Do Not Clean Door Gasket – The door gasket is essentialfor a good seal. Care should be tak...
4 OVEN MAINTENANCE AND CARE General Cleaning IMPORTANT: Before cleaning, make sure all controls are OFF and the oven is cool. Always follow label instructions on cleaningproducts. Soap, water, and a soft cloth or sponge are suggested first unlessotherwise noted. EXTERIOR PORCELAIN ENAMAL SURFACES (O...