Whirlpool AKP 225 IX - User Manual
Whirlpool AKP 225 IX Oven – User Manual, read for free online in PDF format. We hope this helps you resolve any issues you may have. If you have further questions, please contact us through the contact form.

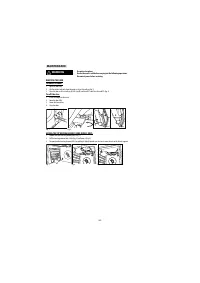
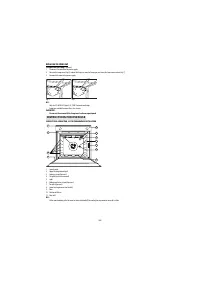
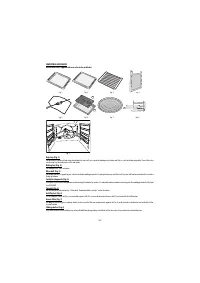
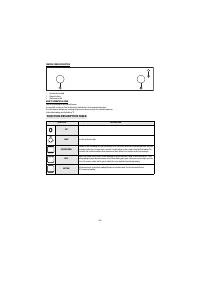
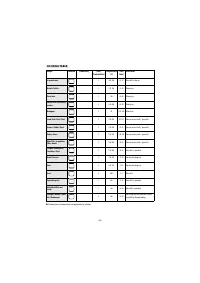
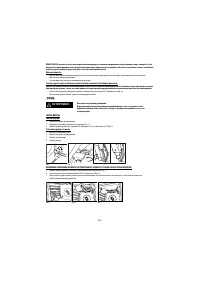
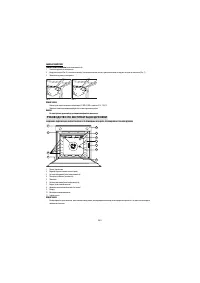

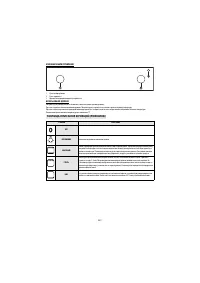
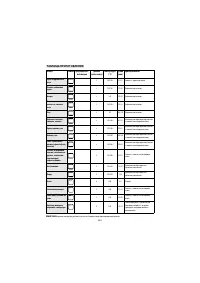
Table of Contents:
- Page 2 – YOUR SAFETY AND THAT OF OTHERS IS VERY IMPORTANT; Regulations require that the appliance is earthed.; Scrapping of household appliances; IMPORTANT SAFETY INSTRUCTIONS
- Page 4 – The electronic programmer does not work:; a brief description of the fault; SPARE PARTS AVAILABLE FOR 10 YEARS.; Oven exterior; Food residues can be easily removed using a brush or sponge.; CLEANING; Do not use steam cleaning equipment.
- Page 5 – MOVING THE TOP HEATING ELEMENT (SOME MODELS ONLY); MAINTENANCE; Use protective gloves.
- Page 6 – REPLACING THE OVEN LAMP; To replace the rear lamp; INSTRUCTIONS FOR OVEN USE
- Page 7 – COMPATIBLE ACCESSORIES; (for the accessories supplied with oven refer to the tech fiche); Use; only
- Page 8 – CONTROL PANEL DESCRIPTION; Function selector knob; HOW TO OPERATE THE OVEN; FUNCTION DESCRIPTION TABLE; FUNCTION; OFF; To switch on the oven light.; CONVENTIONAL
- Page 9 – COOKING TABLE
- Page 10 – How to read the cooking table; Cooking different foods at the same time; RECOMMENDED USE AND TIPS
- Page 11 – Утилизация старой электробытовой техники; ПРАВИЛА ТЕХНИКИ БЕЗОПАСНОСТИ
- Page 12 – УСТАНОВКА
- Page 13 – краткое описание неисправности; авторизованный сервисный центр; (в таком сервисном центре гарантируется использование; ПОСТАВКИ ЗАПЧАСТЕЙ ВОЗМОЖНЫ В ТЕЧЕНИЕ 10 ЛЕТ.; Наружные поверхности духовки; ПОИСК И УСТРАНЕНИЕ НЕИСПРАВНОСТЕЙ; Нельзя пользоваться пароочистителями.
- Page 14 – Установка дверцы на место:; УХОД; Пользуйтесь кухонными рукавицами.
- Page 15 – ЗАМЕНА ЛАМПОЧКИ; Замена задней лампочки; РУКОВОДСТВО ПО ЭКСПЛУАТАЦИИ ДУХОВКИ
- Page 16 – ИСПОЛЬЗУЕМЫЕ ПРИНАДЛЕЖНОСТИ; Используется для приготовления печенья, пирогов и пиццы.; только
- Page 17 – ОПИСАНИЕ ПАНЕЛИ УПРАВЛЕНИЯ; Ручка выбора режима; ИСПОЛЬЗОВАНИЕ ДУХОВКИ; Включение внутреннего освещения духовки.; OБЫЧНЫЙ
- Page 18 – ТАБЛИЦА ПРИГОТОВЛЕНИЯ; Решетка + форма для тортов; Эклеры; Противень для выпечки; Безе; Решетка; Запеканка из овощей
- Page 19 – Как пользоваться таблицей приготовления блюд; Одновременное приготовление различных блюд; ПОЛЕЗНЫЕ СОВЕТЫ И РЕКОМЕНДАЦИИ
User and maintenance manual
Руководство по эксплуатации и
техобслуживанию
RU
(Apply the label from warranty here)
"Loading the manual" means you need to wait until the file loads and becomes available for online reading. Some manuals are very large, and the time they take to appear depends on your internet speed.
Summary
GB2 YOUR SAFETY AND THAT OF OTHERS IS VERY IMPORTANT This manual and the appliance itself provide important safety warnings, to be read and observed at all times. All safety warnings give specific details of the potential risk present and indicate how to reduce risk of injury, damage and electric sh...
GB4 The electronic programmer does not work: • If the display shows the letter “ ” followed by a number, contact your nearest After-sales Service. Specify in this case the number that follows the letter “ ”. Before calling the After-Sales Service: 1. See if you can solve the problem yourself with th...
GB5 REMOVING THE DOORTo remove the door: 1. Open the door fully. 2. Lift the catches and push them forwards as far as they will go (fig. 1). 3. Close the door as far as it will go (A), lift it up (B) and turn it (C) until it is released (D) (fig. 2). To refit the door: 1. Insert the hinges in their ...