Shark WD201 - User Manual

Shark WD201 Vacuum – User Manual, read for free online in PDF format. We hope this helps you resolve any issues you may have. If you have further questions, please contact us through the contact form.


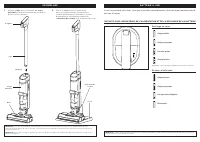
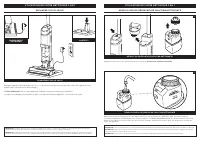
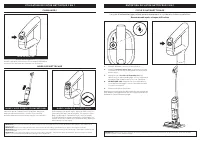
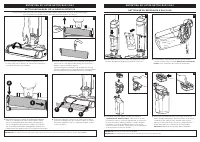


Table of Contents:
- Page 3 – ASSEMBLY; Pole; Charging
- Page 4 – Press the release button and lift off the; Clean Solution Tank; CHARG ING ON TH E DOCK; CORD WRAP; on the charging dock.; Battery Icon; on the main body will illuminate when charging begins.; FILLING TH E CLE AN SOLUTION TAN K; REMOVE THE CLEAN SOLUTION TANK
- Page 5 – See LED Glossary for more information on indicator; Power; CONTROL S; P OWE R; CLE ANING MODE S; Recommended after every use; AR E A R U G M O D E
- Page 6 – Easy Pour spout
- Page 10 – AVERTISSEMENT; CONSIGNES DE SÉCURITÉ IMPORTANTES; CONSERVEZ CES INSTRUCTIONS
- Page 11 – ASSEMBLAGE; Recharge en cours
- Page 12 – UTILISATION DE VOTRE NET TOYEU R 3 E N 1; réservoir de solution nettoyante; UTILISATION DE VOTRE NETTOYEUR 3 EN 1; R ECHARG E SU R LE SOCLE; alignés avec ceux du socle de recharge.; icône de batterie; sur le corps principal s’allume lorsque la recharge commence.; R E M PLISSAG E DU R É S E RVOIR DE SOLUTION N ET TOYANTE
- Page 13 – M IS E E N MARCH E; E NTRETIE N DE VOTRE NET TOYEU R 3 E N 1; réservoir d’eau sale; bouton d’alimentation; COM MAN DE S; Recommandé après chaque utilisation
- Page 14 – Easy Pour (versement; N ET TOYAG E MAN U E L DE L A B ROSS E ROTATIVE
- Page 15 – VÉ RIFICATION DE L A PR É S E NCE D ’OBSTRUC TION S
- Page 16 – SCÉNARIO
- Page 17 – GARANTIE LIMITÉE DE TROIS (3) ANS SUR LA BATTERIE
- Page 18 – CARACTÉRISTIQUES TECHNIQUES; Le numéro de modèle et le numéro de; CONSIGNEZ LES RENSEIGNEMENTS CI-DESSOUS; Numéro de modèle : �������������������������; ENREGISTREZ VOTRE ACHAT
- Page 20 – ENSAMBLADO; palo; BATE RÍA DE IONES DE LITIO; IN DICADOR LE D DE CARGA Y ALIM E NTACIÓN DE L A BATE RÍA; Carga
- Page 21 – USO DE L LIM PIADOR 3 E N 1; Presiona el botón de liberación y levanta; el tanque de solución limpia; USO DEL LIMPIADOR 3 EN 1; CARGA E N L A BAS E; ENROLLACABLES; alineados con los contactos de la base de carga.; ícono de batería; en la estructura principal se iluminará cuando comience la carga.; LLE NADO DE L TANQ U E DE SOLUCIÓN LIM PIA; RETIRAR EL TANQUE DE SOLUCIÓN LIMPIA
- Page 22 – E N CE N DI DO; MANTE NIMIE NTO DE L LIM PIADOR 3 E N 1; tanque de agua sucia; Consulta el glosario de LED para obtener más; encendido; CONTROLE S; Recomendado después de cada uso; M O DO D E ALFO M B R A
- Page 23 – boquilla de vaciado fácil; LIM PIEZ A MAN UAL DE L CE PILLO G IR ATORIO
- Page 24 – VE RIFICACIÓN DE OBSTRUCCION E S
- Page 25 – SITUACIÓN
- Page 26 – GARANTÍA LIMITADA DE TRES (3) AÑOS DE LA BATERÍA
- Page 27 – EXTRACCIÓN Y ELIMINACIÓN DE LA BATERÍA; incineres la batería ni la mezcles con desechos; ESPECIFICACIONES TÉCNICAS; Puedes encontrar el modelo y los; REGISTRA ESTA INFORMACIÓN; Número de modelo: ��������������������������; REGISTRA TU COMPRA
- Page 29 – PLEASE READ CAREFULLY AND KEEP FOR FUTURE REFERENCE.; para obtener más información.
Cordless 3-in-1 Cleaner
Nettoyeur sans fil 3 en 1
Limpiador 3 en 1 inalámbrico
WD200 Series
Série WD200
Serie WD200
OWNER’S GUIDE
GUIDE DE L’UTILISATEUR
GUÍA DEL USUARIO
"Loading the manual" means you need to wait until the file loads and becomes available for online reading. Some manuals are very large, and the time they take to appear depends on your internet speed.
Summary
ASSEMBLY (Click) Handle Pole Main Body NOTE: The Shark® battery, like all lithium-ion batteries, will naturally decrease in capacity over time from the 100% capacity of a new battery. 1. Align the Pole with the opening in the Main Body and insert firmly until it clicks into place. 2. Place the Dock ...
USING YOU R 3 - IN -1 CLE ANE R Press the release button and lift off the Clean Solution Tank . NOTE: When docked properly, the charging lights on the Main Body will blink, indicating that charging has begun. When charging is complete, all three indicator lights will turn off. NOTE: The main unit co...
USING YOU R 3 - IN -1 CLE ANE R MAINTAINING YOU R 3 - IN -1 CLE ANE R HAR D FLOO R M O D E 1. Place the unit on the charging dock. 2 . Empty the Dirty Water Tank and make sure the clean solution tank is at least half full. 3. Press the Power Button to start the self-clean cycle. The icon will pulse ...