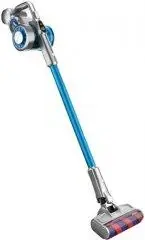
Page 3 - Contents
1 Contents English 1 русский язык 56 Français 45 Italiano 34 Español 23 Deutsch 12
Page 4 - Products Installation; Unpacking
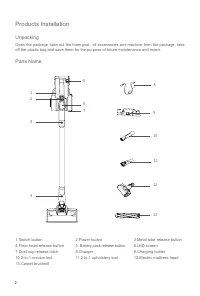
2 Products Installation Unpacking Open the package, take out the foam pad , all accessories and machine from the package, take off the plastic bag and save them for the purpose of future maintenance and repair. Parts Name 1.Switch button4.Floor head release button7.Dust cup release latch10.2-in-1 cr...
Page 6 - Assembly of accessories
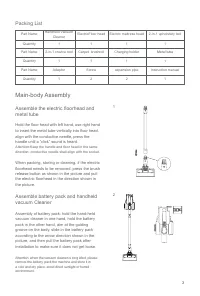
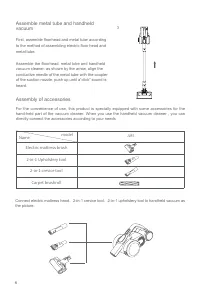
4 Assemble metal tube and handheld vacuum First, assemble floorhead and metal tube according to the method of assembling electric floor head and metal tube. Assemble the floorhead, metal tube and handheld vacuum cleaner: as shown by the arrow, align the conductive needle of the metal tube with the c...
Page 7 - Use of Vacuum; Charging holder assembly; Charging of vacuum cleaner
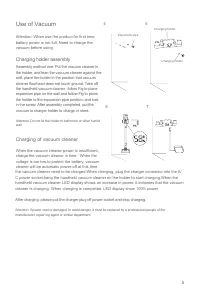
5 Use of Vacuum Attention: When use the product for first time, battery power is not full. Need to charge the vacuum before using. Charging holder assembly Assembly method one: Put the vacuum cleaner in the holder, and lean the vacuum cleaner against the wall, place the holder in the position that v...
Page 8 - Cleaning and Replacing Parts; Use of accessories; Use of Handheld Vacuum Cleaner
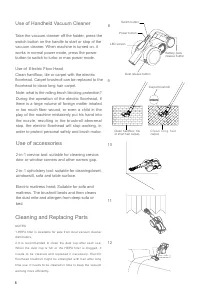
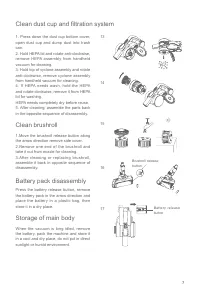
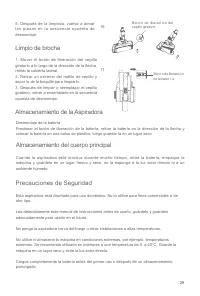
6 Cleaning and Replacing Parts NOTES1.HEPA filter is available for sale from local vacuum cleaner distributors.2.It is recommended to clean the dust cup after each use; When the dust cup is full or the HEPA filter is clogged, it n e e d s t o b e c l e a n e d a n d r e p l a c e d i f n e c e s s a...
Page 10 - Safety Notes
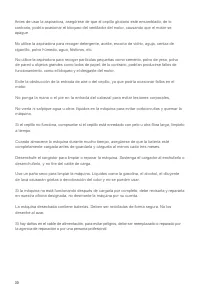
8 Safety Notes This vacuum cleaner is designed for home use. Do not use it for commercial or other purposes. Please read this instruction manual carefully before use, properly save and store it for future use. Do not put the vacuum close to fire or other high temperature facility. Do not use or stor...
Page 11 - Trouble Shooting
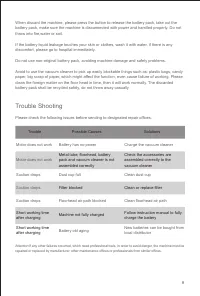
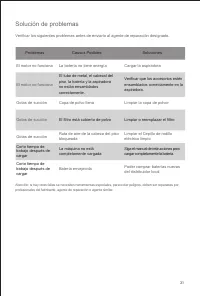
9 Trouble Possible Causes Solutions Motor does not work Battery has no power Charge the vacuum cleaner Motor does not work Metal tube, floorhead, battery pack and vaccum cleaner is not assembled correctly Check the accessories are assembled correctly to the vacuum cleaner Suction drops Dust cup full...
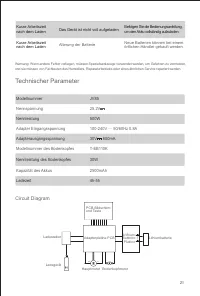
Page 12 - Product Specification; Technical Parameter; Rated Voltage; Circuit Diagram
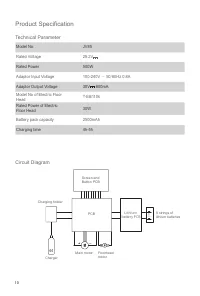
10 Product Specification Technical Parameter Model No. JV85 Rated Voltage 25.2V Rated Power 500W Adaptor Input Voltage 100-240V ~ 50 / 60Hz 0.8A Adaptor Output Voltage 30V 600mA Model No of Electric Floor Head T-EB110k Rated Power of Electric Floor Head 30W Battery pack capacity 2500mAh Charging tim...
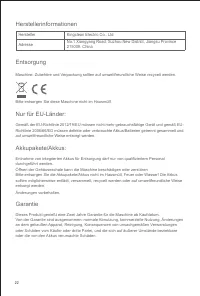
Page 13 - Disposal; Only for EC countries:; Manufacturer; Manufacturer Information
11 Disposal The machine, accessories and packaging should be sorted for environmental-friendly recycling. Do not dispose of the machine into household waste! Only for EC countries: According to the European Guideline 2012/19/EU, machine that are no longer usable, and according to the European Guidel...
Page 14 - Produkte installieren; Auspacken
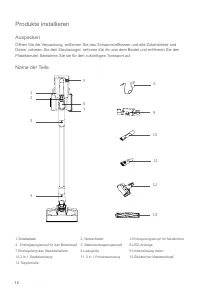
12 Produkte installieren Auspacken Öffnen Sie die Verpackung, entfernen Sie das Schaumstoffkissen und alle Zubehörteile und Daten, nehmen Sie den Staubsauger, nehmen Sie ihn aus dem Beutel und entfernen Sie den Plastikbeutel. Bewahren Sie sie für den zukünftigen Transport auf. Name der Teile 1.Schal...
Page 15 - Packliste; Maschinenmontage; Installation des elektrischen Bodenkopfes; Batteriebaugruppe und Handstaubsauger.
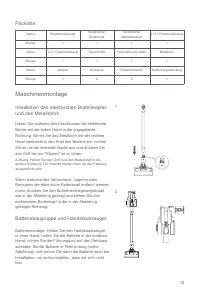
13 Packliste Maschinenmontage Installation des elektrischen Bodenkopfes und des Metallrohrs Halten Sie während des Anschlusses die elektrische Bürste mit der linken Hand in die angegebene Richtung, führen Sie das Metallrohr mit der rechten Hand senkrecht in den Kopf des Bodens ein, richten Sie es mi...
Page 16 - Installation des Metallrohrs und des
14 Warnung: Wenn der Staubsauger längere Zeit nicht benutzt wird, entfernen Sie den Akku, packen Sie die Maschine ein und lagern Sie sie an einem kühlen und trockenen Ort. Vermeiden Sie direktes Sonnenlicht oder feuchte Umgebung. Installation des Metallrohrs und des Handstaubsaugers Montieren Sie zu...
Page 17 - Staubsauger benutzen; Ladungsträgerbefestigung; Vakuumladung
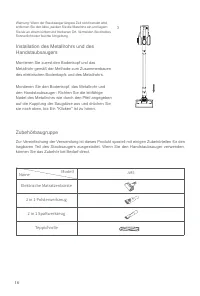
15 6 7 Verbinden Sie den Kopf der elektrischen Matratze, das 2-in-1-Spaltwerkzeug, das 2-in-1-Polsterwerkzeug des Handstaubsaugers wie in der Abbildung gezeigt Staubsauger benutzen Achtung: Wenn Sie das Produkt zum ersten Mal verwenden, ist der Akku nicht voll. Der Staubsauger muss vor dem Gebrauch ...
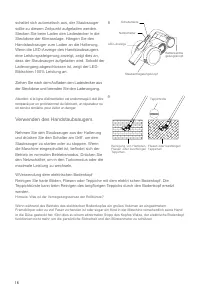
Page 18 - Verwenden des Handstaubsaugers
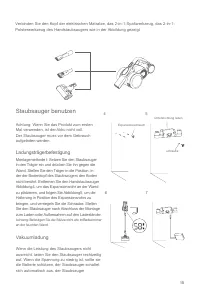
16 Batterieentriegelungsknopf Schaltertaste Netzschalter LED-Anzeige Staubentriegelungsknopf Teppichrolle Reinigung von Hartbden, Fliesen oder kurzflorigen Teppichen. Fliesen oder kurzflorigen Teppichen 8 9 schaltet sich automatisch aus, der Staubsauger sollte zu diesem Zeitpunkt aufgeladen werden. ...
Page 19 - Verwendung von Zubehör
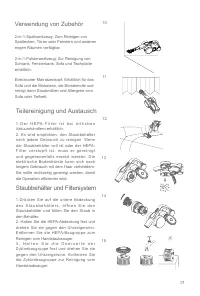
17 Teilereinigung und Austausch Staubbehälter und Filtersystem 1 . D e r H E PA - F i l t e r i s t b e i ö r t l i c h e n Vakuumhändlern erhältlich.2. Es wird empfohlen, den Staubbehälter nach jedem Gebrauch zu reinigen. Wenn der Staubbehälter voll ist oder der HEPA-F i l t e r v e r s t o p f t i...
Page 20 - Bürstenwalze reinigen
18 3 . H a l t e n S i e d i e O b e r s e i t e d e r Zyklonbaugruppe fest und drehen Sie sie gegen den Uhrzeigersinn. Entfernen Sie die Zyklonbaugruppe zur Reinigung vom Handstaubsauger.4. Wenn der HEPA gewaschen werden soll, halten Sie den HEPA fest und drehen Sie ihn im Uhrzeigersinn. Entfernen ...
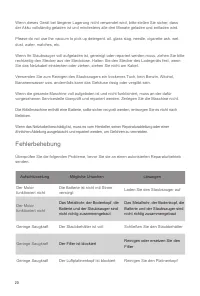
Page 22 - Fehlerbehebung
20 Wenn dieses Gerät bei längerer Lagerung nicht verwendet wird, bitte stellen Sie sicher, dass der Akku vollständig geladen ist und mindestens alle drei Monate geladen und entladen wird. Please do not use the vacuum to pick up detergent, oil, glass slag, needle, cigarette ash, wet dust, water, matc...
Page 23 - Technischer Parameter; Modellnummer
21 Technischer Parameter Modellnummer JV85 Nennspannung 25.2V Nennleistung 500W Adapter Eingangsspannung 100-240V ~ 50/60Hz 0.8A Adapterausgangsspannung 30V 600mA Modellnummer des Bodenkopfes T-EB110K Nennleistung des Bodenkopfes 30W Kapazität des Akkus 2500mAh Ladezeit 4h-5h Circuit Diagram Ladeger...
Page 24 - Entsorgung; Garantie; Hersteller; Herstellerinformationen
22 Entsorgung Maschine, Zubehöre und Verpackung sollten auf umweltfreundliche Weise recycelt werden. Bitte entsorgen Sie diese Maschine nicht im Hausmüll! Nur für EU-Länder: Gemäß der EU-Richtlinie 2012/19/EU müssen nicht mehr gebrauchsfähige Gerät und gemäß EU-Richtlinie 2006/66/EG müssen defekte o...
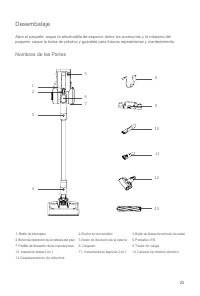
Page 25 - Desembalaje; Nombres de las Partes
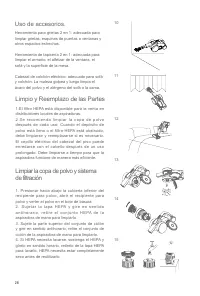
23 Desembalaje Abra el paquete, saque la almohadilla de espuma, todos los accesorios y la máquina del paquete, saque la bolsa de plástico y guárdela para futuras reparaciones y mantenimiento. Nombres de las Partes 1. Botón de interruptor4.Botón de liberación de la cabeza del piso7.Pestillo de libera...
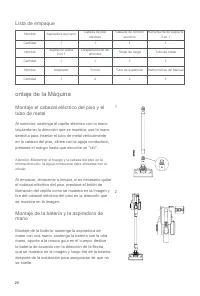
Page 26 - Lista de empaque; ontaje de la Máquina; Montaje el cabezal eléctrico del piso y el; Montaje de la batería y la aspiradora de
24 Lista de empaque ontaje de la Máquina Montaje el cabezal eléctrico del piso y el tubo de metal Al conectar, sostenga el cepillo eléctrico con la mano izquierda en la dirección que se muestra, use la mano derecha para insertar el tubo de metal verticalmente en la cabeza del piso, alinee con la agu...
Page 27 - Montaje del tubo de metal y aspiradora de
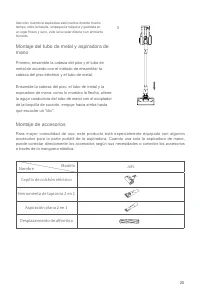
25 Atención: cuando la aspiradora esté inactiva durante mucho tiempo, retire la batería, empaque la máquina y guárdela en un lugar fresco y seco, evite la luz solar directa o un ambiente húmedo. Montaje del tubo de metal y aspiradora de mano Primero, ensamble la cabeza del piso y el tubo de metal de...
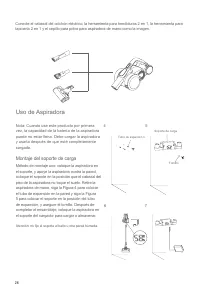
Page 28 - Uso de Aspiradora; Montaje del soporte de carga
26 6 7 Conecte el cabezal del colchón eléctrico, la herramienta para hendiduras 2 en 1, la herramienta para tapicería 2 en 1 y el cepillo para polvo para aspiradora de mano como la imagen. Uso de Aspiradora Nota: Cuando use este producto por primera vez, la capacidad de la batería de la aspiradora p...
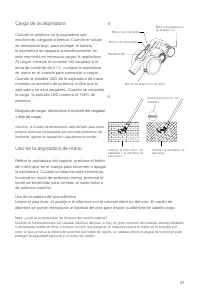
Page 29 - Carga de la aspiradora; Uso de la aspiradora de mano
27 Botón de interruptor Botón de liberación de la batería Botón de encendido Pantalla LED Botón de liberación de polvo D e s p l a z a m i e n t o d e alfombra Limpiar el piso duro, las baldosas o la alfombra de pelo corto. Limpiar la alfombra de pelo largo. 8 9 Carga de la aspiradora Cuando la pote...
Page 33 - Solución de problemas
31 Problemas Causos Posibles Soluciones El motor no funciona La batería no tiene energía Cargar la aspiradora El motor no funciona El tubo de metal, el cabezal del piso, la batería y la aspiradora no están ensamblados correctamente. Verificar que los accesorios estén ensamblados correctamente en la ...
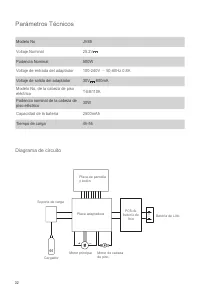
Page 34 - Parámetros Técnicos; Voltaje Nominal; Diagrama de circuito
32 Parámetros Técnicos Modelo No JV85 Voltaje Nominal 25.2V Podencia Nominal 500W Voltaje de entrada del adaptador 100-240V ~ 50 / 60Hz 0.8A Voltaje de salida del adaptador 30V 600mA Modelo No. de la cabeza de piso eléctrico T-EB110K Podencia nominal de la cabeza de piso eléctrico 30W Capacidad de l...
Page 35 - Desechado; Solo para países de la EC:; Fabricante; Información del fabricante
33 Desechado La máquina, los accesorios y el embalaje deben clasificarse para un reciclaje respetuoso con el medio ambiente. No deseche la máquina en la basura doméstica! Solo para países de la EC: De acuerdo con la Guía Europea 2012/19 / UE, las máquinas que ya no son utilizables, y de acuerdo con ...
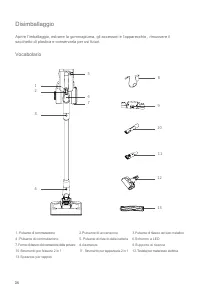
Page 36 - Disimballaggio; Vocabolario
34 Disimballaggio Aprire l’imballaggio, estrarre la gommapiuma, gli accessori e l’apparecchio , rimuovere il sacchetto di plastica e conservarla per usi futuri. Vocabolario 1. Pulsante di commutazione4 .Pulsante di commutazione7.Fermo di rilascio del contenitore della polvere10.Strumento per fessure...
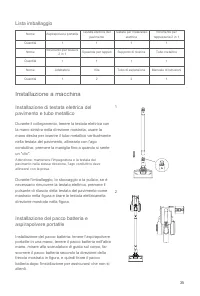
Page 37 - Lista imballaggio; Installazione a macchina; Installazione di testata elettrica del; Installazione del pacco batteria e
35 Lista imballaggio Installazione a macchina Installazione di testata elettrica del pavimento e tubo metallico Durante il collegamento, tenere la testata elettrica con la mano sinistra nella direzione mostrata, usare la mano destra per inserire il tubo metallico verticalmente nella testata del pavi...
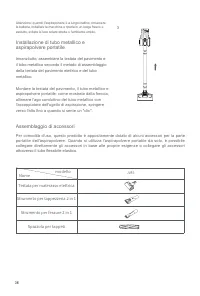
Page 38 - Installazione di tubo metallico e
36 Attenzione: quando l'aspirapolvere è a lungo inattivo, rimuovere la batteria, imballare la macchina e riporla in un luogo fresco e asciutto, evitare la luce solare diretta o l'ambiente umido. Installazione di tubo metallico e aspirapolvere portatile Innanzitutto, assemblare la testata del pavimen...
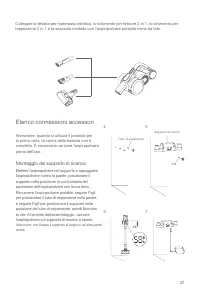
Page 39 - Elenco connessioni accessori; Montaggio del supporto di ricarica
37 6 7 Collegare la testata per materasso elettrica, lo strumento per fessure 2 in 1, lo strumento per tappezzeria 2 in 1 e la spazzola morbida con l'aspirapolvere portatile come da foto. Elenco connessioni accessori Attenzione: quando si utilizza il prodotto per la prima volta, la carica della batt...
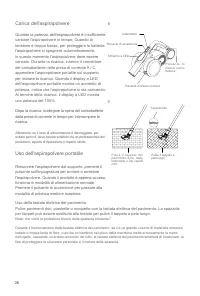
Page 40 - Carica dell'aspirapolvere; Uso dell'aspirapolvere portatile
38 Carica dell'aspirapolvere Quando la potenza dell'aspirapolvere è insufficiente, caricare l'aspirapolvere in tempo; Quando la tensione è troppo bassa, per proteggere la batteria, l'aspirapolvere si spegnerà automaticamente, in questo momento l'aspirapolvere deve essere caricato. Durante la ricaric...
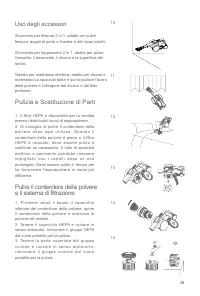
Page 41 - Uso degli accessori
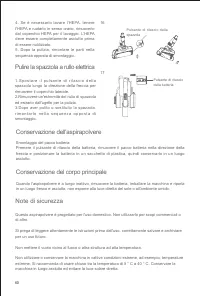
39 Pulizia e Sostituzione di Parti Pulire il contenitore della polvere e il sistema di filtrazione 1. Il filtro HEPA è disponibile per la vendita presso i distributori locali di aspirapolvere.2. Si consiglia di pulire il contenitore della p o l v e r e d o p o o g n i u t i l i z z o ; Q u a n d o i...
Page 44 - Risoluzione dei problemi
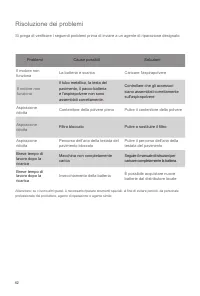
42 Problemi Cause possibili Soluzioni Il motore non funziona La batteria è scarica Caricare l'aspirapolvere Il motore non funziona Il tubo metallico, la testa del pavimento, il pacco batteria e l'aspirapolvere non sono assemblati correttamente. Controllare che gli accessori siano assemblati corretta...
Page 45 - Parametro tecnico; Tensione nominale; Schema Elettrico
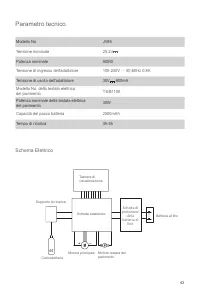
43 Parametro tecnico Modello No JV85 Tensione nominale 25.2V Potenza nominale 500W Tensione di ingresso dell'adattatore 100-240V ~ 50 / 60Hz 0.8A Tensione di uscita dell'adattatore 30V 600mA Modello No. della testata elettrica del pavimento T-EB110K Potenza nominale della testata elettrica del pavim...
Page 46 - Disposizione; Solo per gli stati di EC:; Informazioni su Garanzia; Produttore; Informazioni sul produttore
44 Disposizione La macchina, gli accessori e la confezione devono essere classificati per il riciclaggio amichevole all'ambiente. Non smaltire la macchina nei rifiuti domestici. Solo per gli stati di EC: Secondo la direttiva europea 2012/19/EU, le macchine che non sono più utilizzabili e secondo la ...
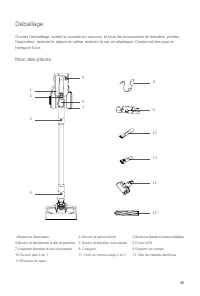
Page 47 - Déballage; Nom des pièces
45 Déballage Ouvrez l'emballage, sortez le coussin en mousse, et tous les accessoires et données, prenez l'aspirateur, enlevez le depuis la valise, enlevez le sac en plastique. Conservez-les pour le transport futur. Nom des pièces 1.Bouton de l'interrupteur4.Bouton de libérationde la tête de planche...
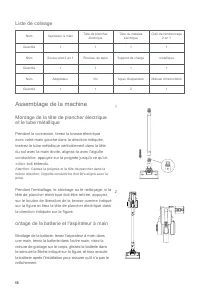
Page 48 - Liste de colisage; Assemblage de la machine; Montage de la tête de plancher électrique; ontage de la batterie et l'aspirateur à main
46 Liste de colisage Assemblage de la machine Montage de la tête de plancher électrique et le tube métallique Pendant la connexion, tenez la brosse électrique avec votre main gauche dans la direction indiquée, insérez le tube métallique verticalement dans la tête du sol avec la main droite, alignez-...
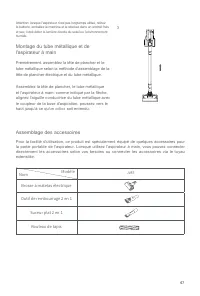
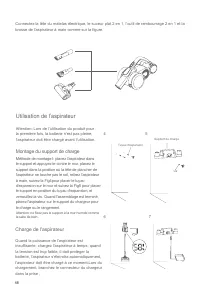
Page 50 - Utilisation de l’aspirateur; Montage du support de charge; Charge de l'aspirateur
48 6 7 Connectez la tête du matelas électrique, le suceur plat 2 en 1, l’outil de rembourrage 2 en 1 et la brosse de l'aspirateur à main comme sur la figure. Utilisation de l’aspirateur Attention: Lors de l’utilisation du produit pour la première fois, la batterie n'est pas pleine, l’aspirateur doit...
Page 52 - Utilisation d'accessoires
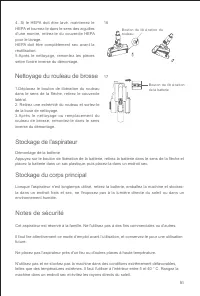
50 Nettoyage et remplacement des pièces Clean dust cup and filtration system Nettoyage du bac à poussière et du système de filtration 1.Le filtre HEPA est disponible pour la vente auprès des distributeurs locaux d'aspirateurs.2 . I l e s t r e c o m m a n d é d e n e t t o y e r l e b a c à poussièr...
Page 55 - Dépannage
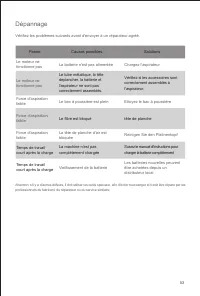
53 Panne Causes possibles Solutions Le moteur ne fonctionne pas La batterie n'est pas alimentée Chargez l'aspirateur Le moteur ne fonctionne pas Le tube métallique, la tête deplancher, la batterie et l'aspirateur ne sont pas correctement assemblés. Vérifiez si les accessoires sont correctement assem...
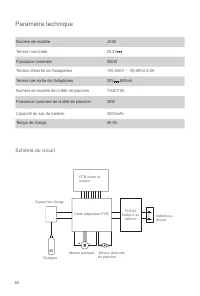
Page 56 - Paramètre technique; Numéro de modèle; Schéma du circuit
54 Paramètre technique Numéro de modèle JV85 Tension nominale 25.2V Puissance nominale 500W Tension d'entrée de l'adaptateur 100-240V ~ 50 / 60Hz 0.8A Tension de sortie de l'adaptateur 30V 600mA Numéro de modèle de la tête de plancher T-EB110K Puissance nominale de la tête de plancher 30W Capacité d...
Page 57 - Disposition; Uniquement pour les pays de la CE; Fabricant; Informations du fabricant
55 Disposition Pour un recyclage respectueux de l'environnement, les machines, les accessoires et les emballages doivent être classés. Ne pas jeter la machine dans les ordures ménagères! Uniquement pour les pays de la CE Selon la directive européenne 2012/19 / EU et conformément à la directive europ...
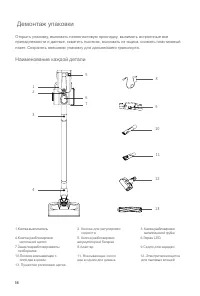
Page 58 - Демонтаж упаковки; Наименование каждой детали
56 Демонтаж упаковки Открыть упаковку, вынимать пенопластовую прокладку, вынимать встроенные все принадлежности и данные, схватить пылесос, вынимать из ящика, снимать пластиковый пакет. Сохранять внешнюю упаковку для дальнейшего транспорта. Наименование каждой детали 1.Кнопка-выключатель 4.Кнопка ра...
Page 59 - Упаковочный лист; Монтаж машины; Монтаж электрической напольной щетки
57 Упаковочный лист Монтаж машины Монтаж электрической напольной щетки и металлической трубки При соединении держите электрическую напольнующетку левой рукой в направлении, показанном на рисунке, и вертикально вставьте соединение напольной щетки в отверстие для монтажанапольной щетки под металлическ...
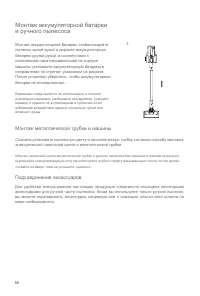
Page 60 - Монтаж металлической трубки и машины
58 Монтаж аккумуляторной батареи и ручного пылесоса Монтаж аккумуляторной батареи: стабилизируйте пылесос одной рукой и держите аккумуляторную батарею другой рукой, в соответствии с положением паза направляющей на корпусе машины установите аккумуляторную батарею в направлении по стрелке, указанном н...
Page 61 - Перечень подсоединений аксессуаров; Использование пылесоса; Монтаж седла для зарядки
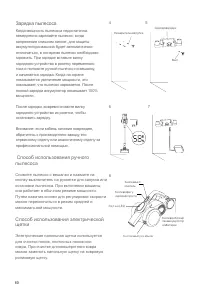
59 JV85 Всасывающее сопло два в одном для дивана Плоское всасывающее сопло два в одном Плоское всасывающее сопло два в одном Пушистая роликовая щетка Модель Наименование Перечень подсоединений аксессуаров Использование пылесоса Внимание: при первом использовании настоящей продукции емкость аккумулят...
Page 63 - Использование аксессуаров
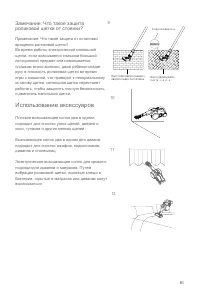
61 Замечание: Что такое защита роликовой щетки от стоянки? Примечание: Что такое защита от остановки вращения роликовой щетки?Во время работы электрической напольной щетки, если всасывается слишком большой посторонний предмет или наматывается слишком много волокон, даже ребенок кладет руку в плоскос...
Page 65 - Очистка электрической щетки
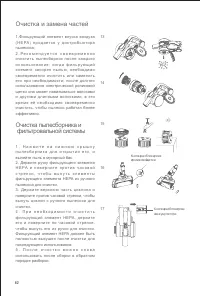
63 Кнопка разблокировк и аккумулятора Очистка электрической щетки Хранение пылесоса Хранение машины 1.Переместите вдоль направления стрелки, и снимите кнаружи крышу сбоку роликовой щетки2.Снимите один конец роликовой щетки вдоль направления на рисунке, чтобы вынуть роликовую щетку из напольной щетки...
Page 67 - Устранение неисправностей
65 Неисправность Возможные причины Решения Электродвигатель не работает Батарея села Зарядить пылесос Электродвигатель не работает Металлическая труба,напольная щетка, аккумуляторная батарея и ручной пылесос установлены неправильно. Проверить установку различных частей и ручного пылесоса Сила всасыв...
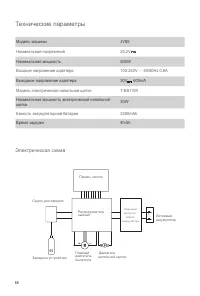
Page 68 - Технические параметры; Номинальное напряжение; Электрическая схема
66 Технические параметры Модель машины JV85 Номинальное напряжение 25.2V Номинальная мощность 500W Входное напряжение адаптера 100-240V ~ 50/60Hz 0.8A Выходное напряжение адаптера 30V 600mA Модель электрической напольной щетки T-EB110K Номинальная мощность электрической напольной щетки 30W Емкость а...
Page 69 - Изготовитель; Информация изготовителя
67 Утилизация С учетом охраны окружающей среды прибор, оснастка и упаковка должны подвергнуться подходящей переработке для повторного использования содержащегося в них сырья. Отработанные приборы не должны выбрасываться совместно с бытовыми отходами! Только для стран-членов ЕС: В соответствии с Евро...