Page 2 - IMPORTANT SAFETY INSTRUCTIONS
2 IMPORTANT SAFETY INSTRUCTIONS Read all instructions before using the appliance. This appliance is not intended for use by persons (including children) with reduced physical, sensory or mental capabilities, or lack of experience and knowledge, unless they have been given supervision or instruct...
Page 6 - INSTALLATION INSTRUCTIONS; Before Using Your Appliance
6 - SAVE THESE INSTRUCTIONS - INSTALLATION INSTRUCTIONS Before Using Your Appliance Remove the exterior and interior packing. Before connecting the appliance to the power source, let it stand upright for approximately 2 hours. This will reduce the possibility of a malfunction in the cooling syst...
Page 7 - How to put off the shelves; Reversing the Door Swing
7 How to put off the shelves 1. Remove all bottles from the shelve. 2. Please keep the door opened fully all the way before pulling the shelves out. 3. Pull the shelf forwards(seeing ① ) until groove on either side of the shelf is level with plastic peg on either side of the cabinet(seeing ② ). Then...
Page 8 - Carbon Filter; OPERATING YOUR APPLIANCE; Smart control mode
8 Carbon Filter A built-in carbon filter protects your wines by acting as a natural barrier against harmful odors. The carbon filter should be replaced every 9-12 months depending on the unit ’ s exposure level to odor. If the unit is placed in a kitchen, regular replacement every three months is id...
Page 9 - Setting the temperature Control
9 Setting the temperature Control Adjustable temperature: 1°C to 18°C (34°F to 65°F) Set the desired temperature by pressing the corresponding buttons, to increase or to decrease. Each press is in 1-degree increment. Once released, set temperature will flash for approximately 5 seconds then reve...
Page 11 - Sabbath mode; Temperature Alarm Function
11 Sabbath mode Press and hold buttons and at the same time for at least 5 seconds to enter or exit Sabbath mode. In this mode, LED will display "Sb". This mode turns off the displays, interior light and prevents them from turning on again. Normal cooling operations will still take place. ...
Page 12 - CARE AND MAINTENANCE; Cleaning Your Appliance; Turn off the power, unplug the appliance, and remove all items.; Power Failure; Securely tape down all loose items inside your appliance.
12 CARE AND MAINTENANCE Cleaning Your Appliance 1. Turn off the power, unplug the appliance, and remove all items. 2. Wash the inside surfaces with a warm water and baking soda solution. The solution should consist of about 2 tablespoons of baking soda to a quart of water. 3. Wring excess water out ...
Page 13 - PROBLEMS WITH YOUR APPLIANCE; TROUBLESHOOTING GUIDE; PROBLEM; restaurants, hotels, bars and other commercial settings.
13 PROBLEMS WITH YOUR APPLIANCE You can solve many common problems easily, saving you the cost of a possible service call. Try the suggestions below to see if you can solve the problem before calling the servicer. TROUBLESHOOTING GUIDE PROBLEM POSSIBLE CAUSE REMEDY Appliance does not operate. The ...
Page 14 - Manual de instrucciones
14 Manual de instrucciones Modelo: EBS51SS1 ANTES DE UTILIZAR EL PRODUCTO, LEA Y SIGA TODAS LAS NORMAS DE SEGURIDAD E INSTRUCCIONES DE USO. CONSERVE ESTE MANUAL EN UN LUGAR SEGURO.
Page 15 - INSTRUCCIONES DE SEGURIDAD IMPORTANTES
15 INSTRUCCIONES DE SEGURIDAD IMPORTANTES Lea atentamente las instrucciones antes de utilizar este producto. Este producto no está diseñado para que lo utilicen personas (incluidos niños) con capacidades físicas, sensoriales o mentales reducidas, o sin conocimiento ni experiencia previa en produ...
Page 20 - INSTRUCCIONES DE INSTALACIÓN; Previo a utilizar el producto; Instalación del aparato
20 - LEA Y GUARDE ESTAS INSTRUCCIONES - INSTRUCCIONES DE INSTALACIÓN Previo a utilizar el producto Retire todo el embalaje interior y exterior. Antes de conectar el aparato a la corriente eléctrica, déjelo reposar en posición vertical durante aproximadamente 2 horas. Esto reducirá la posibilidad...
Page 21 - Instalación de la manija
21 Instalación de la manija Para instalar la manija, por favor siga las instrucciones a continuación: Retire con cuidado la junta (sello) de la puerta en el área donde se colocará la manija. Coloque la manija sobre los orificios para tornillos en el exterior de la puerta y fíjela con los tornill...
Page 22 - Para retirar los estantes; Cambiar el Lado de Apertura de la Puerta
22 Para retirar los estantes 4. Asegúrese de que los estantes estén completamente vacíos. 5. Previo a retirar los estantes, mantenga la puerta completamente abierta. 6. Deslice el estante horizontalmente hacia afuera (imagen ① ) hasta que las clavijas plásticas en cada lado del estante se encuentren...
Page 23 - Filtro de Carbón
23 orificio para el eje de la puerta que se encuentra en la esquina inferior izq uierda. 9. Vuelva a colocar la puerta sobre el gabinete , con un destornillador plano, instale el núcleo de la bisagra en el orificio del eje que se encuentra en la esquina superior izquierda de la puerta. 10. Alinee la...
Page 24 - OPERANDO SU PRODUCTO; Modo de Control Inteligente; Configuración del control de temperatura
24 OPERANDO SU PRODUCTO Temperaturas recomendadas para enfriar Vinos: Vino Tinto: 59 ~ 64.4°F (15 ~ 18°C) Vino Blanco / Seco: 48.2 ~ 57.2°F (9 ~ 14°C) Vino Espumoso: 41 ~ 46.4°F (5 ~ 8°C) El aparato deberá estar ubicado en un lugar donde la temperatura ambiente se encuentra entre 50~100°F (10~38...
Page 27 - Función de Alarma de Temperatura
27 y al mismo tiempo por 10 segundos. Sabbath mode Para activar o desactivar el Modo Sabbat mantenga presionados los botones y al mismo tiempo durante al menos 5 segundos. Cuando el modo Sabbat, se encuentre activado, el LED mostrará "Sb". Cuando esta función es activada, se apagarán las...
Page 28 - CUIDADO Y MANTENIMIENTO; Limpieza del aparato; Gire las patas ajustables hasta la base para evitar daños.; Consejo para ahorrar energía
28 CUIDADO Y MANTENIMIENTO Limpieza del aparato 5. Antes de comenzar con la limpieza o mantenimiento del aparato, apáguelo y asegúrese de desenchufarlo completamente de la corriente eléctrica, posteriormente, vacía el contenido de la unidad. 6. Lave las superficies internas con agua tibia y una solu...
Page 29 - PROBLEMAS CON SU PRODUCTO; GUÍA PARA SOLUCIÓN DE PROBLEMAS; PROBLEMA
29 PROBLEMAS CON SU PRODUCTO Para lograr la resolución de posibles contratiempos en el correcto funcionamiento de la unidad, considere las sugerencias que se presentan a continuación, en caso de tratarse de un problema más complejo, contacte directamente a un técnico autorizado. GUÍA PARA SOLUCIÓN D...
Page 30 - Manuel d’utilisation
30 Manuel d’utilisation Modèle : EBS51SS1 AVANT TOUTE UTILISATION, VEUILLEZ LIRE ET SUIVRE TOUTES LES RÈGLES DE SÉCURITÉ ET LES INSTRUCTIONS D'UTILISATION. CONSERVEZ CE MANUEL DANS UN ENDROIT SÛR.
Page 36 - INSTRUCTIONS POUR L’INSTALLATION; Avant d'utiliser votre appareil; Installation de votre appareil
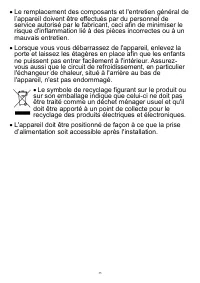
36 - CONSERVEZ CES INSTRUCTIONS - INSTRUCTIONS POUR L’INSTALLATION Avant d'utiliser votre appareil Retirez l'emballage extérieur et intérieur. Avant de brancher l'appareil à la source d'alimentation, laissez-le reposer en position verticale durant environ 2 heures. Cela réduira la possibilité d'...
Page 37 - Inverser le sens de l’ouverture de la porte
37 Comment retirer les étagères 1. Retirez toutes les bouteilles des étagères. 2. Gardez la porte complètement ouverte pour retirer les étagères. 3. Tirez l'étagère vers l'extérieur (voir ① ) jusqu'à ce que la rainure de chaque côté de l'étagère soit vis-à-vis des chevilles en plastique de chaque cô...
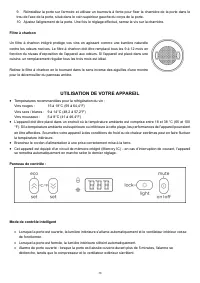
Page 38 - UTILISATION DE VOTRE APPAREIL
38 9. Réinstallez la porte sur l'armoire et utilisez un tournevis à fente pour fixer la charnière de la porte dans le trou de l'axe de la porte, situé dans le coin supérieur gauche du corps de la porte. 10. Ajustez l'alignement de la porte. Une fois le réglage effectué, serrez la vis sur la charnièr...
Page 41 - simultanément durant au moins 5 secondes pour activer ou
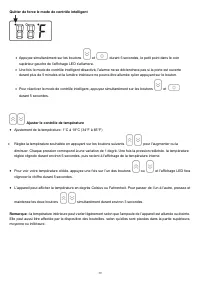
41 VERROUILLAGE Lorsqu’allumé, ce voyant indique que le panneau de contrôle est verrouillé. EN FONCTION Lorsque le compresseur de l'appareil fonctionne, ce voyant s'allume pour indiquer que le mode de refroidissement est activé. Mode Démo Pour activer ou désactiver le mode démo, pressez et mainten...
Page 42 - Fonction alerte de température
42 Fonction alerte de température Si la température ambiante est supérieure ou égale à 30°C (86°F) durant 2 heures, l'alerte de température élevée sera activée. L’affichage LED indiquera « HH », l’alarme sonnera en continu et le système de refroidissement continuera à fonctionner. L'affichage ne rev...
Page 43 - NETTOYAGE ET ENTRETIEN; Nettoyage de l’appareil
43 NETTOYAGE ET ENTRETIEN Nettoyage de l’appareil 1. Coupez le courant, débranchez l'appareil et retirez tout le contenu. 2. Lavez les surfaces intérieures avec une solution d'eau chaude et de bicarbonate de soude. La solution doit être composée d'environ 2 cuillères à soupe de bicarbonate de soude ...
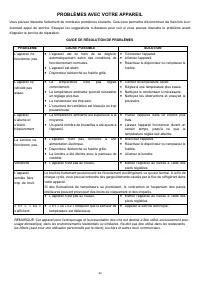
Page 44 - PROBLÈMES AVEC VOTRE APPAREIL
44 PROBLÈMES AVEC VOTRE APPAREIL Vous pouvez résoudre facilement de nombreux problèmes courants. Cela vous permettra d'économiser les frais liés à un éventuel appel de service. Essayez les suggestions ci-dessous pour voir si vous pouvez résoudre le problème avant d'appeler le service de réparation. ...