Page 3 - Contents
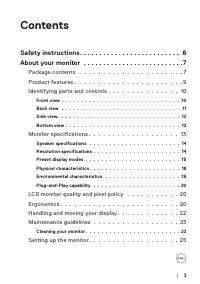
│ 3 Contents Safety instructions . . . . . . . . . . . . . . . . . . . . . . . . . . 6About your monitor . . . . . . . . . . . . . . . . . . . . . . . . . .7 Package contents . . . . . . . . . . . . . . . . . . . . . . 7Product features . . . . . . . . . . . . . . . . . . . . . . . 9Identifying part...
Page 6 - Safety instructions; Connecting your monitor
6 │ Safety instructions Safety instructions Use the following safety guidelines to protect your monitor from potential damage and to ensure your personal safety. Unless otherwise noted, each procedure included in this document assumes that you have read the safety information that shipped with your ...
Page 7 - About your monitor; Package contents; Contact Dell; Display
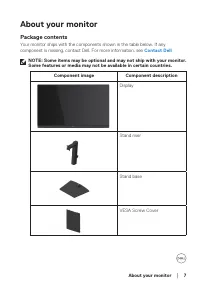
About your monitor │ 7 About your monitor Package contents Your monitor ships with the components shown in the table below. If any component is missing, contact Dell. For more information, see Contact Dell . NOTE: Some items may be optional and may not ship with your monitor. Some features or media ...
Page 8 - Regulatory Information
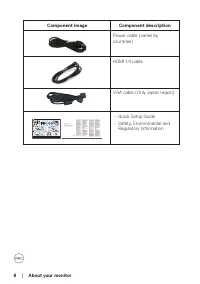
8 │ About your monitor Component image Component description Power cable (varies by countries) HDMI 1.4 cable VGA cable (Only Japan region) 5 Dell P/N: XNW64 Rev. A00 F41G78S1700-* 2023-02© 2023 Dell Inc. or its subsidiaries. E2724HS HDMI 2 1 5 3 4 www.dell.com/support/E2724HS • Quick Setup Guide• S...
Page 9 - Product features; mounting holes for flexible mounting solutions.; The possible long-term effects of blue light emission from
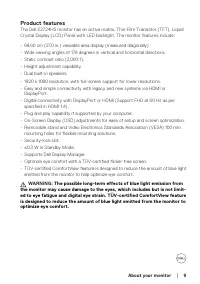
About your monitor │ 9 Product features The Dell E2724HS monitor has an active matrix, Thin-Film Transistor (TFT), Liquid Crystal Display (LCD) Panel with LED backlight. The monitor features include: • 68.60 cm (27.0 in.) viewable area display (measured diagonally). • Wide viewing angles of 178 degr...
Page 10 - Identifying parts and controls; Front view; Function buttons; Using the control buttons
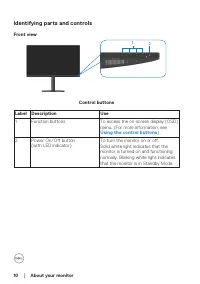
10 │ About your monitor Identifying parts and controls Front view 2 1 Control buttons Label Description Use 1 Function buttons To access the on-screen display (OSD) menu. (For more information, see Using the control buttons ) 2 Power On/Off button(with LED indicator) To turn the monitor on or off. S...
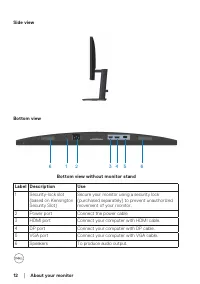
Page 11 - without monitor stand with monitor stand; Label Description
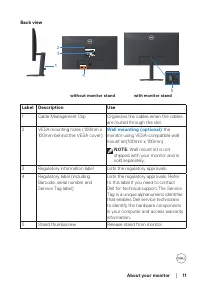
About your monitor │ 11 Back view SVC Tag: 1234567 Express Service Code: 123 456 789 0 S/N: CN-012345- TV100-96N-001V -A00 Date of Mfg/ 生产日期/生產日期 : December. 2020 Q40G024N-700-XXA 液晶显示器型号 : E2724HS 输入电源 : 100-240V 50/60Hz,1.5A 中国制造 DELL E2724HS F40GXXXXXXXXXX--XX DELL E2724HS Flat Panel Monitor /Mon...
Page 13 - Monitor specifications; Model
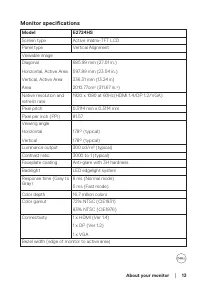
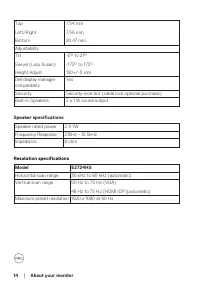
About your monitor │ 13 Monitor specifications Model E2724HS Screen type Active matrix-TFT LCD Panel type Vertical Alignment Viewable imageDiagonal Horizontal, Active Area Vertical, Active Area Area 685.99 mm (27.01 in.) 597.89 mm (23.54 in.) 336.31 mm (13.24 in) 2010.77cm 2 (311.67 in. 2 ) Native r...
Page 15 - Preset display modes
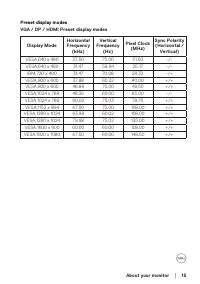
About your monitor │ 15 Preset display modes VGA / DP / HDMI Preset display modes Display Mode Horizontal Frequency (kHz) Vertical Frequency (Hz) Pixel Clock (MHz) Sync Polarity (Horizontal / Vertical) VESA,640 x 480 37.50 75.00 31.50 -/- VESA,640 x 480 31.47 59.94 25.17 -/- IBM,720 x 400 31.47 70.0...
Page 16 - Video input signals; NOTE: This monitor is ENERGY STAR certified.
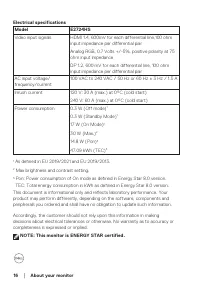
16 │ About your monitor Electrical specifications Model E2724HS Video input signals HDMI 1.4, 600mV for each differential line,100 ohm input impedance per differential pair Analog RGB, 0.7 Volts +/-5%, positive polarity at 75 ohm input impedance DP 1.2, 600 mV for each differential line, 100 ohm inp...
Page 20 - LCD monitor quality and pixel policy; the monitor for long period, we recommend you to:
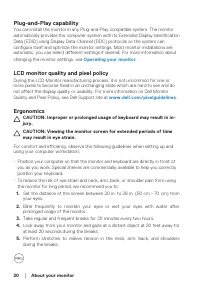
20 │ About your monitor Plug-and-Play capability You can install the monitor in any Plug-and-Play compatible system. The monitor automatically provides the computer system with its Extended Display Identification Data (EDID) using Display Data Channel (DDC) protocols so the system can configure itse...
Page 21 - sitting in front of the monitor.
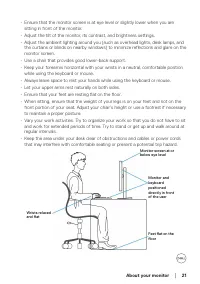
About your monitor │ 21 • Ensure that the monitor screen is at eye level or slightly lower when you are sitting in front of the monitor. • Adjust the tilt of the monitor, its contrast, and brightness settings.• Adjust the ambient lighting around you (such as overhead lights, desk lamps, and the curt...
Page 22 - Handling and moving your display; excessive pressure when lifting or moving the monitor.
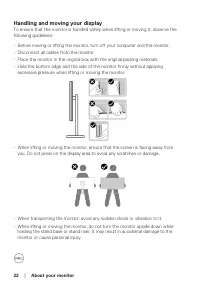
22 │ About your monitor Handling and moving your display To ensure that the monitor is handled safely when lifting or moving it, observe the following guidelines: • Before moving or lifting the monitor, turn off your computer and the monitor.• Disconnect all cables from the monitor.• Place the monit...
Page 23 - Maintenance guidelines
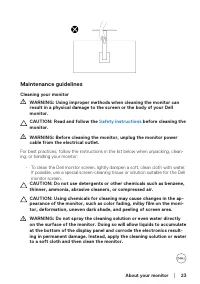
About your monitor │ 23 Maintenance guidelines Cleaning your monitor WARNING: Using improper methods when cleaning the monitor can result in a physical damage to the screen or the body of your Dell monitor. CAUTION: Read and follow the Safety instructions before cleaning the monitor. WARNING: Before...
Page 24 - and show white scuff marks more than a light-colored monitor.
24 │ About your monitor NOTE: Monitor damage due to improper cleaning methods and the use of benzene, thinner, ammonia, abrasive cleaners, alcohol, compressed air, detergent of any kind will lead to a Customer Induced Damage (CID). CID is not covered under the standard Dell warranty. • If you notice...
Page 25 - Setting up the monitor; Connecting the stand; NOTE: The stand is detached when the monitor is shipped from the; To attach the monitor stand:
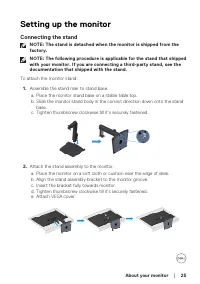
About your monitor │ 25 Setting up the monitor Connecting the stand NOTE: The stand is detached when the monitor is shipped from the factory. NOTE: The following procedure is applicable for the stand that shipped with your monitor. If you are connecting a third-party stand, see the documentation tha...
Page 26 - To connect your monitor to the computer:
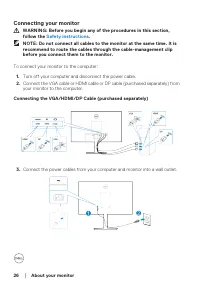
26 │ About your monitor Connecting your monitor WARNING: Before you begin any of the procedures in this section, follow the Safety instructions . NOTE: Do not connect all cables to the monitor at the same time. It is recommend to route the cables through the cable-management clip before you connect ...
Page 27 - Organizing cables
About your monitor │ 27 Organizing cables Use cable management clip on stand assembly to route the cables connected to your monitor. 4. Turn on the Monitor.
Page 28 - Removing the stand; NOTE: To prevent scratches on the screen when removing the stand,; Place the monitor on a soft cloth or cushion at the edge of the desk.
28 │ About your monitor Removing the stand NOTE: To prevent scratches on the screen when removing the stand, ensure that the monitor is placed on a soft and clean surface. NOTE: The following procedure is applicable only for the stand that shipped with your monitor. If you are connecting a third-par...
Page 29 - To remove the VESA cover
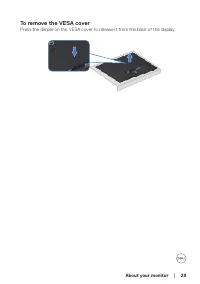
About your monitor │ 29 To remove the VESA cover Press the dimple on the VESA cover to release it from the back of the display.
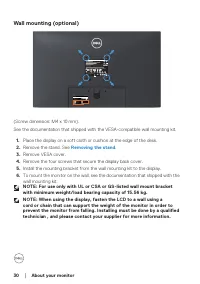
Page 30 - Place the display on a soft cloth or cushion at the edge of the desk.; Remove the four screws that secure the display back cover.; NOTE: For use only with UL or CSA or GS-listed wall mount bracket
30 │ About your monitor Wall mounting (optional) SVC Tag: 1234567 Express Service Code: 123 456 789 0 S/N: CN-012345- TV100-96N-001V -A00 Date of Mfg/ 生产日期/生產日期 : December. 2020 Q40G024N-700-XXA 液晶显示器型号 : E2724HS 输入电源 : 100-240V 50/60Hz,1.5A 中国制造 DELL E2724HS F40GXXXXXXXXXX--XX DELL E2724HS Flat Pan...
Page 31 - Operating your monitor; Turning on the monitor; Press the
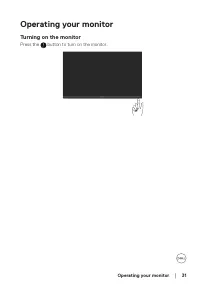
Operating your monitor │ 31 Operating your monitor Turning on the monitor Press the button to turn on the monitor.
Page 32 - Control buttons
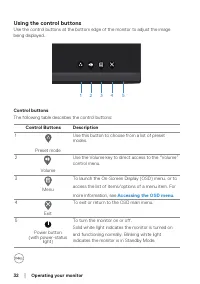
32 │ Operating your monitor Using the control buttons Use the control buttons at the bottom edge of the monitor to adjust the image being displayed. 2 5 3 4 1 Control buttons The following table describes the control buttons: Control Buttons Description 1 Preset mode Use this button to choose from a...
Page 33 - Using the OSD lock function; Select one of the following options.; The following message appears.; Select; Yes; to lock the buttons. Once locked, pressing any control button will
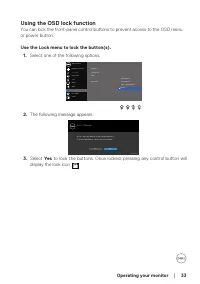
Operating your monitor │ 33 Using the OSD lock function You can lock the front-panel control buttons to prevent access to the OSD menu or power button. Use the Lock menu to lock the button(s). 1. Select one of the following options. Others Personalize Color Display B Auto Adjust rightness / Contrast...
Page 34 - Select one of the following options:
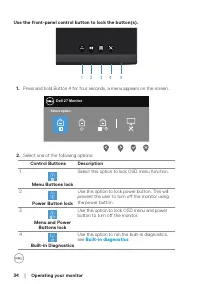
34 │ Operating your monitor Use the front-panel control button to lock the button(s). 2 5 3 4 1 1. Press and hold Button 4 for four seconds, a menu appears on the screen. Dell 27 Monitor Select option: + 2. Select one of the following options: Control Buttons Description 1 Menu Buttons lock Select t...
Page 35 - Select this option to unlock OSD menu function.
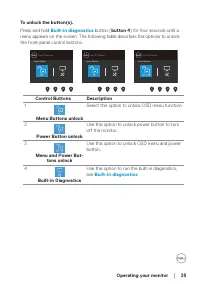
Operating your monitor │ 35 To unlock the button(s). Press and hold Built-in diagnostics button ( button 4 ) for four seconds until a menu appears on the screen. The following table describes the options to unlock the front-panel control buttons. Dell 27 Monitor Select Option: Dell 27 Monitor Select...
Page 36 - Up
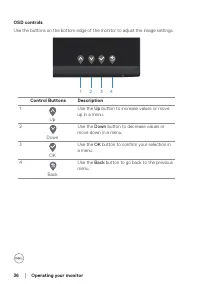
36 │ Operating your monitor OSD controls Use the buttons on the bottom edge of the monitor to adjust the image settings. 2 3 4 1 Control Buttons Description 1 Up Use the Up button to increase values or move up in a menu. 2 Down Use the Down button to decrease values or move down in a menu. 3 OK Use ...
Page 37 - Press the button to display the OSD main menu.; Press the or or button once to activate the highlighted option.
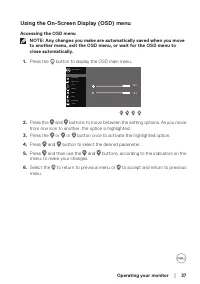
Operating your monitor │ 37 Using the On-Screen Display (OSD) menu Accessing the OSD menu NOTE: Any changes you make are automatically saved when you move to another menu, exit the OSD menu, or wait for the OSD menu to close automatically. 1. Press the button to display the OSD main menu. Input S 75...
Page 39 - Auto Adjust
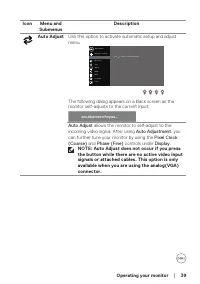
Operating your monitor │ 39 Icon Menu and Submenus Description Auto Adjust Use this option to activate automatic setup and adjust menu. Others Personalize Color Display B Auto Adjust rightness / Contrast Dell 27 Monitor Input Source Menu Press to adjust the screen automatically Audio The following d...
Page 40 - Auto Select
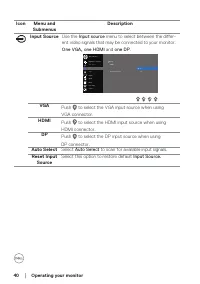
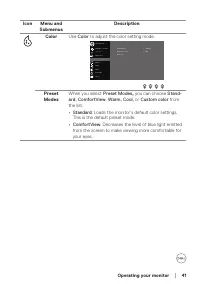
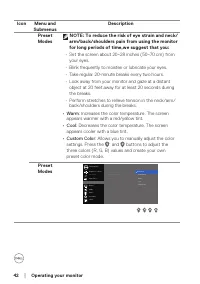
40 │ Operating your monitor Icon Menu and Submenus Description Input Source Use the Input source menu to select between the differ- ent video signals that may be connected to your monitor. One VGA , one HDMI and one DP . Others Personalize Menu Color Display B Auto Adjust rightness / Contrast Dell 2...
Page 43 - • YCbCr
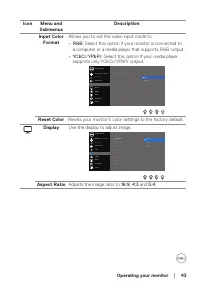
Operating your monitor │ 43 Icon Menu and Submenus Description Input Color Format Allows you to set the video input mode to: • RGB: Select this option if your monitor is connected to a computer or a media player that supports RGB output. • YCbCr / YPbPr: Select this option if your media player suppo...
Page 44 - Pixel Clock; Speaker
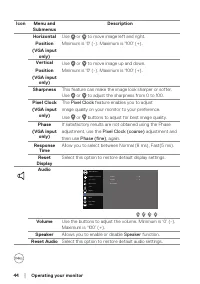
44 │ Operating your monitor Icon Menu and Submenus Description Horizontal Position (VGA input only) Use or to move image left and right.Minimum is '0' (-). Maximum is '100' (+). Vertical Position (VGA input only) Use or to move image up and down. Minimum is '0' (-). Maximum is '100' (+). Sharpness T...
Page 45 - Language
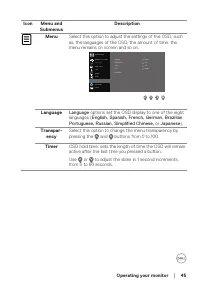
Operating your monitor │ 45 Icon Menu and Submenus Description Menu Select this option to adjust the settings of the OSD, such as, the languages of the OSD, the amount of time, the menu remains on screen and so on. Others Personalize Color Display B Auto Adjust rightness / Contrast Dell 27 Monitor I...
Page 46 - • Menu Buttons
46 │ Operating your monitor Icon Menu and Submenus Description Lock Controls user access to adjustments. The buttons are locked. Others Personalize Color Display B Auto Adjust rightness / Contrast Dell 27 Monitor Input Source Menu Language Transparency Power Button Timer Lock Menu Buttons Menu + Pow...
Page 47 - Select one of the following:
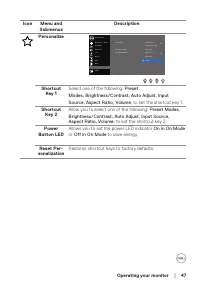
Operating your monitor │ 47 Icon Menu and Submenus Description Personalize Input Source Others Personalize Menu Color Display B Auto Adjust rightness / Contrast Dell 27 Monitor Shorout Key 1 Shorout Key 2 Power Button LED Auto Adjust Input Source Aspect Ratio Brightness/Contrast Reset Personalizatio...
Page 48 - Press to display the information about the display.; Off
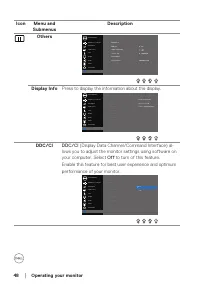
48 │ Operating your monitor Icon Menu and Submenus Description Others Input Source Others Personalize Menu Color Display B Auto Adjust rightness / Contrast Dell 27 Monitor Display Info DDC/CI LCD Conditioning Service Tag Reset Others On Factory Reset ABCDEFG ENERGY STAR ® Audio Display Info Press to...
Page 49 - LCD conditioning; Display the; Reset all settings under the
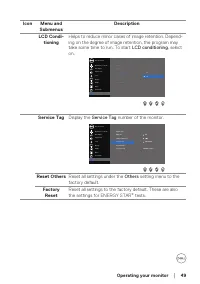
Operating your monitor │ 49 Icon Menu and Submenus Description LCD Condi- tioning Helps to reduce minor cases of image retention. Depend-ing on the degree of image retention, the program may take some time to run. To start LCD conditioning , select on. Input Source Others Personalize Menu Color Disp...
Page 50 - or
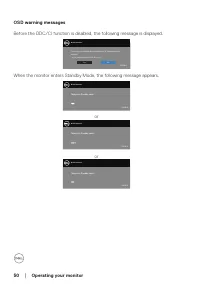
50 │ Operating your monitor OSD warning messages Before the DDC/CI function is disabled, the following message is displayed. The function of adjusting display setting using PC application will be disabled. Do you wish to disable DDC/CI function? Yes No Dell 27 Monitor E2724HS When the monitor enters...
Page 51 - See; Troubleshooting; Troubleshooting for more information.
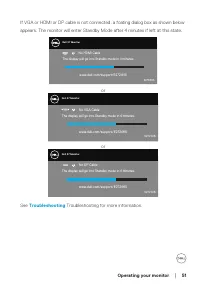
Operating your monitor │ 51 If VGA or HDMI or DP cable is not connected, a foating dialog box as shown below appears. The monitor will enter Standby Mode after 4 minutes if left at this state. Dell P2418HZ Dell 27 Monitor No HDMI Cable The display will go into Standby mode in 4 minutes. www.dell.com...
Page 53 - Using the tilt, swivel, and height adjustment; NOTE: The stand is not attached when the monitor is shipped from the
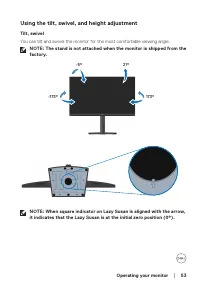
Operating your monitor │ 53 Using the tilt, swivel, and height adjustment Tilt, swivel You can tilt and swivel the monitor for the most comfortable viewing angle. NOTE: The stand is not attached when the monitor is shipped from the factory. -5° 21° 173° -173° NOTE: When square indicator on Lazy Susa...
Page 55 - Turn off both your computer and the monitor.
Troubleshooting │ 55 Troubleshooting WARNING: Before you begin any of the procedures in this section, follow the Safety instructions . Self-Test Your monitor provides a self-test feature that allows you to check if your monitor is functioning properly. If your monitor and computer are properly conne...
Page 56 - NOTE: This box also appears during normal system operation, if the
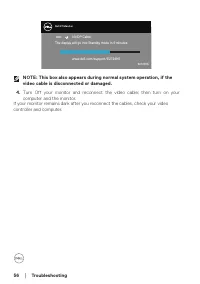
56 │ Troubleshooting Dell P2418HZ Dell 27 Monitor No DP Cable The display will go into Standby mode in 4 minutes. ? E2724HS www.dell.com/support/E2724HS NOTE: This box also appears during normal system operation, if the video cable is disconnected or damaged. 4. Turn Off your monitor and reconnect t...
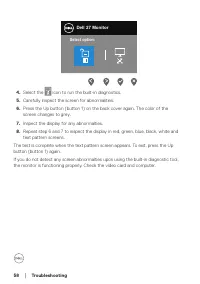
Page 58 - Select the
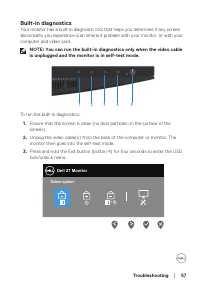
58 │ Troubleshooting Select option: Dell 27 Monitor 4. Select the icon to run the built-in diagnostics. 5. Carefully inspect the screen for abnormalities. 6. Press the Up button (button 1) on the back cover again. The color of the screen changes to grey. 7. Inspect the display for any abnormalties. ...
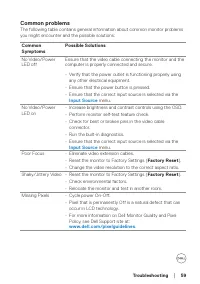
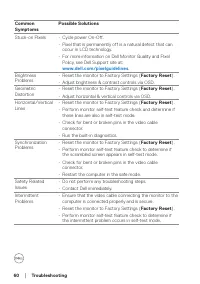
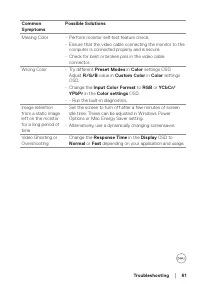
Page 59 - Common problems; Possible Solutions
Troubleshooting │ 59 Common problems The following table contains general information about common monitor problems you might encounter and the possible solutions: Common Symptoms Possible Solutions No Video/Power LED off Ensure that the video cable connecting the monitor and the computer is properl...
Page 62 - Product-specific problems
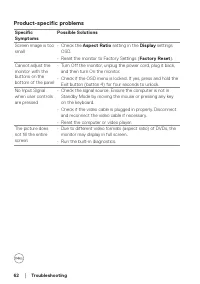
62 │ Troubleshooting Product-specific problems Specific Symptoms Possible Solutions Screen image is too small • Check the Aspect Ratio setting in the Display settings OSD. • Reset the monitor to Factory Settings ( Factory Reset ). Cannot adjust the monitor with the buttons on the bottom of the panel...
Page 63 - Appendix; For information on safety instructions, see the; Safety Environment and; NOTE: If you do not have an active Internet connection, you can find; • Online technical assistance —
Appendix │ 63 Appendix WARNING: Use of controls, adjustments, or procedures other than those specified in this documentation may result in exposure to shock, electrical hazards, and/or mechanical hazards. For information on safety instructions, see the Safety Environment and Regulatory Information (...