Page 2 - Notes, Cautions and Warnings; NOTE: A NOTE indicates important information that helps you make; Copyright © 2020 Dell Inc. or its subsidiaries. All rights reserved.
Notes, Cautions and Warnings NOTE: A NOTE indicates important information that helps you make better use of your computer. CAUTION: A CAUTION indicates potential damage to hardware or loss of data if instructions are not followed. WARNING: A WARNING indicates a potential for property damage, persona...
Page 3 - Contents
Contents │ 3 Contents About your monitor ...........................................5 Package contents ..................................................... 5 Product features ....................................................... 6 Identifying features and controls ...................................
Page 4 - EU product database for energy label and product
4 │ Contents Troubleshooting ............................................... 71 Self-test ..................................................................71 Built-in diagnostics .................................................. 73 Common problems .....................................................
Page 5 - About your monitor; Package contents; Contact Dell; if anything is missing.
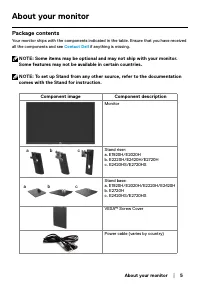
About your monitor │ 5 About your monitor Package contents Your monitor ships with the components indicated in the table. Ensure that you have received all the components and see Contact Dell if anything is missing. NOTE: Some items may be optional and may not ship with your monitor. Some features m...
Page 6 - Quick Start Guide; Product features; : Wide viewing angles of 178 degrees in vertical and
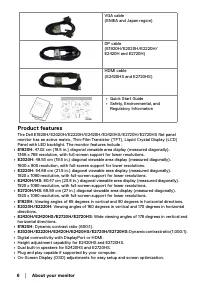
6 │ About your monitor VGA cable(EMEA and Japan region) DP cable (E1920H/E2020H/E2220H/E2420H and E2720H) HDMI cable (E2420HS and E2720HS) • Quick Start Guide • Safety, Environmental, and Regulatory Information Product features The Dell E1920H/E2020H/E2220H/E2420H/E2420HS/E2720H/E2720HS flat panel m...
Page 7 - Optimize eye comfort with a flicker-free screen.; Identifying features and controls; Front view; Label; Function buttons; Using the front
About your monitor │ 7 • ≤ 0.3 W in Standby Mode. • Optimize eye comfort with a flicker-free screen. • Possible long-term effects if blue light emission from the monitor may cause damage to the eyes, including eye fatigue or digital eye strain. ComfortView feature to reduce risk of eye strain from h...
Page 8 - Back view; Side view
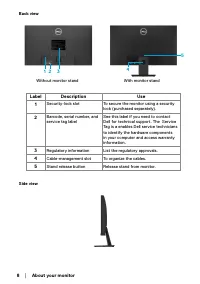
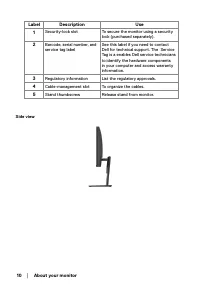
8 │ About your monitor Back view With monitor stand 5 4 Without monitor stand 1 3 2 Label Description Use 1 Security-lock slot To secure the monitor using a security lock (purchased separately). 2 Barcode, serial number, and service tag label See this label if you need to contact Dell for technical ...
Page 9 - Without monitor stand
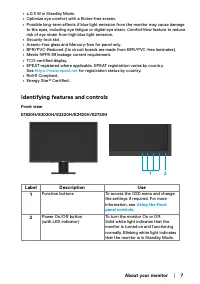
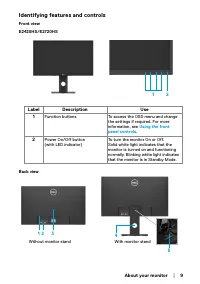
About your monitor │ 9 Identifying features and controls Front view E2420HS/E2720HS 1 2 Label Description Use 1 Function buttons To access the OSD menu and change the settings if required. For more information, see Using the front panel controls . 2 Power On/Off button(with LED indicator) To turn th...
Page 11 - Bottom view, without monitor stand
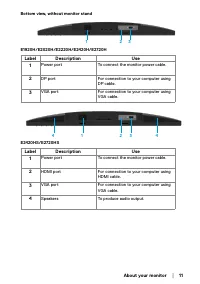
About your monitor │ 11 Bottom view, without monitor stand 1 3 2 E1920H/E2020H/E2220H/E2420H/E2720H Label Description Use 1 Power port To connect the monitor power cable. 2 DP port For connection to your computer using DP cable. 3 VGA port For connection to your computer using VGA cable. 1 3 4 4 2 E...
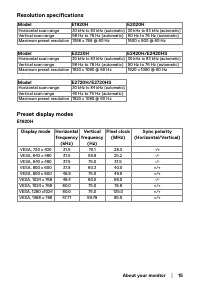
Page 12 - Monitor specifications; Model
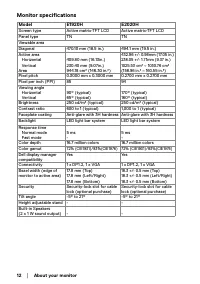
12 │ About your monitor Monitor specifications Model E1920H E2020H Screen type Active matrix-TFT LCD Active matrix-TFT LCD Panel type TN TN Viewable areaDiagonal 470.10 mm (18.5 in.) 494.1 mm (19.5 in.) Active area Horizontal VerticalArea 409.80 mm (16.13in.) 230.40 mm (9.07in.) 944.18 cm² (146.30 i...
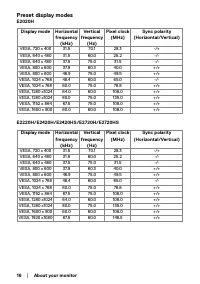
Page 16 - Preset display modes
16 │ About your monitor Preset display modes E2020H Display mode Horizontal frequency (kHz) Vertical frequency (Hz) Pixel clock (MHz) Sync polarity (Horizontal/Vertical) VESA, 720 x 400 31.5 70.1 28.3 -/+ VESA, 640 x 480 31.5 60.0 25.2 -/- VESA, 640 x 480 37.5 75.0 31.5 -/- VESA, 800 x 600 37.9 60.3...
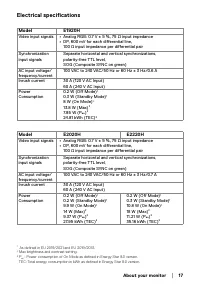
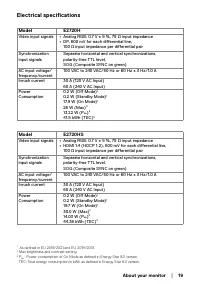
Page 17 - Electrical specifications
About your monitor │ 17 Electrical specifications Model E1920H Video input signals • Analog RGB: 0.7 V ± 5 %, 75 Ω input impedance • DP, 600 mV for each differential line, 100 Ω input impedance per differential pair Synchronization input signals Separate horizontal and vertical synchronizations,pola...
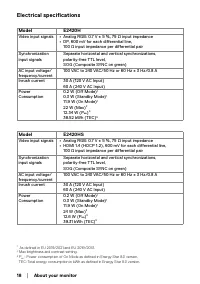
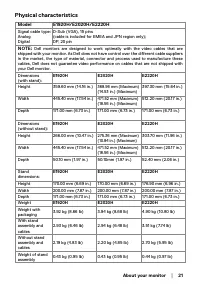
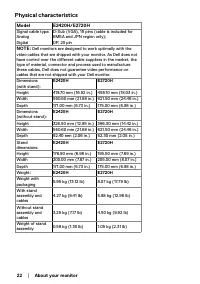
Page 21 - Physical characteristics
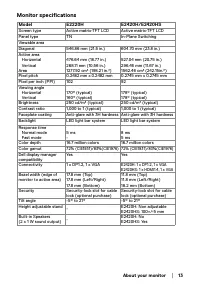
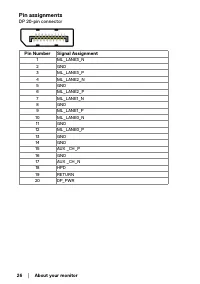
About your monitor │ 21 Physical characteristics Model E1920H/E2020H/E2220H Signal cable type: Analog Digital D-Sub (VGA), 15 pins(cable is included for EMEA and JPN region only);DP, 20 pin NOTE: Dell monitors are designed to work optimally with the video cables that are shipped with your monitor. A...
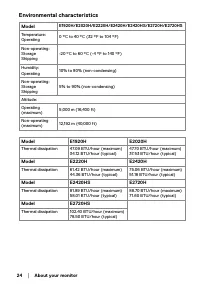
Page 24 - Environmental characteristics; Thermal dissipation
24 │ About your monitor Environmental characteristics Model E1920H/E2020H/E2220H/E2420H/E2420HS/E2720H/E2720HS Temperature:Operating 0 °C to 40 °C (32 °F to 104 °F) Non-operating:StorageShipping -20 °C to 60 °C (-4 °F to 140 °F) Humidity:Operating 10% to 80% (non-condensing) Non-operating:StorageShi...
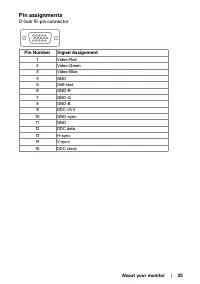
Page 25 - Pin assignments; Pin Number; GND
About your monitor │ 25 Pin assignments D-Sub 15-pin connector Pin Number Signal Assignment 1 Video-Red 2 Video-Green 3 Video-Blue 4 GND 5 Self-test 6 GND-R 7 GND-G 8 GND-B 9 DDC +5 V 10 GND-sync 11 GND 12 DDC data 13 H-sync 14 V-sync 15 DDC clock
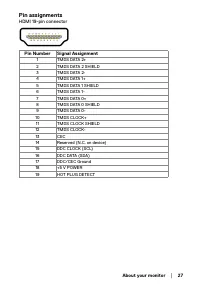
Page 27 - HDMI 19-pin connector
About your monitor │ 27 Pin assignments HDMI 19-pin connector Pin Number Signal Assignment 1 TMDS DATA 2+ 2 TMDS DATA 2 SHIELD 3 TMDS DATA 2- 4 TMDS DATA 1+ 5 TMDS DATA 1 SHIELD 6 TMDS DATA 1- 7 TMDS DATA 0+ 8 TMDS DATA 0 SHIELD 9 TMDS DATA 0- 10 TMDS CLOCK+ 11 TMDS CLOCK SHIELD 12 TMDS CLOCK- 13 CE...
Page 28 - Plug and play capability; Operating your monitor; LCD monitor quality and pixel policy; Cleaning your monitor
28 │ About your monitor Plug and play capability You can install the monitor in any Plug and Play-compatible system. The monitor automatically provides the computer with its Extended Display Identification Data (EDID) using Display Data Channel (DDC) protocols so the computer can configure itself an...
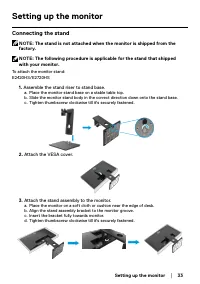
Page 29 - Setting up the monitor; Connecting the stand; NOTE: The stand is not attached when the monitor is shipped from the; Assemble the stand riser to stand base.
Setting up the monitor │ 29 Setting up the monitor Connecting the stand NOTE: The stand is not attached when the monitor is shipped from the factory. NOTE: The following procedure is applicable for the stand that shipped with your monitor. To attach the monitor stand:E1920H/E2020H 1. Assemble the st...
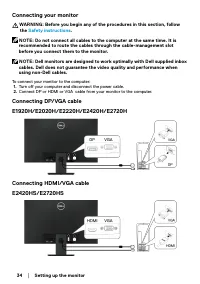
Page 34 - Connecting your monitor; the; To connect your monitor to the computer:; Connecting DP/VGA cable
34 │ Setting up the monitor Connecting your monitor WARNING: Before you begin any of the procedures in this section, follow the Safety instructions . NOTE: Do not connect all cables to the computer at the same time. It is recommended to route the cables through the cable-management slot before you c...
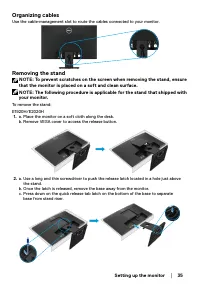
Page 35 - Organizing cables; that the monitor is placed on a soft and clean surface.
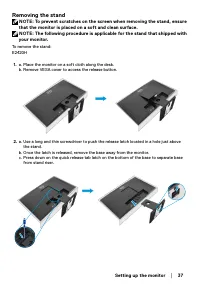
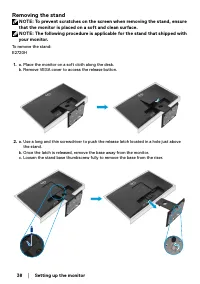
Setting up the monitor │ 35 Organizing cables Use the cable-management slot to route the cables connected to your monitor. Removing the stand NOTE: To prevent scratches on the screen when removing the stand, ensure that the monitor is placed on a soft and clean surface. NOTE: The following procedure...
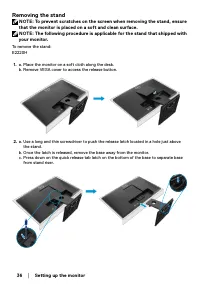
Page 36 - Removing the stand
36 │ Setting up the monitor Removing the stand NOTE: To prevent scratches on the screen when removing the stand, ensure that the monitor is placed on a soft and clean surface. NOTE: The following procedure is applicable for the stand that shipped with your monitor. To remove the stand:E2220H 1. a. P...
Page 39 - Slide the stand out of the monitor completely.
Setting up the monitor │ 39 Removing the stand NOTE: To prevent scratches on the screen when removing the stand, ensure that the monitor is placed on a soft and clean surface. NOTE: The following procedure is applicable for the stand that shipped with your monitor. To remove the stand:E2420HS/E2720H...
Page 40 - Attach the mounting bracket from the wall mounting kit to the LCD.
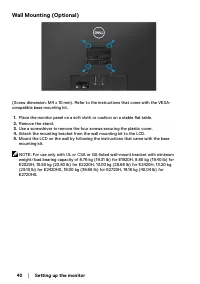
40 │ Setting up the monitor Wall Mounting (Optional) (Screw dimension: M4 x 10 mm). Refer to the instructions that come with the VESA-compatible base mounting kit. 1. Place the monitor panel on a soft cloth or cushion on a stable flat table. 2. Remove the stand. 3. Use a screwdriver to remove the fo...
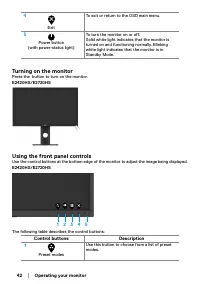
Page 41 - Turning on the monitor; Press the button to turn on the monitor.; Using the front panel controls; The following table describes the control buttons:; Control buttons; Preset modes; Accessing the
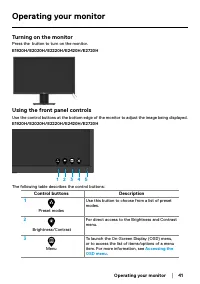
Operating your monitor │ 41 Operating your monitor Turning on the monitor Press the button to turn on the monitor. E1920H/E2020H/E2220H/E2420H/E2720H Using the front panel controls Use the control buttons at the bottom edge of the monitor to adjust the image being displayed. E1920H/E2020H/E2220H/E24...
Page 43 - OSD controls
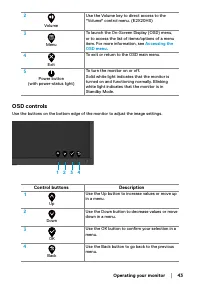
Operating your monitor │ 43 2 Volume Use the Volume key to direct access to the "Volume" control menu. (E2X20HS) 3 Menu To launch the On-Screen Display (OSD) menu, or to access the list of items/options of a menu item. For more information, see Accessing the OSD menu . 4 Exit To exit or retu...
Page 45 - Brightness
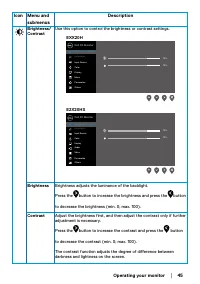
Operating your monitor │ 45 Icon Menu and submenus Description Brightness/Contrast Use this option to control the brightness or contrast settings. Dell XX Monitor Brightness / Contrast Auto Adjust Input Source 75% 75% Color Display Menu Personalize Others EXX20H Dell 2X Monitor Brightness / Contrast...
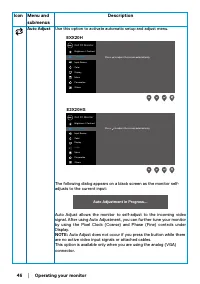
Page 46 - Use this option to activate automatic setup and adjust menu.; Auto Adjust does not occur if you press the button while there
46 │ Operating your monitor Icon Menu and submenus Description Auto Adjust Use this option to activate automatic setup and adjust menu. EXX20H Dell XX Monitor Brightness / Contrast Auto Adjust Input Source Color Display Menu Personalize Others Press to adjust the screen automatically E2X20HS Dell 2X...
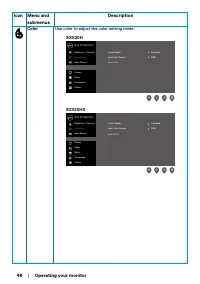
Page 48 - Color; Use color to adjust the color setting mode.
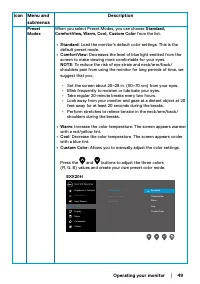
48 │ Operating your monitor Icon Menu and submenus Description Color Use color to adjust the color setting mode. Dell XX Monitor Brightness / Contrast Auto Adjust Input Source Color Display Menu Personalize Others Preset Modes Input Color Format Reset Color Standard RGB EXX20H Dell 2X Monitor Bright...
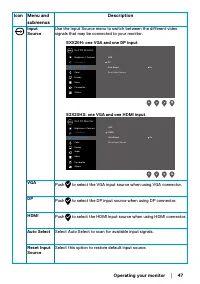
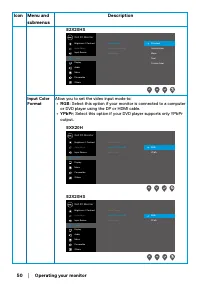
Page 50 - Allow you to set the video input mode to:; • RGB; : Select this option if your monitor is connected to a computer; • YPbPr; : Select this option if your DVD player supports only YPbPr
50 │ Operating your monitor Icon Menu and submenus Description E2X20HS Dell 2X Monitor Brightness / Contrast Auto Adjust Input Source Color Display Menu Audio Personalize Others Preset Modes Input Color Format Reset Color Standard Warm Cool ComfortView Custom Color Input Color Format Allow you to se...
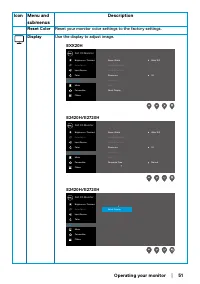
Page 51 - Reset Color; Reset your monitor color settings to the factory settings.; Display; Use the display to adjust image.
Operating your monitor │ 51 Icon Menu and submenus Description Reset Color Reset your monitor color settings to the factory settings. Display Use the display to adjust image. Dell XX Monitor Brightness / Contrast Auto Adjust Input Source Color Aspect Ratio Horizontal Position Vertical Position Sharp...
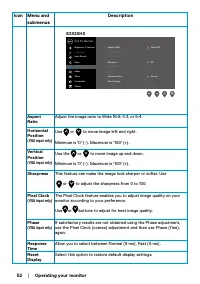
Page 52 - Sharpness
52 │ Operating your monitor Icon Menu and submenus Description E2X20HS Dell 2X Monitor Brightness / Contrast Auto Adjust Input Source Color Display Menu Audio Personalize Others Aspect Ratio Wide 16:9 Horizontal Position Vertical Position Sharpness Pixel Clock Phase Response Time 50 Normal Reset Dis...
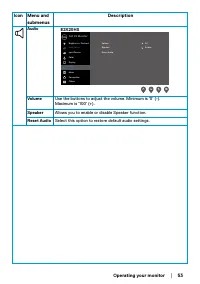
Page 53 - Audio; Volume; Allows you to enable or disable Speaker function.; Reset Audio; Select this option to restore default audio settings.
Operating your monitor │ 53 Icon Menu and submenus Description Audio E2X20HS Dell 2X Monitor Brightness / Contrast Auto Adjust Input Source Color Display Menu Audio Personalize Others Volume 50 Speaker Reset Audio Enable Volume Use the buttons to adjust the volume. Minimum is ‘0’ (-).Maximum is ‘100...
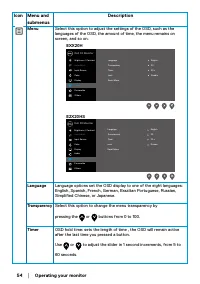
Page 54 - Menu; Language
54 │ Operating your monitor Icon Menu and submenus Description Menu Select this option to adjust the settings of the OSD, such as the languages of the OSD, the amount of time, the menu remains on screen, and so on. Dell XX Monitor Brightness / Contrast Auto Adjust Input Source Color Display Menu Per...
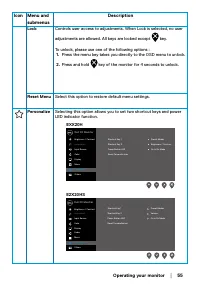
Page 55 - Lock
Operating your monitor │ 55 Icon Menu and submenus Description Lock Controls user access to adjustments. When Lock is selected, no user adjustments are allowed. All keys are locked except key. To unlock, please use one of the following options : 1. Press the menu key takes you directly to the OSD me...
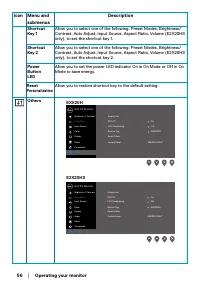
Page 56 - Allow you to restore shortcut key to the default setting.; Others
56 │ Operating your monitor Icon Menu and submenus Description Shortcut Key 1 Allow you to select one of the following: Preset Modes, Brightness/Contrast, Auto Adjust, Input Source, Aspect Ratio, Volume (E2X20HS only), to set the shortcut key 1. Shortcut Key 2 Allow you to select one of the followin...
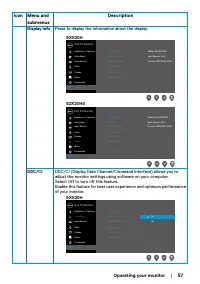
Page 57 - Display Info; Press to display the information about the display.
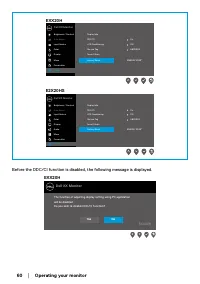
Operating your monitor │ 57 Icon Menu and submenus Description Display Info Press to display the information about the display. EXX20H Dell XX Monitor Brightness / Contrast Auto Adjust Input Source Color Display Menu Personalize Others Display Info DDC/CI LCD Conditioning Service Tag Reset Others Fa...
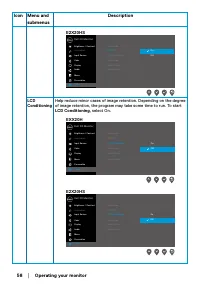
Page 58 - LCD Conditioning
58 │ Operating your monitor Icon Menu and submenus Description Dell 2X Monitor Brightness / Contrast Auto Adjust Input Source Color Display Menu Audio Personalize Others Display Info DDC/CI LCD Conditioning Service Tag Reset Others Factory Reset On Off E2X20HS LCDConditioning Help reduce minor cases...
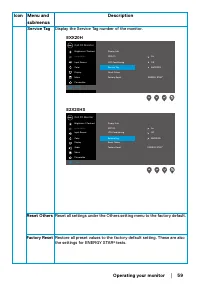
Page 59 - Service Tag; Display the Service Tag number of the monitor.; Reset Others
Operating your monitor │ 59 Icon Menu and submenus Description Service Tag Display the Service Tag number of the monitor. EXX20H Dell XX Monitor Brightness / Contrast Auto Adjust Input Source Color Display Menu Personalize Others Display Info DDC/CI LCD Conditioning Reset Others Factory Reset Servic...
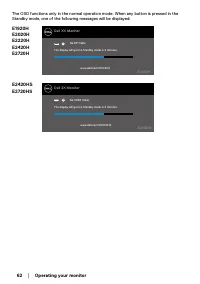
Page 63 - See; Troubleshooting; for more information.
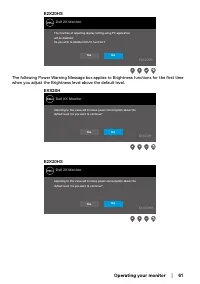
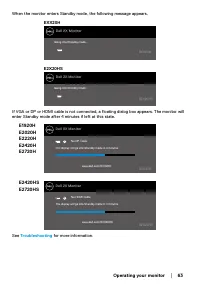
Operating your monitor │ 63 When the monitor enters Standby mode, the following message appears. Dell XX Monitor Going into Standby mode… EXX20H EXX20H Dell 2X Monitor Going into Standby mode… E2X20HS E2X20HS If VGA or DP or HDMI cable is not connected, a floating dialog box appears. The monitor wil...
Page 64 - Setting up display resolution on your monitor; Dell computer
64 │ Operating your monitor Setting up display resolution on your monitor E1920H Setting display resolution to 1366 x 768 For best performance, set the display resolution to 1366 x 768 pixels by performing the following steps: In Windows 7: 1. Right-click on the desktop and click Screen Resolution ....
Page 65 - Change Display Settings.
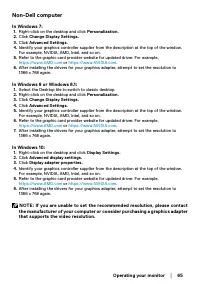
Operating your monitor │ 65 Non-Dell computer In Windows 7: 1. Right-click on the desktop and click Personalization. 2. Click Change Display Settings. 3. Click Advanced Settings. 4. Identify your graphics controller supplier from the description at the top of the window.For example, NVIDIA, AMD, Int...
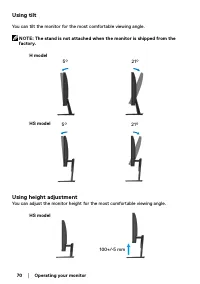
Page 70 - Using tilt; You can tilt the monitor for the most comfortable viewing angle.; Using height adjustment; HS model
70 │ Operating your monitor Using tilt You can tilt the monitor for the most comfortable viewing angle. NOTE: The stand is not attached when the monitor is shipped from the factory. H model 5° 21° HS model 5° 21° Using height adjustment You can adjust the monitor height for the most comfortable view...
Page 71 - Turn off both your computer and the monitor.
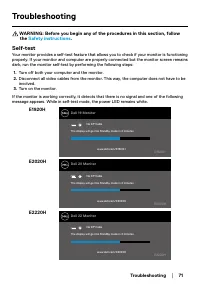
Troubleshooting │ 71 Troubleshooting WARNING: Before you begin any of the procedures in this section, follow the Safety instructions . Self-test Your monitor provides a self-test feature that allows you to check if your monitor is functioning properly. If your monitor and computer are properly conne...
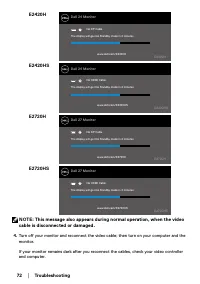
Page 72 - cable is disconnected or damaged.
72 │ Troubleshooting E2420HS Dell 24 Monitor No HDMI Cable www.dell.com/E2420HS The display will go into Standby mode in 4 minutes. E2420HS ? E2720HS Dell 27 Monitor No HDMI Cable www.dell.com/E2720HS The display will go into Standby mode in 4 minutes. E2720HS ? E2420H Dell 24 Monitor No DP Cable ww...
Page 73 - Button 1
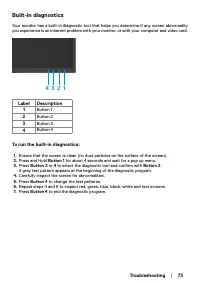
Troubleshooting │ 73 Built-in diagnostics Your monitor has a built-in diagnostic tool that helps you determine if any screen abnormality you experience is an inherent problem with your monitor, or with your computer and video card. 4 3 2 1 Label Description 1 Button 1 2 Button 2 3 Button 3 4 Button ...
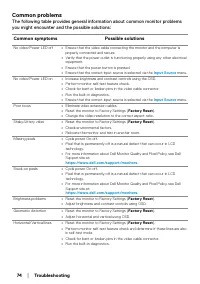
Page 74 - Common problems; Common symptoms; Input Source
74 │ Troubleshooting Common problems The following table provides general information about common monitor problems you might encounter and the possible solutions: Common symptoms Possible solutions No video/Power LED off • Ensure that the video cable connecting the monitor and the computer is prope...
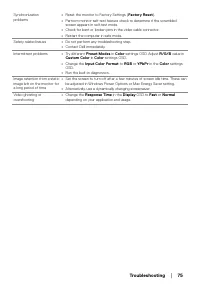
Page 76 - Product-specific problems; Specific symptoms; Aspect Ratio; Factory Reset
76 │ Troubleshooting Product-specific problems Specific symptoms Possible solutions Screen image is too small • Check the Aspect Ratio setting in the Display settings OSD. • Reset the monitor to Factory Settings ( Factory Reset ). Cannot adjust the monitor with the buttons on the bottom of the panel...
Page 77 - Appendix; Safety instructions; NOTE: If you do not have an active Internet connection, you can find; To get online Monitor support content, visit
Appendix │ 77 Appendix Safety instructions WARNING: Use of controls, adjustments, or procedures other than those specified in this documentation may result in exposure to shock, electrical hazards, and/or mechanical hazards. For information on safety instructions, see the Product Information Guide. ...


 Dell AW2523HF
User Manual
Dell AW2523HF
User Manual
 Dell C2722DE
User Manual
Dell C2722DE
User Manual
 Dell E2424HS (210-BGPJ)
User Manual
Dell E2424HS (210-BGPJ)
User Manual
 Dell E2724HS (210-BGQG)
User Manual
Dell E2724HS (210-BGQG)
User Manual
 Dell G3223Q (210-BDXS)
User Manual
Dell G3223Q (210-BDXS)
User Manual
 Dell P2422H (210-AZYX-10MT21)
User Manual
Dell P2422H (210-AZYX-10MT21)
User Manual
 Dell P2723D (210-BDDX)
User Manual
Dell P2723D (210-BDDX)
User Manual
 Dell S2722DZ (210-BBSK)
User Manual
Dell S2722DZ (210-BBSK)
User Manual
 Dell U2414H
Manual
Dell U2414H
Manual
 Dell U2515H
Manual
Dell U2515H
Manual
 Dell S2340L
Manual
Dell S2340L
Manual