Page 3 - Contents
| 3 Contents Safety instructions . . . . . . . . . . . . . . . . . . . . . . . . . . . . . . 6About your monitor . . . . . . . . . . . . . . . . . . . . . . . . . . . . . 7 Package contents . . . . . . . . . . . . . . . . . . . . . . . . . 7Product features . . . . . . . . . . . . . . . . . . . . . ...
Page 4 - | Contents
4 | Contents Tilt, swivel and vertical extension . . . . . . . . . . . . . . . . . . . . . . 44 Rotating the Display (C2422HE/C2722DE only) . . . . . . . . 45Configuring the display settings on your computer after rotation (C2422HE/C2722DE only) . . . . . . . . . . . . . . . 46Operating the monitor ...
Page 5 - Contents |; Teams
Contents | 5 Troubleshooting . . . . . . . . . . . . . . . . . . . . . . . . . . . . . . 106 Self-test . . . . . . . . . . . . . . . . . . . . . . . . . . . . . 106Built-in diagnostics . . . . . . . . . . . . . . . . . . . . . . . 107Common Problems. . . . . . . . . . . . . . . . . . . . . . . . 108...
Page 6 - | Safety instructions; Safety instructions; and can be damaged if dropped or hit sharply.
6 | Safety instructions Safety instructions WARNING: Use of controls, adjustments, or procedures other than those specified in this documentation may result in exposure to shock, electrical hazards, and/or mechanical hazards. • Place the monitor on a solid surface and handle it carefully. The screen...
Page 7 - About your monitor; Package contents; Contact Dell; Display
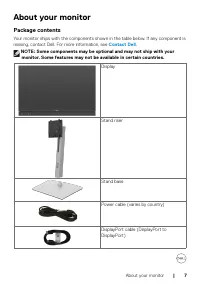
About your monitor | 7 About your monitor Package contents Your monitor ships with the components shown in the table below. If any component is missing, contact Dell. For more information, see Contact Dell . NOTE: Some components may be optional and may not ship with your monitor. Some features may ...
Page 8 - Product features
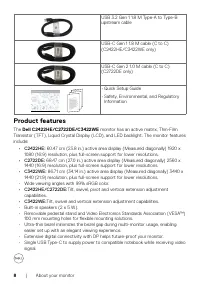
8 | About your monitor USB 3.2 Gen 1 1.8 M Type-A to Type-B upstream cable USB-C Gen 1 1.8 M cable (C to C) (C2422HE/C3422WE only) USB-C Gen 2 1.0 M cable (C to C)(C2722DE only) • Quick Setup Guide• Safety, Environmental, and Regulatory Information Product features The Dell C2422HE/C2722DE/C3422WE m...
Page 10 - | About your monitor; Identifying parts and controls; Front view; Microphones
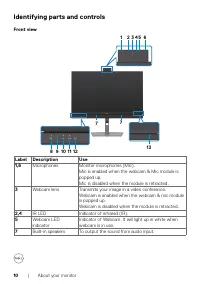
10 | About your monitor Identifying parts and controls Front view 13 8 9 10 11 12 7 7 1 2 3 4 5 6 Label Description Use 1,6 Microphones Monitor microphones (Mic). Mic is enabled when the webcam & Mic module is popped up. Mic is disabled when the module is retracted. 3 Webcam lens Transmits your ...
Page 14 - Monitor specifications; Model
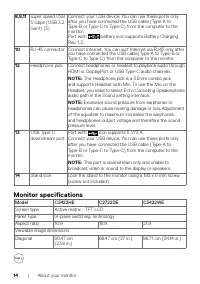
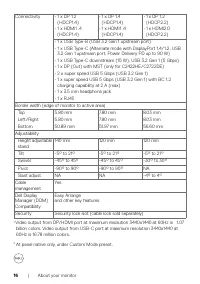
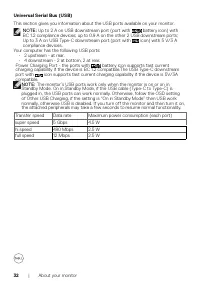
14 | About your monitor 8,9,11 super speed USB 5 Gbps (USB 3.2 Gen1) (3) Connect your USB device. You can use these ports only after you have connected the USB cable (Type-A to Type-B or Type-C to Type-C) from the computer to the monitor. Port with battery icon supports Battery Charging Rev. 1.2. 10...
Page 17 - Resolution specifications
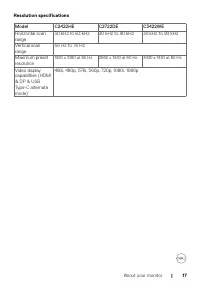
About your monitor | 17 Resolution specifications Model C2422HE C2722DE C3422WE Horizontal scan range 30 kHz to 83 kHz 30 kHz to 90 kHz 30 kHz to 90 kHz Vertical scan range 56 Hz to 76 Hz Maximum preset resolution 1920 x 1080 at 60 Hz 2560 x 1440 at 60 Hz 3440 x 1440 at 60 Hz Video display capabilit...
Page 18 - Display mode
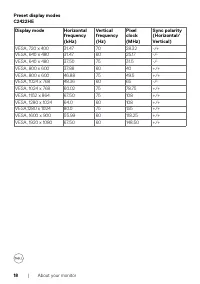
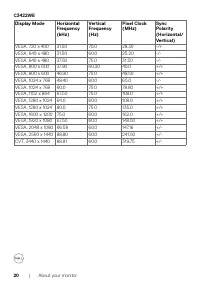
18 | About your monitor Preset display modesC2422HE Display mode Horizontal frequency (kHz) Vertical frequency (Hz) Pixel clock (MHz) Sync polarity (Horizontal/Vertical) VESA, 720 x 400 31.47 70 28.32 -/+ VESA, 640 x 480 31.47 60 25.17 -/- VESA, 640 x 480 37.50 75 31.5 -/- VESA, 800 x 600 37.88 60 4...
Page 19 - Display Mode
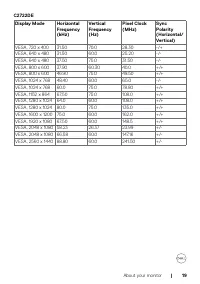
About your monitor | 19 C2722DE Display Mode Horizontal Frequency (kHz) Vertical Frequency (Hz) Pixel Clock (MHz) Sync Polarity (Horizontal/Vertical) VESA, 720 x 400 31.50 70.0 28.30 -/+ VESA, 640 x 480 31.50 60.0 25.20 -/- VESA, 640 x 480 37.50 75.0 31.50 -/- VESA, 800 x 600 37.90 60.30 40.0 +/+ VE...
Page 21 - Maximum number of external monitors that can be
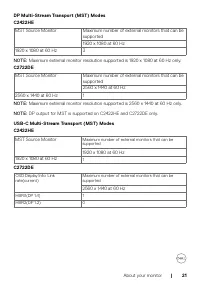
About your monitor | 21 DP Multi-Stream Transport (MST) ModesC2422HE MST Source Monitor Maximum number of external monitors that can be supported1920 x 1080 at 60 Hz 1920 x 1080 at 60 Hz 3 NOTE: Maximum external monitor resolution supported is 1920 x 1080 at 60 Hz only. C2722DE MST Source Monitor Ma...
Page 22 - Unified Communications (UC) Platform Compatibility List
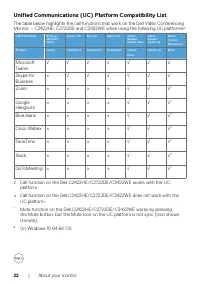
22 | About your monitor Unified Communications (UC) Platform Compatibility List The table below highlights the call functions that work on the Dell Video Conferencing Monitor – C2422HE, C2722DE and C3422WE when using the following UC platforms # . Call Functions Bring up Microsoft Teams Answer call ...
Page 23 - Electrical specifications; : Power consumption of On Mode as defined in Energy Star 8.0 version.
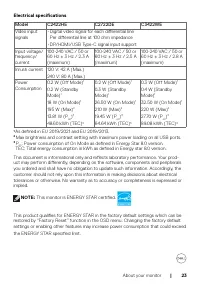
About your monitor | 23 Electrical specifications Model C2422HE C2722DE C3422WE Video input signals • Digital video signal for each differential line Per differential line at 100 ohm impedance • DP/HDMI/USB Type-C signal input support Input voltage/ frequency/current 100-240 VAC / 50 or 60 Hz ± 3 Hz...
Page 24 - Physical characteristics; Connector type
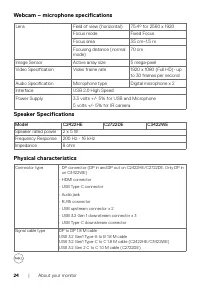
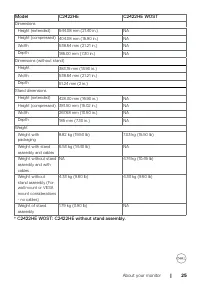
24 | About your monitor Webcam – microphone specifications Lens Field of view (horizontal) 75.4° for 2560 x 1920 Focus mode Fixed Focus Focus area 35 cm~1.5 m Focusing distance (normal mode) 70 cm Image Sensor Active array size 5 mega-pixel Video Specification Video frame rate 1920 x 1080 (Full HD)-...
Page 27 - Environmental characteristics
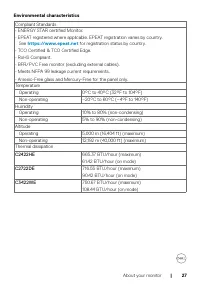
About your monitor | 27 Environmental characteristics Compliant Standards• ENERGY STAR certified Monitor.• EPEAT registered where applicable. EPEAT registration varies by country. See https://www.epeat.net for registration status by country. • TCO Certified & TCO Certified Edge.• RoHS Compliant....
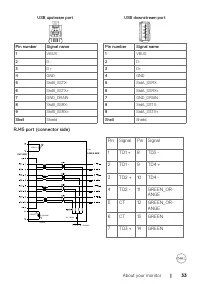
Page 28 - Pin assignments
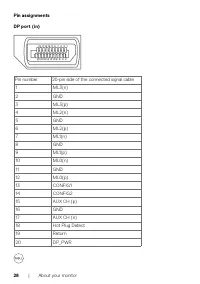
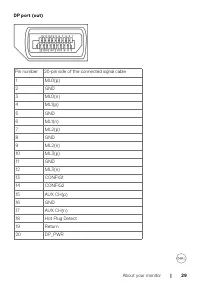
28 | About your monitor Pin assignments DP port (in) Pin number 20-pin side of the connected signal cable 1 ML3(n) 2 GND 3 ML3(p) 4 ML2(n) 5 GND 6 ML2(p) 7 ML1(n) 8 GND 9 ML1(p) 10 ML0(n) 11 GND 12 ML0(p) 13 CONFIG1 14 CONFIG2 15 AUX CH (p) 16 GND 17 AUX CH (n) 18 Hot Plug Detect 19 Return 20 DP_PWR
Page 30 - HDMI port
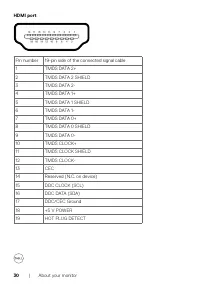
30 | About your monitor HDMI port Pin number 19-pin side of the connected signal cable 1 TMDS DATA 2+ 2 TMDS DATA 2 SHIELD 3 TMDS DATA 2- 4 TMDS DATA 1+ 5 TMDS DATA 1 SHIELD 6 TMDS DATA 1- 7 TMDS DATA 0+ 8 TMDS DATA 0 SHIELD 9 TMDS DATA 0- 10 TMDS CLOCK+ 11 TMDS CLOCK SHIELD 12 TMDS CLOCK- 13 CEC 14...
Page 35 - RJ45 Connector LED status:; LED
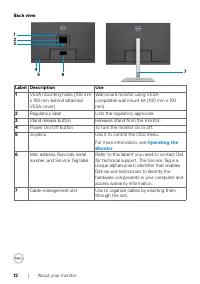
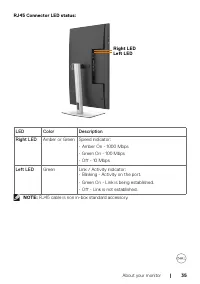
About your monitor | 35 RJ45 Connector LED status: Left LED Right LED LED Color Description Right LED Amber or Green Speed indicator: • Amber On - 1000 Mbps• Green On - 100 Mbps• Off - 10 Mbps Left LED Green Link / Activity indicator:• Blinking - Activity on the port.• Green On - Link is being estab...
Page 36 - Operating the Monitor; LCD monitor quality and pixel policy
36 | About your monitor Plug-and-Play You can install the monitor in any Plug-and-Play-compatible system. The monitor automatically provides the computer system with its extended display identification data (EDID) using display data channel (DDC) protocols so the computer can configure itself and op...
Page 37 - Ergonomics; result in eye strain.; prolonged usage of the monitor.
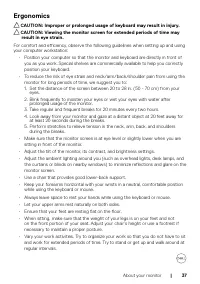
About your monitor | 37 Ergonomics CAUTION: Improper or prolonged usage of keyboard may result in injury. CAUTION: Viewing the monitor screen for extended periods of time may result in eye strain. For comfort and efficiency, observe the following guidelines when setting up and using your computer wo...
Page 39 - Handling and moving your display; excessive pressure when lifting or moving the monitor.
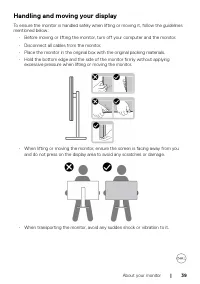
About your monitor | 39 Handling and moving your display To ensure the monitor is handled safely when lifting or moving it, follow the guidelines mentioned below: • Before moving or lifting the monitor, turn off your computer and the monitor.• Disconnect all cables from the monitor.• Place the monit...
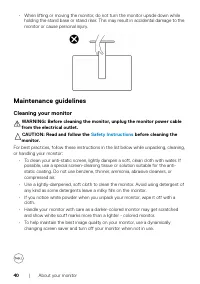
Page 40 - Maintenance guidelines; Cleaning your monitor; from the electrical outlet.; any kind as some detergents leave a milky film on the monitor.
40 | About your monitor • When lifting or moving the monitor, do not turn the monitor upside down while holding the stand base or stand riser. This may result in accidental damage to the monitor or cause personal injury. Maintenance guidelines Cleaning your monitor WARNING: Before cleaning the monit...
Page 41 - Setting up the monitor; Connecting the stand; shipped from the factory.; Align and place the stand riser on the stand base.
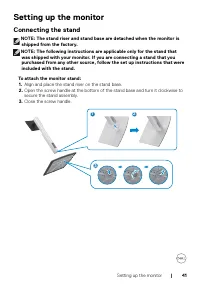
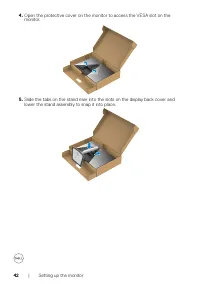
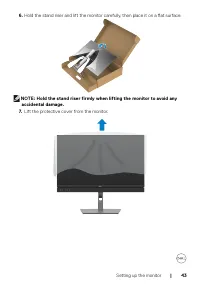
Setting up the monitor | 41 Setting up the monitor Connecting the stand NOTE: The stand riser and stand base are detached when the monitor is shipped from the factory. NOTE: The following instructions are applicable only for the stand that was shipped with your monitor. If you are connecting a stand...
Page 44 - | Setting up the monitor; Using the tilt, swivel, and vertical extension; Tilt, swivel and vertical extension
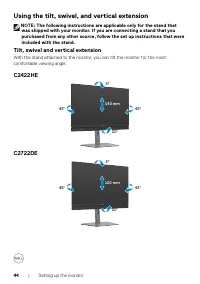
44 | Setting up the monitor Using the tilt, swivel, and vertical extension NOTE: The following instructions are applicable only for the stand that was shipped with your monitor. If you are connecting a stand that you purchased from any other source, follow the set up instructions that were included ...
Page 45 - NOTE: The stand is detached when the monitor is shipped from the; and search for the
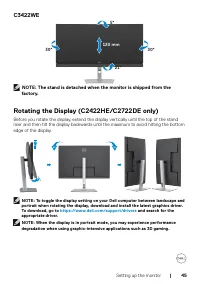
Setting up the monitor | 45 C3422WE 5° 120 mm 21° 30° 30° NOTE: The stand is detached when the monitor is shipped from the factory. Rotating the Display (C2422HE/C2722DE only) Before you rotate the display, extend the display vertically until the top of the stand riser and then tilt the display back...
Page 46 - Configuring the display settings on your computer after
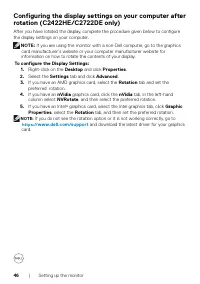
46 | Setting up the monitor Configuring the display settings on your computer after rotation (C2422HE/C2722DE only) After you have rotated the display, complete the procedure given below to configure the display settings on your computer. NOTE: If you are using the monitor with a non-Dell computer, ...
Page 47 - Operating the monitor webcam
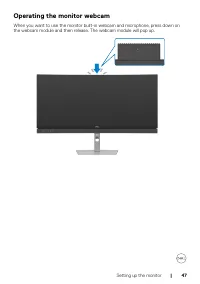
Setting up the monitor | 47 Operating the monitor webcam When you want to use the monitor built-in webcam and microphone, press down on the webcam module and then release. The webcam module will pop up.
Page 48 - Connecting your monitor; the; Turn off your computer.; product specific problems – No image
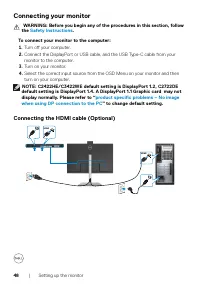
48 | Setting up the monitor Connecting your monitor WARNING: Before you begin any of the procedures in this section, follow the Safety Instructions . To connect your monitor to the computer: 1. Turn off your computer. 2. Connect the DisplayPort or USB cable, and the USB Type-C cable from your monito...
Page 49 - Connecting the DP cable; NOTE: Supports the DP MST feature. To make use of this feature, your PC
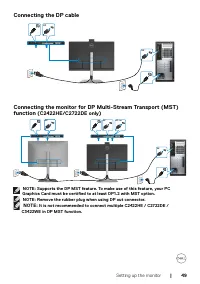
Setting up the monitor | 49 Connecting the DP cable DP DP Connecting the monitor for DP Multi-Stream Transport (MST) function ( C2422HE/C2722DE only ) DP DP out DP DP NOTE: Supports the DP MST feature. To make use of this feature, your PC Graphics Card must be certified to at least DP1.2 with MST op...
Page 50 - Connecting the USB cable; Connecting the USB Type-C cable; Maximum charging power
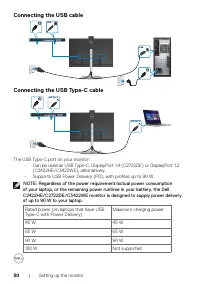
50 | Setting up the monitor Connecting the USB cable USB USB USB Connecting the USB Type-C cable USB Type-C USB Type-C The USB Type-C port on your monitor: • Can be used as USB Type-C, DisplayPort 1.4 (C2722DE) or DisplayPort 1.2 (C2422HE/C3422WE), alternatively. • Supports USB Power Delivery (PD), ...
Page 51 - Connecting the monitor for USB-C Multi-Stream Transport; product; Connecting the monitor for RJ45 Cable (Optional)
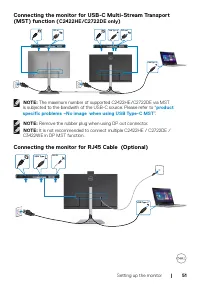
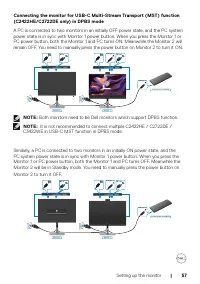
Setting up the monitor | 51 Connecting the monitor for USB-C Multi-Stream Transport (MST) function ( C2422HE/C2722DE only ) DP out USB Type-C DP in USB Type-C NOTE: The maximum number of supported C2422HE/C2722DE via MST is subjected to the bandwith of the USB-C source. Please refer to “ product spe...
Page 52 - Control Panel
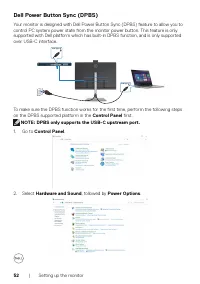
52 | Setting up the monitor Dell Power Button Sync (DPBS) Your monitor is designed with Dell Power Button Sync (DPBS) feature to allow you to control PC system power state from the monitor power button. This feature is only supported with Dell platform which has built-in DPBS function, and is only s...
Page 53 - System Settings; options for selection namely; Do nothing; , otherwise monitor power button cannot
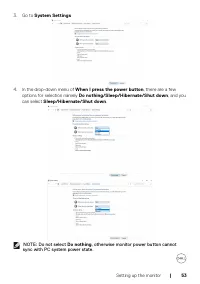
Setting up the monitor | 53 3. Go to System Settings 4. In the drop-down menu of When I press the power button , there are a few options for selection namely Do nothing/Sleep/Hibernate/Shut down , and you can select Sleep/Hibernate/Shut down . NOTE: Do not select Do nothing , otherwise monitor power...
Page 55 - Using DPBS function; Waking on the USB-C cable; Pressing the power button
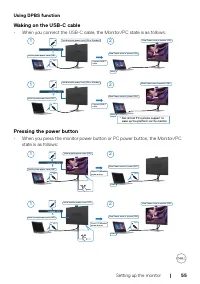
Setting up the monitor | 55 Using DPBS function Waking on the USB-C cable • When you connect the USB-C cable, the Monitor/PC state is as follows: New Power state of monitor (ON)* Initial monitor power state (ON or Standby) Initial monitor power state (ON or Standby) New Power state of monitor (ON) 1...
Page 56 - , the screen prompt will ask if you would; When the monitor and the PC power state are both ON,; press and hold the
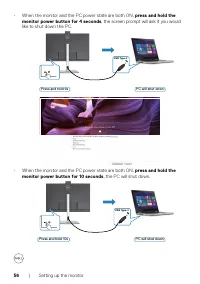
56 | Setting up the monitor • When the monitor and the PC power state are both ON, press and hold the monitor power button for 4 seconds , the screen prompt will ask if you would like to shut down the PC. Press and hold 4s USB Type-C PC will shut down Slide to shut down your PC • When the monitor an...
Page 58 - Connecting the monitor for USB-C in DPBS mode
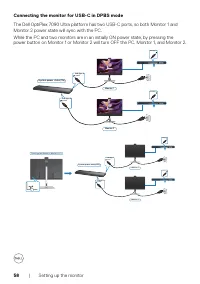
58 | Setting up the monitor Connecting the monitor for USB-C in DPBS mode The Dell OptiPlex 7090 Ultra platform has two USB-C ports, so both Monitor 1 and Monitor 2 power state will sync with the PC.While the PC and two monitors are in an initially ON power state, by pressing the power button on Mon...
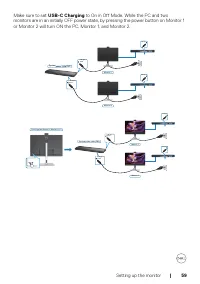
Page 60 - Organizing your cables; Connecting; for cable attachment) organize all cables as shown above.; Securing your monitor using Kensington lock (optional); The security lock slot is located at the bottom of the monitor. (See; Security lock
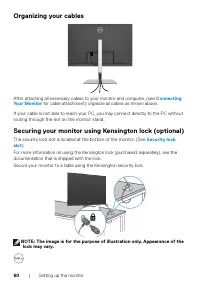
60 | Setting up the monitor Organizing your cables After attaching all necessary cables to your monitor and computer, (see Connecting Your Monitor for cable attachment) organize all cables as shown above. If your cable Is not able to reach your PC, you may connect directly to the PC without routing ...
Page 61 - Removing the monitor stand; To prevent scratches on the LCD screen when removing the; Place the monitor on a soft cloth or cushion.
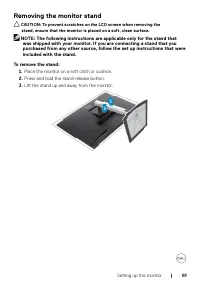
Setting up the monitor | 61 Removing the monitor stand CAUTION: To prevent scratches on the LCD screen when removing the stand, ensure that the monitor is placed on a soft, clean surface. NOTE: The following instructions are applicable only for the stand that was shipped with your monitor. If you ...
Page 62 - NOTE: Use M4 x 11 mm screws to connect the monitor to the wall-; Place the monitor on a soft cloth or cushion on a stable flat table.; NOTE: For use only with UL or CSA or GS-listed wall mount bracket with
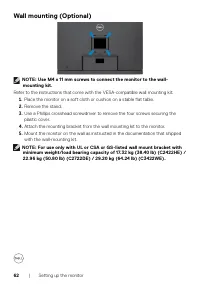
62 | Setting up the monitor Wall mounting (Optional) NOTE: Use M4 x 11 mm screws to connect the monitor to the wall- mounting kit. Refer to the instructions that come with the VESA-compatible wall mounting kit. 1. Place the monitor on a soft cloth or cushion on a stable flat table. 2. Remove the sta...
Page 63 - Operating the monitor; Power on the monitor; Joystick Description
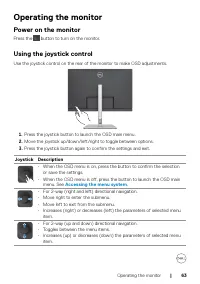
Operating the monitor | 63 Operating the monitor Power on the monitor Press the button to turn on the monitor. Using the joystick control Use the joystick control on the rear of the monitor to make OSD adjustments. 1. Press the joystick button to launch the OSD main menu. 2. Move the joystick up/dow...
Page 64 - Using the rear-panel controls; Accessing the menu system
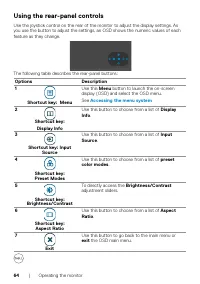
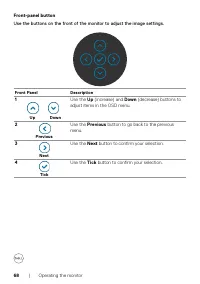
64 | Operating the monitor Using the rear-panel controls Use the joystick control on the rear of the monitor to adjust the display settings. As you use the button to adjust the settings, an OSD shows the numeric values of each feature as they change. Display Info The following table describes the re...
Page 65 - Using the OSD lock function; Select one of the following options.; The following message appears.; Select; Yes; the lock icon
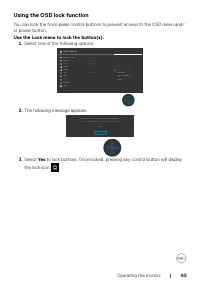
Operating the monitor | 65 Using the OSD lock function You can lock the front-panel control buttons to prevent access to the OSD menu and/or power button. Use the Lock menu to lock the button(s). 1. Select one of the following options. Power Button Menu + Power Buttons Disable Rotation Reset Menu Ti...
Page 66 - Options; Select this option to lock OSD menu function.; Power Button lock; Use this option to run the built-in diagnostics, see
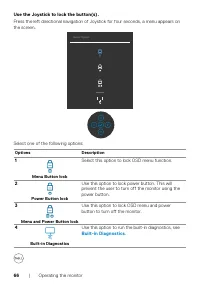
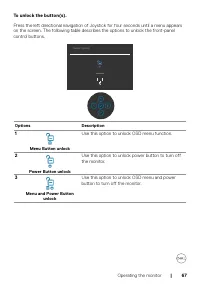
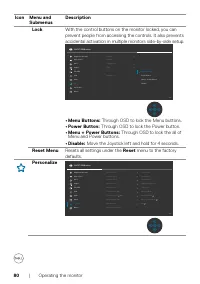
66 | Operating the monitor Use the Joystick to lock the button(s). Press the left directional navigation of Joystick for four seconds, a menu appears on the screen. Select Option: Select one of the following options: Options Description 1 Menu Button lock Select this option to lock OSD menu function...
Page 72 - Hue
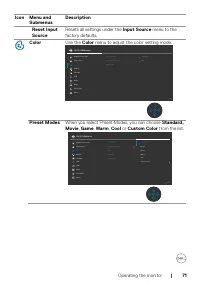
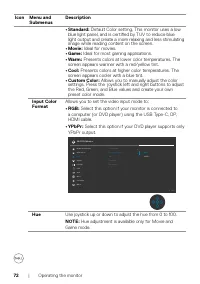
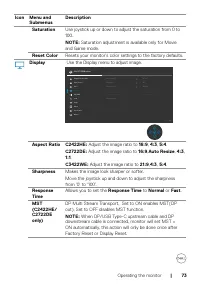
72 | Operating the monitor Icon Menu and Submenus Description • Standard: Default Color setting, This monitor uses a low blue light panel, and is certified by TUV to reduce blue light output and create a more relaxing and less stimulating image while reading content on the screen. • Movie: Ideal for...
Page 75 - Icon Menu and
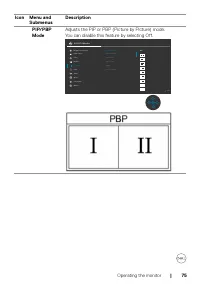
Operating the monitor | 75 Icon Menu and Submenus Description PIP/PBP Mode Adjusts the PIP or PBP (Picture by Picture) mode.You can disable this feature by selecting Off. Exit 24/27/34 Monitor Input Source Color Brightness/Contrast Display PIP/PBP Personalize Others Menu USB Audio PIP/PBP Mode Off P...
Page 76 - | Operating the monitor; Adjust the contrast level of the picture in PBP Mode.
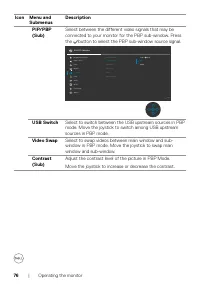
76 | Operating the monitor Icon Menu and Submenus Description PIP/PBP (Sub) Select between the different video signals that may be connected to your monitor for the PBP sub-window. Press the button to select the PBP sub-window source signal. Exit 24/27/34 Monitor Input Source Color Brightness/Contra...
Page 77 - To prevent data damage or loss, before changing
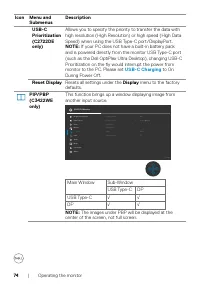
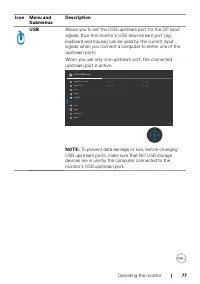
Operating the monitor | 77 Icon Menu and Submenus Description USB Allows you to set the USB upstream port for the DP input signals, thus the monitor’s USB downstream port (eg. keyboard and mouse) can be used by the current input signals when you connect a computer to either one of the upstream ports...
Page 78 - Volume; Audio
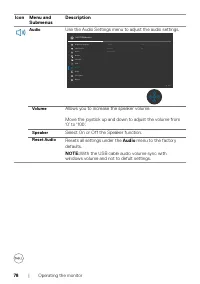
78 | Operating the monitor Icon Menu and Submenus Description Audio Use the Audio Settings menu to adjust the audio settings. Exit 24/27/34 Monitor Input Source Color Brightness/Contrast Display PIP/PBP Personalize Others Menu USB Audio Reset Audio Speaker On Volume 100 Volume Allows you to increase...
Page 79 - Sets the length of time the OSD remains
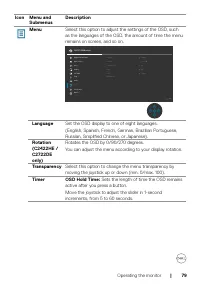
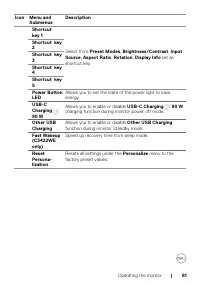
Operating the monitor | 79 Icon Menu and Submenus Description Menu Select this option to adjust the settings of the OSD, such as the languages of the OSD, the amount of time the menu remains on screen, and so on. Exit 24/27/34 Monitor Input Source Color Brightness/Contrast Display PIP/PBP Personaliz...
Page 82 - Displays the monitor’s current settings.
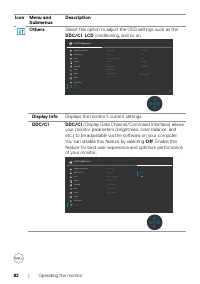
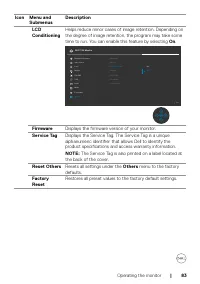
82 | Operating the monitor Icon Menu and Submenus Description Others Select this option to adjust the OSD settings such as the DDC/CI , LCD conditioning, and so on. Exit 24/27/34 Monitor Input Source Color Brightness/Contrast Display PIP/PBP Personalize Others Menu USB Audio Display Info Reset Other...
Page 84 - OSD warning messages; Monitor Specifications; for the Horizontal and Vertical; When the monitor enters the; Standby; mode, the following message will appear:; OSD
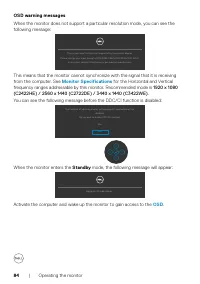
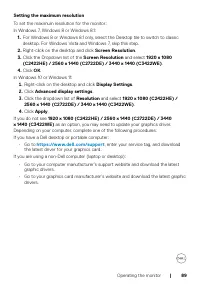
84 | Operating the monitor OSD warning messages When the monitor does not support a particular resolution mode, you can see the following message: The current input timing is not supported by the monitor display. Please change your input timing to 1920x1080/2560x1440/3440x1440, 60Hz or any other mon...
Page 85 - Prompt for Multiple Inputs; Factory Reset
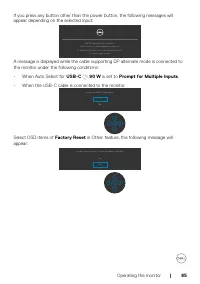
Operating the monitor | 85 If you press any button other than the power button, the following messages will appear depending on the selected input: No DP Signal form your device. Press any key on the keyboard to wake up. If there is no display, press the monitor joystick to select input source. A me...
Page 86 - On in Standby Mode
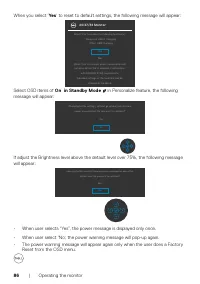
86 | Operating the monitor When you select ‘ Yes ‘ to reset to default settings, the following message will appear: 24/27/34 Monitor Select ‘Yes’ to enable the following function(s): . Always on USB-C Charging . Other USB Charging When ‘Yes’ is selected, power consumption will increase. When ‘No’ is...
Page 87 - or; When the webcam module; When the webcam module; pop in
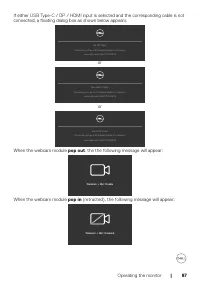
Operating the monitor | 87 If either USB Type-C / DP / HDMI input is selected and the corresponding cable is not connected, a floating dialog box as shown below appears. No DP Cable The display will go into Standby Mode in 4 minutes. www.dell.com/C24/27/3422XE or No USB-C Cable The display will go i...
Page 88 - Troubleshooting
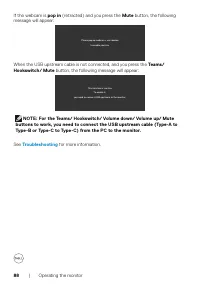
88 | Operating the monitor If the webcam is pop in (retracted) and you press the Mute button, the following message will appear: Please pop up webcam + mic module to enable your mic When the USB upstream cable is not connected, and you press the Teams/ Hookswitch/ Mute button, the following message ...
Page 90 - Shortcut Key 1; NOTE: KVM USB Switch function only work under PBP Mode (Only for
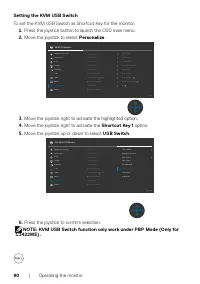
90 | Operating the monitor Setting the KVM USB Switch To set the KVM USB Switch as Shortcut Key for the monitor: 1. Press the joystick button to launch the OSD main menu. 2. Move the joystick to select Personalize . Exit 24/27/34 Monitor Input Source Color Brightness/Contrast Display PIP/PBP Persona...
Page 93 - Auto Select
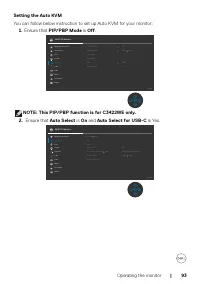
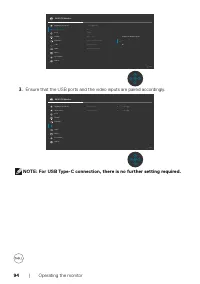
Operating the monitor | 93 Setting the Auto KVM You can follow below instruction to set up Auto KVM for your monitor: 1. Ensure that PIP/PBP Mode is Off . Exit 24/27/34 Monitor Input Source Color Brightness/Contrast Display PIP/PBP Personalize Others Menu USB Audio PIP/PBP Mode Off PIP/PBP (Sub) USB...
Page 95 - Setting up Windows Hello
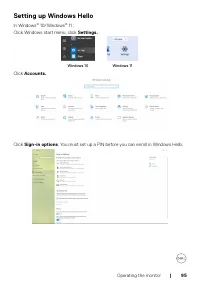
Operating the monitor | 95 Setting up Windows Hello In Windows ® 10/Windows ® 11 : Click Windows start menu, click Settings. Windows 10 Windows 11 Click Accounts. Click Sign-in options . You must set up a PIN before you can enroll in Windows Hello.
Page 97 - Get started
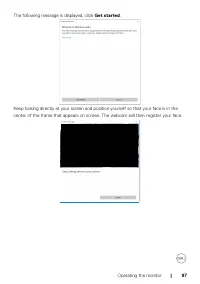
Operating the monitor | 97 The following message is displayed, click Get started . Keep looking directly at your screen and position yourself so that your face is in thecenter of the frame that appears on screen. The webcam will then register your face.
Page 98 - Close; to exit; Windows Hello setup
98 | Operating the monitor When the following message is displayed, click Close to exit Windows Hello setup . Once you have set up, you have another option to improve the recognition. Click Improve recognition if necessary.
Page 99 - Setting up the monitor webcam as default setting; Dell Monitor IR Webcam; to open the; Dell Monitor
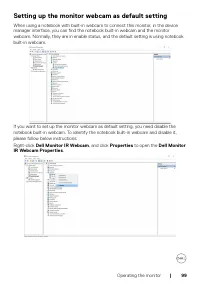
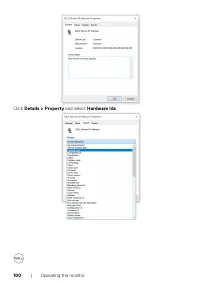
Operating the monitor | 99 Setting up the monitor webcam as default setting When using a notebook with built-in webcam to connect this monitor, in the device manager interface, you can find the notebook built-in webcam and the monitor webcam. Normally, they are in enable status, and the default sett...
Page 100 - Hardware Ids
100 | Operating the monitor Click Details > Property and select Hardware Ids .
Page 101 - Value; Right click the; Disable
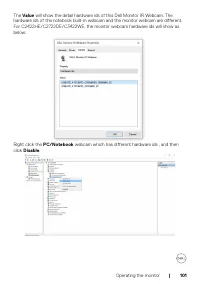
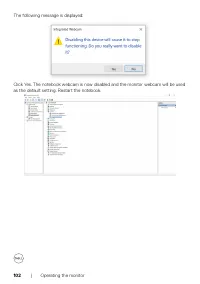
Operating the monitor | 101 The Value will show the detail hardware ids of this Dell Monitor IR Webcam. The hardware ids of the notebook built-in webcam and the monitor webcam are different. For C2422HE/C2722DE/C3422WE, the monitor webcam hardware ids will show as below: Right click the PC/Notebook ...
Page 103 - Setting up the monitor speaker as default setting
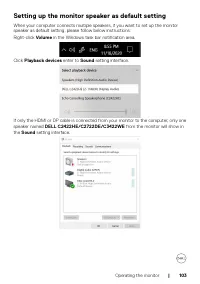
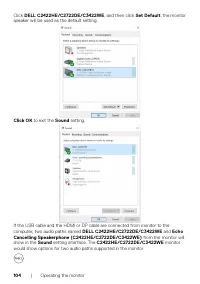
Operating the monitor | 103 Setting up the monitor speaker as default setting When your computer connects multiple speakers, if you want to set up the monitor speaker as default setting, please follow below instructions:Right-click Volume in the Windows task bar notification area. Click Playback dev...
Page 105 - Echo
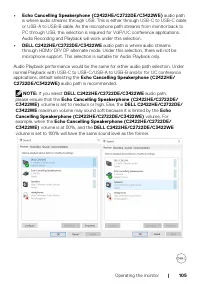
Operating the monitor | 105 • Echo Cancelling Speakerphone (C2422HE/C2722DE/C3422WE) audio path is where audio streams through USB. This is either through USB-C to USB-C cable or USB-A to USB-B cable. As the microphone path streams from monitor back to PC through USB, this selection is required for ...
Page 106 - | Troubleshooting; Turn off both your computer and the monitor.
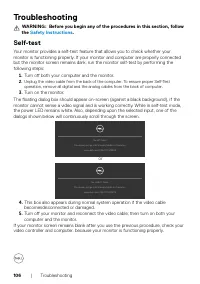
106 | Troubleshooting Troubleshooting WARNING: Before you begin any of the procedures in this section, follow the Safety Instructions . Self-test Your monitor provides a self-test feature that allows you to check whether your monitor is functioning properly. If your monitor and computer are properly...
Page 108 - Common Problems; Possible solutions
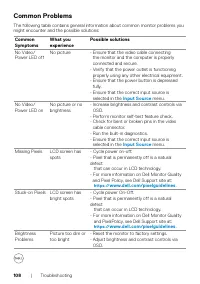
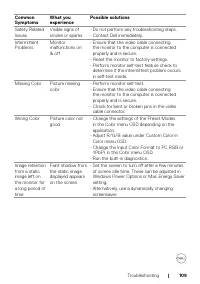
108 | Troubleshooting Common Problems The following table contains general information about common monitor problems you might encounter and the possible solutions: Common Symptoms What you experience Possible solutions No Video/Power LED off No picture • Ensure that the video cable connecting the m...
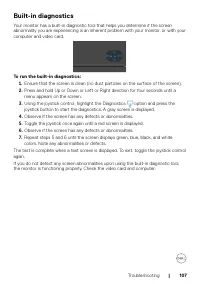
Page 110 - Product specific problems; Problem
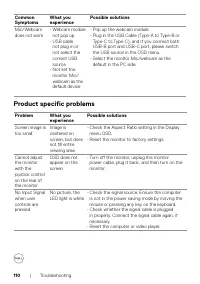
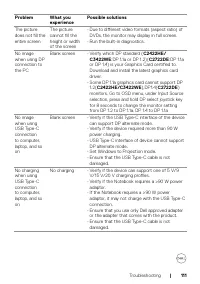
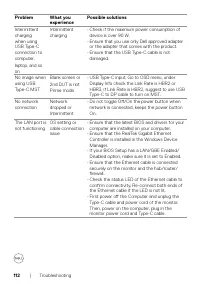
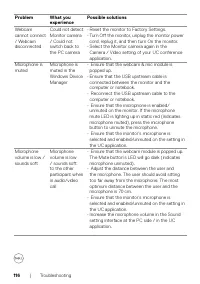
110 | Troubleshooting Common Symptoms What you experience Possible solutions Mic/Webcam does not work • Webcam module not pop up • USB cable not plug in or not select the correct USB source • Not set the monitor Mic/ webcam as the default device • Pop up the webcam module.• Plug in the USB Cable (Ty...
Page 113 - App
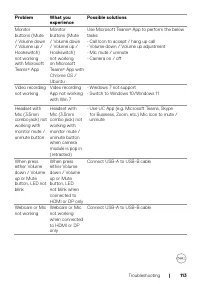
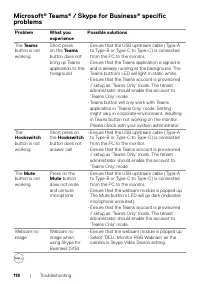
Troubleshooting | 113 Problem What you experience Possible solutions Monitor buttons (Mute / Volume down / Volume up / Hookswitch)not working with Microsoft Teams ® App Monitor buttons (Mute / Volume down / Volume up / Hookswitch) not working on Microsoft Teams ® App with Chrome OS / Ubuntu Use Micr...
Page 120 - Universal Serial Bus (USB) specific problems
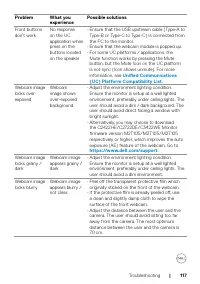
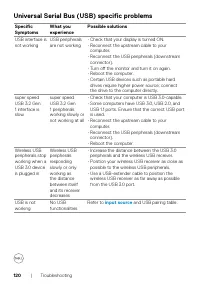
120 | Troubleshooting Universal Serial Bus (USB) specific problems Specific Symptoms What you experience Possible solutions USB interface is not working USB peripherals are not working • Check that your display is turned ON.• Reconnect the upstream cable to your computer. • Reconnect the USB periphe...
Page 121 - Appendix; information; NOTE: If you do not have an active Internet connection, you can find; See; Go to; EU product database for energy label and product
Appendix | 121 Appendix FCC notices (U.S. only) and other regulatory information For FCC notices and other regulatory information, see the regulatory compliance website located at https:// www.dell.com/regulatory_compliance . Contacting Dell For customers in the United States, call 800-WWW-DELL (800...