Page 2 - Notes, Cautions and Warnings; NOTE: A NOTE indicates important information that helps you make; Copyright © 2023 Dell Inc. or its subsidiaries. All rights reserved.
Notes, Cautions and Warnings NOTE: A NOTE indicates important information that helps you make better use of your computer. CAUTION: A CAUTION indicates potential damage to hardware or loss of data if instructions are not followed. WARNING: A WARNING indicates a potential for property damage, persona...
Page 3 - Contents
Contents │ 3 Contents Safety instructions ............................................5 About your monitor ...........................................6 Package contents ..................................................... 6 Product features ....................................................... 7 ...
Page 4 - EU product database for energy label and product
4 │ Contents Using the On-Screen Display (OSD) menu .................. 36 Setting up display resolution on your monitor ..............51 Using tilt ................................................................. 53 Troubleshooting ...............................................54 Self-test ..........
Page 5 - Safety instructions; Before using the monitor, read the safety information that is; Connecting your monitor; Do not place and use the monitor on a wet surface or near water.
Safety instructions │ 5 Safety instructions Use the following safety guidelines to protect your monitor from potential damage and to ensure your personal safety. Unless otherwise noted, each procedure included in this document assumes that you have read the safety information that shipped with your ...
Page 6 - About your monitor; Package contents; Contact Dell; if anything is missing.
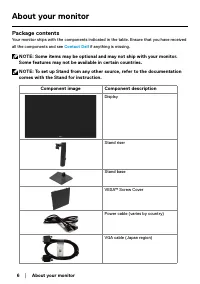
6 │ About your monitor About your monitor Package contents Your monitor ships with the components indicated in the table. Ensure that you have received all the components and see Contact Dell if anything is missing. NOTE: Some items may be optional and may not ship with your monitor. Some features m...
Page 7 - Product features
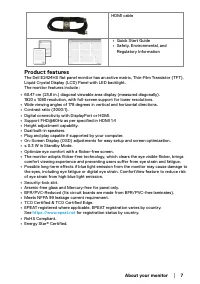
About your monitor │ 7 HDMI cable • Quick Start Guide • Safety, Environmental, and Regulatory Information Product features The Dell E2424HS flat panel monitor has an active matrix, Thin-Film Transistor (TFT), Liquid Crystal Display (LCD) Panel with LED backlight.The monitor features include : • 60.4...
Page 8 - Identifying features and controls; Front view; Label; Function buttons; Using the front
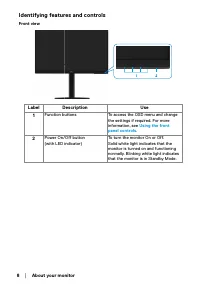
8 │ About your monitor Identifying features and controls Front view Label Description Use 1 Function buttons To access the OSD menu and change the settings if required. For more information, see Using the front panel controls . 2 Power On/Off button(with LED indicator) To turn the monitor On or Off....
Page 9 - Back view; Side view
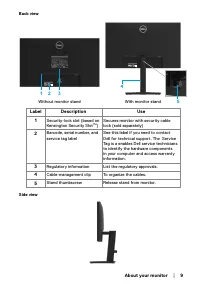
About your monitor │ 9 Back view Without monitor stand With monitor stand 4 5 1 3 2 Label Description Use 1 Security-lock slot (based on Kensington Security Slot TM ) Secures monitor with security cable lock (sold separately) 2 Barcode, serial number, and service tag label See this label if you need...
Page 10 - Bottom view, without monitor stand
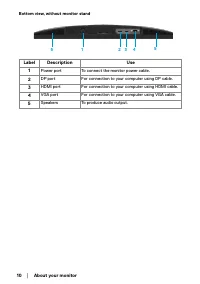
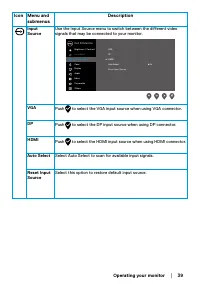
10 │ About your monitor Bottom view, without monitor stand 1 3 4 5 5 2 Label Description Use 1 Power port To connect the monitor power cable. 2 DP port For connection to your computer using DP cable. 3 HDMI port For connection to your computer using HDMI cable. 4 VGA port For connection to your comp...
Page 11 - Monitor specifications; Model
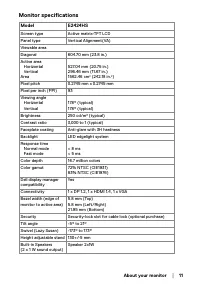
About your monitor │ 11 Monitor specifications Model E2424HS Screen type Active matrix-TFT LCD Panel type Vertical Alignment(VA) Viewable areaDiagonal 604.70 mm (23.8 in.) Active area Horizontal VerticalArea 527.04 mm (20.75 in.)296.46 mm (11.67 in.)1562.46 cm 2 (242.18 in. 2 ) Pixel pitch 0.2745 mm...
Page 12 - Resolution specifications; Horizontal scan range; Preset display modes
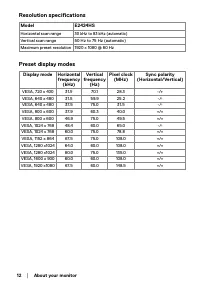
12 │ About your monitor Resolution specifications Model E2424HS Horizontal scan range 30 kHz to 83 kHz (automatic) Vertical scan range 50 Hz to 75 Hz (automatic) Maximum preset resolution 1920 x 1080 @ 60 Hz Preset display modes Display mode Horizontal frequency (kHz) Vertical frequency (Hz) Pixel c...
Page 13 - Electrical specifications; Video input signals; NOTE: This monitor is ENERGY STAR certified.
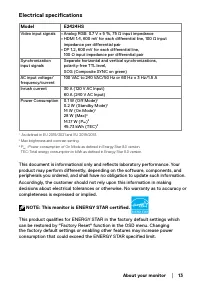
About your monitor │ 13 Electrical specifications Model E2424HS Video input signals • Analog RGB: 0.7 V ± 5 %, 75 Ω input impedance • HDMI 1.4, 600 mV for each differential line, 100 Ω inputimpedance per differential pair • DP 1.2, 600 mV for each differential line,100 Ω input impedance per differen...
Page 14 - Physical characteristics
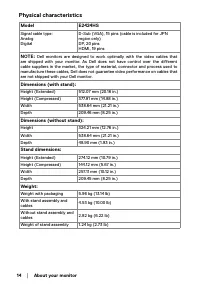
14 │ About your monitor Physical characteristics Model E2424HS Signal cable type:Analog Digital D-Sub (VGA), 15 pins (cable is included for JPN region only)DP, 20 pinsHDMI, 19 pins NOTE: Dell monitors are designed to work optimally with the video cables that are shipped with your monitor. As Dell do...
Page 15 - Environmental characteristics; Thermal dissipation
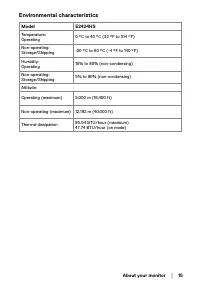
About your monitor │ 15 Environmental characteristics Model E2424HS Temperature:Operating 0 °C to 40 °C (32 °F to 104 °F) Non-operating:Storage/Shipping -20 °C to 60 °C (-4 °F to 140 °F) Humidity:Operating 10% to 80% (non-condensing) Non-operating:Storage/Shipping 5% to 90% (non-condensing) Altitude...
Page 16 - Pin assignments; Pin Number; GND
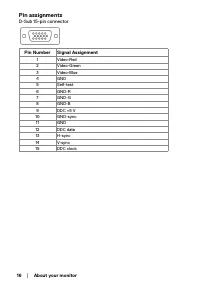
16 │ About your monitor Pin assignments D-Sub 15-pin connector Pin Number Signal Assignment 1 Video-Red 2 Video-Green 3 Video-Blue 4 GND 5 Self-test 6 GND-R 7 GND-G 8 GND-B 9 DDC +5 V 10 GND-sync 11 GND 12 DDC data 13 H-sync 14 V-sync 15 DDC clock
Page 18 - HDMI 19-pin connector
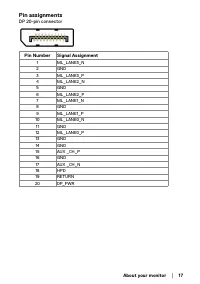
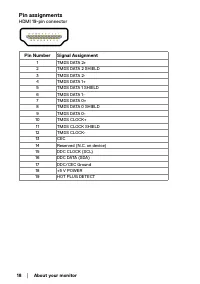
18 │ About your monitor Pin assignments HDMI 19-pin connector Pin Number Signal Assignment 1 TMDS DATA 2+ 2 TMDS DATA 2 SHIELD 3 TMDS DATA 2- 4 TMDS DATA 1+ 5 TMDS DATA 1 SHIELD 6 TMDS DATA 1- 7 TMDS DATA 0+ 8 TMDS DATA 0 SHIELD 9 TMDS DATA 0- 10 TMDS CLOCK+ 11 TMDS CLOCK SHIELD 12 TMDS CLOCK- 13 CE...
Page 19 - Plug and play capability; Operating your monitor; LCD monitor quality and pixel policy
About your monitor │ 19 Plug and play capability You can install the monitor in any Plug and Play-compatible system. The monitor automatically provides the computer with its Extended Display Identification Data (EDID) using Display Data Channel (DDC) protocols so the computer can configure itself an...
Page 20 - Ergonomics; result in eye strain.; Take regular and frequent breaks for 20 minutes every two hours.
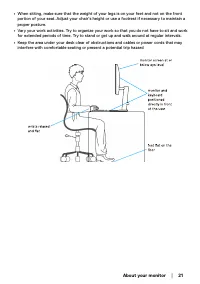
20 │ About your monitor Ergonomics CAUTION: Improper or prolonged usage of keyboard may result in injury. CAUTION: Viewing the monitor screen for extended periods of time may result in eye strain. For comfort and efficiency, observe the following guidelines when setting up and using your computer wo...
Page 22 - Handling and moving your display; Disconnect all cables from the monitor.
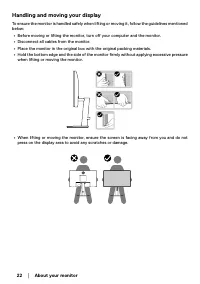
22 │ About your monitor Handling and moving your display To ensure the monitor is handled safely when lifting or moving it, follow the guidelines mentioned below: • Before moving or lifting the monitor, turn off your computer and the monitor. • Disconnect all cables from the monitor. • Place the mon...
Page 23 - Maintenance guidelines; Cleaning your monitor
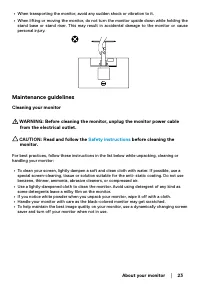
About your monitor │ 23 • When transporting the monitor, avoid any sudden shock or vibration to it. • When lifting or moving the monitor, do not turn the monitor upside down while holding the stand base or stand riser. This may result in accidental damage to the monitor or cause personal injury. Mai...
Page 24 - Setting up the monitor; Connecting the stand; NOTE: The stand is not attached when the monitor is shipped from the; Assemble the stand riser to stand base.
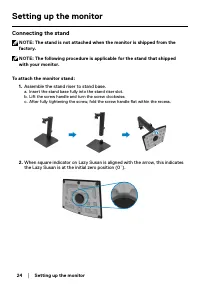
24 │ Setting up the monitor Setting up the monitor Connecting the stand NOTE: The stand is not attached when the monitor is shipped from the factory. NOTE: The following procedure is applicable for the stand that shipped with your monitor. To attach the monitor stand: 1. Assemble the stand riser to ...
Page 25 - Attach the VESA cover.
Setting up the monitor │ 25 3. Attach the VESA cover. 4. Attach the stand assembly to the monitor. a. Place the monitor on a soft cloth or cushion near the edge of desk.b. Align the stand assembly bracket to the monitor groove.c. Insert the bracket fully towards monitor.d. Tighten thumbscrew clockwi...
Page 26 - the; Turn off your computer and disconnect the power cable.; Connecting VGA cable
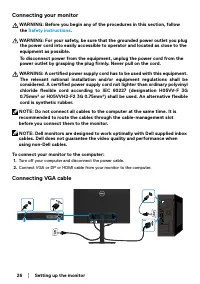
26 │ Setting up the monitor Connecting your monitor WARNING: Before you begin any of the procedures in this section, follow the Safety instructions . WARNING: For your safety, be sure that the grounded power outlet you plug the power cord into easily accessible to operator and located as close to th...
Page 27 - Connecting DP cable; Connecting HDMI cable; Organizing cables
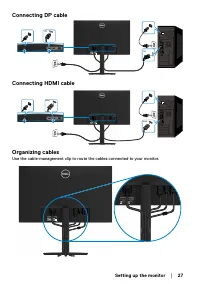
Setting up the monitor │ 27 Connecting DP cable DP DP Connecting HDMI cable HDMI HDMI Organizing cables Use the cable-management clip to route the cables connected to your monitor. 3C0181Y00-xxx-G(A)xx DELL E2424HS Flat Panel Monitor/ 液晶显示器 型号: E2424HS 输入电源: 100-240V ~ 50/60Hz, 1.5A Made in China / ...
Page 28 - Removing the stand; that the monitor is placed on a soft and clean surface.; Slide the stand out of the monitor completely.
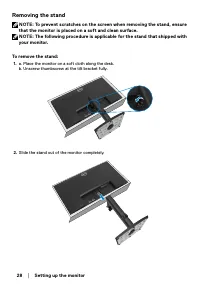
28 │ Setting up the monitor Removing the stand NOTE: To prevent scratches on the screen when removing the stand, ensure that the monitor is placed on a soft and clean surface. NOTE: The following procedure is applicable for the stand that shipped with your monitor. To remove the stand: 1. a. Place t...
Page 30 - Attach the mounting bracket from the wall mounting kit to the LCD.; NOTE: For use only with UL or CSA or GS-listed wall-mount bracket with
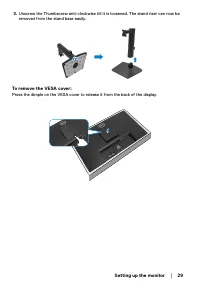
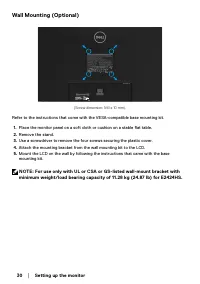
30 │ Setting up the monitor Wall Mounting (Optional) (Screw dimension: M4 x 10 mm). Refer to the instructions that come with the VESA-compatible base mounting kit. 1. Place the monitor panel on a soft cloth or cushion on a stable flat table. 2. Remove the stand. 3. Use a screwdriver to remove the fo...
Page 31 - Turning on the monitor; Control buttons; Accessing the OSD menu
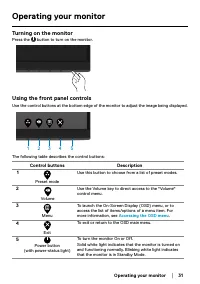
Operating your monitor │ 31 Operating your monitor Turning on the monitor Press the button to turn on the monitor. Using the front panel controls Use the control buttons at the bottom edge of the monitor to adjust the image being displayed. 1 2 3 4 5 The following table describes the control buttons...
Page 32 - Using the OSD lock function; Select one of the following options.; The following message appears.; Dell 24 Monitor
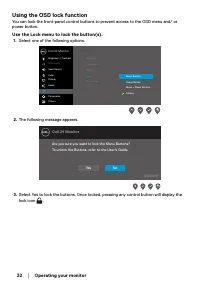
32 │ Operating your monitor Using the OSD lock function You can lock the front-panel control buttons to prevent access to the OSD menu and/ or power button. Use the Lock menu to lock the button(s). 1. Select one of the following options. Language Transparency Timer Lock Reset Menu Power Button Menu ...
Page 33 - Options; in diagnostics
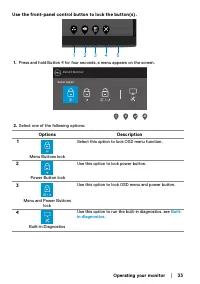
Operating your monitor │ 33 Use the front-panel control button to lock the button(s). 1 2 3 4 5 1. Press and hold Button 4 for four seconds, a menu appears on the screen. Dell 24 Monitor Select option: 2. Select one of the following options: Options Description 1 Menu Buttons lock Select this option...
Page 34 - Button 4
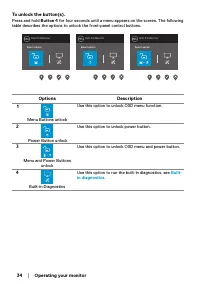
34 │ Operating your monitor To unlock the button(s). Press and hold Button 4 for four seconds until a menu appears on the screen. The following table describes the options to unlock the front-panel control buttons. Dell 24 Monitor Select option: Dell 24 Monitor Select option: Dell 24 Monitor Select ...
Page 35 - OSD controls
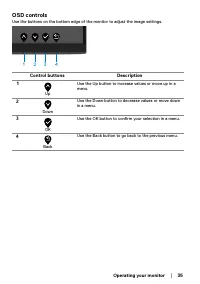
Operating your monitor │ 35 OSD controls Use the buttons on the bottom edge of the monitor to adjust the image settings. 1 2 3 4 Control buttons Description 1 Up Use the Up button to increase values or move up in a menu. 2 Down Use the Down button to decrease values or move down in a menu. 3 OK Use ...
Page 37 - Brightness
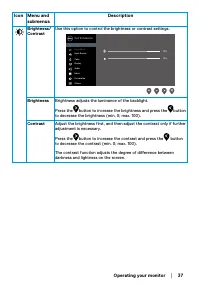
Operating your monitor │ 37 Icon Menu and submenus Description Brightness/Contrast Use this option to control the brightness or contrast settings. Dell 24 Monitor Brightness / Contrast Auto Adjust Input Source 75% 75% Color Display Menu Audio Personalize Others Brightness Brightness adjusts the lumi...
Page 38 - Use this option to activate automatic setup and adjust menu.
38 │ Operating your monitor Icon Menu and submenus Description Auto Adjust Use this option to activate automatic setup and adjust menu. Dell 24 Monitor Brightness / Contrast Auto Adjust Input Source Color Display Menu Audio Personalize Others Press to adjust the screen automatically. The following d...
Page 41 - • RGB
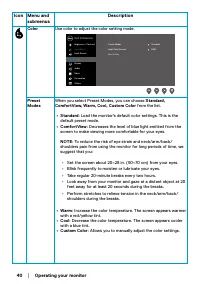
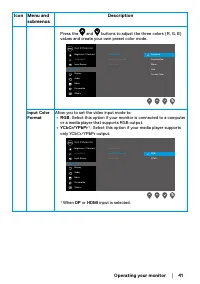
Operating your monitor │ 41 Icon Menu and submenus Description Press the and buttons to adjust the three colors (R, G, B) values and create your own preset color mode. Dell 24 Monitor Brightness / Contrast Auto Adjust Input Source Color Display Menu Audio Personalize Others Preset Modes Input Color ...
Page 42 - Sharpness
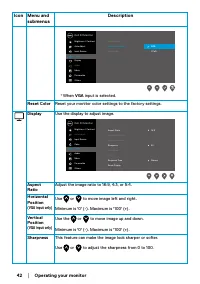
42 │ Operating your monitor Icon Menu and submenus Description Dell 24 Monitor Brightness / Contrast Auto Adjust Input Source Color Display Menu Audio Personalize Others Preset Modes Input Color Format Reset Color YPbPr RGB * When VGA input is selected. Reset Color Reset your monitor color settings ...
Page 43 - Audio; Volume
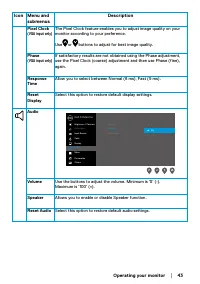
Operating your monitor │ 43 Icon Menu and submenus Description Pixel Clock(VGA input only) The Pixel Clock feature enables you to adjust image quality on your monitor according to your preference. Use or buttons to adjust for best image quality. Phase(VGA input only) If satisfactory results are not ...
Page 44 - Menu; or; Timer; Use
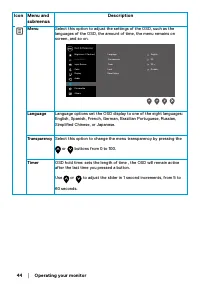
44 │ Operating your monitor Icon Menu and submenus Description Menu Select this option to adjust the settings of the OSD, such as the languages of the OSD, the amount of time, the menu remains on screen, and so on. Dell 24 Monitor Brightness / Contrast Auto Adjust Input Source Color Display Menu Aud...
Page 45 - Lock; Disable
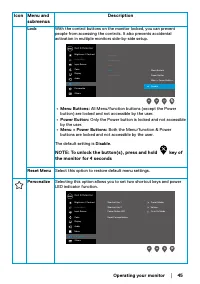
Operating your monitor │ 45 Icon Menu and submenus Description Lock With the control buttons on the monitor locked, you can prevent people from accessing the controls. It also prevents accidental activation in multiple monitors side-by-side setup. Language Transparency Timer Lock Reset Menu Menu But...
Page 46 - Allow you to restore shortcut key to the default setting.; Display Info; Press to display the information about the display.
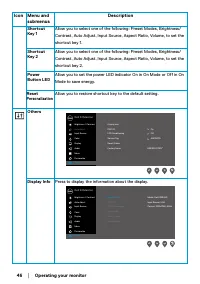
46 │ Operating your monitor Icon Menu and submenus Description Shortcut Key 1 Allow you to select one of the following: Preset Modes, Brightness/Contrast, Auto Adjust, Input Source, Aspect Ratio, Volume, to set the shortcut key 1. Shortcut Key 2 Allow you to select one of the following: Preset Modes...
Page 47 - LCD Conditioning
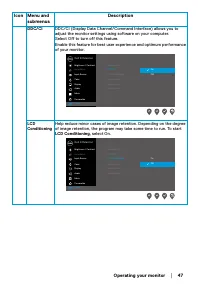
Operating your monitor │ 47 Icon Menu and submenus Description DDC/CI DDC/CI (Display Data Channel/Command Interface) allows you to adjust the monitor settings using software on your computer.Select Off to turn off this feature.Enable this feature for best user experience and optimum performance of ...
Page 48 - Service Tag; Display the Service Tag number of the monitor.; Reset Others
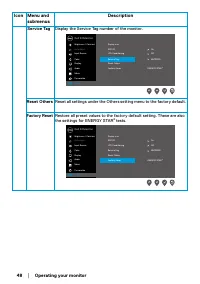
48 │ Operating your monitor Icon Menu and submenus Description Service Tag Display the Service Tag number of the monitor. Dell 24 Monitor Brightness / Contrast Auto Adjust Input Source Color Display Menu Audio Personalize Others Display Info DDC/CI On Off ABCDEFG LCD Conditioning Service Tag Reset O...
Page 49 - OSD warning messages
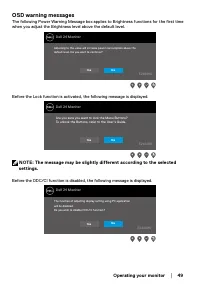
Operating your monitor │ 49 OSD warning messages The following Power Warning Message box applies to Brightness functions for the first time when you adjust the Brightness level above the default level. Dell 24 Monitor Adjusting to this value will increase power consumption above thedefault level. Do...
Page 50 - See; Troubleshooting; for more information.
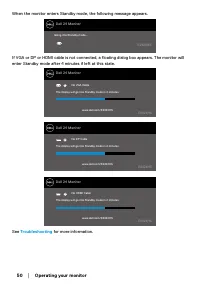
50 │ Operating your monitor When the monitor enters Standby mode, the following message appears. Dell 24 Monitor Going into Standby mode… E2424HS If VGA or DP or HDMI cable is not connected, a floating dialog box appears. The monitor will enter Standby mode after 4 minutes if left at this state. Del...
Page 51 - Setting up display resolution on your monitor; In Windows 10 or Windows 11:
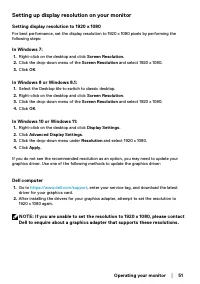
Operating your monitor │ 51 Setting up display resolution on your monitor Setting display resolution to 1920 x 1080 For best performance, set the display resolution to 1920 x 1080 pixels by performing the following steps: In Windows 7: 1. Right-click on the desktop and click Screen Resolution. 2. Cl...
Page 52 - Change Display Settings.; Advanced display settings.
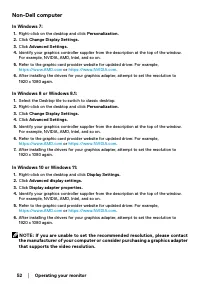
52 │ Operating your monitor Non-Dell computer In Windows 7: 1. Right-click on the desktop and click Personalization. 2. Click Change Display Settings. 3. Click Advanced Settings. 4. Identify your graphics controller supplier from the description at the top of the window.For example, NVIDIA, AMD, Int...
Page 53 - Using tilt; You can tilt the monitor for the most comfortable viewing angle.
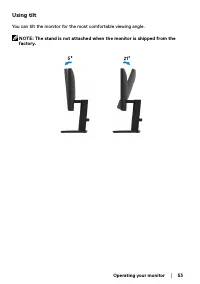
Operating your monitor │ 53 Using tilt You can tilt the monitor for the most comfortable viewing angle. NOTE: The stand is not attached when the monitor is shipped from the factory.
Page 54 - Turn off both your computer and the monitor.; cable is disconnected or damaged.
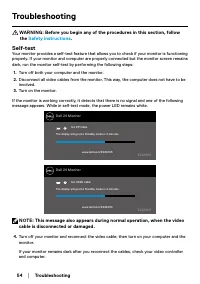
54 │ Troubleshooting Troubleshooting WARNING: Before you begin any of the procedures in this section, follow the Safety instructions . Self-test Your monitor provides a self-test feature that allows you to check if your monitor is functioning properly. If your monitor and computer are properly conne...
Page 55 - Button
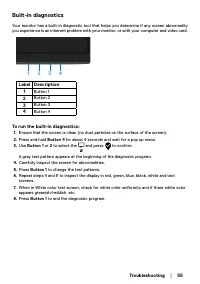
Troubleshooting │ 55 Built-in diagnostics Your monitor has a built-in diagnostic tool that helps you determine if any screen abnormality you experience is an inherent problem with your monitor, or with your computer and video card. 1 2 3 4 Label Description 1 Button 1 2 Button 2 3 Button 3 4 Button ...
Page 56 - Common problems; Common symptoms; Input Source
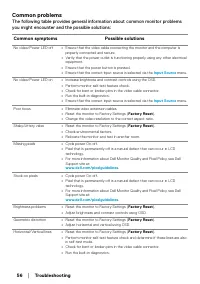
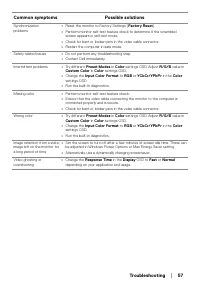
56 │ Troubleshooting Common problems The following table provides general information about common monitor problems you might encounter and the possible solutions: Common symptoms Possible solutions No video/Power LED off • Ensure that the video cable connecting the monitor and the computer is prope...
Page 58 - Product-specific problems; Specific symptoms; Aspect Ratio; Display; Factory Reset
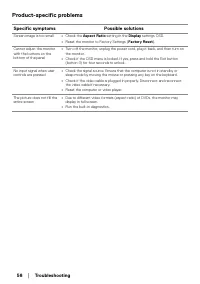
58 │ Troubleshooting Product-specific problems Specific symptoms Possible solutions Screen image is too small • Check the Aspect Ratio setting in the Display settings OSD. • Reset the monitor to Factory Settings ( Factory Reset ). Cannot adjust the monitor with the buttons on the bottom of the panel...
Page 59 - Appendix; NOTE: If you do not have an active Internet connection, you can find; To get online Monitor support content, visit
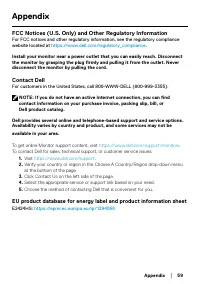
Appendix │ 59 Appendix FCC Notices (U.S. Only) and Other Regulatory Information For FCC notices and other regulatory information, see the regulatory compliance website located at https://www.dell.com/regulatory_compliance . Install your monitor near a power outlet that you can easily reach. Disconne...


 Dell AW2523HF
User Manual
Dell AW2523HF
User Manual
 Dell C2722DE
User Manual
Dell C2722DE
User Manual
 Dell E2720H (210-ATZM-AMRFM21)
User Manual
Dell E2720H (210-ATZM-AMRFM21)
User Manual
 Dell E2724HS (210-BGQG)
User Manual
Dell E2724HS (210-BGQG)
User Manual
 Dell G3223Q (210-BDXS)
User Manual
Dell G3223Q (210-BDXS)
User Manual
 Dell P2422H (210-AZYX-10MT21)
User Manual
Dell P2422H (210-AZYX-10MT21)
User Manual
 Dell P2723D (210-BDDX)
User Manual
Dell P2723D (210-BDDX)
User Manual
 Dell S2722DZ (210-BBSK)
User Manual
Dell S2722DZ (210-BBSK)
User Manual
 Dell U2414H
Manual
Dell U2414H
Manual
 Dell U2515H
Manual
Dell U2515H
Manual
 Dell S2340L
Manual
Dell S2340L
Manual