Page 3 - Contents
│ 3 Contents Safety instructions . . . . . . . . . . . . . . . . . . . . . . . . . . 6About your monitor . . . . . . . . . . . . . . . . . . . . . . . . . .7 Package contents . . . . . . . . . . . . . . . . . . . . . . 7Product features . . . . . . . . . . . . . . . . . . . . . . . 9Identifying part...
Page 6 - Safety instructions; and can be damaged if dropped or hit with a sharp object.
6 │ Safety instructions Safety instructions Use the following safety guidelines to protect your monitor from potential damage and to ensure your personal safety. Unless otherwise noted, each procedure included in this document assumes that you have read the safety information that shipped with your ...
Page 7 - About your monitor; Package contents; Contacting Dell
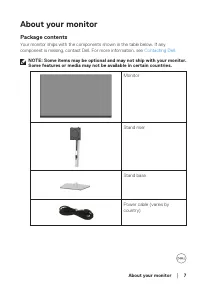
About your monitor │ 7 About your monitor Package contents Your monitor ships with the components shown in the table below. If any component is missing, contact Dell. For more information, see Contacting Dell . NOTE: Some items may be optional and may not ship with your monitor. Some features or med...
Page 8 - DisplayPort 1.2 cable
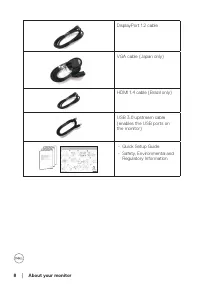
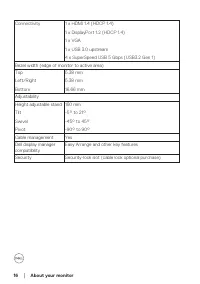
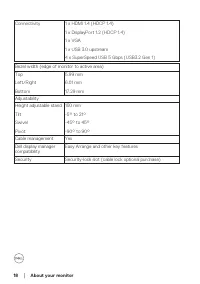
8 │ About your monitor DisplayPort 1.2 cable VGA cable (Japan only) HDMI 1.4 cable (Brazil only) USB 3.0 upstream cable (enables the USB ports on the monitor) • Quick Setup Guide• Safety, Environmental and Regulatory Information
Page 9 - Product features; mounting holes for flexible mounting solutions.
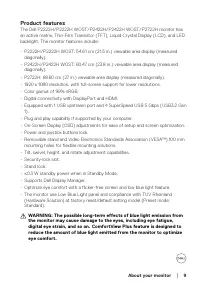
About your monitor │ 9 Product features The Dell P2222H/P2222H WOST/P2422H/P2422H WOST/P2722H monitor has an active matrix, Thin-Film Transistor (TFT), Liquid Crystal Display (LCD), and LED backlight. The monitor features include: • P2222H/P2222H WOST: 54.61 cm (21.5 in.) viewable area display (meas...
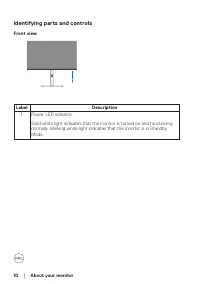
Page 10 - Identifying parts and controls; Front view; Power LED indicator
10 │ About your monitor Identifying parts and controls Front view 1 Label Description 1 Power LED indicator Solid white light indicates that the monitor is turned on and functioning normally. Blinking white light indicates that the monitor is in Standby Mode.
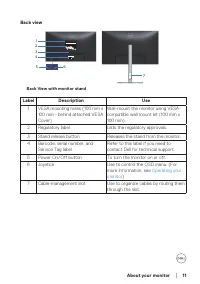
Page 11 - Express Service; DELL P2X22H; Back View with monitor stand; Label; Operating your
About your monitor │ 11 Back view 7 6 Q40G024N-700-XXA DELL P2X22H Flat Panel Monitor /Monitor Plano Panel /Moniteur écran plat / 液晶顯示器 Model No. /Modelo /N°de modelo / 型號/ 모델명/モデル番 号 : P2422Hc Input Ra�ng /Entrade /Daya Tegangan/ 정격입력/ Entrada de energía : 100-240V 50/60Hz,1.5A 輸入電源:交流電壓 100-240 伏特...
Page 13 - Monitor specifications; Model
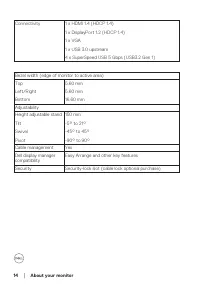
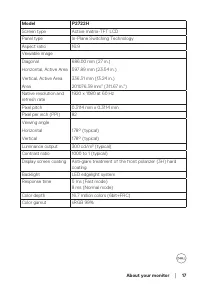
About your monitor │ 13 Monitor specifications Model P2222H/P2222H WOST Screen type Active matrix-TFT LCD Panel type In-Plane Switching Technology Aspect ratio 16:9 Viewable imageDiagonal Horizontal, Active Area Vertical, Active Area Area 546.10 mm (21.5 in.) 476.06 mm (18.74 in.) 267.79 mm (10.54 i...
Page 19 - Horizontal scan range; Supported video modes; Video display capabilities
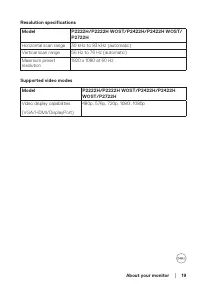
About your monitor │ 19 Resolution specifications Model P2222H/P2222H WOST/P2422H/P2422H WOST/P2722H Horizontal scan range 30 kHz to 83 kHz (automatic) Vertical scan range 56 Hz to 76 Hz (automatic) Maximum preset resolution 1920 x 1080 at 60 Hz Supported video modes Model P2222H/P2222H WOST/P2422H/...
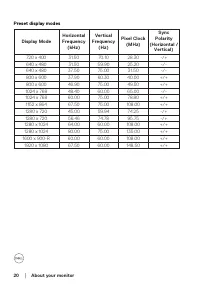
Page 20 - Preset display modes
20 │ About your monitor Preset display modes Display Mode Horizontal Frequency (kHz) Vertical Frequency (Hz) Pixel Clock (MHz) Sync Polarity (Horizontal / Vertical) 720 x 400 31.50 70.10 28.30 -/+ 640 x 480 31.50 59.90 25.20 -/- 640 x 480 37.50 75.00 31.50 -/- 800 x 600 37.90 60.30 40.00 +/+ 800 x 6...
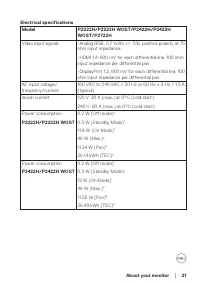
Page 21 - Video input signals
About your monitor │ 21 Electrical specifications Model P2222H/P2222H WOST/P2422H/P2422H WOST/P2722H Video input signals •Analog RGB, 0.7 Volts +/- 5%, positive polarity at 75 ohm input impedance •HDMI 1.4, 600 mV for each differential line, 100 ohm input impedance per differential pair •DisplayPort...
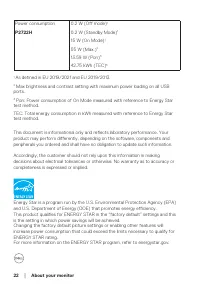
Page 22 - Power consumption
22 │ About your monitor Power consumption P2722H 0.2 W (Off mode) 1 0.2 W (Standby Mode) 1 15 W (On Mode) 1 55 W (Max.) 2 13.59 W (Pon) 3 42.75 kWh (TEC) 3 1 As defined in EU 2019/2021 and EU 2019/2013. 2 Max brightness and contrast setting with maximum power loading on all USB ports. 3 Pon: Power c...
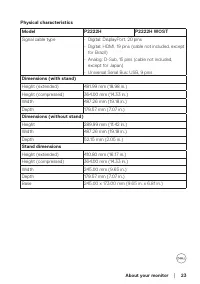
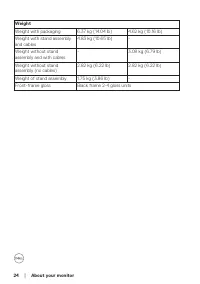
Page 24 - Weight with packaging
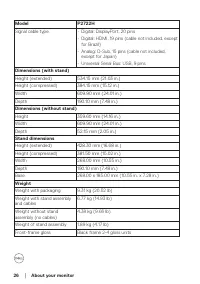
24 │ About your monitor Weight Weight with packaging 6.37 kg (14.04 lb) 4.62 kg (10.16 lb) Weight with stand assembly and cables 4.83 kg (10.65 lb) - Weight without stand assembly and with cables - 3.08 kg (6.79 lb) Weight without stand assembly (no cables) 2.82 kg (6.22 lb) 2.82 kg (6.22 lb) Weight...
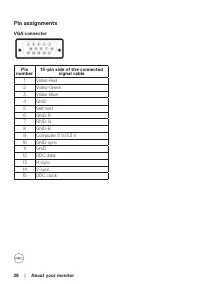
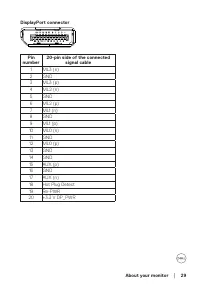
Page 28 - Pin assignments; GND
28 │ About your monitor Pin assignments VGA connector Pin number 15-pin side of the connected signal cable 1 Video-Red 2 Video-Green 3 Video-Blue 4 GND 5 Self-test 6 GND-R 7 GND-G 8 GND-B 9 Computer 5 V/3.3 V 10 GND-sync 11 GND 12 DDC data 13 H-sync 14 V-sync 15 DDC clock
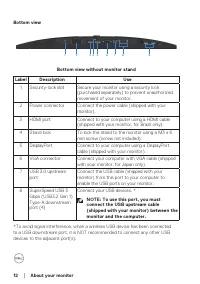
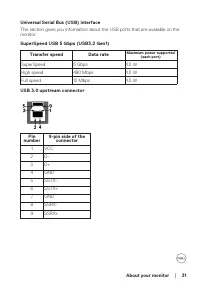
Page 31 - Maximum power supported
About your monitor │ 31 Universal Serial Bus (USB) interface This section gives you information about the USB ports that are available on the monitor. SuperSpeed USB 5 Gbps (USB3.2 Gen1) Transfer speed Data rate Maximum power supported (each port) SuperSpeed 5 Gbps 4.5 W High speed 480 Mbps 4.5 W Fu...
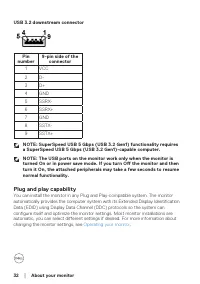
Page 32 - VCC; Plug and play capability; Operating your monitor
32 │ About your monitor USB 3.2 downstream connector Pin number 9-pin side of the connector 1 VCC 2 D- 3 D+ 4 GND 5 SSRX- 6 SSRX+ 7 GND 8 SSTX- 9 SSTX+ NOTE: SuperSpeed USB 5 Gbps (USB 3.2 Gen1) functionality requires a SuperSpeed USB 5 Gbps (USB 3.2 Gen1)-capable computer. NOTE: The USB ports on th...
Page 33 - LCD monitor quality and pixel policy; Cleaning your monitor; before cleaning the; any kind as some detergents leave a milky film on the monitor.
About your monitor │ 33 LCD monitor quality and pixel policy During the LCD Monitor manufacturing process, it is not uncommon for one or more pixels to become fixed in an unchanging state which are hard to see and do not affect the display quality or usability. For more information on Dell Monitor Q...
Page 34 - Setting up the monitor; Connecting the stand; NOTE: The stand is detached when the monitor is shipped from the; cushion that secures it.; appearance of the package cushion may vary.
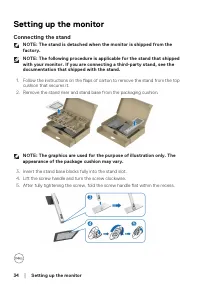
34 │ Setting up the monitor Setting up the monitor Connecting the stand NOTE: The stand is detached when the monitor is shipped from the factory. NOTE: The following procedure is applicable for the stand that shipped with your monitor. If you are connecting a third-party stand, see the documentation...
Page 35 - Attach the stand assembly to the display.
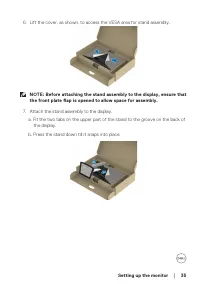
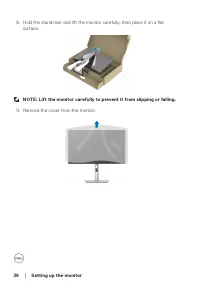
Setting up the monitor │ 35 6. Lift the cover, as shown, to access the VESA area for stand assembly. NOTE: Before attaching the stand assembly to the display, ensure that the front plate flap is opened to allow space for assembly. 7. Attach the stand assembly to the display. a. Fit the two tabs on t...
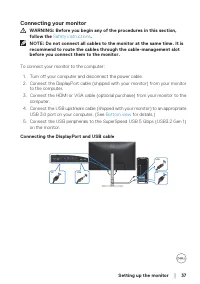
Page 37 - Connecting your monitor; Connecting the DisplayPort and USB cable
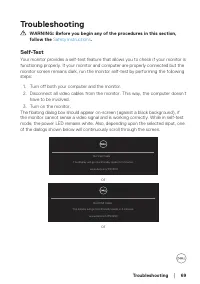
Setting up the monitor │ 37 Connecting your monitor WARNING: Before you begin any of the procedures in this section, follow the Safety instructions . NOTE: Do not connect all cables to the monitor at the same time. It is recommend to route the cables through the cable-management slot before you conn...
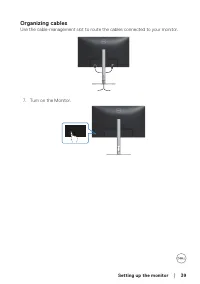
Page 39 - Organizing cables
Setting up the monitor │ 39 Organizing cables Use the cable-management slot to route the cables connected to your monitor. HDMI 2.0 7. Turn on the Monitor.
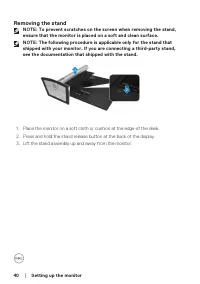
Page 40 - Removing the stand; NOTE: To prevent scratches on the screen when removing the stand,
40 │ Setting up the monitor Removing the stand NOTE: To prevent scratches on the screen when removing the stand, ensure that the monitor is placed on a soft and clean surface. NOTE: The following procedure is applicable only for the stand that shipped with your monitor. If you are connecting a third...
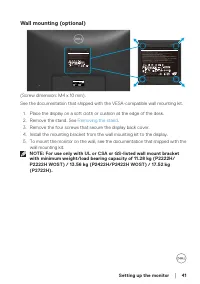
Page 41 - NOTE: For use only with UL or CSA or GS-listed wall mount bracket
Setting up the monitor │ 41 Wall mounting (optional) Q40G024N-700-XXA DELL P2422H Flat Panel Monitor /Monitor Plano Panel /Moniteur écran plat / 液晶顯示器 Model No. /Modelo /N°de modelo / 型號/ 모델명/モデル番 号 : P2422Hc Input Ra�ng /Entrade /Daya Tegangan/ 정격입력/ Entrada de energía : 100-240V 50/60Hz,1.5A 輸入電源:...
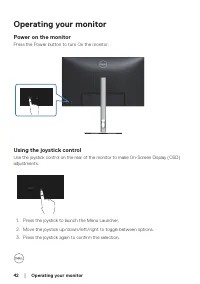
Page 42 - Power on the monitor; Press the Power button to turn On the monitor.; Using the joystick control; Press the joystick to launch the Menu Launcher.
42 │ Operating your monitor Operating your monitor Power on the monitor Press the Power button to turn On the monitor. Using the joystick control Use the joystick control on the rear of the monitor to make On-Screen Display (OSD) adjustments. 1. Press the joystick to launch the Menu Launcher. 2. Mov...
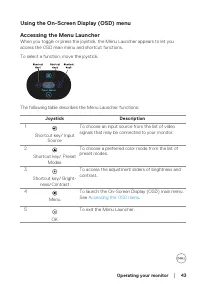
Page 43 - Accessing the Menu Launcher; Joystick; Accessing the OSD menu
Operating your monitor │ 43 Using the On-Screen Display (OSD) menu Accessing the Menu Launcher When you toggle or press the joystick, the Menu Launcher appears to let you access the OSD main menu and shortcut functions. To select a function, move the joystick. The following table describes the Menu ...
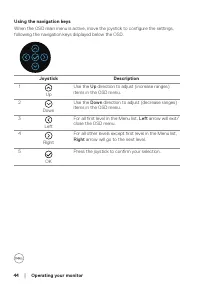
Page 44 - Up
44 │ Operating your monitor Using the navigation keys When the OSD main menu is active, move the joystick to configure the settings, following the navigation keys displayed below the OSD. Joystick Description 1 Up Use the Up direction to adjust (increase ranges) items in the OSD menu. 2 Down Use the...
Page 45 - Select the icon to launch the OSD and display the main menu.; move from one icon to another, the option is highlighted.; NOTE: The directional buttons (and the OK button) displayed may; Press and direction to select the desired parameter.
Operating your monitor │ 45 Accessing the OSD menu NOTE: If you change the settings and then either proceed to another menu or exit the OSD menu, the monitor automatically saves those changes.The changes are also saved if you change the settings and then wait for the OSD menu to disappear. 1. Select...
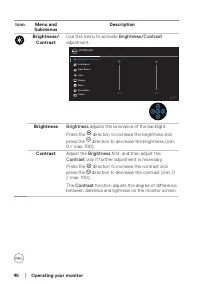
Page 46 - Brightness/Contrast; Brightness
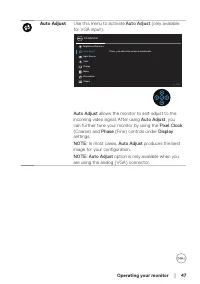
46 │ Operating your monitor Icon Menu and Submenus Description Brightness/ Contrast Use this menu to activate Brightness/Contrast adjustment. Brightness/Contrast Input Source Auto Adjust 2X Monitor Color Display Menu Personalize Others Exit 75% 75% Brightness Brightness adjusts the luminance of the ...
Page 48 - VGA
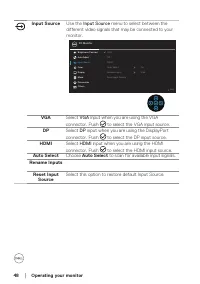
48 │ Operating your monitor Input Source Use the Input Source menu to select between the different video signals that may be connected to your monitor. Brightness/Contrast Input Source Auto Adjust 2X Monitor Color Display Menu Personalize Others Exit DP VGA HDMI Auto Select On Rename Inputs Reset In...
Page 49 - Use
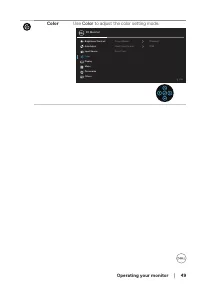
Operating your monitor │ 49 Color Use Color to adjust the color setting mode. Brightness/Contrast Input Source Auto Adjust 2X Monitor Color Display Menu Personalize Others Exit Preset Modes Reset Color Input Color Format RGB Standard
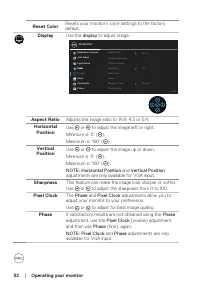
Page 53 - Reset all OSD settings to the factory preset values.
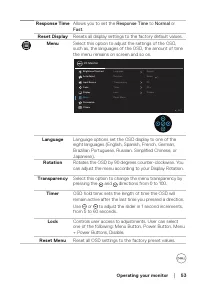
Operating your monitor │ 53 Response Time Allows you to set the Response Time to Normal or Fast . Reset Display Resets all display settings to the factory default values. Menu Select this option to adjust the settings of the OSD, such as, the languages of the OSD, the amount of time the menu remains...
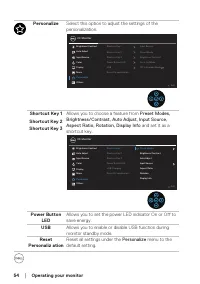
Page 54 - Allows you to choose a feature from; Reset all settings under the
54 │ Operating your monitor Personalize Select this option to adjust the settings of the personalization. Brightness/Contrast Input Source Auto Adjust 2X Monitor Color Display Menu Personalize Others Exit Shortcut Key 1 Shortcut Key 2 Shortcut Key 3 Power Button LED USB Reset Personalization Input S...
Page 55 - Display Info; Displays the monitor’s current settings.
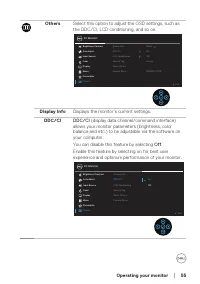
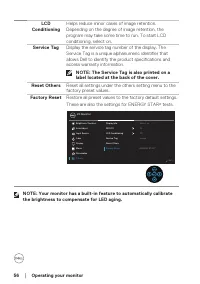
Operating your monitor │ 55 Others Select this option to adjust the OSD settings, such as the DDC/CI, LCD conditioning, and so on. Brightness/Contrast Input Source Auto Adjust 2X Monitor Color Display Menu Personalize Others Exit Select On Off xxxxxx ENERGY STAR ® Display Info DDC/CI LCD Conditionin...
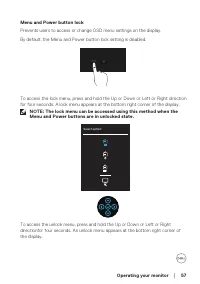
Page 57 - By default, the Menu and Power button lock setting is disabled.; NOTE: The lock menu can be accessed using this method when the
Operating your monitor │ 57 Menu and Power button lock Prevents users to access or change OSD menu settings on the display. By default, the Menu and Power button lock setting is disabled. To access the lock menu, press and hold the Up or Down or Left or Right direction for four seconds. A lock menu ...
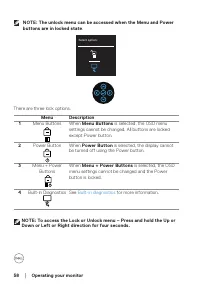
Page 58 - Built-in diagnostics
58 │ Operating your monitor NOTE: The unlock menu can be accessed when the Menu and Power buttons are in locked state . Select option: There are three lock options. Menu Description 1 Menu Buttons When Menu Buttons is selected, the OSD menu settings cannot be changed. All buttons are locked except P...
Page 60 - You will see the following message before the; Lock; function is activated:
60 │ Operating your monitor OSD warning messages When the monitor does not support a particular resolution mode, the following message is displayed: 1920x1080, This means that the monitor cannot synchronize with the signal that it is receiving from the computer. See Monitor specifications for the Ho...
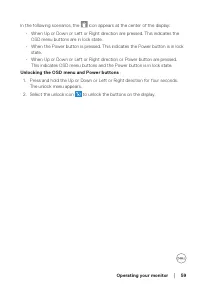
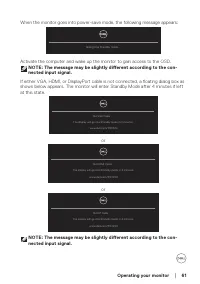
Page 61 - or
Operating your monitor │ 61 When the monitor goes into power-save mode, the following message appears: Going into Standby mode... Activate the computer and wake up the monitor to gain access to the OSD. NOTE: The message may be slightly different according to the con-nected input signal. If either V...
Page 62 - Factory Reset; Troubleshooting
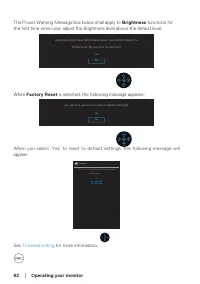
62 │ Operating your monitor The Power Warning Message box below shall apply to Brightness functions for the first time when user adjust the Brightness level above the default level. default level. Do you want to continue? Yes Adjusting to this value will increase power consumption above the No When ...
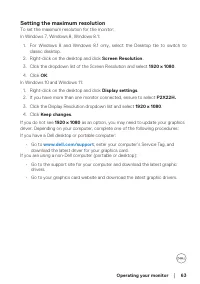
Page 63 - Setting the maximum resolution; Screen Resolution
Operating your monitor │ 63 Setting the maximum resolution To set the maximum resolution for the monitor: In Windows 7, Windows 8, Windows 8.1: 1. For Windows 8 and Windows 8.1 only, select the Desktop tile to switch to classic desktop. 2. Right-click on the desktop and click Screen Resolution . 3. ...
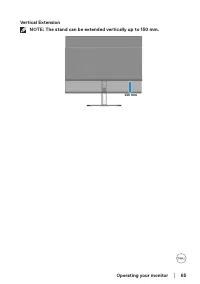
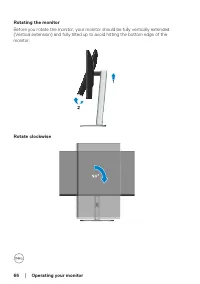
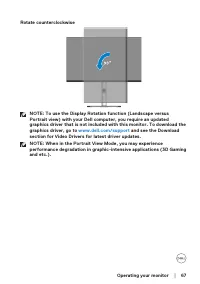
Page 64 - Using the tilt, swivel, and vertical extension
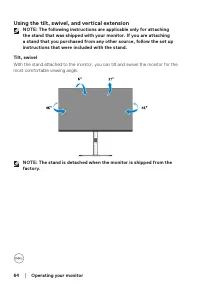
64 │ Operating your monitor Using the tilt, swivel, and vertical extension NOTE: The following instructions are applicable only for attaching the stand that was shipped with your monitor. If you are attaching a stand that you purchased from any other source, follow the set up instructions that were ...
Page 70 - becomes disconnected or damaged.
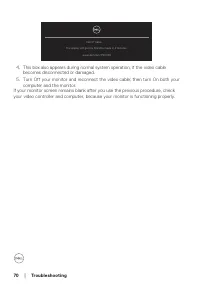
70 │ Troubleshooting No DP Cable The display will go into Standby mode in 4 minutes. www.dell.com/P2X22H 4. This box also appears during normal system operation, if the video cable becomes disconnected or damaged. 5. Turn Off your monitor and reconnect the video cable; then turn On both your compute...
Page 72 - Move the joystick to highlight the Diagnostic icon
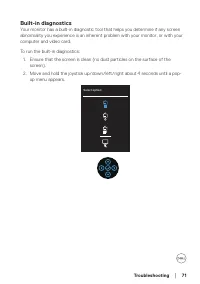
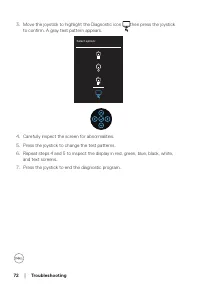
72 │ Troubleshooting 3. Move the joystick to highlight the Diagnostic icon then press the joystick to confirm. A gray test pattern appears. Select option: 4. Carefully inspect the screen for abnormalities. 5. Press the joystick to change the test patterns. 6. Repeat steps 4 and 5 to inspect the disp...
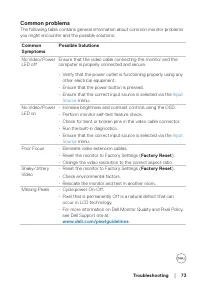
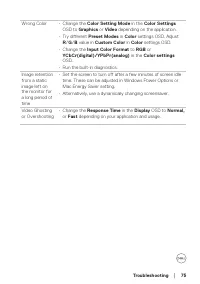
Page 73 - Common problems; Possible Solutions; Input
Troubleshooting │ 73 Common problems The following table contains general information about common monitor problems you might encounter and the possible solutions: Common Symptoms Possible Solutions No Video/Power LED off Ensure that the video cable connecting the monitor and the computer is properl...
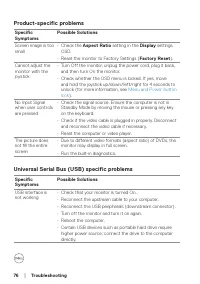
Page 76 - Product-specific problems; Menu and Power button; Universal Serial Bus (USB) specific problems
76 │ Troubleshooting Product-specific problems Specific Symptoms Possible Solutions Screen image is too small • Check the Aspect Ratio setting in the Display settings OSD. • Reset the monitor to Factory Settings ( Factory Reset ). Cannot adjust the monitor with the joystick • Turn Off the monitor, u...
Page 78 - Appendix; For information on safety instructions, see the; Safety Environment and; NOTE: If you do not have an active Internet connection, you can find; • Online technical assistance —
78 │ Appendix Appendix WARNING: Use of controls, adjustments, or procedures other than those specified in this documentation may result in exposure to shock, electrical hazards, and/or mechanical hazards. For information on safety instructions, see the Safety Environment and Regulatory Information (...


 Dell AW2523HF
User Manual
Dell AW2523HF
User Manual
 Dell C2722DE
User Manual
Dell C2722DE
User Manual
 Dell E2424HS (210-BGPJ)
User Manual
Dell E2424HS (210-BGPJ)
User Manual
 Dell E2720H (210-ATZM-AMRFM21)
User Manual
Dell E2720H (210-ATZM-AMRFM21)
User Manual
 Dell E2724HS (210-BGQG)
User Manual
Dell E2724HS (210-BGQG)
User Manual
 Dell G3223Q (210-BDXS)
User Manual
Dell G3223Q (210-BDXS)
User Manual
 Dell P2723D (210-BDDX)
User Manual
Dell P2723D (210-BDDX)
User Manual
 Dell S2722DZ (210-BBSK)
User Manual
Dell S2722DZ (210-BBSK)
User Manual
 Dell U2414H
Manual
Dell U2414H
Manual
 Dell U2515H
Manual
Dell U2515H
Manual
 Dell S2340L
Manual
Dell S2340L
Manual