Page 3 - Contents
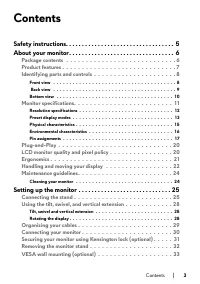
Contents Safety instructions. . . . . . . . . . . . . . . . . . . . . . . . . . . . . . . . . . 5About your monitor. . . . . . . . . . . . . . . . . . . . . . . . . . . . . . . . . 6 Package contents . . . . . . . . . . . . . . . . . . . . . . . . . . . . 6 Product features . . . . . . . . . . . . ....
Page 4 - | Contents; EU Product Database for Energy Label and Product Information
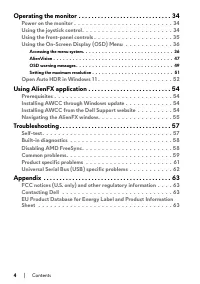
4 | Contents Operating the monitor . . . . . . . . . . . . . . . . . . . . . . . . . . . . . 34 Power on the monitor . . . . . . . . . . . . . . . . . . . . . . . . . 34 Using the joystick control . . . . . . . . . . . . . . . . . . . . . . . 34 Using the front-panel controls . . . . . . . . . . . ....
Page 5 - Safety instructions; secure location for future reference.
Safety instructions | 5 Safety instructions Use the following safety guidelines to protect your monitor from potential damage and to ensure your personal safety. Unless otherwise noted, each procedure included in this document assumes that you have read the safety information that shipped with your ...
Page 6 - | About your monitor; About your monitor; Package contents; component is missing, contact Dell. For more information, see; Contacting Dell; Display
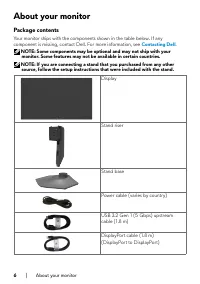
6 | About your monitor About your monitor Package contents Your monitor ships with the components shown in the table below. If any component is missing, contact Dell. For more information, see Contacting Dell . NOTE: Some components may be optional and may not ship with your monitor. Some features m...
Page 7 - Product features
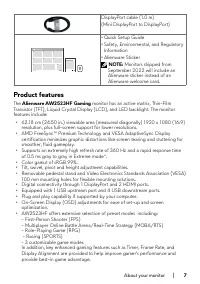
About your monitor | 7 DisplayPort cable (1.0 m) (Mini DisplayPort to DisplayPort) • Quick Setup Guide• Safety, Environmental, and Regulatory Information • Alienware Sticker NOTE: Monitors shipped from September 2022 will include an Alienware sticker instead of an Alienware welcome card. Product fea...
Page 8 - Identifying parts and controls; Front view
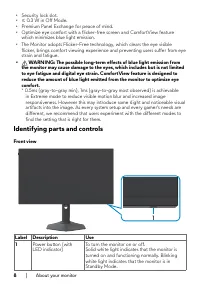
8 | About your monitor • Security lock slot. • ≤ 0.3 W in Off Mode. • Premium Panel Exchange for peace of mind. • Optimize eye comfort with a flicker-free screen and ComfortView feature which minimizes blue light emission. • The Monitor adopts Flicker-Free technology, which clears the eye visible fl...
Page 9 - Back view
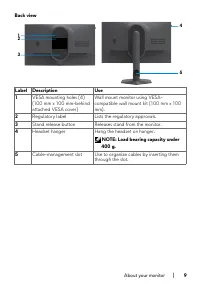
About your monitor | 9 Back view 5 2 3 4 1 Label Description Use 1 VESA mounting holes (4) (100 mm x 100 mm-behind attached VESA cover) Wall mount monitor using VESA- compatible wall mount kit (100 mm x 100 mm). 2 Regulatory label Lists the regulatory approvals. 3 Stand release button Releases stand...
Page 11 - Monitor specifications; Extreme
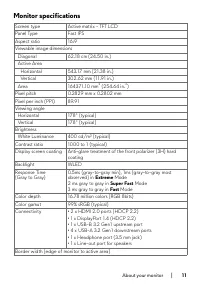
About your monitor | 11 Monitor specifications Screen type Active matrix - TFT LCD Panel Type Fast IPS Aspect ratio 16:9 Viewable image dimensions Diagonal 62.18 cm (24.50 in.) Active Area Horizontal 543.17 mm (21.38 in.) Vertical 302.62 mm (11.91 in.) Area 164371.10 mm 2 (254.64 in. 2 ) Pixel pitch...
Page 12 - Resolution specifications
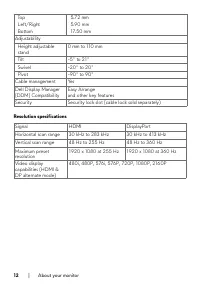
12 | About your monitor TopLeft/RightBottom 5.72 mm5.90 mm17.50 mm Adjustability Height adjustable stand 0 mm to 110 mm Tilt -5° to 21° Swivel -20° to 20° Pivot -90° to 90° Cable management Yes Dell Display Manager (DDM) Compatibility Easy Arrange and other key features Security Security lock slot (...
Page 14 - Electrical specifications; Video input signals; ness is expressed or implied.
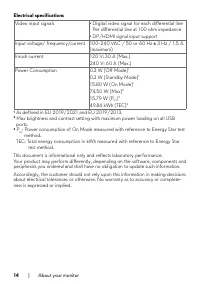
14 | About your monitor Electrical specifications Video input signals • Digital video signal for each differential line Per differential line at 100 ohm impedance • DP/HDMI signal input support Input voltage/ frequency/current 100-240 VAC / 50 or 60 Hz ± 3 Hz / 1.5 A (maximum) Inrush current 120 V: ...
Page 15 - Physical characteristics
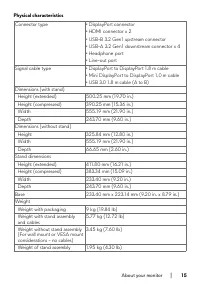
About your monitor | 15 Physical characteristics Connector type • DisplayPort connector • HDMI connector x 2• USB-B 3.2 Gen1 upstream connector• USB-A 3.2 Gen1 downstream connector x 4• Headphone port• Line-out port Signal cable type • DisplayPort to DisplayPort 1.8 m cable • Mini DisplayPort to Dis...
Page 16 - Environmental characteristics; Operating
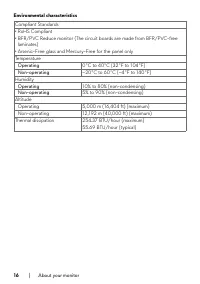
16 | About your monitor Environmental characteristics Compliant Standards• RoHS Compliant • BFR/PVC Reduce monitor (The circuit boards are made from BFR/PVC-free laminates) • Arsenic-Free glass and Mercury-Free for the panel onlyTemperature Operating 0°C to 40°C (32°F to 104°F) Non-operating –20°C t...
Page 17 - Pin assignments
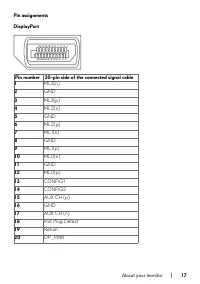
About your monitor | 17 Pin assignments DisplayPort Pin number 20-pin side of the connected signal cable 1 ML3(n) 2 GND 3 ML3(p) 4 ML2(n) 5 GND 6 ML2(p) 7 ML1(n) 8 GND 9 ML1(p) 10 ML0(n) 11 GND 12 ML0(p) 13 CONFIG1 14 CONFIG2 15 AUX CH (p) 16 GND 17 AUX CH (n) 18 Hot Plug Detect 19 Return 20 DP_PWR
Page 18 - HDMI port
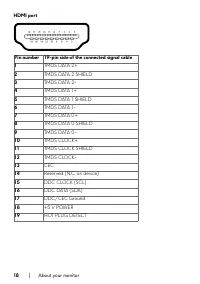
18 | About your monitor HDMI port Pin number 19-pin side of the connected signal cable1 TMDS DATA 2+ 2 TMDS DATA 2 SHIELD 3 TMDS DATA 2- 4 TMDS DATA 1+ 5 TMDS DATA 1 SHIELD 6 TMDS DATA 1- 7 TMDS DATA 0+ 8 TMDS DATA 0 SHIELD 9 TMDS DATA 0- 10 TMDS CLOCK+ 11 TMDS CLOCK SHIELD 12 TMDS CLOCK- 13 CEC 14 ...
Page 20 - Operating the monitor; LCD monitor quality and pixel policy; Quality and Pixel Policy, see
20 | About your monitor Plug-and-Play You can install the monitor to any Plug-and-Play-compatible computer. The monitor automatically provides the computer with its Extended Display Identification Data (EDID) using Display Data Channel (DDC) protocols so that the computer can configure itself and op...
Page 21 - Ergonomics; result in eye strain.
About your monitor | 21 Ergonomics CAUTION: Improper or prolonged usage of keyboard may result in injury. CAUTION: Viewing the monitor screen for extended periods of time may result in eye strain. For comfort and efficiency, observe the following guidelines when setting up and using your computer wo...
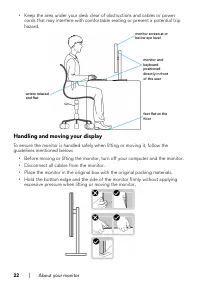
Page 22 - Handling and moving your display; guidelines mentioned below:
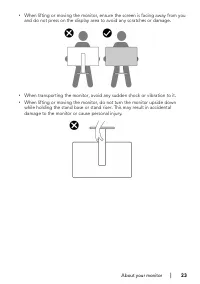
22 | About your monitor • Keep the area under your desk clear of obstructions and cables or power cords that may interfere with comfortable seating or present a potential trip hazard. monitor screen at or below eye level monitor and keyboard positioned directl y in front of the user feet flat on the...
Page 24 - Maintenance guidelines; Cleaning your monitor; Safety Instructions; and show white scuff marks more than a lighter- colored monitor.
24 | About your monitor Maintenance guidelines Cleaning your monitor WARNING: Before cleaning the monitor, unplug the monitor power cable from the electrical outlet. CAUTION: Read and follow the Safety Instructions before cleaning the monitor. Improper cleaning methods can result in physical damage ...
Page 25 - Setting up the monitor; Connecting the stand; To connect the monitor stand:; Align and place the stand riser on the stand base.
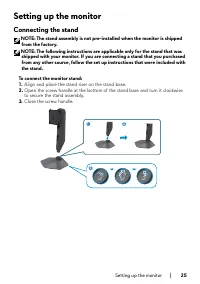
Setting up the monitor | 25 Setting up the monitor Connecting the stand NOTE: The stand assembly is not pre-installed when the monitor is shipped from the factory. NOTE: The following instructions are applicable only for the stand that was shipped with your monitor. If you are connecting a stand tha...
Page 26 - | Setting up the monitor; front flap is opened to allow space for the assembly.; press down the stand assembly to snap it into place.
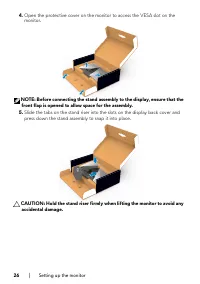
26 | Setting up the monitor 4. Open the protective cover on the monitor to access the VESA slot on the monitor. NOTE: Before connecting the stand assembly to the display, ensure that the front flap is opened to allow space for the assembly. 5. Slide the tabs on the stand riser into the slots on the ...
Page 28 - Using the tilt, swivel, and vertical extension; Tilt, swivel and vertical extension; and search for the
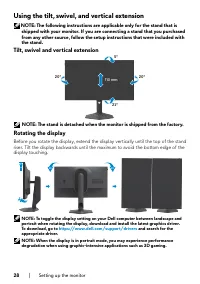
28 | Setting up the monitor Using the tilt, swivel, and vertical extension NOTE: The following instructions are applicable only for the stand that is shipped with your monitor. If you are connecting a stand that you purchased from any other source, follow the setup instructions that were included wi...
Page 29 - Organizing your cables; ing Your Monitor; for cable attachment) organize all cables as shown above.
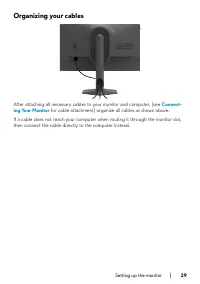
Setting up the monitor | 29 Organizing your cables After attaching all necessary cables to your monitor and computer, (see Connect- ing Your Monitor for cable attachment) organize all cables as shown above. If a cable does not reach your computer when routing it through the monitor slot, then connec...
Page 30 - Connecting your monitor; the; Turn off your computer.; Connecting the DP cable; Connecting the USB cable
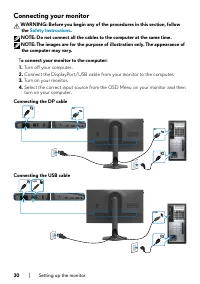
30 | Setting up the monitor Connecting your monitor WARNING: Before you begin any of the procedures in this section, follow the Safety Instructions . NOTE: Do not connect all the cables to the computer at the same time. NOTE: The images are for the purpose of illustration only. The appearance of the...
Page 31 - Securing your monitor using Kensington lock (optional); The security lock slot is located at the bottom of the monitor. (See; Security lock
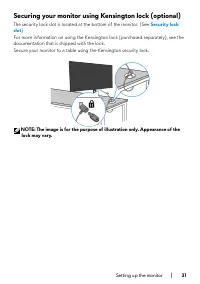
Setting up the monitor | 31 Securing your monitor using Kensington lock (optional) The security lock slot is located at the bottom of the monitor. (See Security lock slot ) For more information on using the Kensington lock (purchased separately), see the documentation that is shipped with the lock.S...
Page 32 - Removing the monitor stand; CAUTION: To prevent scratches on the LCD screen when removing the; Place the monitor on a soft cloth or cushion.
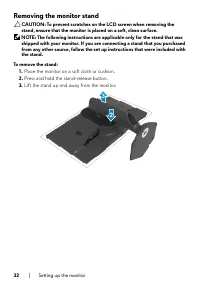
32 | Setting up the monitor Removing the monitor stand CAUTION: To prevent scratches on the LCD screen when removing the stand, ensure that the monitor is placed on a soft, clean surface. NOTE: The following instructions are applicable only for the stand that was shipped with your monitor. If you ar...
Page 33 - that is shipped with the wall mounting kit.; NOTE: For use only with UL or CSA or GS-listed wall mount bracket with
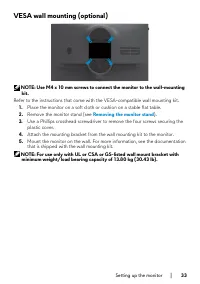
Setting up the monitor | 33 VESA wall mounting (optional) NOTE: Use M4 x 10 mm screws to connect the monitor to the wall-mounting kit. Refer to the instructions that come with the VESA-compatible wall mounting kit. 1. Place the monitor on a soft cloth or cushion on a stable flat table. 2. Remove the...
Page 34 - | Operating the monitor; Power on the monitor; Joystick
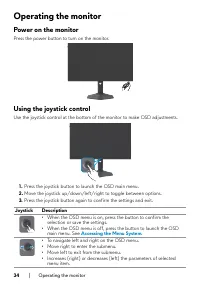
34 | Operating the monitor Operating the monitor Power on the monitor Press the power button to turn on the monitor. Using the joystick control Use the joystick control at the bottom of the monitor to make OSD adjustments. 1. Press the joystick button to launch the OSD main menu. 2. Move the joystic...
Page 35 - Using the front-panel controls; Accessing the menu system
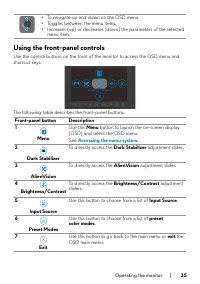
Operating the monitor | 35 • To navigate up and down on the OSD menu • Toggles between the menu items. • Increases (up) or decreases (down) the parameters of the selected menu item. Using the front-panel controls Use the control buttons on the front of the monitor to access the OSD menu and shortcut...
Page 36 - Use this menu to personalize your visual gameplay; Preset Modes
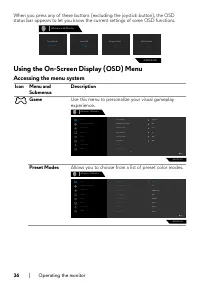
36 | Operating the monitor When you press any of these buttons (excluding the joystick button), the OSD status bar appears to let you know the current settings of some OSD functions. Alienware 25 Monitor AW2523HF Standard Preset Modes Off Smart HDR Fast Response Time 0 Dark Stabilizer Using the On-S...
Page 37 - The possible long-term effects of blue
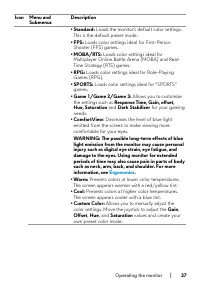
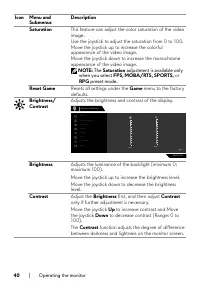
Operating the monitor | 37 Icon Menu and Submenus Description • Standard: Loads the monitor’s default color settings. This is the default preset mode. • FPS: Loads color settings ideal for First-Person Shooter (FPS) games. • MOBA/RTS: Loads color settings ideal for Multiplayer Online Battle Arena (M...
Page 38 - Off
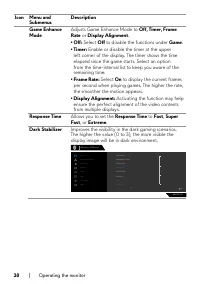
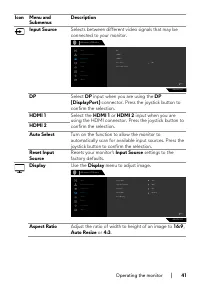
38 | Operating the monitor Icon Menu and Submenus Description Game Enhance Mode Adjusts Game Enhance Mode to Off, Timer, Frame Rate or Display Alignment . • Off: Select Off to disable the functions under Game . • Timer: Enable or disable the timer at the upper left corner of the display. The timer s...
Page 39 - AlienVision; Hue adjustment is available only for
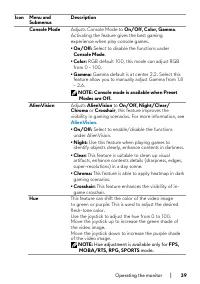
Operating the monitor | 39 Icon Menu and Submenus Description Console Mode Adjusts Console Mode to On/Off, Color, Gamma . Activating the feature gives the best gaming experience when play console games. • On/Off: Select to disable the functions under Console Mode . • Color: RGB default 100, this mod...
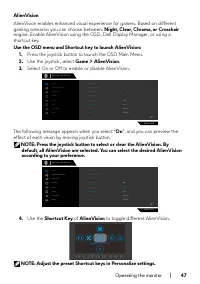
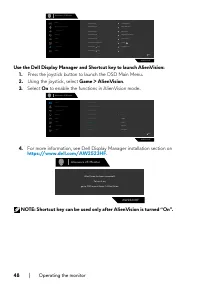
Page 48 - Press the joystick button to launch the OSD Main Menu.; to enable the functions in AlienVision mode.; NOTE: Shortcut key can be used only after AlienVision is turned “On”.
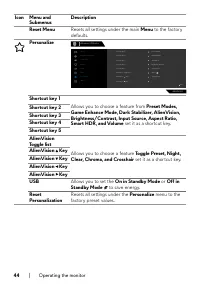
48 | Operating the monitor Alienware 25 Monitor AW2523HF Shortcut Key 2 Shortcut Key 1 Shortcut Key 3 Dark Stabilizer Preset Modes AlienVision AlienVision Toggle Preset AlienVision - Game Shortcut Key 5 Shortcut Key 4 AlienVision Toggle List Input Source Brightness/Contrast Exit Display Menu Persona...
Page 49 - OSD warning messages; Monitor Specifications; Standby Mode; OSD
Operating the monitor | 49 OSD warning messages When the monitor does not support a particular resolution, you can see the following message: The current input timing is not supported by the monitor display. Please change your input timing to 1920x1080, 60Hz or any other monitor listed timing as per...
Page 50 - Factory Reset
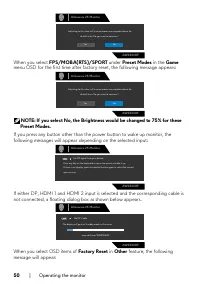
50 | Operating the monitor Yes No Adjusting to this value will increase power consumption above the default level. Do you want to continue? Alienware 25 Monitor AW2523HF When you select FPS/MOBA(RTS)/SPORT under Preset Modes in the Game menu OSD for the first time after factory reset, the following ...
Page 51 - Troubleshooting
Operating the monitor | 51 Yes No Are you sure you want to reset to default settings? Alienware 25 Monitor AW2523HF See Troubleshooting for more information. Setting the maximum resolution To set the maximum resolution for the monitor:In Windows 7, Windows 8 or Windows 8.1: 1. For Windows 8 or Windo...
Page 52 - Open Auto HDR in Windows 11; Use the joystick, select; Click Windows start menu, click
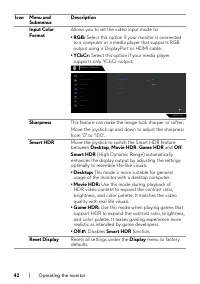
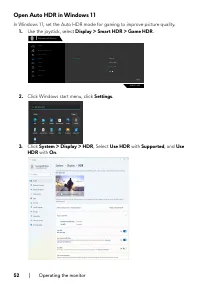
52 | Operating the monitor Open Auto HDR in Windows 11 In Windows 11, set the Auto HDR mode for gaming to improve picture quality. 1. Use the joystick, select Display > Smart HDR > Game HDR . AW2523HF Exit Input Color Format Aspect Ratio Smart HDR Sharpness Reset Display Desktop Game HDR Alien...
Page 53 - Auto HDR; with; A message pops as below when you start a game.
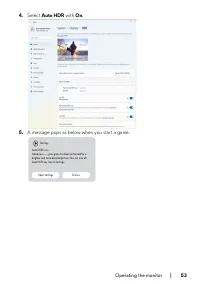
Operating the monitor | 53 4. Select Auto HDR with On . 5. A message pops as below when you start a game. Settings Auto HDR is onGood news --- your game has been enhanced for a brighter and more detailed picture. You can turn offAuto HDR any time in Settings. Open Settings Dismiss
Page 54 - | Using AlienFX application; Using AlienFX application; Prerequisites; Alternatively, you can find the AWCC application in the Start; Windows Update; Installing AWCC from the Dell Support website; ter AW2523HF in the query field at
54 | Using AlienFX application Using AlienFX application NOTE: For more information, see Alienware Command Center Online Help. Prerequisites Before installing the AWCC on a non-Alienware system: • Ensure the OS of your computer is Windows 10 R3 or later.• Ensure your internet connection is active. I...
Page 55 - Navigating the AlienFX window; FX
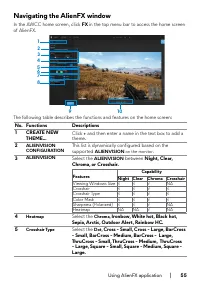
Using AlienFX application | 55 Navigating the AlienFX window In the AWCC home screen, click FX in the top menu bar to access the home screen of AlienFX. 10 9 1 6 78 45 3 2 The following table describes the functions and features on the home screen: No. Functions Descriptions 1 CREATE NEW THEME... Cl...
Page 56 - Theme saved successfully!
56 | Using AlienFX application 6 CROSSHAIR COLOR MASK Differentiate the white color selection from background color in Light mode. 7 TOGGLE LIST Select group of ALIENVISION and use the mapped hotkey to toggle through the list. 8 SWITCH SHORTCUT Assign shortcut key to cycle through the list. 9 SAVE T...
Page 57 - performing the following steps:; disconnected or damaged.
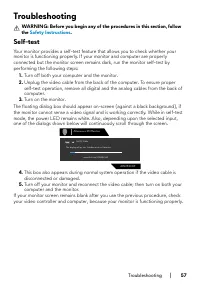
Troubleshooting | 57 Troubleshooting WARNING: Before you begin any of the procedures in this section, follow the Safety Instructions . Self-test Your monitor provides a self-test feature that allows you to check whether your monitor is functioning properly. If your monitor and computer are properly ...
Page 58 - | Troubleshooting; Diagnostic; Disabling AMD FreeSync
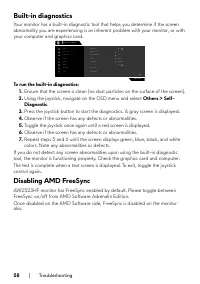
58 | Troubleshooting Built-in diagnostics Your monitor has a built-in diagnostic tool that helps you determine if the screen abnormality you are experiencing is an inherent problem with your monitor, or with your computer and graphics card. AW2523HF Exit DDC/CI Display Info LCD Conditioning Firmware...
Page 59 - Common problems; Common; Turn off the monitor and turn it on again.
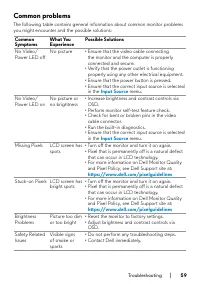
Troubleshooting | 59 Common problems The following table contains general information about common monitor problems you might encounter and the possible solutions: Common Symptoms What You Experience Possible Solutions No Video/ Power LED off No picture • Ensure that the video cable connecting the m...
Page 60 - test; problem is flagged in the self-test mode.
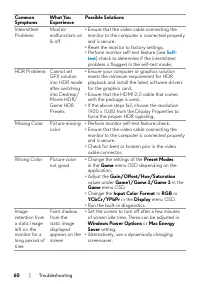
60 | Troubleshooting Common Symptoms What You Experience Possible Solutions Intermittent Problems Monitor malfunctions on & off • Ensure that the video cable connecting the monitor to the computer is connected properly and is secure. • Reset the monitor to factory settings. • Perform monitor sel...
Page 61 - Product specific problems; Turn off the monitor, unplug the power
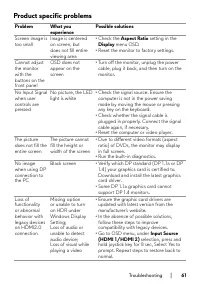
Troubleshooting | 61 Product specific problems Problem What you experience Possible solutions Screen image is too small Image is centered on screen, but does not fill entire viewing area • Check the Aspect Ratio setting in the Display menu OSD. • Reset the monitor to factory settings. Cannot adjust ...
Page 62 - Universal Serial Bus (USB) specific problems; Specific; Turn off your monitor and turn it on again.
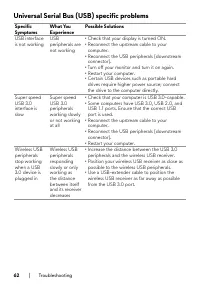
62 | Troubleshooting Universal Serial Bus (USB) specific problems Specific Symptoms What You Experience Possible Solutions USB interface is not working USB peripherals are not working • Check that your display is turned ON. • Reconnect the upstream cable to your computer. • Reconnect the USB periphe...
Page 63 - Appendix; To get online Monitor support content:
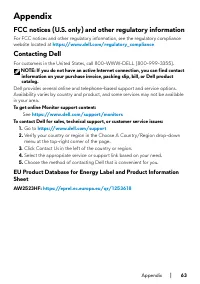
Appendix | 63 Appendix FCC notices (U.S. only) and other regulatory information For FCC notices and other regulatory information, see the regulatory compliance website located at https://www.dell.com/regulatory_compliance Contacting Dell For customers in the United States, call 800-WWW-DELL (800-999...