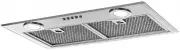
Page 2 - WARNING: - TO REDUCE THE RISK OF INJURY TO PERSONS IN THE EVENT OF A
2 READ AND SAVE THESE INSTRUCTIONS BEFORE YOU START INSTALLING THIS RANGE HOOD WARNING: - TO REDUCE THE RISK OF A RANGE TOP GREASE FIRE: a) Never leave surface units unattended at high settings. Boilovers cause smoking and greasy spillovers that may ignite. Heat oils slowly on low or medium setting....
Page 3 - WARNING; VENTING REQUIREMENTS; Cold Weather installations
3 3. When cutting or drilling into wall or ceiling, do not damage electrical wiring and other hidden utilities. 4. Ducted fans must always be vented to the outdoors. ALL WALL AND FLOOR OPENINGS WHERE THE RANGE HOOD IS INSTALLED MUST BE SEALED. This Range Hood requires at least 24" of clearance b...
Page 4 - State of California Proposition 65 Warning (US only); defects or other reproductive harm.; ELECTRICAL REQUIREMENTS; the field wiring compartment.
4 • Electrical ground is required on this Range Hood. • If cold water pipe is interrupted by plastic, nonmetallic gaskets or other materials, DO NOT use for grounding. • DO NOT ground to a gas pipe. • DO NOT have a fuse in the neutral or grounding circuit. A fuse in the neutral or grounding circuit ...
Page 6 - INSTALLATION HEIGHT REQUIREMENTS; THE HOOD IS NOT DESIGNED FOR USE OVER PRO-STYLE COOKING
6 MIN. 24" OVER ELECTRIC INSTALLATION HEIGHT REQUIREMENTS MIN. 30" OVER GAS THE HOOD IS NOT DESIGNED FOR USE OVER PRO-STYLE COOKING SURFACES, INSTALLATIONS OVER PRO-STYLE COOKING SURFACES WILL COMPLETELY VOID THE WARRANTY OF THIS PRODUCT . WARNING !
Page 7 - MAIN PARTS; Components; Product Components; Instruction Manual
7 MAIN PARTS Components Ref. Qty. Product Components 1 1 Hood Body, complete with: Controls, Light, Filters,Blower. 10 1 Damper ø 5" Ref. Qty. Installation Components 12a 10 Screws (for hood installation) 12b 4 Screws 1/8"x1/2" (for Cover installation) Qty. Documentation 1 Instruction Ma...
Page 8 - Activated Charcoal Filter sku # KITFC142; Two men required for installation
8 Available Accessories Parts needed - 5" Round Metal ductwork . Activated Charcoal Filter sku #; KITFC142 Two men required for installation Wear work gloves for safety
Page 10 - INSTALL THE RANGE HOOD; Remove grease filters and set aside.
10 INSTALL THE RANGE HOOD 1 2 Remove grease filters and set aside. Remove the bottom of the Range Hood by pulling forward as shown.
Page 11 - Create an opening in the bottom of the Cabinet, as shown.; Attention; plug in the future, after installing the product.
11 3 The Hood can be installed directly on the underside of the cabinet (minimum 24" for electric ranges and 30" for gas ranges). Create an opening in the bottom of the Cabinet, as shown. Attention : The cabinet must be accessible so that you can access the hood cable and plug in the future,...
Page 12 - from underneath the hood.; KSEG24XU uses 8 screws
12 Insert the hood until the side supports snap into place. Lock in position by tightening the screws Vf from underneath the hood. Fasten using the 10 screws 12a provided. 10 1/2” 1/2” 19” 9/16 - 26” 5/8 Min.9/16" Max 1" 3/16 Vf Attention: KSEG24XU uses 8 screws KSEG30XU uses 10 screws 4 5
Page 14 - CHOOSE YOUR DUCTING METHOD; Ducted Venting Installation
14 CHOOSE YOUR DUCTING METHOD Ducted Venting Installation 8 Non Ducted - Recirculation Option Install Damper that is included with the Hood before connecting to the ductwork. H I Install Roof or Wall Cap purchased separately. Connect the ø 5" metal ductwork to the Roof or Wall Cap and then attac...
Page 15 - ELECTRICAL INSTALLATION WITH CONNECTION CABLE; GROUNDING INSTRUCTIONS; - Improper grounding can result in a risk of electric shock.
15 9 ELECTRICAL INSTALLATION WITH CONNECTION CABLE Max. 33 7/16 ” GROUNDING INSTRUCTIONS This appliance must be grounded. In the event of an electrical short circuit, grounding reduces the risk of electric shock by providing an escape wire for the electric current. This appliance is equipped with a ...
Page 16 - For Non-Ducted Recirculation Option; The charcoal filters must be
16 10 For Non-Ducted Recirculation Option The charcoal filters must be inserted behind the grease filters as indicated. Required Activated Charcoal Filter Accessory - sku # - KITFC142
Page 17 - USE AND CARE INFORMATION; For Best Results; odors from the kitchen.; Button; Press the button to turn the light ON and press again to turn it OFF.
17 USE AND CARE INFORMATION For Best Results Start the Range Hood several minutes before cooking to develop proper airflow. Allow the Range Hood to operate for several minutes after cooking is complete to clear all smoke and odors from the kitchen. Button Function LED indicator light (L) Light On/Of...
Page 18 - Cleaning Exterior surfaces:; Replacing Activated Charcoal Filter
18 Cleaning metal grease filters The metal grease filters can be cleaned in hot detergent solution or washed in the dishwasher. They should be cleaned every 2 months use, or more frequently if use is particularly heavy. • Remove the filter, pushing the lever towards the back of the unit and at the s...
Page 19 - Light Bulb Replacement
19 Light Bulb Replacement • Remove grease filters and set aside. • Remove the bottom of the Range Hood by 4 screws 12b as shown. • Replace the lamp with a new one of the same type. • Replace the bottom of the Range Hood by 4 screws 12b . • Replace the grease filters . E12 self-ballasted led lamps – ...