Smeg CK2000LED - User Manual
Smeg CK2000LED Range Hood – User Manual, read for free online in PDF format. We hope this helps you resolve any issues you may have. If you have further questions, please contact us through the contact form.


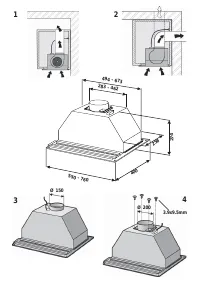

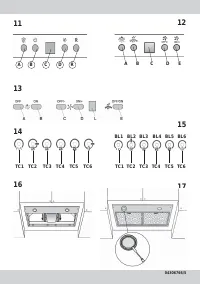
Table of Contents:
- Page 2 – ENGLISH; DESCRIPTION; INSTALLATION IN FILTERING VERSION:
- Page 3 – OPERATION
- Page 5 – DEUTSCH; BESCHREIBUNG; INSTALLATION
- Page 6 – INSTALLATION UMLUFTVERSION:; FUNKTIONSWEISE
- Page 8 – FRANCAIS
- Page 9 – INSTALLATION VERSION RECYCLAGE :; FONCTIONNEMENT
- Page 12 – ITALIANO; DESCRIZIONE; INSTALLAZIONE IN VERSIONE ASPIRANTE:
- Page 13 – INSTALLAZIONE IN VERSIONE FILTRANTE:; FUNZIONAMENTO; FUNZIONAMENTO COME CAPPA TRADIZIONALE :
- Page 15 – ESPAÑOL; DESCRIPCIÓN; INSTALACIÓN
- Page 16 – INSTALACION EN VERSION FILTRANTE:; FUNCIONAMIENTO
- Page 18 – PORTUGUÊS; DESCRIÇÃO
- Page 19 – INSTALAÇÃO; INSTALAÇÃO NA VERSÃO FILTRANTE:; FUNCIONAMENTO
- Page 22 – NEDERLANDS; BESCHRIJVING
- Page 23 – INSTALLATIE IN DE FILTERVERSIE:; WERKING
- Page 25 – РУССКИЙ; ОПИСАНИЕ
INSTRUCTIONS FOR INSTALLATION AND USE
MONTAGE- UND GEBRAUCHSANWEISUNG
INSTRUCTIONS POUR L'INSTALLATION ET L’UTILISATION
ISTRUZIONI PER L'INSTALLAZIONE E L’USO
INSTRUCCIONES PARA INSTALACIÓN Y USO
INSTRUÇÕES DE INSTALAÇÃO Y UTILIZAÇÃO
AANWIJZING VOOR GEBRUIK EN INSTALLATIE
ИНСТРУКЦИИ ПО ПОЛЬЗОВАНИЮ
"Loading the manual" means you need to wait until the file loads and becomes available for online reading. Some manuals are very large, and the time they take to appear depends on your internet speed.
Summary
ENGLISH If the supply cord is damaged, it must be replaced by the manufacturer, its service agent or similarly qualifiedpersons in order to avoid a hazard. Only for hoods equipped with electronic control:The 4th speed (intensive) is automatically lowered to 3rd speed after 5 minutes of operation to ...
OPERATION Depending on the model, the unit is equipped with the following controls: Controls shown in Fig. 11: Button A = turns the lights on/off. Button B = turns the TIMER on/off: press once to turn the timer on, therefore, after 5 minutes, the motor cuts out (at the same time the selected speedbl...
- Fig. 17: open the cover by prising in the slots. Replace with lamps of the same type. WARNING: Do nottouch the new lamp with bare hands.- If the light spot is damaged, it must be replaced only by the manufacturer, its service agent or similarly qualifiedpersons in order to avoid a hazard. DEUTSCH ...