Page 2 - IMPORTANT SAFETY INSTRUCTIONS; • Do not allow to be used as a toy. Close attention is
Eng 1 This household sewing machine is designed to comply with IEC/EN 60335-2-28 and UL1594. When using an electrical appliance, basic safety precautions should always be followed, including the following: Read all instructions before using this household sewing machine. Keep the instructions in a s...
Page 3 - SAVE THESE INSTRUCTIONS
• Keep fingers away from all moving parts. Special care is required around the sewing machine needle. • Always use the proper needle plate. The wrong plate can cause the needle to break. • Do not use bent needles. • Do not pull or push fabric while stitching. It may deflect the needle causing it to ...
Page 5 - SINGER is the exclusive trademark of
SERVICING OF DOUBLE INSULATED PRODUCTS In a double-insulated product, two systems of insulation are provided instead of grounding. No ground means is provided on a double-insulated product, nor should a means for grounding be added to the product. Servicing of a double- insulated product requires ex...
Page 6 - P O U R R E D U I R E L E R I S Q U E D E
Fre 1 Cette machine à coudre à usage domestique est conçue pour répondre aux normes IEC/EN 60335-2-28 et UL1594. C O N S I G N E S D E S É C U R I T É IMPORTANTES Lors de l’utilisation d’un appareil électrique, les précautions de sécurité essentielles doivent toujours être respectées, y compris les ...
Page 8 - CONSERVEZ CES INSTRUCTIONS; POUR L’EUROPE UNIQUEMENT :
Fre 3 • Si le cordon de la pédale est endommagé, il doit être remplacé par le fabricant ou son agent de service, ou toute autre personne qualifiée, afin d’éviter les risques. • Cette machine est équipée d’une double isolation. N’utilisez que des pièces détachées d’origine. Voir les instructions rela...
Page 9 - ENTRETIEN DES PRODUITS; isolation et ne doit non plus y être ajouté. L’entretien d’un
Fre 4 SINGER est une marque exclusive de The Singer Company Limited S.à.r.l. ou de ses Affiliés. © 2019 The Singer Company Limited S.à.r.l. ou de ses Affiliés. Tous droits réservés. Veuillez noter qu’en cas de mise au rebut, ce produit doit bénéficier d ’ u n r e c y c l a g e s é c u r i s é , c o ...
Page 10 - Cuando utilice un aparato eléctrico, debe respetar siempre las; PELIGRO –; ADVERTENCIA –; PA R A R E D U C I R E L R I E S G O D E; de coser inmediatamente después de utilizarla y antes de; RIESGO DE QUEMADURAS, INCENDIO, DESCARGA; la máquina de coser al distribuidor autorizado o centro de
Spa 1 Esta máquina de coser doméstica ha sido diseñada de conformidad con las normas IEC/EN 60335-2-28 y UL1594. INSTRUCCIONES DE SEGURIDAD IMPORTANTES Cuando utilice un aparato eléctrico, debe respetar siempre las precauciones de seguridad básicas, incluyendo las siguientes: Lea todas las instrucci...
Page 12 - GUARDE ESTAS INSTRUCCIONES; PARA EUROPA SOLAMENTE:
Spa 3 GUARDE ESTAS INSTRUCCIONES PARA EUROPA SOLAMENTE: Esta máquina puede ser utilizada por niños de 8 años en adelante y por personas con alguna discapacidad física, sensorial o mental o sin la experiencia y los conocimientos necesarios en el caso de que hayan sido supervisados o recibido instrucc...
Page 13 - amplios conocimientos del sistema y sólo debe ser realizado; SINGER es una marca registrada de; Recuerde que este producto se debe reciclar de un modo seguro en
Spa 4 MANTENIMIENTO DE PRODUCTOS CON DOBLE AISLAMIENTO Un producto provisto de doble aislamiento incorpora dos sistemas de aislamiento en lugar de la toma a tierra. Los productos con doble aislamiento no incorporan ningún dispositivo de toma a tierra, ni se debe acoplar al mismo ningún dispositivo d...
Page 14 - TABLE OF CONTENTS; CARING FOR YOUR MACHINE
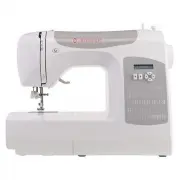
6 1. KNOWING YOUR SEWING MACHINE Machine identification ------------------------9-10 Accessories --------------------------------------- 11 Setting up your machine -----------------------12 Spool pins, Presser foot lifter ----------------- 13 Darning plate, Converting to free-arm sewing ------------...
Page 15 - Mise en place de la canette dans le; TABLE DES MATIÈRES; Point de matelassage d'apparence; Version pour l’Europe
7 1. DESCRIPTION DE LA MACHINE À COUDRE Description -------------------------------------- 9-10Accessoires----------------------------------------- 11Préparation de la machine ------------------ 12Porte-bobine, Levier du pied presseur ----------------------- 13Plaque De Reprisage, Utilisation du bra...
Page 16 - INDICE DE CONTENIDOS; ACCESORIOS OPCIONALES; RENDIMIENTO
8 1. PRINCIPALES PARTES DE LA MAQUINA Identificación de la máquina ----------------- 9-10 Accesorios -----------------------------------------11 Preparación de la máquina ----------------------12 Porta carretes, Palanca pie prensatelas ---------13 Placa transparente , Utilización del brazo libre ---...
Page 17 - KNOWING YOUR SEWING MACHINE; DESCRIPTION DE LA MACHINE À COUDRE; PRINCIPALES PARTES DE LA MAQUINA; MACHINE IDENTIFICATION
9 1. KNOWING YOUR SEWING MACHINE 1. DESCRIPTION DE LA MACHINE À COUDRE 1. PRINCIPALES PARTES DE LA MAQUINA 1. Bobbin winding tension disk 2. Thread take-up 3. Thread tension control 4. Face cover 5. Thread cutter 6. Removable extension table / Accessory box 7. Bobbin winding shaft 8. Bobbin winding ...
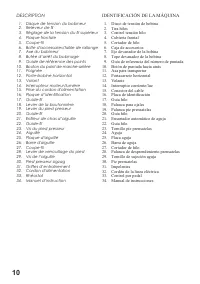
Page 18 - DESCRIPTION; IDENTIFICACIÓN DE LA MÁQUINA
10 DESCRIPTION IDENTIFICACIÓN DE LA MÁQUINA 1. Disque de tension du bobineur 2. Releveur de fil 3. Réglage de la tension du fil supérieur 4. Plaque frontale 5. Coupe-fil 6. Boîte d'accessoires/table de rallonge 7. Axe du bobineur 8. Butée d’arrêt du bobinage 9. Guide de référence des points 10. Bout...
Page 19 - The foot that comes on your sewing; Rondelle feutre; El prensatelas que viene con la máquina; ACCESSORIES; ACCESSOIRES; ACCESORIOS
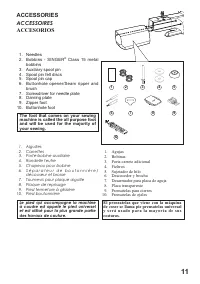
11 9 10 5 6 7 8 1 3 2 4 1. Needles 2. Bobbins - SINGER ® Class 15 metal bobbins 3. Auxiliary spool pin 4. Spool pin felt discs 5. Spool pin cap 6. Buttonhole opener/Seam ripper and brush 7. Screwdriver for needle plate 8. Darning plate 9. Zipper foot 10. Buttonhole foot The foot that comes on your s...
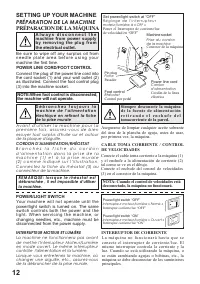
Page 20 - FOOT CONTROL; machine the first time.; the machine will not operate.; PRÉPARACION DE LA MÁQUINA; PRÉPARATION DE LA MACHINE; SETTING UP YOUR MACHINE; A l w a y s d i s c o n n e c t t h e; Connect the plug of the power line cord into
12 B r a n c h e z l a f i c h e d u c o r d o n d ’ a l i m e n t a t i o n d a n s l a p r i s e d e l a m a c h i n e ( 1 ) e t à l a p r i s e m u r a l e (2) c o m m e i n d i q u é s u r l ’ i l l u s t r a t i o n . Connectez la fiche du rhéostat (3) au connecteur de la machine. P OWER LINE C...
Page 21 - SPOOL PINS; with a spool cap to ensure smooth flow of; PORTE-BOBINE HORIZONTAL; PORTE-BOBINE VERTICAL; PORTA CARRETE VERTICAL; PRESSER FOOT LIFTER; Lift and hold it to its highest position to; LEVIER DU PIED PRESSEUR; PALANCA PIE PRENSATELAS
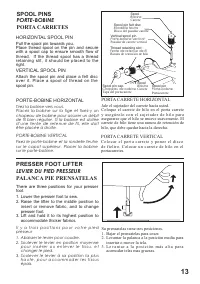
13 Spool pin cap Chapeau de bobine Tapa del portacarrete Spool Bobine Carrete Spool pin Porte-bobine Portacarrete Vertical spool pin Porte-bobine vertical Pasador de carrete vertical Spool Bobine Carrete Thread retaining slot Fente de retenue de fil Ranura de retención de hilo Spool pin felt disc Ro...
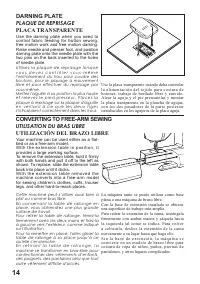
Page 22 - CONVERTING TO FREE-ARM SEWING; UTILISATION DU BRAS LIBRE; UTILIZACIÓN DEL BRAZO LIBRE; PLAQUE DE REPRISAGE; PLACA TRANSPARENTE
14 Your machine can be used either as a flat- bed or as a free-arm model. W i t h t h e e x t e n s i o n t a b l e i n p o s i t i o n , i t provides a large working surface. To remove the extension table, hold it firmly with both hands and pull it off to the left as shown. To replace, slide the ex...
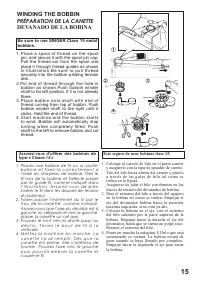
Page 23 - WINDING THE BOBBIN; Be sure to use SINGER Class 15 metal; type « Classe 15 »; Este seguro de usar bobinas clase 15.; PRÉPARATION DE LA CANETTE; DEVANADO DE LA BOBINA
15 4 1 3 2 1. Place a spool of thread on the spool pin, and secure it with the spool pin cap. Pull the thread out from the spool and place it through thread guides as shown i n i l l u s t r a t i o n . B e s u r e t o p u l l t h r e a d securely into the bobbin winding tension disk. 2.Put end of t...
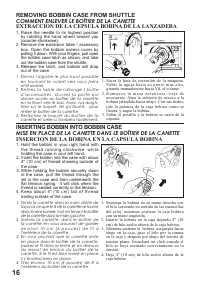
Page 24 - REMOVING BOBBIN CASE FROM SHUTTLE; COMMENT ENLEVER LE BOÎTIER DE LA CANETTE; EXTRACCION DE LA CEPSULA BOBINA DE LA LANZADERA; MISE EN PLACE DE LA CANETTE DANS LE BOÎTIER DE LA CANETTE; INSERCION DE LA BOBINA EN LA CAPSULA BOBINA; façon à ce que le fil de la canette se tourne
16 1. Raise the needle to its highest position by rotating the hand wheel toward you (counter-clockwise). 2. Remove the extension table / accessory box. Open the bobbin access cover by pulling it down. With your fingers, pull open the bobbin case latch as shown, and take out the bobbin case from the...
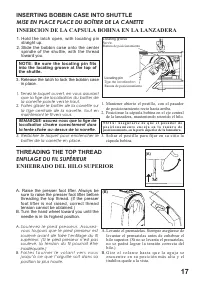
Page 25 - Release the latch to lock the bobbin case; INSERTING BOBBIN CASE INTO SHUTTLE; maintenant le fil vers vous.; MISE EN PLACE PLACE DU BOÎTIER DE LA CANETTE; INSERCION DE LA CAPSULA BOBINA EN LA LANZADERA; ENFILAGE DU FIL SUPÉRIEUR; ENHEBRADO DEL HILO SUPERIOR; soulevé avant de faire l’enfilage du fil; NOTE: Be sure the locating pin fits; localisation s'insère correctement dans
17 Locating pin 1. Hold the latch open, with locating pin straight up. 2. Slide the bobbin case onto the center spindle of the shuttle, with the thread toward you. 3. Release the latch to lock the bobbin case in place. INSERTING BOBBIN CASE INTO SHUTTLE 1. Tenez le loquet ouvert, en vous assurant qu...
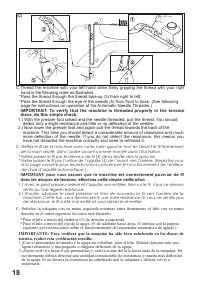
Page 26 - To verify that the machine is threaded properly in the tension; sentir qu’une légère résistance.; derecha en el orden siguiente tal como está ilustrado.; tensión, realice esta verificación sencilla:; ligera resistencia y una pequeña o ninguna deflexión de la aguja.
18 ② ③ ① ④ ⑤ 1 2 3 5 4 *Pass the thread through the thread take-up (3) from right to left. *Pass the thread through the eye of the needle (5) from front to back. (See following page for instructions on operation of the Automatic Needle Threader.) 1.) With the presser foot raised and the needle threa...
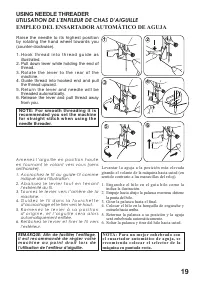
Page 27 - N O T E : F o r s m o o t h t h r e a d i n g i t i s; USING NEEDLE THREADER; Raise the needle to its highest position; i l e s t r e c o m m a n d é d e r é g l e r v o t r e; NOTA: Para un mejor enhebrado con; UTILISATION DE L’ENFILEUR DE CHAS D’AIGUILLE; G u i d e z l e f i l d a n s l a f o u r c h e t t e; EMPLEO DEL ENSARTADOR AUTOMÁTICO DE AGUJA
19 1. H o o k t h r e a d i n t o t h r e a d g u i d e a s illustrated. 2. Pull down lever while holding the end of thread. 3. R o t a t e t h e l e v e r t o t h e r e a r o f t h e machine. 4. Guide thread into hooked end and pull the thread upward. 5. R e t u r n t h e l e v e r a n d n e e d l ...
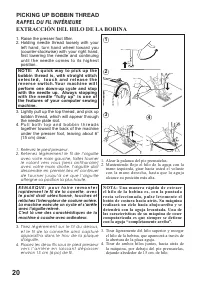
Page 28 - s e l e c t e d , t o u c h a n d r e l e a s e t h e; PICKING UP BOBBIN THREAD; RAPPEL DU FIL INFÉRIEURE; EXTRACCIÓN DEL HILO DE LA BOBINA; first lowering the needle and continuing; avec votre main droite, l’aiguille doit; Lightly pull up the top thread, and pick up; apparaîtra dans le trou de la plaque
20 NOTE: A quick way to pick up the bobbin thread is, with straight stitch s e l e c t e d , t o u c h a n d r e l e a s e t h e r e v e r s e s w i t c h . Yo u r m a c h i n e w i l l perform one down-up cycle and stop with the needle up. Always stopping with the needle “fully up” is one of the fe...
Page 29 - canette et comme fil supérieure.; NEEDLE, THREAD AND FABRIC CHART; TABLEAU DES TISSUS, DU FIL ET DES AIGUILLES
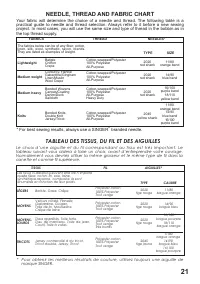
21 Your fabric will determine the choice of a needle and thread. The following table is a practical guide to needle and thread selection. Always refer to it before a new sewing project. In most cases, you will use the same size and type of thread in the bobbin as in the top thread supply. * For best...
Page 30 - abastecedor de hilo superior.; TABLA DE HILO, AGUJA Y MATERIAL
22 Su material determinará la selección de aguja e hilo. Esta tabla es una guía práctica para la selección de aguja e hilo. Siempre buscar una referencia antes de coser el material nuevo. En la mayoría de los casos se deberá usar el mismo tamaño y tipo de hilo tanto en la bobina como en el abasteced...
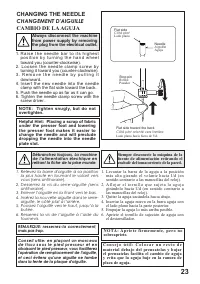
Page 31 - R a i s e t h e n e e d l e b a r t o i t s h i g h e s t; dropping the needle into the needle; Relevez la barre d'aiguille à sa position; CHANGING THE NEEDLE; CHANGEMENT D'AIGUILLE; CAMBIO DE LA AGUJA
23 Flat side Côté plat Lado plano Flat side toward the back Lado plano hacia fuera de Vd. Côté plat orienté vers l'arrière Needle Aiguille Aguja Stop pin Butée Pasador 1. R a i s e t h e n e e d l e b a r t o i t s h i g h e s t p o s i t i o n b y t u r n i n g t h e h a n d w h e e l toward you (c...
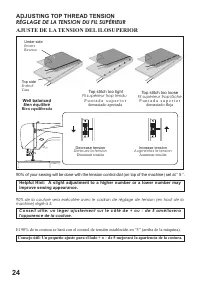
Page 32 - improve sewing appearance.; ADJUSTING TOP THREAD TENSION; C o n s e i l u t i l e : u n l é g e r a j u s t e m e n t s u r l e c ô t é d e + o u - d e 5 a m é l i o r e r a; RÉGLAGE DE LA TENSION DU FIL SUPÉRIEUR; AJUSTE DE LA TENSION DEL ILOSUPERIOR; Well balanced; Bien équilibré; Bien equilibrada; Top stitch too tight; Fil supérieur trop tendu; P u n t a d a s u p e r i o r; Fil supérieur trop lâche
24 90% of your sewing will be done with the tension control dial (on top of the machine) set at “ 5 ”. Helpful Hint: A slight adjustment to a higher number or a lower number may improve sewing appearance. ADJUSTING TOP THREAD TENSION C o n s e i l u t i l e : u n l é g e r a j u s t e m e n t s u r ...
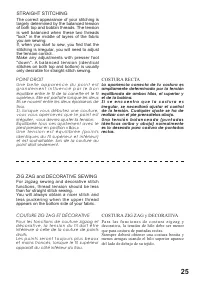
Page 33 - ZIG ZAG and DECORATIVE SEWING; COUTURE ZIG ZAG ET DÉCORATIVE; COSTURA ZIG ZAG y DECORATIVA; For zigzag sewing and decorative stitch; STRAIGHT STITCHING; POINT DROIT; COSTURA RECTA
25 ZIG ZAG and DECORATIVE SEWING COUTURE ZIG ZAG ET DÉCORATIVE COSTURA ZIG ZAG y DECORATIVA For zigzag sewing and decorative stitch functions, thread tension should be less than for straight stitch sewing. You will always obtain a nicer stitch and l e s s p u c k e r i n g w h e n t h e u p p e r t ...
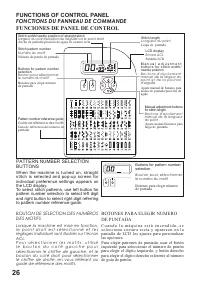
Page 34 - FUNCTIONS OF CONTROL PANEL; PATTERN NUMBER SELECTION; FONCTIONS DU PANNEAU DE COMMANDE; FUNCIONES DE PANEL DE CONTROL; BOUTON DE SÉLECTION DES NUMÉROS; BOTONES PARA ELEGIR NUMERO; Lorsque la machine est mise en fonction,
26 C u a n d o l a m á q u i n a e s t á e n c e n d i d a , s e s e l e c c i o n a c o s t u r a r e c t a y a p a r e c e n e n l a pantalla de LCD los ajustes para personalizar las opciones. Para elegir patrones de puntada, usar el botón izquierdo para seleccionar el número de patrón para elegir...
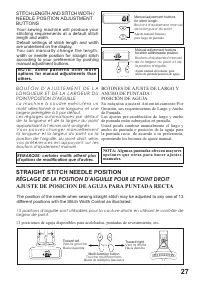
Page 35 - de la longueur et de la largeur du point; NOTA: Algunas puntadas ofrecen mayores; STITCH LENGTH AND STITCH WIDTH /; B O U T O N D ' A J U S T E M E N T D E L A; BOTONES DE AJUSTE DE LARGO Y; STRAIGHT STITCH NEEDLE POSITION; RÉGLAGE DE LA POSITION D'AIGUILLE POUR LE POINT DROIT; AJUSTE DE POSICION DE AGUJA PARA PUNTADA RECTA
27 Your sewing machine will produce your stitching requirements at a default stitch length and width. Default settings of stitch length and width are underlined on the display. Yo u c a n m a n u a l l y c h a n g e t h e l e n g t h , width or needle position for straight stitch according to your p...
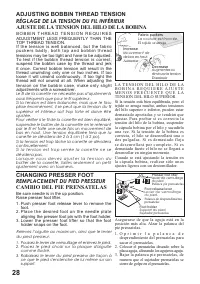
Page 36 - it once. Correct bobbin tension will result in the; ADJUSTING BOBBIN THREAD TENSION; RÉGLAGE DE LA TENSION DU FIL INFÉRIEUR; AJUSTE DE LA TENSION DEL HILO DE LA BOBINA; Lower the presser foot lifter so that the foot; REMPLACEMENT DU PIED PRESSEUR; CAMBIO DEL PIE PRENSATELAS
28 B O B B I N T H R E A D T E N S I O N R E Q U I R E S ADJUSTMENT LESS FREQUENTLY THAN THE TOP THREAD TENSION. If the tension is well balanced, but the fabric p u c k e r s b a d l y , b o t h t o p a n d b o b b i n t h r e a d tensions may be too tight and have to be adjusted. To test if the bob...
Page 37 - HELPFUL MESSAGES; MESSAGES D’AIDE; MENSAJES DE AYUDA
29 Bobbin winder is moved to right (operating position) during sewing. ➡ Check bobbin winder and move it to left. Le bobineur se déplace vers la droite (position activée) pendant la couture. ➡ Vérifier le bobineur et déplacer le vers la gauche. El devanador de bobina se movió a la derecha (posición ...
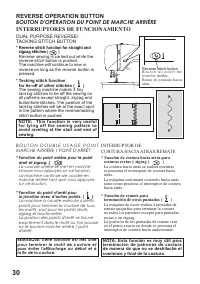
Page 38 - DUAL PURPOSE REVERSE/; The sewing machine makes 4 tiny; REVERSE OPERATION BUTTON; BOUTON D'OPÉRATION DU POINT DE MARCHE ARRIÈRE; INTERRUPTORES DE FUNCIONAMIENTO; B O U T O N D O U B L E U S A G E P O I N T; INTERRUPTOR DE; * Fonction du point arrière pour le point; * Función de remate para; REMARQUE: cette fonction est très utile; de manera de que no se deshilache el
30 * Fonction du point d'arrêt pour la jonction avec d'autres points. ( ) La machine à coudre exécute 4 petits points pour terminer la couture de tous les motifs, sauf pour les points droits, zigzag et boutonnière. La position des points d'arrêt se trouve exactement dans le motif où l'on pousse sur ...
Page 39 - CUADRO DE REFERENCIA RÁPIDA DE LARGO Y; TABLEAU DE RÉFÉRENCE RAPIDE DES LARGEURS ET
31 STITCH POINTS PUNT ADA PATTERN No. N° DU MODÈLE PATTERN No. WIDTH LARGEUR (mm) ANCHO LENGTH LONGUEUR (mm) LARGO STITCH POINTS PUNT ADA PATTERN No. N° DU MODÈLE PATTERN No. WIDTH LARGEUR (mm) ANCHO LENGTH LONGUEUR (mm) LARGO AUTO AUTO AUTO MANUAL MANUEL MANUAL AUTO AUTO AUTO MANUAL MANUEL MANUAL A...
Page 40 - ariées
32 STITCH POINTS PUNT ADA PATTERN No. N° DU MODÈLE PATTERN No. WIDTH LARGEUR (mm) ANCHO LENGTH LONGUEUR (mm) LARGO STITCH POINTS PUNT ADA PATTERN No. N° DU MODÈLE PATTERN No. WIDTH LARGEUR (mm) ANCHO LENGTH LONGUEUR (mm) LARGO AUTO AUTO AUTO MANUAL MANUEL MANUAL AUTO AUTO AUTO MANUAL MANUEL MANUAL A...
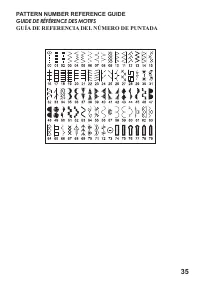
Page 43 - PATTERN NUMBER REFERENCE GUIDE; GUIDE DE RÉFÉRENCE DES MOTIFS; GUÍA DE REFERENCIA DEL NÚMERO DE PUNTADA
35 PATTERN NUMBER REFERENCE GUIDE GUIDE DE RÉFÉRENCE DES MOTIFS GUÍA DE REFERENCIA DEL NÚMERO DE PUNTADA
Page 44 - PUNTADA RECTA; A.Thread tension control; switch and sew a few stitches at the start and end of the seam.; Pied presseur - Pied universel; tension peut être nécessaire.; A. Réglage de la tension du fil supérieur
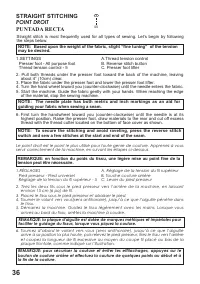
36 STRAIGHT STITCHING POINT DROIT PUNTADA RECTA Straight stitch is most frequently used for all types of sewing. Let’s begin by following the steps below. NOTE: Based upon the weight of the fabric, slight “fine tuning” of the tension may be desired. A.Thread tension control B. Reverse stitch button ...
Page 45 - tejido cuando cose una costura.; To keep the seam straight, use one of the; Pour piquer une ligne droite, utilisez les; KEEPING SEAMS STRAIGHT; POUR GARDER LA COUTURE DROITE; MANTENIENDO LA PUNTADA
37 6 3 4 2 5 A C B La puntada recta se usa más frecuentemente para coser todo tipos de costura. Comencemos siguiendo los pasos abajo. NOTA: De acuerdo con el peso del tejido, puede ser necesario ajustar ligeramente la tensión. A. Control tensión hilo B. Botón de puntadas hacia atrás C. Palanca pie p...
Page 46 - HAND-LOOK QUILT STITCH; POINT DE MATELASSAGE D'APPARENCE FAIT À LA MAIN; PUNTADA DE ACOLCHADO CONTINUA; Increase thread tension a little bit at; experiment with different tension and; R E M A R Q U E : p o u r u n e a p p a r e n c e; experimente con diferentes combinaciones; Use zipper foot to sew to the right or left of; INSERTING ZIPPERS AND PIPING
38 HAND-LOOK QUILT STITCH POINT DE MATELASSAGE D'APPARENCE FAIT À LA MAIN PUNTADA DE ACOLCHADO CONTINUA This stitch is designed to look like hand sewing for topstitching and quilting. 1. Thread bobbin with desired top stitching color. When sewing, the machine will pull this thread to the top. 2. T h...
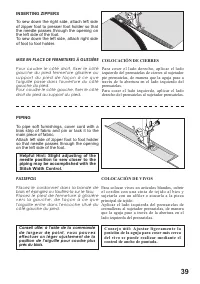
Page 47 - INSERTING ZIPPERS; of zipper foot to presser foot holder so that; PIPING; Attach left side of zipper foot to foot holder; Helpful Hint: Slight adjusting of the; l'aiguille passe dans l'ouverture du côté
39 INSERTING ZIPPERS To sew down the right side, attach left side of zipper foot to presser foot holder so that the needle passes through the opening on the left side of the foot. To sew down the left side, attach right side of foot to foot holder. PIPING To pipe soft furnishings, cover cord with a ...
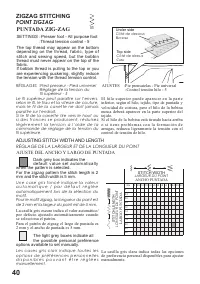
Page 48 - For the zigzag pattern the stitch length is 2; ADJUSTING STITCH WIDTH AND LENGTH; RÉGLAGE DE LA LARGEUR ET DE LA LONGUEUR DU POINT; AJUSTE DEL ANCHO Y LARGO DE; ZIGZAG STITCHING; POINT ZIGZAG
40 Under side Côté de dessous Reverso Top side Côté de dessus Cara SETTINGS : Presser foot - All purpose foot :Thread tension control - 5 The light grey boxes indicate all the possible personal preference options available to set manually. Dark grey box indicates the default value set automatically ...
Page 49 - H e l p f u l H i n t : F o r a p l e a s i n g; solide, car il fait trois points courts là où le; C o n s e j o ú t i l : P a r a l o g r a r m e j o r e s; ZIG-ZAG DE TRES PUNTADAS; POINT DE LINGERIE; PUNTADA DE LENCERIA
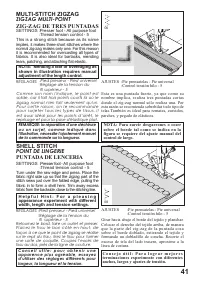
41 This is a strong stitch because as its name implies, it makes three short stitches where the normal zig-zag makes only one. For this reason it is recommended for overcasting all types of fabrics. It is also ideal for bartacks, mending tears, patching, and attaching flat elastic. :Presser foot - A...
Page 50 - La largeur du point bourdon augmente; La puntada de satín aumenta cuando la aguja; R E M A R Q U E : l o r s q u e v o u s c o u s e z u n; NOTA: Al coser una puntada en satín; SATIN STITCH; POINT BOURDON; PUNTADA DE RELLENO O SATÍN; POSITIONNEMENT DES MOTIFS; UBICACION DE LOS PATRONES
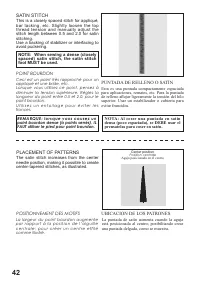
42 The satin stitch increases from the center needle position, making it possible to create center-tapered stitches, as illustrated. This is a closely spaced stitch for appliqué, bar tacking, etc. Slightly loosen the top thread tension and manually adjust the stitch length between 0.5 and 2.0 for sa...
Page 51 - SEWING ON A BUTTON; d u p o i n t e n f o n c t i o n d u b o u t o n ) e t; Consejo útil: Para asegurar el hilo, tire; POSE DE BOUTONS; COSIDO DE BOTONES
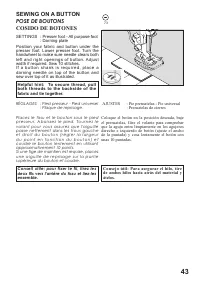
43 Position your fabric and button under the presser foot. Lower presser foot. Turn the handwheel to make sure needle clears both left and right openings of button. Adjust width if required. Sew 10 stitches. I f a b u t t o n s h a n k i s r e q u i r e d , p l a c e a darning needle on top of the b...
Page 52 - BLINDHEM STITCH; POINT INVISBLE; PUNTADA INVISIBLE; Settings; utilisé pour confectionner des rebords; La puntada invisible se usa principalmente para
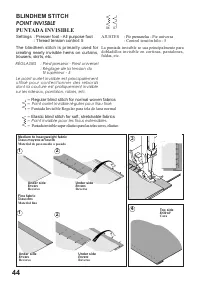
44 1 2 1 2 Medium to heavyweight fabric Tissus moyens et lourds Material de peso medio a pesado Under side Envers Reverso Under side Envers Reverso Under side Envers Reverso Under side Envers Reverso Fine fabric Tissus fins Material fino BLINDHEM STITCH : Presser foot - All purpose foot : Thread ten...
Page 53 - surjetez le rebord coupé.; movimiento de la aguja, ensanchando o alargando la puntada.; faites un essai de couture.; Now fold the fabric as illustrated with the wrong side up.
45 NOTE: It takes practice to sew blind hems. Do a test sew first. NOTE: In addition to the adjustment on the foot, the stitch width control can be used. The stitch width control changes the swing of the needle for a narrower or wider stitch. 1. Avec un fil assorti, cousez le rebord coupé. Sur un ti...
Page 54 - STRAIGHT STRETCH STITCH; POINT DROIT EXTENSIBLE; PUNTADA RECTA TRIPLE; POINT NID D’ABEILLE; PUNTADA PANAL; DECORATIVE AND STRETCH STITCHES; POINT DÉCORATIFS ET POINTS EXTENSIBLES; PUNTADAS DECORATIVAS Y ELÁSTICAS
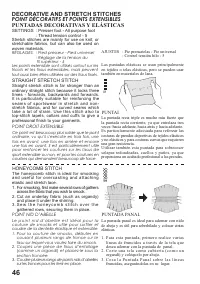
46 1. For smocking, first make several rows of gathers across the fabric that you wish to smock. 2. Cut an underlay fabric (such as organdy) and place it under the shirring. 3. S e w t h e h o n e y c o m b s t i t c h o v e r t h e gathered rows, securing them in place. Ce point est beaucoup plus s...
Page 55 - OVEREDGE STITCH; POINT SURJET EXTENSIBLE; PUNTADA SOBRE-ORILLADO; POINT PLUME; PUNTADA PLUMA
47 OVEREDGE STITCH POINT SURJET EXTENSIBLE PUNTADA SOBRE-ORILLADO This is the same type stitch used by the garment industry in making sportswear - it forms and finishes the seam in one operation. It’s very effective for use in repairing raw or worn seams of garments. Point extensible spécial pour as...
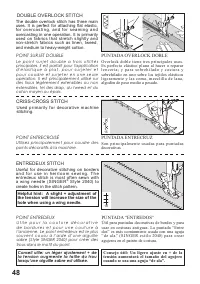
Page 56 - la tension augmente la taille du trou; Consejo útil: Un ligero ajuste en + de la; PUNTADA ENTRECRUZ; POINT ENTREDEUX; PUNTADA “ENTREDOS”; uses. It is perfect for attaching flat elastic,; DOUBLE OVERLOCK STITCH; POINT SURJET DOUBLE; PUNTADA OVERLOCK DOBLE
48 Useful for decorative stitching on borders a n d f o r u s e i n h e i r l o o m s e w i n g . T h e entredeux stitch is most often sewn with a wing needle (SINGER ® Style 2040) to create holes in the stitch pattern. Used primarily for decorative machine stitching. Helpful hint: A slight + adjust...
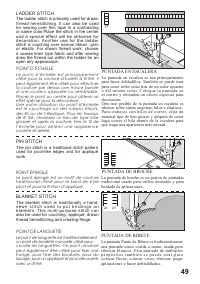
Page 57 - PIN STITCH; POINT ÉPINGLE; PUNTADA DE BROCHE; POINT DE LANGUETTE; PUNTADA DE RIBETE; POINT D’ÉCHELLE; PUNTADA EN ESCALERA
49 The pin stitch is a traditional stitch pattern used for picot-like edges and for appliqué work. The blanket stitch is traditionally a hand- s e w n s t i t c h u s e d t o p u t b i n d i n g s o n blankets. This multi-purpose stitch can also be used for couching, appliqué, drawn thread hemstitch...
Page 58 - CROSSED STITCH; POINT CROISÉ; PUNTADA CRUZADA; POINT GREC; FISHBONE STITCH; POINT D’ARRÊTE; PUNTADA RASPA; POINT SURJET OBLIQUE; PUNTADA OVERLOCK INCLINADO; POINT ÉPINGLE OBLIQUE; PUNTADA ALFILER INCLINADO
50 Use to sew and finish elastic fabrics or for decorative work. A traditional pattern suited for decorative borders and edge finishings. U s e d m a i n l y f o r d e c o r a t i v e m a c h i n e stitching. U t i l e p o u r c o u d r e e t f a i r e l a f i n i t i o n des tissus extensibles, ain...
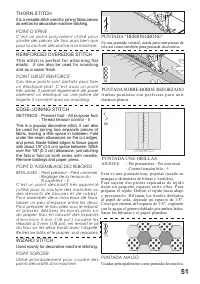
Page 59 - and as a seam finish.; pour la couture décorative à la machine.; THORN STITCH; POINT D’ÉPINE; PUNTADA “HERRINGBONE”; POINT SURJET RENFORCÉ; REFORZADO; POINT D’ASSEMBLAGE DES REBORDS; WIZARD STITCH; POINT SORCIER
51 It is a versatile stitch used for joining fabric pieces as well as for decorative machine stitching. T h i s s t i t c h i s p e r f e c t f o r a t t a c h i n g f l a t elastic. It can also be used for smocking and as a seam finish. Used mainly for decorative machine stitching. This is a popula...
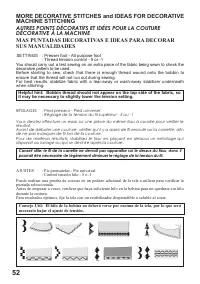
Page 60 - it may be necessary to slightly lower the tension setting.; de ne pas manquer de fil lors de la couture.; puntada seleccionada.; necesario bajar el ajuste de tensión.; MORE DECORATIVE STITCHES and IDEAS FOR DECORATIVE; AUTRES POINTS DÉCORATIFS ET IDÉES POUR LA COUTURE; MAS PUNTADAS DECORATIVAS E IDEAS PARA DECORAR; SETTINGS; RÉGLAGES; AJUSTES
52 You should carry out a test sewing on an extra piece of the fabric being sewn to check the decorative pattern to be used. Before starting to sew, check that there is enough thread wound onto the bobbin to ensure that the thread will not run out during sewing. For best results, stabilize fabric wi...
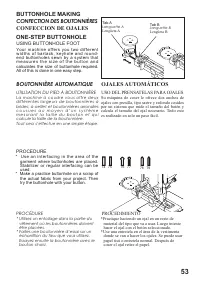
Page 61 - La machine à coudre vous offre deux; BUTTONHOLE MAKING; CONFECTION DES BOUTONNIÈRES; CONFECCION DE OJALES; BOUTONNIÈRE AUTOMATIQUE; OJALES AUTOMÁTICOS; USING BUTTONHOLE FOOT; UTILISATION DU PIED À BOUTONNIÈRE; USO DEL PRENSATELAS PARA OJALES; PROCÉDURE; PROCEDIMIENTO; Stabilizer or regular interfacing can be
53 Yo u r m a c h i n e o ff e r s y o u t w o d i ff e r e n t widths of bartack, keyhole and round- end buttonholes sewn by a system that m e a s u r e s t h e s i z e o f t h e b u t t o n a n d calculates the size of buttonhole required. All of this is done in one easy step. Tab A Languette A Le...
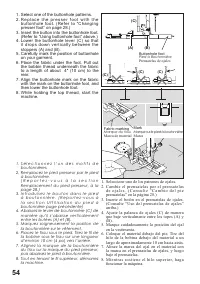
Page 62 - buttonhole foot. (Refer to “Changing
54 Mark Marque sur le pied à boutonnière Marca Fabric marking Marque du tissu Marca de material 1. Select one of the buttonhole patterns. 2. R e p l a c e t h e p r e s s e r f o o t w i t h t h e buttonhole foot. (Refer to “Changing presser foot” on page 28.) 3. Insert the button into the buttonhol...
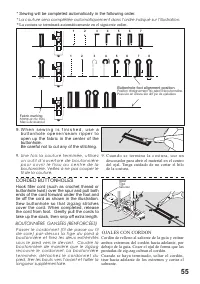
Page 63 - Une fois la couture terminée, utilisez; Hook filler cord (such as crochet thread or; CORDED BUTTONHOLES
55 Buttonhole foot alignment position Position d'alignement du pied à boutonnière. Posición de alineación del pie de ojaladora Fabric marking Marque du tissu Marca de material 1 2 3 4 5 6 7 8 1 2 3 4 5 6 7 9. W h e n s e w i n g i s f i n i s h e d , u s e a b u t t o n h o l e o p e n e r / s e a m...
Page 64 - To ensure the best possible operation of; CAUTION; ENTRETIENT DE LA MACHINE; Pour assurer un meilleur rendement de la; E s n e c e s a r i o q u e m a n t e n g a l a s p i e z a s; A l w a y s d i s c o n n e c t t h e; D é b r a n c h e z t o u j o u r s l a; Siempre desconecte la máquina
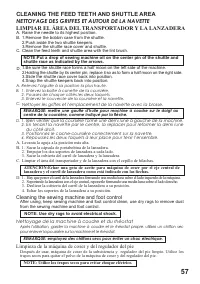
56 3. CARING FOR YOUR MACHINE To ensure the best possible operation of your machine, it is necessary to keep the essential parts clean at all times. Always disconnect the machine from power s u p p l y b y r e m o v i n g t h e p l u g f r o m t h e electrical outlet. CAUTION Feed teeth Griffes Tran...
Page 65 - from the sewing machine and foot control.; NOTE: Use dry rags to avoid electrical shock.; pour enlever la poussière sur la machine et le rhéostat.; NOTE: Utilice los trapos secos para evitar choque eléctrico.; CLEANING THE FEED TEETH AND SHUTTLE AREA; NETTOYAGE DES GRIFFES ET AUTOUR DE LA NAVETTE; LIMPIAR EL ÁREA DEL TRANSPORTADOR Y LA LANZADERA; Remove the bobbin case from the shuttle.; shuttle; Raise the needle to its highest position.; Enlevez la boîte à canette de la coursière.; Positionnez le cache-coursière correctement sur la navette.; centre de la coursière, comme indiqué par la flèche.; Nettoyer les griffes et l'emplacement de la navette avec la brosse.; Cleaning the sewing machine and foot control; Nettoyage de la machine à coudre et du rhéostat; Limpieza de la máquina de coser y del regulador del pie
57 After using, keep sewing machine and foot control clean, use dry rags to remove dust from the sewing machine and foot control. NOTE: Use dry rags to avoid electrical shock. Après l'utilisation, garder la machine à coudre et le rhéostat propre, utilisez un chiffon sec pour enlever la poussière sur...
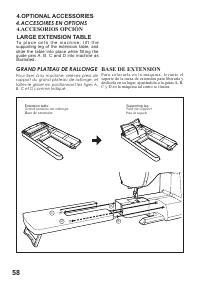
Page 66 - OPTIONAL ACCESSORIES; Pour fixer à la machine, relevez pied de; ACCESOIRES EN OPTIONS; P a r a c o l o c a r l a e n l a m á q u i n a , l e v a n t e e l; LARGE EXTENSION TABLE; GRAND PLATEAU DE RALLONGE; BASE DE EXTENSION
58 To p l a c e o n t o t h e m a c h i n e , l i f t t h e supporting leg of the extension table, and slide the table into place while fitting the guide pins A, B, C and D into machine as illustrated. 4.OPTIONAL ACCESSORIES Pour fixer à la machine, relevez pied de support du grand plateau de rallon...
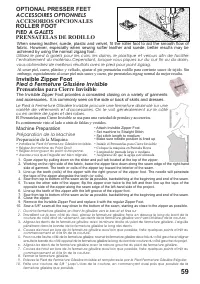
Page 67 - ROLLER FOOT; PIED A GALETS; PRENSATELAS DE RODILLO; achieved by using the normal zigzag foot.; Invisible Zipper Foot; Pied à Fermeture Glissière Invisible; Prensatelas para Cierre Invisible; ou en arrière de jupes et des robes.; Es comúnmente visto al lado o atrás de faldas y vestidos.; OPTIONAL PRESSER FEET; ACCESSOIRES OPTIONNELS; ACCESORIOS OPCIONALES; Machine Preparation; Préparation de la Machine; Preparación de la Máquina
59 ROLLER FOOT PIED A GALETS PRENSATELAS DE RODILLO When sewing leather, suede, plastic and velvet, fit the roller foot to aid the smooth flow of fabric. However, especially when sewing softer leather and suede, better results may be achieved by using the normal zigzag foot. Utilisez le pied à galet...
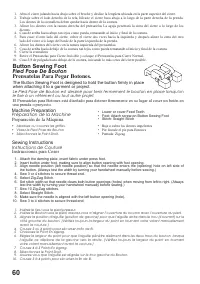
Page 68 - Button Sewing Foot; Pied Pose De Bouton; Prensatelas Para Pegar Botones.; when attaching it to a garment or project.; le fixe à un vêtement ou tout autre projet.; una prenda o proyecto.; Preparación de la Máquina.; Sewing Instructions; Instructions de Couture; Instrucciones para Coser
60 Button Sewing Foot Pied Pose De Bouton Prensatelas Para Pegar Botones. The Button Sewing Foot is designed to hold the button firmly in place when attaching it to a garment or project. Le Pied Pose de Bouton est dessiné pour tenir fermement le bouton en place lorsqu'on le fixe à un vêtement ou tou...
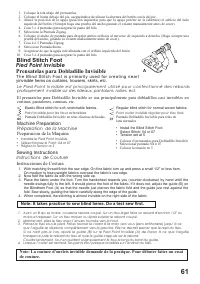
Page 69 - Blind Stitch Foot; Pied Point Invisible; Prensatelas para Dobladillo Invisible; T h e B l i n d S t i t c h F o o t i s p r i m a r i l y u s e d f o r c r e a t i n g n e a r l; Préparation de la Machine; Peeparacion de la Maquina; Instructions de Couture; Instrucciones de Costura; Note: It takes practice to sew blind hems. Do a test sew first.
61 1. Coloque la tela abajo del prensatelas. 2. Coloque el botón debajo del pie, asegurándose de alinear la abertura del botón con la del pie. 3. Alinee la posición de la aguja (posición izquierda) para que la aguja penetre en la (abertura) el orificio del lado izquierdo del botón. (Siempre haga una...
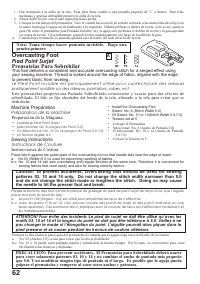
Page 70 - Nota: Toma tiempo hacer puntada invisible. Haga una; Overcasting Foot; Pied Point Surjet; Prensatelas Para Sobrehilar; to prevent fabric from raveling.
62 1. Dar terminado a la orilla de la tela. Para telas finas cambie a una puntada pequeña de ½” o menor. Para telas medianas y gruesas dobladille primero la orilla de la tela. 2. Ahora doble la tela, con el lado izquierdo hacia arriba. 3. Coloque la tela debajo del prensatelas. Gire el volante hacia...
Page 71 - PERFORMANCE CHECKLIST; GENERAL PROBLEMS
63 5. PERFORMANCE CHECKLIST GENERAL PROBLEMS Machine does not sew. * Power switch is turned off. - Turn on the switch. * Assure foot control plug is fully engaged (pushed into its socket). * Buttonhole lever is not raised when sewing stitch patterns. – Raise buttonhole lever. * Buttonhole lever is n...
Page 72 - PROBLÈMES DE FIL; PROBLÈMES GÉNÉRAUX; VÉRIFICATION DES PROBLÈMES MINEUR DE COUTURE
64 PROBLÈMES DE FIL Les fils s’emmêlent: * Les fils supérieur et inférieur ne sont pas tirés sous le pied presseur et vers l’arrière, avant de ommencer les coutures - les maintenir pendant quelques points. Le fil de l'aiguille casse. * La machine n’est pas correctement enfilée (voir page 17 - 18). *...
Page 73 - CUADRO DE VERIFICACION DE RENDIMIENTO; PROBLEMAS GENERALES
65 5. CUADRO DE VERIFICACION DE RENDIMIENTO PROBLEMAS GENERALES Máquina no cose. * El interruptor de energía no está conectado. - en la posición LOW o HIGH. * Assurez que la fiche du rhéostat est totalement insérée (poussé la dans son réceptacle). * La palanca de ojal no está levantada cuando se cos...


 Singer 4423
User Manual
Singer 4423
User Manual
 Singer 4411CL
User Manual
Singer 4411CL
User Manual
 Singer 4432CL
User Manual
Singer 4432CL
User Manual
 Singer 64S
User Manual
Singer 64S
User Manual
 Singer Confidence 7467
User Manual
Singer Confidence 7467
User Manual
 Singer Fashion Mate 7256
User Manual
Singer Fashion Mate 7256
User Manual
 Singer M2100SINGER
User Manual
Singer M2100SINGER
User Manual
 Singer M3300HD
User Manual
Singer M3300HD
User Manual
 Singer M3500SINGER
User Manual
Singer M3500SINGER
User Manual
 Singer S0100
User Manual
Singer S0100
User Manual