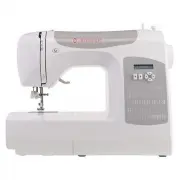
Singer C5200 - User Manual
Singer C5200 Sewing Machine – User Manual, read for free online in PDF format. We hope this helps you resolve any issues you may have. If you have further questions, please contact us through the contact form.
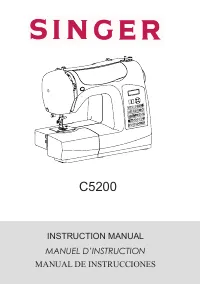


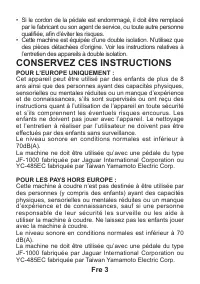
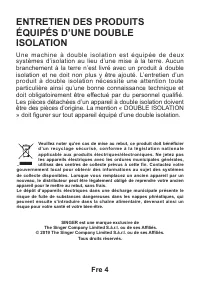


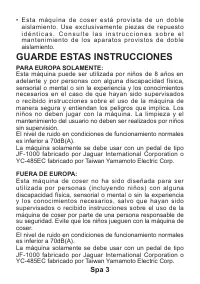


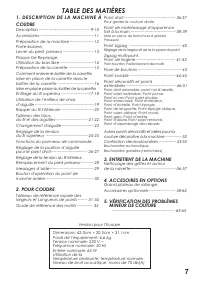


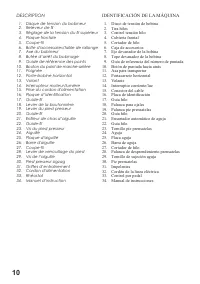
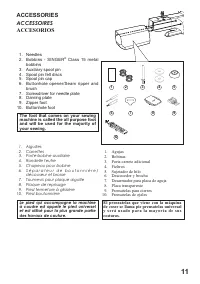
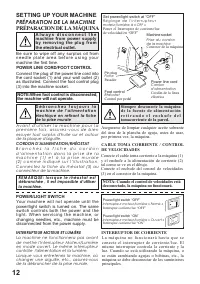
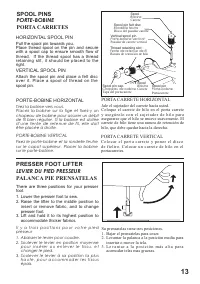
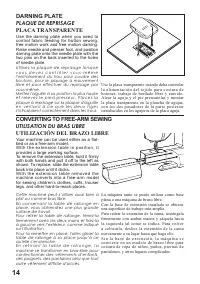
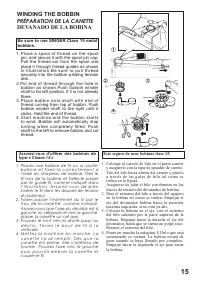
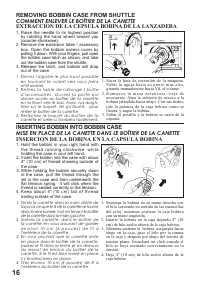
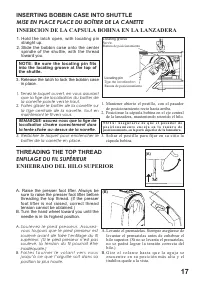
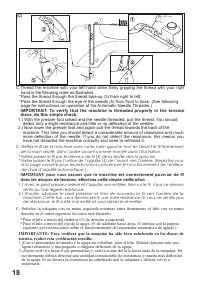
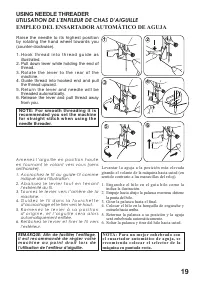
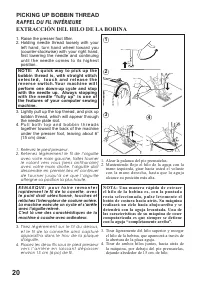
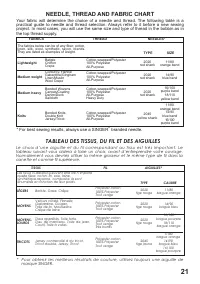

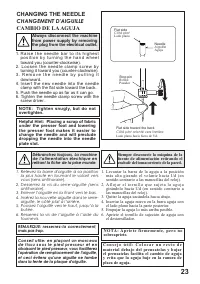
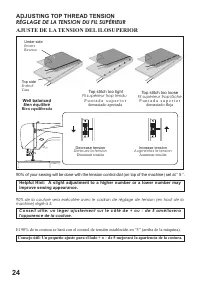
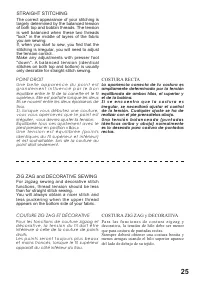
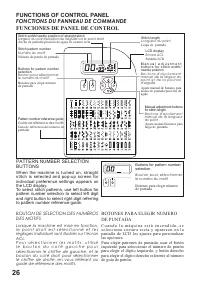
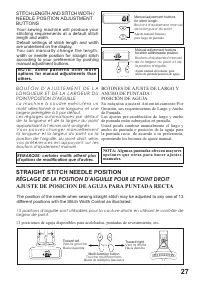
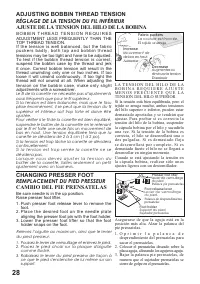

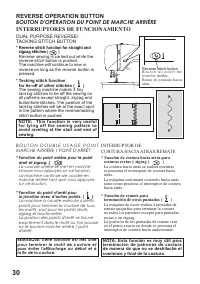


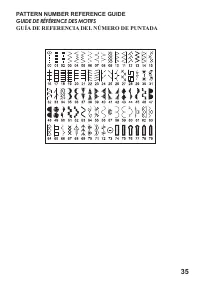
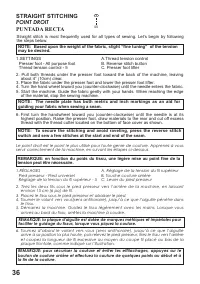


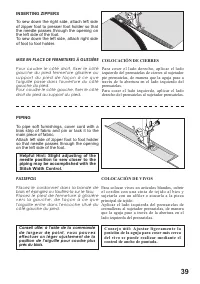
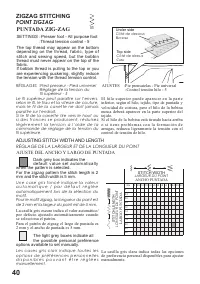
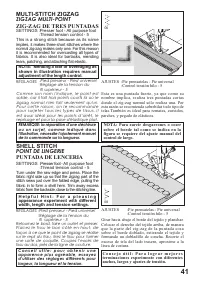
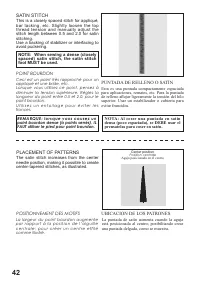
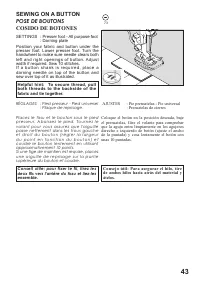
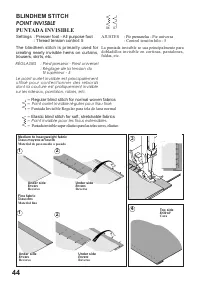

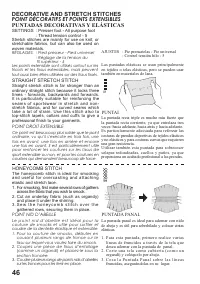

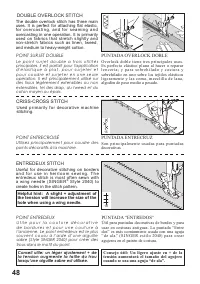
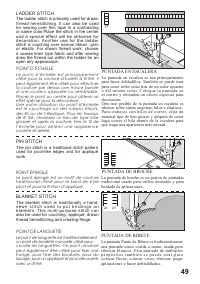

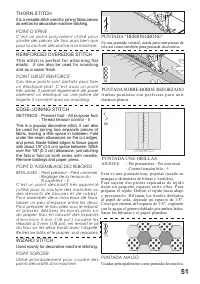
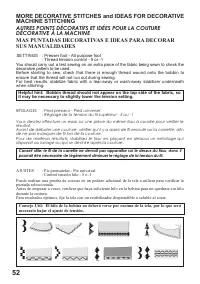
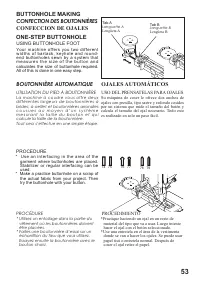
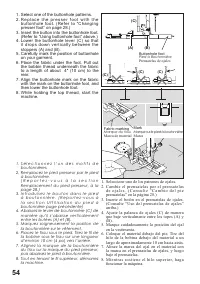
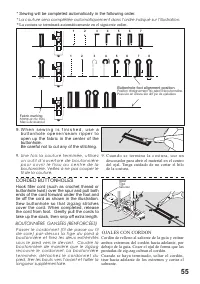

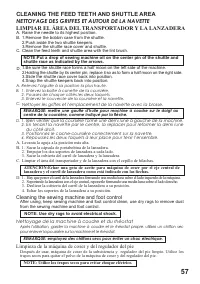
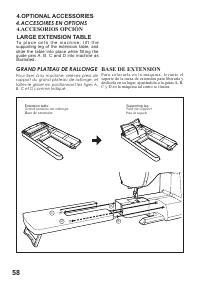
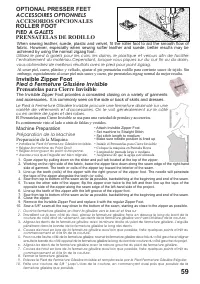
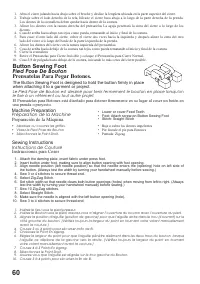
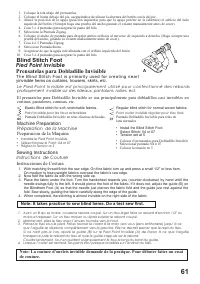
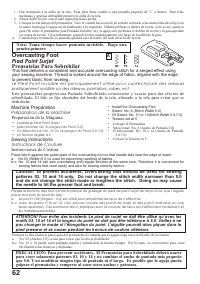


Table of Contents:
- Page 2 – IMPORTANT SAFETY INSTRUCTIONS; • Do not allow to be used as a toy. Close attention is
- Page 3 – SAVE THESE INSTRUCTIONS
- Page 5 – SINGER is the exclusive trademark of
- Page 6 – P O U R R E D U I R E L E R I S Q U E D E
- Page 8 – CONSERVEZ CES INSTRUCTIONS; POUR L’EUROPE UNIQUEMENT :
- Page 9 – ENTRETIEN DES PRODUITS; isolation et ne doit non plus y être ajouté. L’entretien d’un
- Page 10 – Cuando utilice un aparato eléctrico, debe respetar siempre las; PELIGRO –; ADVERTENCIA –; PA R A R E D U C I R E L R I E S G O D E; de coser inmediatamente después de utilizarla y antes de; RIESGO DE QUEMADURAS, INCENDIO, DESCARGA; la máquina de coser al distribuidor autorizado o centro de
- Page 12 – GUARDE ESTAS INSTRUCCIONES; PARA EUROPA SOLAMENTE:
- Page 13 – amplios conocimientos del sistema y sólo debe ser realizado; SINGER es una marca registrada de; Recuerde que este producto se debe reciclar de un modo seguro en
- Page 14 – TABLE OF CONTENTS; CARING FOR YOUR MACHINE
- Page 15 – Mise en place de la canette dans le; TABLE DES MATIÈRES; Point de matelassage d'apparence; Version pour l’Europe
- Page 16 – INDICE DE CONTENIDOS; ACCESORIOS OPCIONALES; RENDIMIENTO
- Page 17 – KNOWING YOUR SEWING MACHINE; DESCRIPTION DE LA MACHINE À COUDRE; PRINCIPALES PARTES DE LA MAQUINA; MACHINE IDENTIFICATION
- Page 18 – DESCRIPTION; IDENTIFICACIÓN DE LA MÁQUINA
- Page 19 – The foot that comes on your sewing; Rondelle feutre; El prensatelas que viene con la máquina; ACCESSORIES; ACCESSOIRES; ACCESORIOS
- Page 20 – FOOT CONTROL; machine the first time.; the machine will not operate.; PRÉPARACION DE LA MÁQUINA; PRÉPARATION DE LA MACHINE; SETTING UP YOUR MACHINE; A l w a y s d i s c o n n e c t t h e; Connect the plug of the power line cord into
- Page 21 – SPOOL PINS; with a spool cap to ensure smooth flow of; PORTE-BOBINE HORIZONTAL; PORTE-BOBINE VERTICAL; PORTA CARRETE VERTICAL; PRESSER FOOT LIFTER; Lift and hold it to its highest position to; LEVIER DU PIED PRESSEUR; PALANCA PIE PRENSATELAS
- Page 22 – CONVERTING TO FREE-ARM SEWING; UTILISATION DU BRAS LIBRE; UTILIZACIÓN DEL BRAZO LIBRE; PLAQUE DE REPRISAGE; PLACA TRANSPARENTE
- Page 23 – WINDING THE BOBBIN; Be sure to use SINGER Class 15 metal; type « Classe 15 »; Este seguro de usar bobinas clase 15.; PRÉPARATION DE LA CANETTE; DEVANADO DE LA BOBINA
- Page 24 – REMOVING BOBBIN CASE FROM SHUTTLE; COMMENT ENLEVER LE BOÎTIER DE LA CANETTE; EXTRACCION DE LA CEPSULA BOBINA DE LA LANZADERA; MISE EN PLACE DE LA CANETTE DANS LE BOÎTIER DE LA CANETTE; INSERCION DE LA BOBINA EN LA CAPSULA BOBINA; façon à ce que le fil de la canette se tourne
- Page 25 – Release the latch to lock the bobbin case; INSERTING BOBBIN CASE INTO SHUTTLE; maintenant le fil vers vous.; MISE EN PLACE PLACE DU BOÎTIER DE LA CANETTE; INSERCION DE LA CAPSULA BOBINA EN LA LANZADERA; ENFILAGE DU FIL SUPÉRIEUR; ENHEBRADO DEL HILO SUPERIOR; soulevé avant de faire l’enfilage du fil; NOTE: Be sure the locating pin fits; localisation s'insère correctement dans
- Page 26 – To verify that the machine is threaded properly in the tension; sentir qu’une légère résistance.; derecha en el orden siguiente tal como está ilustrado.; tensión, realice esta verificación sencilla:; ligera resistencia y una pequeña o ninguna deflexión de la aguja.
- Page 27 – N O T E : F o r s m o o t h t h r e a d i n g i t i s; USING NEEDLE THREADER; Raise the needle to its highest position; i l e s t r e c o m m a n d é d e r é g l e r v o t r e; NOTA: Para un mejor enhebrado con; UTILISATION DE L’ENFILEUR DE CHAS D’AIGUILLE; G u i d e z l e f i l d a n s l a f o u r c h e t t e; EMPLEO DEL ENSARTADOR AUTOMÁTICO DE AGUJA
- Page 28 – s e l e c t e d , t o u c h a n d r e l e a s e t h e; PICKING UP BOBBIN THREAD; RAPPEL DU FIL INFÉRIEURE; EXTRACCIÓN DEL HILO DE LA BOBINA; first lowering the needle and continuing; avec votre main droite, l’aiguille doit; Lightly pull up the top thread, and pick up; apparaîtra dans le trou de la plaque
- Page 29 – canette et comme fil supérieure.; NEEDLE, THREAD AND FABRIC CHART; TABLEAU DES TISSUS, DU FIL ET DES AIGUILLES
- Page 30 – abastecedor de hilo superior.; TABLA DE HILO, AGUJA Y MATERIAL
- Page 31 – R a i s e t h e n e e d l e b a r t o i t s h i g h e s t; dropping the needle into the needle; Relevez la barre d'aiguille à sa position; CHANGING THE NEEDLE; CHANGEMENT D'AIGUILLE; CAMBIO DE LA AGUJA
- Page 32 – improve sewing appearance.; ADJUSTING TOP THREAD TENSION; C o n s e i l u t i l e : u n l é g e r a j u s t e m e n t s u r l e c ô t é d e + o u - d e 5 a m é l i o r e r a; RÉGLAGE DE LA TENSION DU FIL SUPÉRIEUR; AJUSTE DE LA TENSION DEL ILOSUPERIOR; Well balanced; Bien équilibré; Bien equilibrada; Top stitch too tight; Fil supérieur trop tendu; P u n t a d a s u p e r i o r; Fil supérieur trop lâche
- Page 33 – ZIG ZAG and DECORATIVE SEWING; COUTURE ZIG ZAG ET DÉCORATIVE; COSTURA ZIG ZAG y DECORATIVA; For zigzag sewing and decorative stitch; STRAIGHT STITCHING; POINT DROIT; COSTURA RECTA
- Page 34 – FUNCTIONS OF CONTROL PANEL; PATTERN NUMBER SELECTION; FONCTIONS DU PANNEAU DE COMMANDE; FUNCIONES DE PANEL DE CONTROL; BOUTON DE SÉLECTION DES NUMÉROS; BOTONES PARA ELEGIR NUMERO; Lorsque la machine est mise en fonction,
- Page 35 – de la longueur et de la largeur du point; NOTA: Algunas puntadas ofrecen mayores; STITCH LENGTH AND STITCH WIDTH /; B O U T O N D ' A J U S T E M E N T D E L A; BOTONES DE AJUSTE DE LARGO Y; STRAIGHT STITCH NEEDLE POSITION; RÉGLAGE DE LA POSITION D'AIGUILLE POUR LE POINT DROIT; AJUSTE DE POSICION DE AGUJA PARA PUNTADA RECTA
- Page 36 – it once. Correct bobbin tension will result in the; ADJUSTING BOBBIN THREAD TENSION; RÉGLAGE DE LA TENSION DU FIL INFÉRIEUR; AJUSTE DE LA TENSION DEL HILO DE LA BOBINA; Lower the presser foot lifter so that the foot; REMPLACEMENT DU PIED PRESSEUR; CAMBIO DEL PIE PRENSATELAS
- Page 37 – HELPFUL MESSAGES; MESSAGES D’AIDE; MENSAJES DE AYUDA
- Page 38 – DUAL PURPOSE REVERSE/; The sewing machine makes 4 tiny; REVERSE OPERATION BUTTON; BOUTON D'OPÉRATION DU POINT DE MARCHE ARRIÈRE; INTERRUPTORES DE FUNCIONAMIENTO; B O U T O N D O U B L E U S A G E P O I N T; INTERRUPTOR DE; * Fonction du point arrière pour le point; * Función de remate para; REMARQUE: cette fonction est très utile; de manera de que no se deshilache el
- Page 39 – CUADRO DE REFERENCIA RÁPIDA DE LARGO Y; TABLEAU DE RÉFÉRENCE RAPIDE DES LARGEURS ET
- Page 40 – ariées
- Page 43 – PATTERN NUMBER REFERENCE GUIDE; GUIDE DE RÉFÉRENCE DES MOTIFS; GUÍA DE REFERENCIA DEL NÚMERO DE PUNTADA
- Page 44 – PUNTADA RECTA; A.Thread tension control; switch and sew a few stitches at the start and end of the seam.; Pied presseur - Pied universel; tension peut être nécessaire.; A. Réglage de la tension du fil supérieur
- Page 45 – tejido cuando cose una costura.; To keep the seam straight, use one of the; Pour piquer une ligne droite, utilisez les; KEEPING SEAMS STRAIGHT; POUR GARDER LA COUTURE DROITE; MANTENIENDO LA PUNTADA
- Page 46 – HAND-LOOK QUILT STITCH; POINT DE MATELASSAGE D'APPARENCE FAIT À LA MAIN; PUNTADA DE ACOLCHADO CONTINUA; Increase thread tension a little bit at; experiment with different tension and; R E M A R Q U E : p o u r u n e a p p a r e n c e; experimente con diferentes combinaciones; Use zipper foot to sew to the right or left of; INSERTING ZIPPERS AND PIPING
- Page 47 – INSERTING ZIPPERS; of zipper foot to presser foot holder so that; PIPING; Attach left side of zipper foot to foot holder; Helpful Hint: Slight adjusting of the; l'aiguille passe dans l'ouverture du côté
- Page 48 – For the zigzag pattern the stitch length is 2; ADJUSTING STITCH WIDTH AND LENGTH; RÉGLAGE DE LA LARGEUR ET DE LA LONGUEUR DU POINT; AJUSTE DEL ANCHO Y LARGO DE; ZIGZAG STITCHING; POINT ZIGZAG
- Page 49 – H e l p f u l H i n t : F o r a p l e a s i n g; solide, car il fait trois points courts là où le; C o n s e j o ú t i l : P a r a l o g r a r m e j o r e s; ZIG-ZAG DE TRES PUNTADAS; POINT DE LINGERIE; PUNTADA DE LENCERIA
- Page 50 – La largeur du point bourdon augmente; La puntada de satín aumenta cuando la aguja; R E M A R Q U E : l o r s q u e v o u s c o u s e z u n; NOTA: Al coser una puntada en satín; SATIN STITCH; POINT BOURDON; PUNTADA DE RELLENO O SATÍN; POSITIONNEMENT DES MOTIFS; UBICACION DE LOS PATRONES
- Page 51 – SEWING ON A BUTTON; d u p o i n t e n f o n c t i o n d u b o u t o n ) e t; Consejo útil: Para asegurar el hilo, tire; POSE DE BOUTONS; COSIDO DE BOTONES
- Page 52 – BLINDHEM STITCH; POINT INVISBLE; PUNTADA INVISIBLE; Settings; utilisé pour confectionner des rebords; La puntada invisible se usa principalmente para
- Page 53 – surjetez le rebord coupé.; movimiento de la aguja, ensanchando o alargando la puntada.; faites un essai de couture.; Now fold the fabric as illustrated with the wrong side up.
- Page 54 – STRAIGHT STRETCH STITCH; POINT DROIT EXTENSIBLE; PUNTADA RECTA TRIPLE; POINT NID D’ABEILLE; PUNTADA PANAL; DECORATIVE AND STRETCH STITCHES; POINT DÉCORATIFS ET POINTS EXTENSIBLES; PUNTADAS DECORATIVAS Y ELÁSTICAS
- Page 55 – OVEREDGE STITCH; POINT SURJET EXTENSIBLE; PUNTADA SOBRE-ORILLADO; POINT PLUME; PUNTADA PLUMA
- Page 56 – la tension augmente la taille du trou; Consejo útil: Un ligero ajuste en + de la; PUNTADA ENTRECRUZ; POINT ENTREDEUX; PUNTADA “ENTREDOS”; uses. It is perfect for attaching flat elastic,; DOUBLE OVERLOCK STITCH; POINT SURJET DOUBLE; PUNTADA OVERLOCK DOBLE
- Page 57 – PIN STITCH; POINT ÉPINGLE; PUNTADA DE BROCHE; POINT DE LANGUETTE; PUNTADA DE RIBETE; POINT D’ÉCHELLE; PUNTADA EN ESCALERA
- Page 58 – CROSSED STITCH; POINT CROISÉ; PUNTADA CRUZADA; POINT GREC; FISHBONE STITCH; POINT D’ARRÊTE; PUNTADA RASPA; POINT SURJET OBLIQUE; PUNTADA OVERLOCK INCLINADO; POINT ÉPINGLE OBLIQUE; PUNTADA ALFILER INCLINADO
- Page 59 – and as a seam finish.; pour la couture décorative à la machine.; THORN STITCH; POINT D’ÉPINE; PUNTADA “HERRINGBONE”; POINT SURJET RENFORCÉ; REFORZADO; POINT D’ASSEMBLAGE DES REBORDS; WIZARD STITCH; POINT SORCIER
- Page 60 – it may be necessary to slightly lower the tension setting.; de ne pas manquer de fil lors de la couture.; puntada seleccionada.; necesario bajar el ajuste de tensión.; MORE DECORATIVE STITCHES and IDEAS FOR DECORATIVE; AUTRES POINTS DÉCORATIFS ET IDÉES POUR LA COUTURE; MAS PUNTADAS DECORATIVAS E IDEAS PARA DECORAR; SETTINGS; RÉGLAGES; AJUSTES
- Page 61 – La machine à coudre vous offre deux; BUTTONHOLE MAKING; CONFECTION DES BOUTONNIÈRES; CONFECCION DE OJALES; BOUTONNIÈRE AUTOMATIQUE; OJALES AUTOMÁTICOS; USING BUTTONHOLE FOOT; UTILISATION DU PIED À BOUTONNIÈRE; USO DEL PRENSATELAS PARA OJALES; PROCÉDURE; PROCEDIMIENTO; Stabilizer or regular interfacing can be
- Page 62 – buttonhole foot. (Refer to “Changing
- Page 63 – Une fois la couture terminée, utilisez; Hook filler cord (such as crochet thread or; CORDED BUTTONHOLES
- Page 64 – To ensure the best possible operation of; CAUTION; ENTRETIENT DE LA MACHINE; Pour assurer un meilleur rendement de la; E s n e c e s a r i o q u e m a n t e n g a l a s p i e z a s; A l w a y s d i s c o n n e c t t h e; D é b r a n c h e z t o u j o u r s l a; Siempre desconecte la máquina
- Page 65 – from the sewing machine and foot control.; NOTE: Use dry rags to avoid electrical shock.; pour enlever la poussière sur la machine et le rhéostat.; NOTE: Utilice los trapos secos para evitar choque eléctrico.; CLEANING THE FEED TEETH AND SHUTTLE AREA; NETTOYAGE DES GRIFFES ET AUTOUR DE LA NAVETTE; LIMPIAR EL ÁREA DEL TRANSPORTADOR Y LA LANZADERA; Remove the bobbin case from the shuttle.; shuttle; Raise the needle to its highest position.; Enlevez la boîte à canette de la coursière.; Positionnez le cache-coursière correctement sur la navette.; centre de la coursière, comme indiqué par la flèche.; Nettoyer les griffes et l'emplacement de la navette avec la brosse.; Cleaning the sewing machine and foot control; Nettoyage de la machine à coudre et du rhéostat; Limpieza de la máquina de coser y del regulador del pie
- Page 66 – OPTIONAL ACCESSORIES; Pour fixer à la machine, relevez pied de; ACCESOIRES EN OPTIONS; P a r a c o l o c a r l a e n l a m á q u i n a , l e v a n t e e l; LARGE EXTENSION TABLE; GRAND PLATEAU DE RALLONGE; BASE DE EXTENSION
- Page 67 – ROLLER FOOT; PIED A GALETS; PRENSATELAS DE RODILLO; achieved by using the normal zigzag foot.; Invisible Zipper Foot; Pied à Fermeture Glissière Invisible; Prensatelas para Cierre Invisible; ou en arrière de jupes et des robes.; Es comúnmente visto al lado o atrás de faldas y vestidos.; OPTIONAL PRESSER FEET; ACCESSOIRES OPTIONNELS; ACCESORIOS OPCIONALES; Machine Preparation; Préparation de la Machine; Preparación de la Máquina
- Page 68 – Button Sewing Foot; Pied Pose De Bouton; Prensatelas Para Pegar Botones.; when attaching it to a garment or project.; le fixe à un vêtement ou tout autre projet.; una prenda o proyecto.; Preparación de la Máquina.; Sewing Instructions; Instructions de Couture; Instrucciones para Coser
- Page 69 – Blind Stitch Foot; Pied Point Invisible; Prensatelas para Dobladillo Invisible; T h e B l i n d S t i t c h F o o t i s p r i m a r i l y u s e d f o r c r e a t i n g n e a r l; Préparation de la Machine; Peeparacion de la Maquina; Instructions de Couture; Instrucciones de Costura; Note: It takes practice to sew blind hems. Do a test sew first.
- Page 70 – Nota: Toma tiempo hacer puntada invisible. Haga una; Overcasting Foot; Pied Point Surjet; Prensatelas Para Sobrehilar; to prevent fabric from raveling.
- Page 71 – PERFORMANCE CHECKLIST; GENERAL PROBLEMS
- Page 72 – PROBLÈMES DE FIL; PROBLÈMES GÉNÉRAUX; VÉRIFICATION DES PROBLÈMES MINEUR DE COUTURE
- Page 73 – CUADRO DE VERIFICACION DE RENDIMIENTO; PROBLEMAS GENERALES
INSTRUCTION MANUAL
MANUEL D’INSTRUCTION
MANUAL DE INSTRUCCIONES
C
5200
"Loading the manual" means you need to wait until the file loads and becomes available for online reading. Some manuals are very large, and the time they take to appear depends on your internet speed.
Was this manual helpful?
About this manual
- Brand
- Singer
- Model
- C5200
- Document type
- User Manual
- Category
- Sewing Machine
- Language(s)
- English, Spanish, French
- Pages
- 76
- File size
- 6.4 MB
- Format
Summary
Eng 1 This household sewing machine is designed to comply with IEC/EN 60335-2-28 and UL1594. When using an electrical appliance, basic safety precautions should always be followed, including the following: Read all instructions before using this household sewing machine. Keep the instructions in a s...
• Keep fingers away from all moving parts. Special care is required around the sewing machine needle. • Always use the proper needle plate. The wrong plate can cause the needle to break. • Do not use bent needles. • Do not pull or push fabric while stitching. It may deflect the needle causing it to ...
SERVICING OF DOUBLE INSULATED PRODUCTS In a double-insulated product, two systems of insulation are provided instead of grounding. No ground means is provided on a double-insulated product, nor should a means for grounding be added to the product. Servicing of a double- insulated product requires ex...
Ask a question
Related manuals
More Singer Sewing Machines models
Other Singer appliances
 Singer 12K User Manual
 Singer 14CG754 User Manual
 Singer 14HD854 User Manual
 Singer 14J334 User Manual
- Singer 14SH744 User Manual
- Singer 14SH754 User Manual
 Singer 14T970C User Manual
 Singer 37-10 User Manual
 Singer 118 User Manual
 Singer 120U User Manual
 Singer 160 User Manual
-User-Manual/webp/1.webp) Singer 384.13012 (Sold at Sears) User Manual
Singer 384.13012 (Sold at Sears) User Manual Singer 401 User Manual
 Singer 401A User Manual
 Singer 413 User Manual
 Singer 1108 User Manual
 Singer 1120 User Manual