Page 2 - Contents; Before you begin; About this manual
2 English Contents Contents Before you begin 2 Anti-tip device 2 About this manual 2 For your safety 3 Preparing to install the range 3 Prepare tools & Parts 3 Checking the installation site 4 To avoid breakage 6 Connecting the power 7 Step 1. Meeting electrical connection requirements 7 Step 2....
Page 3 - For your safety; Preparing to install the range; Prepare tools & Parts
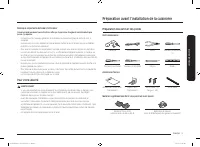
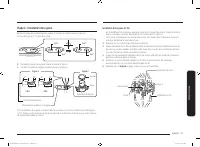
English 3 Before you begin Important note to the consumer Keep these instructions for the local electrical inspector’s use. • As when using any appliance generating heat, there are certain safety precautions you should follow. • Be sure your range is installed and grounded properly by a qualified in...
Page 4 - Checking the installation site
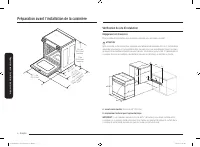
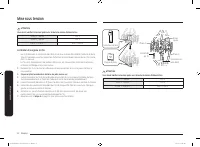
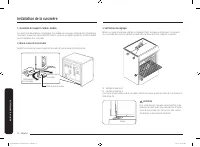
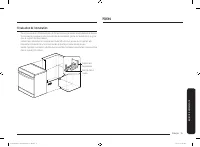
4 English Preparing to install the range Preparing to install the range Preparing to install the range 36 1 / 4 in (921.2 mm) Min. 37 in (939.8mm) Max. 29 15 / 16 in (761.0 mm) 26 7 / 16 in (671.7 mm) 49 1 / 4 in (1250.3 mm) Door fully open 28 11 / 16 in (728.6 mm) With handle Checking the installat...
Page 6 - To avoid breakage
6 English Preparing to install the range Preparing to install the range Preparing to install the range To avoid breakage CAUTION Do NOT lift or handle the unit by the cooktop glass or door handle. Fig. 1 C1 C3 C2 C4 1. The counter top around the cut-out should be flat and leveled. 2. Before installi...
Page 7 - Connecting the power; Step 1. Meeting electrical connection requirements
English 7 Connecting the power Connecting the power Step 1. Meeting electrical connection requirements CAUTION For personal safety, do not use an extension cord with this appliance. Remove the house fuse or open the circuit breaker before beginning installation. This appliance must be supplied with ...
Page 8 - Step 2. Accessing the power cord connection
8 English Connecting the power Connecting the power Connecting the power Step 2. Accessing the power cord connection Loosen and then remove the rear access cover screw with a screwdriver. Remove the rear access cover by pull right and then out. The terminal block will then be accessible. Terminal bl...
Page 9 - Step 3. Installing the power cord
English 9 Connecting the power Step 3. Installing the power cord For power cord installations, hook the strain relief over the power cord hole (1 3 ⁄ 8 ") located below the rear of the drawer body. Insert the power cord through the strain relief and tighten the device. Conduit connection plate P...
Page 11 - Step 4. Installing the conduit
English 11 Connecting the power Step 4. Installing the conduit Remove the conduit connection plate and rotate it as shown below.The conduit hole (1 1 ⁄ 8 ") must be used. 1 1 ⁄ 8 " 1 1 ⁄ 8 " 1 3 ⁄ 8 " 1 3 ⁄ 8 " 1. Prepare the conduit cord as shown in Figure 1. 2. Install the cond...
Page 13 - Installing the range; Installing the anti-tip device; Step 5. Replacing the access cover
English 13 Installing the range Installing the range Installing the anti-tip device WARNING To reduce the risk of tipping, you must secure the appliance by properly installing the Anti-Tip device packed with the appliance. • Refer to the installation instructions supplied with the bracket.• If the a...
Page 15 - Finalizing the installation; Memo
English 15 Installing the range Finalizing the installation • Move range close enough to the opening to plug into the receptacle.• Slide the range into position ensuring that the rear left (or rear right) leg slides under the Anti-Tip bracket. • Carefully tip the range forward to insure that the Ant...
Page 17 - Estufa eléctrica; Manual de instalación
Estufa eléctrica Manual de instalación NE63*8***** Install_NE63T8911_AA_DG68-01257A-00_MES.indd 1 3/19/2020 4:14:24 PM
Page 18 - Contenido; Antes de comenzar; Dispositivo anti inclinación; Acerca de este manual
2 Español Contenido Contenido Antes de comenzar 2 Dispositivo anti inclinación 2 Acerca de este manual 2 Para su seguridad 3 Preparación para instalar la estufa 3 Prepare las herramientas y las piezas 3 Control del sitio de instalación 4 Para evitar la rotura 6 Cómo conectar la corriente eléctrica 7...
Page 19 - Para su seguridad; Preparación para instalar la estufa; Prepare las herramientas y las piezas
Español 3 Antes de c omenz ar Nota importante para el usuario Guarde estas instrucciones para que puedan ser consultadas por el inspector del servicio eléctrico de su localidad. • Como con cualquier artefacto que genera calor, existen ciertas precauciones de seguridad que se deben cumplir. • Asegúre...
Page 20 - Control del sitio de instalación
4 Español Pr eparación par a ins talar la e stuf a Pr eparación par a ins talar la e stuf a Preparación para instalar la estufa 36 1 / 4 pulgadas (921.2 mm) mín. 37 pulgadas (939.8mm) máx. 29 15 / 16 pulgadas (761.0 mm) 26 7 / 16 pulgadas (671.7 mm) 49 1 / 4 pulgadas (1250.3 mm) Puert a c omple tame...
Page 22 - Para evitar la rotura
6 Español Pr eparación par a ins talar la e stuf a Pr eparación par a ins talar la e stuf a Preparación para instalar la estufa Para evitar la rotura PRECAUCIÓN NO levante ni sostenga la unidad por el vidrio de la cubierta o la manija de la puerta. Fig. 1 C1 C3 C2 C4 1. La mesada alrededor del recor...
Page 23 - Cómo conectar la corriente eléctrica; Paso 1. Cumplimiento de los requisitos de conexión eléctrica
Español 7 Cómo c onec tar la c orrient e eléc trica Cómo conectar la corriente eléctrica Paso 1. Cumplimiento de los requisitos de conexión eléctrica PRECAUCIÓN Para seguridad de las personas, no utilice cables prolongadores con este electrodoméstico. Retire el fusible de la casa o corte la electric...
Page 24 - Paso 2. Acceso a la conexión del cable de alimentación
8 Español Cómo c onec tar la c orrient e eléc trica Cómo c onec tar la c orrient e eléc trica Cómo conectar la corriente eléctrica Paso 2. Acceso a la conexión del cable de alimentación Afloje y luego retire el tornillo de la cubierta de acceso posterior con un destornillador. Retire la cubierta de ...
Page 25 - Paso 3. Instalación del cable de alimentación
Español 9 Cómo c onec tar la c orrient e eléc trica Paso 3. Instalación del cable de alimentación Cuando se realicen instalaciones de cables de alimentación, enganche el sujetador de cables con amortiguador de esfuerzo sobre el orificio del cable de alimentación (1 3 ⁄ 8 ”) ubicado debajo de la part...
Page 27 - Paso 4. Instalación del conducto
Español 11 Cómo c onec tar la c orrient e eléc trica Paso 4. Instalación del conducto Retire la placa de conexión del conducto y rótela como se muestra a continuación.Se debe utilizar el orificio de conducto (1 1 ⁄ 8 ”). 1 1 ⁄ 8 " 1 1 ⁄ 8 " 1 3 ⁄ 8 " 1 3 ⁄ 8 " 1. Prepare el cable de ...
Page 29 - Instalación de la estufa; Instalación del dispositivo anti inclinación; Paso 5. Colocación de la cubierta de acceso
Español 13 Ins talación de la e stuf a Instalación de la estufa Instalación del dispositivo anti inclinación ADVERTENCIA Para reducir el riesgo de inclinaciones o vuelcos, debe sujetar el electrodoméstico instalando correctamente el dispositivo anti inclinación que viene empacado con la estufa. • Re...
Page 31 - Finalización de la instalación; Notas
Español 15 Ins talación de la e stuf a Finalización de la instalación • Mueva la estufa lo suficientemente cerca de su lugar como para enchufar en el tomacorriente.• Deslice la estufa a su posición, asegurándose de que la pata trasera izquierda (o trasera derecha) se deslice por debajo de la ménsula...
Page 33 - Cuisinière électrique; Manuel d'installation
Cuisinière électrique Manuel d'installation NE63*8***** Install_NE63T8911_AA_DG68-01257A-00_CFR.indd 1 3/19/2020 4:14:41 PM
Page 34 - Table des matières; Avant de commencer; Dispositif anti-basculement; A propos de ce manuel
2 Français Table de s matièr es Table des matières Avant de commencer 2 Dispositif anti-basculement 2 A propos de ce manuel 2 Pour votre sécurité 3 Préparation avant l'installation de la cuisinière 3 Préparation des outils et des pièces 3 Vérification du site d'installation 4 Pour éviter toute ruptu...
Page 35 - Pour votre sécurité; Préparation avant l'installation de la cuisinière; Préparation des outils et des pièces
Français 3 Av ant de c ommenc er Remarque importante destinée à l'utilisateur Conservez précieusement ces instructions afin que la personne chargée du contrôle électrique puisse s'y reporter. • Comme pour tout appareil générant de la chaleur, certaines consignes de sécurité sont à respecter. • Assur...
Page 36 - Vérification du site d'installation
4 Français Pr éparation av ant l'ins tallation de la cuisinièr e Pr éparation av ant l'ins tallation de la cuisinièr e Préparation avant l'installation de la cuisinière 36 1 / 4 po (921,2 mm) minimum 37 po (939,8 mm) maximum 29 15 / 16 po (761,0 mm) 26 7 / 16 po (671,7 mm) 49 1 / 4 po (1250,3 mm) Po...
Page 38 - Pour éviter toute rupture
6 Français Pr éparation av ant l'ins tallation de la cuisinièr e Pr éparation av ant l'ins tallation de la cuisinièr e Préparation avant l'installation de la cuisinière Pour éviter toute rupture ATTENTION Veillez à NE PAS soulever ou manipuler l'appareil par la vitre de la table de cuisson ou par la...
Page 39 - Mise sous tension
Français 7 Mise sous t ension Mise sous tension Étape 1 : respect des exigences en matière de raccordements électriques ATTENTION Pour votre propre sécurité, n'utilisez pas de rallonge avec cet appareil. Retirez le fusible du domicile ou coupez le disjoncteur avant de démarrer l'installation. Cet ap...
Page 40 - Étape 2 : accès au branchement du cordon d'alimentation
8 Français Mise sous t ension Mise sous t ension Mise sous tension Étape 2 : accès au branchement du cordon d'alimentation Desserrez puis retirez la vis du panneau d'accès situé à l'arrière à l'aide d'un tournevis. Retirez le panneau d'accès situé à l'arrière en le tirant bien droit pour le faire so...
Page 41 - Étape 3 : installation du cordon d'alimentation
Français 9 Mise sous t ension Étape 3 : installation du cordon d'alimentation Pour l'installation du cordon d'alimentation, accrochez le réducteur de tension sur l'orifice du cordon d'alimentation (1 3 / 8 ") situé sous la partie arrière du tiroir. Insérez le cordon d'alimentation dans le réduct...
Page 43 - Étape 4 : installation de la gaine
Français 11 Mise sous t ension Étape 4 : installation de la gaine Retirez la plaque de raccordement de la gaine et tournez-la comme indiqué ci-dessous.Le trou de la gaine (1 1 / 8 ") doit être utilisé. 1 1 / 8 " 1 1 / 8 " 1 3 / 8 " 1 3 / 8 " 1. Préparez le cordon de la gaine comm...
Page 45 - Installation de la cuisinière; Installation du dispositif anti-basculement; Étape 5 : remise en place du panneau d'accès
Français 13 Ins tallation de la cuisinièr e Installation de la cuisinière Installation du dispositif anti-basculement AVERTISSEMENT Pour réduire le risque de basculement, vous devez fixer l'appareil en installant convenablement le dispositif anti-basculement fourni avec l'appareil. • Reportez-vous a...
Page 47 - Finalisation de l'installation; Notes
Français 15 Ins tallation de la cuisinièr e Finalisation de l'installation • Placez la cuisinière suffisamment près de l'ouverture pour permettre le branchement de la prise.• Positionnez la cuisinière en vous assurant que le pied arrière gauche (ou arrière droit) se glisse sous le support anti-bascu...