Samsung NE63BG8315SSAA - Manuals
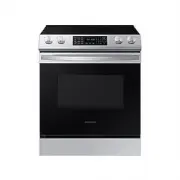
User Manual Samsung NE63BG8315SSAA


Summary
2 English WARNING To reduce the risk of tipping the range, the range must be secured by a properly installed Anti-Tip device. AFTER THE RANGE HAS BEEN INSTALLED, CONFIRM THAT THE ANTI-TIP DEVICE HAS BEEN PROPERLY INSTALLED AND VERIFY THAT THE ANTI-TIP DEVICE IS PROPERLY ENGAGED . Refer to the instal...
English 3 • Connect the equipment into an outlet on a circuit different from that to which the receiver is connected. • Consult the dealer or an experienced radio/TV technician for help. To satisfy FCC RF exposure requirements, a separation distance of 20 cm or more should be maintained between the ...
4 English 2. IC Notice The term “IC” before the radio certification number only signifies that Industry Canada technical specifications were met. Operation is subject to the following two conditions: (1) this device may not cause interference, and (2) this device must accept any interference, includ...
Samsung Ranges Manuals
-
 Samsung NE63A6111SS/AA
User Manual
Samsung NE63A6111SS/AA
User Manual
-
 Samsung NE63A6311SS/AA
User Manual
Samsung NE63A6311SS/AA
User Manual
-
 Samsung NE63A6511SS/AA
User Manual
Samsung NE63A6511SS/AA
User Manual
-
 Samsung NE63A6711SS/AA
User Manual
Samsung NE63A6711SS/AA
User Manual
-
 Samsung NE63A6751SS/AA
User Manual
Samsung NE63A6751SS/AA
User Manual
-
 Samsung NE63B8211SS
User Manual
Samsung NE63B8211SS
User Manual
-
 Samsung NE63B8211SS/AA
User Manual
Samsung NE63B8211SS/AA
User Manual
-
 Samsung NE63B8611SS
User Manual
Samsung NE63B8611SS
User Manual
-
 Samsung NE63BG8315SS
User Manual
Samsung NE63BG8315SS
User Manual
-
 Samsung NE63T8111SS/AA
User Manual
Samsung NE63T8111SS/AA
User Manual
-
 Samsung NE63T8511SS/AA
User Manual
Samsung NE63T8511SS/AA
User Manual
-
 Samsung NE63T8911SG
User Manual
Samsung NE63T8911SG
User Manual
-
 Samsung NE63T8911SS
User Manual
Samsung NE63T8911SS
User Manual
-
 Samsung NSG6DG8300SRAA
User Manual
Samsung NSG6DG8300SRAA
User Manual
-
 Samsung NX58R5601SS
User Manual
Samsung NX58R5601SS
User Manual
-
 Samsung NX60A6111SS
User Manual
Samsung NX60A6111SS
User Manual
-
 Samsung NX60A6111SS/AA
User Manual
Samsung NX60A6111SS/AA
User Manual
-
 Samsung NX60A6311SS
User Manual
Samsung NX60A6311SS
User Manual
-
 Samsung NX60A6311SS/AA
User Manual
Samsung NX60A6311SS/AA
User Manual