Page 2 - SPECIFICATIONS; WARNING Read all safety warnings and all
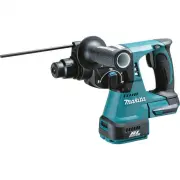
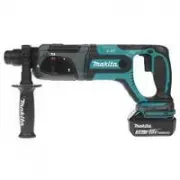
2 ENGLISH (Original instructions) SPECIFICATIONS Model LXRH01 LXRH02 Concrete 24 mm (15/16") Steel 13 mm (1/2") Capacities Wood 27 mm (1-1/16") No load speed (RPM) 0 - 950/min. Blows per minute 0 - 4,700 Overall length 328 mm (12-7/8") 353 mm (13-7/8") Net weight 3.3 kg ( 7.3 lbs...
Page 4 - Tips for maintaining maximum battery life
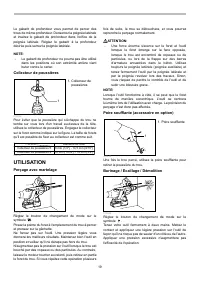
4 7. In cold weather or when the tool has not been used for a long time, let the tool warm up for a while by operating it under no load. This will loosen up the lubrication. Without proper warm-up, hammering operation is difficult. 8. Always be sure you have a firm footing. Be sure no one is below w...
Page 5 - FUNCTIONAL DESCRIPTION; Installing or removing battery cartridge; Switch action
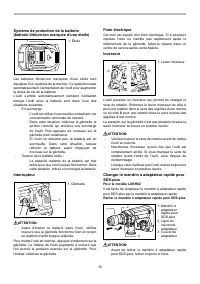
5 FUNCTIONAL DESCRIPTION CAUTION: • Always be sure that the tool is switched off and the battery cartridge is removed before adjusting or checking function on the tool. Installing or removing battery cartridge CAUTION: • Hold the tool and the battery cartridge firmly when installing or removing batt...
Page 6 - Reversing switch action; For model LXRH02; Selecting the action mode; Rotation with hammering
6 Reversing switch action 1 A B 012628 This tool has a reversing switch to change the direction of rotation. Depress the reversing switch lever from the A side for clockwise rotation or from the B side for counterclockwise rotation. When the reversing switch lever is in the neutral position, the swi...
Page 7 - Hammering only; Torque limiter; ASSEMBLY; Bit grease
7 Hammering only 1 012630 For chipping, scaling or demolition operations, depress the lock button and rotate the action mode changing knob to the symbol. Use a bull point, cold chisel, scaling chisel, etc. CAUTION: • Do not rotate the action mode changing knob when the tool is running. The tool will...
Page 8 - Depth gauge; OPERATION; Hammer drilling operation
8 1 2 012625 Bit angle (when chipping, scaling or demolishing) 1 2 012632 The bit can be secured at the desired angle. To change the bit angle, depress the lock button and rotate the action mode changing knob to the O symbol. Turn the bit to the desired angle. Depress the lock button and rotate the ...
Page 9 - Drilling in wood or metal
9 rods embedded in the concrete. Always use the side grip (auxiliary handle) and firmly hold the tool by both side grip and switch handle during operations. Failure to do so may result in the loss of control of the tool and potentially severe injury. NOTE: Eccentricity in the bit rotation may occur ...
Page 11 - MAKITA LIMITED ONE YEAR WARRANTY
11 MAKITA LIMITED ONE YEAR WARRANTY Warranty Policy Every Makita tool is thoroughly inspected and tested before leaving the factory. It is warranted to be free of defects from workmanship and materials for the period of ONE YEAR from the date of original purchase. Should any trouble develop during t...
Page 12 - SPÉCIFICATIONS; MISE EN GARDE Veuillez lire toutes les mises en
12 FRANÇAIS (Mode d’emploi original) SPÉCIFICATIONS Modèle LXRH01 LXRH02 Béton 24 mm (15/16") Acier 13 mm (1/2") Capacités Bois 27 mm (1-1/16") Vitesse à vide (T/MIN) 0 - 950/min. Nombre de frappes par minute 0 - 4 700 Longueur totale 328 mm (12-7/8") 353 mm (13-7/8") Poids net 3...
Page 13 - Utilisation et entretien des outils électriques
13 un outil électrique. Évitez d'utiliser un outil électrique si vous êtes fatigué ou si vous avez pris une drogue, de l'alcool ou un médicament. Un moment d'inattention pendant l'utilisation d'un outil électrique peut entraîner une grave blessure. 11. Portez des dispositifs de protection personnell...
Page 14 - Réparation; Symboles
14 évitez tout contact avec ce liquide. En cas de contact accidentel, rincez avec beaucoup d’eau. Si le liquide pénètre dans vos yeux, il faut aussi consulter un médecin. L'électrolyte qui s'échappe de la batterie peut causer des irritations ou des brûlures. Réparation 28. Faites réparer votre outil...
Page 15 - Installation ou retrait de la batterie
15 ENC007-7 CONSIGNES DE SÉCURITÉ IMPORTANTES POUR LA BATTERIE 1. Avant d'utiliser la batterie, lisez toutes les instructions et précautions relatives (1) au chargeur de batterie, (2) à la batterie, et (3) à l'outil utilisant la batterie. 2. Ne démontez pas la batterie. 3. Cessez immédiatement l'uti...
Page 16 - Interrupteur; Pour le modèle LXRH02
16 Système de protection de la batterie (batterie lithium-ion marquée d’une étoile) 1 012128 Les batteries lithium-ion marquées d’une étoile sont équipées d’un système de protection. Ce système coupe automatiquement l’alimentation de l’outil pour augmenter la durée de vie de la batterie. L'outil s’a...
Page 17 - Fixer le mandrin à adaptateur rapide; Sélection du mode de fonctionnement; Rotation avec martelage; Limiteur de couple; ASSEMBLAGE
17 Saisissez le couvercle adaptateur du mandrin à adaptateur rapide pour SDS-plus et tournez-le dans le sens de la flèche jusqu'à ce que la ligne du couvercle adaptateur passe du symbole au symbole . Tirez avec force dans le sens de la flèche. Fixer le mandrin à adaptateur rapide 1 2 3 4 012689 Véri...
Page 19 - Collecteur de poussières; UTILISATION; Perçage avec martelage
19 Le gabarit de profondeur vous permet de percer des trous de même profondeur. Desserrez la poignée latérale et insérez le gabarit de profondeur dans l'orifice de la poignée latérale. Réglez le gabarit à la profondeur désirée puis serrez la poignée latérale. NOTE: • Le gabarit de profondeur ne pour...
Page 20 - Perçage du bois ou du métal
20 Perçage du bois ou du métal 1 2 012684 1 2 012685 Utilisez l'ensemble mandrin en option. Lorsque vous l'installez, référez-vous à la section ''Installation ou retrait du foret'', à la page précédente. Réglez le bouton de changement de mode de sorte que le pointeur indique le symbole . Pour le mod...
Page 21 - GARANTIE LIMITÉE D’UN AN MAKITA; Politique de garantie
21 ENTRETIEN ATTENTION: • Assurez-vous toujours que l'outil est hors tension et que la batterie est retirée avant d'y effectuer tout travail d'inspection ou d'entretien. • N'utilisez jamais d'essence, de benzine, de solvant, d'alcool ou d'autres produits similaires. Une décoloration, une déformation...
Page 22 - ESPECIFICACIONES; ADVERTENCIA: lea todas las advertencias de
22 ESPAÑOL (Instrucciones originales) ESPECIFICACIONES Modelo LXRH01 LXRH02 Concreto 24 mm (15/16") Acero 13 mm (1/2") Capacidades Madera 27 mm (1-1/16") Velocidad sin carga (r.p.m.) 0 - 950r/min Golpes por minuto 0 - 4 700 Longitud total 328 mm (12-7/8") 353 mm (13-7/8") Peso ne...
Page 25 - Símbolos; No desarme el cartucho de batería.
25 USD302-1 Símbolos A continuación se muestran los símbolos utilizados para la herramienta. ・ volts o voltios ・ corriente directa o corriente continua ・ velocidad en vacío o sin carga ・ revoluciones o alternaciones por minuto, frecuencia de rotación. ・ número de percusiones ENC007-7 INSTRUCCIONES I...
Page 26 - Accionamiento del interruptor
26 DESCRIPCIÓN DEL FUNCIONAMIENTO PRECAUCIÓN: • Asegúrese siempre de que la herramienta esté apagada y el cartucho de batería extraído antes de realizar cualquier ajuste o comprobación en la herramienta. Instalación o desmontaje del cartucho de batería PRECAUCIÓN: • Sujete la herramienta y el cartuc...
Page 27 - Freno eléctrico; Para modelo LXRH02; Selección del modo de accionamiento; Rotación de martillo
27 suelta. Para poner en marcha la herramienta, simplemente apriete el gatillo interruptor. La velocidad de la herramienta aumenta incrementando la presión en el gatillo. Suelte el gatillo interruptor para parar. Freno eléctrico Esta herramienta está equipada con un freno eléctrico. Si la herramient...
Page 28 - Limitador de torsión; ENSAMBLE; Grasa para brocas
28 símbolo . Utilice una broca de carburo de tungsteno. Acción de rotación solamente. 1 012631 Para taladrar madera, metal o plástico, suelte la traba y gire la perilla que cambia el modo de accionamento al símbolo . Utilice una broca para madera o de espiral. Acción de martillo solamente 1 012630 S...
Page 29 - Calibrador de profundidad
29 1 2 001296 Inserte la broca o el cincel en la herramienta. Girelo y presiónelo hacia dentro hasta que quede encajado. 2 1 012624 Si la broca no puede ser empujada hacia dentro, extráigala. Tire de la cubierta del mandril hacia abajo unas cuantas veces. Después vuelva a insertar la broca. Gire la ...
Page 30 - OPERACIÓN; Operación de taladrado con percusión
30 Diámetro de la broca Contenedor de polvo 5 6 mm (1/4") - 14,5 mm (9/16") Contenedor de polvo 9 12 mm (15/32") - 16 mm (5/8") 006386 OPERACIÓN Operación de taladrado con percusión 012634 Ajuste la perilla que cambia el modo de accionamento al símbolo . Posicione la broca en el luga...
Page 31 - MANTENIMIENTO
31 que aparece en páginas anteriores. Establezca la perilla que cambia el modo de acción de tal forma que el indicador apunte hacia el símbolo . Para modelo LXRH02 PRECAUCIÓN: • Nunca utilice la acción de "rotación con martilleo" cuando el montaje opcional esté instalado en la herramienta. P...
Page 32 - ACCESORIOS OPCIONALES; Política de garantía
32 ACCESORIOS OPCIONALES PRECAUCIÓN: • Estos accesorios o aditamentos (incluidos o no) están recomendados para utilizar con su herramienta Makita especificada en este manual. El empleo de cualesquiera otros accesorios o acoplamientos conllevará un riesgo de sufrir heridas personales. Utilice los acc...
Page 36 - Makita Corporation
36 Some dust created by power sanding, sawing, grinding, drilling, and otherconstruction activities contains chemicals known to the State of Californiato cause cancer, birth defects or other reproductive harm. Some examplesof these chemicals are:• lead from lead-based paints,• crystalline silica fro...