Page 2 - SPECIFICATIONS; General power tool safety warnings; Save all warnings and instruc-
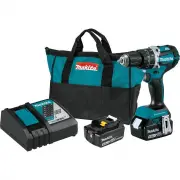
2 ENGLISH ENGLISH (Original instructions) SPECIFICATIONS Model: XPH12 Drilling capacities Masonry 13 mm (1/2") Steel 13 mm (1/2") Wood 38 mm (1/1/2") Fastening capacities Wood screw 10 mm x 90 mm (3/8" x 3-1/2") Machine screw M6 (1/4") No load speed (RPM) High (2) 0 - 2,000 /...
Page 3 - Cordless hammer driver drill safety; SAVE THESE INSTRUCTIONS.
3 ENGLISH 4. Remove any adjusting key or wrench before turning the power tool on. A wrench or a key left attached to a rotating part of the power tool may result in personal injury. 5. Do not overreach. Keep proper footing and balance at all times. This enables better control of the power tool in un...
Page 4 - Symbols; Important safety instructions for; Tips for maintaining maximum; FUNCTIONAL; Installing or removing battery
4 ENGLISH Symbols The followings show the symbols used for tool. volts direct current no load speed revolutions or reciprocation per minute number of blow Important safety instructions for battery cartridge 1. Before using battery cartridge, read all instruc- tions and cautionary markings on (1) bat...
Page 5 - Indicating the remaining battery; Tool / battery protection system
5 ENGLISH To remove the battery cartridge, slide it from the tool while sliding the button on the front of the cartridge. To install the battery cartridge, align the tongue on the battery cartridge with the groove in the housing and slip it into place. Insert it all the way until it locks in place w...
Page 6 - Switch action
6 ENGLISH Switch action 1 ► 1. Switch trigger CAUTION: Before installing the battery car- tridge into the tool, always check to see that the switch trigger actuates properly and returns to the "OFF" position when released. To start the tool, simply pull the switch trigger. Tool speed is incr...
Page 7 - Selecting the action mode; Adjusting the fastening torque
7 ENGLISH CAUTION: Always set the speed change lever fully to the correct position. If you operate the tool with the speed change lever positioned halfway between the "1" side and "2" side, the tool may be damaged. CAUTION: Do not use the speed change lever while the tool is running....
Page 8 - ASSEMBLY; Installing or removing driver bit/; Installing hook; OPERATION
8 ENGLISH ASSEMBLY CAUTION: Always be sure that the tool is switched off and the battery cartridge is removed before carrying out any work on the tool. Installing or removing driver bit/ drill bit Optional accessory 1 3 2 ► 1. Sleeve 2. Close 3. Open Turn the sleeve counterclockwise to open the chuc...
Page 9 - Screwdriving operation; Drilling operation; MAINTENANCE
9 ENGLISH Screwdriving operation CAUTION: Adjust the adjusting ring to the proper torque level for your work. CAUTION: Make sure that the driver bit is inserted straight in the screw head, or the screw and/or driver bit may be damaged. First, turn the action mode changing ring so that the arrow on t...
Page 10 - MAKITA LIMITED ONE YEAR; Warranty Policy
10 ENGLISH OPTIONAL ACCESSORIES CAUTION: These accessories or attachments are recommended for use with your Makita tool specified in this manual. The use of any other accessories or attachments might present a risk of injury to persons. Only use accessory or attachment for its stated purpose. If you...
Page 11 - ESPECIFICACIONES; Advertencias generales de; Conserve todas las advertencias
11 ESPAÑOL ESPAÑOL (Instrucciones originales) ESPECIFICACIONES Modelo: XPH12 Capacidades de taladrado Mampostería 13 mm (1/2") Acero 13 mm (1/2") Madera 38 mm (1/1/2") Capacidades de fijación Tornillo para madera 10 mm x 90 mm (3/8" x 3-1/2") Tornillo de máquina 6 mm (1/4") V...
Page 12 - Advertencias de seguridad para el
12 ESPAÑOL Seguridad personal 1. Manténgase alerta, preste atención a lo que está haciendo y utilice su sentido común cuando opere una herramienta eléctrica. No utilice una herramienta eléctrica cuando esté cansado o bajo la influencia de drogas, alco - hol o medicamentos. Un momento de distracción ...
Page 13 - Símbolos; Instrucciones importantes de; GUARDE ESTAS
13 ESPAÑOL 3. Sujete la herramienta eléctrica por las super- ficies de agarre aisladas al realizar una ope - ración en la que el accesorio de corte pueda estar en contacto con cables ocultos. Si el accesorio de corte entra en contacto con un cable con corriente, las piezas metálicas expuestas de la ...
Page 14 - DESCRIPCIÓN DEL; Instalación o extracción del; Indicación de la capacidad restante
14 ESPAÑOL Consejos para alargar al máximo la vida útil de la batería 1. Cargue el cartucho de batería antes de que se descargue completamente. Pare siem- pre la operación y cargue el cartucho de batería cuando note menos potencia en la herramienta. 2. No cargue nunca un cartucho de batería que esté...
Page 16 - Cambio de velocidad; Selección del modo de
16 ESPAÑOL NOTA: Cuando la herramienta se sobrecaliente, ésta se detendrá automáticamente y la lámpara comen - zará a destellar. En este caso, suelte el gatillo inte - rruptor. La lámpara se apagará en un minuto. NOTA: Utilice un paño seco para quitar la suciedad de la lente de la lámpara. Tenga cui...
Page 17 - Ajuste de la torsión de apriete; MONTAJE; Instalación o extracción de la punta
17 ESPAÑOL Esta herramienta cuenta con tres modos de accionamiento. • Modo de taladrado (rotación solamente) • Modo de taladrado y martilleo (rotación con percusión) • Modo de atornillado (rotación con embrague) Seleccione el modo apropiado para el trabajo en cuestión. Gire el anillo de cambio de mo...
Page 18 - OPERACIÓN; Operación de atornillado
18 ESPAÑOL Instalación del gancho 1 3 2 ► 1. Ranura 2. Gancho 3. Tornillo El gancho resulta útil para colgar temporalmente la herramienta. Se puede instalar en cualquiera de los lados de la herramienta. Para instalar el gancho, insér- telo en una ranura de la carcasa de la herramienta de cualquiera ...
Page 19 - Operación de taladrado; MANTENIMIENTO
19 ESPAÑOL Operación de taladrado con percusión PRECAUCIÓN: En el momento de comenzar a penetrar, cuando se atasca el agujero con viru- tas y partículas, o cuando se topa contra varillas de refuerzo de hormigón armado, se ejerce una tremenda y repentina fuerza de torsión sobre la herramienta/broca. ...
Page 20 - GARANTÍA LIMITADA DE UN AÑO; Ésta Garantía no aplica para México
20 ESPAÑOL ACCESORIOS OPCIONALES PRECAUCIÓN: Estos accesorios o aditamen- tos están recomendados para utilizarse con su herramienta Makita especificada en este manual. El empleo de cualquier otro accesorio o aditamento puede conllevar el riesgo de lesiones personales. Utilice los accesorios o aditam...
Page 24 - WARNING; productos químicos son:; Makita Corporation
Some dust created by power sanding, sawing, grinding, drilling, and other construction activities contains chemicals known to the State of California to cause cancer, birth defects or other reproductive harm. Some examples of these chemicals are: • lead from lead-based paints, • crystalline silica f...