Page 2 - SPECIFICATIONS; GENERAL SAFETY RULES
2 ENGLISH SPECIFICATIONS Model HR4041C Carbide-tipped bit 40 mm (1-9/16") Capacities Core bit 118 mm (4-5/8") No load speed (RPM) 230 - 460 /min. Blows per minute 1,300 - 2,600 Overall length 428 mm (16-7/8") Net weight 6.2 kg (13.7 lbs) • Due to our continuing programme of research and ...
Page 4 - FUNCTIONAL DESCRIPTION; Switch action; ASSEMBLY
4 ・ hertz ・ alternating current ・ no load speed ・ Class II Construction ・ revolutions or reciprocation per minute ・ number of blow FUNCTIONAL DESCRIPTION CAUTION: • Always be sure that the tool is switched off and unplugged before adjusting or checking function on the tool. Switch action 1 007781 CA...
Page 5 - OPERATION; Hammer drilling operation
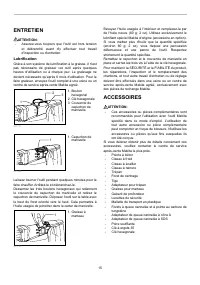
5 Installing or removing the bit Press in the tool retainer and turn it until the red dots on the tool retainer and the tool holder are aligned. Release the tool retainer. 1 2 007794 Insert the bit into the tool holder as far as it will go. Press in the tool retainer and turn it a full 180 degrees. ...
Page 6 - When using the center bit; When not using the center bit
6 Chipping/Scaling/Demolition 007798 Set the change lever to the symbol. Hold the tool firmly with both hands. Turn the tool on and apply slight pressure on the tool so that the tool will not bounce around, uncontrolled. Pressing very hard on the tool will not increase the efficiency. Core bit (opti...
Page 7 - MAINTENANCE; Lubrication; ACCESSORIES
7 Rotate the change lever to the position. Rest the core bit on the concrete and turn the tool on. Once the core bit has cut a shallow groove into the concrete, rotate the change lever to the position and resume drilling. 007800 NOTE: • No problem is caused even if the core bit unscrews slightly dur...
Page 8 - MAKITA LIMITED ONE YEAR WARRANTY
8 • Spline shank Carbide-tipped bits • Spline shank to A-Taper adapter • Spline shank to SDS adapter • Blow-out bulb • Lock nut wrench 35 • Hex wrench MAKITA LIMITED ONE YEAR WARRANTY Warranty Policy Every Makita tool is thoroughly inspected and tested before leaving the factory. It is warranted to ...
Page 9 - FRANÇAIS; SPÉCIFICATIONS; Sécurité de la zone de travail
9 FRANÇAIS SPÉCIFICATIONS Modèle HR4041C Foret au carbure 40 mm (1-9/16") Capacités Trépan 118 mm (4-5/8") Vitesse à vide (T/MIN) 230 - 460 /min. Nombre de frappes par minute 1,300 - 2,600 Longueur totale 428 mm (16-7/8") Poids net 6.2 kg (13.7 lbs) • Étant donné l'évolution constante de...
Page 11 - Symboles; Interrupteur
11 4. Portez un casque rigide (casque de sécurité) ainsi que des lunettes de sécurité et/ou un écran facial. Les lunettes ordinaires et les lunettes de soleil ne constituent PAS des lunettes de sécurité. Le port d'un masque à poussière et de gants épais est également fortement recommandé. 5. Assurez...
Page 12 - Changement de vitesse; ASSEMBLAGE; Installation et retrait du foret
12 Changement de vitesse 1 007785 Il est possible de régler le nombre de rotations et de frappes par minute simplement en tournant le cadran de réglage. Le cadran est gradué de 1 (vitesse la plus lente) à 5 (vitesse la plus rapide). Pour connaître le rapport entre les graduations du cadran et le nom...
Page 13 - Gabarit de profondeur; UTILISATION; Perçage avec martelage; Lors de l'utilisation du foret de centrage
13 Pour retirer la fraise, suivez la procédure d'installation en sens inverse. Gabarit de profondeur 1 2 007799 Le gabarit de profondeur vous permet de percer des trous de même profondeur. Insérez le gabarit de profondeur dans l'orifice de la base de la poignée. Réglez le gabarit de profondeur sur l...
Page 14 - Lorsque le foret de centrage n'est pas utilisé
14 1 2 003209 Installation du foret de centrage 1 003210 Posez le trépan sur le béton et mettez le contact. Une fois que le trépan a pratiqué un sillon peu profond dans le béton, retirez le foret de centrage. Poursuivez ensuite le perçage. 007800 Pour retirer le foret de centrage, suivez la procédur...
Page 15 - ENTRETIEN; Lubrification; ACCESSOIRES
15 ENTRETIEN ATTENTION: • Assurez-vous toujours que l'outil est hors tension et débranché avant d'y effectuer tout travail d'inspection ou d'entretien. Lubrification Grâce à son système de lubrification à la graisse, il n'est pas nécessaire de graisser cet outil après quelques heures d'utilisation o...
Page 16 - GARANTIE LIMITÉE D’UN AN MAKITA
16 GARANTIE LIMITÉE D’UN AN MAKITA Politique de garantie Chaque outil Makita est inspecté rigoureusement et testé avant sa sortie d’usine. Nous garantissons qu’il sera exempt de défaut de fabrication et de vice de matériau pour une période d’UN AN à partir de la date de son achat initial. Si un prob...
Page 17 - ESPAÑOL; ESPECIFICACIONES; ¡ADVERTENCIA! Lea todas las instrucciones.
17 ESPAÑOL ESPECIFICACIONES Modelo HR4041C Especificaciones eléctricas en México 120 V 11 A 50/60 Hz brocas de carburo 40 mm (1-9/16") Capacidades Broca de corona 118 mm (4-5/8") Revoluciones por minuto (r.p.m.) 230 r/min- 460 r/min Golpes por minuto 1 300 - 2 600 Longitud total 428 mm (16-7...
Page 19 - Símbolos; Accionamiento del interruptor
19 Los anteojos comunes o para el sol NO son gafas de seguridad. También se recomienda usar una mascarilla para protegerse del polvo y guantes bien acolchados. 5. Asegúrese de que la broca se encuentre fija en su lugar antes de su funcionamiento. 6. En condiciones normales de funcionamiento, la herr...
Page 20 - Cambio de velocidad; MONTAJE; Instalación o extracción de la broca
20 Cambio de velocidad 1 007785 Las revoluciones y percusiones por minuto pueden ajustarse simplemente girando el control de ajuste de velocidad. El control está marcado con 1(mínima velocidad) a 5 (máxima velocidad). Consulte la tabla de abajo para ver la relación entre las posiciones del control d...
Page 21 - Calibrador de profundidad; OPERACIÓN; Operación de taladrado con percusión; Cuando utilice la broca centradora
21 Para retirar la broca, siga el proceso inverso al de instalación. Calibrador de profundidad 1 2 007799 El tope de profundidad sirve para taladrar agujeros a una profundidad uniforme. Inserte el tope de profundidad en el agujero de la base de empuñadura. Ajuste el tope de profundidad a la profundi...
Page 22 - Cuando no se utilice la broca centradora
22 1 2 003209 Instale la broca centradora. 1 003210 Deje la broca corona en el hormigón y encienda la herramienta. Una vez que la broca corona ha realizado una canaleta poco profunda en el hormigón, retire la broca centradora. Luego continúe con la perforación. 007800 Para retirar la broca corona, s...
Page 23 - MANTENIMIENTO; Lubricación; ACCESORIOS
23 MANTENIMIENTO PRECAUCIÓN: • Asegúrese siempre que la herramienta esté apagada y desconectada antes de intentar realizar una inspección o mantenimiento. Lubricación Esta herramienta no necesita lubricación por hora ni diaria dado que posee un sistema incorporado de lubricación. Se la debe lubricar...
Page 24 - GARANTÍA LIMITADA MAKITA DE UN AÑO
24 GARANTÍA LIMITADA MAKITA DE UN AÑO LA SIGUIENTE GARANTÍA NO APLICA PARA MÉXICO Política de garantía Cada herramienta Makita es inspeccionada y probada exhaustivamente antes de salir de fábrica. Se garantiza que va a estar libre de defectos de mano de obra y materiales por el periodo de UN AÑO a p...
Page 28 - Makita Corporation
28 Some dust created by power sanding, sawing, grinding, drilling, and otherconstruction activities contains chemicals known to the State of Californiato cause cancer, birth defects or other reproductive harm. Some examplesof these chemicals are:• lead from lead-based paints,• crystalline silica fro...