Page 4 - Table of contents; Part One: Using Nexus 4
NE XUS 4 GUIDEBOOK iv Table of contents Part One: Using Nexus 4 1. Get started 2 Insert a SIM card 2 Charge the battery 4 Get around 7 Browse & organize your Home screens 10 Touch & type 14 Type text by speaking 16 Why use a Google Account? 18 What’s New in Android 20 2. Explore your phone 2...
Page 5 - Use the Phone app
NE XUS 4 GUIDEBOOK v Use & customize the lock screen 35 Try Face Unlock 38 Share content with Android Beam 39 Change the wallpaper 41 Take a screenshot 42 Connect to keyboards, mice, & other devices 43 3. Use the Phone app 47 Make a phone call 47 Answer or divert calls 49 Work with the Call ...
Page 8 - Part Two: Adjusting settings
NE XUS 4 GUIDEBOOK viii Part Two: Adjusting settings 8. Wireless & network settings 156 Connect to Wi-Fi networks 156 Connect to Bluetooth devices 163 Optimize data usage 168 Control airplane mode & other network settings 174 Connect to virtual private networks 176 9. Device settings 179 Cha...
Page 9 - Security settings
NE XUS 4 GUIDEBOOK ix 10. Security settings 192 Security on Android 192 Manage security settings 193 Protect against harmful apps 195 Set screen lock 197 Encrypt your data 200 Work with certificates 203 11. Personal, account, & system settings 208 Manage location access 208 Change backup & r...
Page 10 - Part One; Using
Page 11 - Get started; Insert a SIM card
GE T STA RTED 2 1 Get started Insert a SIM card Before you start using your phone, you may need to insert your Micro SIM card. If no card is installed, the message “No SIM card” ap- pears on the phone’s lock screen.
Page 13 - Charge the battery
GE T STA RTED 4 Charge the battery Your battery will not be fully charged when you first unpack your Nexus 4. It’s a good idea to fully charge the battery as soon as you get a chance. If you’re using the travel adapter that comes with the phone, connect one end of the data cable to the charger port ...
Page 15 - Set up your phone
GE T STA RTED 6 IMPORTANT: If you use a wireless char- ger, you must use an approved model and only as directed. The Nexus 4 trav- el adapter may not generate enough current to power a wireless charger. DO NOT throw the battery in municipal waste. The symbol of the crossed out wheeled bin indicates ...
Page 16 - Get around
GE T STA RTED 7 dress and password for your Google Ac- count. If you don’t have one yet, create one. An email address that you use for any of the following counts as a Google Account: • Gmail • YouTube • Google Apps • AdWords • Any other Google product When you sign in with a Google Account, all the...
Page 19 - Browse & organize your Home; Browse Home screens
GE T STA RTED 10 TIP: You can use Quick Settings to tog- gle Wi-Fi, change display brightness, and more. To open Quick Settings, swipe down with two fingers from the top of any screen. Or, swipe down with one finger to pull down the notification shade, and touch the Quick Settings icon at the top ri...
Page 22 - Organize Home screens
GE T STA RTED 13 Organize Home screens To add an app or widget to a Home screen: 1. Go to the Home screen where you want to place the app or widget. 2. Touch the All Apps icon. 3. Swipe right, if necessary, to find the app or widget you want. 4. Touch & hold the app or widget until the Home scre...
Page 25 - Type text by speaking
GE T STA RTED 16 • Rotate the screen. The orientation of most screens rotates with your phone as you turn it. To lock or unlock the screen’s vertical orientation, swipe down with two fingers from the top of any screen and touch the Rotation icon in Quick Settings. To change your phone’s noti- ficati...
Page 27 - Why use a Google Account?
GE T STA RTED 18 To change your phone’s speech settings, go to Settings > Per- sonal > Language & input. Settings Why use a Google Account? A Google Account lets you organize and ac- cess your personal information from any computer or mobile device: • Use Google Play. Google Play brings to...
Page 29 - What’s New in Android
GE T STA RTED 20 What’s New in Android Whether you’re new to Android or an avid user, check out some of the new features in Android 4.1 and 4.2 (Jelly Bean). For a com- prehensive list of all changes since Android 4.0, see Android 4.1, Jelly Bean and Android 4.2: A new flavor of Jelly Bean . • Gestu...
Page 33 - Explore your; Swipe up for Google Now
E XPLORE YOUR PHONE 24 2 Explore your phone Swipe up for Google Now Google Now is about getting you just the right information, at just the right time. It tells you today’s weather before you start your day, how much traffic to expect before you leave for work, and even your favorite team’s score wh...
Page 34 - You’re in control
E XPLORE YOUR PHONE 25 appears when you’re about to start your commute home: Give it a try! Swipe your finger up from the bottom of any screen, or touch the Google Search bar at the top of the screen. When you want to see more cards, touch Show more cards at the bottom of the screen. When you don’t ...
Page 36 - Swipe down for notifications &
E XPLORE YOUR PHONE 27 For more information about Google Now and your location information, see “Chapter 5, Use Google Now & Search.” Swipe down for notifications & settings Notifications alert you to the arrival of new messages, calendar events, and alarms, as well as ongoing events, such a...
Page 39 - Quick Settings
E XPLORE YOUR PHONE 30 Quick Settings Use Quick Settings to easily toggle Wi-Fi, manage display brightness, open the main Settings menu, and more. To open Quick Set- tings, swipe down from the top right corner of any screen:
Page 40 - Relax with Google Play; Use Google Play widgets
E XPLORE YOUR PHONE 31 Relax with Google Play Google Play brings together all your favorite content in one place – movies, TV shows, books, music, magazines, apps, and more – so you can reach it from any of your devices. Use Google Play widgets These widgets are available on your Home screens: • My ...
Page 42 - Shop on Google Play; Find your content
E XPLORE YOUR PHONE 33 Shop on Google Play To open the Google Play Store app, touch the Play Store icon in your Favorites tray on every Home screen. Most things you purchase on Google Play are available from your computer as well as from any of your Android mobile de- vices. (Android apps are one ex...
Page 43 - Google Play settings
E XPLORE YOUR PHONE 3 4 You can get to your content using any of the Google Play icons in your Favorites tray, including Books, Magazines, Movies, and Music. Or, touch the Play Store icon to open Google Play, and then go to one of the main sections, such as Apps, Music, and so on. When you touch the...
Page 44 - Google Play support; Use & customize the lock
E XPLORE YOUR PHONE 35 you want from the Menu in the top right corner. The Google Play Settings screen lets you control when you’re notified about updates to apps and games, clear your search histo- ry, and enable user controls. To filter Android apps based on maturity level or require a PIN before ...
Page 45 - Navigate the lock screen
E XPLORE YOUR PHONE 36 messages, Calendar entries, and other app content without unlocking your screen. To set or change the type of lock, see Set screen lock . Navigate the lock screen Clock is the default widget. To hide the PIN, pattern, or password lock, swipe down from the clock or other widget...
Page 46 - Add a widget to the lock screen
E XPLORE YOUR PHONE 37 the Filmstrip view of your Gallery. The image or video is automatically saved to your Gal- lery, but you can’t view any of your other pho- tos and videos until you unlock your screen. To get back to the main Camera app, swipe right. To close the Camera app, touch the bottom of...
Page 47 - Reorder lock screen widgets; Try Face Unlock
E XPLORE YOUR PHONE 38 Reorder lock screen widgets 1. Touch & hold a widget. 2. Drag the widget and release it in the loca- tion of your choice. Remove a lock screen widget Touch & hold the widget, then drag it onto the Remove icon. Try Face Unlock You can set an automatic screen lock for yo...
Page 48 - Share content with Android
E XPLORE YOUR PHONE 39 Face Unlock is one of the options available. After you’ve set it up, you can unlock your phone simply by looking at it. Although Face Unlock is not very secure, it can be conve- nient and fun to use. TIP: After you set up Face Unlock, look under Settings > Personal > Sec...
Page 50 - Change the wallpaper
E XPLORE YOUR PHONE 41 TIP: When you touch another device to the back of your Nexus 4, make sure it’s near the “u” in “nexus” to success- fully beam content. To turn on NFC, go to Settings > Wireless & networks > More > NFC. To turn on Android Beam, go to Settings > Wireless & ne...
Page 51 - Take a screenshot
E XPLORE YOUR PHONE 42 synced with your phone. Live Wallpapers. Choose from a scrolling list of animated wallpapers. Wallpapers. Choose from thumbnails of default images, or touch a thumbnail for a larger version. You can download additional wallpapers on Google Play. 3. To set a wallpaper, touch Se...
Page 52 - other devices
E XPLORE YOUR PHONE 4 3 1. Make sure the image you want to capture is displayed on the screen. 2. Press the Power and Volume down but- tons simultaneously. The screenshot is automatically saved in your Gallery. TIP: To easily share your screenshot via Gmail, Google+, and more, swipe down the notific...
Page 53 - Keyboards
E XPLORE YOUR PHONE 4 4 IMPORTANT: Continuous use of a mouse via Bluetooth will cause a significant additional drain on your battery. You pair and connect Bluetooth input de- vices to your phone in the same way as any other Bluetooth device. Keyboards In addition to entering text, you can use your k...
Page 54 - Mice
E XPLORE YOUR PHONE 45 Mice When you connect a mouse to your phone via Bluetooth and move the mouse, an ar- row-shaped cursor appears, just as on a computer: • Use the mouse to move the cursor. • Clicking, pressing, and dragging with the mouse button is equivalent to touching, touching & holding...
Page 56 - Use the; Make a phone call
USE THE PHONE APP 47 3 Use the Phone app Make a phone call You can place calls from the Phone app , the People app , or other apps or widgets that display contact information. Wherever you see a phone number, you can usually touch it to dial. To dial using the Phone app: 1. Touch the Phone icon on a...
Page 58 - Answer or divert calls
USE THE PHONE APP 49 To return to the Phone app while a call is in progress: 1. Swipe down from the top of the screen to reveal your notifications. 2. Touch the green phone icon. To end a call in progress, touch the End Call icon at the bottom of the screen. Answer or divert calls When you receive a...
Page 60 - Work with the Call log
USE THE PHONE APP 51 Work with the Call log The Call log is a list of all the calls you’ve placed, received, or missed. It provides a convenient way to redial a number, return a call, or add a number to your Contacts. Within the Phone app , the Call log is un- der the middle tab . Touch a number for...
Page 63 - Listen to your voicemail
USE THE PHONE APP 5 4 You’ll also want to add SIP addresses for the contacts you want to call this way. To do so: 1. Touch the contact’s info in the Call log tab. 2. Touch to go to the contact’s card. 3. Touch the Menu icon, then Edit. 4. Scroll to the bottom of the screen, touch Add another field, ...
Page 64 - Options during a call
USE THE PHONE APP 55 2. Touch New voicemail. Your phone dials the voicemail message. Follow the instructions to retrieve your messages. To change your voicemail service or other settings: 1. Touch the Phone icon on a Home or All Apps screen. 2. Touch Menu, then Settings. 3. Touch the voicemail setti...
Page 70 - Basic editing
USE THE K E YBOA RD 61 Basic editing • Move the insertion point. Touch where you want to type. The cursor blinks in the new position, and a blue tab appears below it. Drag the tab to move the cursor. • Select text. Touch & hold or double-tap within the text. The nearest word highlights, with a t...
Page 71 - Use next-word suggestions
USE THE K E YBOA RD 62 • Cut, copy, paste. Select the text you want to manipulate. Then touch Cut, Copy or Paste button: Use next-word suggestions 1. Touch the location where you want to in- put text. 2. Start typing out a word. When the word you want is displayed in a list above the keyboard, touch...
Page 72 - Try Gesture Typing
USE THE K E YBOA RD 6 3 Your phone will continue to suggest words as you type. To change your phone’s key- board and input methods, go to Settings > Personal > Lan- guage & input. To turn next-word sugges- tions on or off, go to Settings > Personal > Language & in- put > Keybo...
Page 73 - Use Gesture Typing without space bar
USE THE K E YBOA RD 6 4 3. Release your finger when the word you want is displayed in the floating preview or in the middle of the suggestion strip. To select one of the other words in the sug- gestion strip, touch it. If the word you want isn’t shown while using Gesture Typing, you can type it out ...
Page 74 - Use keyboard dictionaries; Personal dictionary
USE THE K E YBOA RD 65 Use keyboard dictionaries To manage keyboard dictionaries, go to Set- tings > Personal > Language & input. Personal dictionary You can add your own words to your person- al dictionary so that your phone remembers them. Touch the Add icon to add a word or phrase, as w...
Page 75 - Try some apps; Use All Apps
TRY SOME A PPS 66 5 Try some apps Use All Apps To see all your apps, touch All Apps in the Favorites tray on any Home screen. This is where you can see all your apps, in- cluding those downloaded on Google Play. You can move app icons to any of your Home screens. From All Apps, you can: • Move betwe...
Page 77 - Start Gmail
TRY SOME A PPS 6 8 Start Gmail Use the Gmail app to read and write email from any mobile device or browser. To open it, touch the Gmail icon on a Home or All Apps screen. Gmail But Gmail isn’t just about email. You can use your Gmail account to sign in to all Google apps and services, including thes...
Page 78 - Find People
TRY SOME A PPS 69 • Swipe left or right to read the previous or next conversation. To organize your email, check the box beside a message to select it. Then use the icons and menu along the top of the screen to man- age the selected messages. To change your settings, add an account, or get help, tou...
Page 80 - Manage your Calendar
TRY SOME A PPS 71 touch icons at the top of the screen or the Menu icon to search contacts, add a contact, edit or share contact details, delete a contact, and so on. You can also touch the star beside the contact’s name to add that contact to your Favorites list. • Change your settings. While viewi...
Page 82 - Set an alarm
TRY SOME A PPS 73 down the notification shade. Then swipe using one finger to expand the notifica- tion if necessary, and touch Email guests. Open & use Clock To open the Clock, touch the Clock icon from a Home or All Apps screen. Set an alarm 1. Touch the Alarm Clock icon in the lower left corn...
Page 83 - Set a timer
TRY SOME A PPS 74 Set a timer 1. Touch the Timer icon in the top left corner of the screen. 2. Enter the time you want, then touch Start. When the timer is going, you can add an ad- ditional minute, pause the timer, or delete the current timer. The timer beeps when the time is up. It keeps beeping u...
Page 84 - View your Clock; Manage downloads
TRY SOME A PPS 75 View your Clock To view the current date and time, touch the Clock icon at the top center of the screen. Manage downloads To manage most downloads, touch the Downloads icon on the All Apps screen. Movies and some other content that you download don’t show up in the Downloads app. D...
Page 86 - Use Google; About Google Now
USE GOOGLE NOW & SE ARCH 7 7 6 Use Google Now & Search About Google Now Google Now gives you just the right informa- tion at just the right time. Swipe up from the bottom of your phone to get commute traffic before work, popular nearby places, your fa- vorite team’s current score, and more. ...
Page 87 - About Google Now cards
USE GOOGLE NOW & SE ARCH 78 you don’t need to do anything else. If you like, you can fine-tune some settings, but Google Now doesn’t need any elaborate setup. The information you need is always at your fingertips. To know when to display what information, Google Now uses contextual data from you...
Page 89 - history
USE GOOGLE NOW & SE ARCH 80 er Service and the U.S. Geological Survey. Coverage is currently provided by a limited number of key partners, only in the United States (excepting U.S. Geological Survey earthquake alerts). Google can’t guarantee that you’ll see every relevant alert. However, Google ...
Page 91 - About Web History & other data
USE GOOGLE NOW & SE ARCH 82 Along with location history, Google Now uses Google’s location service and GPS. To manage these settings from the Google Now screen, touch Menu > Settings > Privacy and accounts > Location services. For more details, see “Control location ac- cess, reporting,...
Page 92 - Use Google Now
USE GOOGLE NOW & SE ARCH 83 certain kinds of information, such as flight details, won’t show up. Use Google Now To view the Google Now cards that are wait- ing for you at any particular time, swipe up from the bottom of your phone, or touch Google on any Home screen. Google Now displays cards wh...
Page 93 - Edit card settings
USE GOOGLE NOW & SE ARCH 8 4 Edit card settings To change the settings for an individual Google Now card: • Touch Menu > Settings on the card. OR • From the lower right corner of the Google Now screen, touch Menu > Settings > Google Now. The Google Now settings screen appears, where you...
Page 94 - Adjust notifications
USE GOOGLE NOW & SE ARCH 85 Adjust notifications When a card has a new update, you’ll receive a notification at the top of your screen. You can pull down the notifications shade to open the card or dismiss the notification. Most notifications for Google Now cards can be turned off or set to low ...
Page 95 - Turn off Google Now
USE GOOGLE NOW & SE ARCH 86 Google Now, and adjust the settings un- der Notifications. To change ringtone and vibrate options for all standard notifications, start from the Google Now screen, touch Menu > Settings > Google Now, and adjust the settings under Standard Notifications. Turn off...
Page 96 - Control location access,
USE GOOGLE NOW & SE ARCH 87 history. If you do, check Also turn off Lo- cation history. Turning off location history may affect the way other Google products work. 4. Touch Turn off. Turning off Google Now and location history doesn’t delete existing history or turn off lo- cation reporting. For...
Page 98 - Turn off location reporting & history; Delete location history details
USE GOOGLE NOW & SE ARCH 89 Turn off location reporting & history To turn off both location reporting and loca- tion history for your phone: 1. Go to Settings > Google > Maps & Latitude. This brings you to the Location settings screen for Google Maps. 2. To turn off location report...
Page 99 - Turn off location access for your phone
USE GOOGLE NOW & SE ARCH 90 1. Open a web browser and make sure you’re signed in with the account whose loca- tion history you want to manage. 2. Visit http://google.com/locationhistory . A page appears that allows you to view your location history for any date. 3. To delete all your recorded lo...
Page 101 - Search & Voice Actions basics; Voice Search & Voice Actions
USE GOOGLE NOW & SE ARCH 92 Search & Voice Actions basics To use Google Search, touch Google on any Home screen or swipe up from the bottom of your phone. You can use Voice Actions with Google Search to get directions, send messages, and perform a number of other common tasks. Voice Search &...
Page 103 - Search by typing
USE GOOGLE NOW & SE ARCH 9 4 see “Use Voice Actions” and ”Voice Actions commands.” Search by typing Type your query in the search box on the Home or Google Now screen, or in Google Chrome’s omnibox. As you type, suggestions appear below the Search box. The first few suggestions attempt to com- p...
Page 106 - Use Voice Actions
USE GOOGLE NOW & SE ARCH 97 Calculator [A math phrase] 75 divided by 6 Food [Type of food][Type of food] in [location] Mexican food Mexican food in Urbana, Illinois Use Voice Actions You can use Voice Actions with Google Search to get directions, send messages, and perform a number of other comm...
Page 108 - Voice Actions commands
USE GOOGLE NOW & SE ARCH 99 of alternate transcriptions, or to edit by speaking or typing. When confident that the transcription is accurate, Voice Search displays tran- scribed words as regular text. Words or phrases for which it has provided alter- nate transcriptions are underlined. • Touch a...
Page 111 - Google Now Card list
USE GOOGLE NOW & SE ARCH 102 “Set alarm” “Time” or “for” & time, such as “10:45 a.m.” or “20 minutes from now,” “La-bel” & name of alarm “Set alarm for 7:45 p.m., label, switch the laundry” “Listen to” Words to search You-Tube for, such as the name of a song, artist, or album. “Listen to...
Page 123 - About Gmail Cards
USE GOOGLE NOW & SE ARCH 114 Travel: Translate Shown when you’re visiting a place with a different language, to help translate words and phrases. Weather Periodically displays weather for home, work, or your current location. About Gmail Cards Gmail cards are based on confirmation mes- sages sen...
Page 124 - About the Location History card
USE GOOGLE NOW & SE ARCH 115 lected for use with Google Now. For example, cards appear before restaurant reservations you’ve made with OpenTable or when you re- ceive email updates for packages in transit. Gmail cards typically include links to oth- er useful information, such as a link to the e...
Page 125 - About the Stocks card
USE GOOGLE NOW & SE ARCH 116 phone, which are then compared to typical movements involved in walking or cycling. This information isn’t available unless you’ve turned on location reporting and history for at least one of your Android devices. If you’ve turned these on for more than one device, t...
Page 126 - Search settings; Google Now
USE GOOGLE NOW & SE ARCH 117 To change Stock card settings from the main Google Now screen ,go to Settings > Google Now > Stocks. Search settings To view Google Search settings, including those for Google Now, scroll to the bottom of the Google Now screen and touch Menu > Settings. The ...
Page 127 - Voice settings
USE GOOGLE NOW & SE ARCH 118 cards and related notifications from the Google Now settings screen. Options for each card vary. Most include a Notifications section that lets you control how you’re informed when a card changes. Typically, you can choose between Off, Low priority, or Standard notif...
Page 129 - Phone search
USE GOOGLE NOW & SE ARCH 120 IMPORTANT: To detect when you say “Google” to launch Voice Search or Voice Actions, Google analyzes sound picked up by your phone’s microphone in intervals of a few seconds or less. The sound is immediately discarded after analysis and is not stored on the device or ...
Page 131 - Accessibility; Accessibility overview
ACCESSIBILIT Y 122 7 Accessibility Accessibility overview Your phone’s accessibility features make it easier to use if you have visual impairments: TalkBack is a pre-installed screen reader service provided by Google. It uses spoken feedback to describe the results of actions, such as opening an app...
Page 132 - Users with low vision; Related Settings
ACCESSIBILIT Y 123 increasing the text size, changing the speed at which text is spoken, and more. Users with low vision If you have low vision and don’t plan to use Explore by Touch, go to support.google. com/nexus to see Help content formatted for sighted users. You can make reading and navigating...
Page 133 - Accessibility gestures for
ACCESSIBILIT Y 124 Accessibility gestures for Android 4.2 (Jelly Bean) When TalkBack and Explore by Touch are turned on, you can use simple gestures to navigate your Nexus 4: • Drag one finger. Explore your screen and hear audible feedback for what is being touched. • Double-tap anywhere on the scre...
Page 135 - Shortcut gestures in TalkBack
ACCESSIBILIT Y 126 Shortcut gestures in TalkBack Note: These gestures work only when Ex- plore by Touch is turned on. TalkBack has shortcut gestures to help you get to your Home screen, go back, and more. To try these shortcuts, swipe using a single motion: • Up then right: Open continuous reading m...
Page 138 - Overlays
ACCESSIBILIT Y 129 TIP: If you share your phone with other users and need to turn accessibility features off, you can use a shortcut to turn them back on again. To turn on this shortcut, go to Set- tings > Accessibility > Accessibility shortcut, then slide the switch to the On position. To tur...
Page 139 - Use magnification gestures
ACCESSIBILIT Y 130 Use magnification gestures When this feature is turned on, you can mag- nify your screen by triple-tapping. (For users with low vision) Note: Triple-tap for magnification works ev- erywhere except for the keyboard and navi- gation buttons. Magnify: Triple-tap & hold. Magnify &...
Page 140 - Use TalkBack
ACCESSIBILIT Y 131 Use TalkBack TalkBack provides spoken feedback to help you navigate your phone, describing what you touch and activate. Note: Sighted assistance is needed for users with no vision to enable TalkBack if it wasn’t turned on during the initial setup. To turn TalkBack off or on: 1. Go...
Page 141 - Change TalkBack settings; When to speak
ACCESSIBILIT Y 132 and alerts you of notifications and other occurrences. If you also enabled Explore by Touch, moving your finger around the screen triggers a de- scription of each item it touches. Double-tap to activate the last spoken item, and swipe with two fingers to perform swiping actions th...
Page 142 - Feedback settings; Touch exploration
ACCESSIBILIT Y 133 Feedback settings • Sound feedback. Check to control naviga- tion sounds. • Sound volume. Available when Sound feedback is checked. You can set this as a percentage of media volume. Touch exploration • Launch “Explore by touch” tutorial. • Manage shortcut gestures. Allows you to a...
Page 143 - Enhance web accessibility; Use Explore by Touch with
ACCESSIBILIT Y 13 4 slider for Music, video, games, & other media to change the volume level. You can also use the volume control on the right side of your phone when you hear spo- ken feedback. Enhance web accessibility In order to have full accessibility support for products such as Gmail and ...
Page 145 - Navigate the Home screen
ACCESSIBILIT Y 136 • Explore your screen using one finger to hear what icons and buttons are on the screen and can be selected. • After finding icons and buttons, double- tap anywhere on the screen to open apps, menus, and more. To learn about the gestures you can use with TalkBack and Explore by To...
Page 149 - Try Google Play
ACCESSIBILIT Y 14 0 To find your notifications, use two fingers to pull down the notification shade from the top left side of the screen, or swipe up then right using a single motion. You can also use the Quick Settings menu to easily open settings for Wi-Fi, Bluetooth, and more. To open Quick Setti...
Page 152 - Google Play Settings
ACCESSIBILIT Y 14 3 visit Reading in text mode at the end of this article.) Or, find the Play Store icon and double-tap to open Google Play. In the top right corner, to the left of the Menu and Search icons, you’ll find a My Library icon corresponding to the section of Google Play you’re currently v...
Page 153 - Use Gmail; Read your messages
ACCESSIBILIT Y 14 4 accounts, or get help, choose the option you want from the Menu at the top right. The Google Play Settings screen lets you control when you’re notified about updates to apps and games, clear your search his- tory, and enable user controls. To filter An- droid apps based on maturi...
Page 154 - Compose and send a message
ACCESSIBILIT Y 145 Gmail app and double-tap to open it. Gmail opens to your Inbox. To hear the subject lines of your conversa- tions, swipe right or down. When you find a conversation you want to hear: • Double-tap to open it. If you have chosen to allow enhanced web accessibility, you can touch onc...
Page 155 - Search your Inbox
ACCESSIBILIT Y 14 6 finger across the keyboard and lift your finger on the chosen key to input text. 3. Find and double-tap the Send icon in the main action bar at the top of the screen to send your message. Search your Inbox 1. From a conversation list, find the Search icon in the action bar at the...
Page 156 - Gmail settings
ACCESSIBILIT Y 147 Gmail settings You can change a number of settings for Gmail from any Gmail screen. • Find and double-tap More options at the top right corner of the screen, then find and double-tap Settings. General settings apply to all Gmail accounts. Other settings apply only to a specific ac...
Page 157 - Browse Chrome
ACCESSIBILIT Y 14 8 Browse Chrome These instructions assume that you have turned on TalkBack, Explore by Touch, and Enhanced Web Accessibility. • From a Home or Apps screen, find the Chrome icon and double-tap to open it. Chrome opens to display your homepage or the most recent page you were browsin...
Page 159 - Force enable zoom
ACCESSIBILIT Y 150 To customize web page zooming, go to More options > Settings > Accessibility. You can also browse in Incognito mode. To open an Incognito tab, find and double-tap More options > New Incognito tab. To toggle between standard tabs and Incognito tabs, find and double-tap the...
Page 160 - More Chrome Help; Use the lock screen; About the lock screen
ACCESSIBILIT Y 151 enable zoom” will allow you to zoom in or out on those sites. More Chrome Help To get more detailed Help while navigating a webpage, working with tabs, and so on, go to the Chrome Help Center . Note that the con- tent you’ll find does not cover accessibility features like TalkBack...
Page 161 - Unlock your phone; Accessibility settings
ACCESSIBILIT Y 152 • You force your screen to turn off and the phone to lock by pressing the power button. Unlock your phone 1. Hold the screen in portrait mode and turn it on by pressing the Power button on the right side of your phone. 2. Touch the lower center of the screen. 3. Slide your finger ...
Page 164 - Part Two; Adjusting
Page 165 - Wireless; Connect to Wi-Fi networks; network
WIRELESS & NE T WORK SE T TINGS 156 8 Wireless & network settings Connect to Wi-Fi networks Turn Wi-Fi on & connect to a Wi-Fi network If you’re adding a Wi-Fi network when first setting up your phone, Wi-Fi is turned on automatically. 1. Touch Settings > Wireless & networks > ...
Page 168 - Forget a Wi-Fi network
WIRELESS & NE T WORK SE T TINGS 159 1. Turn on Wi-Fi, if it’s not already on. 2. Touch the Plus icon at the top of the screen. 3. Enter the SSID (name) of the network. If necessary, enter security or other net- work configuration details. 4. Touch Save. The information about the network is saved...
Page 169 - Configure proxy settings for a Wi-Fi
WIRELESS & NE T WORK SE T TINGS 16 0 Configure proxy settings for a Wi-Fi network Some network administrators require you to connect to internal or external network resources via a proxy server. By default, the Wi-Fi networks you add are not configured to connect via a proxy, but you can change ...
Page 172 - Connect to Bluetooth devices
WIRELESS & NE T WORK SE T TINGS 16 3 To turn Wi-Fi on or off, go to Settings > Wireless & networks > Wi-Fi. To manage data usage and mobile hotspots, go to Set- tings > Wireless & networks > Data usage. Settings Connect to Bluetooth devices To connect to a Bluetooth device, f...
Page 173 - Turn Bluetooth on or off
WIRELESS & NE T WORK SE T TINGS 16 4 TIP: To extend the life of your battery between charges, turn off Bluetooth when you’re not using it. You may also be required to turn Bluetooth off in some locations. Bluetooth is turned off when you switch to Airplane mode. System bar icons in the top right...
Page 174 - Pair your phone with a Bluetooth
WIRELESS & NE T WORK SE T TINGS 165 can change the name so that it is more recognizable. 1. Under Settings > Wireless & networks, make sure Bluetooth is turned on. 2. Touch Bluetooth. 3. In the Bluetooth screen, touch Menu > Rename phone. 4. Type a new name and touch Rename. Pair your ...
Page 175 - Connect to a Bluetooth device
WIRELESS & NE T WORK SE T TINGS 166 and displays the IDs of all available Blue- tooth devices in range. 3. If your phone stops scanning before your Bluetooth device is ready, touch Search for devices. 4. Touch the ID of the Bluetooth device in the list to pair with it. 5. Follow the instructions...
Page 176 - Configure or unpair a Bluetooth device
WIRELESS & NE T WORK SE T TINGS 167 Bluetooth, make sure Bluetooth is turned on. 2. In the list of devices, touch a paired but unconnected device. When the phone and the device are con- nected, the device is displayed as con- nected in the list. Configure or unpair a Bluetooth device Some Blueto...
Page 177 - Optimize data usage
WIRELESS & NE T WORK SE T TINGS 16 8 tooth device you want to configure. A screen opens that allows you to change the device’s name, unpair it, or select pro- files. Touch the Back button when you’re finished. Optimize data usage Data usage refers to the amount of data up- loaded or downloaded b...
Page 180 - Set data usage warning
WIRELESS & NE T WORK SE T TINGS 171 Set auto-sync You can also conserve data usage by sync- ing your apps manually, only when you need the data, rather than relying on auto-sync. To turn auto-sync off or on, touch Menu > Auto-sync data. Set data usage warning Drag the orange line by its right...
Page 181 - View or restrict data usage by app
WIRELESS & NE T WORK SE T TINGS 172 3. Drag the red line by its right side to the limit you want to set. When your data usage reaches the limit, mobile data will be turned off automati- cally and many features of your phone won’t work correctly. You’ll receive a no- tification when this occurs. ...
Page 183 - Advanced data usage settings; Control airplane mode & other
WIRELESS & NE T WORK SE T TINGS 174 Advanced data usage settings Two other settings available from the Menu icon can have dramatic effects—but may sometimes be useful: • Data roaming can result in steep addition- al charges. However, in some locations this may be the only way to connect to the I...
Page 185 - Connect to virtual private
WIRELESS & NE T WORK SE T TINGS 176 Connect to virtual private networks Virtual private networks (VPNs) allow entry into secured local networks from the out- side. Corporations, schools, and other insti- tutions use VPNs to grant access to local network resources when people are not on campus or...
Page 186 - Add a VPN
WIRELESS & NE T WORK SE T TINGS 17 7 Add a VPN 1. From the VPN screen, touch Add VPN profile. 2. In the form that appears, fill in the in- formation provided by your network administrator 3. Touch Save. The VPN is added to the list on the VPN screen. Connect to or disconnect from a VPN 1. From t...
Page 187 - Edit a VPN; Delete a VPN
WIRELESS & NE T WORK SE T TINGS 178 Edit a VPN 1. From the VPN screen, touch & hold the name of the VPN profile. 2. In the dialog that opens, touch Edit profile. 3. Edit the VPN settings you want. 4. Touch Save. Delete a VPN 1. From the VPN screen, touch & hold the name of the VPN profil...
Page 188 - Device settings; Change sound settings
DE VICE SE T TINGS 179 9 Device settings Change sound settings To customize the sounds your phone makes, go to Settings > Device > Sound: • Volumes sets the master volume sepa- rately for music, notifications, and alarms. You can still use the physical volume con- trol on the phone to raise or...
Page 189 - Set up Daydream; Turn on Daydream
DE VICE SE T TINGS 180 Set up Daydream When Daydream is on, your phone displays photos, colors, and more while it is charging or docked. Turn on Daydream 1. Go to Settings > Device > Display. 2. Touch Daydream. 3. Slide the switch to On. To decide if your phone sleeps while docked, charging, o...
Page 190 - Time to sleep
DE VICE SE T TINGS 181 • Currents displays snippets from the Cur- rents app. You can touch one to open it or swipe it away to hide it. • Photo Frame presents a slideshow of photos on your phone or Google+ ac- count. Touch the Settings icon next to Photo Frame to control what photos are displayed. • ...
Page 191 - Turn off Daydream; Use Wireless Display
DE VICE SE T TINGS 182 Turn off Daydream 1. Go to Settings > Device > Display. 2. Touch Daydream. 3. Slide the switch to Off. Use Wireless Display Nexus 4 supports the Miracast protocol for wireless display. You can connect your phone via Wi-Fi to a variety of displays and other devices that s...
Page 192 - Transfer files through USB; Windows transfer
DE VICE SE T TINGS 183 Transfer files through USB You can use a USB cable to transfer music, pictures, and other files from your phone to a computer and vice versa. This connec- tion uses the MTP protocol, which is sup- ported by most recent versions of Windows but not by Mac OS X. For file transfer...
Page 193 - Mac OS transfer
DE VICE SE T TINGS 18 4 Mac OS transfer 1. Install Android File Transfer from www. android.com/filetransfer , and follow the instructions there. (If you are using An- droid File Transfer for the first time, dou- ble-click it to open it. After the first con- nection, it opens automatically whenever y...
Page 194 - Extend battery life
DE VICE SE T TINGS 185 tions, touch Settings > Device > Storage > Menu > USB computer connection. Extend battery life To control Battery settings, go to Set- tings > Device > Battery. You can extend your battery’s life between charges by turning off features that you don’t need. Yo...
Page 195 - Check battery level and usage details
DE VICE SE T TINGS 186 • If you don’t need it, turn off automatic syncing for all apps: Settings > Accounts > Google account-name. This means you need to sync manually to collect messag- es, email, and other recent information, and won’t receive notifications when up- dates occur. • If you kno...
Page 196 - Manage memory usage
DE VICE SE T TINGS 187 WARNING: If you stop some apps or services, your device may not work correctly. Battery status (charging, discharging) and level (as a percentage of fully charged) are displayed at the top of the screen. The discharge graph shows battery level over time since you last charged ...
Page 198 - Use the Apps screen
DE VICE SE T TINGS 189 that’s saved for offline use and streaming it via a Wi-Fi or mobile network. Use the Apps screen The Apps screen allows you to adjust several aspects of the way your device uses memory. To view these settings, go to Settings > Device > Apps. Settings You’ll see three tab...
Page 201 - Security; Security on Android
SECURIT Y SE T TINGS 192 10 Security settings Security on Android Android takes a multi-layered approach to security: Prevent. Apps in Google Play are scanned continuously to block harmful apps and pol- icy violators. You can also choose to have apps installed from other sources verified. Control. A...
Page 202 - Manage security settings
SECURIT Y SE T TINGS 193 encryption help prevent unauthorized ac- cess to the entire phone. Defend. Once identified, dangerous apps can be removed remotely. This chapter includes information about the verify apps feature (used both for prevention and defense), screen lock, encryption, and other secu...
Page 204 - Protect against harmful apps; About verifying apps
SECURIT Y SE T TINGS 195 Protect against harmful apps About verifying apps Some apps can harm you or your phone. You can choose to verify apps in order to help pre- vent harmful software from being installed on your phone. If you attempt to install an app from any source while app verification is tu...
Page 205 - Control app verification
SECURIT Y SE T TINGS 196 IMPORTANT: When you verify apps, Google receives log information, URLs related to the app, and general infor- mation about the device, such as the Device ID, version of the operating system, IP address, and one or more cookies. Control app verification App verification is tu...
Page 206 - Turn off app verification; Set screen lock
SECURIT Y SE T TINGS 197 • Installing this app may harm your phone. The app may be harmful to your phone and personal information. • Installation has been blocked. The app is harmful and can’t be installed. Turn off app verification To stop verifying apps at any time, go to Set- tings > Security ...
Page 209 - Encrypt your data
SECURIT Y SE T TINGS 20 0 • Doesn’t contain any recognizable words or phrases. To change when your phone goes to sleep, go to Settings > Device > Display > Sleep. To see your passwords when you input them, go to Settings > Personal > Security > Make passwords visible. Settings Encr...
Page 212 - Work with certificates
SECURIT Y SE T TINGS 203 When encryption is complete, you’re prompt- ed to enter your PIN or password. Subsequently, you must enter your PIN or password each time you power on your phone, to decrypt it. Work with certificates You can use digital certificates to identify your device for a variety of ...
Page 213 - Install client & CA certificates
SECURIT Y SE T TINGS 20 4 saved in PKCS#12 key store files with a .p12 or .pfx extension. If your key store has some other extension, you much change it to .p12 or .pfx or you won’t be able to install it. When you install a certificate from a PKCS#12 key store, Android also installs any accom- panyi...
Page 215 - Work with CA certificates
SECURIT Y SE T TINGS 206 IMPORTANT: Apps such as Email that support certificates allow you to in- stall certificates directly from within the app. For details, see the Help or other instructions that come with each app. Work with CA certificates If a certificate authority (CA) certificate gets compr...
Page 217 - settings; Manage location access
PERSONA L , SE T TINGS 208 11 Personal, account, & system settings Manage location access You can let your phone access GPS, Wi-Fi networks, and mobile networks to estimate your location. Apps that have your permis- sion can use this information to deliver lo- cation-based services, such as the ...
Page 218 - For your phone
PERSONA L , SE T TINGS 20 9 For your phone To control what location information your phone can use, go to Settings > Personal > Location access. When the Access to my location switch at the top of the screen is On, you can select either or both of these checkboxes: • GPS satellites. Just like ...
Page 219 - For Google apps
PERSONA L , SE T TINGS 210 IMPORTANT: Turning off location ac- cess for your phone also turns it off for Google Now, other Google apps, and non-Google apps. That means that no apps can receive your precise location information, and many useful features will be disabled. For Google apps When location...
Page 220 - Change backup & reset options
PERSON A L , SE T TINGS 211 IMPORTANT: When you turn Location settings off, non-Google apps and Google’s location service will continue to receive your location. To change these settings, go to Settings > Per- sonal > Location access. Change backup & reset options To view the settings desc...
Page 223 - Add or remove accounts; Add an account
PERSON A L , SE T TINGS 214 Add or remove accounts Add an account To add some accounts, you may need to ob- tain details from system administrator about the service to which the account connects. For example, you may need to know the ac- count’s domain or server address. 1. Go to Settings > Accou...
Page 224 - Remove an account
PERSON A L , SE T TINGS 215 When you’re finished, the account is added in one of two places: • Google Accounts show up under Settings > Accounts > Google. • Other accounts show up under Settings > Accounts. Remove an account You can remove any account and all informa- tion associated with i...
Page 225 - Configure sync options
PERSON A L , SE T TINGS 216 Configure sync options To reach sync settings for Google accounts, start from Settings > Accounts > Google. You can configure synchronization options for any of your apps. You can also decide what kinds of data to synchronize for each account. For some accounts, syn...
Page 226 - Configure auto-sync for all apps
PERSON A L , SE T TINGS 217 Configure auto-sync for all apps To control Anto-sync for all apps that use it, open Settings > Data usage > Menu and check or uncheck Auto-sync data. If you turn off Auto-sync, you need to sync manually to collect messages, email, and other recent information, and ...
Page 227 - Configure Google Account sync
PERSON A L , SE T TINGS 218 Configure Google Account sync settings To adjust a single Google Account’s sync settings: 1. Go to Settings > Personal > Accounts > Google. indicates that some or all of an ac- count’s information is configured to sync automatically. indicates that none of an acc...
Page 228 - Sync a Google Account manually
PERSON A L , SE T TINGS 219 Sync a Google Account manually 1. Go to Settings > Accounts > Google. 2. Touch the account whose data you want to sync. 3. Touch Menu > Sync now.
Page 229 - Hardware reference; What’s in the box
A PPENDIX 220 Appendix: Hardware reference What’s in the box
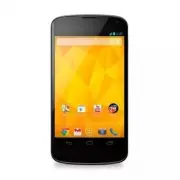
Page 231 - Nexus 4
Page 233 - Specs
A PPENDIX 224 Specs Screen 4.7” diagonal1280x768 pixel resolution (320 ppi)WXGA IPSCorning® Gorilla® Glass 2 Size 133.9 x 68.7 x 9.1mm Weight 139g Cameras 8 MP (main)1.3 MP (front) Memory 8GB or 16GB (actual formatted capacity will be less)2GB RAM CPU Qualcomm Snapdragon™ S4 Pro 1.5GHz


 LG A7110
User Manual
LG A7110
User Manual
 LG AX5000
User Manual
LG AX5000
User Manual
 LG C1300
User Manual
LG C1300
User Manual
 LG C1300A
User Manual
LG C1300A
User Manual
 LG C1300I
User Manual
LG C1300I
User Manual
 LG C1500
User Manual
LG C1500
User Manual
 LG C2000
User Manual
LG C2000
User Manual
 LG CB630
User Manual
LG CB630
User Manual
 LG CE500
User Manual
LG CE500
User Manual
 LG CF360
User Manual
LG CF360
User Manual
 LG CF360A
User Manual
LG CF360A
User Manual
 LG CG180
User Manual
LG CG180
User Manual
 LG CG225
User Manual
LG CG225
User Manual
 LG CG300
User Manual
LG CG300
User Manual
 LG CP150
User Manual
LG CP150
User Manual
 LG CU320
User Manual
LG CU320
User Manual
 LG CU400
User Manual
LG CU400
User Manual
 LG CU405
User Manual
LG CU405
User Manual
 LG CU500
User Manual
LG CU500
User Manual