Electrolux EMS3067X - Manuals
Electrolux EMS3067X Microwave – User Manual, Manual in PDF format online.
Manuals:
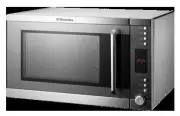
User Manual Electrolux EMS3067X


Summary
2 important safety instructions warning When the appliance is operated in the grill, convection and combination modes, extreme care should be taken as the microwave oven will become hot in these modes. caution • Only use utensils suitable for use in microwave ovens. • This microwave oven should be c...
setting up your microwave oven 3 Installation and Connection 1. This appliance is only intended for domestic use. 2. This microwave oven is intended for built-in use only. It is not intended for counter-top use or for use inside a cupboard. 3. Please refer to the installation instructions on pages 1...
Turntable installation 1. Place the turntable ring assembly on the cavity bottom.2. Place the glass tray on top of the turntable support. • Do not place the glass tray upside down.• Both glass tray and turntable ring assembly must always be used during cooking. • Always place food and food container...
Manual Electrolux EMS3067X


Summary
Welcome to the world of Electrolux Congratulations and thank you for choosing a first class product from Electrolux. Our appliances are designed to be easy to use and complimentary to your lifestyle. Please take a few minutes to study this manual so that you can take advantage of the benefits of you...
Wood No No No Grill rack No Yes Yes Turntable Yes Yes Yes Turntable support Yes Yes Yes Plastic Yes No No It is quite normal for steam to be emitted around the door, or for misting to occur on the door, or even for water droplets to appear below the door during the cooking cycle. This is merely cond...
• Remove all packing material and any promotion material from the microwave oven. • Examine the oven for any damage such as dents or a broken door. Do not install if the oven is damaged. Call the service center. • Remove the protective film on the oven cabinet surface. Do not remove the light brown ...
Electrolux Microwaves Manuals
-
 Electrolux EMC2867BI
User Manual
Electrolux EMC2867BI
User Manual
-
 Electrolux EMF2527BA
User Manual
Electrolux EMF2527BA
User Manual
-
 Electrolux EMS 2105 S
User Manual
Electrolux EMS 2105 S
User Manual
-
 Electrolux EMS 26004
User Manual
Electrolux EMS 26004
User Manual
-
 Electrolux EMS 2840 S
User Manual
Electrolux EMS 2840 S
User Manual
-
 Electrolux EMS26004OW
User Manual
Electrolux EMS26004OW
User Manual
-
 Electrolux EMS30400OX
User Manual
Electrolux EMS30400OX
User Manual
-
 Electrolux EMZ725MMK
User Manual
Electrolux EMZ725MMK
User Manual
-
 Electrolux EMZ729EMK
User Manual
Electrolux EMZ729EMK
User Manual