Whirlpool WOS52ES4MW - Manual
Whirlpool WOS52ES4MW Oven – Manual, read for free online in PDF format. We hope this helps you resolve any issues you may have. If you have further questions, please contact us through the contact form.


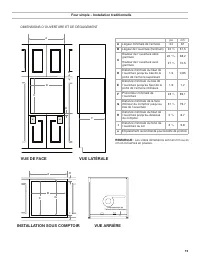
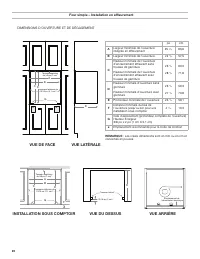
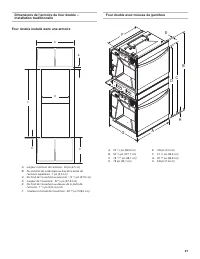
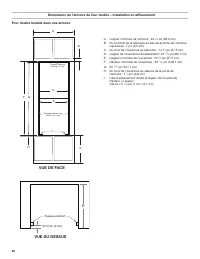
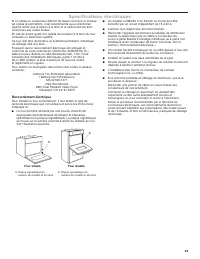
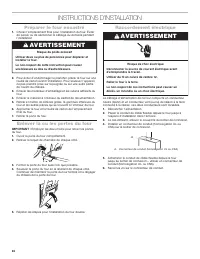
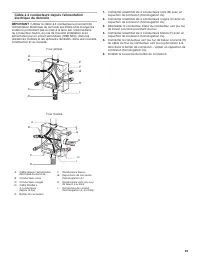
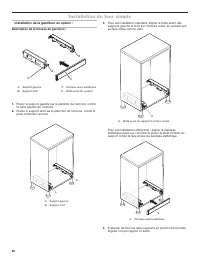
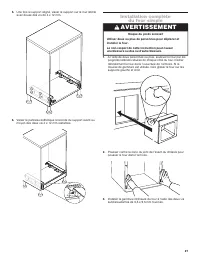
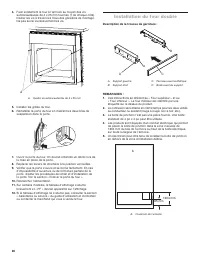
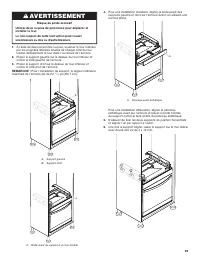
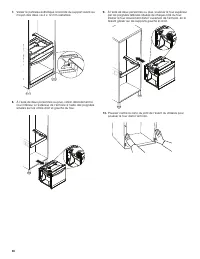
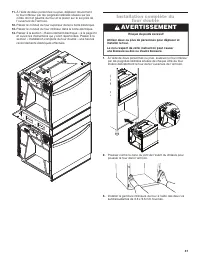
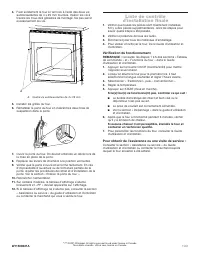
Table of Contents:
- Page 2 – INSTALLATION REQUIREMENTS; Tools and Parts; Tools needed; Location Requirements; Product Dimensions
- Page 3 – UNDER COUNTER INSTALLATION; OPENING/CLEARANCE DIMENSIONS; Single Oven - Traditional Installation
- Page 4 – Single Oven - Flush Installation; FRONT VIEW; SIDE VIEW
- Page 6 – TOP VIEW; Double Oven Cabinet Dimensions - Flush Installation
- Page 7 – Electrical Requirements; Electrical Connection
- Page 8 – INSTALLATION INSTRUCTIONS; Prepare Built-In Oven; WARNING
- Page 9 – -Wire Cable from Home Power Supply
- Page 10 – Single Oven Installation; Optional Trim Kit Installation:
- Page 11 – Complete Single Oven Installation
- Page 12 – Double Oven Installation
- Page 15 – Complete Double Oven Installation
- Page 16 – Final Installation Checklist; Check Operation; If you need Assistance or Service:
- Page 17 – SÉCURITÉ DU FOUR ENCASTRÉ
- Page 18 – EXIGENCES D’INSTALLATION; Outils et pièces; Outils nécessaires; Exigences d’emplacement; Dimensions du produit
- Page 19 – INSTALLATION SOUS COMPTOIR; DIMENSIONS D’OUVERTURE ET DE DÉGAGEMENT; Four simple – Installation traditionnelle
- Page 20 – Four simple – Installation en affleurement; VUE DE FACE; VUE LATÉRALE
- Page 22 – VUE DU DESSUS; Four double installé dans une armoire
- Page 23 – Spécifications électriques; Raccordement électrique
- Page 24 – INSTRUCTIONS D’INSTALLATION; Préparer le four encastré; AVERTISSEMENT
- Page 26 – Installation du four simple; Installation de la garniture en option :
- Page 28 – Installation du four double
- Page 32 – Liste de contrôle; Vérification du fonctionnement; Pour obtenir de l’assistance ou une visite de service :
INSTALLATION INSTRUCTIONS
BUILT-IN 24'' SINGLE AND DOUBLE OVEN
INSTRUCTIONS D’INSTALLATION
FOURS ENCASTRÉS SIMPLES ET DOUBLES DE 24 PO
Table of Contents / Table des matières
BUILT-IN OVEN SAFETY
IMPORTANT:
Save for local electrical inspector’s use.
IMPORTANT :
Conserver ces instructions à l’usage de l’inspecteur des installations électriques local.
W11508921A
BUILT-IN OVEN SAFETY ................................................................1
INSTALLATION REQUIREMENTS .................................................2
Tools and Parts .............................................................................2
Location Requirements ................................................................2
Electrical Requirements ...............................................................7
INSTALLATION INSTRUCTIONS ...................................................8
Prepare Built-In Oven ...................................................................8
Remove Oven Door(s) ..................................................................8
Make Electrical Connection .........................................................8
Single Oven Installation ..............................................................10
Complete Single Oven Installation .............................................11
Double Oven Installation ............................................................12
Complete Double Oven Installation ...........................................15
Final Installation Checklist..........................................................16
SÉCURITÉ DU FOUR ENCASTRÉ ..............................................17
EXIGENCES D’INSTALLATION ...................................................18
Outils et pièces ...........................................................................18
Exigences d’emplacement .........................................................18
Spécifications électriques ..........................................................23
INSTRUCTIONS D’INSTALLATION .............................................24
Préparer le four encastré ............................................................24
Enlever la ou les portes du four .................................................24
Raccordement électrique ..........................................................24
Installation du four simple ..........................................................26
Installation complète du four simple ..........................................27
Installation du four double .........................................................28
Installation complète du four double .........................................31
Liste de contrôle d’installation finale .........................................32
"Loading the manual" means you need to wait until the file loads and becomes available for online reading. Some manuals are very large, and the time they take to appear depends on your internet speed.
Other Manuals for Whirlpool WOS52ES4MW
Summary
2 INSTALLATION REQUIREMENTS Tools and Parts Gather the required tools and parts before starting installation. Read and follow the instructions provided with any tools listed here. Tools needed ■ Phillips screwdriver ■ Measuring tape ■ Hand or electric drill (for wall cabinet installations) ■ 1" ...
3 FRONT VIEW SIDE VIEW A H I C B G Power Supply Location UNDER COUNTER INSTALLATION BACK VIEW in cm A Width of cabinet (minimum) 24 61 B Width of cutout (minimum) 22 5 ⁄ 8 57.5 C Height of cutout without trim Height of cutout with trim 22 15 ⁄ 16 27 3 ⁄ 4 58.2 70.5 D Top of cutout to bottom of upper...
Single Oven - Flush Installation FRONT VIEW 3/8 " (1 cm) Top Cleat* 13/16 " (2.1 cm) Side Cleat* A B C D G F 13/16" (2 cm) Side Cleat* E Power Supply Location UNDER COUNTER INSTALLATION BACK VIEW TOP VIEW in cm A Width of flush inset cutout (minimum) 25 1 ⁄ 16 63.6 B Width of opening (mi...