Page 2 - TABLE OF CONTENTS; IMPORTANT SAFEGUARDS; READ ALL INSTRUCTIONS.; Unplug from outlet when not in use, before putting on
2 TABLE OF CONTENTS Important Safeguards ................................................................. 2Grounding Instructions ................................................................ 4Introduction ................................................................................. 5The Par...
Page 4 - GROUNDING INSTRUCTIONS
4 GROUNDING INSTRUCTIONS For your protection, this appliance is equipped with a 3-conductor cord set.120 volt units are supplied with a molded 3-prong grounding-type plug (NEMA 5-15P), and should be used in combination with a properly connected grounding-type outlet as shown in Figure 1. If a ground...
Page 5 - INTRODUCTION; Size, power and convenience
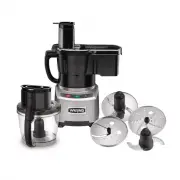
5 INTRODUCTION Waring ® Commercial food processors are the most versatile food processors in their class, featuring a LiquiLock ® Seal System that enables processing of large volumes of liquid without leakage and the need to remove the S-blade while pouring. These professional machines are prime exa...
Page 6 - THE PARTS
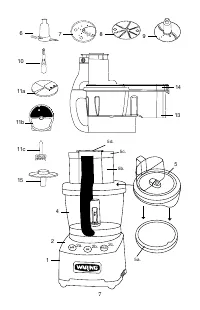
6 THE PARTS The Waring ® Commercial WFP16SCD consists of the following standard parts and accessories: 1. Base – Heavy-duty die-cast base a. Motor shaft 2. Controls – Large, easy-to-read control buttons a. OFF b. ON c. PULSE 3. S afety interlock (not shown). Prevents machine from operating until cov...
Page 8 - ASSEMBLY OF BATCH BOWL PARTS; Read this if assembling the batch bowl parts to use S-blade
8 ASSEMBLY OF BATCH BOWL PARTS Prior to First Use: • Clean and sanitize the motor base. Wash, rinse, and sanitize the batch bowl, cover, food pusher, small pusher insert and accessories. • Place base on a counter or table near a 3-prong electrical outlet. Position it so you look at the front of the ...
Page 9 - Two pushers for feed tube
9 • Do not fill liquid over MAX LIQUID FILL LINE. If too much liquid is used, it will overflow. In this case, stop operation, remove liquid to below MAX LIQUID FILL LINE and continue processing. Read this if assembling batch bowl parts to use slicing disc or shredding disc assembly. To assemble the ...
Page 10 - DISASSEMBLY OF BATCH BOWL PARTS; ALWAYS UNPLUG THE UNIT BEFORE DISASSEMBLING.; Disassembly when removing the S-blade or; It is recommended that you remove the bowl from the motor; Disassembly when removing an accessory disc
10 DISASSEMBLY OF BATCH BOWL PARTS ALWAYS UNPLUG THE UNIT BEFORE DISASSEMBLING. • Remove the large food pusher from the feed tube. Remove the small pusher from the large pusher. Disassembly when removing the S-blade or whipping disc • Remove the batch bowl from the unit by rotating clockwise (left) ...
Page 11 - ASSEMBLY OF CONTINUOUS-FEED CHUTE PARTS; Follow directions on
11 • Remove the batch bowl from the unit by rotating clockwise (left) to disengage the tabs on the bottom of the bowl platform from the batch bowl. When the bowl handle is on the left (about 7 o’clock position), you can gently lift the bowl straight up and out. ASSEMBLY OF CONTINUOUS-FEED CHUTE PART...
Page 12 - DISASSEMBLY OF CONTINUOUS-FEED; ALWAYS UNPLUG THE CORD BEFORE DISASSEMBLING.
12 assembly of continuous-feed chute). Position the dicing grid so that it fits securely on the tabs of the continuous feed chute. Guide the stem of the slicing blade through the center hole of the dicing grid and over the drive shaft. Be sure that the slicing blade is completely secured on the shaf...
Page 13 - Continuous use
13 OPERATING THE CONTROLS • Plug the machine into an electrical outlet. The outlet must be 120V, 60Hz. • There are three control buttons on the base unit. The three controls are: ON OFF PULSE How they work: ON: Press the ON button to start the motor. OFF: Press the OFF button to stop the motor. PULS...
Page 14 - Turning the machine off with the OFF button; FOOD PREPARATION; Small pusher
14 • Always use the PULSE button for pulsing. Never move the bowl and cover assembly on or off to control pulses. It is less efficient and could damage the machine. Turning the machine off with the OFF button • Always switch the food processor off by pressing and releasing the OFF button. This assur...
Page 15 - Large pusher; RESETTING THERMAL PROTECTION
15 Large pusher This pusher is typically used when inserting vegetables horizontally for longer cuts. RESETTING THERMAL PROTECTION The WFP16SCD food processor is equipped with an automatic reset switch to protect the motor from overheating.If your food processor stops running under heavy use, press ...
Page 16 - USE INSTRUCTIONS; Chopping and mincing
16 USE INSTRUCTIONS FOR S-BLADE/CUTTER BLADE • The sealed S-blade (cutter blade) is designed for chopping, grinding, puréeing, blending, mixing or kneading. • Assemble the bowl and blade as instructed in the section titled “Assembly of Batch Bowl Parts” (page 8). Chopping and mincing • To chop or mi...
Page 17 - Purée or Mix; Do not fill liquid past MAX LIQUID FILL LINE.; ACCESSORY DISC SELECTION AND USE
17 Purée or Mix To purée tomatoes, vegetables and fruits, make sauces, or mix and blend ingredients, place the ingredients into the bowl, turn the unit on and allow it to run continuously until you reach the desired consistency. Do not let the machine run unattended. If too much liquid is used, it w...
Page 19 - DICING OPERATION
19 not expand beyond the MAX FILL LINE or it may leak through the feed tube. If the mixture expands to the point where it leaks out the feed tube, stop operation and reduce the contents of the bowl to below the MAX LIQUID FILL LINE and continue operation. For whipped cream, simply add heavy cream an...
Page 21 - Removing processed food from the batch bowl; NEVER
21 vegetables vertically or standing up. For a very fine chop of onions, quarter the onion and gravity-feed it through the chute. Removing processed food from the batch bowl 1. Turn the machine off and wait for the blade to stop moving before removing the lid and pusher. 2. If the blade holds the bo...
Page 22 - TROUBLESHOOTING
22 TROUBLESHOOTING This section describes potential problems and the correct solutions for them. Problems that cannot be solved with the guidelines listed below should be referred to one of the Waring Authorized Service Centers for assistance. A listing of authorized service agencies is supplied wit...
Page 23 - CLEANING AND MAINTENANCE; Always unplug motor base when not in use, before inserting
23 If you notice that the • S top use, discard contents and do not attempt to fix blade is bending during the disc at home. Call local Waring service agency for heavy operation and/or advice and/or to purchase a new disc. yielding inconsistent cut results CLEANING AND MAINTENANCE Always unplug motor...
Page 24 - To clean and sanitize the motor base
24 RINSE Use only water to rinse. SANITIZE Use regular, unscented bleach diluted with water between 50°F and 120°F. Follow the food equipment cleaning instructions on the label to not exceed 200 ppm total available chlorine. The sanitizing dilutions are based on the hypochlorite concentration of the...
Page 25 - LIMITED WARRANTY
25 LIMITED WARRANTY LIMITED FIVE YEAR MOTOR WARRANTYLIMITED TWO YEAR PARTS AND LABOR WARRANTY(U.S. and Canada only) Waring ® Commercial warrants that this product’s motor shall be free from defects in material and workmanship for a period of five years from the date of purchase when used with foodst...
Page 26 - ÍNDICE; MEDIDAS DE SEGURIDAD; LEA TODAS LAS INSTRUCCIONES.; Desconecte el aparato cuando no está en uso, antes de; Las cuchillas son muy filosas manipúlelas con mucho
26 ÍNDICE Medidas de seguridad importantes ............................................26Instrucciones de puesta a tierra ..................................................28Introducción ............................................................................... 29Piezas y características .........
Page 28 - INSTRUCCIONES DE PUESTA A TIERRA
28 GUARDE ESTAS INSTRUCCIONESAPROBADO PARA USO COMERCIAL INSTRUCCIONES DE PUESTA A TIERRA Para su protección, este aparato está equipado con un cable eléctrico con conductor de tierra.Los aparatos de 120 V están equipados con clavija tripolar de conexión con tierra (NEMA 5-15P), la cual debe ser con...
Page 29 - INTRODUCCIÓN; Alta capacidad, potencia y comodidad
29 INTRODUCCIÓN Los robots de cocina Waring ® Commercial son los aparatos más versátiles de su categoría. Equipados con el sistema hermético LiquiLock ® , permiten procesar altas cantidades de líquido sin derrame y vaciar el bol sin tener que retirar la cuchilla. Estos aparatos profesionales son el ...
Page 30 - PIEZAS
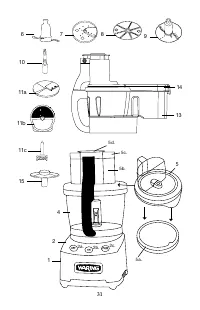
30 PIEZAS El robot de cocina WFP16SCD de Waring ® Commercial cuenta con las piezas y los accesorios siguientes: 1. Resistente base de fundición a. Árbol del motor 2. Controles grandes y fáciles de leer a. OFF (apagado) b. ON (encendido) c. PULSE (pulso) 3. Mecanismo de bloqueo de seguridad (no ilust...
Page 32 - ENSAMBLAJE DEL BOL REGULAR; Antes del primer uso:
32 ENSAMBLAJE DEL BOL REGULAR Antes del primer uso: • Limpie y desinfecte el bloque-motor. Lave, enjuague y desinfecte el bol, la tapa, los empujadores y los accesorios. • Coloque el aparato sobre una mesa o una encimera, cerca de una toma de corriente. Posiciónelo de manera que los controles estén ...
Page 33 - Instalación del disco rebanador o del disco triturador; NUNCA INTENTE ENCENDER EL APARATO SI LA TAPA; DESMONTAJE DEL BOL REGULAR; Desmontaje de la cuchilla y del disco batidor
33 Instalación del disco rebanador o del disco triturador Para instalar el disco rebanador ajustable (WFP16S10): quite la tapa. Instale el adaptador removible sobre el árbol motor. El disco rebanador ajustable permite elegir entre 16 grosores, de 1 mm a 6 mm. Elija el grosor deseado. Una vez fijado ...
Page 34 - Le aconsejamos que retire el bol del bloque-motor antes de; Remoción de los discos; ENSAMBLAJE DEL BOL PARA PROCESADO
34 • Quite la tapa, presionando las patas de bloqueo en el asa del bol y alzando hacia arriba. El sello negro es fácil de quitar para limpiar. Le aconsejamos que retire el bol del bloque-motor antes de retirar la cuchilla/el disco batidor. NOTA: VACÍE EL BOL ANTES DE RETIRAR LA CUCHILLA O EL DISCO B...
Page 36 - FUNCIONAMIENTO DEL APARATO
36 DESMONTAJE DEL BOL PARA PROCESADO CONTINUO SIEMPRE DESENCHUFE EL APARATO ANTES DE DESENSAMBLARLO. • Gire la tapa en sentido horario hasta desencajar las anclas.• Retire el empujador grande de la boca de alimentación. Retire el empujador pequeño del empujador grande. • Retire el bol del bloque-mot...
Page 37 - MODO DE EMPLEO; Encendido continuo; PREPARACIÓN DE LOS ALIMENTOS
37 MODO DE EMPLEO Encendido continuo Oprima el botón ON. Función de pulso • Para utilizar la función de pulso, oprima el botón PULSE repetidamente. El motor permanecerá encendido hasta que suelte el botón. • La función de pulso permite controlar la duración de cada pulsación y la frecuencia de las p...
Page 38 - SELECCIÓN DEL EMPUJADOR; Empujador pequeño; DISPOSITIVO DE PROTECCIÓN DEL MOTOR
38 • Preparación para rebanar: Corte ambos lados de los alimentos largos como las zanahorias, los pepinos o el apio; esto mejorará la consistencia de las rodajas. SELECCIÓN DEL EMPUJADOR Puede introducir alimentos en la boca de alimentación durante el funcionamiento. Sin embargo, es preferible dejar...
Page 40 - No pase la línea “MAX LIQUID FILL”.; SELECCIÓN DEL DISCO
40 deseada. No descuide/deje el aparato sin vigilancia durante el funcionamiento. Una cantidad excesiva de líquido en el bol puede provocar un derrame. En caso de que esto suceda, apague el aparato y vacíe parcialmente el bol. No pase la línea “MAX LIQUID FILL”. SELECCIÓN DEL DISCO Los accesorios in...
Page 43 - USO DEL DISCO PARA CORTAR EN JULIANA; Cómo vaciar el bol
43 • Lave todos los alimentos antes de procesarlos. Pele las frutas y los vegetales si es necesario. Quite las pepas, pepitas y semillas grandes. Corte los alimentos en pedazos más pequeños si fuera necesario. • Nunca intente rallar queso suave; solamente use queso duro. Puede rallar Mozzarella, per...
Page 44 - RESOLUCIÓN DE PROBLEMAS
44 2. Si el bol está bloqueado, sosténgalo por el asa y gírelo rápidamente de la derecha a la izquierda. 3. S i está usando un disco, retírelo antes de vaciar el bol. Si está usando la cuchilla, puede dejarla en el bol para vaciar este. Utilice una espátula para vaciar el bol. NUNCA INTRODUZCA LOS D...
Page 45 - LIMPIEZA Y MANTENIMIENTO
45 Si el aparato • A verigüe que la toma de corriente está funcionando. aún no funciona • Averigüe que el disyuntor está encendido. correctamente: • Averigüe que el fusible no está quemado.• Comuníquese con un centro de servicio autorizado. El aparato rechina • Apague y desconecte el aparato. Averig...
Page 47 - GARANTÍA LIMITADA
47 2. Para desinfectar: restriegue el exterior de la jarra con un paño suave o una esponja empapada en solución desinfectante*. NO SUMERJA LA BASE EN SOLUCIÓN LIMPIADORA, AGUA O SOLUCIÓN DESINFECTANTE. 3. Permita que se seque al aire. *Utilice solamente las soluciones desinfectantes recomendadas en ...
Page 48 - TABLE DES MATIÈRES; IMPORTANTES CONSIGNES; LIRE TOUTES LES INSTRUCTIONS.; Débrancher l’appareil après usage, avant d’installer ou
48 TABLE DES MATIÈRES Importantes consignes de sécurité .............................................48Instructions de mise à la terre .....................................................50Introduction .................................................................................51Pièces ..........
Page 50 - INSTRUCTIONS DE MISE À LA TERRE
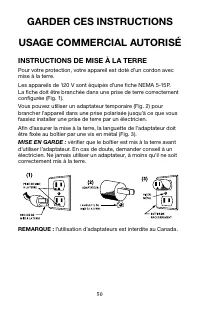
50 GARDER CES INSTRUCTIONS USAGE COMMERCIAL AUTORISÉ INSTRUCTIONS DE MISE À LA TERRE Pour votre protection, votre appareil est doté d’un cordon avec mise à la terre.Les appareils de 120 V sont équipés d’une fiche NEMA 5-15P. La fiche doit être branchée dans une prise de terre correctement configurée...
Page 51 - Haute capacité, puissance et commodité
51 INTRODUCTION Les robots de cuisine Waring Commercial ® sont les plus polyvalents de leur catégorie. Dotés du système d’étanchéité LiquiLock ® , ils permettent de préparer de grands volumes de liquide sans fuite et de vider le bol sans avoir à retirer la lame. Ces appareils professionnels sont le ...
Page 52 - PIÈCES
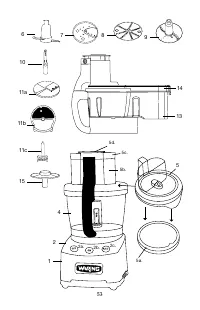
52 PIÈCES Le robot de cuisine WFP16SCD de Waring ® Commercial inclut les pièces et accessoires suivants : 1. Socle résistant moulé sous pression a. Arbre du moteur 2. Boutons de contrôles grands et faciles à lire a. OFF (arrêt) b. ON (marche) c. PULSE (pulse) 3. M écanisme de verrouillage de sécurit...
Page 54 - ASSEMBLAGE DU BOL NORMAL; Avant la première utilisation:
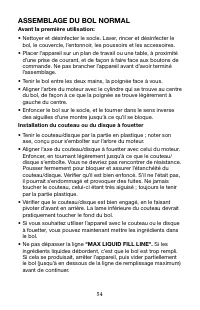
54 ASSEMBLAGE DU BOL NORMAL Avant la première utilisation: • Nettoyer et désinfecter le socle. Laver, rincer et désinfecter le bol, le couvercle, l’entonnoir, les poussoirs et les accessoires. • Placer l’appareil sur un plan de travail ou une table, à proximité d’une prise de courant, et de façon à ...
Page 55 - Poussoir 2 en 1; DÉSASSEMBLAGE DU BOL NORMAL; TOUJOURS DÉBRANCHER L’APPAREIL AVANT DE LE; Désassemblage du couteau ou du disque à fouetter
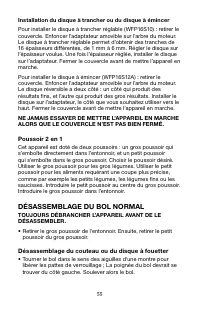
55 Installation du disque à trancher ou du disque à émincer Pour installer le disque à trancher réglable (WFP16S10) : retirer le couvercle. Enfoncer l’adaptateur amovible sur l’arbre du moteur. Le disque à trancher réglable permet d’obtenir des tranches de 16 épaisseurs différentes, de 1 mm à 6 mm. ...
Page 56 - Désassemblage des disques; ASSEMBLAGE DU BOL À DÉBIT CONTINU
56 • Retirer le couvercle en appuyant sur les pattes de verrouillage qui se trouvent sur la poignée et un tirant le couvercle vers le haut. Le joint d’étanchéité noir peut se retirer facilement pour le nettoyage. Il est conseillé de retirer le bol du socle-moteur avant d’enlever le couteau ou le dis...
Page 58 - DÉSASSEMBLAGE DU BOL À DÉBIT CONTINU
58 NE JAMAIS ESSAYER DE METTRE L’APPAREIL EN MARCHE ALORS QUE LE COUVERCLE N’EST PAS BIEN FERMÉ. • Introduire le petit poussoir au centre du gros poussoir. Introduire le gros poussoir dans l’entonnoir. • Une fois le bol à débit continu assemblé, mettre un récipient sous la bouche de sortie. DÉSASSEM...
Page 59 - Mode continu
59 FONCTIONNEMENT DE L’APPAREIL • Brancher l’appareil dans une prise électrique de 120 V (60 Hz).• Les boutons de commande se trouvent face à vous. Les trois boutons de commande sont : ON (marche) OFF (arrêt) PULSE (pulse) Mode d’emploi des boutons : ON (marche) : A ppuyer sur ce bouton pour mettre ...
Page 60 - Arrêt de l’appareil; PRÉPARATION DES ALIMENTS; Petit poussoir
60 • La fonction “pulse” est aussi pratique pour hacher/moudre les aliments durs. Utiliser la fonction “pulse” pour broyer les aliments. Terminer de hacher en mode continu. • Toujours utiliser le bouton PULSE pour contrôler les pulsations. Ne jamais essayer de les contrôler en bougeant le bol ou le ...
Page 61 - Gros poussoir; DISPOSITIF DE PROTECTION DU MOTEUR; Hacher ou émincer
61 typiquement pour couper les carottes, le céleri ou les saucisses en rondelles fines et uniformes. Gros poussoir Le gros poussoir sert à pousser les aliments introduits à l’horizontale dans l’entonnoir. Il permet d’obtenir des morceaux plus longs. DISPOSITIF DE PROTECTION DU MOTEUR Cet appareil es...
Page 62 - Ne pas dépasser la ligne de remplissage maximum (“
62 Hacher de la viande Pour obtenir des résultats homogènes, couper la viande en morceaux de 1 po. (2,5 cm). Ne pas hacher plus de 2 lb (910 g) de viande à la fois. Presser le bouton PULSE 3 ou 4 fois de suite, à un rythme d’une seconde entre chaque pulsation. Pour obtenir une texture plus fine, uti...
Page 66 - UTILISATION DU DISQUE À JULIENNE; Comment vider le bol
66 fromage dur uniquement. La Mozzarella peut être râpée, mais seulement si elle est très froide (environ 36°F/2°C). • Pour éviter que le moteur ne surchauffe, il est conseillé d’appuyer puis de relâcher le poussoir tour à tour jusqu’à ce que le fromage soit complètement râpé. Éviter de faire pressi...
Page 67 - NE PAS INTRODUIRE LES DOIGTS DANS LE BOL SI LE; RÉSOLUTION DE PROBLÈMES
67 NE PAS INTRODUIRE LES DOIGTS DANS LE BOL SI LE COUTEAU Y EST. RÉSOLUTION DE PROBLÈMES Vous trouverez dans cette section la solution aux problèmes les plus courants. Si cette liste ne solutionne pas votre problème, veuillez contacter un service après-vente autorisé. Consulter la liste des services...
Page 68 - NETTOYAGE ET ENTRETIEN; Toujours débrancher l’appareil après usage et avant
68 Si l'appareil ne • V érifier que la prise de courant est sous tension. fonctionne • V érifier que le disjoncteur est allumé. toujours pas • Vérifier que le fusible qui alimente la prise n’est pas correctement : grillé. • Contacter un service après-vente Waring autorisé. L’appareil grince • Éteind...
Page 69 - Nettoyage du socle-moteur
69 4. Pour le lavage à la main, utiliser uniquement des détergents en poudre peu moussant spécialement formulés pour laver la vaisselle et les ustensiles de cuisine, comme par exemple le détergent LF2100 de International Products Corp. Ces produits sont disponibles auprès des fournisseurs de laborat...
Page 70 - GARANTIE LIMITÉE
70 1. Nettoyage : nettoyer le socle à l’aide d’un linge légèrement humide. 2. Désinfection : essuyer le socle à l’aide d’un torchon doux ou d’une éponge imprégnés de solution désinfectante*. NE PAS SUBMERGER LE SOCLE DANS LA SOLUTION DE NETTOYAGE, L’EAU OU LA SOLUTION DÉSINFECTANTE. 3. Laisser séche...