Page 2 - IMPORTANT SAFEGUARDS; READ ALL INSTRUCTIONS.; Unplug from outlet when not in use, before putting on or
2 IMPORTANT SAFEGUARDS When using electrical appliances, basic safety precautions should always be taken including the following: 1. READ ALL INSTRUCTIONS. 2. Unplug from outlet when not in use, before putting on or taking off parts, before removing food from work bowl, and before cleaning. To unplu...
Page 4 - GROUNDING INSTRUCTIONS
4 GROUNDING INSTRUCTIONS For your protection, this appliance is equipped with a 3-conductor cord set.120 volt units are supplied with a molded 3-prong grounding-type plug (NEMA 5-15P), and should be used in combination with a properly connected grounding-type outlet as shown in Figure 1. If a ground...
Page 5 - INTRODUCTION; Size, power and convenience
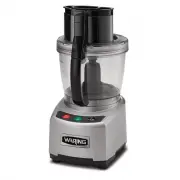
5 INTRODUCTION Waring ® Commercial food processors are the most versatile food processors in their class, featuring a LiquiLock ® Seal System that enables processing of large volumes of liquid without leakage and without the need to remove the S-blade while pouring. These professional machines are p...
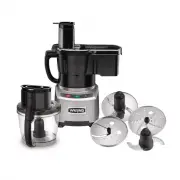
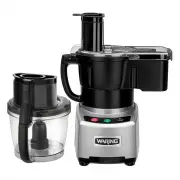
Page 6 - THE PARTS
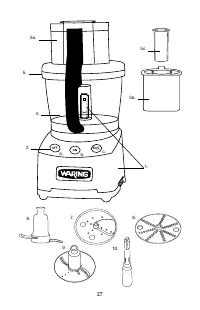
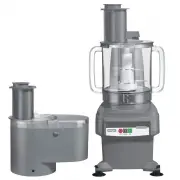
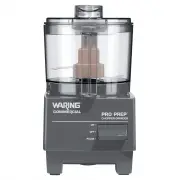
6 THE PARTS The Waring ® Commercial WFP16S consists of the following standard parts and accessories: 1. Die-cast motor base with vertical heavy-duty shaft 2. Three control buttons a. OFF b. ON c. PULSE 3. S afety interlock (not shown) prevents machine from operating until cover is correctly in place...
Page 8 - ASSEMBLY OF BATCH BOWL PARTS; Read this if assembling the batch bowl parts to use S-blade
8 ASSEMBLY OF BATCH BOWL PARTS We will use the terms work bowl, batch bowl and cutter bowl interchangeably throughout this instruction book. They mean the same thing. Prior to First Use: • Clean and sanitize the motor base. Wash, rinse, and sanitize the work bowl, cover, food pusher, food pusher ins...
Page 9 - Two pushers for feed tube
9 • If processing food with the S-blade or whipping disc, now is the time to add the food or liquid to the work bowl. • Do not fill liquid over MAX LIQUID FILL LINE. If too much liquid is used, it will overflow. In that case, stop operation, remove liquid to below MAX LIQUID FILL LINE and continue p...
Page 10 - DISASSEMBLY OF BATCH BOWL PARTS; ALWAYS UNPLUG THE CORD BEFORE DISASSEMBLING.; Disassembly when removing the S-blade or whipping; It is recommended that you remove the bowl from the motor; Disassembly when removing an accessory disc
10 DISASSEMBLY OF BATCH BOWL PARTS ALWAYS UNPLUG THE CORD BEFORE DISASSEMBLING. • Remove the large food pusher from the feed tube. Remove the small pusher from the large pusher. Disassembly when removing the S-blade or whipping disc • Remove the work bowl from the unit by rotating clockwise (left) t...
Page 11 - Continuous use
11 OPERATING THE CONTROLS • Plug the machine into an electrical outlet. The outlet must be 120V, 60Hz. • There are three control buttons on the base unit. The three controls are: ON OFF PULSE How they work: ON: Press the ON button to start the motor.O FF: To turn the motor off, press the OFF button....
Page 12 - Turning the machine off with the OFF button; FOOD PREPARATION; Small pusher
12 • Always use the PULSE button for pulsing. Never move the bowl and cover assembly on or off to control pulses. It is less efficient and could damage the machine. Turning the machine off with the OFF button • Always switch the food processor off by pressing and releasing the OFF button. This assur...
Page 13 - Large pusher; RESETTING THERMAL PROTECTION; Chopping and mincing
13 Large pusher This pusher is typically used when inserting vegetables horizontally for longer cuts. RESETTING THERMAL PROTECTION The WFP16S Food Processor is equipped with an automatic reset switch to protect the motor from overheating.If your food processor stops running under heavy use, turn the...
Page 14 - Do not fill liquid past MAX LIQUID FILL LINE.; Turning the machine off with the OFF Button.
14 not chopped fine enough, let the processor run continuously for a few seconds. If the machine has trouble starting, reduce the amount of meat in the bowl and start again. Chopping/grating hard cheese To chop, place up to 2 lb. of uniformly cut 1-inch (2.5 cm) cubes of chilled cheese into the bowl...
Page 18 - Removing processed food from the batch bowl; NEVER USE FINGERS TO; TROUBLESHOOTING
18 vertically or standing up. For a very fine chop of onions, quarter the onion and gravity-feed it through the chute. • When sliced food reaches MAX LIQUID FILL LINE, remove all sliced food from the bowl. Removing processed food from the batch bowl 1. Turn the machine off and wait for the blade to ...
Page 19 - CLEANING AND MAINTENANCE; Always unplug motor base when not in use, before inserting
19 Unit jams or vibrates • Turn unit off and unplug. excessively • Disassemble the batch bowl/accessories.• Make sure there is no food in S-blade hub (if applicable). • Clean food off accessory discs (if applicable).• Reassemble unit, and run first with the bowl empty, then put food into the bowl an...
Page 21 - LIMITED WARRANTY
21 2. To sanitize: Wipe down the motor base with a soft cloth or sponge that has been dampened with sanitizing solution*. DO NOT IMMERSE THE MOTOR BASE IN WASHING SOLUTION, RINSE WATER OR SANITIZING SOLUTION. 3. Allow to air-dry.*Use only sanitizing solutions recommended in this manual. LIMITED WARR...
Page 22 - LEA TODAS LAS INSTRUCCIONES.; Desconecte el aparato cuando no está en uso, antes de
22 MEDIDAS DE SEGURIDAD IMPORTANTES Al usar aparatos eléctricos, siempre debe tomar precauciones básicas de seguridad, incluso las siguientes: 1. LEA TODAS LAS INSTRUCCIONES. 2. Desconecte el aparato cuando no está en uso, antes de instalar/sacar piezas, antes de vaciar el bol y antes de limpiarlo. ...
Page 24 - INSTRUCCIONES DE PUESTA A TIERRA
24 INSTRUCCIONES DE PUESTA A TIERRA Para su protección, este aparato está equipado con un cable eléctrico con conductor de tierra.Los aparatos de 120 V están equipados con clavija tripolar de conexión con tierra (NEMA 5-15P), la cual debe ser conectada a una toma de corriente puesto a tierra (Fig. 1...
Page 25 - INTRODUCCIÓN; Alta capacidad, potencia y comodidad
25 INTRODUCCIÓN Las procesadoras de alimentos Waring ® Commercial son los aparatos más versátiles de su categoría. Equipadas con el sistema hermético LiquiLock ® , permiten procesar altas cantidades de líquido sin derrame y vaciar el bol sin tener que retirar la cuchilla. Estos aparatos profesionale...
Page 26 - PIEZAS
26 PIEZAS La procesadora de alimentos WFP16S de Waring Commercial incluye las piezas y los accesorios siguientes: 1. Bloque-motor de fundición con resistente árbol motor 2. Tres controles a. OFF (apagado) b. ON (encendido) c. PULSE (pulso) 3. M ecanismo de enclavamiento/bloqueo de seguridad (no ilus...
Page 28 - ENSAMBLAJE DEL BOL REGULAR; Antes del primer uso:
28 ENSAMBLAJE DEL BOL REGULAR Antes del primer uso: • Limpie y desinfecte el bloque-motor. Lave, enjuague y desinfecte el bol, la tapa, los empujadores y los accesorios. • Coloque el aparato sobre una mesa o una encimera, cerca de una toma de corriente. Posiciónelo de manera que los controles estén ...
Page 29 - Juego de empujadores 2 en 1
29 • No pase la línea “ MAX LIQUID FILL ” . Una cantidad excesiva de líquido en el bol puede provocar un derrame. Si esto ocurriera, apague el aparato y vacíe parcialmente el bol, hasta debajo de la marca “ MAX LIQUID FILL ”. Instalación de los discos Para instalar el disco rebanador ajustable (WFP1...
Page 30 - DESMONTAJE DEL BOL REGULAR; SIEMPRE DESENCHUFE EL APARATO ANTES DE; Desmontaje de la cuchilla y del disco batidor; Le aconsejamos que retire el bol del bloque-motor antes de; Remoción de los discos; FUNCIONAMIENTO DEL APARATO
30 DESMONTAJE DEL BOL REGULAR SIEMPRE DESENCHUFE EL APARATO ANTES DE DESENSAMBLARLO. • Retire el empujador grande de la boca de llenado. Retire el empujador pequeño del empujador grande. Desmontaje de la cuchilla y del disco batidor • Gire el bol en sentido horario para liberar las anclas. El asa de...
Page 31 - MODO DE EMPLEO; Encendido continuo
31 Modo de empleo de los botones: ON: oprima este botón para encender el aparato.O FF: oprima este botón una vez para apagar el aparato. O prima el botón PULSE repetidamente para usar la función de pulso. El motor permanecerá encendido hasta que suelte el botón. MODO DE EMPLEO Encendido continuo Opr...
Page 32 - Nota – Uso de la cuchilla picadora:
32 • Aunque el sistema de seguridad apaga el aparato al girar o sacar la tapa, este método no debería usarse para apagar el aparato. • Por seguridad, siempre oprima el botón OFF antes de abrir la tapa. PREPARACIÓN DE LOS ALIMENTOS • Lave todos los alimentos antes de procesarlos. Pele las frutas y lo...
Page 33 - Picar y moler
33 DISPOSITIVO DE PROTECCIÓN DEL MOTOR Su aparato cuenta con un dispositivo de protección térmica que apaga automáticamente el motor en caso de recalentamiento.Si esto ocurriera, apague y desenchufe el aparato. Vacíe el bol y tire los alimentos procesados. Permita que el motor se enfríe por 30 minut...
Page 34 - No pase la línea “MAX LIQUID FILL”.; Cómo apagar el aparato
34 Picar/rallar queso duro Corte el queso (bien refrigerado) en cubitos de aproximadamente 1 pulgada (2.5 cm) y póngalo en el bol, sin exceder la capacidad máxima de 2 libras (910 g). Utilice la función de pulso para conseguir pedacitos del tamaño de guisantes, y luego la función de encendido contin...
Page 37 - USO DEL DISCO PARA CORTAR EN JULIANA
37 • Lave todos los alimentos antes de procesarlos. Pele las frutas y los vegetales si es necesario. Quite las pepas, pepitas y semillas grandes. Corte los alimentos en pedazos más pequeños si fuera necesario. • Coloque los alimentos en la boca de llenado deseada, horizontalmente para obtener pedazo...
Page 38 - Cómo vaciar el bol; NUNCA; RESOLUCIÓN DE PROBLEMAS
38 Cómo vaciar el bol 1. Apague el aparato y espere hasta que la cuchilla esté completamente inmóvil antes de retirar la tapa. 2. Si el bol está bloqueado, sosténgalo por el asa y gírelo rápidamente de la derecha a la izquierda. 3. S i está usando un disco, retírelo antes de vaciar el bol. Si está u...
Page 39 - LIMPIEZA Y MANTENIMIENTO
39 El aparato no alcanza la • Vacíe el bol e intente procesar menos alimentos a la velocidad máxima vez. Si el aparato aún no • A verigüe que la toma de corriente está funcionando. funciona correctamente • Averigüe que el disyuntor está encendido.• Averigüe que el fusible no está quemado.• Comuníque...
Page 41 - GARANTÍA LIMITADA
41 2. Para desinfectar: restriegue el exterior de la jarra con un paño suave o una esponja empapada en solución desinfectante*. NO SUMERJA LA BASE EN SOLUCIÓN LIMPIADORA, AGUA O SOLUCIÓN DESINFECTANTE. 3. Permita que se seque al aire.*Utilice solamente las soluciones desinfectantes recomendadas en e...
Page 42 - LIRE TOUTES LES INSTRUCTIONS.; Débrancher l’appareil après usage et avant toute
42 IMPORTANTES CONSIGNES DE SÉCURITÉ L'utilisation d'appareils électriques requiert la prise de précautions élémentaires, parmi lesquelles les suivantes : 1. LIRE TOUTES LES INSTRUCTIONS. 2. Débrancher l’appareil après usage et avant toute manipulation (y compris vider le bol) ou entretien. Saisir l...
Page 44 - INSTRUCTIONS DE MISE À LA TERRE
44 INSTRUCTIONS DE MISE À LA TERRE Pour votre protection, votre appareil est doté d'un cordon avec mise à la terre.Les appareils de 120 V sont équipés d'une fiche NEMA 5-15P. La fiche doit être branchée dans une prise de terre correctement configurée (Fig. 1). Vous pouvez utiliser un adaptateur temp...
Page 45 - Haute capacité, puissance et commodité
45 INTRODUCTION Les robots de cuisine Waring Commercial ® sont les plus polyvalents de leur catégorie. Dotés du système d'étanchéité LiquiLock ® , ils permettent de préparer de grands volumes de liquide sans fuite et de vider le bol sans avoir à retirer la lame. Ces appareils professionnels sont le ...
Page 46 - PIÈCES
46 PIÈCES Le robot de cuisine WFP16S de Waring ® Commercial inclut les pièces et accessoires suivants : 1. Socle moulé sous pression avec arbre moteur à usage intensif 2. Trois boutons de commande a. OFF (arrêt) b. ON (marche) c. PULSE (pulse) 3. M écanisme de verrouillage sécurité (non illustré) em...
Page 48 - ASSEMBLAGE DU BOL NORMAL; Avant la première utilisation:
48 ASSEMBLAGE DU BOL NORMAL Avant la première utilisation: • Nettoyer et désinfecter le socle. Laver, rincer et désinfecter le bol, le couvercle, l’entonnoir, les poussoirs et les accessoires. • Placer l’appareil sur un plan de travail ou une table, à proximité d'une prise de courant, et de façon à ...
Page 49 - Poussoir 2 en 1
49 trop rempli. Si cela se produisait, arrêter l'appareil, puis vider partiellement le bol (jusqu'à en dessous de la LIGNE DE REMPLISSAGE MAXIMUM ) avant de continuer. Installation des disques Pour installer le disque à trancher réglable (WFP16S10) : retirer le couvercle. Enfoncer l'adaptateur amovi...
Page 50 - DÉSASSEMBLAGE DU BOL NORMAL; TOUJOURS DÉBRANCHER L'APPAREIL AVANT DE LE; Désassemblage du couteau ou du disque à fouetter; Il est conseillé de retirer le bol du socle-moteur avant; Désassemblage des disques; FONCTIONNEMENT DE L'APPAREIL
50 DÉSASSEMBLAGE DU BOL NORMAL TOUJOURS DÉBRANCHER L'APPAREIL AVANT DE LE DÉSASSEMBLER. • Retirer le gros poussoir de l’entonnoir. Ensuite, retirer le petit poussoir du gros poussoir. Désassemblage du couteau ou du disque à fouetter • Tourner le bol dans le sens des aiguilles d’une montre pour libér...
Page 51 - INSTRUCTIONS; Mode continu
51 Mode d'emploi des boutons : ON (marche) : appuyer sur ce bouton pour mettre l'appareil en marche continue.O FF (arrêt) : appuyer sur ce bouton une fois pour éteindre l'appareil. A ppuyer, puis relâcher le bouton PULSE pour utiliser le mode “pulse”. Le moteur continuera à tourner aussi longtemps ...
Page 52 - Arrêt de l’appareil; PRÉPARATION DES ALIMENTS; Remarque - Lorsque vous utilisez le couteau :
52 Arrêt de l’appareil • Toujours utiliser le bouton OFF pour éteindre l’appareil ; cela coupera le courant qui alimente le moteur. • Éteindre l’appareil et attendre que le couteau soit complètement immobile avant d’ouvrir le couvercle. • Le mécanisme de sécurité arrêtera l’appareil si vous tournez ...
Page 53 - Gros poussoir; DISPOSITIF DE PROTECTION DU MOTEUR; Hacher ou émincer
53 Gros poussoir Le gros poussoir sert à pousser les aliments introduits à l’horizontale dans l'entonnoir. Il permet d'obtenir des morceaux plus longs. DISPOSITIF DE PROTECTION DU MOTEUR Cet appareil est équipé d’un dispositif de protection thermique qui arrête le moteur automatiquement en cas de su...
Page 54 - Ne pas dépasser la LIGNE DE REMPLISSAGE MAXIMUM.
54 une texture plus fine, utiliser le mode continu (ON) pendant quelques secondes. Si l’appareil a du mal à hacher, retirer un peu de viande et continuer. Râper/réduire en poudre du fromage dur Couper le fromage (bien réfrigéré) en cubes de 1 po. (2,5 cm) et placer les morceaux dans le bol, sans dép...
Page 58 - Comment vider le bol; NE; RÉSOLUTION DE PROBLÈMES
58 l'entonnoir. Pour couper les oignons très fins, les jeter dans l'entonnoir alors que l'appareil est en marche, un quart à la fois. • Vider le bol avant que les aliments n'atteignent la LIGNE DE REMPLISSAGE MAXIMUM. Comment vider le bol 1. Éteindre l'appareil et attendre que la lame soit complètem...
Page 59 - NETTOYAGE ET ENTRETIEN; Toujours débrancher l'appareil après usage et avant
59 L'appareil s’enraye ou • Éteindre et débrancher l'appareil. vibre excessivement • Démonter le bol et les accessoires.• Vérifier que des aliments ne soient pas coincés dans la tige du couteau (si vous utilisez le couteau). • Nettoyer le disque (le cas échéant).• Remettre le bol sur le socle-moteur...
Page 61 - GARANTIE LIMITÉE
61 SÉCHAGE Égoutter les pièces et les laisser sécher à l'air. Nettoyage du socle-moteur Nettoyer et désinfecter le socle-moteur avant d’utiliser l’appareil pour la première fois et après chaque utilisation. Débrancher l'appareil. 1. Nettoyage : nettoyer le socle à l'aide d'un linge légèrement humide...


 Waring Commercial FP2200
User Manual
Waring Commercial FP2200
User Manual
 Waring Commercial WCG75
User Manual
Waring Commercial WCG75
User Manual
 Waring Commercial WFP11S
User Manual
Waring Commercial WFP11S
User Manual
 Waring Commercial WFP11SW
User Manual
Waring Commercial WFP11SW
User Manual
 Waring Commercial WFP14SC
User Manual
Waring Commercial WFP14SC
User Manual
 Waring Commercial WFP14SW
User Manual
Waring Commercial WFP14SW
User Manual
 Waring Commercial WFP16SC
User Manual
Waring Commercial WFP16SC
User Manual
 Waring Commercial WFP16SCD
User Manual
Waring Commercial WFP16SCD
User Manual