Page 2 - Deviations depending on the model are noted in the text.
2 Thank you for choosing to buy one of our products. Your appliance is made to high standards and is easy to use. Nevertheless, please take the time to read these operating instructions in order to familiarize yourself with the appliance and get the best use out of it. Please follow the safety preca...
Page 3 - Contents
3 Contents 1 Safety precautions 4 1.1 Symbols used . . . . . . . . . . . . . . . . . . . . . . . . . . . . . . . . . . . . . . . . . . . . . . 4 1.2 General safety precautions . . . . . . . . . . . . . . . . . . . . . . . . . . . . . . . . . . . . 5 1.3 Appliance-specific safety precautions . . . . ...
Page 4 - Safety precautions; Symbols used; Information and precautions to observe.
4 1 Safety precautions 1.1 Symbols used Denotes important safety precautions. Failure to observe said precautions can result in injury or damage to the appliance or fittings! Information and precautions to observe. Information and precautions to observe. Tips for ease of use. Read the operating inst...
Page 5 - Safety precautions; General safety precautions
1 Safety precautions 5 1.2 General safety precautions • Read the operating instructions before using the appliance for the first time! • This appliance is not intended for use by persons (including children) with reduced physical, sensory or mental capabilities, or lack of experience and/or knowledg...
Page 6 - Appliance-specific safety precautions; • WARNING: If the surface is cracked, switch
1 Safety precautions 6 1.3 Appliance-specific safety precautions • WARNING: If the surface is cracked, switch the appliance off and disconnect it from the mains to avoid possible electric shock. • WARNING: The appliance and its accessible parts get hot during use. Be careful not to touch the heating...
Page 8 - Disclaimer; with water. If water gets inside it can damage the appliance.; Instructions for use
1 Safety precautions 8 1.4 Disclaimer • Any repairs, modifications or manipulations to the appliance, especially any live parts, may only be carried out by the manufacturer, its Customer Services or similarly qualified persons. Repairs if carried out incorrectly may cause serious injury, damage to t...
Page 10 - Disposal; Packaging; Disable the appliance after disconnecting it.; Appliance disposal; • The
1 Safety precautions 10 1.6 Disposal Packaging Disconnection ➤ Pull the plug out of the mains socket or have the appliance disconnected from the mains supply by an electrician. Then cut off the mains cable. ➤ Disable the appliance after disconnecting it. Appliance disposal • The symbol on the identi...
Page 11 - Using for the first time; Where is the identification plate?; Identification plate with serial number (FN)
11 2 Using for the first time • The appliance must be installed and connected to the mains supply in accordance with the separate installation instructions. Have a qualified fitter/electrician carry out the necessary work. • A cooking zone can give off an unpleasant smell during the first few hours ...
Page 12 - Your appliance; Appliance overview
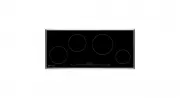
12 3 Your appliance 3.1 Appliance overview GK36TIPS, GK36TIPSC, GK36TIPSF • 1 dual ring cooking zone ø 180/260 mm • 1 cooking zone ø 210 mm • 1 cooking zone ø 145 mm GK46TIPS, GK46TIPSC, GK46TIPSF • 1 cooking zone ø 210 mm • 2 cooking zones ø 180 mm • 1 cooking zone ø 145 mm
Page 13 - Your appliance
3 Your appliance 13 GK46TIAS, GK46TIASC, GK46TIASF, GK46TIASU • 1 cooking zone ø 210 mm • 2 cooking zones ø 180 mm • 1 cooking zone ø 145 mm GK46TIABS, GK46TIABSC, GK46TIABSF, GK46TIABSU • 1 frying zone ø 180/280 mm • 1 cooking zone ø 210 mm • 1 cooking zone ø 180 mm • 1 cooking zone ø 145 mm
Page 14 - Operating and display elements; Touch buttons
3 Your appliance 14 3.2 Operating and display elements GK36TI… GK46TI… Touch buttons Displays Appliance ON/OFF Slider (for setting the power level) PowerPlus Pause cooking ON/OFF and restore function Operating time/timer Wipe protection ON/OFF 1 Cooking zone power level 2 Operating time activated 3 ...
Page 15 - How induction hobs function; – quick reacting
3 Your appliance 15 3.3 How induction hobs function Induction hobs work very differently from conventional hobs or hot plates. The induction coils under the glass ceramic plate produce a rapidly changing magnetic field which directly heats up the magnetic base of the cookware. The glass ceramic plat...
Page 16 - Suitable cookware
3 Your appliance 16 3.4 Pan detection Each cooking zone is equipped with pan detection.This detects: – suitable induction compatible cookware with a magnetic base – the magnetic base of the cookware and switches on the outer cooking ring of the dual ring cooking zone. • If the cookware is removed du...
Page 18 - Operating the appliance; Switching the appliance on and off; Power level
18 4 Operating the appliance The individual cooking zones are all operated in the same way. When the appliance is switched off, all the displays are dark (stand-by mode), except for the residual heat indicator should any cooking zone still be hot. 4.1 Switching the appliance on and off ➤ Switch the ...
Page 19 - Switching a cooking zone off; Residual heat indicator; Keep warm setting; Switching PowerPlus on
4 Operating the appliance 19 4.4 Switching a cooking zone off ➤ Press on the slider. – If no other entry is made and none of the other cooking zones are in use, the appliance switches off automatically after 10 seconds. Residual heat indicator After the cooking zone is switched off, remains illumina...
Page 20 - Operating the appliance; Power management; Maximum available power level with cooking zone
4 Operating the appliance 20 Power management GK36TIPS, GK36TIPSC, GK36TIPSF PowerPlus cannot be used with all the cooking zones at the same time. When PowerPlus is activated, the other cooking zones work at reduced power. PowerPlus with cooking zone Maximum available power level with cooking zone 1...
Page 23 - Automatic boost; Switching the automatic boost on; Press and hold the required power level on the slider for 3 seconds.; Switching the automatic boost off before time; Using the slider, set a lower power level.
4 Operating the appliance 23 4.7 Automatic boost All the cooking zones are equipped with a selectable automatic boost. With this function, a cooking zone works at power level 9 for a certain length of time (see table). Then it automatically goes back to the power level set. Switching the automatic b...
Page 24 - Operating time; Setting the operating time
4 Operating the appliance 24 4.8 Operating time With the operating time function, a cooking zone switches off automatically after a set time (between 1–99 minutes). Setting the operating time ➤ Select the required cooking zone. ➤ Press the touch button. – flashes in the display. ➤ Touch the slider f...
Page 26 - Timer; Setting the timer
4 Operating the appliance 26 4.9 Timer The timer functions like an egg timer (1–99 minutes). It can be used at any time and independently of all other functions. Setting the timer ➤ Switch the appliance on. ➤ Press the touch button 2×. – flashes in the display. ➤ The required duration of the timer c...
Page 28 - Restore function
4 Operating the appliance 28 4.11 Restore function If the appliance has been inadvertently switched off, the settings can be restored within 6 seconds. ➤ Switch the appliance on. – The indicator light at the touch button flashes. ➤ Press the touch button. 4.12 Pause cooking With this function, the p...
Page 30 - User settings; User setting
30 5 User settings The following user settings can be set and stored individually. User setting Setting value Factory setting P0 Loudness of acoustic signal 0 No acoustic signal 7 1–8 Adjustable (1 = quiet, 8 = loud) P1 Acoustic signal at end of operating time/timer 0 No acoustic signal 2 1 Automati...
Page 32 - Care and maintenance; Cleaning
32 6 Care and maintenance 6.1 Cleaning Always clean the hob after use. This prevents food residues from burning on. Dried-on or burned-on food residue is harder to clean off. Use of improper cleaning techniques can result in damage to the markings or surface. ➤ Use only a soft cloth or sponge with w...
Page 33 - Trouble-shooting and error messages; What to do if ...; ... the appliance is not working and the displays are not illuminated
33 7 Trouble-shooting and error messages 7.1 What to do if … … the appliance is not working and the displays are not illuminated … flashes alternately with the power level in the display … illuminates in the displays Possible cause Solution • The fuse or circuit breaker for electrical installations ...
Page 34 - Trouble-shooting and error messages; ... a continuous acoustic signal is emitted,; Possible cause
7 Trouble-shooting and error messages 34 … a continuous acoustic signal is emitted, flashes in a display and the appliance switches off … and flash alternately in the display Possible cause Solution • A touch button or slider was touched for longer than 10 seconds. ➤ Remove object or food that has b...
Page 36 - or
7 Trouble-shooting and error messages 36 … or and a number illuminate in the display Possible cause Solution • Internal error occurred. ➤ Note down the error number. ➤ Note down the serial number (FN) of the appliance. See the identification plate for this. ➤ Call Customer Services.
Page 37 - Index
37 8 Index A Accessories Ordering . . . . . . . . . . . . . . . . . . . 39 Appliance Switching off . . . . . . . . . . . . . 18, 40Switching on . . . . . . . . . . . . . 18, 40 Appliance overview . . . . . . . . . . . . 12Automatic boost . . . . . . . . . . . . . . 23 C Care. . . . . . . . . . . . ....
Page 38 - Index
38 8 Index T Timer . . . . . . . . . . . . . . . . . . . . . . . 26Touch buttons . . . . . . . . . . . . . . . . 14Trouble-shooting . . . . . . . . . . . . . . 33Type . . . . . . . . . . . . . . . . . . . . . . . . . 2 U User settings . . . . . . . . . . . . . . . . . 30Using for the first time . . ...
Page 39 - Repair service; The; section will help you
39 9 Repair service Whether you contact us about a malfunction or an order, please always state the serial number (FN) and the model type of your appliance. Enter these details below and also on the service sticker which comes with the appliance. Stick it in a conspicuous place or in your telephone ...
Page 40 - Quick instructions; To switch appliance on
Quick instructions Please first read the safety precautions in the operating instructions! To switch appliance on ➤ Press the touch button pressed for about 1 second. To select cooking zone ➤ Press the slider for the required cooking zone or slide your finger along it to set the power level. Alterna...