Page 2 - Contents; PREPARATION
Contents PREPARATION Safety information 3 INSTALLATION Installing a Clean Station 13 OPERATION Charging the Jet Bot 15 Using the Jet Bot 18 Basic use 18 Operation status on the LED Status Indicator 19Cleaning Functions 20 Additional functions 22 Attaching Boundary Markers 23 Parts diagram 24 Jet Bot...
Page 3 - Safety information; retain it for your reference.; Caution/Warning symbols used; WARNING; Other symbols used; NOTE; Accessories
P REP ARA TION PREPARATION Safety information • Before operating the appliance, please read this manual thoroughly and retain it for your reference. • Because the following operating instructions cover various models, the characteristics of your vacuum cleaner may differ slightly from those describe...
Page 4 - General; • If the vacuum cleaner is not working as it should, has been dropped,
P REP ARA TION Failure to meet these requirements could cause damage to the internal parts of the vacuum and void your warranty. General • Do not allow to be used as a toy. Close attention is necessary when used by or near children. • Use only as described in this manual.• Do not operate the Jet Bot...
Page 5 - Clean Station; • Do not unplug by pulling on the cord. To unplug, grasp the plug, not the
P REP ARA TION • For information on Samsung’s environmental commitments and product regulatory obligations, e.g. REACH, visit our sustainability page available via www.samsung.com Clean Station • Do not modify the polarized plug to fit a non-polarized outlet or extension cord. • Do not use outdoors ...
Page 6 - Jet Bot; • Do not put any objects into openings. Do not use with any openings
P REP ARA TION Jet Bot • Do not pick up hard or sharp objects such as glass, nails, screws, coins, and etc. • Do not use without a filter in place. When servicing the unit, never put fingers or other objects into the fan chamber in case the unit accidentally turns on. • Do not put any objects into o...
Page 7 - Power related; Before use
P REP ARA TION Power related WARNING • Please prevent any risk of electric shock or fire. – Do not damage the power cord. – Do not pull the power cord too hard or touch the power plug with wet hands. – Do not use a power source other than rated volatge of the charger and also do not use a multi-outl...
Page 8 - CAUTION
P REP ARA TION • Be sure the Jet Bot does not suck in or touch any kind of liquids (water, beverage, filth, etc.). – The Jet Bot can be severely damaged and it may contaminate other areas if the wheels pass through liquid. • Do not spill any liquids on the Clean Station. – There is a risk of fire or...
Page 10 - In use
P REP ARA TION In use WARNING • If any abnormal sounds, smells or smoke come from the Jet Bot, immediately shut off the power switch of the Jet Bot and contact a service center. CAUTION • Using the Jet Bot on a thick carpet may damage both the Jet Bot and the carpet. – The Jet Bot cannot pass over a...
Page 11 - Cleaning and maintenance
P REP ARA TION Cleaning and maintenance WARNING • When the power cord is damaged, contact a service center to get it replaced by a certified repairman. – There is a risk of fire or electric shock. • Please check with a SAMSUNG Electronics service center when replacing batteries. – Using batteries fr...
Page 13 - Installing a Clean Station
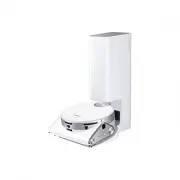
INSTALLA TION INSTALLATION Installing a Clean Station Approximately 0.5 m Approximately 0.5 m Status Indicator Approximately 1 m 1 Connect the provided power cord to the bottom of the Clean Station. 2 Position the power cord into the fixing groove at the rear of the Clean Station. 3 Raise the front ...
Page 15 - Charging the Jet Bot
OPERA TION Charging the Jet Bot Before using the Jet Bot for the first time, charge it completely. (For the charging time and cleaning time, refer to the ‘Product specification’.) OFF ON 1 Remove the yellow gasket attached to the power switch at the side of the Jet Bot and press the power switch to ...
Page 16 - Auto charging
OPERA TION Auto charging The Jet Bot automatically returns to the Clean Station when it completes cleaning or when the battery is low to recharge. Docking (Recharging) You can return the Jet Bot to the Clean Station while cleaning to recharge. • Press the [ ] on the Jet Bot or use the SmartThings Ap...
Page 17 - Checking if the docking (recharging) does not work
OPERA TION Checking if the docking (recharging) does not work Check the Clean Station’s installation status • Check whether the Clean Station has been installed in a place where the Clean Station cannot guide the Jet Bot to return. • Check whether the distance between the Clean Station and the Jet B...
Page 18 - Using the Jet Bot; Basic use; Starting cleaning; Stopping cleaning; Sleep Mode
OPERA TION Using the Jet Bot Before using the Jet Bot, press the power switch at the side of the Jet Bot to turn the Jet Bot on. ❇ ❇ For the normal use of the Jet Bot’s functions, the SmartThings connection is required. – For downloading and installing the SmartThings App, refer to the ‘SmartThings ...
Page 19 - Operation status on the LED Status Indicator
OPERA TION Operation status on the LED Status Indicator Classification Color Meaning Jet Bot While operating Red Blinking without moving An error occurs. Blinking while moving Auto returning to the Clean Station due to low battery On Operating stops due to low battery Blue Monitoring While charging ...
Page 20 - Cleaning Functions
OPERA TION Cleaning Functions Cleaning Functions Operation Cleaning Methods • Auto Clean: Cleans automatically until the Jet Bot completes cleaning one time. • Room Clean: You can select a room you want to clean.• Around Furniture Clean: You can select the areas around furniture or an electronic app...
Page 22 - Additional functions
OPERA TION Additional functions Additional functions Operation Energy-Saving Mode • When charging is complete, the Jet Bot automatically enters the Sleep Mode. While the Jet Bot is docked on the Clean Station, press and hold the [ ] for 7 seconds to set it to the Sleep Mode. To cancel the Sleep Mode...
Page 23 - Attaching Boundary Markers
OPERA TION Attaching Boundary Markers If Boundary Markers are attached before using the Jet Bot, the Jet Bot can operate safely. You can purchase additional Boundary Markers at a service center. To prevent the Jet Bot from entering the following areas, attach the Boundary Markers to the floor in a s...
Page 24 - Parts diagram; Top
OPERA TION Parts diagram Jet Bot 11 04 10 01 12 04 01 08 07 06 09 02 04 05 03 Top 01 Obstacle Sensor 02 Power switch 03 Upper Cover 04 Docking Sensor Window 05 LiDAR Sensor 06 Fine dust Filter 07 Dustbin 08 Start/stop button 09 Docking (Recharging) button 10 Status Indicator 11 Camera 12 3D Sensor 0...
Page 25 - Cleaning the Jet Bot; Emptying and cleaning the Dustbin
MAINTENANCE Cleaning the Jet Bot Before maintenance work, you should turn off the power switch at the side of the Jet Bot. Emptying and cleaning the Dustbin 1 Detach the upper cover using the groove under the cover. 2 Hold the Dustbin handle and lift the Dustbin up. 3 Unlock the transparent clip at ...
Page 26 - Cleaning the Driving Wheel
MAINTENANCE 7 Attach the filter to the Dustbin. 8 Attach the Upper Cover and the Lower Cover to the Dustbin. Make sure you can hear them click into position. 9 Attach the Dustbin to the Jet Bot. Grasp the handle and put the Dustbin into both grooves. Cleaning the Driving Wheel 1 Place a soft cloth d...
Page 27 - Cleaning the brush
MAINTENANCE Cleaning the brush 1 Push the Brush Cover Lock upward to unlock. 2 Detach the brush cover. 3 Lift up the left side of the brush first and then pull the brush from the groove on the right. 4 Clean the brush. 5 Attach the brush. 6 Attach the brush cover. English 27 1-DJ68-00846G-04_IB_VR95...
Page 28 - Cleaning the Sensor Window
MAINTENANCE Cleaning the Sensor Window Wipe the Sensor Window with a soft cloth. Obstacle Sensor 3D Sensor Docking sensor window Camera LiDAR Sensor Cliff Sensor Dust Sensor Window Cleaning the Fine dust Filter For detailed methods of use and cleaning, refer to the QR code. English 28 1-DJ68-00846G-...
Page 29 - Cleaning the Clean Station; Replacing the Dust Bag; Cleaning the Fine dust Filter
MAINTENANCE Cleaning the Clean Station Before cleaning the Clean Station, unplug the power cord from the electrical outlet. Replacing the Dust Bag 1 Press the [PUSH] button on the top of the Clean Station to open its cover. 2 Pull the top of the Dust Bag holder gently. – If you do not pull the Dust ...
Page 30 - Cleaning the bottom cover
MAINTENANCE Cleaning the bottom cover 1 Lay the Clean Station on its side and turn the 7 fixed screws on the bottom cover in the unlock direction( ). 2 Detach the cover and remove dirt. 3 Clean the cover with water and dry it completely in the shade. 4 Attach the cover to the Clean Station. 5 Turn t...
Page 31 - SmartThings App; Setting up the wireless router
APPENDIX SmartThings App The SmartThings App is only compatible with models that have a Wi-Fi function.If you do not have a Wi-Fi router, you cannot use the SmartThings App. Setting up the wireless router • Please refer to the user manual of your wireless router for the settings of the wireless rout...
Page 32 - Downloading the SmartThings App; Setting up a SAMSUNG account
APPENDIX Downloading the SmartThings App • Download and install the SmartThings App from the markets (Google Play Store, Apple App Store, or SAMSUNG Galaxy Store). To find the app, use the keyword “SmartThings”. NOTE • SmartThings is incompatible with some tablets and some mobile devices.• Some iPad...
Page 33 - Software Update
APPENDIX 4 [Android] The connection to your device will be progressed automatically. – [iOS] Open the setting app, and select [vacuum]_E30AJT** in the Wi-Fi list. 5 Provide the authentication when you are directed to do so. 6 [Android] The connection to your wireless router will be progressed automa...
Page 34 - Functions of the SmartThings App
APPENDIX Functions of the SmartThings App Classification Functions Explanation Monitoring Cleaning Report • You can check the result of the last cleaning.• You can check the histories of last 50 cleanings. Home Monitoring • The Home monitoring feature utilizes a camera on the front of the Jet Bot so...
Page 36 - Installation; Charging; Notes and cautions
APPENDIX Installation NOTE • Install the Clean Station in a place where the floor and wall are level.• If the cleaning area is wooden floors, it is best to install the Clean Station along the grain of wooden floors. • If the power switch is off, the Jet Bot will not charge even if it is docked on th...
Page 37 - Using
APPENDIX • If the Jet Bot is left detached from the Clean Station, the battery will drain naturally. – Try to keep the Jet Bot being charged on the Clean Station. (However, turn off the power switch and leave the Clean Station unplugged when planning to leave the house for long periods of time by go...
Page 39 - Battery usage
APPENDIX Battery usage NOTE • When you purchase a battery, check the SAMSUNG logo ( ) attached on the battery and the model name, then contact a service center. • This battery is exclusively for the SAMSUNG Electronics Jet Bot. Do not use it for any other products or purposes. • Do not disassemble o...
Page 40 - Corrective measures before reporting a problem
APPENDIX Corrective measures before reporting a problem 1 The Status Indicator turns red and blinks with a voice guide. 2 Turn off the power switch and check the instructions below and take appropriate actions. 3 When turning the Jet Bot on by pressing the power switch, the Status Indicator turns wh...
Page 42 - Troubleshooting
APPENDIX Troubleshooting Symptom Checklist The Jet Bot is not working at all. • Check if the power switch is on.• Check if the Status Indicator is on.• Check if the Jet Bot's battery is depleted. – When the Jet Bot’s Status Indicator turns red and stays red, place the Jet Bot manually on the Clean S...
Page 47 - Open Source Announcement
APPENDIX Open Source Announcement The software included in this product contains open source software. To obtain the source code covered under licenses which have the obligation of publishing source code (e.g. GPL, LGPL… etc), please visit http://opensource.samsung.com/ and search by model name. It ...
Page 48 - Product Specification
APPENDIX Product Specification Classification Items VR50T95**** series Mechanical specifications Weight 4.4 kg Size W 305 mm x D 320 mm x H 120* mm (*Including LiDAR sensor: 136.5 mm) Cleaning method LiDAR location recognition Button method of the Jet Bot Touch type Electrical specifications Power ...