Ryobi RY4CSS - User Manual

Ryobi RY4CSS Grass Trimmer – User Manual, read for free online in PDF format. We hope this helps you resolve any issues you may have. If you have further questions, please contact us through the contact form.


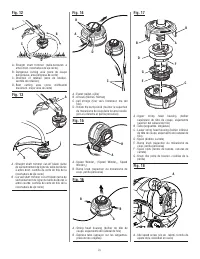


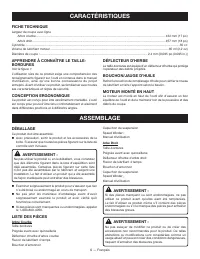


Table of Contents:
- Page 2 – se hace referencia en el manual del operador.
- Page 6 – TABLE OF CONTENTS; TABLE DES MATIÈRES / ÍNDICE DE CONTENIDO; INTRODUCTION; INTRODUCTION / INTRODUCCIÓN
- Page 7 – GENERAL SAFETY RULES; READ AND UNDERSTAND ALL INSTRUCTIONS.; READ ALL INSTRUCTIONS
- Page 9 – SYMBOLS
- Page 10 – PRODUCT SPECIFICATIONS; FEATURES; KNOW YOUR STRING TRIMMER; ASSEMBLY; UNPACKING; Curved Shaft
- Page 11 – ATTACHING THE STORAGE HANGER
- Page 12 – OPERATION; ETHANOL-BLENDED FUELS
- Page 13 – STARTING AND STOPPING
- Page 14 – CUTTING TIPS; To advance the cutting line manually:; MAINTENANCE
- Page 15 – GENERAL MAINTENANCE; Line Replacement; IDLE SPEED ADJUSTMENT
- Page 16 – To change the engine lubricant:; SPARK PLUG REPLACEMENT
- Page 17 – STORING THE PRODUCT; When storing 1 month or longer:; HIGH ALTITUDE ENGINE OPERATION
- Page 18 – MAINTENANCE SCHEDULE; CALL US FIRST; For any questions about operating or maintaining your product,
- Page 19 – TROUBLESHOOTING; PROBLEM
- Page 21 – WARRANTY; LIMITED WARRANTY STATEMENT
- Page 22 – RÈGLES DE SÉCURITÉ GÉNÉRALES; LIRE TOUTES LES INSTRUCTIONS
- Page 24 – SYMBOLES
- Page 25 – CARACTÉRISTIQUES
- Page 26 – INSTALLATION DE LA POIGNÉE AVANT; ASSEMBLAGE
- Page 27 – UTILISATION; CARBURANTS À BASE D’ÉTHANOL
- Page 28 – DÉMARRAGE ET ARRÊT; UTILISATION DU TAILLE-BORDURES
- Page 29 – CONSEILS DE COUPE; ENTRETIEN
- Page 30 – RÉGLAGE DU RALENTI
- Page 31 – NETTOYAGE DU FILTRE À AIR; REMPLACEMENT DE LA BOUGIE
- Page 32 – REMISAGE LE PRODUIT
- Page 33 – PROGRAMME D’ENTRETIEN; NOUS APPELER D’ABORD; BESOIN D’AID
- Page 34 – DÉPANNAGE; PROBLÈME
- Page 36 – GARANTIE; ÉNONCÉ DE LA GARANTIE LIMITÉE
- Page 37 – REGLAS DE SEGURIDAD GENERALES; LEA Y COMPRENDA TODAS LAS INSTRUCCIONES.; LEA TODAS LAS INSTRUCCIONES
- Page 40 – CARACTERÍSTICAS
- Page 41 – MONTAJE DEL MANGO DELANTERO; ARMADO; D E S M O N TA J E D E L A D I TA M E N T O D E L
- Page 42 – FUNCIONAMIENTO; COMBUSTIBLES MEZCLADOS CON ETANOL
- Page 43 – ARRANQUE Y APAGADO; MANEJO DE LA RECORTADORA
- Page 44 – SUGERENCIAS PARA CORTAR; MANTENIMIENTO
- Page 45 – MANTENIMIENTO GENERAL
- Page 46 – REEMPLAZO DE LA BUJÍA
- Page 47 – AJUSTE DE LA APERTURA DEL ÁRBOL DE; ALMACENAMIENTO DE LA PRODUCTO
- Page 48 – PROGRAMA DE MANTENIMIENTO; LLÁMENOS PRIMERO; ¿NECESITA A
- Page 49 – SOLUCIÓN DE PROBLEMAS; PROBLEMA
- Page 51 – GARANTÍA; DECLARACIÓN DE LA GARANTÍA LIMITADA
- Page 52 – CALIFORNIA PROPOSITION 65; OPERATOR’S MANUAL; MANUEL D’UTILISATION / MANUAL DEL OPERADOR; 0cc 4-CYCLE STRING TRIMMERS; TAILLE-BORDURES À LIGNE 4 TEMPS DE 30 cc; TECHTRONIC INDUSTRIES POWER EQUIPMENT
OPERATOR’S MANUAL
MANUEL D’UTILISATION
MANUAL DEL OPERADOR
30
CC
4-CYCLE
STRING TRIMMERS
TAILLE-BORDURES À LIGNE
4 TEMPS DE 30
CC
RECORTADORAS DE HILO
DE CUATRO TIMPOS 30
CC
RY4CCS
RY4CSS
Le taille-bordures à ligne a été conçue et fabriquée conformément
à nos strictes normes de fiabilité, simplicité d’emploi et sécurité
d’utilisation. Correctement entretenue, elle vous donnera des
années de fonctionnement robuste et sans problème.
AVERTISSEMENT :
Pour réduire les risques de
blessures, l’utilisateur doit lire et veiller à bien comprendre le
manuel d’utilisation avant d’employer ce produit.
Su recortadoras de hilo ha sido diseñada y fabricada de conformidad
con las estrictas normas para brindar fiabilidad, facilidad de uso
y seguridad para el operador. Con el debido cuidado, le brindará
muchos años de sólido y eficiente funcionamiento.
ADVERTENCIA:
Para reducir el riesgo de lesiones,
el usuario debe leer y comprender el manual del operador antes
de usar este producto.
CONSERVER CE MANUEL POUR
FUTURE RÉFÉRENCE
GUARDE ESTE MANUAL PARA
FUTURAS CONSULTAS
SAVE THIS MANUAL FOR FUTURE REFERENCE
Your string trimmer has been engineered and manufactured to our high standard for dependability, ease of operation, and
operator safety. When properly cared for, it will give you years of rugged, trouble-free performance.
WARNING:
To reduce the risk of injury, the user must read and understand the operator’s manual before using
this product.
NOTICE AVIS AVISO
Do not use E15 or E85 fuel in this product. It is a violation of federal law and will damage the unit and
void your warranty. Only use unleaded gasoline containing up to 10% ethanol.
Ne pas utiliser d’essence E15 ou E85 dans ce produit. Une telle utilisation représente une violation de
la loi fédérale et endommagera l’appareil et annulera la garantie. Utiliser seulement de l’essence sans plomb ne contenant
pas plus de 10 % d’éthanol.
No utilice combustibles E15 o E85 con este producto. Esto constituye una violación a la ley federal, dañará la unidad y anulará
la garantía. Utilice únicamente gasolina sin plomo que contiene hasta 10% de etanol.
"Loading the manual" means you need to wait until the file loads and becomes available for online reading. Some manuals are very large, and the time they take to appear depends on your internet speed.
Was this manual helpful?
About this manual
- Brand
- Ryobi
- Model
- RY4CSS
- Document type
- User Manual
- Category
- Grass Trimmer
- Language(s)
- English, Spanish, French
- Pages
- 52
- File size
- 7.4 MB
- Format
Summary
ii A - String head (tête à ligne de coupe, cabezal del hilo) B - Drive shaft housing (tube de l’arbre moteur, alojamiento del eje de impulsión) C - Coupler (coupleur, acoplador) D - Front handle with overmold (poignée avant avec surmoulure, mango delantero con sobremoldeado) E - Strap hanger (dispos...
2 Introduction ...................................................................................................................................................................... 2 Introduction / Introducción General Safety Rules ................................................................
3 — English GENERAL SAFETY RULES WARNING: READ AND UNDERSTAND ALL INSTRUCTIONS. Failure to follow all instructions listed below may result in electric shock, fire and/or serious personal injury. READ ALL INSTRUCTIONS For safe operation, read and understand all instructions before using this produc...
Ask a question
Related manuals
More Ryobi Grass Trimmers models
 Ryobi MAX POWER RY36ELTX33A-140 5133004547 User Manual
 Ryobi P2030 User Manual
 Ryobi P20015BTL User Manual
 Ryobi P20120 User Manual
 Ryobi P20180 User Manual
 Ryobi RLT430CESD 5133002546 User Manual
 Ryobi RLT4125 User Manual
 Ryobi RLT7038 5133001243 User Manual
 Ryobi RY252CS User Manual
 Ryobi RY253SS User Manual
 Ryobi RY40250 User Manual
 Ryobi RY41135 User Manual