Page 2 - Important Safety Information
2 Important Safety Information If there are any abnormalities during the measurement, remove the arm cuff.Do not use this device on infants or persons who cannot express their intentions.Do not inflate the arm cuff more than necessary.Do not use the device for any purpose other than measuring blood ...
Page 4 - Know Your Device; Monitor
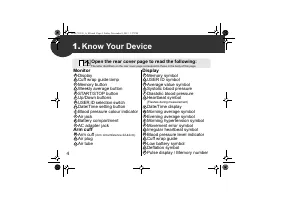
4 1. Know Your Device Monitor Display Cuff wrap guide lamp Memory button Weekly average button START/STOP button Up/Down buttons USER ID selection switch Date/Time setting button Blood pressure colour indicator Air jack Battery compartment AC adapter jack Arm cuff Arm cuff (Arm circumference 22-42cm...
Page 5 - Display Symbols
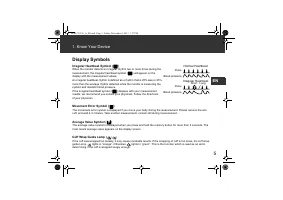
5 1. Know Your Device EN Display Symbols Irregular Heartbeat Symbol ( ) When the monitor detects an irregular rhythm two or more times during the measurement, the irregular heartbeat symbol ( ) will appear on the display with the measurement values. An irregular heartbeat rhythm is defined as a rhyt...
Page 7 - Preparation; Battery Installation; Remove the battery cover.
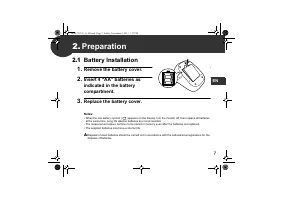
7 EN 2. Preparation 2.1 Battery Installation 1. Remove the battery cover. 2. Insert 4 “AA” batteries as indicated in the battery compartment. 3. Replace the battery cover. Notes: • When the low battery symbol ( ) appears on the display, turn the monitor off, then replace all batteries at the same ti...
Page 8 - Using the AC Adapter
8 2. Preparation 2.2 Using the AC Adapter 1. Insert the AC adapter plug into the AC adapter jack on the rear side of the monitor. 2. Plug the AC adapter into an electrical outlet. To disconnect the AC adapter, unplug the AC adapter from the electrical outlet first and then remove the AC adapter plug...
Page 9 - Setting the Date and Time; Push or button to change the year.; Press the START/STOP button to turn the monitor off.
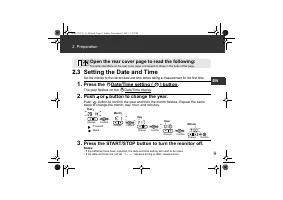
9 2. Preparation EN 2.3 Setting the Date and Time Set the monitor to the correct date and time before taking a measurement for the first time. 1. Press the Date/Time setting ( ) button. The year flashes on the Date/Time display. 2. Push or button to change the year. Push button to confirm the year a...
Page 10 - Using the Device; Applying the Arm Cuff; Insert; Secure closed with the fabric fastener.; Open both the front and rear covers to read the following:
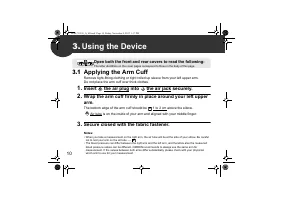
10 3. Using the Device 3.1 Applying the Arm Cuff Remove tight-fitting clothing or tight rolled up sleeve from your left upper arm.Do not place the arm cuff over thick clothes. 1. Insert the air plug into the air jack securely. 2. Wrap the arm cuff firmly in place around your left upper arm. The bott...
Page 11 - How to Sit Correctly
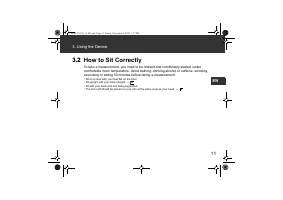
11 3. Using the Device EN 3.2 How to Sit Correctly To take a measurement, you need to be relaxed and comfortably seated, under comfortable room temperature. Avoid bathing, drinking alcohol or caffeine, smoking, exercising or eating 30 minutes before taking a measurement. • Sit on a chair with your f...
Page 12 - Taking a Measurement
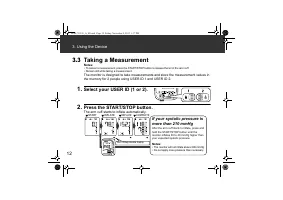
12 3. Using the Device 3.3 Taking a Measurement Notes: • To cancel a measurement, press the START/STOP button to release the air in the arm cuff. • Remain still while taking a measurement. The monitor is designed to take measurements and store the measurement values in the memory for 2 people using ...
Page 13 - Using the Guest Mode
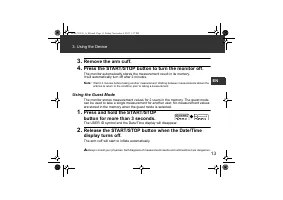
13 3. Using the Device EN 3. Remove the arm cuff. 4. Press the START/STOP button to turn the monitor off. The monitor automatically stores the measurement result in its memory. It will automatically turn off after 2 minutes. Note: Wait 2-3 minutes before taking another measurement. Waiting between m...
Page 14 - Using the Memory Function; To View the Measurement Values Stored in Memory
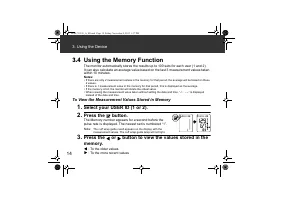
14 3. Using the Device 3.4 Using the Memory Function The monitor automatically stores the results up to 100 sets for each user (1 and 2). It can also calculate an average value based on the last 3 measurement values taken within 10 minutes. Notes: • If there are only 2 measurement values in the memo...
Page 15 - To View the Average Value
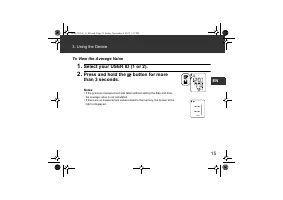
15 3. Using the Device EN To View the Average Value 1. Select your USER ID (1 or 2). 2. Press and hold the button for more than 3 seconds. Notes: • If the previous measurement was taken without setting the date and time, the average value is not calculated. • If there are no measurement values store...
Page 16 - To View the Weekly Average Value; Press the
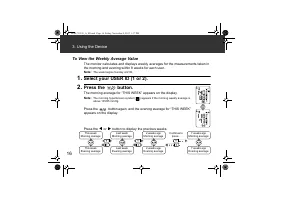
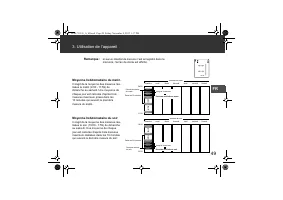
16 3. Using the Device To View the Weekly Average Value The monitor calculates and displays weekly averages for the measurements taken in the morning and evening within 8 weeks for each user. Note: The week begins Sunday at 2:00. 1. Select your USER ID (1 or 2). 2. Press the button. The morning aver...
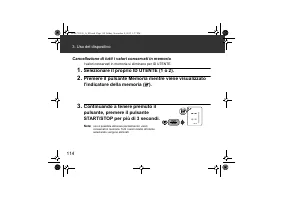
Page 18 - To Delete All the Values Stored in Memory
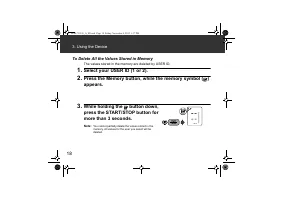
18 3. Using the Device To Delete All the Values Stored in Memory The values stored in the memory are deleted by USER ID. 1. Select your USER ID (1 or 2). 2. Press the Memory button, while the memory symbol ( ) appears. 3. While holding the button down, press the START/STOP button for more than 3 sec...
Page 19 - Error Messages and Troubleshooting; Error Messages
19 EN 4. Error Messages and Troubleshooting 4.1 Error Messages Display Cause Solution Irregular heartbeats are detected. Remove the arm cuff. Wait 2-3 minutes and then take another measurement. Repeat the steps in section 3.3. If this error continues to appear, contact your physician. Movement durin...
Page 20 - Error Messages and Troubleshooting
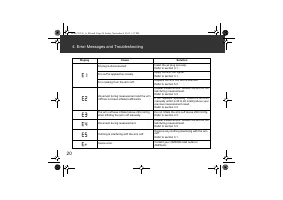
20 4. Error Messages and Troubleshooting Air plug is disconnected. Insert the air plug securely.Refer to section 3.1. Arm cuff is applied too loosely. Apply the arm cuff tighter.Refer to section 3.1. Air is leaking from the arm cuff. Replace the arm cuff with a new one.Refer to section 5.3. Movement...
Page 21 - Troubleshooting
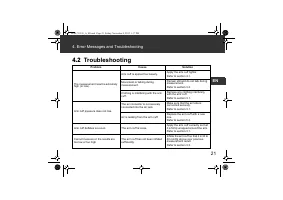
21 4. Error Messages and Troubleshooting EN 4.2 Troubleshooting Problem Cause Solution The measurement result is extremely high (or low). Arm cuff is applied too loosely. Apply the arm cuff tighter. Refer to section 3.1. Movement or talking during measurement. Remain still and do not talk during mea...
Page 23 - Maintenance and Storage; Maintenance
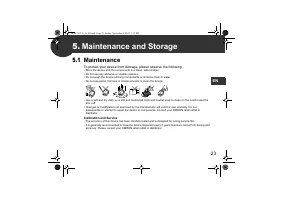
23 EN 5. Maintenance and Storage 5.1 Maintenance To protect your device from damage, please observe the following: • Store the device and the components in a clean, safe location.• Do not use any abrasive or volatile cleaners. • Do not wash the device and any components or immerse them in water.• Do...
Page 24 - Maintenance and Storage; Storage; Unplug the air plug from the air jack.
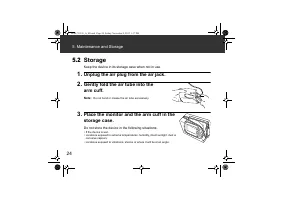
24 5. Maintenance and Storage 5.2 Storage Keep the device in its storage case when not in use. 1. Unplug the air plug from the air jack. 2. Gently fold the air tube into the arm cuff. Note: Do not bend or crease the air tube excessively. 3. Place the monitor and the arm cuff in the storage case. Do ...
Page 25 - Optional Medical Accessories; Arm cuff
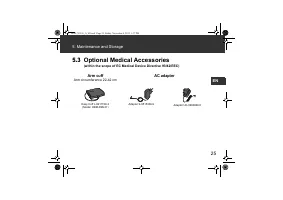
25 5. Maintenance and Storage EN 5.3 Optional Medical Accessories (within the scope of EC Medical Device Directive 93/42/EEC) Arm cuff Arm circumference 22-42 cm AC adapter Easy Cuff L-9911729-4 (Model: HEM-RML31) Adapter S-9515336-9 Adapter UK-9983666-5 HEM-7322-E_A_M.book Page 25 Friday, November ...
Page 26 - Specifications
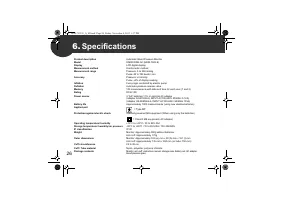
26 6. Specifications Product description Automatic Blood Pressure Monitor Model OMRON M6 AC (HEM-7322-E) Display LCD digital display Measurement method Oscillometric method Measurement range Pressure: 0 to 299 mmHgPulse: 40 to 180 beats / min. Accuracy Pressure: ± 3 mmHg Pulse: ± 5% of display readi...
Page 29 - Warranty
29 EN 7. Warranty Thank you for buying an OMRON product. This product is constructed of high quality materials and great care has been taken in its manufacturing. It is designed to give you every satisfaction, provided that it is properly operated and maintained as described in the instruction manua...
Page 30 - Some Useful Information about Blood Pressure; What is Blood Pressure?; Why is it a Good Thing to measure Blood Pressure at Home?
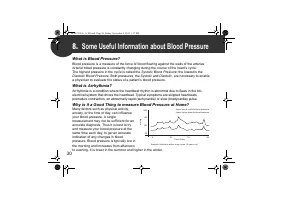
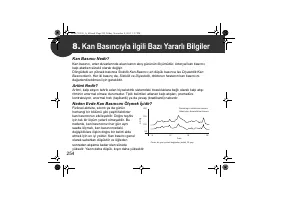
30 8. Some Useful Information about Blood Pressure What is Blood Pressure? Blood pressure is a measure of the force of blood flowing against the walls of the arteries. Arterial blood pressure is constantly changing during the course of the heart’s cycle. The highest pressure in the cycle is called t...
Page 32 - Table des matières
Table des matières Merci d’avoir fait l’acquisition du tensiomètre automatique OMRON M6 AC.L’OMRON M6 AC est un tensiomètre compact et entièrement automatisé, fonctionnant sur le principe de l’oscillométrie. Il mesure votre pression artérielle et votre pouls, simplement et rapidement. Pour un gonfla...
Page 33 - Informations importantes sur la sécurité
33 FR Informations importantes sur la sécurité Avertissement : indique une situation potentiellement dangereuse qui, si elle n’est pas évitée, peut entraîner la mort ou de graves lésions. (Utilisation générale) Consulter votre médecin avant d’utiliser l’appareil si vous êtes enceinte et que vous pré...
Page 36 - Description de l’appareil; Tensiomètre; Affichage
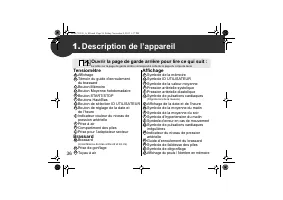
36 1. Description de l’appareil Tensiomètre AffichageTémoin du guide d’enroulement du brassard Bouton MémoireBouton Moyenne hebdomadaireBouton START/STOPBoutons Haut/BasBouton de sélection ID UTILISATEURBouton de réglage de la date et de l’heure Indicateur couleur du niveau de pression artérielle Pr...
Page 37 - Description de l’appareil; Symboles de l’affichage
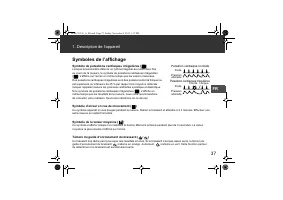
37 1. Description de l’appareil FR Symboles de l’affichage Symbole de pulsations cardiaques irrégulières ( ) Lorsque le tensiomètre détecte un rythme irrégulier au moins deux fois au cours de la mesure, le symbole de pulsations cardiaques irrégulières ( ) s’affiche sur l’écran en même temps que les ...
Page 39 - Préparation; Installation des piles; Retirer le couvercle des piles.
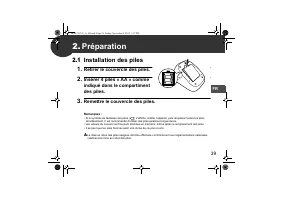
39 FR 2. Préparation 2.1 Installation des piles 1. Retirer le couvercle des piles. 2. Insérer 4 piles « AA » comme indiqué dans le compartiment des piles. 3. Remettre le couvercle des piles. Remarques : • Si le symbole de faiblesse des piles ( ) s’affiche, arrêter l’appareil, puis remplacer toutes l...
Page 40 - Utilisation de l’adaptateur secteur
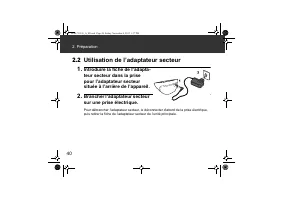
40 2. Préparation 2.2 Utilisation de l’adaptateur secteur 1. Introduire la fiche de l’adapta-teur secteur dans la prise pour l’adaptateur secteur située à l’arrière de l’appareil. 2. Brancher l’adaptateur secteur sur une prise électrique. Pour débrancher l’adaptateur secteur, le déconnecter d’abord ...
Page 41 - Réglage de la date et de l’heure; Appuyer sur le bouton de réglage de la date et de l’heure (; Appuyer sur les boutons ou pour changer l’année.; Appuyer sur le bouton START/STOP pour arrêter le tensiomètre.
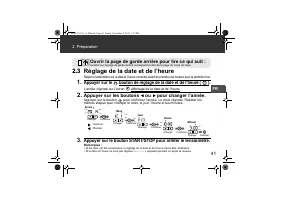
41 2. Préparation FR 2.3 Réglage de la date et de l’heure Régler le tensiomètre sur la date et l’heure correctes avant de prendre une mesure pour la première fois. 1. Appuyer sur le bouton de réglage de la date et de l’heure ( ). L’année clignote sur l’écran affichage de la date et de l’heure. 2. Ap...
Page 42 - Utilisation de l’appareil; Pose du brassard; Insérer fermement; Fermer la bande en tissu FERMEMENT.; Ouvrir les couvercles avant et arrière pour lire ce qui suit :
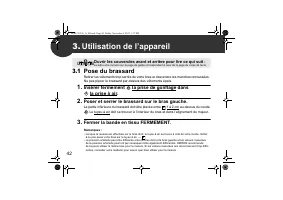
42 3. Utilisation de l’appareil 3.1 Pose du brassard Retirer les vêtements trop serrés de votre bras et descendre les manches retroussées. Ne pas placer le brassard par-dessus des vêtements épais. 1. Insérer fermement la prise de gonflage dans la prise à air. 2. Poser et serrer le brassard sur le br...
Page 43 - Utilisation de l’appareil; Comment s’asseoir correctement
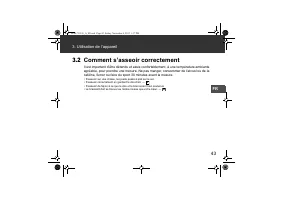
43 3. Utilisation de l’appareil FR 3.2 Comment s’asseoir correctement Il est important d’être détendu et assis confortablement, à une température ambiante agréable, pour prendre une mesure. Ne pas manger, consommer de l’alcool ou de la caféine, fumer ou faire du sport 30 minutes avant la mesure. • S...
Page 44 - Réalisation d’une mesure; Sélectionner votre ID; Si votre pression systolique
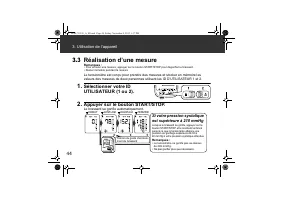
44 3. Utilisation de l’appareil 3.3 Réalisation d’une mesure Remarques : • Pour annuler une mesure, appuyer sur le bouton START/STOP pour dégonfler le brassard.• Rester immobile pendant la mesure. Le tensiomètre est conçu pour prendre des mesures et stocker en mémoire les valeurs des mesures de deux...
Page 45 - Utilisation du mode Invité; Appuyer sur le bouton START/STOP
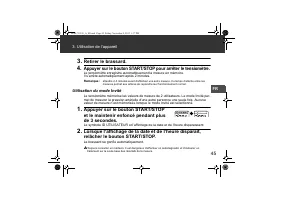
45 3. Utilisation de l’appareil FR 3. Retirer le brassard. 4. Appuyer sur le bouton START/STOP pour arrêter le tensiomètre. Le tensiomètre enregistre automatiquement la mesure en mémoire. Il s’arrête automatiquement après 2 minutes. Remarque : attendre 2-3 minutes avant d’effectuer une autre mesure....
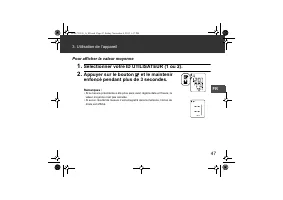
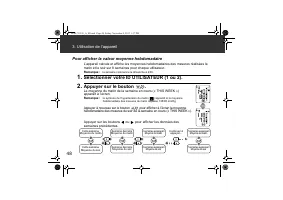
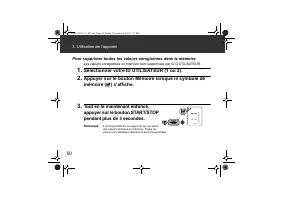
Page 46 - Utilisation de la fonction de mémoire; Pour afficher les mesures enregistrées dans la mémoire; Appuyer sur le bouton .; Appuyer sur le bouton ou pour afficher les mesures
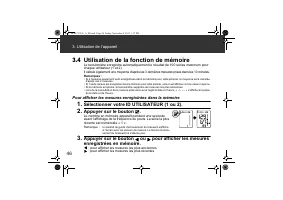
46 3. Utilisation de l’appareil 3.4 Utilisation de la fonction de mémoire Le tensiomètre enregistre automatiquement le résultat de 100 séries maximum pour chaque utilisateur (1 et 2). Il calcule également une moyenne d’après les 3 dernières mesures prises dans les 10 minutes. Remarques : • Si 2 mesu...
Page 51 - Messages d’erreur et dépannage; Messages d’erreur
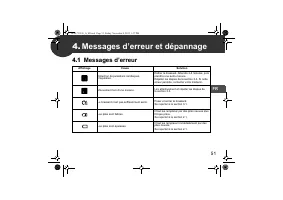
51 FR 4. Messages d’erreur et dépannage 4.1 Messages d’erreur Affichage Cause Solution Détection de pulsations cardiaques irrégulières. Retirer le brassard. Attendre 2-3 minutes, puis prendre une autre mesure. Répéter les étapes de la section 3.3. Si cette erreur persiste, contacter votre médecin. M...
Page 52 - Messages d’erreur et dépannage
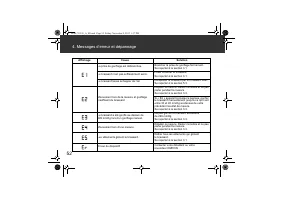
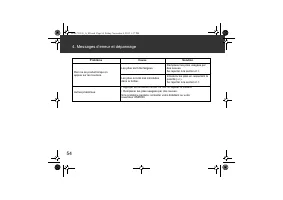
52 4. Messages d’erreur et dépannage La prise de gonflage est débranchée. Brancher la prise de gonflage fermement.Se reporter à la section 3.1. Le brassard n’est pas suffisamment serré. Poser et serrer le brassard.Se reporter à la section 3.1. Le brassard laisse échapper de l’air. Remplacer le brass...
Page 53 - Dépannage
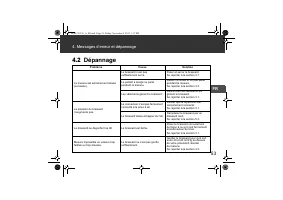
53 4. Messages d’erreur et dépannage FR 4.2 Dépannage Problème Cause Solution La mesure est extrêmement élevée (ou basse). Le brassard n’est pas suffisamment serré. Poser et serrer le brassard. Se reporter à la section 3.1. Le patient a bougé ou parlé pendant la mesure. Rester immobile et ne pas par...
Page 55 - Maintenance et stockage
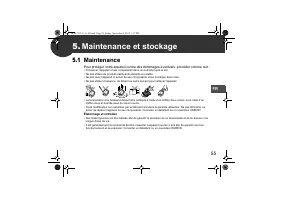
55 FR 5. Maintenance et stockage 5.1 Maintenance Pour protéger votre appareil contre des dommages éventuels, procéder comme suit : • Conserver l’appareil et ses composants dans un endroit propre et sûr.• Ne pas utiliser de produits nettoyants abrasifs ou volatils. • Ne pas laver l’appareil ni aucun ...
Page 56 - Maintenance et stockage; Stockage; Débrancher la prise de gonflage de la prise à air.
56 5. Maintenance et stockage 5.2 Stockage Conserver l’appareil dans son étui de rangement lorsqu’il n’est pas utilisé. 1. Débrancher la prise de gonflage de la prise à air. 2. Plier délicatement le tuyau à air dans le brassard. Remarque : ne pas plier excessivement le tuyau à air. 3. Placer le tens...
Page 57 - Accessoires médicaux en option; Brassard; Transformateur de courant alternatif
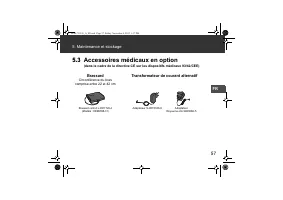
57 5. Maintenance et stockage FR 5.3 Accessoires médicaux en option (dans le cadre de la directive CE sur les dispositifs médicaux 93/42/CEE) Brassard Circonférence du bras comprise entre 22 et 42 cm Transformateur de courant alternatif Brassard confort L-9911729-4 (Modèle : HEM-RML31) Adaptateur S-...
Page 58 - Spécifications
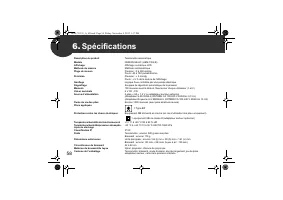
58 6. Spécifications Description du produit Tensiomètre automatique Modèle OMRON M6 AC (HEM-7322-E) Affichage Affichage numérique LCD Méthode de mesure Méthode oscillométrique Plage de mesure Pression : 0 à 299 mmHgPouls : 40 à 180 pulsations/min. Précision Pression : ± 3 mmHg Pouls : ± 5 % de la le...
Page 61 - Garantie
61 FR 7. Garantie Merci d’avoir acheté un produit OMRON. Ce produit est fabriqué à l’aide de matériaux de haute qualité et les plus grands soins ont été apportés à sa fabrication. Il est conçu pour vous apporter toute satisfaction, à condition de l’utiliser et de l’entretenir correctement, conformém...
Page 62 - Informations utiles sur la pression artérielle
62 8. Informations utiles sur la pression artérielle Qu’est-ce que la pression artérielle ? La pression artérielle est une mesure de la pression exercée par le sang sur les parois des artères. La pression artérielle change constamment tout au long du cycle cardiaque. La pression la plus élevée au co...
Page 64 - Inhalt
Inhalt Vielen Dank, dass Sie sich für das automatische Blutdruckmessgerät OMRON M6 AC ent- schieden haben.Das OMRON M6 AC ist ein handliches vollautomatisches Blutdruckmessgerät, das auf dem oszillo- metrischen Prinzip beruht. Es misst Ihren Blutdruck und die Pulsfrequenz einfach und schnell. Für da...
Page 65 - Wichtige Sicherheitsinformationen
65 DE Wichtige Sicherheitsinformationen Warnung: Zeigt eine möglicherweise gefährliche Situation an, die wenn sie nicht vermieden wird, zum Tod oder zu sehr schweren Verletzungen führen kann. (Allgemeine Verwendung) Schwangere, die an Präeklampsie leiden, und Patienten mit diagnostizierter Arrhythmi...
Page 68 - Übersicht über das Messgerät; Messgerät; Öffnen Sie die hintere Umschlagseite, um Folgendes zu lesen:
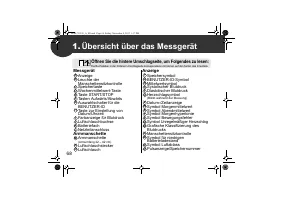
68 1. Übersicht über das Messgerät Messgerät Anzeige Leuchte der Manschettensitzkontrolle Speichertaste Wochenmittelwert-Taste Taste START/STOP Tasten Aufwärts/Abwärts Auswahlschalter für die BENUTZER-ID Taste zur Einstellung von Datum/Uhrzeit Farbanzeige für Blutdruck Luftschlauchbuchse Batteriefac...
Page 69 - Übersicht über das Messgerät; Anzeigesymbole
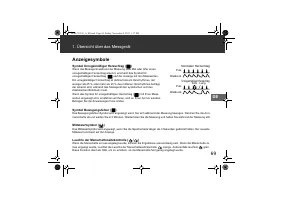
69 1. Übersicht über das Messgerät DE Anzeigesymbole Symbol Unregelmäßiger Herzschlag ( ) Wenn das Messgerät während der Messung zwei Mal oder öfter einen unregelmäßigen Herzschlag erkennt, erscheint das Symbol für unregelmäßigen Herzschlag ( ) auf der Anzeige mit den Messwerten. Ein unregelmäßiger ...
Page 71 - Vorbereitung; Einlegen der Batterien; Anbringen der Batterieabdeckung.
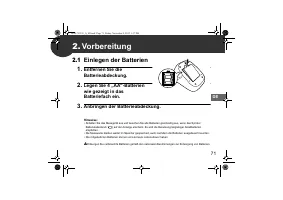
71 DE 2. Vorbereitung 2.1 Einlegen der Batterien 1. Entfernen Sie die Batterieabdeckung. 2. Legen Sie 4 „AA“-Batterien wie gezeigt in das Batteriefach ein. 3. Anbringen der Batterieabdeckung. Hinweise: • Schalten Sie das Messgerät aus und tauschen Sie alle Batterien gleichzeitig aus, wenn das Symbol...
Page 72 - Verwendung des Netzteils
72 2. Vorbereitung 2.2 Verwendung des Netzteils 1. Den Netzteilstecker in den Netzteilanschluss auf der Rückseite des Messgerätes einstecken. 2. Schließen Sie das Netzteil an einer Steckdose an. Zum Trennen des Netzteils sollte zuerst der Netzstecker des Netzteils aus der Steckdose und dann der Netz...
Page 73 - Datum und Uhrzeit einstellen; Drücken Sie die Taste zur Einstellung von Datum/Uhrzeit (; Drücken Sie die Taste oder , um das Jahr zu ändern.; Drücken Sie die Taste START/STOP, um das Messgerät
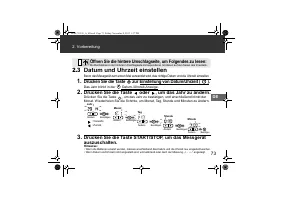
73 2. Vorbereitung DE 2.3 Datum und Uhrzeit einstellen Bevor das Messgerät zum ersten Mal verwendet wird, das richtige Datum und die Uhrzeit einstellen. 1. Drücken Sie die Taste zur Einstellung von Datum/Uhrzeit ( ). Das Jahr blinkt in der Datum-/Uhrzeit-Anzeige. 2. Drücken Sie die Taste oder , um d...
Page 74 - Verwendung des Messgerätes; Anlegen der Armmanschette; Stecken Sie den Luftschlauchstecker; Den Klettverschluss FEST zusammendrücken.
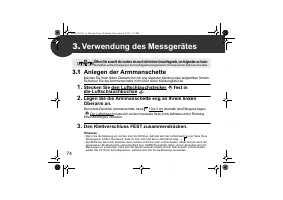
74 3. Verwendung des Messgerätes 3.1 Anlegen der Armmanschette Machen Sie Ihren linken Oberarm frei von eng sitzender Kleidung oder aufgerollten Ärmeln. Schieben Sie die Armmanschette nicht über dicke Kleidungsstücke. 1. Stecken Sie den Luftschlauchstecker fest in die Luftschlauchbuchse . 2. Legen S...
Page 75 - Verwendung des Messgerätes; So sitzen Sie richtig
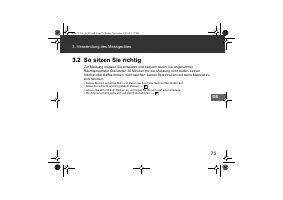
75 3. Verwendung des Messgerätes DE 3.2 So sitzen Sie richtig Zur Messung müssen Sie entspannt und bequem sitzen, bei angenehmer Raumtemperatur. Die letzten 30 Minuten vor der Messung nicht baden, keinen Alkohol oder Kaffee trinken, nicht rauchen, keinen Sport treiben und keine Mahlzeit zu sich nehm...
Page 76 - Eine Messung vornehmen; Wählen Sie Ihre; Wenn Ihr systolischer Druck
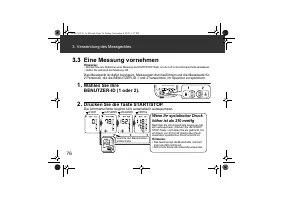
76 3. Verwendung des Messgerätes 3.3 Eine Messung vornehmen Hinweise: • Drücken Sie zum Abbrechen einer Messung die START/STOP-Taste, um die Luft in der Armmanschette abzulassen.• Halten Sie während der Messung still. Das Messgerät ist dafür konzipiert, Messungen durchzuführen und die Messwerte für ...
Page 77 - Nehmen Sie die Armmanschette ab.; Anwendung des Gastmodus; und halten Sie sie mindestens
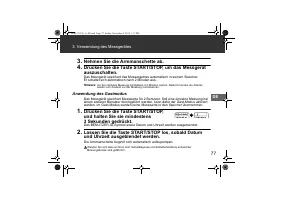
77 3. Verwendung des Messgerätes DE 3. Nehmen Sie die Armmanschette ab. 4. Drücken Sie die Taste START/STOP, um das Messgerät auszuschalten. Das Messgerät speichert das Messergebnis automatisch in seinem Speicher. Er schaltet sich automatisch nach 2 Minuten aus. Hinweis: Vor der nächsten Messung min...
Page 78 - Benutzung der Speicherfunktion; Zur Anzeige der gespeicherten Messwerte; Drücken Sie die Taste .
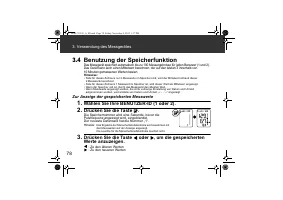
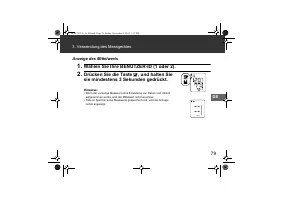
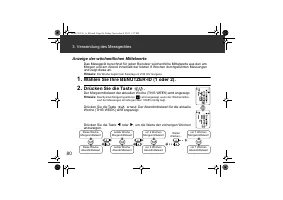
78 3. Verwendung des Messgerätes 3.4 Benutzung der Speicherfunktion Das Messgerät speichert automatisch bis zu 100 Messergebnisse für jeden Benutzer (1 und 2). Das Gerät kann auch einen Mittelwert berechnen, der auf den letzten 3 innerhalb von 10 Minuten gemessenen Werten basiert. Hinweise: • Falls ...
Page 83 - Fehlermeldungen und Fehlersuche und -behebung; Fehlermeldungen und Störungsbehebung
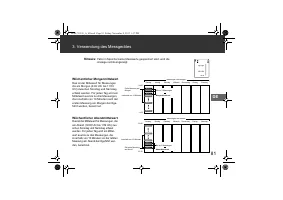
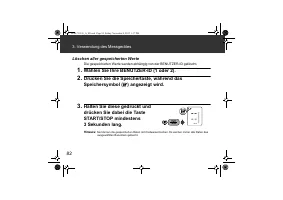
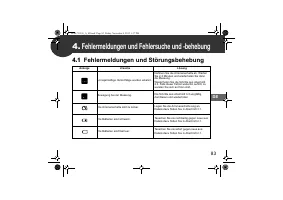
83 DE 4. Fehlermeldungen und Fehlersuche und -behebung 4.1 Fehlermeldungen und Störungsbehebung Anzeige Ursache Lösung Unregelmäßige Herzschläge wurden erkannt. Nehmen Sie die Armmanschette ab. Warten Sie 2-3 Minuten und wiederholen Sie dann die Messung. Wiederholen Sie die Schritte aus Abschnitt 3....
Page 84 - Fehlermeldungen und Fehlersuche und -behebung
84 4. Fehlermeldungen und Fehlersuche und -behebung Luftschlauchstecker hat sich gelöst. Stecken Sie den Luftschlauchstecker fest ein.Details dazu finden Sie in Abschnitt 3.1. Die Armmanschette sitzt zu locker. Legen Sie die Armmanschette eng an.Details dazu finden Sie in Abschnitt 3.1. Die Armmansc...
Page 85 - Fehlersuche und -behebung
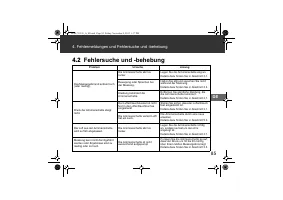
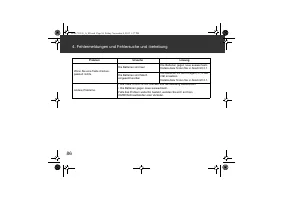
85 4. Fehlermeldungen und Fehlersuche und -behebung DE 4.2 Fehlersuche und -behebung Problem Ursache Lösung Das Messergebnis ist extrem hoch (oder niedrig). Die Armmanschette sitzt zu locker. Legen Sie die Armmanschette eng an. Details dazu finden Sie in Abschnitt 3.1. Bewegung oder Sprechen bei der...
Page 87 - Wartung und Lagerung; Wartung
87 DE 5. Wartung und Lagerung 5.1 Wartung Damit das Messgerät nicht beschädigt wird, bitte Folgendes beachten: • Das Messgerät und seine Komponenten an einem sauberen und sicheren Ort aufbewahren.• Keine Scheuermittel oder flüchtige Reinigungsmittel verwenden. • Das Messgerät und seine Komponenten n...
Page 88 - Wartung und Lagerung; Lagerung
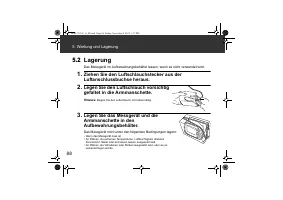
88 5. Wartung und Lagerung 5.2 Lagerung Das Messgerät im Aufbewahrungsbehälter lassen, wenn es nicht verwendet wird. 1. Ziehen Sie den Luftschlauchstecker aus der Luftanschlussbuchse heraus. 2. Legen Sie den Luftschlauch vorsichtig gefaltet in die Armmanschette. Hinweis: Biegen Sie den Luftschlauch ...
Page 89 - Medizinisches optionales Zubehör; Armmanschette
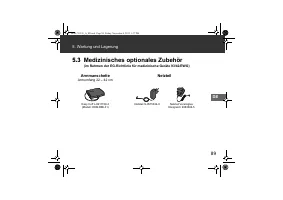
89 5. Wartung und Lagerung DE 5.3 Medizinisches optionales Zubehör (im Rahmen der EG-Richtlinie für medizinische Geräte 93/42/EWG) Armmanschette Armumfang 22 – 42 cm Netzteil Easy Cuff L-9911729-4 (Modell: HEM-RML31) Netzteil S-9515336-9 Netzteil Vereinigtes Königreich 9983666-5 HEM-7322-E_A_M.book ...
Page 90 - Technische Daten
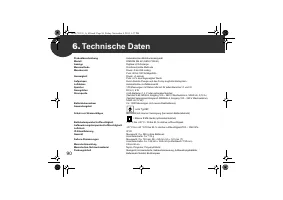
90 6. Technische Daten Produktbeschreibung Automatisches Blutdruckmessgerät Modell OMRON M6 AC (HEM-7322-E) Anzeige Digitale LCD-Anzeige Messmethode Oszillometrische Methode Messbereich Druck: 0 bis 299 mmHg Puls: 40 bis 180 Schläge/Min. Genauigkeit Druck: ± 3 mmHg Puls: ± 5 % des angezeigten Werts ...
Page 93 - Gewährleistung
93 DE 7. Gewährleistung Vielen Dank für den Kauf eines OMRON-Produkts. Diese Produkt wurde aus hochwertigen Materialien und mit großer Sorgfalt hergestellt. Es wurde entwickelt, um Sie voll zufrieden zu stellen, insofern es korrekt betrieben und gewartet wird wie in der Gebrauchsanweisung beschriebe...
Page 94 - Einige nützliche Informationen über den Blutdruck; Warum ist es sinnvoll, den Blutdruck zu Hause zu messen?
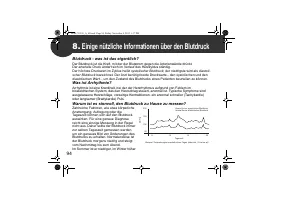
94 8. Einige nützliche Informationen über den Blutdruck Blutdruck - was ist das eigentlich? Der Blutdruck ist die Kraft, mit der der Blutstrom gegen die Arterienwände drückt. Der arterielle Druck ändert sich im Verlauf des Herzzyklus ständig. Der höchste Druckwert im Zyklus heißt systolischer Blutdr...
Page 96 - Indice
Indice Grazie per aver acquistato il misuratore automatico della pressione arteriosa OMRON M6 AC.OMRON M6 AC è un misuratore della pressione arteriosa compatto, completamente automatico, il cui funzionamento si basa sul principio oscillometrico. L’apparecchio misura in modo semplice e rapido la pres...
Page 97 - Informazioni importanti sulla sicurezza
97 IT Informazioni importanti sulla sicurezza Avvertenza: indica una situazione potenzialmente pericolosa che, se non evitata, può causare lesioni gravi o la morte. (Utilizzo generale) Consultare il medico curante prima di utilizzare l’apparecchio in gravidanza (inclusi i casi di preeclampsia) o in ...
Page 100 - Informazioni sul dispositivo; Misuratore
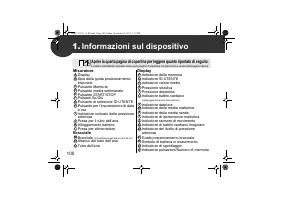
100 1. Informazioni sul dispositivo Misuratore Display Spia della guida posizionamento bracciale Pulsante Memoria Pulsante media settimanale Pulsante START/STOP Pulsanti Su/Giù Pulsante di selezione ID UTENTE Pulsante per l’impostazione di data e ora Indicatore colorato della pressione arteriosa Pre...
Page 101 - Informazioni sul dispositivo; Indicatori visualizzati sul display
101 1. Informazioni sul dispositivo IT Indicatori visualizzati sul display Indicatore di battito cardiaco irregolare ( ) Quando il misuratore rileva un ritmo irregolare per due o più volte durante la misurazione, sul display viene visualizzato l’indicatore di battito cardiaco irregolare ( ), insieme...
Page 103 - Preparativi; Richiudere il coperchio del vano batterie.
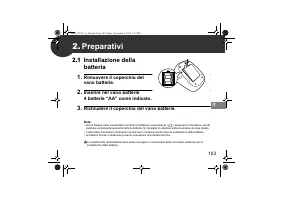
103 IT 2. Preparativi 2.1 Installazione della batteria 1. Rimuovere il coperchio del vano batterie. 2. Inserire nel vano batterie 4 batterie “AA” come indicato. 3. Richiudere il coperchio del vano batterie. Note: • Se sul display viene visualizzato il simbolo di batteria in esaurimento ( ), spegnere...
Page 104 - Uso dell’alimentatore CA
104 2. Preparativi 2.2 Uso dell’alimentatore CA 1. Inserire la spina per l’alimen-tatore CA nella presa per l’ali-mentatore posta sul retro del misuratore. 2. Inserire l’alimentatore CA in una presa elettrica. Per scollegare l’alimentatore CA, estrarlo innanzitutto dalla presa elettrica, quindi rimu...
Page 105 - Impostazione di data e ora; Premere il pulsante per l’impostazione di data e ora (; Premere il pulsante o per cambiare l’anno.; Premere il pulsante START/STOP per spegnere il misuratore.
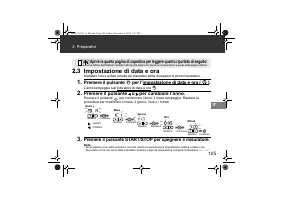
105 2. Preparativi IT 2.3 Impostazione di data e ora Impostare l’ora e la data corrette sul misuratore prima di eseguire la prima misurazione. 1. Premere il pulsante per l’impostazione di data e ora ( ). L’anno lampeggia sull’indicatore di data e ora . 2. Premere il pulsante o per cambiare l’anno. P...
Page 106 - Uso del dispositivo; Applicazione del bracciale; Inserire saldamente l’attacco del tubo dell’aria
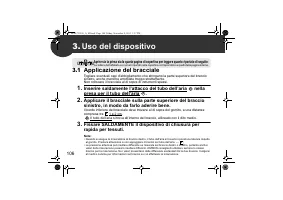
106 3. Uso del dispositivo 3.1 Applicazione del bracciale Togliere eventuali capi d’abbigliamento che stringano la parte superiore del braccio sinistro, anche maniche arrotolate troppo strettamente. Non collocare il bracciale al di sopra di indumenti spessi. 1. Inserire saldamente l’attacco del tubo...
Page 107 - Uso del dispositivo; Come sedersi correttamente
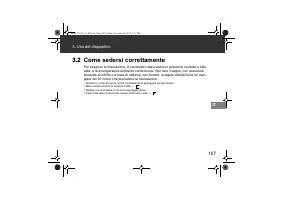
107 3. Uso del dispositivo IT 3.2 Come sedersi correttamente Per eseguire la misurazione, è necessario stare seduti in posizione comoda e rilas-sata, a una temperatura ambiente confortevole. Non fare il bagno, non assumere bevande alcoliche o a base di caffeina, non fumare, svolgere attività fisica ...
Page 108 - Misurazione; Selezionare il proprio ID; Se la pressione sistolica è
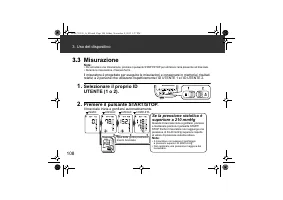
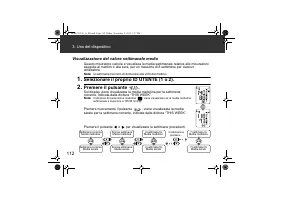
108 3. Uso del dispositivo 3.3 Misurazione Note: • Per annullare una misurazione, premere il pulsante START/STOP per eliminare l’aria presente nel bracciale. • Durante la misurazione, rimanere fermi. Il misuratore è progettato per eseguire le misurazioni e conservare in memoria i risultati relativi ...
Page 109 - Rimuovere il bracciale.; Uso della modalità Ospite; Premere e mantenere premuto per più; Rilasciare il pulsante START/STOP quando l’indicatore
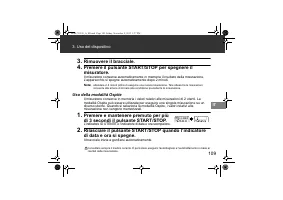
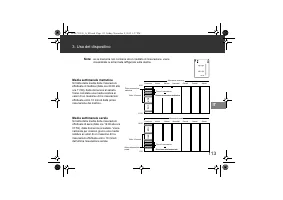
109 3. Uso del dispositivo IT 3. Rimuovere il bracciale. 4. Premere il pulsante START/STOP per spegnere il misuratore. Il misuratore conserva automaticamente in memoria il risultato della misurazione. L’apparecchio si spegne automaticamente dopo 2 minuti. Nota: attendere 2-3 minuti prima di eseguire...
Page 110 - Uso della funzione di memoria; Premere il pulsante .; Premere il pulsante o per visualizzare i valori
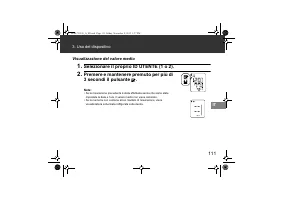
110 3. Uso del dispositivo 3.4 Uso della funzione di memoria Il misuratore conserva automaticamente in memoria un massimo di 100 set di risultati per ciascun utente (1 e 2). Inoltre, il dispositivo calcola un valore medio in base ai risultati delle ultime 3 misurazioni effettuate nell’arco di 10 min...
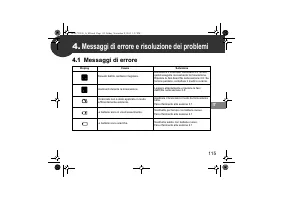
Page 115 - Messaggi di errore e risoluzione dei problemi; Messaggi di errore
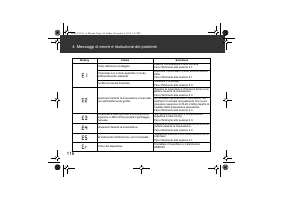
115 IT 4. Messaggi di errore e risoluzione dei problemi 4.1 Messaggi di errore Display Causa Soluzione Rilevato battito cardiaco irregolare. Rimuovere il bracciale. Attendere 2-3 minuti, quindi eseguire nuovamente la misurazione. Ripetere le fasi descritte nella sezione 3.3. Se l’errore persiste, co...
Page 116 - Messaggi di errore e risoluzione dei problemi
116 4. Messaggi di errore e risoluzione dei problemi Il tubo dell’aria è scollegato. Inserire correttamente il tubo dell’aria.Fare riferimento alla sezione 3.1. Il bracciale non è stato applicato in modo sufficientemente aderente. Applicare il bracciale in modo da farlo aderire bene.Fare riferimento...
Page 117 - Risoluzione dei problemi
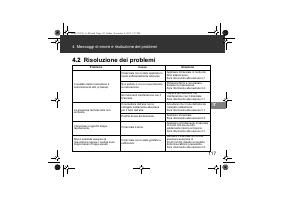
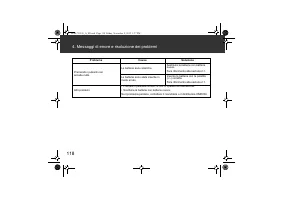
117 4. Messaggi di errore e risoluzione dei problemi IT 4.2 Risoluzione dei problemi Problema Causa Soluzione Il risultato della misurazione è estremamente alto (o basso). Il bracciale non è stato applicato in modo sufficientemente aderente. Applicare il bracciale in modo da farlo aderire bene. Fare...
Page 119 - Manutenzione e conservazione; Manutenzione
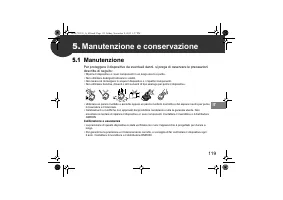
119 IT 5. Manutenzione e conservazione 5.1 Manutenzione Per proteggere il dispositivo da eventuali danni, si prega di osservare le precauzioni descritte di seguito: • Riporre il dispositivo e i suoi componenti in un luogo sicuro e pulito.• Non utilizzare detergenti abrasivi o volatili. • Non lavare ...
Page 120 - Manutenzione e conservazione; Conservazione; Scollegare il tubo dell’aria dalla rispettiva presa.
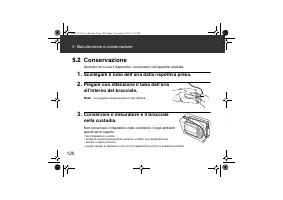
120 5. Manutenzione e conservazione 5.2 Conservazione Quando non si usa il dispositivo, conservarlo nell’apposita custodia. 1. Scollegare il tubo dell’aria dalla rispettiva presa. 2. Piegare con attenzione il tubo dell’aria all’interno del bracciale. Nota: non piegare eccessivamente il tubo dell’ari...
Page 121 - Accessori medicali opzionali; Bracciale; Alimentatore
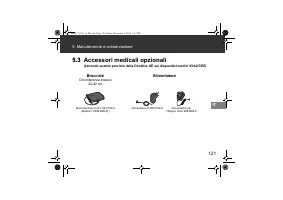
121 5. Manutenzione e conservazione IT 5.3 Accessori medicali opzionali (secondo quanto previsto dalla Direttiva UE sui dispositivi medici 93/42/CEE) Bracciale Circonferenza braccio 22-42 cm Alimentatore Bracciale Easy Cuff L-9911729-4 (Modello: HEM-RML31) Alimentatore S-9515336-9 Alimentatore per i...
Page 122 - Caratteristiche tecniche
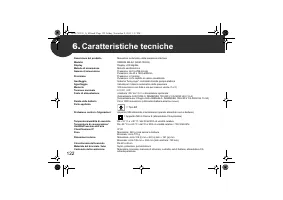
122 6. Caratteristiche tecniche Descrizione del prodotto Misuratore automatico della pressione arteriosa Modello OMRON M6 AC (HEM-7322-E) Display Display LCD digitale Metodo di misurazione Metodo oscillometrico Gamma di misurazione Pressione: da 0 a 299 mmHg Pulsazioni: da 40 a 180 battiti/min. Prec...
Page 123 - Caratteristiche tecniche
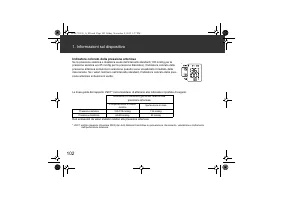
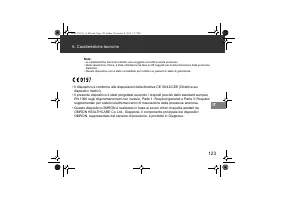
123 6. Caratteristiche tecniche IT Note: • Le caratteristiche tecniche indicate sono soggette a modifica senza preavviso.• Nella valutazione clinica, è stata utilizzata la 5a fase su 85 soggetti per la determinazione della pressione diastolica. • Questo dispositivo non è stato convalidato per l’util...
Page 125 - Garanzia
125 IT 7. Garanzia Grazie per aver acquistato un prodotto OMRON. Questo prodotto è stato costruito impiegando materiali di alta qualità ed è stato realizzato con estrema cura. Il dispositivo è progettato per soddisfare al meglio le esigenze dell’utilizzatore, purché venga usato nel modo corretto e g...
Page 126 - Informazioni utili sulla pressione arteriosa; Che cos’è la pressione arteriosa?; Perché è opportuno misurare in casa la pressione arteriosa?
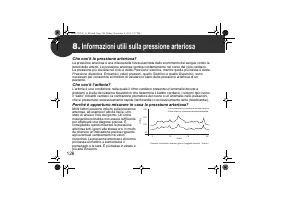
126 8. Informazioni utili sulla pressione arteriosa Che cos’è la pressione arteriosa? La pressione arteriosa è una misura della forza esercitata dallo scorrimento del sangue contro le pareti delle arterie. La pressione arteriosa cambia costantemente nel corso del ciclo cardiaco. La pressione più ele...
Page 127 - cx; Check following compon; Automatic Blood Pressure Monitor; Model M6 AC; Monitor de presión arterial automático; Modelo M6 AC
cx Manufacturer EU-representative OPE B.V. OMRON HEALTHCARE EUROPE B.V. orp, THE NETHERLANDS Scorpius 33, 2132 LR Hoofddorp, THE NETHERLANDSwww.omron-healthcare.com Production facility Üretim Tesisi Site de production Produktionsstätte Stabilimento di produzione Planta de producción Productiefacilit...
Page 128 - Índice
Índice Gracias por comprar el Monitor de presión arterial automático OMRON M6 AC.El OMRON M6 AC es un monitor de presión arterial compacto y totalmente automático cuyo funcionamiento se basa en el principio oscilométrico. Mide la presión arterial y el pulso de manera sencilla y rápida. Gracias a su ...
Page 129 - Información importante sobre la seguridad
129 ES Información importante sobre la seguridad Advertencia: Indica una posible situación de riesgo que, si no se evita, puede provocar la muerte o graves lesiones. (Uso general) Consulte a su médico antes de utilizar el dispositivo en caso de embarazo y de que padezca pre-eclampsia, o en caso de q...
Page 132 - Conozca su dispositivo
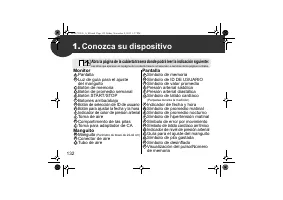
132 1. Conozca su dispositivo Monitor Pantalla Luz de guía para el ajuste del manguito Botón de memoria Botón de promedio semanal Botón START/STOP Botones arriba/abajo Botón de selección de ID de usuario Botón para ajustar la fecha y la hora Indicador de color de presión arterial Toma de aire Compar...
Page 133 - Conozca su dispositivo; Símbolos en pantalla
133 1. Conozca su dispositivo ES Símbolos en pantalla Símbolo de latido cardíaco arrítmico ( ) Cuando el monitor detecta un ritmo irregular dos o más veces durante la medición, aparecerá en la pantalla el símbolo de latido cardíaco arrítmico ( ) junto a los valores de medición. Un ritmo de latido ca...
Page 135 - Preparación; Instalación de las pilas; Retire la tapa de las pilas.
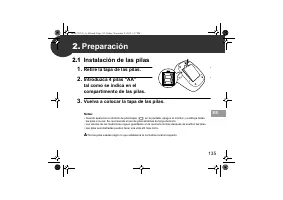
135 ES 2. Preparación 2.1 Instalación de las pilas 1. Retire la tapa de las pilas. 2. Introduzca 4 pilas “AA” tal como se indica en el compartimento de las pilas. 3. Vuelva a colocar la tapa de las pilas. Notas: • Cuando aparezca el símbolo de pilas bajas ( ) en la pantalla, apague el monitor y sust...
Page 136 - Uso del adaptador de CA
136 2. Preparación 2.2 Uso del adaptador de CA 1. Introduzca la clavija del adaptador de CA en la toma del adaptador de CA de la parte posterior del monitor. 2. Enchufe el adaptador de CA en una toma eléctrica. Para desconectar el adaptador de CA, desenchufe primero el adaptador de CA de la toma elé...
Page 137 - Ajuste de la fecha y la hora; Pulse los botones o para cambiar el año.; Pulse el botón START/STOP para apagar el monitor.
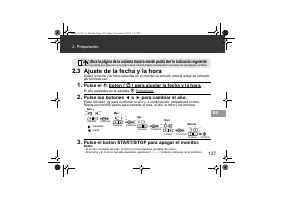
137 2. Preparación ES 2.3 Ajuste de la fecha y la hora Ajuste la fecha y la hora correctas en el monitor de presión arterial antes de utilizarlo por primera vez. 1. Pulse el botón ( ) para ajustar la fecha y la hora. El año parpadea en la pantalla Fecha/Hora. 2. Pulse los botones o para cambiar el a...
Page 138 - Colocación del manguito; Introduzca con firmeza el conector para tubo de aire; Cierre el manguito de tela CON FIRMEZA.
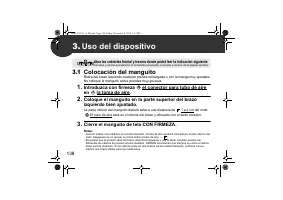
138 3. Uso del dispositivo 3.1 Colocación del manguito Retire del brazo izquierdo cualquier prenda remangada o con la manga muy ajustada. No coloque el manguito sobre prendas muy gruesas. 1. Introduzca con firmeza el conector para tubo de aire en la toma de aire. 2. Coloque el manguito en la parte s...
Page 139 - Cómo sentarse correctamente
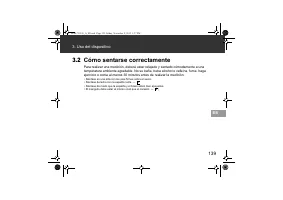
139 3. Uso del dispositivo ES 3.2 Cómo sentarse correctamente Para realizar una medición, deberá estar relajado y sentado cómodamente a una temperatura ambiente agradable. No se bañe, beba alcohol o cafeína, fume, haga ejercicio o coma al menos 30 minutos antes de realizar la medición. • Siéntese en...
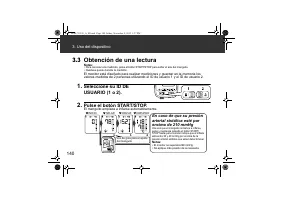
Page 140 - Obtención de una lectura; En caso de que su presión
140 3. Uso del dispositivo 3.3 Obtención de una lectura Notas: • Para cancelar una medición, pulse el botón START/STOP para soltar el aire del manguito. • Quédese quieto durante la medición. El monitor está diseñado para realizar mediciones y guardar en la memoria los valores medidos de 2 personas u...
Page 141 - Uso del modo de invitado
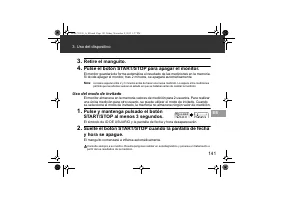
141 3. Uso del dispositivo ES 3. Retire el manguito. 4. Pulse el botón START/STOP para apagar el monitor. El monitor guardará de forma automática el resultado de las mediciones en la memoria. Si olvida apagar el monitor, tras 2 minutos, se apagará automáticamente. Nota: conviene esperar entre 2 y 3 ...
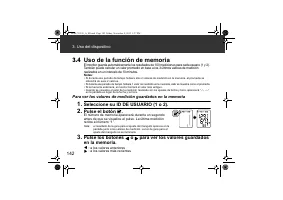
Page 142 - Uso de la función de memoria; Para ver los valores de medición guardados en la memoria; Pulse los botones o para ver los valores guardados
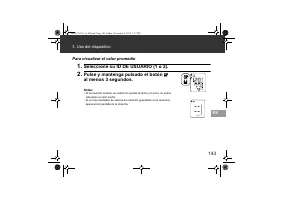
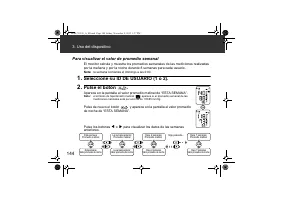
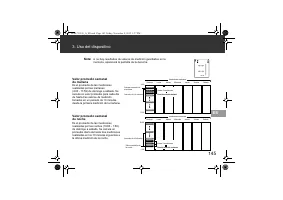
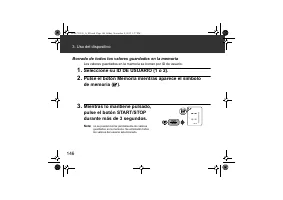
142 3. Uso del dispositivo 3.4 Uso de la función de memoria El monitor guarda automáticamente los resultados de 100 mediciones para cada usuario (1 y 2). También puede calcular un valor promedio en base a los 3 últimos valores de medición realizados en un intervalo de 10 minutos. Notas: • Si durante...
Page 147 - Mensajes de error y resolución de problemas; Mensajes de error
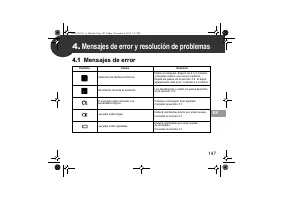
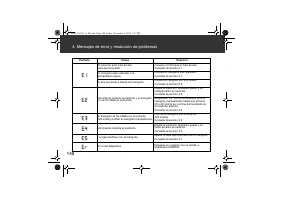
147 ES 4. Mensajes de error y resolución de problemas 4.1 Mensajes de error Pantalla Causa Solución Detección de latidos arrítmicos. Retire el manguito. Espere de 2 a 3 minutos y después realice una nueva medición. Repita los pasos de la sección 3.3. Si sigue apareciendo este error, consulte a su mé...
Page 148 - Mensajes de error y resolución de problemas
148 4. Mensajes de error y resolución de problemas El conector para tubo de aire está desconectado. Conecte con firmeza el tubo de aire.Consulte la sección 3.1. El manguito está colocado con demasiada holgura. Coloque el manguito bien ajustado.Consulte la sección 3.1. El aire se pierde a través del ...
Page 149 - Resolución de problemas
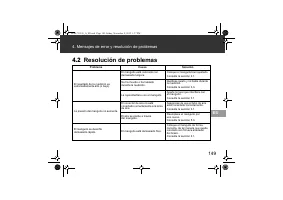
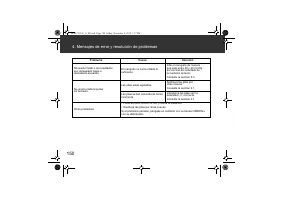
149 4. Mensajes de error y resolución de problemas ES 4.2 Resolución de problemas Problema Causa Solución El resultado de la medición es extremadamente alto (o bajo). El manguito está colocado con demasiada holgura. Coloque el manguito bien ajustado. Consulte la sección 3.1. Se ha movido o ha hablad...
Page 151 - Mantenimiento y conservación; Mantenimiento
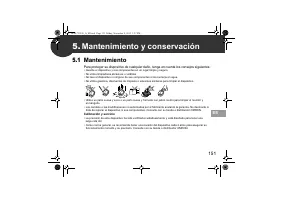
151 ES 5. Mantenimiento y conservación 5.1 Mantenimiento Para proteger su dispositivo de cualquier daño, tenga en cuenta los consejos siguientes: • Guarde el dispositivo y sus componentes en un lugar limpio y seguro.• No utilice limpiadores abrasivos o volátiles. • No lave el dispositivo ni ninguno ...
Page 152 - Mantenimiento y conservación; Conservación; Desconecte el tubo de aire de la toma de aire.
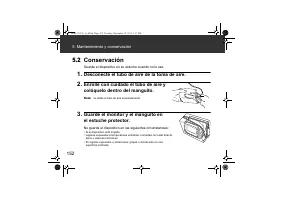
152 5. Mantenimiento y conservación 5.2 Conservación Guarde el dispositivo en su estuche cuando no lo use. 1. Desconecte el tubo de aire de la toma de aire. 2. Enrolle con cuidado el tubo de aire y colóquelo dentro del manguito. Nota: no doble el tubo de aire excesivamente. 3. Guarde el monitor y el...
Page 153 - Accesorios médicos opcionales; Manguito; Adaptador de CA
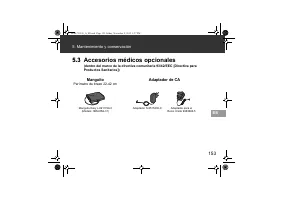
153 5. Mantenimiento y conservación ES 5.3 Accesorios médicos opcionales (dentro del marco de la directiva comunitaria 93/42/EEC [Directiva para Productos Sanitarios]) Manguito Perímetro de brazo 22-42 cm Adaptador de CA Manguito Easy L-9911729-4 (Modelo: HEM-RML31) Adaptador S-9515336-9 Adaptador p...
Page 154 - Especificaciones
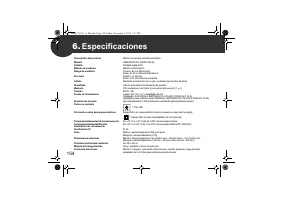
154 6. Especificaciones Descripción del producto Monitor de presión arterial automático Modelo OMRON M6 AC (HEM-7322-E) Pantalla Pantalla digital LCD Método de medición Método oscilométrico Rango de medición Presión: de 0 a 299 mmHg Pulso: de 40 a 180 pulsaciones/min. Precisión Presión: ± 3 mmHg Pul...
Page 157 - Garantía
157 ES 7. Garantía Gracias por adquirir un producto OMRON. Este producto está fabricado con materiales de calidad y su fabricación se ha realizado con total escrupulosidad. Está diseñado para utilizarse en cualquier situación, suponiendo que se manipule correctamente y se realicen las labores de man...
Page 158 - Informaciones útiles acerca de la presión arterial; ¿Qué es la presión arterial?; ¿Por qué es conveniente medir la presión arterial en casa?
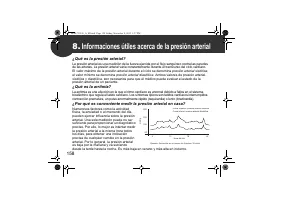
158 8. Informaciones útiles acerca de la presión arterial ¿Qué es la presión arterial? La presión arterial es una medición de la fuerza ejercida por el flujo sanguíneo contra las paredes de las arterias. La presión arterial varía constantemente durante el transcurso del ciclo cardíaco. El valor máxi...
Page 159 - Check following components!; Automatic Bl; Mode
v Fabricante Representante en la UE OMRON HEALTHCARE EUROPE B.V. Scorpius 33, 2132 LR Hoofddorp, PAÍSES BAJOSwww.omron-healthcare.com Planta de producción OMRON HEALTHCARE MANUFACTURING VIETNAM CO., LTD. Binh Duong Province, VIETNAM OMRON HEALTHCARE UK LTD. Opal Drive, Fox Milne, Milton Keynes, MK15...
Page 160 - Inhoud
Inhoud Dank u voor uw aankoop van de OMRON M6 AC automatische bloeddrukmeter.De OMRON M6 AC is een compacte, volledig automatische bloeddrukmeter die werkt vol- gens het oscillometrische principe. De bloeddrukmeter meet de bloeddruk en de hartslag eenvoudig en snel. Het apparaat maakt voor het comfo...
Page 161 - Belangrijke veiligheidsinformatie
161 NL Belangrijke veiligheidsinformatie Waarschuwing: geeft een mogelijk gevaarlijke situatie aan die, wanneer deze niet vermeden wordt, kan leiden tot de dood of tot ernstig letsel. (Algemeen gebruik) Raadpleeg uw arts voordat u het apparaat gebruikt tijdens zwangerschap, inclusief pre-eclampsie, ...
Page 164 - Ken uw apparaat; Meter; Open de achterkaft voor het volgende:
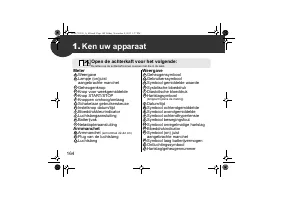
164 1. Ken uw apparaat Meter Weergave Lampje (on)juist aangebrachte manchet Geheugenknop Knop voor weekgemiddelde Knop START/STOP Knoppen omhoog/omlaag Schakelaar gebruikerskeuze Instelknop datum/tijd Bloeddrukkleurindicator Luchtslangaansluiting Batterijvak Netadapteraansluiting Armmanchet Armmanch...
Page 165 - Weergavesymbolen
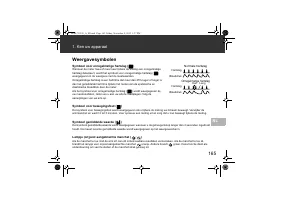
165 1. Ken uw apparaat NL Weergavesymbolen Symbool voor onregelmatige hartslag ( ) Wanneer de meter twee of meer keer tijdens de meting een onregelmatige hartslag detecteert, wordt het symbool voor onregelmatige hartslag ( ) weergegeven in de weergave met de meetwaarden. Onregelmatige hartslag is ee...
Page 167 - Voorbereiding; Batterij plaatsen; Plaats het kapje van batterijvak terug.
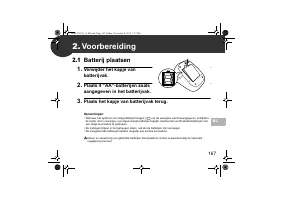
167 NL 2. Voorbereiding 2.1 Batterij plaatsen 1. Verwijder het kapje van batterijvak. 2. Plaats 4 “AA”-batterijen zoals aangegeven in het batterijvak. 3. Plaats het kapje van batterijvak terug. Opmerkingen: • Wanneer het symbool voor laag batterijvermogen ( ) op de weergave wordt weergegeven, schake...
Page 168 - De netadapter gebruiken
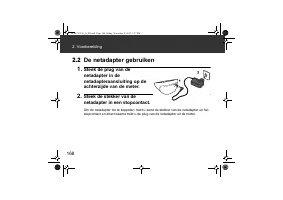
168 2. Voorbereiding 2.2 De netadapter gebruiken 1. Steek de plug van de netadapter in de netadapteraansluiting op de achterzijde van de meter. 2. Steek de stekker van de netadapter in een stopcontact. Om de netadapter los te koppelen, trekt u eerst de stekker van de netadapter uit het stopcontact e...
Page 169 - Datum en tijd instellen; Druk op de knop of om het jaar te wijzigen.; Druk op de knop START/STOP om de meter uit te schakelen.
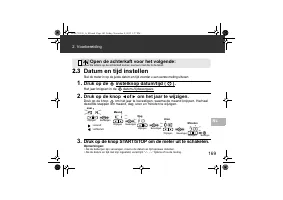
169 2. Voorbereiding NL 2.3 Datum en tijd instellen Stel de meter in op de juiste datum en tijd voordat u een eerste meting uitvoert. 1. Druk op de instelknop datum/tijd ( ). Het jaar knippert in de datum-/tijdweergave. 2. Druk op de knop of om het jaar te wijzigen. Druk op de knop om het jaar te be...
Page 170 - Het apparaat gebruiken; De armmanchet aanbrengen; Steek; Sluit de stoffen sluiting STEVIG.; Open zowel de voor- als achterkaft voor het volgende:
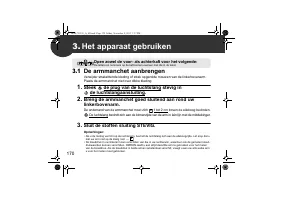
170 3. Het apparaat gebruiken 3.1 De armmanchet aanbrengen Verwijder strakzittende kleding of strak opgerolde mouwen van de linkerbovenarm. Plaats de armmanchet niet over dikke kleding. 1. Steek de plug van de luchtslang stevig in de luchtslangaansluiting. 2. Breng de armmanchet goed sluitend aan ro...
Page 171 - Het apparaat gebruiken; Juiste houding
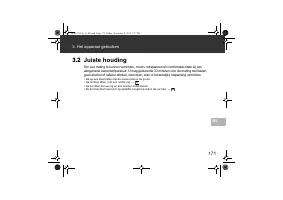
171 3. Het apparaat gebruiken NL 3.2 Juiste houding Om een meting te kunnen verrichten, moet u ontspannen en comfortabel zitten bij een aangename kamertemperatuur. U mag gedurende 30 minuten voor de meting niet baden, geen alcohol of cafeïne drinken, niet roken, eten of lichamelijke inspanning verri...
Page 172 - Een meting verrichten; Selecteer de gebruiker; Als uw systolische druk
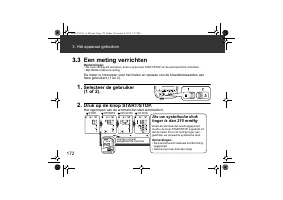
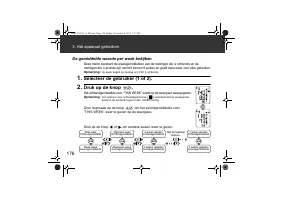
172 3. Het apparaat gebruiken 3.3 Een meting verrichten Opmerkingen: • Als u een meting wilt annuleren, drukt u op de knop START/STOP om de armmanchet te ontluchten. • Blijf stilzitten tijdens de meting. De meter is ontworpen voor het meten en opslaan van de bloeddrukwaarden van twee gebruikers (1 e...
Page 173 - Verwijder de armmanchet.; De gastmodus gebruiken
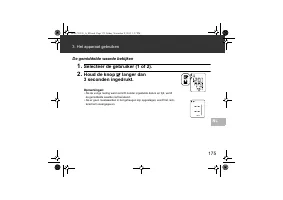
173 3. Het apparaat gebruiken NL 3. Verwijder de armmanchet. 4. Druk op de knop START/STOP om de meter uit te schakelen. Het meetresultaat wordt automatisch in het geheugen van de meter opgeslagen. Na 2 minuten wordt het apparaat automatisch uitgeschakeld. Opmerking: wacht 2-3 minuten en verricht da...
Page 174 - Gebruik van de geheugenfunctie; In het geheugen opgeslagen meetwaarden bekijken; Druk op de knop of om de in het geheugen
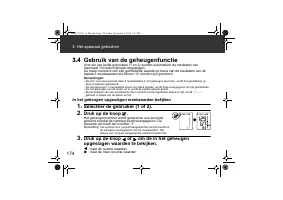
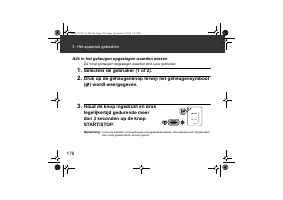
174 3. Het apparaat gebruiken 3.4 Gebruik van de geheugenfunctie Voor elk van beide gebruikers (1 en 2) worden automatisch de resultaten van maximaal 100 sets metingen opgeslagen. De meter berekent ook een gemiddelde waarde op basis van de resultaten van de laatste 3 meetwaarden die binnen 10 minute...
Page 179 - Foutmeldingen en problemen oplossen; Foutmeldingen
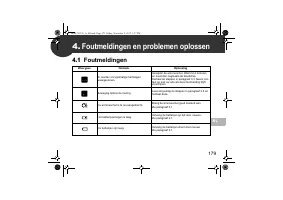
179 NL 4. Foutmeldingen en problemen oplossen 4.1 Foutmeldingen Weergave Oorzaak Oplossing Er worden onregelmatige hartslagen waargenomen. Verwijder de armmanchet. Wacht 2-3 minuten en meet dan nogmaals de bloeddruk. Herhaal de stappen in paragraaf 3.3. Neem con- tact op met uw arts als deze foutmel...
Page 180 - Foutmeldingen en problemen oplossen
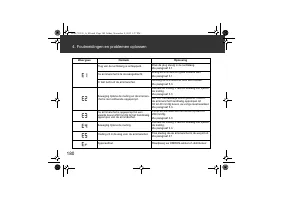
180 4. Foutmeldingen en problemen oplossen Plug van de luchtslang is ontkoppeld. Druk de plug stevig in de luchtslang.Zie paragraaf 3.1. De armmanchet is te los aangebracht. Breng de armmanchet goed sluitend aan.Zie paragraaf 3.1. Er lekt lucht uit de armmanchet. Vervang de armmanchet door een nieuw...
Page 181 - Problemen oplossen
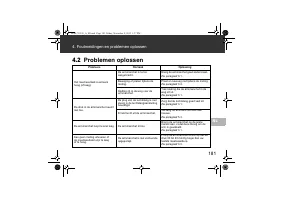
181 4. Foutmeldingen en problemen oplossen NL 4.2 Problemen oplossen Probleem Oorzaak Oplossing Het meetresultaat is extreem hoog (of laag). De armmanchet is te los aangebracht. Breng de armmanchet goed sluitend aan. Zie paragraaf 3.1. Beweging of praten tijdens de meting. Praat en beweeg niet tijde...
Page 183 - Opslag en onderhoud; Onderhoud
183 NL 5. Opslag en onderhoud 5.1 Onderhoud Neem onderstaande voorzorgsmaatregelen in acht om beschadiging van het apparaat te voorkomen: • Bewaar het apparaat en de componenten op een schone plaats.• Gebruik geen schurende of vluchtige reinigingsmiddelen. • Was het apparaat en de componenten niet e...
Page 184 - Opslag en onderhoud; Opslag; Koppel de luchtslang los van de luchtslangaansluiting.
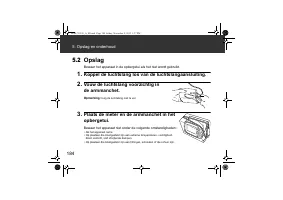
184 5. Opslag en onderhoud 5.2 Opslag Bewaar het apparaat in de opbergetui als het niet wordt gebruikt. 1. Koppel de luchtslang los van de luchtslangaansluiting. 2. Vouw de luchtslang voorzichtig in de armmanchet. Opmerking: buig de luchtslang niet te ver. 3. Plaats de meter en de armmanchet in het ...
Page 185 - Optionele medische accessoires; Armmanchet
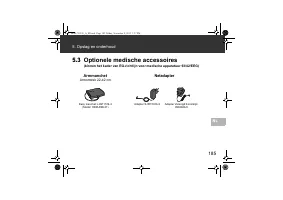
185 5. Opslag en onderhoud NL 5.3 Optionele medische accessoires (binnen het kader van EG-richtlijn voor medische apparatuur 93/42/EEG) Armmanchet Armomtrek 22-42 cm Netadapter Easy manchet L-9911729-4 (Model: HEM-RML31) Adapter S-9515336-9 Adapter Verenigd Koninkrijk 9983666-5 HEM-7322-E_A_M.book P...
Page 186 - Specificaties
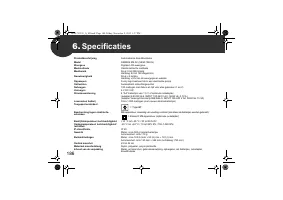
186 6. Specificaties Productbeschrijving Automatische bloeddrukmeter Model OMRON M6 AC (HEM-7322-E) Weergave Digitale LCD-weergave Meetmethode Oscillometrische methode Meetbereik Druk: 0 tot 299 mmHg Hartslag: 40 tot 180 slagen/min. Nauwkeurigheid Druk: ± 3 mmHg Hartslag: ± 5% van de weergegeven waa...
Page 190 - Nuttige informatie over bloeddruk; Waarom is het goed om de bloeddruk thuis te meten?
190 8. Nuttige informatie over bloeddruk Wat is bloeddruk? Bloeddruk is de druk van het bloed op de slagaderwand. Arteriële bloeddruk verandert voort-durend tijdens de hartcyclus. De hoogste bloeddruk in deze cyclus wordt de systolische bloeddruk genoemd; de laagste is de diastolische bloeddruk . Zo...
Page 192 - Содержание
Содержание Благодарим Вас за приобретение автоматического измерителя артериального давления и частоты пульса OMRON M6 AC. OMRON M6 AC — это компактный , полностью автоматический измеритель артериального давления и частоты пульса , работающий на основе осциллометрического метода . Он легко и быстро и...
Page 196 - Электронный
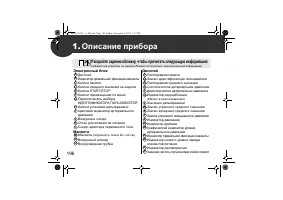
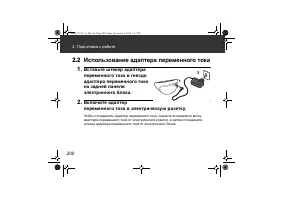
196 1. Описание прибора Электронный блок ДисплейИндикатор правильной фиксации манжеты Кнопка памяти Кнопка среднего значения за неделю Кнопка START/STOP Кнопки перемещения по меню Переключатель выбора ИДЕНТИФИКАТОРА ПОЛЬЗОВАТЕЛЯ Кнопка установки даты / времени Цветовой индикатор артериального давлен...
Page 197 - Индикаторы
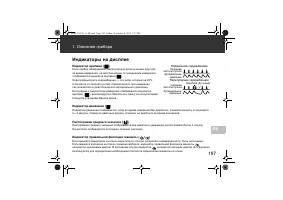
197 1. Описание прибора RU Индикаторы на дисплее Индикатор аритмии ( ) Если прибор обнаруживает нерегулярный ритм не менее двух раз за время измерения , на дисплее рядом со значениями измерения отображается индикатор аритмии ( ). Нерегулярный ритм сердцебиения — это ритм , который на 25% отличается ...
Page 199 - Установка; «AA»
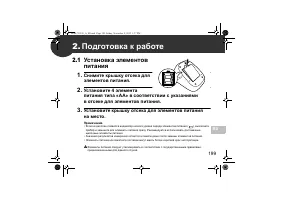
199 RU 2. Подготовка к работе 2.1 Установка элементов питания 1. Снимите крышку отсека для элементов питания . 2. Установите 4 элемента питания типа «AA» в соответствии с указаниями в отсеке для элементов питания . 3. Установите крышку отсека для элементов питания на место . Примечания . • Если на д...
Page 201 - Подготовка к работе; Раскройте заднюю обложку
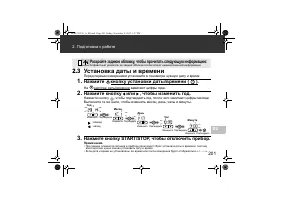
201 2. Подготовка к работе RU 2.3 Установка даты и времени Перед первым измерением установите в тонометре нужную дату и время . 1. Нажмите кнопку установки даты / времени ( ). На дисплее даты / времени замигают цифры года . 2. Нажмите кнопку или , чтобы изменить год . Нажмите кнопку , чтобы подтверд...
Page 202 - Расположение
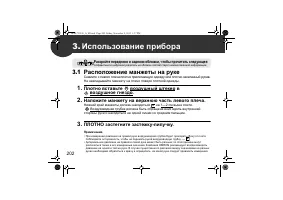
202 3. Использование прибора 3.1 Расположение манжеты на руке Снимите с левого плеча плотно прилегающую одежду или плотно закатанный рукав . Не накладывайте манжету на плечо поверх плотной одежды . 1. Плотно вставьте воздушный штекер в воздушное гнездо . 2. Наложите манжету на верхнюю часть левого п...
Page 203 - Правильная
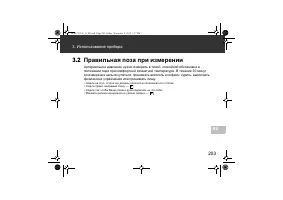
203 3. Использование прибора RU 3.2 Правильная поза при измерении Артериальное давление нужно измерять в тихой , спокойной обстановке в положении сидя при комфортной комнатной температуре . В течение 30 минут до измерения нельзя купаться , принимать алкоголь и кофеин , курить , выполнять физические ...
Page 204 - Выполнение
204 3. Использование прибора 3.3 Выполнение измерений Примечания . • Для отмены измерения нажмите кнопку START/STOP, чтобы выпустить воздух из манжеты . • Не двигайтесь во время измерения . Прибор выполняет измерения и хранит в памяти результаты для 2 пользователей , которым присваиваются ИДЕНТИФИКА...
Page 205 - Гостевой
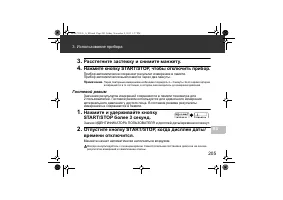
205 3. Использование прибора RU 3. Расстегните застежку и снимите манжету . 4. Нажмите кнопку START/STOP, чтобы отключить прибор . Прибор автоматически сохраняет результат измерения в памяти . Прибор автоматически выключается через две минуты . Примечание . Перед повторным измерением необходимо подо...
Page 206 - Просмотр
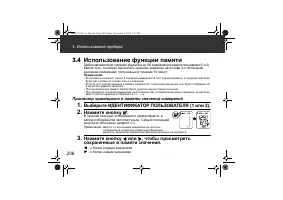
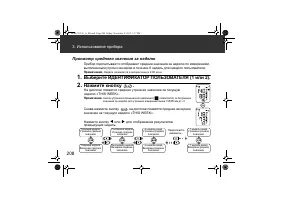
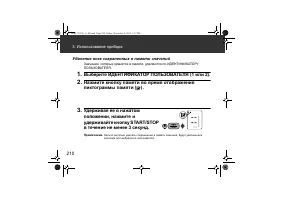
206 3. Использование прибора 3.4 Использование функции памяти Прибор автоматически сохраняет результаты до 100 измерений для каждого пользователя (1 и 2). Кроме того , он может вычислять среднее значение на основе 3- х последних значений измерений , полученных в течение 10 минут . Примечания . • Есл...
Page 209 - Использование прибора
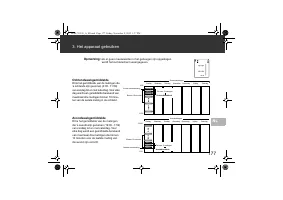
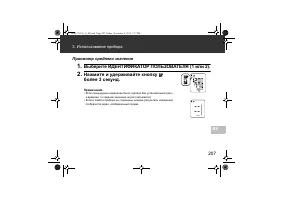
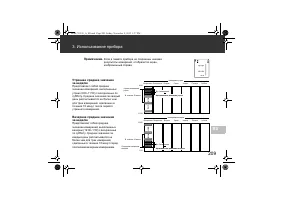
209 3. Использование прибора RU Примечание . Если в памяти прибора не сохранены никакие результаты измерений , отобразится экран , изображенный справа . Утреннее среднее значение за неделю Представляет собой среднее значение измерений , выполненных утром (4:00–11:59) с воскресенья по субботу . Средн...
Page 211 - Значки
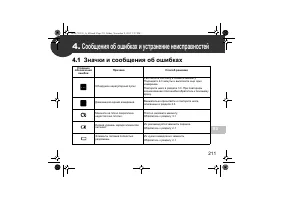
211 RU 4. Сообщения об ошибках и устранение неисправностей 4.1 Значки и сообщения об ошибках Условное обозначение ошибки Причина Способ решения Обнаружен нерегулярный пульс . Расстегните застежку и снимите манжету . Подождите 2-3 минуты и выполните еще одно измерение . Повторите шаги в разделе 3.3. ...
Page 213 - Поиск
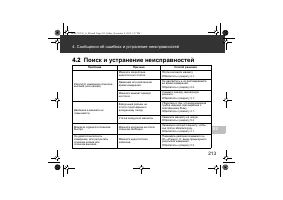
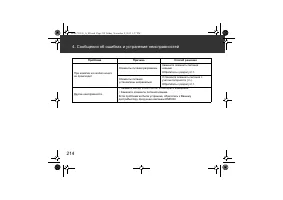
213 4. Сообщения об ошибках и устранение неисправностей RU 4.2 Поиск и устранение неисправностей Проблема Причина Способ решения Результат измерения слишком высокий ( или низкий ). Манжета закреплена недостаточно плотно . Плотно наложите манжету . Обратитесь к разделу 3.1. Движение или разговор во в...
Page 215 - Уход
215 RU 5. Уход и хранение 5.1 Уход Соблюдайте следующие правила для защиты прибора от повреждений : • Храните прибор и его компоненты в чистом и безопасном месте . • Не используйте абразивные или легко испаряющиеся чистящие средства . • Не мойте прибор и какие - либо его компоненты , и не погружайте...
Page 216 - Хранение
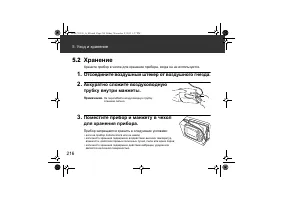
216 5. Уход и хранение 5.2 Хранение Храните прибор в чехле для хранения прибора , когда он не используется . 1. Отсоедините воздушный штекер от воздушного гнезда . 2. Аккуратно сложите воздуховодную трубку внутри манжеты . Примечание . Не перегибайте воздуховодную трубку слишком сильно . 3. Поместит...
Page 217 - Вспомогательные; Манжета; Адаптер
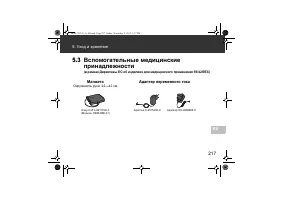
217 5. Уход и хранение RU 5.3 Вспомогательные медицинские принадлежности ( в рамках Директивы ЕС об изделиях для медицинского применения 93/42/EEC) Манжета Окружность руки : 22—42 см Адаптер переменного тока Easy Cuff L-9911729-4 ( Модель : HEM-RML31) Адаптер S-9515336-9 Адаптер UK-9983666-5 HEM-732...
Page 221 - Гарантия
221 RU 7. Гарантия Благодарим за приобретение изделия компании OMRON. Этот прибор изготовлен из высококачественных материалов с предельной осторожностью . Он способен удовлетворить любые Ваши потребности при условии надлежащей эксплуатации и технического обслуживания в соответствии с руководством по...
Page 224 - çindekiler
İ çindekiler OMRON M6 AC Otomatik Kan Bas ı nc ı Ölçüm Aleti'ni sat ı n ald ı ğ ı n ı z için te ş ekkür ederiz. OMRON M6 AC, osilometrik prensiple çal ı ş an kompakt ve tam otomatik bir kan bas ı nc ı ölçüm cihaz ı d ı r. Kan bas ı nc ı ve nab ı z oran ı n ı z ı kolay ve h ı zl ı bir ş ekilde ölçer....
Page 225 - Önemli Güvenlik Bilgileri
225 TR Önemli Güvenlik Bilgileri Uyar ı : Önlenmedi ğ inde ölüme ya da ciddi yaralanmaya neden olabilecek potansiyel bir tehlike durumunu belirtir. (Genel Kullan ı m) Preeklampsi de dahil olmak üzere hamilelikte veya Aritmi ya da arteriyoskleroz te ş hisi konulmu ş sa, cihaz ı kullanmadan önce dokto...
Page 228 - Ölçüm Cihaz; İĞİ; Kolluk; dakileri okumak için arka kapak sayfas
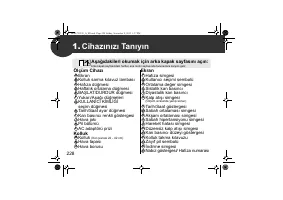
228 1. Cihaz ı n ı z ı Tan ı y ı n Ölçüm Cihaz ı Ekran Kolluk sarma k ı lavuz lambas ı Haf ı za dü ğ mesi Haftal ı k ortalama dü ğ mesi BA Ş LAT/DURDUR dü ğ mesi Yukar ı /A ş a ğ ı dü ğ meleri KULLANICI K İ ML İĞİ seçim dü ğ mesi Tarih/Saat ayar dü ğ mesi Kan bas ı nc ı renkli göstergesi Hava jak ı ...
Page 229 - Tan; Ekran Sembolleri
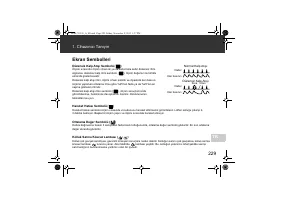
229 1. Cihaz ı n ı z ı Tan ı y ı n TR Ekran Sembolleri Düzensiz Kalp At ı ş ı Sembolü ( ) Ölçüm s ı ras ı nda ölçüm cihaz ı iki ya da daha fazla sefer düzensiz ritim alg ı larsa, düzensiz kalp ritmi sembolü ( ), ölçüm de ğ erleri ile birlikte ekranda gösterilecektir. Düzensiz kalp at ı ş ı ritmi, öl...
Page 231 - Pilin Tak
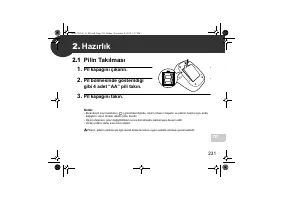
231 TR 2. Haz ı rl ı k 2.1 Pilin Tak ı lmas ı 1. Pil kapa ğ ı n ı ç ı kar ı n. 2. Pil bölmesinde gösterildi ğ i gibi 4 adet “AA” pili tak ı n. 3. Pil kapa ğ ı n ı tak ı n. Notlar: • Ekranda pil zay ı f sembolü ( ) görüntülendi ğ inde, ölçüm cihaz ı n ı kapat ı n ve pillerin hepsini ayn ı anda de ğ i...
Page 232 - rl; AC Adaptörünün Kullan
232 2. Haz ı rl ı k 2.2 AC Adaptörünün Kullan ı lmas ı 1. AC adaptörü fi ş ini ölçüm cihaz ı n ı n arkas ı ndaki AC adaptörü jak ı na tak ı n. 2. AC adaptörü fi ş ini bir elektrik prizine tak ı n. AC adaptörünü ç ı karmak için önce AC adaptörünün fi ş ini elektrik prizinden, sonra AC adaptörünü ölçü...
Page 233 - Tarih ve Saatin Ayarlanmas
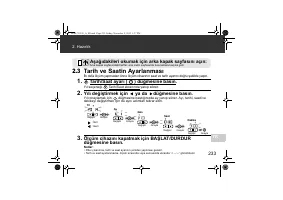
233 2. Haz ı rl ı k TR 2.3 Tarih ve Saatin Ayarlanmas ı İ lk defa ölçüm yapmadan önce ölçüm cihaz ı n ı n saat ve tarih ayar ı n ı do ğ ru ş ekilde yap ı n. 1. Tarih/Saat ayar ı ( ) dü ğ mesine bas ı n. Y ı l seçene ğ i Tarih/Saat ekran ı nda yan ı p söner. 2. Y ı l ı de ğ i ş tirmek için ya da dü ğ...
Page 234 - Kollu; dakileri okumak için ön ve arka kapa
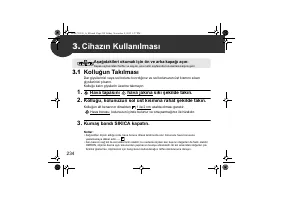
234 3. Cihaz ı n Kullan ı lmas ı 3.1 Kollu ğ un Tak ı lmas ı Dar giysilerinizi veya sol kolunu k ı v ı rd ı ğ ı n ı z ve sol kolunuzun üst k ı sm ı n ı s ı kan giysilerinizi ç ı kar ı n. Kollu ğ u kal ı n giysilerin üzerine takmay ı n. 1. Hava tapas ı n ı hava jak ı na s ı k ı ş ekilde tak ı n. 2. K...
Page 235 - Do
235 3. Cihaz ı n Kullan ı lmas ı TR 3.2 Do ğ ru Oturma Yöntemi Bir ölçüm yapmak için, uygun oda s ı cakl ı ğ ı nda rahat ve konforlu bir ş ekilde oturmu ş olman ı z gerekmektedir. Bir ölçüm yapmadan önceki 30 dakika içinde banyo yapmamak, alkol ya da kafein almamak, egzersiz yapmamak veya yemek yeme...
Page 236 - Bir Ölçüm Yapma; Kullan; Sistolik bas
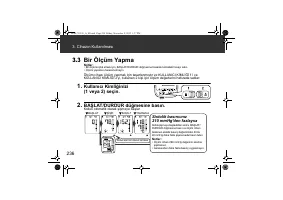
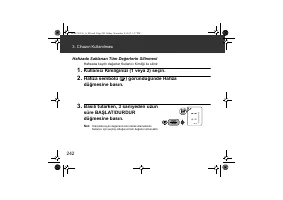
236 3. Cihaz ı n Kullan ı lmas ı 3.3 Bir Ölçüm Yapma Notlar: • Bir ölçümü iptal etmek için, BA Ş LAT/DURDUR dü ğ mesine basarak kolluktaki havay ı sal ı n. • Ölçüm yaparken hareket etmeyin. Ölçüm cihaz ı ölçüm yapmak için tasarlanm ı ş t ı r ve KULLANICI K İ ML İĞİ 1'i ve KULLANICI K İ ML İĞİ 2'yi, ...
Page 238 - Haf
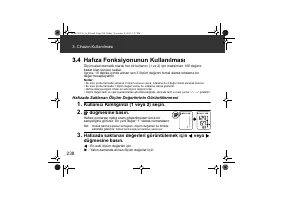
238 3. Cihaz ı n Kullan ı lmas ı 3.4 Haf ı za Fonksiyonunun Kullan ı lmas ı Ölçüm aleti otomatik olarak her bir kullan ı c ı (1 ve 2) için maksimum 100 de ğ ere kadar olan sonucu saklar. Ayr ı ca, 10 dakika içinde al ı nan son 3 ölçüm de ğ erini temel alarak ortalama bir de ğ er hesaplayabilir. Notl...
Page 243 - Hata Mesajlar
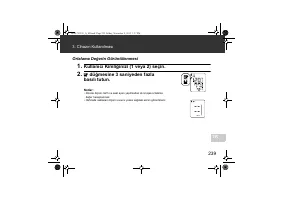
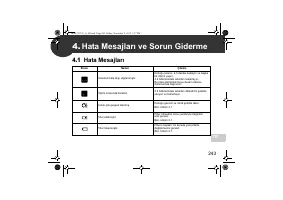
243 TR 4. Hata Mesajlar ı ve Sorun Giderme 4.1 Hata Mesajlar ı Ekran Neden Çözüm Düzensiz kalp at ı ş ı alg ı lanm ı ş t ı r. Kollu ğ u ç ı kar ı n. 2-3 dakika bekleyin ve ba ş ka bir ölçüm yap ı n. 3.3 bölümündeki ad ı mlar ı tekrarlay ı n. Bu hata görüntülenmeye devam ederse doktorunuza ba ş vurun...
Page 244 - ve Sorun Giderme
244 4. Hata Mesajlar ı ve Sorun Giderme Hava tapas ı ç ı km ı ş . Hava tapas ı n ı sa ğ lam ş ekilde tak ı n. Bkz. bölüm 3.1. Kolluk çok gev ş ek tak ı lm ı ş . Kollu ğ u güvenli ve rahat ş ekilde tak ı n. Bkz. bölüm 3.1. Kolluktan hava s ı z ı nt ı s ı var. Kollu ğ u yenisiyle de ğ i ş tirin. Bkz. ...
Page 245 - Sorun Giderme
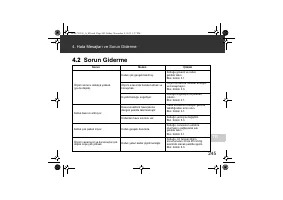
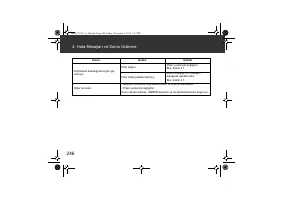
245 4. Hata Mesajlar ı ve Sorun Giderme TR 4.2 Sorun Giderme Sorun Neden Çözüm Ölçüm sonucu oldukça yüksek (ya da dü ş ük). Kolluk çok gev ş ek tak ı lm ı ş . Kollu ğ u güvenli ve rahat ş ekilde tak ı n. Bkz. bölüm 3.1. Ölçüm s ı ras ı nda hareket etmek ve konu ş mak. Ölçüm s ı ras ı nda hareket etm...
Page 247 - Bak
247 TR 5. Bak ı m ve Saklama 5.1 Bak ı m Cihaz ı n ı z ı n zarar görmemesi için a ş a ğ ı daki aç ı klamalara uyun: • Cihaz ı ve bile ş enleri temiz, güvenli bir yerde saklay ı n. • A ş ı nd ı r ı c ı ya da uçucu olmayan temizleyicileri kullanmay ı n. • Cihaz ı ya da herhangi bir bile ş eni y ı kama...
Page 248 - m ve Saklama; Saklama
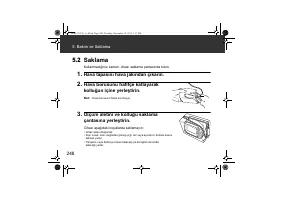
248 5. Bak ı m ve Saklama 5.2 Saklama Kullanmad ı ğ ı n ı z zaman, cihaz ı saklama çantas ı nda tutun. 1. Hava tapas ı n ı hava jak ı ndan ç ı kar ı n. 2. Hava borusunu hafifçe katlayarak kollu ğ un içine yerle ş tirin. Not: Hava borusunu fazla k ı v ı rmay ı n. 3. Ölçüm aletini ve kollu ğ u saklama...
Page 249 - Opsiyonel T
249 5. Bak ı m ve Saklama TR 5.3 Opsiyonel T ı bbi Aksesuarlar (EC T ı bbi Cihaz Direktifi 93/42/EEC kapsam ı dahilinde) Kolluk Kol çevresi 22 - 42 cm AC adaptörü Easy Cuff L-9911729-4 (Model: HEM-RML31) Adaptör S-9515336-9 İ ngiltere Adaptörü 9983666-5 HEM-7322-E_A_M.book Page 249 Friday, November ...
Page 250 - Özellikler
250 6. Özellikler Ürün tan ı m ı Otomatik Kan Bas ı nc ı Ölçüm Aleti Model OMRON M6 AC (HEM-7322-E) Ekran LCD dijital ekran Ölçüm metodu Osilometrik metot Ölçüm aral ı ğ ı Bas ı nç: 0 - 299 mmHg Nab ı z: 40 - 180 at ı ş / dak. Do ğ ruluk Bas ı nç: ± 3 mmHg Nab ı z: ± görüntülenen de ğ erin %5'i Ş i ...
Page 253 - Garanti
253 TR 7. Garanti Bir OMRON ürünü sat ı n ald ı ğ ı n ı z için te ş ekkür ederiz. Bu ürün yüksek kaliteli malzemelerden üretilmi ş ve üretimi s ı ras ı nda büyük dikkat gösterilmi ş tir. Kullan ı m k ı lavuzunda belirtildi ğ i gibi kullan ı m ı ve bak ı m ı yap ı ld ı ğ ı sürece sizi memnun edecek ş...
Page 256 - نامضلا
۲۹ ﻡﺎﺗﻟﺍ ﺎﺿﺭﻟﺍ ﻙﺣﻧﻣﻳﻟ ﻡﻣﺻﻣ ﻭﻫﻭ . ﻪﻌﻳﻧﺻﺗ ﻲﻓ ﺔﻐﻟﺎﺑﻟﺍ ﺔﻳﺎﻧﻌﻟﺍ ﺓﺎﻋﺍﺭﻣ ﻊﻣ ﺓﺩﻭﺟﻟﺍ ﺔﻳﻟﺎﻋ ﺩﺍﻭﻣ ﻥﻣ ﺞﺗﻧﻣﻟﺍ ﺍﺫﻫ ﻊﻳﻧﺻﺗ ﻡﺗ ﺩﻘﻟ .OMRON ﺕﺎﺟﺗﻧﻣ ﺩﺣﺃ ءﺍﺭﺷ ﻰﻠﻋ ﻙﺭﻛﺷﻧ . ﺕﺍﺩﺎﺷﺭﻹﺍ ﻝﻳﻟﺩ ﻲﻓ ﺢﺿﻭﻣﻟﺍ ﻭﺣﻧﻟﺍ ﻰﻠﻋﻭ ﻡﻳﻠﺳ ﻝﻛﺷﺑ ﻪﺗﻧﺎﻳﺻﻭ ﻪﻠﻳﻐﺷﺗ ﻁﺭﺷﺑ ﻡﻭﻘﺗﺳ ،ﻥﺎﻣﺿﻟﺍ ﺓﺭﺗﻓ ﻝﻼﺧﻭ . ﺞﺗﻧﻣﻟﺍ ﺍﺫﻬﻟ ﺔﻣﺋﻼﻣﻟﺍ ﺩﺍﻭﻣﻟﺍﻭ ،ﺔﻟﺎﻣﻌﻟﺍﻭ ،ﻊﻳﻧﺻﺗﻟﺍ OMRON ﻥﻣﺿﺗﻭ ....
Page 257 - تافصاوملا
۲۸ AR ﺕﺎﻔﺻﺍﻭﻣﻟﺍ . ٦ (EMC) ﻲﺳﻳﻁﺎﻧﻐﻣﻭﺭﻬﻛﻟﺍ ﻕﻓﺍﻭﺗﻟﺍ ﻥﻋ ﺔﻣﺎﻫ ﺕﺎﻣﻭﻠﻌﻣ ﻝﺧﺍﺩﺗﻠﻟ ﻡﺍﺩﺧﺗﺳﻻﺍ ﺩﻳﻗ ﺔﻳﺑﻁﻟﺍ ﺓﺯﻬﺟﻷﺍ ﺽﺭﻌﺗﺗ ﺩﻗ ، ( ﺔﻳﻭﻠﺧﻟﺍ ) ﺔﻟﻭﻣﺣﻣﻟﺍ ﻑﺗﺍﻭﻬﻟﺍﻭ ﺔﻳﺻﺧﺷﻟﺍ ﺏﺳﺍﻭﺣﻟﺍ ﻝﺛﻣ ﺔﻳﻧﻭﺭﺗﻛﻟﻹﺍ ﺓﺯﻬﺟﻷﺍ ﺩﺩﻋ ﻲﻓ ﺓﺩﺭﻁﻣﻟﺍ ﺓﺩﺎﻳﺯﻟﺍ ﻊﻣ ﺙﻭﺩﺣ ﺔﻳﻟﺎﻣﺗﺣﺍ ﻙﻟﺫ ﻥﻋ ﺞﺗﻧﻳ ﺩﻗﻭ ﺔﺣﻳﺣﺻ ﺭﻳﻏ ﺓﺭﻭﺻﺑ ﻲﺑﻁﻟﺍ ﺯﺎﻬﺟﻟﺍ ﻝﻣﻋ ﻰﻟﺇ ﻲﺳﻳﻁﺎﻧﻐﻣﻭﺭﻬﻛﻟﺍ ﻝﺧﺍﺩﺗﻟﺍ ﻱﺩﺅﻳ ...
Page 260 - ةيرايتخلاا
۲٥ ﻥﻳﺯﺧﺗﻟﺍﻭ ﺔﻧﺎﻳﺻﻟﺍ . ٥ ﺔﻳﺭﺎﻳﺗﺧﻻﺍ ﺔﻳﺑﻁﻟﺍ ﺕﺎﻘﺣﻠﻣﻟﺍ ۳ - ٥ (93/42/EEC ﻲﺑﻭﺭﻭﻷﺍ ﺩﺎﺣﺗﻻﺍ ﻥﻋ ﺓﺭﺩﺎﺻﻟﺍ ﺔﻳﺑﻁﻟﺍ ﺓﺯﻬﺟﻷﺍ ﻪﻳﺟﻭﺗ ﺭﻳﻳﺎﻌﻣﻟ ﻊﺿﺧﺗ ) ﻉﺍﺭﺫﻠﻟ ﻁﻏﺎﺿﻟﺍ ﻁﻳﺭﺷﻟﺍ ﻡﺳ ٤۲ - ۲۲ ﻉﺍﺭﺫﻟﺍ ﻁﻳﺣﻣ ﺩﺩﺭﺗﻣﻟﺍ ﺭﺎﻳﺗﻟﺍ ﺊﻳﺎﻬﻣ Easy Cuff L-9911729-4 (HEM-RML31 : ﺯﺍﺭﻁﻟﺍ ) S-9515336-9 ﺯﺍﺭﻁ ﺊﻳﺎﻬﻣ UK-9983666-5 ﺊﻳﺎﻬﻣ HEM-7322-E_A_M_AR.ind...
Page 261 - نيزختلا
۲٤ AR ﻥﻳﺯﺧﺗﻟﺍﻭ ﺔﻧﺎﻳﺻﻟﺍ . ٥ ﻥﻳﺯﺧﺗﻟﺍ ۲ - ٥ . ﻪﻣﺍﺩﺧﺗﺳﺍ ﻡﺩﻋ ءﺎﻧﺛﺃ ﻪﻧﻳﺯﺧﺗ ﺔﺑﻳﻘﺣ ﻲﻓ ﺯﺎﻬﺟﻟﺎﺑ ﻅﻔﺗﺣﺍ . ﻪﺑ ﺹﺎﺧﻟﺍ ﺱﺑﻘﻣﻟﺍ ﻥﻋ ءﺍﻭﻬﻟﺍ ﻡﻭﻁﺭﺧ ﻝﺻﻓﺍ . ۱ . ﻉﺍﺭﺫﻠﻟ ﻁﻏﺎﺿﻟﺍ ﻁﻳﺭﺷﻟﺍ ﻝﺧﺍﺩ ﻕﻓﺭﺑ ءﺍﻭﻬﻟﺍ ﻡﻭﻁﺭﺧ ﻲﻁﺑ ﻡﻗ . ۲ . ﺓﺩﺷﺑ ءﺍﻭﻬﻟﺍ ﻡﻭﻁﺭﺧ ﻲﻧﺛﺑ ﻡﻘﺗ ﻻ : ﺔﻅﺣﻼﻣ . ﻥﻳﺯﺧﺗﻟﺍ ﺔﺑﻳﻘﺣ ﻲﻓ ﻉﺍﺭﺫﻠﻟ ﻁﻏﺎﺿﻟﺍ ﻁﻳﺭﺷﻟﺍﻭ ﺱﺎﻳﻘﻟﺍ ﺯﺎﻬﺟ ﻊﺿ . ۳ : ﺔﻳﻟﺎﺗﻟﺍ...
Page 262 - ةنايصلا; نيزختلاو
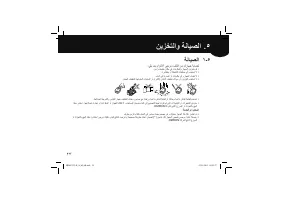
۲۳ ﺔﻧﺎﻳﺻﻟﺍ ۱ - ٥ : ﻲﻠﻳ ﺎﻣﺑ ﻡﺍﺯﺗﻟﻻﺍ ﻰﺟﺭﻳ ،ﻑﻠﺗﻟﺍ ﻥﻣ ﻙﺯﺎﻬﺟ ﺔﻳﺎﻣﺣﻟ . ﻥﻣﺁﻭ ﻑﻳﻅﻧ ﻥﺎﻛﻣ ﻲﻓ ﺕﺎﻧﻭﻛﻣﻟﺍﻭ ﺯﺎﻬﺟﻟﺍ ﻥﻳﺯﺧﺗﺑ ﻡﻗ • . ﺓﺭﻳﺎﻁﺗﻣ ﻭﺃ ﺔﻁﺷﺎﻛ ﺕﺎﻔﻅﻧﻣ ﻱﺃ ﻡﺩﺧﺗﺳﺗ ﻻ • . ءﺎﻣﻟﺍ ﻲﻓ ﺎﻫﺭﻣﻐﺗ ﻭﺃ ﺕﺎﻧﻭﻛﻣ ﻱﺃﻭ ﺯﺎﻬﺟﻟﺍ ﻝﺳﻐﺗ ﻻ • . ﺯﺎﻬﺟﻟﺍ ﻑﻳﻅﻧﺗﻟ ﺔﻬﺑﺎﺷﻣﻟﺍ ﺕﺎﺑﻳﺫﻣﻟﺍ ﻭﺃ ، ( ﺭﻧﺗﻟﺍ ) ﻥﺎﻫﺩﻟﺍ ﻑﻳﻔﺧﺗ ﻝﺋﺍﻭﺳ ﻭﺃ ،ﻥﻳﺯﻧﺑﻟﺍ ﻡﺩﺧﺗﺳﺗ ﻻ • . ﻁﻏﺎﺿﻟﺍ ...
Page 264 - اهحلاصإو
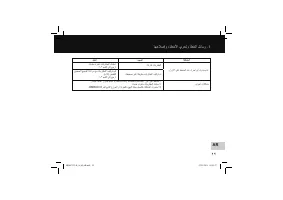
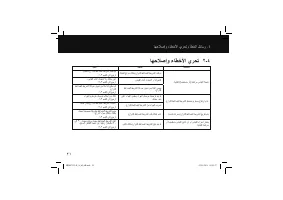
۲۱ ﺎﻬﺣﻼﺻﺇﻭ ءﺎﻁﺧﻷﺍ ﻱﺭﺣﺗ ۲ - ٤ ﺔﻠﻛﺷﻣﻟﺍ ﺏﺑﺳﻟﺍ ﻝﺣﻟﺍ . ﺔﻳﺎﻐﻠﻟ ( ﺔﺿﻔﺧﻧﻣ ﻭﺃ ) ﺔﻌﻔﺗﺭﻣ ﺱﺎﻳﻘﻟﺍ ﺔﺟﻳﺗﻧ . ﺔﻳﺎﻐﻠﻟ ﺦﺗﺭﻣ ﻝﻛﺷﺑ ﻉﺍﺭﺫﻠﻟ ﻁﻏﺎﺿﻟﺍ ﻁﻳﺭﺷﻟﺍ ﻑﻟ ﻡﺗ . ﻡﺎﻛﺣﺈﺑ ﻉﺍﺭﺫﻠﻟ ﻁﻏﺎﺿﻟﺍ ﻁﻳﺭﺷﻟﺍ ﻑﻠﺑ ﻡﻗ . ۱ - ۳ ﻡﺳﻘﻟﺍ ﻰﻟﺇ ﻊﺟﺭﺍ . ﺱﺎﻳﻘﻟﺍ ءﺎﻧﺛﺃ ﺙﺩﺣﺗﻟﺍ ﻭﺃ ﻙﺭﺣﺗﻟﺍ . ﺱﺎﻳﻘﻟﺍ ءﺎﻧﺛﺃ ﺙﺩﺣﺗﺗ ﻻﻭ ﺎًﻧﻛﺎﺳ ﻕﺑﺍ . ۳ - ۳ ﻡﺳﻘﻟﺍ ﻰﻟﺇ ﻊﺟﺭﺍ ﻁﻏﺎﺿﻟﺍ ﻁﻳﺭﺷﻟﺍ...
Page 269 - ةيعوبسلأا
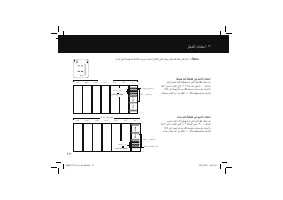
ﺯﺎﻬﺟﻟﺍ ﻡﺍﺩﺧﺗﺳﺍ . ۳ ۱٦ AR ﺔﻳﻋﻭﺑﺳﻷﺍ ﺔﻣﻳﻘﻟﺍ ﻁﺳﻭﺗﻣ ﺽﺭﻌﻟ ﻝﻛﻟ ﻊﻳﺑﺎﺳﺃ ﺔﻳﻧﺎﻣﺛ ﻝﻼﺧ ءﺎﺳﻣﻟﺍﻭ ﺡﺎﺑﺻﻟﺍ ﻲﻓ ﺎﻬﻠﻳﺟﺳﺗ ﻡﺗ ﻲﺗﻟﺍ ﺕﺎﺳﺎﻳﻘﻠﻟ ﺔﻳﻋﻭﺑﺳﻷﺍ ﺕﻻﺩﻌﻣﻟﺍ ﺽﺭﻋﻭ ﺏﺎﺳﺣﺑ ﺯﺎﻬﺟﻟﺍ ﻡﻭﻘﻳ . ﻡﺩﺧﺗﺳﻣ . ۲ : ۰۰ ﺔﻋﺎﺳﻟﺍ ﺩﺣﻷﺍ ﻡﻭﻳ ﻉﻭﺑﺳﻷﺍ ﺃﺩﺑﻳ : ﺔﻅﺣﻼﻣ .( ۲ ﻭﺃ ۱ ) ﻙﺑ ﺔﺻﺎﺧﻟﺍ ﻡﺩﺧﺗﺳﻣﻟﺍ ﺔﻳﻭﻫ ﺩﺩﺣ . ۱ . ﺭﺯﻟﺍ ﻰﻠﻋ ﻁﻐﺿﺍ . ۲ ." ﻉﻭﺑﺳﻷﺍ ﺍﺫﻫ " ـ...
Page 270 - ةميقلا
ﺯﺎﻬﺟﻟﺍ ﻡﺍﺩﺧﺗﺳﺍ . ۳ ۱٥ ﺔﻣﻳﻘﻟﺍ ﻁﺳﻭﺗﻣ ﺽﺭﻌﻟ .( ۲ ﻭﺃ ۱ ) ﻙﺑ ﺔﺻﺎﺧﻟﺍ ﻡﺩﺧﺗﺳﻣﻟﺍ ﺔﻳﻭﻫ ﺩﺩﺣ . ۱ . ٍﻥﺍﻭﺛ ۳ ﻥﻣ ﺭﺛﻛﻷ ﺭﺯ ﻰﻠﻋ ﺭﺍﺭﻣﺗﺳﻻﺍ ﻊﻣ ﻁﻐﺿﺍ . ۲ : ﺕﺎﻅﺣﻼﻣ . ﺔﻣﻳﻘﻟﺍ ﻁﺳﻭﺗﻣ ﺏﺎﺳﺣ ﻡﺗﻳ ﻥﻠﻓ ،ﺕﻗﻭﻟﺍﻭ ﺦﻳﺭﺎﺗﻟﺍ ﻁﺑﺿ ﻥﻭﺩﺑ ﺔﻘﺑﺎﺳﻟﺍ ﺕﺎﺳﺎﻳﻘﻟﺍ ﻰﻠﻋ ﻝﻭﺻﺣﻟﺍ ﻡﺗ ﺍﺫﺇ • . ﻥﻣﻳﻷﺍ ﺏﻧﺎﺟﻟﺍ ﻰﻠﻋ ﺔﺣﺿﻭﻣﻟﺍ ﺔﺷﺎﺷﻟﺍ ﺽﺭﻋ ﻡﺗﻳﺳﻓ ،ﺓﺭﻛﺍﺫﻟﺍ ﻲﻓ ﺔﻧﺯﺧﻣ ﺱﺎﻳﻗ ﻡﻳﻗ ...
Page 271 - ةركاذلا
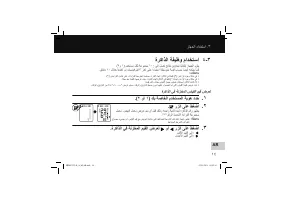
ﺯﺎﻬﺟﻟﺍ ﻡﺍﺩﺧﺗﺳﺍ . ۳ ۱٤ AR ﺓﺭﻛﺍﺫﻟﺍ ﺔﻔﻳﻅﻭ ﻡﺍﺩﺧﺗﺳﺍ ٤ - ۳ .( ۲ﻭ ۱ ) ﻡﺩﺧﺗﺳﻣ ﻝﻛﻟ ﺔﻋﻭﻣﺟﻣ ۱۰۰ ﻰﻟﺇ ﻝﺻﺗ ﺞﺋﺎﺗﻧ ﻥﻳﺯﺧﺗﺑ ﺎًﻳﺋﺎﻘﻠﺗ ﺯﺎﻬﺟﻟﺍ ﻡﻭﻘﻳ . ﻕﺋﺎﻗﺩ ۱۰ ﻝﻼﺧ ﺎﻫﺫﺧﺃ ﻡﺗ ﺕﺎﺳﺎﻳﻗ ﻡﻳﻗ ۳ ﺭﺧﺁ ﻰﻠﻋ ﺍًﺩﺎﻣﺗﻋﺍ ﺔﻁﺳﻭﺗﻣ ﺔﻣﻳﻗ ﺏﺎﺳﺣ ﺎ ًﺿﻳﺃ ﻪﻧﻛﻣﻳ ﺎﻣﻛ : ﺕﺎﻅﺣﻼﻣ .( ۲ ) ﻥﻳﺗءﺍﺭﻘﻟﺍ ﻥﻳﺗﺎﻫ ﻰﻠﻋ ﺕﺍءﺍﺭﻘﻟﺍ ﻁﺳﻭﺗﻣﻟﺍ ﺩﻣﺗﻌﻳﺳ ،ﺓﺭﺗﻔﻟﺍ ﻩﺫﻬﻟ ﺓﺭﻛﺍﺫﻟﺍ ﻲﻓ ﻁ...
Page 272 - فيضلا
ﺯﺎﻬﺟﻟﺍ ﻡﺍﺩﺧﺗﺳﺍ . ۳ ۱۳ . ﻉﺍﺭﺫﻠﻟ ﻁﻏﺎﺿﻟﺍ ﻁﻳﺭﺷﻟﺍ ﺔﻟﺍﺯﺈﺑ ﻡﻗ . ۳ . ﺱﺎﻳﻘﻟﺍ ﺯﺎﻬﺟ ﻝﻳﻐﺷﺗ ﻑﺎﻘﻳﻹ ( ﻑﺎﻘﻳﺇ / ءﺩﺑ ) START/STOP ﺭﺯﻟﺍ ﻰﻠﻋ ﻁﻐﺿﺍ . ٤ . ﻪﺗﺭﻛﺍﺫ ﻲﻓ ﻡﺩﻟﺍ ﻁﻐﺿ ﺱﺎﻳﻗ ﻡﻳﻗ ﻥﻳﺯﺧﺗﺑ ﺎًﻳﺋﺎﻘﻠﺗ ﺱﺎﻳﻘﻟﺍ ﺯﺎﻬﺟ ﻡﻭﻘﻳ . ﻥﻳﺗﻘﻳﻗﺩ ﺩﻌﺑ ﺎًﻳﺋﺎﻘﻠﺗ ﻝﻳﻐﺷﺗﻟﺍ ﻥﻋ ﻑﻗﻭﺗﻳﺳﻭ . ﺱﺎﻳﻘﻟﺍ ءﺍﺭﺟﺇ ﻝﺑﻗ ﺎﻬﺗﻟﺎﺣ ﻰﻟﺇ ﺓﺩﻭﻌﻟﺎﺑ ﻥﻳﻳﺍﺭﺷﻠﻟ ﺱﺎﻳﻘﻟﺍ ﺕﺎﻳﻠﻣﻋ ﻥﻳﺑ ...
Page 273 - سايق
ﺯﺎﻬﺟﻟﺍ ﻡﺍﺩﺧﺗﺳﺍ . ۳ ۱۲ AR ﺱﺎﻳﻗ ءﺍﺭﺟﺇ ۳ - ۳ : ﺕﺎﻅﺣﻼﻣ . ﻁﻏﺎﺿﻟﺍ ﻁﻳﺭﺷﻟﺍ ﻥﻣ ءﺍﻭﻬﻟﺍ ﺭﻳﺭﺣﺗﻟ ( ﻑﺎﻘﻳﺇ / ءﺩﺑ ) START/STOP ﺭﺯﻟﺍ ﻰﻠﻋ ﻁﻐﺿﺍ ،ﺱﺎﻳﻘﻟﺍ ءﺎﻐﻟﻹ • . ﻁﻐﺿﻟﺍ ﺱﺎﻳﻗ ءﺎﻧﺛﺃ ﺎًﻧﻛﺎﺳ ﻕﺑﺍ • ﺔﻳﻭﻫ ﻥﺎﻣﺩﺧﺗﺳﻳ ( ۲ ) ﻥﻳﺻﺧﺷﻟ ﺓﺭﻛﺍﺫﻟﺍ ﻲﻓ ﺱﺎﻳﻘﻟﺍ ﻡﻳﻗ ﻥﻳﺯﺧﺗﻭ ﻁﻐﺿﻟﺍ ﺱﺎﻳﻗ ﺕﺎﻳﻠﻣﻋ ءﺍﺭﺟﻹ ﺱﺎﻳﻘﻟﺍ ﺯﺎﻬﺟ ﻡﻳﻣﺻﺗ ﻡﺗ ﺩﻘﻟ . ۲ ﻡﺩﺧﺗﺳﻣﻟﺍ ﺔﻳﻭﻫﻭ ۱ ﻡ...
Page 274 - ةحيحص
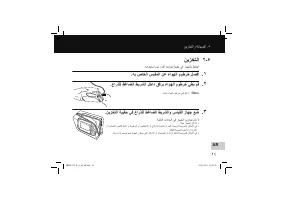
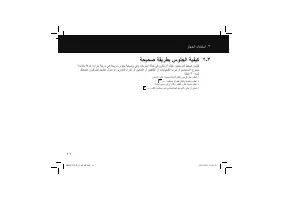
ﺯﺎﻬﺟﻟﺍ ﻡﺍﺩﺧﺗﺳﺍ . ۳ ۱۱ ﺔﺣﻳﺣﺻ ﺔﻘﻳﺭﻁﺑ ﺱﻭﻠﺟﻟﺍ ﺔﻳﻔﻳﻛ ۲ - ۳ . ﺔﻣﺋﻼﻣ ﺔﻓﺭﻏ ﺓﺭﺍﺭﺣ ﺔﺟﺭﺩ ﻲﻓ ﺔﺣﻳﺭﻣ ﺱﻭﻠﺟ ﺔﻳﻌﺿﻭ ﻲﻓﻭ ءﺎﺧﺭﺗﺳﺍ ﺔﻟﺎﺣ ﻲﻓ ﻥﻭﻛﺗ ﻥﺃ ﻙﻳﻠﻋ ﻥﻳﻌﺗﻳ ﻡﺩﻟﺍ ﻁﻐﺿ ﺱﺎﻳﻘﻟ ﻁﻐﺿﻟﺍ ﺱﺎﻳﻗ ﻝﺑﻗ ﻡﺎﻌﻁﻟﺍ ﻝﻭﺎﻧﺗ ﻭﺃ ﻥﻳﺭﺎﻣﺗﻟﺍ ءﺍﺭﺟﺇ ﻭﺃ ﻥﻳﺧﺩﺗﻟﺍ ﻭﺃ ﻥﻳﻳﻓﺎﻛﻟﺍ ﻭﺃ ﺕﺎﻳﻟﻭﺣﻛﻟﺍ ﺏﺭﺷ ﻭﺃ ﻡﺎﻣﺣﺗﺳﻻﺍ ﻉﻭﻧﻣﻣ . ﺔﻘﻳﻗﺩ ۳۰ ﺓﺩﻣﻟ . ﺽﺭﻷﺍ ﻰﻠﻋ ﺔﻳﻭﺗﺳﻣ ﻙﺎﻣَﺩَﻗ ﻥﻛ...
Page 275 - عارذلل
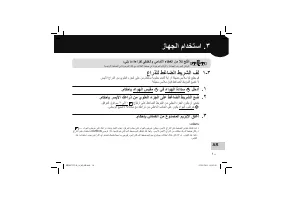
۱۰ AR ﺯﺎﻬﺟﻟﺍ ﻡﺍﺩﺧﺗﺳﺍ . ۳ ﻉﺍﺭﺫﻠﻟ ﻁﻏﺎﺿﻟﺍ ﻁﻳﺭﺷﻟﺍ ﻑﻟ ۱ - ۳ . ﺭﺳﻳﻷﺍ ﻉﺍﺭﺫﻟﺍ ﻥﻣ ﻱﻭﻠﻌﻟﺍ ءﺯﺟﻟﺍ ﻰﻠﻋ ﻥﻣ ﻡﺎﻛﺣﺈﺑ ﺔﻳﻭﻁﻣ ﻡﺎﻣﻛﺃ ﺔﻳﺃ ﻭﺃ ﺔﻘﻳﺿ ﺱﺑﻼﻣ ﺔﻳﺃ ﻊﻠﺧﺑ ﻡﻗ . ﺔﻛﻳﻣﺳ ﺱﺑﻼﻣ ﻕﻭﻓ ﻁﻏﺎﺿﻟﺍ ﻁﻳﺭﺷﻟﺍ ﻊﺿﺗ ﻻ . ﻡﺎﻛﺣﺈﺑ ءﺍﻭﻬﻟﺍ ﺱﺑﻘﻣ J ﻲﻓ ءﺍﻭﻬﻟﺍ ﺓﺩﺍﺩﺳ N ﻝﺧﺩﺃ . ۱ . ﻡﺎﻛﺣﺈﺑ ﺭﺳﻳﻷﺍ ﻙﻋﺍﺭﺫ ﻥﻣ ﻱﻭﻠﻌﻟﺍ ءﺯﺟﻟﺍ ﻰﻠﻋ ﻁﻏﺎﺿﻟﺍ ﻁﻳﺭﺷﻟﺍ ﻊﺿ . ۲ . ﻕﻓﺭﻣﻟﺍ ﻕ...
Page 276 - دادعلإا; تقولاو
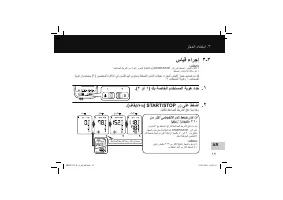
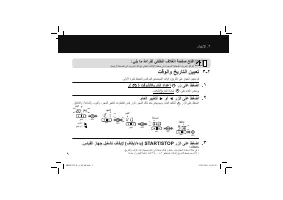
۹ ﺩﺍﺩﻋﻹﺍ . ۲ : ﻲﻠﻳ ﺎﻣ ﺓءﺍﺭﻘﻟ ﻲﻔﻠﺧﻟﺍ ﻑﻼﻐﻟﺍ ﺔﺣﻔﺻ ﺢﺗﻓﺍ . ﺔﻳﺳﻳﺋﺭﻟﺍ ﺔﺣﻔﺻﻟﺍ ﻲﻓ ﻑﻭﺭﺣﻟﺍ ﻙﻠﺗ ﻊﻣ ﻲﻔﻠﺧﻟﺍ ﻑﻼﻐﻟﺍ ﺔﺣﻔﺻ ﻲﻓ ﺓﺩﻭﺟﻭﻣﻟﺍ ﺔﻳﺋﺎﺟﻬﻟﺍ ﻑﻭﺭﺣﻟﺍ ﻕﻓﺍﻭﺗﺗ ﺕﻗﻭﻟﺍﻭ ﺦﻳﺭﺎﺗﻟﺍ ﻥﻳﻳﻌﺗ ۳ - ۲ . ﻰﻟﻭﻷﺍ ﺓﺭﻣﻠﻟ ﻁﻐﺿﻟﺍ ﺱﺎﻳﻗ ﻝﺑﻗ ﻥﻳﺣﻳﺣﺻﻟﺍ ﺕﻗﻭﻟﺍﻭ ﺦﻳﺭﺎﺗﻟﺍ ﻰﻠﻋ ﺯﺎﻬﺟﻟﺍ ﻥﻳﻳﻌﺗﺑ ﻡﻗ .( ) ﺕﻗﻭﻟﺍ / ﺦﻳﺭﺎﺗﻟﺍ ﺩﺍﺩﻋﺇ H ﺭﺯ ﻰﻠﻋ ﻁﻐﺿﺍ . ۱ . ﺕﻗﻭﻟﺍ / ﺦﻳﺭﺎ...
Page 277 - يرايتخلاا
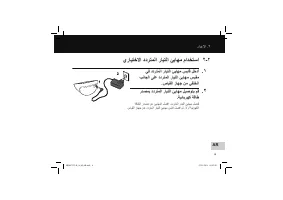
۸ AR ﺩﺍﺩﻋﻹﺍ . ۲ ﻱﺭﺎﻳﺗﺧﻻﺍ ﺩﺩﺭﺗﻣﻟﺍ ﺭﺎﻳﺗﻟﺍ ﺊﻳﺎﻬﻣ ﻡﺍﺩﺧﺗﺳﺍ ۲ - ۲ ﻲﻓ ﺩﺩﺭﺗﻣﻟﺍ ﺭﺎﻳﺗﻟﺍ ﺊﻳﺎﻬﻣ ﺱﺑﺎﻗ ﻝﺧﺩﺃ . ۱ ﺏﻧﺎﺟﻟﺍ ﻰﻠﻋ ﺩﺩﺭﺗﻣﻟﺍ ﺭﺎﻳﺗﻟﺍ ﺊﻳﺎﻬﻣ ﺱﺑﻘﻣ . ﺱﺎﻳﻘﻟﺍ ﺯﺎﻬﺟ ﻥﻣ ﻲﻔﻠﺧﻟﺍ ﺭﺩﺻﻣﺑ ﺩﺩﺭﺗﻣﻟﺍ ﺭﺎﻳﺗﻟﺍ ﺊﻳﺎﻬﻣ ﻝﻳﺻﻭﺗﺑ ﻡﻗ . ۲ . ﺔﻳﺋﺎﺑﺭﻬﻛ ﺔﻗﺎﻁ ﺔﻗﺎﻁﻟﺍ ﺭﺩﺻﻣ ﻥﻋ ﺊﻳﺎﻬﻣﻟﺍ ﻝﺻﻓﺍ ،ﺩﺩﺭﺗﻣﻟﺍ ﺭﺎﻳﺗﻟﺍ ﺊﻳﺎﻬﻣ ﻝﺻﻔﻟ . ﺱﺎﻳﻘﻟﺍ ﺯﺎﻬﺟ ﻥﻋ ﺩﺩﺭﺗﻣﻟﺍ ﺭﺎﻳﺗ...
Page 278 - ةيراطبلا
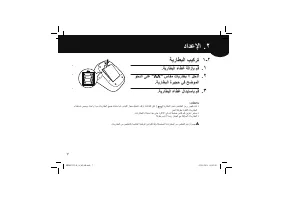
ﺯﺎﻬﺟﻟﺍ ﻡﺍﺩﺧﺗﺳﺍ . ۳ ۷ ﺔﻳﺭﺎﻁﺑﻟﺍ ﺏﻳﻛﺭﺗ ۱ - ۲ . ﺔﻳﺭﺎﻁﺑﻟﺍ ءﺎﻁﻏ ﺔﻟﺍﺯﺈﺑ ﻡﻗ . ۱ ﻭﺣﻧﻟﺍ ﻰﻠﻋ "AA" ﺱﺎﻘﻣ ﺕﺎﻳﺭﺎﻁﺑ ٤ ﻝﺧﺩﺃ . ۲ . ﺔﻳﺭﺎﻁﺑﻟﺍ ﺓﺭﻳﺟﺣ ﻲﻓ ﺢﺿﻭﻣﻟﺍ . ﺔﻳﺭﺎﻁﺑﻟﺍ ءﺎﻁﻏ ﻝﺍﺩﺑﺗﺳﺎﺑ ﻡﻗ . ۳ : ﺕﺎﻅﺣﻼﻣ ﻡﺍﺩﺧﺗﺳﺎﺑ ﻰﺻﻭﻳ . ﺓﺩﺣﺍﻭ ﺓﺭﻣ ﺕﺎﻳﺭﺎﻁﺑﻟﺍ ﻊﻳﻣﺟ ﻝﺩﺑﺗﺳﺍ ﻡﺛ ،ﺱﺎﻳﻘﻟﺍ ﺯﺎﻬﺟ ﻝﻳﻐﺷﺗ ﻑﻗﻭﺃ ،ﺔﺷﺎﺷﻟﺍ ﻰﻠﻋ ( ) ﺔﻳﺭﺎﻁﺑﻟﺍ ﻥﺣﺷ ﺽﺎﻔﺧﻧﺍ ﺯﻣ...
Page 279 - زاهجلا
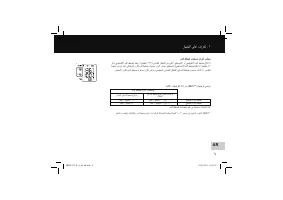
٦ AR ﻡﺩﻟﺍ ﻁﻐﺿ ﻯﻭﺗﺳﻣ ﻥﺍﻭﻟﺃ ﺭﺷﺅﻣ ﻭﺃ / ﻭ ﻲﺿﺎﺑﻘﻧﻻﺍ ﻡﺩﻟﺍ ﻁﻐﺿﻟ ﺎًﻳﻘﺑﺋﺯ ﺍ ًﺭﺗﻣﻳﻠﻠﻣ ۱۳٥ ) ﻲﺳﺎﻳﻘﻟﺍ ﻕﺎﻁﻧﻟﺍ ﻥﻣ ﻰﻠﻋﺃ ﻲﻁﺎﺳﺑﻧﻻﺍ ﻭﺃ ﻲﺿﺎﺑﻘﻧﻻﺍ ﻡﺩﻟﺍ ﻁﻐﺿ ﻥﺎﻛ ﺍﺫﺇ ﺔﺟﻳﺗﻧ ﺽﺭﻋ ﺩﻧﻋ ﻲﻟﺎﻘﺗﺭﺑﻟﺍ ﻥﻭﻠﻟﺍ ﻡﺩﻟﺍ ﻁﻐﺿ ﻯﻭﺗﺳﻣ ﻥﺍﻭﻟﺃ ﺭﺷﺅﻣ ﻲﻁﻌﻳﺳﻓ ، ( ﻲﻁﺎﺳﺑﻧﻻﺍ ﻡﺩﻟﺍ ﻁﻐﺿﻟ ﺎًﻳﻘﺑﺋﺯ ﺍ ًﺭﺗﻣﻳﻠﻠﻣ ۸٥ . ﺭﺿﺧﻷﺍ ﻥﻭﻠﻟﺎﺑ ﻡﺩﻟﺍ ﻁﻐﺿ ﻯﻭﺗﺳﻣ ﻥﺍﻭﻟﺃ ﺭﺷﺅﻣ ءﻲﺿﻳﺳﻓ ،...
Page 282 - ةملاسلا
۳ ( ﺔﻳﺭﺎﻁﺑﻟﺍ ﻡﺍﺩﺧﺗﺳﺍ ) . ﺢﻳﺣﺻﻟﺍ ﻝﻛﺷﻟﺎﺑ ﺎﻬﺑﺎﻁﻗﺃ ﺓﺍﺫﺎﺣﻣ ﻥﻭﺩ ﺕﺎﻳﺭﺎﻁﺑﻟﺍ ﻝﺧﺩﺗ ﻻ ﻯﺭﺧﺃ ﻊﻣ ﺓﺩﻳﺩﺟ ﺕﺎﻳﺭﺎﻁﺑ ﻡﺩﺧﺗﺳﺗ ﻻ . ﺕﺎﻳﺭﺎﻁﺑﻟﺍ ﻥﻣ ﺭﺧﺁ ﻉﻭﻧ ﻱﺃ ﻡﺩﺧﺗﺳﺗ ﻻ . ﺯﺎﻬﺟﻟﺍ ﺍﺫﻫ ﻊﻣ ﻁﻘﻓ "AA" ﺱﺎﻘﻣ ﺯﻳﻧﺟﻧﻣ ﺕﺎﻳﺭﺎﻁﺑ ﻭﺃ ﺔﻳﻭﻠﻗ ﺕﺎﻳﺭﺎﻁﺑ ٤ ﻡﺩﺧﺗﺳﺍ . ﺔﻠﻣﻌﺗﺳﻣ . ﺭﺛﻛﺃ ﻭﺃ ﺭﻬﺷﺃ ﺔﺛﻼﺛ ﺓﺩﻣﻟ ﺯﺎﻬﺟﻟﺍ ﻡﺍﺩﺧﺗﺳﻻ ﺔﺟﺎﺣﻟﺍ ﻡﺩﻋ ﺔﻟﺎﺣ ﻲﻓ ﺕﺎﻳﺭﺎﻁﺑﻟﺍ ﺔ...
Page 285 - تايوتحملا
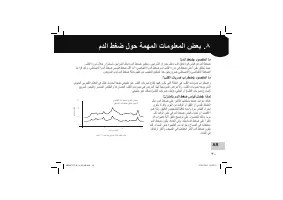
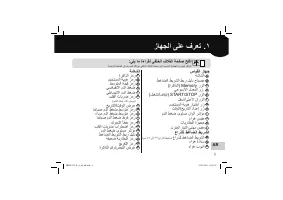
.OMRON M6 AC ﺯﺍﺭﻁ ﻲﻟﻵﺍ ﻡﺩﻟﺍ ﻁﻐﺿ ﺱﺎﻳﻗ ﺯﺎﻬﺟ ﻙﺋﺍﺭﺷﻟ ﺍ ًﺭﻛﺷ ﺔﻘﻳﺭﻁ ﻰﻠﻋ ﻪﻠﻣﻋ ﻲﻓ ﺩﻣﺗﻌﻳﻭ ،ﺎ ًﻣﺎﻣﺗ ﻲﻟﺁ ﻝﻛﺷﺑ ﻝﻣﻌﻳ ﻡﺩﻟﺍ ﻁﻐﺿ ﺔﺑﻗﺍﺭﻣﻟ ﻕﻳﻗﺩ ﺯﺎﻬﺟ ﻭﻫ OMRON M6 AC ﺯﺎﻬﺟ ﻥﺇ ﺔﻳﻧﻘﺗ ﺯﺎﻬﺟﻟﺍ ﻡﺩﺧﺗﺳﻳﻭ . ﺔﻳﻫﺎﻧﺗﻣ ﺔﻋﺭﺳﻭ ﺔﻁﺎﺳﺑﺑ ﻙﻳﺩﻟ ﺽﺑﻧﻟﺍ ﻝﺩﻌﻣﻭ ﻡﺩﻟﺍ ﻁﻐﺿ ﺱﺎﻳﻘﺑ ﺯﺎﻬﺟﻟﺍ ﺍﺫﻫ ﻡﻭﻘﻳ ﺙﻳﺣ . ﺔﺑﺫﺑﺫﻟﺎﺑ ﺱﺎﻳﻘﻟﺍ ﺔﺟﺎﺣﻟﺍ ﻥﻭﺩ ﺔﻅﻭﺣﻠﻣ ﺔﺣﺍﺭ ﺭﻓﻭﺗﻭ ﺎﻬﺑ...