Page 2 - Contents
2 Contents Introduction .............................................................................. 3Important Safety Information .................................................. 41. Overview .............................................................................. 52. Preparation ...........
Page 3 - Introduction
3 EN Introduction Thank you for purchasing the OMRON M1 Plus Upper Arm Blood Pressure Monitor. The OMRON M1 Plus is a manual inflation blood pressure monitor, operating on the oscillometric principle. It measures your blood pressure and pulse rate simply and quickly. The unit also stores up to 21 me...
Page 4 - Important Safety Information
4 Important Safety Information Consult your doctor during pregnancy, arrhythmia and arteriosclerosis.You should never change the dosage of medication prescribed by your doctor.Use the M1 Plus only for yourself. Caution: • Do not leave the unit unattended with infants or persons who cannot express th...
Page 5 - Main unit; F. Battery compartment
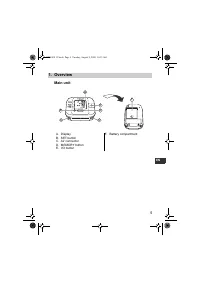
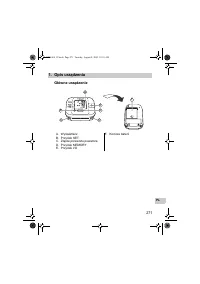
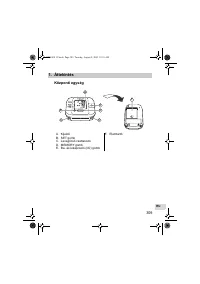
5 1.Overview EN 1. Overview Main unit A. DisplayB. SET buttonC. Air connectorD. MEMORY buttonE. I/O button F. Battery compartment B A C C E D F HEM-4011C.book Page 5 Tuesday, August 9, 2005 10:35 AM
Page 6 - Air Release Button
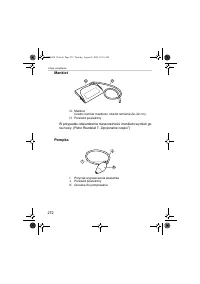
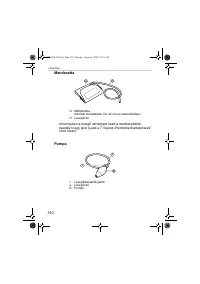
6 1.Overview Arm Cuff If air starts to leak from the arm cuff, please replace with a new one. (Refer to Chapter 7 “Optional Parts”) Inflation Bulb G. Arm cuff (Medium cuff: arm circumference 22-32 cm) H. Air Tube I. Air Release Button J. Air TubeK. Air Inflation Bulb H G J K I HEM-4011C.book Page 6 ...
Page 7 - O. Average value symbol
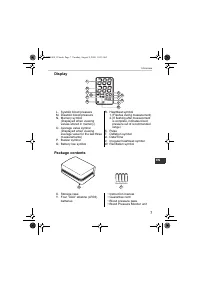
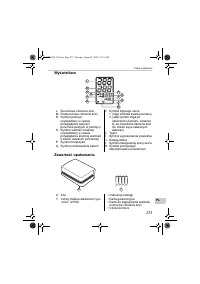
7 1.Overview EN Display Package contents L. Systolic blood pressureM. Diastolic blood pressureN. Memory symbol (Displayed when viewing values stored in memory) O. Average value symbol (Displayed when viewing average value for the last three measurements) P. Buzzer symbolQ. Battery low symbol R. Hear...
Page 8 - Installing/Replacing the Batteries; Turn the main unit upside down.
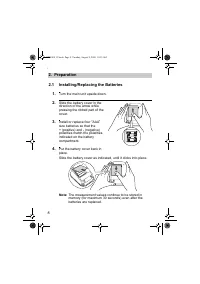
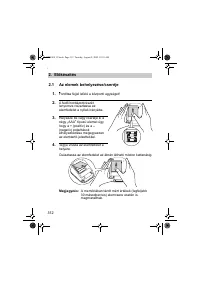
8 2.Preparation 2. Preparation 2.1 Installing/Replacing the Batteries 1. Turn the main unit upside down. 2. Slide the battery cover in the direction of the arrow while pressing the ribbed part of the cover. 3. Install or replace four “ AAA ” size batteries so that the + (positive) and - (negative) p...
Page 9 - Battery Life & Replacement
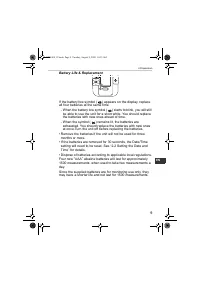
9 2.Preparation EN Battery Life & Replacement If the battery low symbol ( ) appears on the display, replace all four batteries at the same time. - When the battery low symbol ( ) starts to blink, you will still be able to use the unit for a short while. You should replace the batteries with new ...
Page 10 - Setting the Date and Time; measurement for the first time.
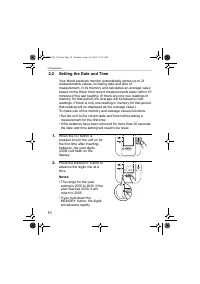
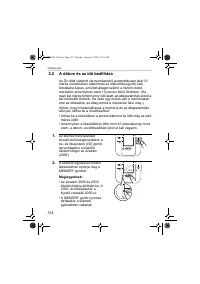
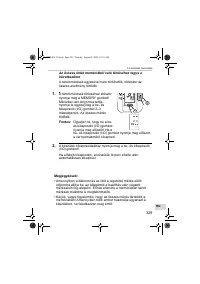
10 2.Preparation 2.2 Setting the Date and Time Your blood pressure monitor automatically stores up to 21 measurements values, including date and time of measurement, in its memory and calculates an average value based on the three most recent measurements taken within 10 minutes of the last reading....
Page 13 - Adjusting the Settings Modes; Buzzer Mode
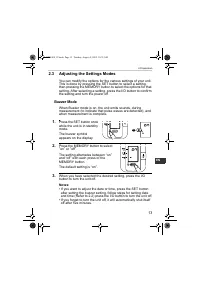
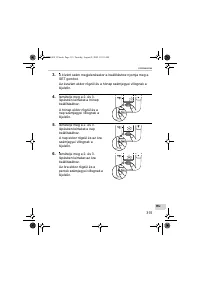
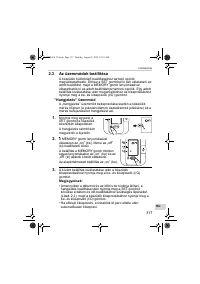
13 2.Preparation EN 2.3 Adjusting the Settings Modes You can modify the options for the various settings of your unit. This is done by pressing the SET button to select a setting, then pressing the MEMORY button to select the options for that setting. After selecting a setting, press the I/O button ...
Page 14 - How to Sit Correctly When Taking a Measurement; You can take a measurement on either your left or right arm.
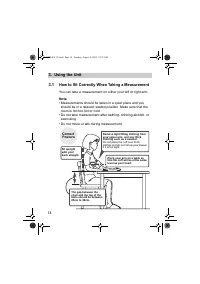
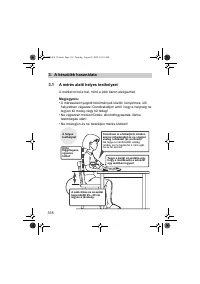
14 3.Using the Unit 3. Using the Unit 3.1 How to Sit Correctly When Taking a Measurement You can take a measurement on either your left or right arm. Note: • Measurements should be taken in a quiet place and you should be in a relaxed, seated position. Make sure that the room is not too hot or cold....
Page 15 - Incorrect Posture
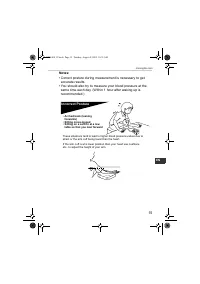
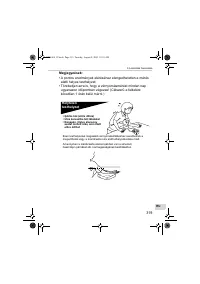
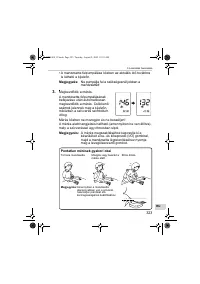
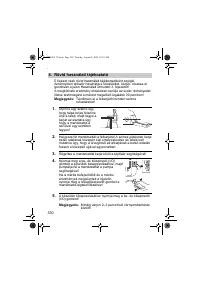
15 3.Using the Unit EN Notes: • Correct posture during measurement is necessary to get accurate results. • You should also try to measure your blood pressure at the same time each day. (Within 1 hour after waking up is recommended.) Incorrect Posture These situations tend to lead to higher blood pre...
Page 16 - Applying the Arm Cuff
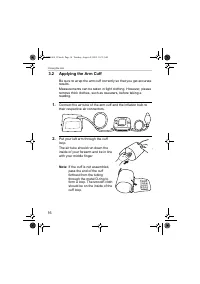
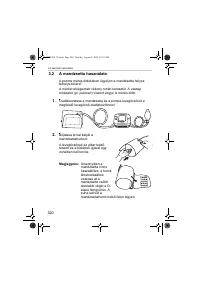
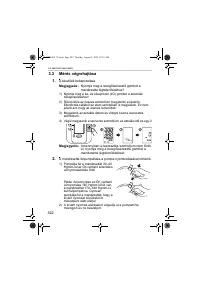
16 3.Using the Unit 3.2 Applying the Arm Cuff Be sure to wrap the arm cuff correctly so that you get accurate results. Measurements can be taken in light clothing. However, please remove thick clothes, such as sweaters, before taking a reading. 1. Connect the air tube of the arm cuff and the inflati...
Page 17 - Position the arm correctly.; Taking measurements on the right arm; • The cuff should be 1 to 2; ) The air tube should run
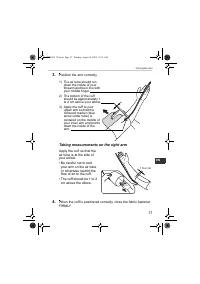
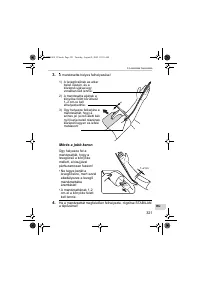
17 3.Using the Unit EN 3. Position the arm correctly. Taking measurements on the right arm Apply the cuff so that the air tube is at the side of your elbow.• Be careful not to rest your arm on the air tube, or otherwise restrict the flow of air to the cuff. • The cuff should be 1 to 2 cm above the e...
Page 18 - Taking a Reading; Press the air release button to release any air in the arm cuff.; ) All items in the display will be displayed briefly.; Pump the inflation bulb to inflate the arm cuff.; ) Inflate the cuff until it is 30 to 40
18 3.Using the Unit 3.3 Taking a Reading 1. Turning on the unit. Note: Press the air release button to release any air in the arm cuff. 1) Press the I/O button to turn the unit on. 2) All items in the display will be displayed briefly. The battery symbol will also be displayed for test purposes. Thi...
Page 19 - Common Causes of Inaccurate Results
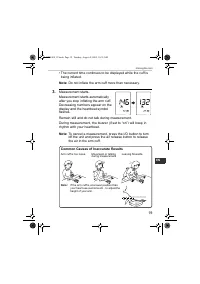
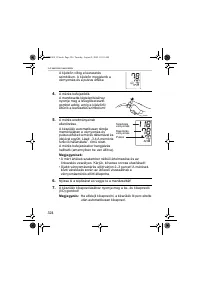
19 3.Using the Unit EN • The current time continues to be displayed while the cuff is being inflated. Note: Do not inflate the arm cuff more than necessary. 3. Measurement starts. Measurement starts automatically after you stop inflating the arm cuff. Decreasing numbers appear on the display and the...
Page 22 - What is Irregular Heartbeat?; ) in the results indicates arrhythmia or not can only be; Normal Heartbeat
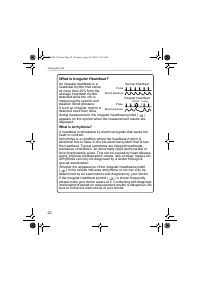
22 3.Using the Unit What is Irregular Heartbeat? An irregular heartbeat is a heartbeat rhythm that varies by more than 25% from the average heartbeat rhythm detected while the unit is measuring the systolic and diastolic blood pressure.If such an irregular rhythm is detected more than twice during m...
Page 23 - Using the Memory Function
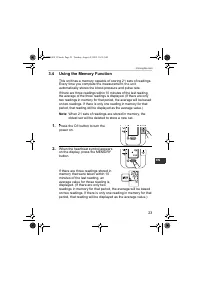
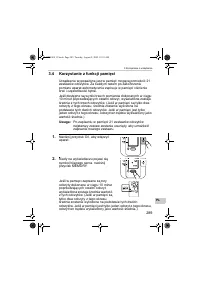
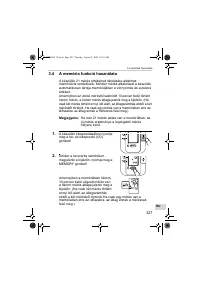
23 3.Using the Unit EN 3.4 Using the Memory Function This unit has a memory capable of storing 21 sets of readings. Every time you complete the measurement, the unit automatically stores the blood pressure and pulse rate. If there are three readings within 10 minutes of the last reading, the average...
Page 24 - Press the I/O button to turn the unit off.
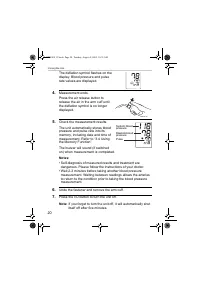
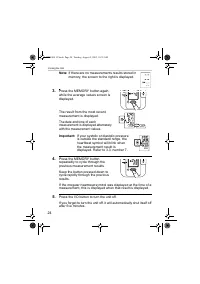
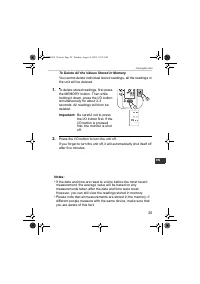
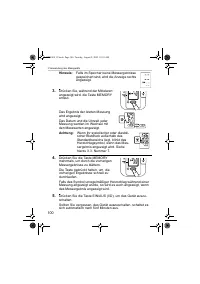
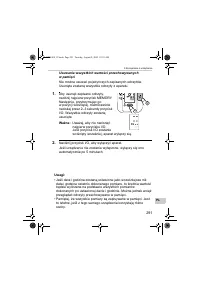
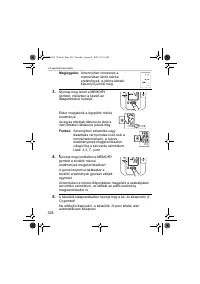
24 3.Using the Unit Note: If there are no measurements results stored in memory, the screen to the right is displayed. 3. Press the MEMORY button again, while the average values screen is displayed. The result from the most recent measurement is displayed. The date and time of each measurement is di...
Page 26 - Quick Reference Guide; Remove any tight-fitting clothing from your upper arm.
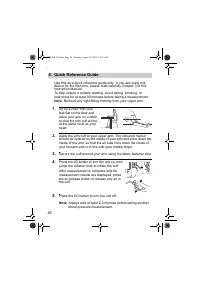
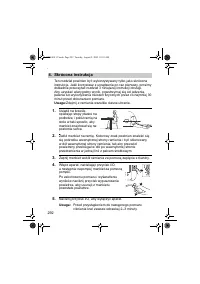
26 4.Quick Reference Guide 4. Quick Reference Guide Use this as a quick reference guide only. If you are using this device for the first time, please read carefully Chapter 3 of this Instruction Manual.To help ensure a reliable reading, avoid eating, smoking, or exercising for at least 30 minutes be...
Page 27 - Handling Errors and Problems
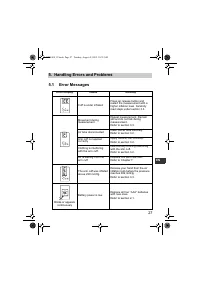
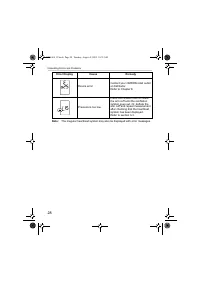
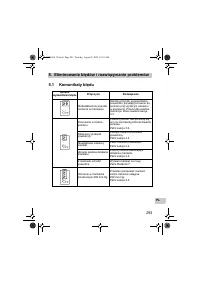
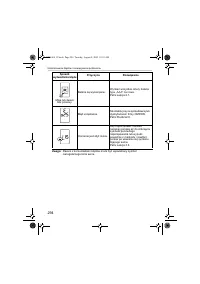
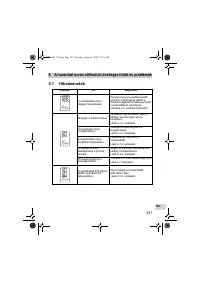
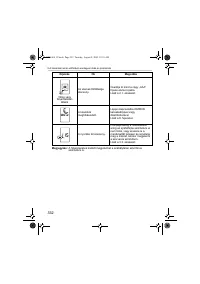
27 5.Handling Errors and Problems EN 5. Handling Errors and Problems 5.1 Error Messages Error Display Cause Remedy Cuff is under inflated. Press air release button and restart the measurement with a higher inflation level. Carefully read steps under section 3.3. Movement during measurement Repeat me...
Page 29 - Troubleshooting
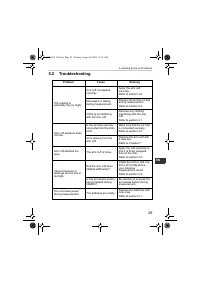
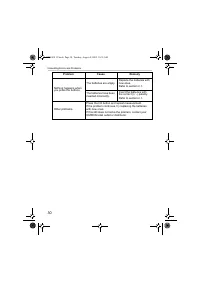
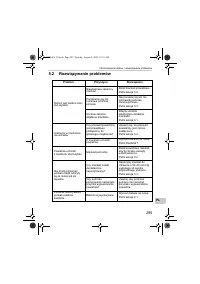
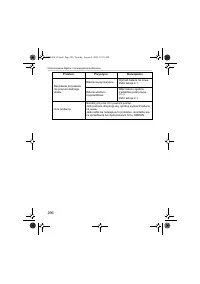
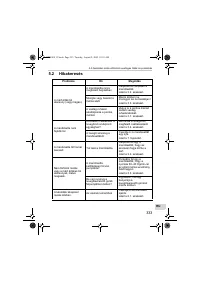
29 5.Handling Errors and Problems EN 5.2 Troubleshooting Problem Cause Remedy The reading is extremely low (or high). Arm cuff not applied correctly. Apply the arm cuff correctly. Refer to section 3.2. Movement or talking during measurement. Remain still and do not talk during measurement.Refer to s...
Page 31 - Maintenance and Storage; Maintenance; • Do not subject the main unit and cuff to extreme temperatures,; • Do not carry out repairs of any kind yourself. If a defect
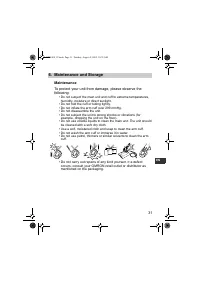
31 6.Maintenance and Storage EN 6. Maintenance and Storage Maintenance To protect your unit from damage, please observe the following: • Do not subject the main unit and cuff to extreme temperatures, humidity, moisture or direct sunlight. • Do not fold the cuff or tubing tightly.• Do not inflate the...
Page 32 - Calibration and Service; • The accuracy of this blood pressure monitor has been
32 6.Maintenance and Storage Calibration and Service • The accuracy of this blood pressure monitor has been carefully tested and is designed for a long service life. • It is generally recommended to have the unit inspected every two years to ensure correct functioning and accuracy. Please consult yo...
Page 33 - Storage; Keep the unit in its storage case when not in use.
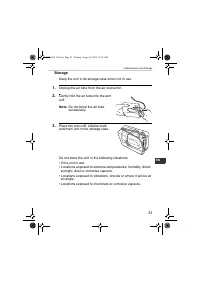
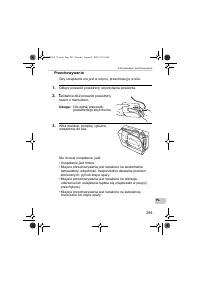
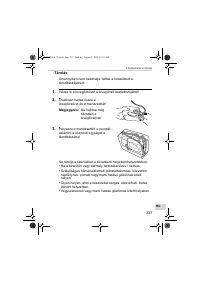
33 6.Maintenance and Storage EN Storage Keep the unit in its storage case when not in use. 1. Unplug the air tube from the air connector. 2. Gently fold the air tube into the arm cuff. Note: Do not bend the air tube excessively. 3. Place the arm cuff, inflation bulb and main unit in the storage case...
Page 34 - Medium Arm Cuffs; Large Arm Cuff; Small Arm Cuff; Small cuff and bulb combination; Regular bulb
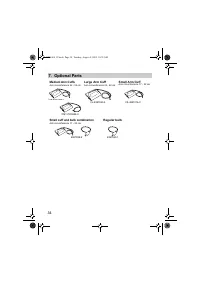
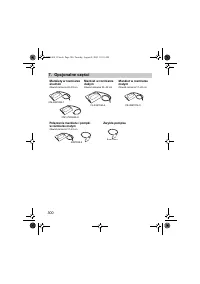
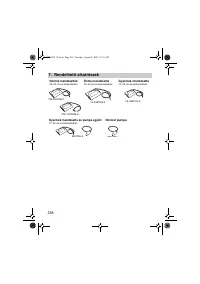
34 7.Optional Parts 7. Optional Parts Medium Arm Cuffs Arm circumference 22 - 32 cm Large Arm Cuff Arm circumference 32 - 42 cm Small Arm Cuff Arm circumference 17 - 22 cm Small cuff and bulb combination Arm circumference 17 - 22 cm Regular bulb CM1-7935058-8 CM-4997086-7 CL-4997065-4 CS-4997076-0 4...
Page 35 - Caution: Please read the instruction manual carefully
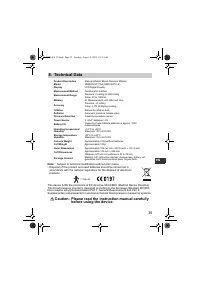
35 8.Technical Data EN 8. Technical Data Note: Subject to technical modification without prior notice • Disposal of this product and used batteries should be carried out in accordance with the national regulations for the disposal of electronic products. This device fulfils the previsions of EC dire...
Page 36 - EC
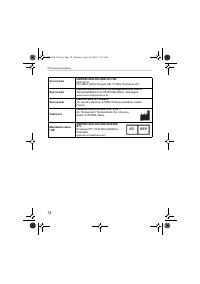
36 8.Technical Data Subsidiary OMRON HEALTHCARE UK LTD. Opal DriveFox Milne, Milton Keynes MK 15 0DG, United Kingdom Niederlassung OMRON Medizintechnik Handelsgesellschaft m.b.H. Windeckstraße 81a D-68163 Mannheim, Deutschland www.omron-medizintechnik.de Succursale OMRON SANTÉ FRANCE 14, rue de Lisb...
Page 37 - Some Useful Information about Blood Pressure; What is Blood Pressure?
37 9.Some Useful Information about Blood Pressure EN 9. Some Useful Information about Blood Pressure What is Blood Pressure? Blood pressure is a measure of the force of blood flowing against the walls of the arteries. Arterial blood pressure is constantly changing during the course of the heart’s cy...
Page 39 - Tensiomètre manuel; Modèle M1 Plus; РУКОВОДСТВО
Tensiomètre manuel Modèle M1 Plus • Instruction Manual• Mode d’emploi• Gebrauchsanweisung• Manuale di istruzioni• Manual de instrucciones• Gebruiksaanwijzing• РУКОВОДСТВО ПО ЭКСПЛУАТАЦИИ • Instrukcja• Kezelési Útmutató EN FR DE IT ES NL RU IM-HEM-4011C-E-01-07/05 PL HU FR HEM-4011C.book Page 39 Tues...
Page 40 - Table des matières; Position assise correcte lors de la réalisation d’une
40 Table des matières Introduction ............................................................................ 41Informations importantes sur la sécurité ............................ 421. Présentation générale ....................................................... 432. Préparation ...................
Page 42 - Informations importantes sur la sécurité; - Lorsque l’appareil ne doit pas être utilisé pendant une longue
42 Informations importantes sur la sécurité Consulter votre médecin si vous êtes enceinte, souffrez d’arythmie ou d’artériosclérose.Vous ne devez jamais changer la dose de médicament prescrite par votre médecin.Utiliser le M1 Plus uniquement sur vous-même. Attention : • Ne pas laisser l’appareil san...
Page 43 - Présentation générale; Unité principale; F. Compartiment des piles
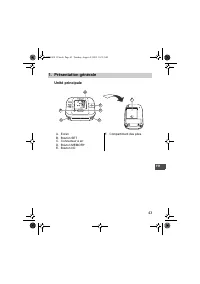
43 1.Présentation générale FR 1. Présentation générale Unité principale A. EcranB. Bouton SETC. Connecteur à airD. Bouton MEMORYE. Bouton I/O F. Compartiment des piles B A C C E D F HEM-4011C.book Page 43 Tuesday, August 9, 2005 10:35 AM
Page 44 - Brassard; Bouton de purge d’air
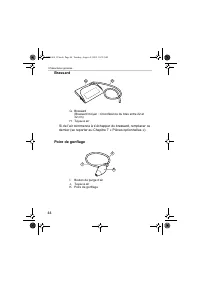
44 1.Présentation générale Brassard Si de l’air commence à s’échapper du brassard, remplacer ce dernier (se reporter au Chapitre 7 « Pièces optionnelles »). Poire de gonflage G. Brassard (Brassard moyen : circonférence du bras entre 22 et 32 cm) H. Tuyau à air I. Bouton de purge d’air J. Tuyau à air...
Page 45 - Ecran; O. Symbole de la valeur moyenne
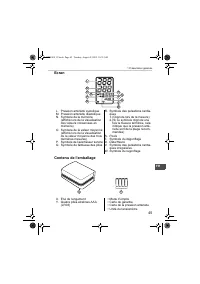
45 1.Présentation générale FR Ecran Contenu de l’emballage L. Pression artérielle systoliqueM. Pression artérielle diastoliqueN. Symbole de la mémoire (affiché lors de la visualisation des valeurs conservées en mémoire) O. Symbole de la valeur moyenne (affiché lors de la visualisation de la valeur m...
Page 46 - Installation/Remplacement des piles; Retourner l’appareil.
46 2.Préparation 2. Préparation 2.1 Installation/Remplacement des piles 1. Retourner l’appareil. 2. Faire glisser le couvercle du compartiment des piles dans le sens de la flèche tout en appuyant sur la partie nervurée du couvercle. 3. Installer ou remplacer les qua-tre piles AAA en faisant corres-p...
Page 47 - Durée de vie des piles et remplacement
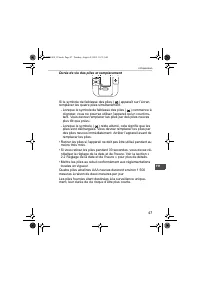
47 2.Préparation FR Durée de vie des piles et remplacement Si le symbole de faiblesse des piles ( ) apparaît sur l’écran, remplacer les quatre piles simultanément. - Lorsque le symbole de faiblesse des piles ( ) commence à clignoter, vous ne pourrez utiliser l’appareil qu’un court ins-tant. Vous dev...
Page 48 - Réglage de la date et de l’heure; prendre une mesure pour la première fois.
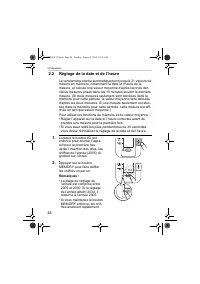
48 2.Préparation 2.2 Réglage de la date et de l’heure Le tensiomètre stocke automatiquement jusqu’à 21 valeurs de mesure en mémoire, notamment la date et l’heure de la mesure, et calcule une valeur moyenne d’après les trois der-nières mesures prises dans les 10 minutes suivant la dernière mesure. (S...
Page 49 - L'année est réglée et les chiffres du mois clignotent surl'écran.
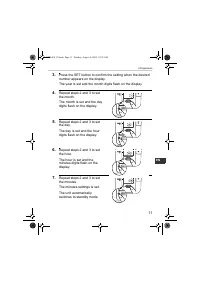
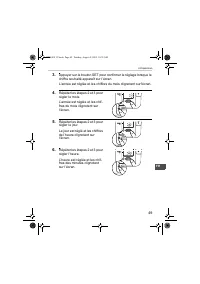
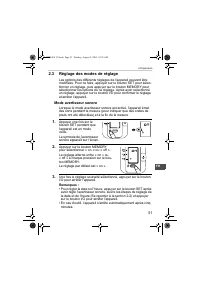
49 2.Préparation FR 3. Appuyer sur le bouton SET pour confirmer le réglage lorsque le chiffre souhaité apparaît sur l’écran. L'année est réglée et les chiffres du mois clignotent surl'écran. 4. Répéter les étapes 2 et 3 pour régler le mois. L’année est réglée et les chif-fres du mois clignotent sur ...
Page 51 - Réglage des modes de réglage; Mode avertisseur sonore
51 2.Préparation FR 2.3 Réglage des modes de réglage Les options des différents réglages de l’appareil peuvent être modifiées. Pour ce faire, appuyer sur le bouton SET pour sélec-tionner un réglage, puis appuyer sur le bouton MEMORY pour sélectionner les options de ce réglage. Après avoir sélectionn...
Page 52 - Utilisation de l’appareil; La mesure peut être réalisée sur le bras gauche ou droit.
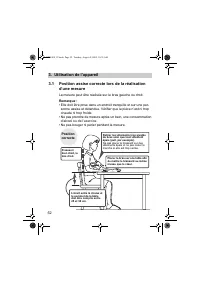
52 3.Utilisation de l’appareil 3. Utilisation de l’appareil 3.1 Position assise correcte lors de la réalisation d’une mesure La mesure peut être réalisée sur le bras gauche ou droit. Remarque : • Elle doit être prise dans un endroit tranquille et sur une per- sonne assise et détendue. Vérifier que l...
Page 53 - • Avoir une position correcte lors de la mesure est indispensa-; Position incorrecte
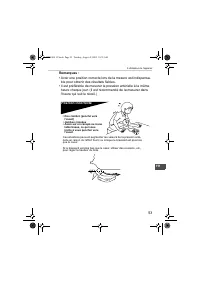
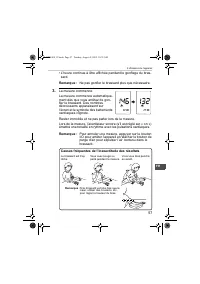
53 3.Utilisation de l’appareil FR Remarques : • Avoir une position correcte lors de la mesure est indispensa- ble pour obtenir des résultats fiables. • Il est préférable de mesurer la pression artérielle à la même heure chaque jour. (Il est recommandé de la mesurer dans l’heure qui suit le réveil.) ...
Page 54 - Application du brassard
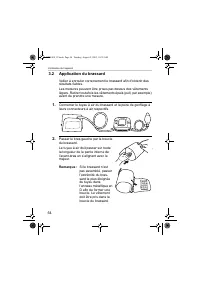
54 3.Utilisation de l’appareil 3.2 Application du brassard Veiller à enrouler correctement le brassard afin d’obtenir des résultats fiables. Les mesures peuvent être prises par-dessus des vêtements légers. Retirer toutefois les vêtements épais (pull, par exemple) avant de prendre une mesure. 1. Conn...
Page 55 - Positionner le bras correctement.; Réalisation de mesures au bras droit; • Le brassard doit être; ) Le tuyau à air doit passer
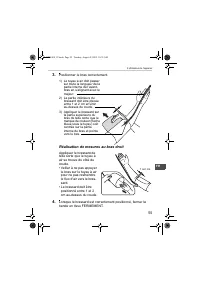
55 3.Utilisation de l’appareil FR 3. Positionner le bras correctement. Réalisation de mesures au bras droit Appliquer le brassard de telle sorte que le tuyau à air se trouve du côté du coude.• Veiller à ne pas appuyer le bras sur le tuyau à air pour ne pas restreindre le flux d’air vers le bras-sard...
Page 56 - Réalisation d’une mesure; Mise sous tension de l’appareil.; l’heure et 0 sont affichés.; Pomper la poire de gonflage pour gonfler le brassard.; ) Gonfler le brassard jusqu’à ce qu’il
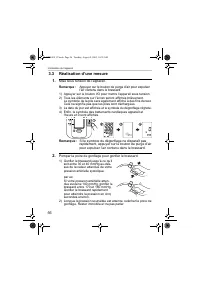
56 3.Utilisation de l’appareil 3.3 Réalisation d’une mesure 1. Mise sous tension de l’appareil. Remarque : Appuyer sur le bouton de purge d’air pour expulser l’air contenu dans le brassard. 1) Appuyer sur le bouton I/O pour mettre l’appareil sous tension.2) Tous les éléments sur l’écran seront affic...
Page 57 - • L’heure continue à être affichée pendant le gonflage du bras-; Causes fréquentes de l’inexactitude des résultats
57 3.Utilisation de l’appareil FR • L’heure continue à être affichée pendant le gonflage du bras- sard. Remarque : Ne pas gonfler le brassard plus que nécessaire. 3. La mesure commence. La mesure commence automatique-ment dès que vous arrêtez de gon-fler le brassard. Des nombres décroissants apparai...
Page 58 - La mesure se termine.
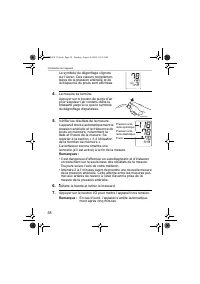
58 3.Utilisation de l’appareil Le symbole du dégonflage clignote sur l’écran. Des valeurs complémen-taires de la pression artérielle et de la fréquence du pouls sont affichées. 4. La mesure se termine. Appuyer sur le bouton de purge d’air pour expulser l’air contenu dans le brassard jusqu’à ce que l...
Page 59 - • Si votre pression systolique ou diastolique sort
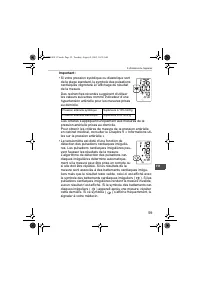
59 3.Utilisation de l’appareil FR Important : • Si votre pression systolique ou diastolique sort de la plage standard, le symbole des pulsations cardiaques clignotera à l’affichage du résultat de la mesure. Des recherches récentes suggèrent d’utiliser les valeurs suivantes comme indicateur d’une hyp...
Page 60 - ) apparaît sur l’écran en même temps que les résultats de
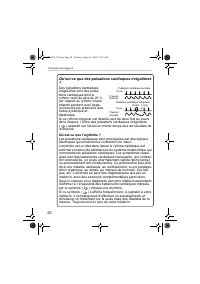
60 3.Utilisation de l’appareil Qu’est-ce que des pulsations cardiaques irrégulières ? Des pulsations cardiaques irrégulières sont des pulsa-tions cardiaques dont le rythme varie de plus de 25 % par rapport au rythme moyen détecté pendant que l’appa-reil mesure les pressions arté-rielles systolique e...
Page 61 - Utilisation de la fonction de mémoire
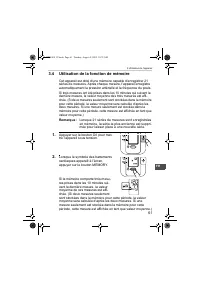
61 3.Utilisation de l’appareil FR 3.4 Utilisation de la fonction de mémoire Cet appareil est doté d’une mémoire capable d’enregistrer 21 séries de mesures. Après chaque mesure, l’appareil enregistre automatiquement la pression artérielle et la fréquence du pouls. Si trois mesures ont été prises dans...
Page 62 - Appuyer sur le bouton I/O pour arrêter l’appareil.
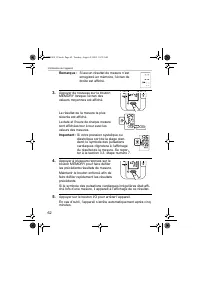
62 3.Utilisation de l’appareil Remarque : Si aucun résultat de mesure n’est enregistré en mémoire, l’écran de droite est affiché. 3. Appuyer de nouveau sur le bouton MEMORY lorsque l’écran des valeurs moyennes est affiché. Le résultat de la mesure la plus récente est affiché. La date et l’heure de c...
Page 63 - Pour supprimer toutes les valeurs stockées en mémoire
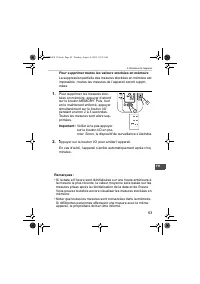
63 3.Utilisation de l’appareil FR Pour supprimer toutes les valeurs stockées en mémoire La suppression partielle des mesures stockées en mémoire est impossible ; toutes les mesures de l’appareil seront suppri-mées. 1. Pour supprimer les mesures stoc-kées en mémoire, appuyer d’abord sur le bouton MEM...
Page 64 - Guide de référence rapide; Fixer le brassard autour du bras à l’aide de la bande en tissu.
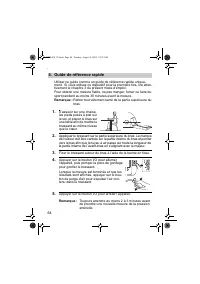
64 4.Guide de référence rapide 4. Guide de référence rapide Utiliser ce guide comme un guide de référence rapide unique-ment. Si vous utilisez ce dispositif pour la première fois, lire atten-tivement le chapitre 3 du présent mode d’emploi.Pour obtenir une mesure fiable, ne pas manger, fumer ou faire...
Page 65 - Résolution des erreurs et des problèmes
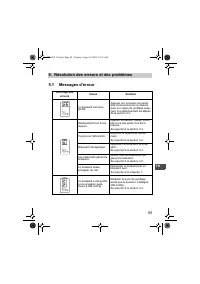
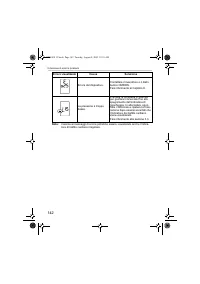
65 5.Résolution des erreurs et des problèmes FR 5. Résolution des erreurs et des problèmes 5.1 Messages d’erreur Affichage des erreurs Cause Solution Le brassard est sous-gonflé. Appuyer sur le bouton de purge d’air et recommencer la mesure avec un niveau de gonflage supé-rieur. Lire attentivement l...
Page 67 - Dépannage
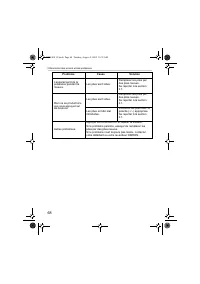
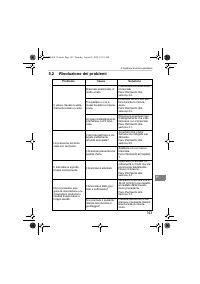
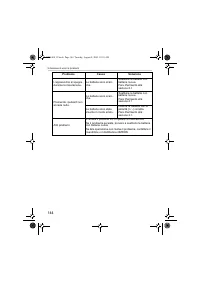
67 5.Résolution des erreurs et des problèmes FR 5.2 Dépannage Problème Cause Solution La mesure est extrême-ment basse (ou élevée). Brassard mal appliqué. Appliquer correctement le brassard. Se reporter à la section 3.2. Vous avez bougé ou parlé pendant la mesure. Rester immobile et ne pas parler lo...
Page 69 - Maintenance et stockage; • Ne pas installer l’appareil et le brassard dans des environne-; • Ne pas procéder vous-même à des réparations d’aucune
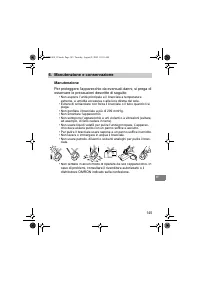
69 6.Maintenance et stockage FR 6. Maintenance et stockage Maintenance Pour protéger votre appareil des dommages éventuels, observer les recommandations suivantes : • Ne pas installer l’appareil et le brassard dans des environne- ments soumis à des températures extrêmes, à une humidité important ou ...
Page 70 - Calibration et service; • Des tests rigoureux ont été réalisés afin de garantir la préci-
70 6.Maintenance et stockage Calibration et service • Des tests rigoureux ont été réalisés afin de garantir la préci- sion de ce tensiomètre et de lui assurer une longue durée de vie. • Il est généralement recommandé de faire inspecter l’appareil tous les deux ans afin de garantir son bon fonctionne...
Page 71 - Stockage; Débrancher le tuyau à air du connecteur à air.
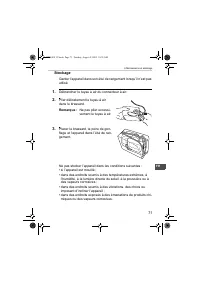
71 6.Maintenance et stockage FR Stockage Garder l’appareil dans son étui de rangement lorsqu’il n’est pas utilisé. 1. Débrancher le tuyau à air du connecteur à air. 2. Plier délicatement le tuyau à air dans le brassard. Remarque : Ne pas plier excessi-vement le tuyau à air. 3. Placer le brassard, la...
Page 72 - Pièces optionnelles; Brassards moyens; Poire courante
72 7.Pièces optionnelles 7. Pièces optionnelles Brassards moyens Circonférence du bras entre 22 et 32 cm Grand brassard Circonférence du bras entre 32 et 42 cm Petit brassard Circonférence du bras entre 17 et 22 cm Combinaison petit brassard/poire Circonférence du bras entre 17 et 22 cm Poire couran...
Page 73 - Données techniques; Attention : Lire le mode d’emploi attentivement avant
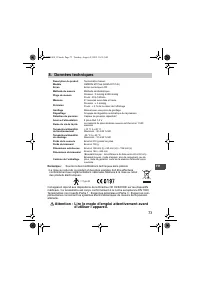
73 8.Données techniques FR 8. Données techniques Remarque : Soumis à des modifications techniques sans préavis • La mise au rebut de ce produit et des piles usagées doit être effectuée conformément aux réglementations nationales relatives à la mise au rebut des produits électroniques. Cet appareil r...
Page 75 - Informations utiles sur la pression artérielle; sion artérielle systolique
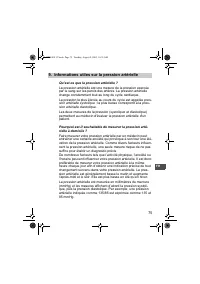
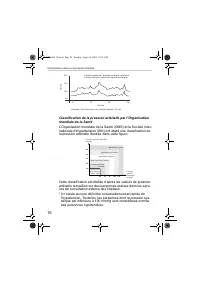
75 9.Informations utiles sur la pression artérielle FR 9. Informations utiles sur la pression artérielle Qu’est-ce que la pression artérielle ? La pression artérielle est une mesure de la pression exercée par le sang sur les parois des artères. La pression artérielle change constamment tout au long ...
Page 77 - Halbautomatisches Blutdruckmessgerät; Modell M1 Plus
Halbautomatisches Blutdruckmessgerät Modell M1 Plus • Instruction Manual• Mode d’emploi• Gebrauchsanweisung• Manuale di istruzioni• Manual de instrucciones• Gebruiksaanwijzing• РУКОВОДСТВО ПО ЭКСПЛУАТАЦИИ • Instrukcja• Kezelési Útmutató EN FR DE IT ES NL RU IM-HEM-4011C-E-01-07/05 PL HU HEM-4011C.bo...
Page 78 - Inhalt
78 Inhalt Einführung .............................................................................. 79Sicherheitsinformationen ...................................................... 801. Überblick ............................................................................ 812. Vorbereitung ...........
Page 79 - Einführung
79 DE Einführung Vielen Dank, dass Sie sich für das OMRON M1 Plus Oberarm-Blutdruckmessgerät entschieden haben. Das OMRON M1 Plus ist ein halbautomatisches Blutdruck-messgerät, das auf dem oszillometrischen Prinzip beruht. Es misst Ihren Blutdruck und die Pulsfrequenz einfach und schnell. Außerdem s...
Page 80 - Sicherheitsinformationen
80 Sicherheitsinformationen Bei Schwangerschaft, Arrhythmie und Arteriosklerose sollten Sie sich an Ihren Arzt wenden.Ändern Sie niemals die Dosis eines vom Arzt verordneten Medikaments.Verwenden Sie das M1 Plus nur für sich selbst. Achtung: • Das Messgerät nicht unbeaufsichtigt bei Kleinkindern ode...
Page 81 - Hauptgerät
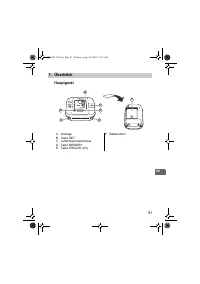
81 1.Überblick DE 1. Überblick Hauptgerät A. AnzeigeB. Taste SETC. LuftschlauchanschlussD. Taste MEMORYE. Taste EIN/AUS (I/O) F. Batteriefach B A C C E D F HEM-4011C.book Page 81 Tuesday, August 9, 2005 10:35 AM
Page 82 - Luftablassknopf
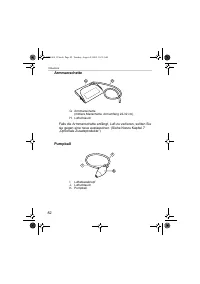
82 1.Überblick Armmanschette Falls die Armmanschette anfängt, Luft zu verlieren, sollten Sie sie gegen eine neue austauschen. (Siehe hierzu Kapitel 7 „Optionale Zusatzprodukte“) Pumpball G. Armmanschette (mittlere Manschette: Armumfang 22-32 cm) H. Luftschlauch I. Luftablassknopf J. LuftschlauchK. P...
Page 83 - schlag
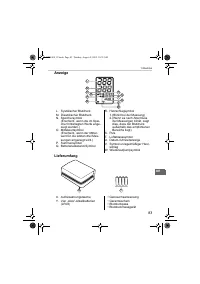
83 1.Überblick DE Anzeige Lieferumfang L. Systolischer BlutdruckM. Diastolischer BlutdruckN. Speichersymbol (Erscheint, wenn die im Spei-cher hinterlegten Werte ange-zeigt werden.) O. Mittelwertsymbol (Erscheint, wenn der Mittel-wert für die letzten drei Mes-sungen angezeigt wird.) P. SummersymbolQ....
Page 84 - Batterien einsetzen und auswechseln; Das Hauptgerät kopfüber drehen.
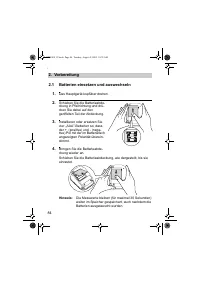
84 2.Vorbereitung 2. Vorbereitung 2.1 Batterien einsetzen und auswechseln 1. Das Hauptgerät kopfüber drehen. 2. Schieben Sie die Batterieabde-ckung in Pfeilrichtung und drü-cken Sie dabei auf den geriffelten Teil der Abdeckung. 3. Installieren oder ersetzen Sie vier „ AAA “ -Batterien so, dass der +...
Page 85 - Batterie-Lebensdauer und Austausch
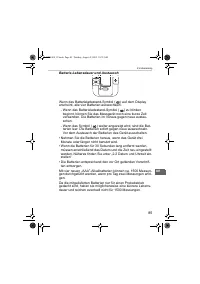
85 2.Vorbereitung DE Batterie-Lebensdauer und Austausch Wenn das Batterieladestand-Symbol ( ) auf dem Display erscheint, alle vier Batterien auswechseln. - Wenn das Batterieladestand-Symbol ( ) zu blinken beginnt, können Sie das Messgerät noch eine kurze Zeit verwenden. Die Batterien im Voraus gegen...
Page 86 - Datum und Uhrzeit einstellen; Datum und die Uhrzeit einstellen.
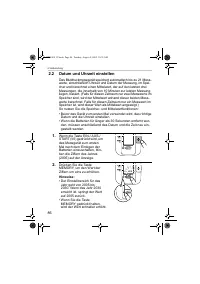
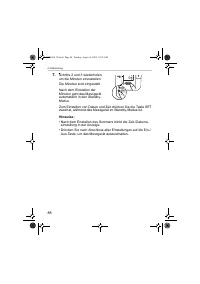
86 2.Vorbereitung 2.2 Datum und Uhrzeit einstellen Das Blutdruckmessgerät speichert automatisch bis zu 21 Mess-werte, einschließlich Uhrzeit und Datum der Messung, im Spei-cher und berechnet einen Mittelwert, der auf den letzten drei Messungen, die innerhalb von 10 Minuten zur letzten Messung liegen...
Page 89 - Anpassen der Einstellungsmodi
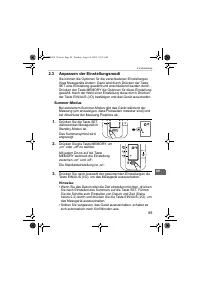
89 2.Vorbereitung DE 2.3 Anpassen der Einstellungsmodi Sie können die Optionen für die verschiedenen Einstellungen Ihres Messgeräts ändern. Dazu wird durch Drücken der Taste SET eine Einstellung gewählt und anschließend werden durch Drücken der Taste MEMORY die Optionen für diese Einstellung gewählt...
Page 90 - Verwendung des Messgeräts; Sie können die Messung am rechten oder linken Arm durchführen.
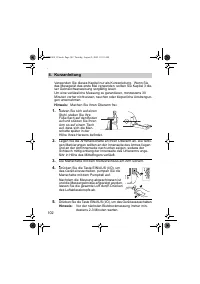
90 3.Verwendung des Messgeräts 3. Verwendung des Messgeräts 3.1 So sitzen Sie beim Messen richtig Sie können die Messung am rechten oder linken Arm durchführen. Hinweis: • Messungen sollten an einem ruhigen Ort durchgeführt wer- den und Sie sollten entspannt sitzen. Stellen Sie sicher, dass das Zimm...
Page 91 - • Die richtige Körperhaltung ist zum Erlangen genauer Ergeb-; Falsche Haltung
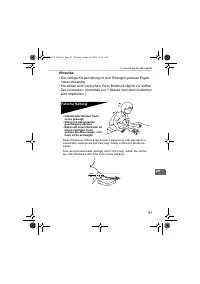
91 3.Verwendung des Messgeräts DE Hinweise: • Die richtige Körperhaltung ist zum Erlangen genauer Ergeb- nisse notwendig. • Sie sollten auch versuchen, Ihren Blutdruck täglich zur selben Zeit zu messen. (Innerhalb von 1 Stunde nach dem Aufstehen wird empfohlen.) Falsche Haltung Diese Situationen füh...
Page 92 - Anlegen der Armmanschette
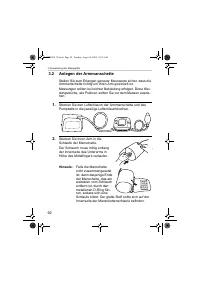
92 3.Verwendung des Messgeräts 3.2 Anlegen der Armmanschette Stellen Sie zum Erlangen genauer Messwerte sicher, dass die Armmanschette richtig um Ihren Arm gewickelt ist. Messungen sollten bei leichter Bekleidung erfolgen. Dicke Klei-dungsstücke, wie Pullover, sollten Sie vor dem Messen auszie-hen. ...
Page 93 - Armmanschette richtig anbringen.; Messungen am rechten Arm; • Die Manschette muss; ) Der Schlauch muss mittig
93 3.Verwendung des Messgeräts DE 3. Armmanschette richtig anbringen. Messungen am rechten Arm Legen Sie die Manschette so an, dass der Luft-schlauch an der Seite Ihres Ellbogens verläuft.• Achten Sie darauf, dass Ihr Arm nicht auf dem Luftschlauch liegt, da dadurch der Luftstrom zur Manschette behi...
Page 94 - Eine Messung vornehmen; Einschalten des Messgeräts.; ) Das aktuelle Datum wird angezeigt und das Luftablasssymbol; Pumpen Sie die Armmanschette mit dem Pumpball auf.; ) Wenn der gewünschte Druck erreicht ist, lassen Sie den
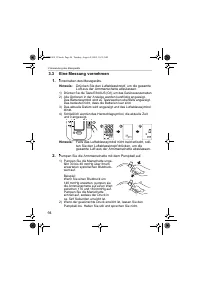
94 3.Verwendung des Messgeräts 3.3 Eine Messung vornehmen 1. Einschalten des Messgeräts. Hinweis: Drücken Sie den Luftablassknopf, um die gesamte Luft aus der Armmanschette abzulassen. 1) Drücken Sie die Taste EIN/AUS (O/l), um das Gerät auszuschalten.2) Alle Optionen in der Anzeige werden kurzfrist...
Page 95 - • Die aktuelle Zeit wird weiter angezeigt, während die Man-; Übliche Gründe für ungenaue Messungen
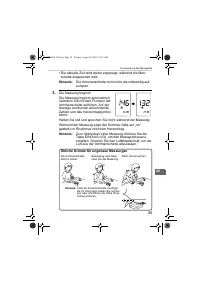
95 3.Verwendung des Messgeräts DE • Die aktuelle Zeit wird weiter angezeigt, während die Man- schette aufgepumpt wird. Hinweis: Die Armmanschette nicht mehr als notwendig auf-pumpen. 3. Die Messung beginnt. Die Messung beginnt automatisch, nachdem Sie mit dem Pumpen der Armmanschette aufhören. Auf d...
Page 96 - Überprüfen Sie die Messergebnisse.
96 3.Verwendung des Messgeräts Das Luftablasssymbol blinkt in der Anzeige. Blutdruck- und Pulsfre-quenzwerte werden angezeigt. 4. Die Messung ist zu Ende.Drücken Sie den Luftablassknopf, um solange Luft aus der Armmanschette abzulassen, bis das Luftablasssym-bol nicht mehr angezeigt wird. 5. Überprü...
Page 97 - • Wenn Ihr systolischer oder diastolischer Blut-
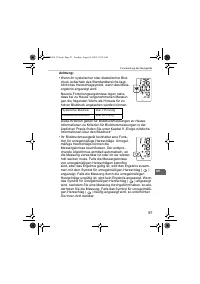
97 3.Verwendung des Messgeräts DE Achtung: • Wenn Ihr systolischer oder diastolischer Blut- druck außerhalb des Standardbereichs liegt, blinkt das Herzschlagsymbol, wenn das Mess-ergebnis angezeigt wird. Neuere Forschungsergebnisse legen nahe, dass bei zu Hause vorgenommenen Messun-gen die folgenden...
Page 98 - Was ist ein unregelmäßiger Herzschlag?; ) Folge einer Arrhythmie ist oder nicht, kann nur durch
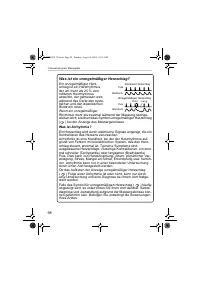
98 3.Verwendung des Messgeräts Was ist ein unregelmäßiger Herzschlag? Ein unregelmäßiger Herz-schlag ist ein Herzrhythmus, der um mehr als 25 % vom mittleren Herzrhythmus abweicht, der gemessen wird, während das Gerät den systo-lischen und den diastolischen Blutdruck misst.Wenn ein unregelmäßiger Rh...
Page 99 - Benutzung der Speicherfunktion
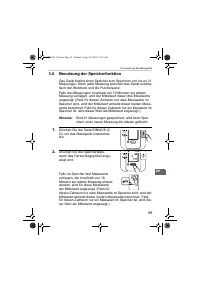
99 3.Verwendung des Messgeräts DE 3.4 Benutzung der Speicherfunktion Das Gerät besitzt einen Speicher zum Speichern von bis zu 21 Messungen. Nach jeder Messung speichert das Gerät automa-tisch den Blutdruck und die Pulsfrequenz. Falls drei Messungen innerhalb von 10 Minuten zur letzten Messung vorli...
Page 101 - Löschen aller gespeicherten Werte
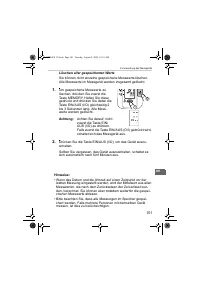
101 3.Verwendung des Messgeräts DE Löschen aller gespeicherten Werte Sie können nicht einzelne gespeicherte Messwerte löschen. Alle Messwerte im Messgerät werden insgesamt gelöscht. 1. Um gespeicherte Messwerte zu löschen, drücken Sie zuerst die Taste MEMORY. Halten Sie diese gedrückt und drücken Si...
Page 103 - Fehlermeldungen
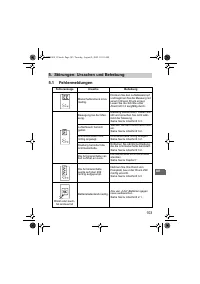
103 5.Störungen: Ursachen und Behebung DE 5. Störungen: Ursachen und Behebung 5.1 Fehlermeldungen Fehleranzeige Ursache Behebung Manschettendruck ist zu niedrig. Drücken Sie den Luftablassknopf und beginnen Sie die Messung mit einem höheren Druck erneut. Lesen Sie die Schritte unter Abschnitt 3.3 so...
Page 105 - Fehlersuche und -behebung
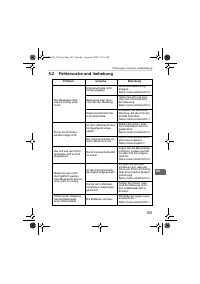
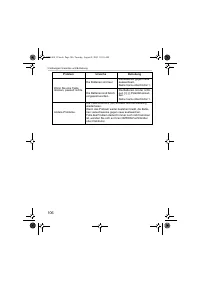
105 5.Störungen: Ursachen und Behebung DE 5.2 Fehlersuche und -behebung Problem Ursache Behebung Die Messwerte sind extrem niedrig (oder hoch). Armmanschette nicht richtig angelegt. Armmanschette richtig anlegen. Siehe hierzu Abschnitt 3.2. Bewegung oder Spre-chen bei der Messung. Halten Sie still u...
Page 107 - Wartung und Aufbewahrung; Wartung; • Das Hauptgerät und die Manschette keinen extremen Tempera-; • Nehmen Sie selbst keine Reparaturen vor. Wenden Sie sich
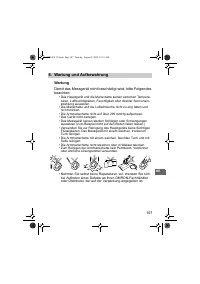
107 6.Wartung und Aufbewahrung DE 6. Wartung und Aufbewahrung Wartung Damit das Messgerät nicht beschädigt wird, bitte Folgendes beachten: • Das Hauptgerät und die Manschette keinen extremen Tempera- turen, Luftfeuchtigkeiten, Feuchtigkeit oder direkter Sonnenein-strahlung aussetzen. • Die Manschett...
Page 108 - Kalibrierung und Wartung; • Die Genauigkeit dieses Blutdruckmessgeräts wurde sorgfältig
108 6.Wartung und Aufbewahrung Kalibrierung und Wartung • Die Genauigkeit dieses Blutdruckmessgeräts wurde sorgfältig geprüft und im Hinblick auf eine lange nutzbare Lebensdauer entwickelt. • Es wird im Allgemeinen empfohlen, bei dem Messgerät alle zwei Jahre eine Inspektion durchführen zu lassen, u...
Page 109 - Aufbewahrung; • An Plätzen, die Vibrationen oder Stößen ausgesetzt sind,
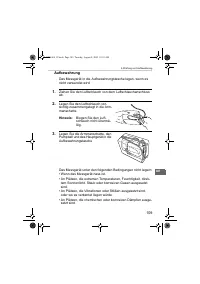
109 6.Wartung und Aufbewahrung DE Aufbewahrung Das Messgerät in die Aufbewahrungstasche legen, wenn es nicht verwendet wird. 1. Ziehen Sie den Luftschlauch von dem Luftschlauchanschluss ab. 2. Legen Sie den Luftschlauch vor-sichtig zusammengelegt in die Arm-manschette. Hinweis: Biegen Sie den Luft-s...
Page 110 - Optionale Zusatzprodukte; Normaler Pumpball
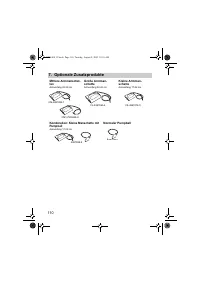
110 7.Optionale Zusatzprodukte 7. Optionale Zusatzprodukte Mittlere Armmanschet-ten Armumfang 22-32 cm Große Armman-schette Armumfang 32-42 cm Kleine Armman-schette Armumfang 17-22 cm Kombination: Kleine Manschette mit Pumpball Armumfang 17-22 cm Normaler Pumpball CM1-7935058-8 CM-4997086-7 CL-49970...
Page 111 - Achtung: Lesen Sie diese Gebrauchsanweisung aufmerk-
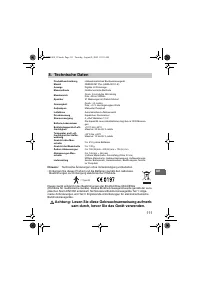
111 8.Technische Daten DE 8. Technische Daten Hinweis: Technische Änderungen ohne Vorankündigung vorbehalten. • Entsorgen Sie dieses Produkt und die Batterien gemäß den nationalen Bestimmungen zur Entsorgung elektronischer Produkte. Dieses Gerät entspricht den Bestimmungen der EG-Richtlinie 93/42/EW...
Page 113 - Einige nützliche Informationen über den Blutdruck; systolischer Blutdruck
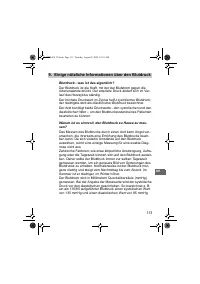
113 9.Einige nützliche Informationen über den Blutdruck DE 9. Einige nützliche Informationen über den Blutdruck Blutdruck - was ist das eigentlich? Der Blutdruck ist die Kraft, mit der der Blutstrom gegen die Arterienwände drückt. Der arterielle Druck ändert sich im Ver-lauf des Herzzyklus ständig. ...
Page 115 - Misuratore di pressione a gonfiaggio manuale; Modello M1 Plus
Misuratore di pressione a gonfiaggio manuale Modello M1 Plus • Instruction Manual• Mode d’emploi• Gebrauchsanweisung• Manuale di istruzioni• Manual de instrucciones• Gebruiksaanwijzing• РУКОВОДСТВО ПО ЭКСПЛУАТАЦИИ • Instrukcja• Kezelési Útmutató EN FR DE IT ES NL RU IM-HEM-4011C-E-01-07/05 PL HU HEM...
Page 116 - Sommario; Come assumere una posizione corretta quando si
116 Sommario Introduzione .......................................................................... 117Informazioni importanti sulla sicurezza ............................. 1181. Panoramica ...................................................................... 1192. Preparazione.......................
Page 117 - Introduzione
117 IT Introduzione Grazie per aver acquistato il misuratore di pressione arteriosa OMRON M1 Plus. OMRON M1 Plus è un misuratore di pressione a gonfiaggio manuale, il cui funzionamento si basa sul principio oscillome-trico. L’apparecchio misura in modo semplice e rapido la pres-sione arteriosa e la ...
Page 118 - Informazioni importanti sulla sicurezza
118 Informazioni importanti sulla sicurezza Consultare il medico curante in caso di gravidanza, aritmia o arterio-sclerosi.Non modificare mai le dosi di medicinali prescritte dal medico curante.Usare l’apparecchio M1 Plus solo per una persona. Attenzione: • Non lasciare l’apparecchio incustodito in ...
Page 119 - Unità principale; F. Alloggiamento batterie
119 1.Panoramica IT 1. Panoramica Unità principale A. DisplayB. Pulsante SETC. Connettore per l’ariaD. Pulsante MEMORYE. Pulsante I/O F. Alloggiamento batterie B A C C E D F HEM-4011C.book Page 119 Tuesday, August 9, 2005 10:35 AM
Page 120 - Pulsante rilascio aria
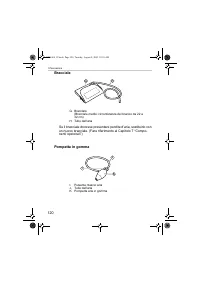
120 1.Panoramica Bracciale Se il bracciale dovesse presentare perdite d’aria, sostituirlo con un nuovo bracciale. (Fare riferimento al Capitolo 7 “Compo-nenti opzionali”) Pompetta in gomma G. Bracciale (Bracciale medio: circonferenza del braccio da 22 a 32 cm) H. Tubo dell’aria I. Pulsante rilascio ...
Page 122 - Installazione/sostituzione delle batterie; Capovolgere l’unità principale.
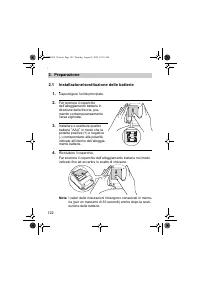
122 2.Preparazione 2. Preparazione 2.1 Installazione/sostituzione delle batterie 1. Capovolgere l’unità principale. 2. Far scorrere il coperchio dell’alloggiamento batterie in direzione della freccia, pre-mendo contemporaneamente l’area zigrinata. 3. Installare o sostituire quattro batterie “ AAA ” ...
Page 123 - Durata delle batterie e sostituzione
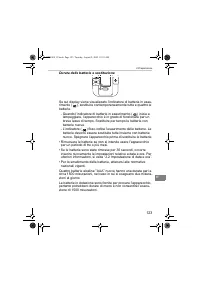
123 2.Preparazione IT Durata delle batterie e sostituzione Se sul display viene visualizzato l’indicatore di batteria in esau-rimento ( ), sostituire contemporaneamente tutte e quattro le batterie. - Quando l’indicatore di batterie in esaurimento ( ) inizia a lampeggiare, l’apparecchio è in grado di...
Page 124 - Impostazione di data e ora; eseguire la prima misurazione.
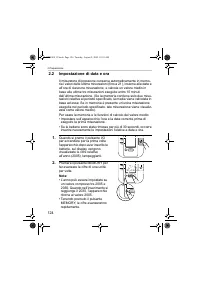
124 2.Preparazione 2.2 Impostazione di data e ora Il misuratore di pressione conserva automaticamente in memo-ria i valori delle ultime misurazioni (fino a 21), insieme alla data e all’ora di ciascuna misurazione, e calcola un valore medio in base alle ultime tre misurazioni eseguite entro 10 minuti...
Page 125 - I minuti risultano impostati.
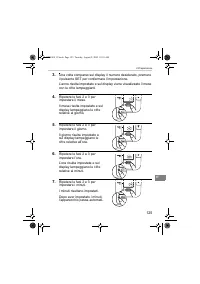
125 2.Preparazione IT 3. Una volta comparso sul display il numero desiderato, premere il pulsante SET per confermare l’impostazione. L’anno risulta impostato e sul display viene visualizzato il mese con le cifre lampeggianti. 4. Ripetere le fasi 2 e 3 per impostare il mese. Il mese risulta impostato...
Page 127 - Regolazione delle modalità di impostazione; Modalità avvisi acustici
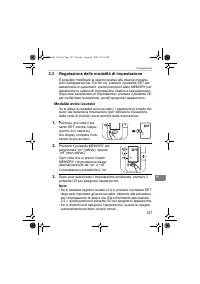
127 2.Preparazione IT 2.3 Regolazione delle modalità di impostazione È possibile modificare le opzioni relative alle diverse imposta-zioni dell’apparecchio. Per far ciò, premere il pulsante SET per selezionare un parametro, quindi premere il tasto MEMORY per selezionare le opzioni di impostazione re...
Page 128 - Uso dell’apparecchio; • Eseguire la misurazione in un luogo tranquillo, stando seduti
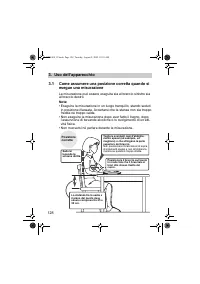
128 3.Uso dell’apparecchio 3. Uso dell’apparecchio 3.1 Come assumere una posizione corretta quando si esegue una misurazione La misurazione può essere eseguita sia al braccio sinistro sia al braccio destro. Nota: • Eseguire la misurazione in un luogo tranquillo, stando seduti in posizione rilassata....
Page 129 - • Per ottenere risultati accurati è necessario assumere una; Posizione errata
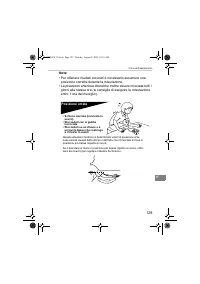
129 3.Uso dell’apparecchio IT Note: • Per ottenere risultati accurati è necessario assumere una posizione corretta durante la misurazione. • La pressione arteriosa dovrebbe inoltre essere misurata tutti i giorni alla stessa ora (si consiglia di eseguire la misurazione entro 1 ora dal risveglio). Pos...
Page 130 - Applicazione del bracciale
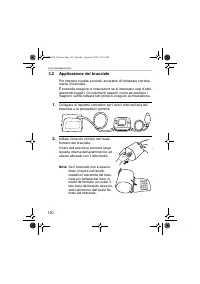
130 3.Uso dell’apparecchio 3.2 Applicazione del bracciale Per ottenere risultati accurati, accertarsi di indossare corretta-mente il bracciale. È possibile eseguire le misurazioni se si indossano capi d’abbi-gliamento leggeri. Gli indumenti pesanti, come ad esempio i maglioni, vanno tuttavia tolti p...
Page 131 - Posizionare correttamente il braccio.; Esecuzione delle misurazioni al braccio destro; • Il bracciale deve essere; ) Sistemare il bracciale sulla
131 3.Uso dell’apparecchio IT 3. Posizionare correttamente il braccio. Esecuzione delle misurazioni al braccio destro Posizionare il bracciale in modo che il tubo si trovi in posizione laterale rispetto al gomito.• Prestare attenzione a non appoggiare il brac-cio sul tubo dell’aria e a non bloccare ...
Page 132 - Misurazione; Accendere l’apparecchio.; ) Compare infine l’indicatore del battito cardiaco e vengono; Gonfiare il bracciale mediante la pompetta in gomma.; ) Una volta raggiunta la pressione desiderata, rilasciare la pom-
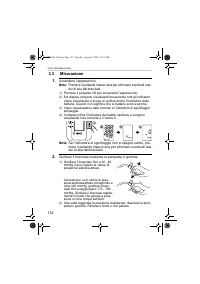
132 3.Uso dell’apparecchio 3.3 Misurazione 1. Accendere l’apparecchio. Nota: Premere il pulsante rilascio aria per eliminare eventuali resi-dui di aria dal bracciale. 1) Premere il pulsante I/O per accendere l’apparecchio.2) Sul display vengono visualizzati brevemente tutti gli indicatori. Viene vis...
Page 133 - • L’ora corrente continua ad essere visualizzata durante il gon-; Problemi comuni che determinano risultati imprecisi
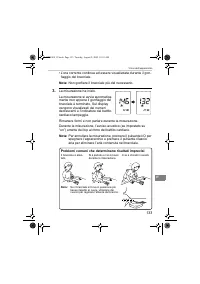
133 3.Uso dell’apparecchio IT • L’ora corrente continua ad essere visualizzata durante il gon- fiaggio del bracciale. Nota: Non gonfiare il bracciale più del necessario. 3. La misurazione ha inizio. La misurazione si avvia automatica-mente non appena il gonfiaggio del bracciale è terminato. Sul disp...
Page 134 - • È pericoloso eseguire l’autodiagnosi e l’autotrattamento in base
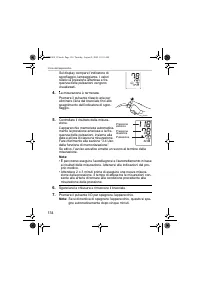
134 3.Uso dell’apparecchio Sul display compare l’indicatore di sgonfiaggio, lampeggiante. I valori relativi a pressione arteriosa e fre-quenza delle pulsazioni vengono visualizzati. 4. La misurazione è terminata.Premere il pulsante rilascio aria per eliminare l’aria dal bracciale fino allo spegnimen...
Page 135 - • Se la pressione sistolica o diastolica non rientra
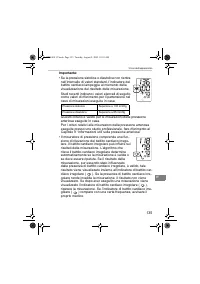
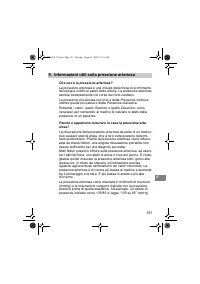
135 3.Uso dell’apparecchio IT Importante: • Se la pressione sistolica o diastolica non rientra nell’intervallo di valori standard, l’indicatore del battito cardiaco lampeggia al momento della visualizzazione del risultato della misurazione. Studi recenti indicano i valori elencati di seguito come va...
Page 136 - Che cos’è il battito cardiaco irregolare?; ) nel risultato della misurazione
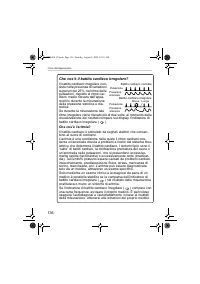
136 3.Uso dell’apparecchio Che cos’è il battito cardiaco irregolare? Il battito cardiaco irregolare con-siste nella presenza di variazioni superiori del 25%, nel ritmo delle pulsazioni, rispetto al ritmo car-diaco medio rilevato dall’appa-recchio durante la misurazione della pressione sistolica e di...
Page 137 - Uso della funzione di memorizzazione
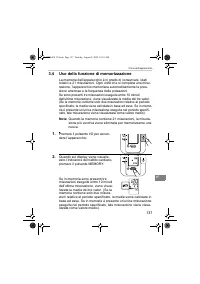
137 3.Uso dell’apparecchio IT 3.4 Uso della funzione di memorizzazione La memoria dell’apparecchio è in grado di conservare i dati relativi a 21 misurazioni. Ogni volta che si completa una misu-razione, l’apparecchio memorizza automaticamente la pres-sione arteriosa e la frequenza delle pulsazioni. ...
Page 138 - Se la pressione sistolica o diastolica
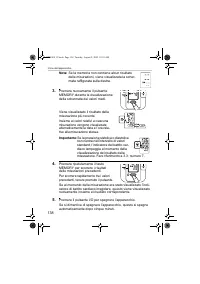
138 3.Uso dell’apparecchio Nota: Se la memoria non contiene alcun risultato delle misurazioni, viene visualizzata la scher-mata raffigurata sulla destra. 3. Premere nuovamente il pulsante MEMORY durante la visualizzazione della schermata dei valori medi. Viene visualizzato il risultato della misuraz...
Page 139 - Cancellazione di tutti i valori conservati in memoria
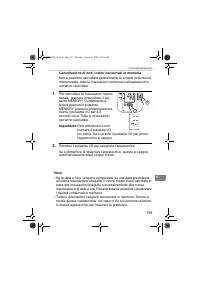
139 3.Uso dell’apparecchio IT Cancellazione di tutti i valori conservati in memoria Non è possibile cancellare parzialmente le singole misurazioni memorizzate; tutte le misurazioni contenute nell’apparecchio verranno cancellate. 1. Per cancellare le misurazioni memo-rizzate, premere innanzitutto il ...
Page 140 - Guida rapida di riferimento; Premere il pulsante I/O per spegnere l’apparecchio.
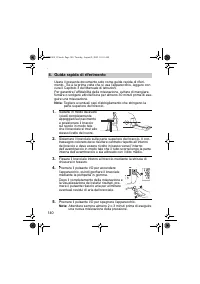
140 4.Guida rapida di riferimento 4. Guida rapida di riferimento Usare il presente documento solo come guida rapida di riferi-mento. Se è la prima volta che si usa l’apparecchio, leggere con cura il Capitolo 3 del Manuale di istruzioni.Per garantire l’affidabilità della misurazione, evitare di mangi...
Page 141 - Gestione di errori e problemi
141 5.Gestione di errori e problemi IT 5. Gestione di errori e problemi 5.1 Messaggi di errore Errore visualizzato Causa Soluzione Il bracciale non è abba-stanza gonfio. Premere il pulsante rilascio aria ed eseguire nuovamente la misura-zione gonfiando il bracciale a un livello di pressione maggiore...
Page 143 - Risoluzione dei problemi
143 5.Gestione di errori e problemi IT 5.2 Risoluzione dei problemi Problema Causa Soluzione Il valore rilevato è estre-mamente basso (o alto). Bracciale posizionato in modo errato. Posizionare correttamente il bracciale. Fare riferimento alla sezione 3.2. Si è parlato o ci si è mossi durante la mis...
Page 145 - Manutenzione e conservazione; Manutenzione; • Non esporre l’unità principale e il bracciale a temperature; • Non tentare in alcun modo di riparare da soli l’apparecchio. In
145 6.Manutenzione e conservazione IT 6. Manutenzione e conservazione Manutenzione Per proteggere l’apparecchio da eventuali danni, si prega di osservare le precauzioni descritte di seguito: • Non esporre l’unità principale e il bracciale a temperature estreme, a umidità eccessiva o alla luce dirett...
Page 146 - Calibrazione e assistenza; • La precisione di questo misuratore di pressione arteriosa è
146 6.Manutenzione e conservazione Calibrazione e assistenza • La precisione di questo misuratore di pressione arteriosa è stata verificata con cura; l’apparecchio è progettato per durare a lungo. • Per garantirne la precisione e il funzionamento corretto, si consiglia di far controllare l’apparecch...
Page 147 - Conservazione; Scollegare il tubo dell’aria dal connettore per l’aria.
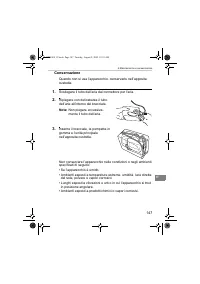
147 6.Manutenzione e conservazione IT Conservazione Quando non si usa l’apparecchio, conservarlo nell’apposita custodia. 1. Scollegare il tubo dell’aria dal connettore per l’aria. 2. Ripiegare con delicatezza il tubo dell’aria all’interno del bracciale. Nota: Non piegare eccessiva-mente il tubo dell...
Page 148 - Componenti opzionali; Bracciali medi; Pompetta standard
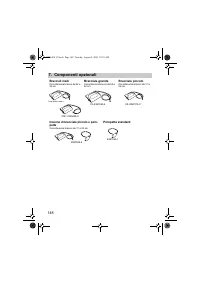
148 7.Componenti opzionali 7. Componenti opzionali Bracciali medi Circonferenza braccio da 22 a 32 cm Bracciale grande Circonferenza braccio da 32 a 42 cm Bracciale piccolo Circonferenza braccio da 17 a 22 cm Insieme di bracciale piccolo e pom-petta Circonferenza braccio da 17 a 22 cm Pompetta stand...
Page 149 - Attenzione: Leggere attentamente il manuale di istru-
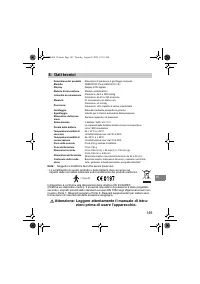
149 8.Dati tecnici IT 8. Dati tecnici Nota: Soggetto a modifiche tecniche senza preavviso • Lo smaltimento di questo prodotto e delle batterie deve avvenire nel rispetto della normativa nazionale sullo smaltimento dei prodotti elettronici. Il dispositivo è conforme alle disposizioni della direttiva ...
Page 151 - Informazioni utili sulla pressione arteriosa; Che cos’è la pressione arteriosa?
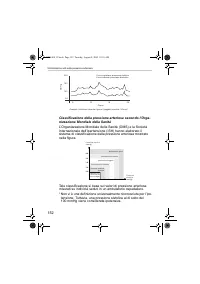
151 9.Informazioni utili sulla pressione arteriosa IT 9. Informazioni utili sulla pressione arteriosa Che cos’è la pressione arteriosa? La pressione arteriosa è una misura della forza di scorrimento del sangue contro le pareti delle arterie. La pressione arteriosa cambia costantemente nel corso del ...
Page 153 - Monitor de presión arterial de inflado manual; Modelo M1 Plus
Monitor de presión arterial de inflado manual Modelo M1 Plus • Instruction Manual• Mode d’emploi• Gebrauchsanweisung• Manuale di istruzioni• Manual de instrucciones• Gebruiksaanwijzing• РУКОВОДСТВО ПО ЭКСПЛУАТАЦИИ • Instrukcja• Kezelési Útmutató EN FR DE IT ES NL RU IM-HEM-4011C-E-01-07/05 PL HU HEM...
Page 154 - Índice; Cómo sentarse correctamente cuando se realice la
154 Índice Introducción ......................................................................... 155Información importante sobre seguridad .......................... 1561. Descripción general ........................................................ 1572. Preparación ...................................
Page 155 - Introducción
155 ES Introducción Gracias por comprar el monitor de presión arterial OMRON M1 para el brazo. El OMRON M1 es un monitor de presión arterial de inflado manual cuyo funcionamiento se basa en el principio oscilomé-trico. Mide la presión arterial y el pulso de manera sencilla y rápida. La unidad tambié...
Page 156 - Información importante sobre seguridad; - No inserte las pilas con las polaridades alineadas de forma inco-
156 Información importante sobre seguridad Consulte a su médico si está embarazada, padece arritmia o arterio-sclerosis.No modifique nunca la dosis de medicación que le haya prescrito su médico.Utilice el M1 Plus únicamente para usted mismo. Precaución: • No permita que niños o personas que no pueda...
Page 157 - Descripción general; Unidad principal; lete y pera de inflado
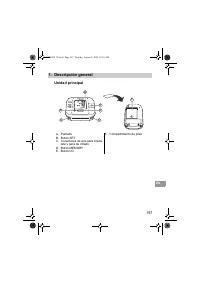
157 1.Descripción general ES 1. Descripción general Unidad principal A. PantallaB. Botón SETC. Conectores de aire para braza- lete y pera de inflado D. Botón MEMORYE. Botón I/O F. Compartimiento de pilas B A C C E D F HEM-4011C.book Page 157 Tuesday, August 9, 2005 10:35 AM
Page 158 - Brazalete; Botón para salida de aire
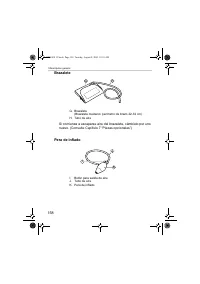
158 1.Descripción general Brazalete Si comienza a escaparse aire del brazalete, cámbielo por uno nuevo. (Consulte Capítulo 7 “Piezas opcionales”) Pera de inflado G. Brazalete (Brazalete mediano: perímetro de brazo 22-32 cm) H. Tubo de aire I. Botón para salida de aire J. Tubo de aireK. Pera de infla...
Page 159 - Pantalla
159 1.Descripción general ES Pantalla Contenido del envase L. Presión arterial sistólicaM. Presión arterial diastólicaN. Símbolo de memoria (Se visualiza cuando se están viendo valores guardados en la memoria) O. Símbolo de valor promedio (Aparece cuando se ve el prome-dio de los valores de las tres...
Page 160 - Colocación o sustitución de las pilas; Ponga boca abajo la unidad principal.
160 2.Preparación 2. Preparación 2.1 Colocación o sustitución de las pilas 1. Ponga boca abajo la unidad principal. 2. Deslice la tapa de las pilas en la dirección de la flecha mien-tras presiona la parte estriada de la misma. 3. Instale o sustituya las cuatro pilas “ AAA ” para que las polari- dade...
Page 161 - Duración de las pilas y su sustitución
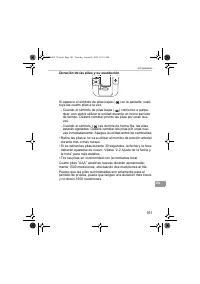
161 2.Preparación ES Duración de las pilas y su sustitución Si aparece el símbolo de pilas bajas ( ) en la pantalla, susti- tuya las cuatro pilas a la vez. - Cuando el símbolo de pilas bajas ( ) comience a parpa- dear, aún podrá utilizar la unidad durante un breve período de tiempo. Deberá cambiar p...
Page 162 - Ajuste de la fecha y la hora; zarla por primera vez.
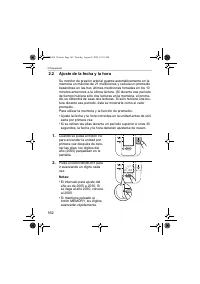
162 2.Preparación 2.2 Ajuste de la fecha y la hora Su monitor de presión arterial guarda automáticamente en la memoria un máximo de 21 mediciones y calcula un promedio basándose en las tres últimas mediciones tomadas en los 10 minutos anteriores a la última lectura. (Si durante ese período de tiempo...
Page 163 - El año se ajusta y los dígitos de mes parpadean en la pantalla.
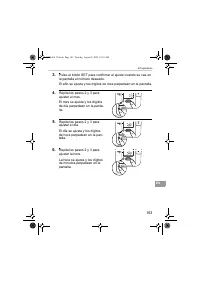
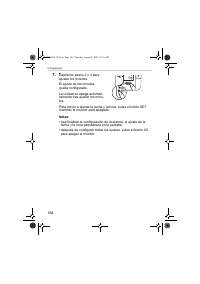
163 2.Preparación ES 3. Pulse el botón SET para confirmar el ajuste cuando se vea en la pantalla el número deseado. El año se ajusta y los dígitos de mes parpadean en la pantalla. 4. Repita los pasos 2 y 3 para ajustar el mes. El mes se ajusta y los dígitos de día parpadean en la panta-lla. 5. Repit...
Page 165 - Ajustar los modos de configuración; Modo de alarma; on
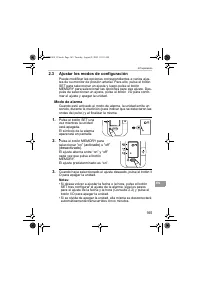
165 2.Preparación ES 2.3 Ajustar los modos de configuración Puede modificar las opciones correspondientes a varios ajus-tes de su monitor de presión arterial. Para ello, pulse el botón SET para seleccionar un ajuste y luego pulse el botón MEMORY para seleccionar las opciones para ese ajuste. Des-pué...
Page 166 - Uso del monitor de presión arterial; Puede realizar la medición en el brazo izquierdo o en el derecho.
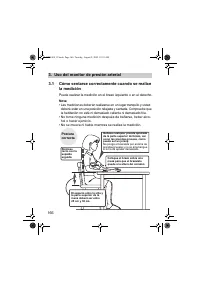
166 3.Uso del monitor de presión arterial 3. Uso del monitor de presión arterial 3.1 Cómo sentarse correctamente cuando se realice la medición Puede realizar la medición en el brazo izquierdo o en el derecho. Nota: • Las mediciones deberán realizarse en un lugar tranquilo y usted deberá estar en una...
Page 167 - • Una postura correcta durante la medición es determinante; Postura incorrecta
167 3.Uso del monitor de presión arterial ES Notas: • Una postura correcta durante la medición es determinante para obtener resultados precisos. • Debería también intentar medir su presión a la misma hora todos los días. (Se recomienda hacerlo durante la primera hora después de levantarse). Postura ...
Page 168 - Colocación del brazalete
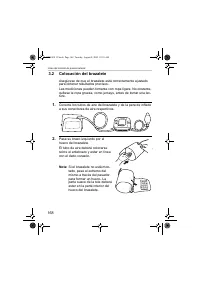
168 3.Uso del monitor de presión arterial 3.2 Colocación del brazalete Asegúrese de que el brazalete está correctamente ajustado para obtener resultados precisos. Las mediciones pueden tomarse con ropa ligera. No obstante, quítese la ropa gruesa, como jerseys, antes de tomar una lec-tura. 1. Conecte...
Page 169 - Coloque el brazo correctamente.; Tomar mediciones en el brazo derecho; • El brazalete deberá que-; ) Coloque el brazalete en la
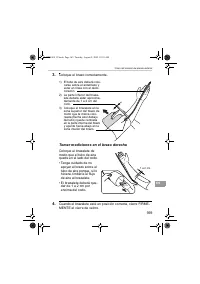
169 3.Uso del monitor de presión arterial ES 3. Coloque el brazo correctamente. Tomar mediciones en el brazo derecho Coloque el brazalete de modo que el tubo de aire quede en el lado del codo.• Tenga cuidado de no apoyar el brazo sobre el tubo de aire porque, si lo hiciera, limitaría el flujo de air...
Page 170 - Obtener una lectura; trará la hora y el 0.; Bombee la pera de inflado para inflar el brazalete.; ) Infle el brazalete hasta que se
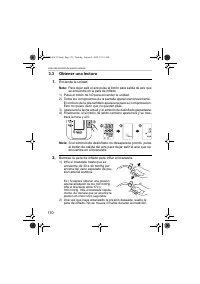
170 3.Uso del monitor de presión arterial 3.3 Obtener una lectura 1. Encienda la unidad. Nota: Para dejar salir el aire pulse el botón para salida de aire que se encuentra en la pera de inflado. 1) Pulse el botón de I/O para encender la unidad.2) Todos los componentes de la pantalla aparecerán breve...
Page 171 - • Se mostrará la hora mientras se infla el brazalete.; Causas habituales de resultados imprecisos
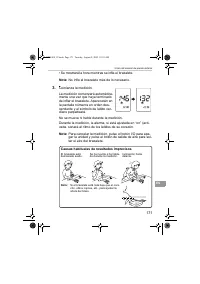
171 3.Uso del monitor de presión arterial ES • Se mostrará la hora mientras se infla el brazalete. Nota: No infle el brazalete más de lo necesario. 3. Comienza la medición. La medición comenzará automática-mente una vez que haya terminado de inflar el brazalete. Aperecerán en la pantalla números en ...
Page 172 - • Es peligroso autodiagnosticarse en base a los resultados
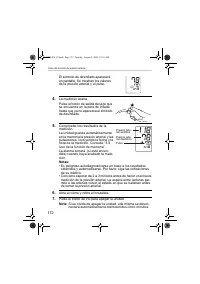
172 3.Uso del monitor de presión arterial El símbolo de desinflado aparecerá en pantalla. Se mostran los valores de la presión arterial y el pulso. 4. La medición acaba. Pulse el botón de salida del aire que se encuentra en la pera de inflado hasta que ya no aparezca el símbolo de desinflado. 5. Com...
Page 173 - • Si la presión sistólica o diastólica está por
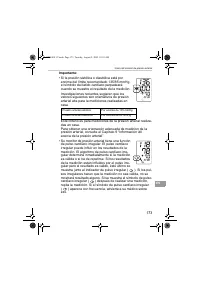
173 3.Uso del monitor de presión arterial ES Importante: • Si la presión sistólica o diastólica está por encima del límite recomendado 135\85 mmHg, el símbolo del latido cardíaco parpadeará cuando se muestre el resultado de la medición. Investigaciones recientes sugieren que los valores siguientes s...
Page 174 - ¿Qué es el pulso cardíaco irregular?; ) en los resultados indica arritmia o no.
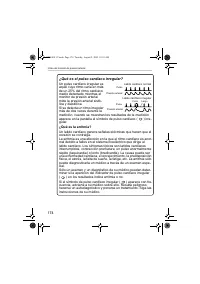
174 3.Uso del monitor de presión arterial ¿Qué es el pulso cardíaco irregular? Un pulso cardíaco irregular es aquél cuyo ritmo varía en más de un 25% del ritmo cardíaco medio detectado mientras el monitor de presión arterial mide la presión arterial sistó-lica y diastólica.Si se detecta un ritmo irr...
Page 175 - Uso de la función de memoria
175 3.Uso del monitor de presión arterial ES 3.4 Uso de la función de memoria Esta unidad tiene una memoria capaz de guardar 21 medicio-nes. Cada vez que finaliza una medición, la unidad guarda automáticamente la presión arterial y el pulso. Si existen tres lecturas realizadas en los 10 minutos ante...
Page 176 - Pulse el botón de I/O para apagar la unidad.
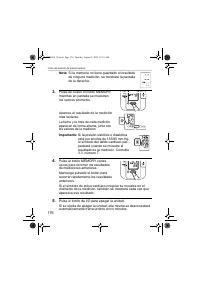
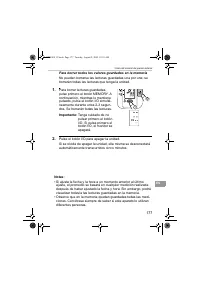
176 3.Uso del monitor de presión arterial Nota: Si la memoria no tiene guardado el resultado de ninguna medición, se mostrará la pantalla de la derecha. 3. Pulse de nuevo el botón MEMORY, mientras en pantalla se muestran los valores promedio. Aparece el resultado de la medición más reciente. La fech...
Page 177 - Para borrar todos los valores guardados en la memoria
177 3.Uso del monitor de presión arterial ES Para borrar todos los valores guardados en la memoria No pueden borrarse las lecturas guardadas una por una; se borrarán todas las lecturas que tenga la unidad. 1. Para borrar lecturas guardadas, pulse primero el botón MEMORY. A continuación, mientras lo ...
Page 178 - Guía de referencia rápida; Pulse el botón I/O para apagar la unidad.
178 4.Guía de referencia rápida 4. Guía de referencia rápida Utilice este documento únicamente como guía de referencia. Si utiliza este dispositivo por primera vez, lea atentamente el Capí-tulo 3 de este Manual de Instrucciones.Para contribuir a garantizar una lectura válida, evite comer, fumar o ha...
Page 179 - Tratamiento de errores y problemas
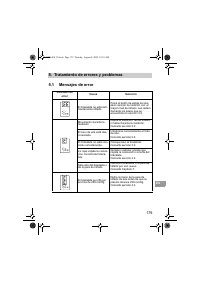
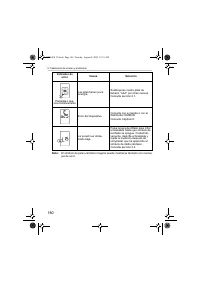
179 5.Tratamiento de errores y problemas ES 5. Tratamiento de errores y problemas 5.1 Mensajes de error Indicador de error Causa Solución El brazalete no está sufi-cientemente inflado. Pulse el botón de salida del aire para reiniciar la medición con un mayor nivel de inflado. Lea deteni-damente los ...
Page 181 - Resolución de problemas
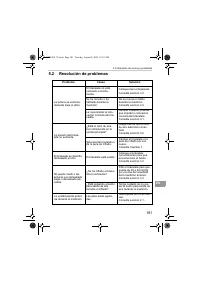
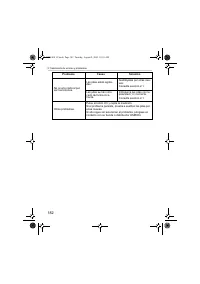
181 5.Tratamiento de errores y problemas ES 5.2 Resolución de problemas Problema Causa Solución La lectura es extrema-damente baja (o alta). El brazalete no está colocado correcta-mente. Coloque bien el brazalete. Consulte sección 3.2. Se ha movido o ha hablado durante la medición. No se mueva ni ha...
Page 183 - Mantenimiento y almacenaje; Mantenimiento; • No someta la unidad principal ni el brazalete a temperaturas y; • No efectúe ningún tipo de reparación por su cuenta. Si se
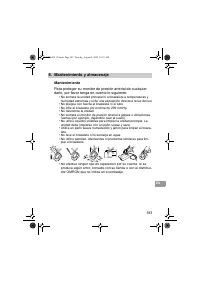
183 6.Mantenimiento y almacenaje ES 6. Mantenimiento y almacenaje Mantenimiento Para proteger su monitor de presión arterial de cualquier daño, por favor tenga en cuenta lo siguiente: • No someta la unidad principal ni el brazalete a temperaturas y humedad extremas y evite una exposición directa a l...
Page 184 - Calibrado y revisión; • La precisión de este monitor de presión arterial ha sido verifi-
184 6.Mantenimiento y almacenaje Calibrado y revisión • La precisión de este monitor de presión arterial ha sido verifi- cada cuidadosamente y está diseñado para tener una larga vida útil. • Como norma general se recomienda hacer una inspección del monitor de presión arterial cada dos años para aseg...
Page 185 - Almacenaje; Desenchufe el tubo de aire del conector de aire.
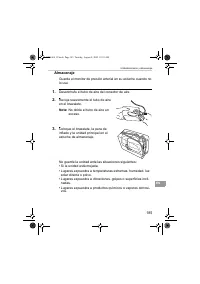
185 6.Mantenimiento y almacenaje ES Almacenaje Guarde el monitor de presión arterial en su estuche cuando no lo use. 1. Desenchufe el tubo de aire del conector de aire. 2. Recoja suavemente el tubo de aire en el brazalete. Nota: No doble el tubo de aire en exceso. 3. Coloque el brazalete, la pera de...
Page 186 - Brazaletes medianos; Brazalete grande; Brazalete pequeño; Pera normal
186 7.Piezas opcionales 7. Piezas opcionales Brazaletes medianos Perímetro de brazo 22 - 32 cm Brazalete grande Perímetro de brazo 32 - 42 cm Brazalete pequeño Perímetro de brazo 17 - 22 cm Combinación de brazalete pequeño y pera Perímetro de brazo 17 - 22 cm Pera normal CM1-7935058-8 CM-4997086-7 C...
Page 187 - Atención: Por favor, lea atentamente este manual de
187 8.Datos técnicos ES 8. Datos técnicos Nota: Puede haber modificaciones técnicas sin previo aviso. • La eliminación de este producto y las pilas usadas deben realizarse en conformidad con las normativas nacionales sobre eliminación de produc-tos electrónicos. Este aparato cumple las disposiciones...
Page 189 - Información útil acerca de la presión arterial; ¿Qué es la presión arterial?
189 9.Información útil acerca de la presión arterial ES 9. Información útil acerca de la presión arterial ¿Qué es la presión arterial? La presión arterial es una medida de la fuerza ejercida por el flujo sanguíneo contra las paredes de las arterias. La presión arterial varía constantemente durante e...
Page 191 - Bloeddrukmeter met handpomp; Model M1 Plus
Bloeddrukmeter met handpomp Model M1 Plus • Instruction Manual• Mode d’emploi• Gebrauchsanweisung• Manuale di istruzioni• Manual de instrucciones• Gebruiksaanwijzing• РУКОВОДСТВО ПО ЭКСПЛУАТАЦИИ • Instrukcja• Kezelési Útmutató EN FR DE IT ES NL RU IM-HEM-4011C-E-01-07/05 PL HU HEM-4011C.book Page 19...
Page 192 - Inhoud
192 Inhoud Inleiding ................................................................................ 193Belangrijke veiligheidsinformatie ....................................... 1941. Overzicht .......................................................................... 1952. Voorbereiding .............
Page 193 - Inleiding
193 NL Inleiding Dank u voor de aankoop van de OMRON M1 Plus bloeddruk-meter voor de bovenarm. De OMRON M1 Plus is een bloeddrukmeter met handpompbe-diening die werkt volgens het oscillometrische principe. Hier-mee meet u de bloeddruk en de hartslag eenvoudig en snel. Tevens worden er tot 21 metinge...
Page 194 - Belangrijke veiligheidsinformatie
194 Belangrijke veiligheidsinformatie Raadpleeg uw arts bij zwangerschap, aritmie of arteriosclerose.Wijzig nooit de dosis van door uw arts voorgeschreven medicatie.Gebruik de M1 Plus alleen voor uzelf. Let op: • Laat de meter niet zonder toezicht bij kinderen of personen die geen instemming kunnen ...
Page 195 - Hoofdeenheid
195 1.Overzicht NL 1. Overzicht Hoofdeenheid A. DisplayB. SET-knop (instellen)C. LuchtslangaansluitingD. MEMORY-knop (geheugen)E. I/O (aan/uit) knop F. Batterijvak B A C C E D F HEM-4011C.book Page 195 Tuesday, August 9, 2005 10:35 AM
Page 196 - Ontluchtingsknop
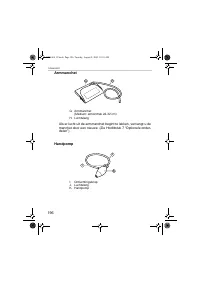
196 1.Overzicht Armmanchet Als er lucht uit de armmanchet begint te lekken, vervangt u de manchet door een nieuwe. (Zie Hoofdstuk 7 “Optionele onder-delen”) Handpomp G. Armmanchet (Medium: armomtrek 22-32 cm) H. Luchtslang I. Ontluchtingsknop J. LuchtslangK. Handpomp H G J K I HEM-4011C.book Page 19...
Page 197 - O. Symbool gemiddelde waarde
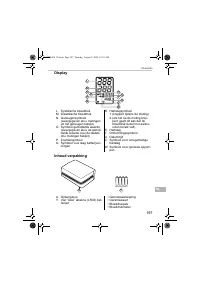
197 1.Overzicht NL Display Inhoud verpakking L. Systolische bloeddrukM. Diastolische bloeddrukN. Geheugensymbool (weergegeven als u metingen uit het geheugen bekijkt) O. Symbool gemiddelde waarde (weergegeven als u de gemid-delde waarde over de laatste drie metingen bekijkt) P. ZoemersymboolQ. Symbo...
Page 198 - De batterijen plaatsen/vervangen; Draai de hoofdeenheid ondersteboven.
198 2.Voorbereiding 2. Voorbereiding 2.1 De batterijen plaatsen/vervangen 1. Draai de hoofdeenheid ondersteboven. 2. Schuif het batterijdeksel in de richting van de pijl, terwijl u op het geribbelde gedeelte drukt. 3. Plaats of vervang vier “ AAA ” batterijen. Zorg ervoor dat de + (positieve) en - (...
Page 199 - Levensduur en vervanging van batterijen
199 2.Voorbereiding NL Levensduur en vervanging van batterijen Als het symbool voor laag batterijvermogen ( ) op de display wordt weergegeven, moeten alle vier de batterijen worden ver-vangen. - Als het symbool voor laag batterijvermogen ( ) gaat knip- peren, kunt u de meter nog even gebruiken. Verv...
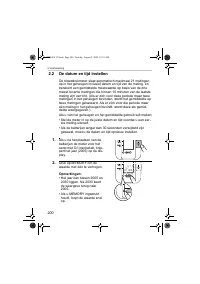
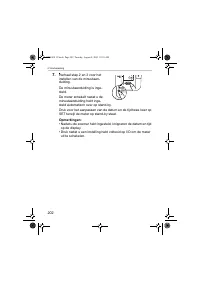
Page 200 - De datum en tijd instellen; • Als de batterijen langer dan 30 seconden verwijderd zijn
200 2.Voorbereiding 2.2 De datum en tijd instellen De bloeddrukmeter slaat automatisch maximaal 21 metingen op in het geheugen inclusief datum en tijd van de meting, en berekent een gemiddelde meetwaarde op basis van de drie meest recente metingen die binnen 10 minuten van de laatste meting zijn ver...
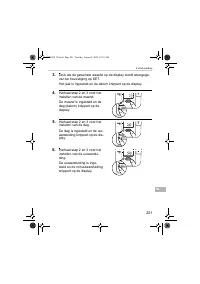
Page 201 - Het jaar is ingesteld en de datum knippert op de display.
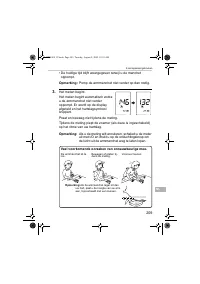
201 2.Voorbereiding NL 3. Druk als de gewenste waarde op de display wordt weergege-ven ter bevestiging op SET. Het jaar is ingesteld en de datum knippert op de display. 4. Herhaal stap 2 en 3 voor het instellen van de maand. De maand is ingesteld en de dag (datum) knippert op de display. 5. Herhaal ...
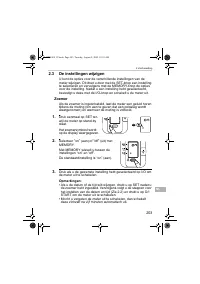
Page 203 - De instellingen wijzigen; Zoemer
203 2.Voorbereiding NL 2.3 De instellingen wijzigen U kunt de opties voor de verschillende instellingen van de meter wijzigen. Dit doet u door met de SET-knop een instelling te selecteren en vervolgens met de MEMORY-knop de opties voor de instelling. Nadat u een instelling hebt geselecteerd, bevesti...
Page 204 - Het apparaat gebruiken
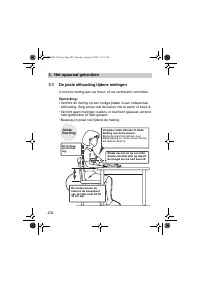
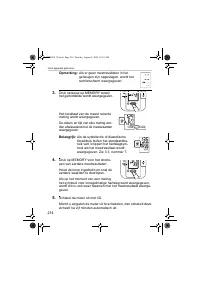
204 3.Het apparaat gebruiken 3. Het apparaat gebruiken 3.1 De juiste zithouding tijdens metingen U kunt de meting aan uw linker- of uw rechterarm verrichten. Opmerking: • Verricht de meting op een rustige plaats in een ontspannen zithouding. Zorg ervoor dat de kamer niet te warm of koud is. • Verric...
Page 205 - • De juiste houding tijdens het meten is essentieel voor het ver-; Verkeerde houding
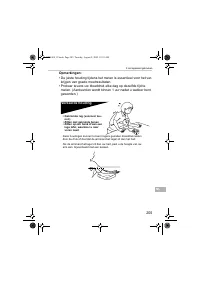
205 3.Het apparaat gebruiken NL Opmerkingen: • De juiste houding tijdens het meten is essentieel voor het ver- krijgen van goede meetresultaten. • Probeer tevens uw bloeddruk elke dag op dezelfde tijd te meten. (Aanbevolen wordt binnen 1 uur nadat u wakker bent geworden.) Verkeerde houding Deze houd...
Page 206 - De armmanchet aanbrengen
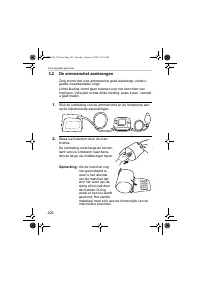
206 3.Het apparaat gebruiken 3.2 De armmanchet aanbrengen Zorg ervoor dat u de armmanchet goed aanbrengt, zodat u goede meetresultaten krijgt. Lichte kleding vormt geen beletsel voor het verrichten van metingen. Verwijder echter dikke kleding, zoals truien, voordat u gaat meten. 1. Sluit de luchtsla...
Page 207 - Plaats de arm in de juiste positie.; Metingen aan de rechterarm verrichten; • De manchet moet 1 tot 2; ) De luchtslang moet langs
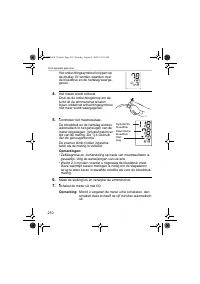
207 3.Het apparaat gebruiken NL 3. Plaats de arm in de juiste positie. Metingen aan de rechterarm verrichten Breng de manchet zo aan, dat de luchtslang aan de zijkant van uw elleboog zit.• Zorg ervoor dat uw arm niet op de luchtslang rust, zodat de lucht-stroom naar de manchet niet wordt gehinderd. ...
Page 208 - Een meting verrichten; Het apparaat inschakelen.; ) De huidige datum wordt weergegeven en het ontluchtingssym-; Pomp met de handpomp de armmanchet op.; ) Pomp de manchet op tot de druk
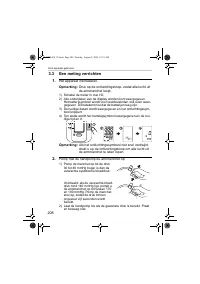
208 3.Het apparaat gebruiken 3.3 Een meting verrichten 1. Het apparaat inschakelen. Opmerking: Druk op de ontluchtingsknop, zodat alle lucht uit de armmanchet loopt. 1) Schakel de meter in met I/O.2) Alle onderdelen van de display worden kort weergegeven. Het batterijsymbool wordt voor testdoeleinde...
Page 209 - • De huidige tijd blijft weergegeven terwijl u de manchet; Veel voorkomende oorzaken van onnauwkeurige mee-
209 3.Het apparaat gebruiken NL • De huidige tijd blijft weergegeven terwijl u de manchet oppompt. Opmerking: Pomp de armmanchet niet verder op dan nodig. 3. Het meten begint. Het meten begint automatisch zodra u de armmanchet niet verder oppompt. Er wordt op de display afgeteld en het hartslagsymbo...
Page 211 - • Als de systolische of diastolische bloeddruk
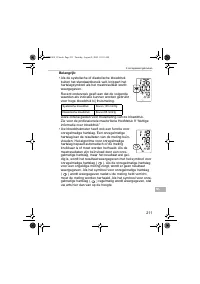
211 3.Het apparaat gebruiken NL Belangrijk: • Als de systolische of diastolische bloeddruk buiten het standaardbereik valt, knippert het hartslagsymbool als het meetresultaat wordt weergegeven. Recent onderzoek geeft aan dat de volgende waarden als indicatie kunnen worden gebruikt voor hoge bloeddru...
Page 212 - Wat is onregelmatige hartslag?; ) bij het resultaat op aritmie wijst, kan alleen worden
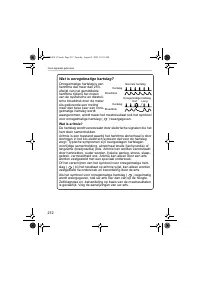
212 3.Het apparaat gebruiken Wat is onregelmatige hartslag? Onregelmatige hartslag is een hartritme dat meer dan 25% afwijkt van het gemiddelde hartritme tijdens het meten van de systolische en diastoli-sche bloeddruk door de meter.Als gedurende een meting meer dan twee keer een onre-gelmatige harts...
Page 213 - Gebruik van de geheugenfunctie
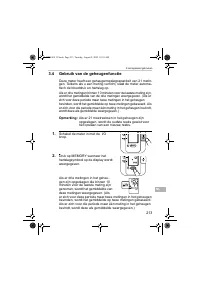
213 3.Het apparaat gebruiken NL 3.4 Gebruik van de geheugenfunctie Deze meter heeft een geheugenopslagcapaciteit van 21 metin-gen. Telkens als u een meting verricht, slaat de meter automa-tisch de bloeddruk en hartslag op. Als er drie metingen binnen 10 minuten voor de laatste meting zijn, wordt het...
Page 215 - Alle in het geheugen opgeslagen waarden wissen
215 3.Het apparaat gebruiken NL Alle in het geheugen opgeslagen waarden wissen U kunt de opgeslagen metingen niet afzonderlijk wissen. Alle metingen in de meter worden gewist. 1. Druk voor het wissen van de metin-gen eerst op MEMORY. Druk vervol-gens met MEMORY ingedrukt 2-3 seconden op I/O. Alle me...
Page 217 - Oplossen van fouten en problemen
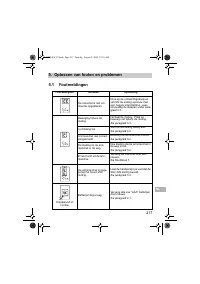
217 5.Oplossen van fouten en problemen NL 5. Oplossen van fouten en problemen 5.1 Foutmeldingen Foutweergave Oorzaak Oplossing De manchet is niet vol-doende opgeblazen. Druk op de ontluchtingsknop en verricht de meting opnieuw met een hogere manchetdruk. Lees zorgvuldig de stappen onder para-graaf 3...
Page 219 - Problemen oplossen
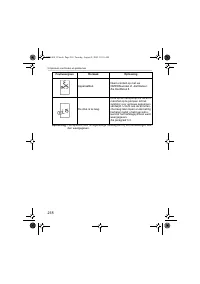
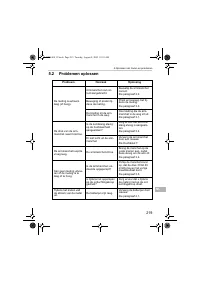
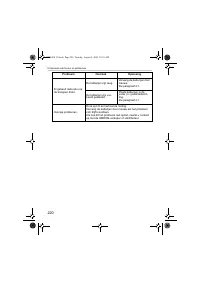
219 5.Oplossen van fouten en problemen NL 5.2 Problemen oplossen Probleem Oorzaak Oplossing De meting is extreem laag (of hoog). Armmanchet niet cor-rect aangebracht. Bevestig de armmanchet correct. Zie paragraaf 3.2. Beweging of praten tij-dens de meting. Praat en beweeg niet tij-dens de meting.Zie...
Page 221 - Opslag en onderhoud; Onderhoud; • Voer nooit zelf reparaties uit. Raadpleeg bij defecten uw
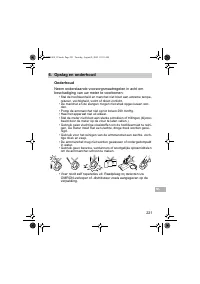
221 6.Opslag en onderhoud NL 6. Opslag en onderhoud Onderhoud Neem onderstaande voorzorgsmaatregelen in acht om beschadiging van uw meter te voorkomen: • Stel de hoofdeenheid en manchet niet bloot aan extreme tempe- raturen, vochtigheid, vocht of direct zonlicht. • De manchet en de slangen mogen nie...
Page 222 - Kalibratie en onderhoud; • De nauwkeurigheid van deze bloeddrukmeter is zorgvuldig
222 6.Opslag en onderhoud Kalibratie en onderhoud • De nauwkeurigheid van deze bloeddrukmeter is zorgvuldig getest en hij is ontworpen voor een lange levensduur. • Het wordt algemeen aanbevolen de meter elke twee jaar te laten controleren op juiste werking en nauwkeurigheid. Raad-pleeg de erkende ve...
Page 223 - Opslag; Maak de luchtslang los van de aansluiting.
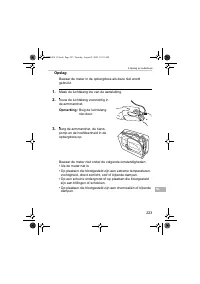
223 6.Opslag en onderhoud NL Opslag Bewaar de meter in de opbergdoos als deze niet wordt gebruikt. 1. Maak de luchtslang los van de aansluiting. 2. Vouw de luchtslang voorzichtig in de armmanchet. Opmerking: Buig de luchtslang niet door. 3. Berg de armmanchet, de hand-pomp en de hoofdeenheid in de o...
Page 224 - Optionele onderdelen; Grote armmanchet
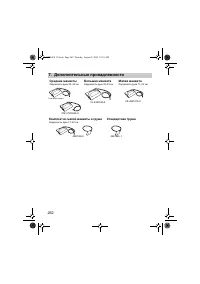
224 7.Optionele onderdelen 7. Optionele onderdelen Medium armmanchet-ten Armomtrek 22 - 32 cm Grote armmanchet Armomtrek 32 - 42 cm Kleine armmanchet Armomtrek 17 - 22 cm Combinatie van kleine manchet en pomp Armomtrek 17 - 22 cm Gewone pomp CM1-7935058-8 CM-4997086-7 CL-4997065-4 CS-4997076-0 49970...
Page 225 - Technische gegevens; Waarschuwing:lees deze handleiding goed door voor-
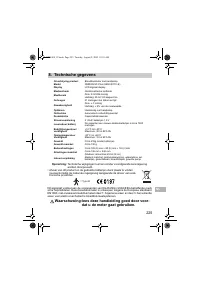
225 8.Technische gegevens NL 8. Technische gegevens Opmerking: Technische wijzigingen kunnen zonder voorafgaande kennisgeving worden doorgevoerd. • Afvoer van dit product en de gebruikte batterijen dient plaats te vinden overeenkomstig de nationale regelgeving aangaande de afvoer van elek-tronische ...
Page 227 - Nuttige informatie over bloeddruk; systolische
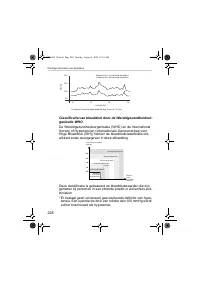
227 9.Nuttige informatie over bloeddruk NL 9. Nuttige informatie over bloeddruk Wat is bloeddruk? Bloeddruk is de druk van het bloed op de slagaderwand. Arteri-ele bloeddruk verandert voortdurend tijdens de hartcyclus. De hoogste bloeddruk in deze cyclus wordt de systolische bloeddruk genoemd, de la...
Page 230 - Содержание
230 Содержание Введение .............................................................................. 231 Важные меры предосторожности ................................... 232 1. Обзор ............................................................................... 233 2. Подготовка к работе ...........
Page 231 - Введение; OMRON M1 Plus
231 RU Введение Благодарим Вас за покупку прибора OMRON M1 Plus для измерения давления на плече . OMRON M1 Plus является прибором для измерения давления с ручным нагнетанием воздуха в манжету , работающим на осциллометрическом принципе . Он измеряет артериальное давление и пульс просто и быстро . Кр...
Page 232 - M1 Plus; Внимание; AA
232 Важные меры предосторожности При беременности , аритмии или атеросклерозе проконсультируйтесь с лечащим врачом . Никогда не изменяйте дозировку медикаментов , выписанных лечащим врачом . M1 Plus предназначен только для личного использования . Внимание : • Не оставляйте прибор без присмотра в при...
Page 233 - Обзор; Электронный
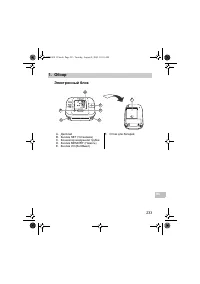
233 1. Обзор RU 1. Обзор Электронный блок A. Дисплей B. Кнопка SET ( Установка ) C. Коннектор воздушной трубки D. Кнопка MEMORY ( Память ) E. Кнопка I/O ( Вкл / Выкл ) F. Отсек для батарей B A C C E D F HEM-4011C.book Page 233 Tuesday, August 9, 2005 10:35 AM
Page 235 - Дисплей
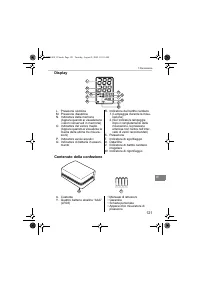
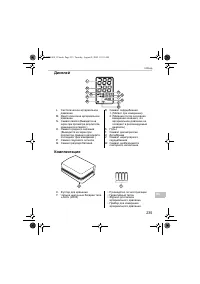
235 1. Обзор RU Дисплей Комплектация L. Систолическое артериальное давление M. Диастолическое артериальное давление N. Символ памяти ( Выводится на экран при просмотре результатов , хранящихся в памяти .) O. Символ среднего значения ( Выводится на экран при просмотре среднего результата последних тр...
Page 236 - Подготовка; Примечание
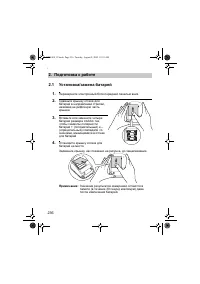
236 2. Подготовка к работе 2. Подготовка к работе 2.1 Установка / замена батарей 1. Переверните электронный блок передней панелью вниз . 2. Сдвиньте крышку отсека для батарей в направлении стрелки , нажимая на рифленую часть крышки . 3. Вставьте или замените четыре батареи размера « AA А » так , что...
Page 237 - Срок
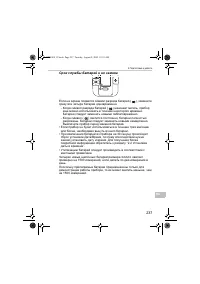
237 2. Подготовка к работе RU Срок службы батарей и их замена Если на экране появился символ разряда батарей ( ), замените сразу все четыре батареи одновременно . - Когда символ разряда батарей ( ) начинает мигать , прибор еще можно использовать в течение некоторого времени . Батареи следует заменит...
Page 238 - Установка; MEMORY; Примечания
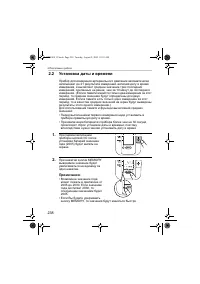
238 2. Подготовка к работе 2.2 Установка даты и времени Прибор для измерения артериального давления автоматически запоминает до 21 результата измерений , включая дату и время измерения , и вычисляет среднее значение трех последних измерений , сделанных не ранее , чем за 10 минут до последнего измере...
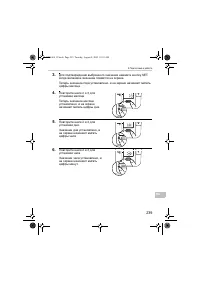
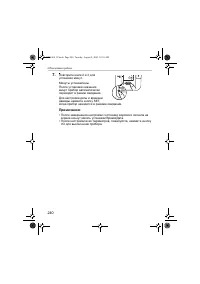
Page 241 - Настройка; Состояние
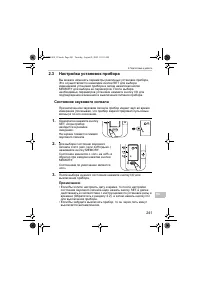
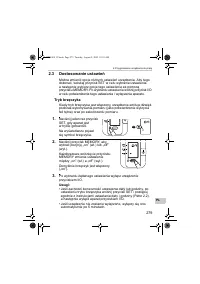
241 2. Подготовка к работе RU 2.3 Настройка установок прибора Вы можете изменять параметры различных установок прибора . Это осуществляется нажатием кнопки SET для выбора изменяемой установки прибора и затем нажатием кнопки MEMORY для выбора ее параметров . После выбора необходимых параметров устано...
Page 243 - Неправильное
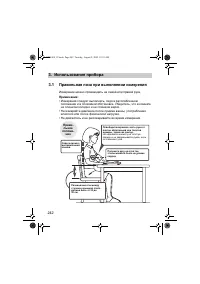
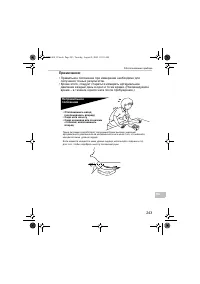
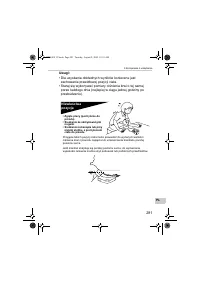
243 3. Использование прибора RU Примечания : • Правильное положение при измерении необходимо для получения точных результатов . • Кроме этого , следует стараться измерять артериальное давление каждый день в одно и то же время . ( Рекомендуемое время – в течение одного часа после пробуждения .) Непра...
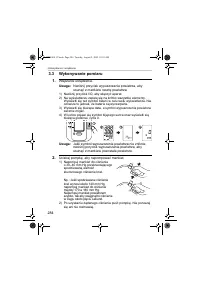
Page 244 - Наложение
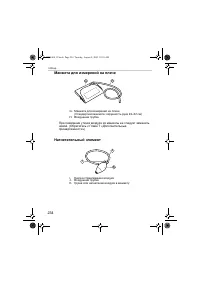
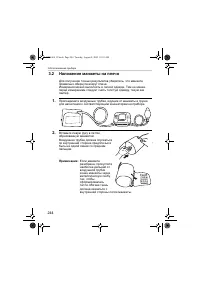
244 3. Использование прибора 3.2 Наложение манжеты на плечо Для получения точных результатов убедитесь , что манжета правильно обернута вокруг плеча . Измерения можно выполнять в легкой одежде . Тем не менее , перед измерением следует снять толстую одежду , такую как свитер . 1. Присоедините воздушн...
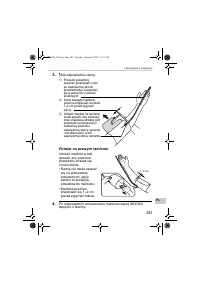
Page 245 - Измерение
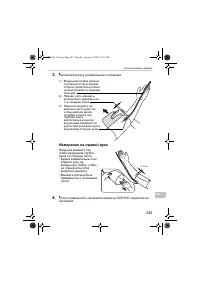
245 3. Использование прибора RU 3. Расположите руку в правильном положении . Измерение на правой руке Наденьте манжету так , чтобы воздушная трубка была со стороны локтя . • Будьте внимательны и не кладите руку на воздушную трубку , чтобы не ограничить поток воздуха в манжету . • Манжета должна быть...
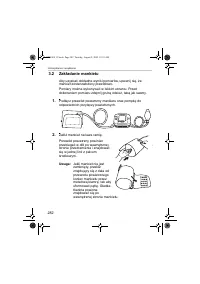
Page 246 - Выполнение
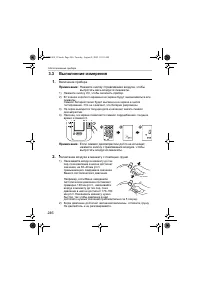
246 3. Использование прибора 3.3 Выполнение измерения 1. Включение прибора . Примечание : Нажмите кнопку стравливания воздуха , чтобы выпустить весь воздух из манжеты . 1) Нажмите кнопку I/O, чтобы включить прибор . 2) В течение короткого времени на экране будут высвечиваться все символы . Символ ба...
Page 247 - Обычные
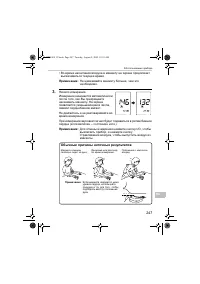
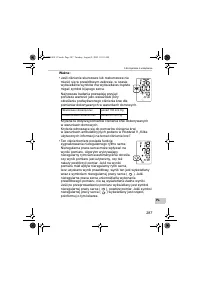
247 3. Использование прибора RU • Во время нагнетания воздуха в манжету на экране продолжает высвечиваться текущее время . Примечание : Не накачивайте манжету больше , чем это необходимо . 3. Начало измерения . Измерение начинается автоматически после того , как Вы прекращаете накачивать манжету . Н...
Page 249 - Важно
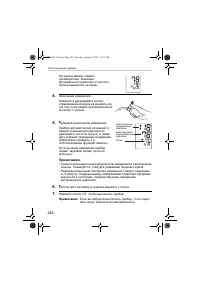
249 3. Использование прибора RU Важно : • Если Ваше систолическое или диастолическое давление оказалось за пределами нормы , то при выводе на экран результата измерения будет мигать символ сердцебиения . Проведенные в последнее время исследования показали , что в качестве ориентира для определения п...
Page 250 - Что
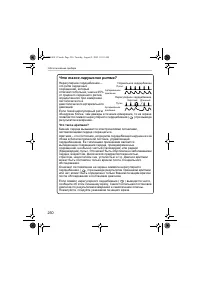
250 3. Использование прибора Что такое нарушение ритма ? Нерегулярное сердцебиение – это ритм сердечных сокращений , который отличается больше , чем на 25% от среднего сердечного ритма , определенного при измерении систолического и диастолического артериального давлений . Если такой нерегулярный рит...
Page 251 - Использование
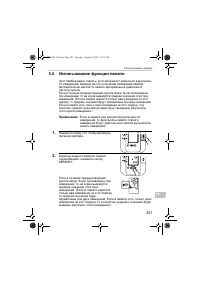
251 3. Использование прибора RU 3.4 Использование функции памяти Этот прибор имеет память , в которой могут храниться результаты 21 измерения . Каждый раз по окончании измерения прибор автоматически заносит в память артериальное давление и частоту пульса . Если в течение предшествующих десяти минут ...
Page 253 - Удаление
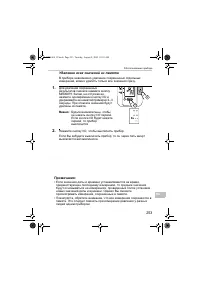
253 3. Использование прибора RU Удаление всех значений из памяти В приборе невозможно удаление сохраненных отдельных измерений , можно удалить только все значения сразу . 1. Для удаления сохраненных результатов сначала нажмите кнопку MEMORY. Затем , не отпуская ее , нажмите одновременно кнопку I/O и...
Page 254 - Краткое
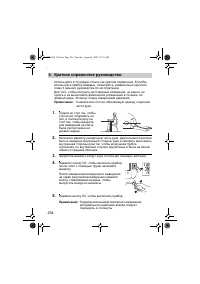
254 4. Краткое справочное руководство 4. Краткое справочное руководство Используйте этот раздел только как краткий справочник . Если Вы используете прибор впервые , пожалуйста , внимательно прочтите главу 3 данного руководства по эксплуатации . Для того , чтобы получить достоверные измерения , не еш...
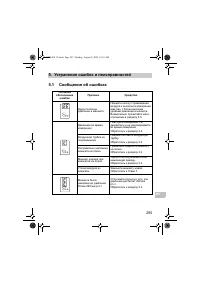
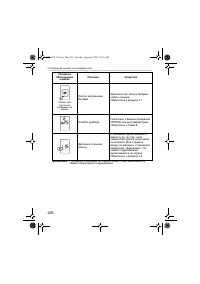
Page 257 - Поиск
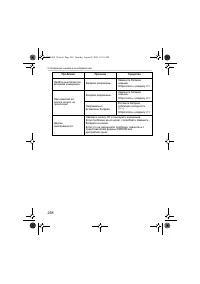
257 5. Устранение ошибок и неисправностей RU 5.2 Поиск и устранение неисправностей Проблема Причина Средство Значение слишком низкое ( или высокое ). Неправильно наложена манжета на плечо . Правильно закрепите манжету на плече . Обратитесь к разделу 3.2. Движение или разговор во время измерения . Не...
Page 259 - Обслуживание
259 6. Обслуживание и хранение RU 6. Обслуживание и хранение Обслуживание Для предотвращения повреждений прибора , пожалуйста , не допускайте : • Воздействия на измерительный блок и манжету чрезмерно высокой или низкой температуры , влажности , влаги или прямого солнечного света . • Тугого сворачива...
Page 260 - Проверка
260 6. Обслуживание и хранение Проверка и обслуживание • Данный прибор для измерения артериального давления предназначен для длительной эксплуатации и его точность была тщательно проверена . • Для обеспечения правильной работы и точности прибора рекомендуется проверять прибор каждые два года . Пожал...
Page 261 - Хранение
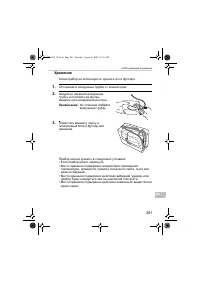
261 6. Обслуживание и хранение RU Хранение Когда прибор не используется , храните его в футляре . 1. Отсоедините воздушные трубки от коннекторов . 2. Аккуратно сверните воздушную трубку и положите ее внутрь манжеты для измерения на плече . Примечание : Не слишком сгибайте воздушную трубку . 3. Помес...
Page 263 - Технические
263 8. Технические характеристики RU 8. Технические характеристики Примечание : Технические характеристики могут быть изменены без предварительного уведомления • Утилизация данного изделия и использованных батарей должна осуществляться в соответствии с государственными правилами по утилизации электр...
Page 268 - owa pozycja cia; łę; ęś
268 Spis tre ś ci Wst ę p .................................................................................... 269 Wa ż ne informacje dotycz ą ce bezpiecze ń stwa .................. 270 1. Opis urz ą dzenia............................................................... 271 2. Przygotowanie urz ą dze...
Page 269 - Wst; ść
269 PL Wst ę p Dzi ę kujemy za zakup aparatu do mierzenia ci ś nienia krwi na ramieniu OMRON M1 Plus. OMRON M1 Plus jest urz ą dzeniem do mierzenia ci ś nienia krwi z r ę cznie pompowanym mankietem, dzia ł aj ą cym z wykorzystaniem metody oscylometrycznej. Urz ą dzenie pozwala na ł atwy i szybki pom...
Page 270 - ąż; Ostrze; łą
270 Wa ż ne informacje dotycz ą ce bezpiecze ń stwa W przypadku niemiarowo ś ci pracy serca, mia ż d ż ycy naczy ń oraz w okresie ci ąż y skonsultuj si ę z lekarzem. Nigdy nie wolno samodzielnie zmienia ć dawkowania leków przepisanych przez lekarza.Ci ś nieniomierz M1 Plus powinien by ć wykorzystywa...
Page 271 - dzenia; ówne urz; wietlacz
271 1.Opis urz ą dzenia PL 1. Opis urz ą dzenia G ł ówne urz ą dzenie A. Wy ś wietlacz B. Przycisk SETC. Z łą cze przewodu powietrza D. Przycisk MEMORYE. Przycisk I/O F. Komora baterii B A C C E D F HEM-4011C.book Page 271 Tuesday, August 9, 2005 10:35 AM
Page 272 - Mankiet; W przypadku stwierdzenia nieszczelno; Pompka; redni rozmiar mankietu: obwód ramienia 22–32 cm)
272 1.Opis urz ą dzenia Mankiet W przypadku stwierdzenia nieszczelno ś ci mankietu wymie ń go na nowy. (Patrz Rozdzia ł 7 „Opcjonalne cz ęś ci”) Pompka G. Mankiet ( ś redni rozmiar mankietu: obwód ramienia 22–32 cm) H. Przewód powietrzny I. Przycisk wypuszczania powietrza J. Przewód powietrznyK. Gru...
Page 273 - Wy
273 1.Opis urz ą dzenia PL Wy ś wietlacz Zawarto ść opakowania L. Skurczowe ci ś nienie krwi M. Rozkurczowe ci ś nienie krwi N. Symbol pami ę ci (wy ś wietlany w czasie przegl ą dania warto ś ci przechowywanych w pami ę ci) O. Symbol warto ś ci ś redniej (wy ś wietlany w czasie przegl ą dania ś redn...
Page 274 - dzenia do pracy; ęść
274 2.Przygotowanie urz ą dzenia do pracy 2. Przygotowanie urz ą dzenia do pracy 2.1 Instalowanie/wymiana baterii 1. Odwró ć g ł ówne urz ą dzenie górn ą stron ą w dó ł . 2. Naci ś nij ż ebrowan ą cz ęść pokrywy komory baterii i przesu ń j ą w kierunku zgodnym ze strza ł k ą . 3. W ł ó ż lub wymie ń...
Page 275 - ywotno
275 2.Przygotowanie urz ą dzenia do pracy PL Ż ywotno ść baterii i ich wymiana Je ś li na wy ś wietlaczu uka ż e si ę symbol roz ł adowania baterii ( ), wymie ń wszystkie cztery baterie. - Je ś li symbol roz ł adowania baterii ( ) zaczyna miga ć , z urz ą dzenia b ę dzie mo ż na jeszcze korzysta ć p...
Page 276 - Ustawianie daty i godziny
276 2.Przygotowanie urz ą dzenia do pracy 2.2 Ustawianie daty i godziny Ci ś nieniomierz automatycznie zapisuje w pami ę ci do 21 warto ś ci pomiarów wraz z dat ą i godzin ą ich wykonania. Na podstawie trzech ostatnich pomiarów, wykonanych w ci ą gu 10 minut poprzedzaj ą cych ostatni odczyt, urz ą d...
Page 279 - Dostosowanie ustawie; Tryb brz
279 2.Przygotowanie urz ą dzenia do pracy PL 2.3 Dostosowanie ustawie ń Mo ż na zmieni ć opcje ró ż nych ustawie ń urz ą dzenia. Aby tego dokona ć , wciskaj przycisk SET w celu wybrania ustawienia, a nast ę pnie wybierz opcje tego ustawienia za pomoc ą przycisku MEMORY. Po wybraniu ustawienia wci ś ...
Page 280 - Prawid
280 3.Korzystanie z urz ą dzenia 3. Korzystanie z urz ą dzenia 3.1 Prawid ł owa pozycja cia ł a w czasie pomiaru Pomiary mo ż na wykonywa ć na lewym lub prawym ramieniu. Uwaga: • Wykonuj pomiary w spokojnym pomieszczeniu. Osoba, u której dokonywany jest pomiar, powinna by ć rozlu ź niona i znajdowa ...
Page 281 - Niew
281 3.Korzystanie z urz ą dzenia PL Uwagi: • Dla uzyskania dok ł adnych wyników konieczne jest zachowanie prawid ł owej pozycji cia ł a. • Staraj si ę wykonywa ć pomiary ci ś nienia krwi o tej samej porze ka ż dego dnia (najlepiej w ci ą gu jednej godziny po przebudzeniu). Niew ł a ś ciwa pozycja Pr...
Page 282 - Zak
282 3.Korzystanie z urz ą dzenia 3.2 Zak ł adanie mankietu Aby uzyska ć dok ł adne wyniki pomiarów, upewnij si ę , ż e mankiet zosta ł za ł o ż ony prawid ł owo. Pomiary mo ż na wykonywa ć w lekkim ubraniu. Przed dokonaniem pomiaru zdejmij grub ą odzie ż , tak ą jak swetry. 1. Pod łą cz przewód powi...
Page 283 - Pomiar na prawym ramieniu
283 3.Korzystanie z urz ą dzenia PL 3. U ł ó ż odpowiednio rami ę . Pomiar na prawym ramieniu Umie ść mankiet w taki sposób, aby przewód powietrzny znalaz ł si ę z boku ł okcia. • Rami ę nie mo ż e opiera ć si ę na przewodzie powietrznym, gdy ż zak ł óci to przep ł yw powietrza do mankietu. • Mankie...
Page 284 - Wykonywanie pomiaru
284 3.Korzystanie z urz ą dzenia 3.3 Wykonywanie pomiaru 1. W łą czanie urz ą dzenia. Uwaga: Naci ś nij przycisk wypuszczania powietrza, aby usun ąć z mankietu reszt ę powietrza. 1) Naci ś nij przycisk I/O, aby w łą czy ć aparat. 2) Na wy ś wietlaczu zapal ą si ę na krótko wszystkie elementy. Wy ś w...
Page 285 - żą; Najcz
285 3.Korzystanie z urz ą dzenia PL • Podczas pompowania mankietu wy ś wietlana jest bie żą ca godzina. Uwaga: Nie pompuj mankietu nadmiernie. 3. Rozpoczyna si ę pomiar. Pomiar rozpoczyna si ę automatycznie po zaprzestaniu pompowania mankietu. Na wy ś wietlaczu pojawiaj ą si ę malej ą ce liczby, a s...
Page 287 - Wa; ąć
287 3.Korzystanie z urz ą dzenia PL Wa ż ne: • Je ś li ci ś nienie skurczowe lub rozkurczowe nie mie ś ci si ę w prawid ł owym zakresie, w czasie wy ś wietlania wyników ma wy ś wietlaczu b ę dzie miga ć symbol bij ą cego serca. Najnowsze badania pozwalaj ą przyj ąć poni ż sze warto ś ci jako wskazów...
Page 288 - Co to jest nieregularna praca serca?
288 3.Korzystanie z urz ą dzenia Co to jest nieregularna praca serca? Nieregularna praca serca to rytm bicia serca, który ró ż ni si ę o ponad 25% od ś redniego wykrytego rytmu bicia serca w czasie, kiedy urz ą dzenie mierzy skurczowe i rozkurczowe ci ś nienie krwi. Je ś li taki nieregularny rytm pr...
Page 289 - Korzystanie z funkcji pami
289 3.Korzystanie z urz ą dzenia PL 3.4 Korzystanie z funkcji pami ę ci Urz ą dzenie wyposa ż one jest w pami ęć mog ą c ą pomie ś ci ć 21 zestawów odczytów. Za ka ż dym razem po zako ń czeniu pomiaru aparat automatycznie zapisuje w pami ę ci ci ś nienie krwi i cz ę stotliwo ść t ę tna. Je ś li dost...
Page 291 - Usuwanie wszystkich warto
291 3.Korzystanie z urz ą dzenia PL Usuwanie wszystkich warto ś ci przechowywanych w pami ę ci Nie mo ż na usuwa ć pojedynczych zapisanych odczytów. Usuni ę te zostan ą wszystkie odczyty z aparatu. 1. Aby usun ąć zapisane odczyty, naci ś nij najpierw przycisk MEMORY. Nast ę pnie, przytrzymuj ą c go ...
Page 292 - Skrócona instrukcja; źć
292 4.Skrócona instrukcja 4. Skrócona instrukcja Ten rozdzia ł powinien by ć wykorzystywany tylko jako skrócona instrukcja. Je ś li korzystasz z urz ą dzenia po raz pierwszy, prosimy dok ł adnie przeczyta ć rozdzia ł 3 niniejszej instrukcji obs ł ugi. Aby uzyska ć wiarygodny wynik, powstrzymaj si ę ...
Page 295 - Rozwi
295 5.Eliminowanie b łę dów i rozwi ą zywanie problemów PL 5.2 Rozwi ą zywanie problemów Problem Przyczyna Rozwi ą zanie Odczyt jest bardzo niski (lub wysoki). Niew ł a ś ciwie za ł o ż ony mankiet. Za ł ó ż mankiet prawid ł owo. Patrz sekcja 3.2. Poruszanie si ę lub rozmowa podczas pomiaru. Nie por...
Page 297 - Konserwacja i przechowywanie; Konserwacja; Aby zapobiec uszkodzeniu urz
297 6.Konserwacja i przechowywanie PL 6. Konserwacja i przechowywanie Konserwacja Aby zapobiec uszkodzeniu urz ą dzenia, post ę puj zgodnie z poni ż szymi zaleceniami. • Nie wystawiaj g ł ównego urz ą dzenia i mankietu na dzia ł anie ekstremalnych temperatur, wilgoci oraz na bezpo ś rednie dzia ł an...
Page 298 - Kalibracja i serwis
298 6.Konserwacja i przechowywanie Kalibracja i serwis • Dok ł adno ść tego aparatu do mierzenia ci ś nienia krwi zosta ł a starannie przetestowana i powinna si ę utrzymywa ć przez d ł ugi okres u ż ytkowania urz ą dzenia. • Ogólnie zaleca si ę przeprowadzanie co dwa lata kontroli technicznej w celu...
Page 299 - Przechowywanie
299 6.Konserwacja i przechowywanie PL Przechowywanie Gdy urz ą dzenie nie jest w u ż yciu, przechowuj je w etui. 1. Od łą cz przewód powietrzny od przy łą cza powietrza. 2. Delikatnie z ł ó ż przewód powietrzny razem z mankietem. Uwaga: Nie zginaj przewodu powietrznego zbyt mocno. 3. W ł ó ż mankiet...
Page 303 - ytecznych informacji na temat ci; Co to jest ci
303 9.Kilka u ż ytecznych informacji na temat ci ś nienia krwi PL 9. Kilka u ż ytecznych informacji na temat ci ś nienia krwi Co to jest ci ś nienie krwi? Ci ś nienie krwi to miara si ł y, jak ą p ł yn ą ca krew wywiera na ś ciany t ę tnic. Ci ś nienie krwi t ę tniczej podlega ci ą g ł ym zmianom w ...
Page 304 - Klasyfikacja ci
304 9.Kilka u ż ytecznych informacji na temat ci ś nienia krwi Klasyfikacja ci ś nienia krwi wed ł ug Ś wiatowej Organizacji Zdrowia Ś wiatowa Organizacja Zdrowia (WHO) oraz Mi ę dzynarodowe Towarzystwo Nadci ś nienia T ę tniczego (ISH) opracowa ł y przedstawion ą na poni ż szym rysunku klasyfikacj ...
Page 305 - Digitális félautomata vérnyomásmér; M1 Plus típus
Digitális félautomata vérnyomásmér ő M1 Plus típus • Instruction Manual• Mode d’emploi• Gebrauchsanweisung• Manuale di istruzioni• Manual de instrucciones• Gebruiksaanwijzing• РУКОВОДСТВО ПО ЭКСПЛУАТАЦИИ • Instrukcja• Kezelési útmutató EN FR DE IT ES NL RU IM-HEM-4011C-E-01-07/05 PL HU HEM-4011C.boo...
Page 306 - Tartalom; Bevezet
306 Tartalom Bevezet ő ............................................................................... 307 Fontos biztonsági tudnivalók ............................................. 3081. Áttekintés ......................................................................... 3092. El ő készítés...........
Page 307 - Kérjük, hogy a készülék használata el
307 HU Bevezet ő Köszönjük, hogy OMRON M1 Plus felkaros vérnyomásmér ő t vásárolt. Az OMRON M1 Plus oszcillometrikus elven m ű köd ő , digitális félautomata vérnyomásmér ő . A vérnyomás és a pulzus egyszer ű és gyors mérésére szolgál. Emellett a készülék képes akár 21 mérést tárolni a memóriájában, ...
Page 308 - Fontos biztonsági tudnivalók; használja a készüléket, vegye ki az elemeket!
308 Fontos biztonsági tudnivalók Terhesség, szívritmuszavar és érelmeszesedés esetén forduljon orvosához!Soha ne változtassa meg az orvosa által felírt gyógyszermennyiségeket!Az M1 Plus készüléket lehet ő leg csak egy személy használja! Vigyázat: • Ne hagyja a készüléket gyermekek, illetve döntéskép...
Page 309 - Központi egység; csatlakozó
309 1.Áttekintés HU 1. Áttekintés Központi egység A. Kijelz ő B. SET gombC. Leveg ő cs ő csatlakozó D. MEMORY gombE. Be- és kikapcsoló (I/O) gomb F. Elemtartó B A C C E D F HEM-4011C.book Page 309 Tuesday, August 9, 2005 10:35 AM
Page 310 - Mandzsetta; Amennyiben a leveg; Pumpa; Leveg
310 1.Áttekintés Mandzsetta Amennyiben a leveg ő szivárogni kezd a mandzsettából, cserélje ki egy újra! (Lásd a 7. fejezet „Rendelhet ő alkatrészek” cím ű részt!) Pumpa G. Mandzsetta (Normál mandzsetta: 22–32 cm-es karkerülethez) H. Leveg ő cs ő I. Leveg ő leereszt ő gomb J. Leveg ő cs ő K. Pumpa H ...
Page 312 - készítés; Fordítsa fejjel lefelé a központi egységet!
312 2.El ő készítés 2. El ő készítés 2.1 Az elemek behelyezése/cseréje 1. Fordítsa fejjel lefelé a központi egységet! 2. A fed ő bordázott részét lenyomva csúsztassa az elemfedelet a nyilak irányába. 3. Helyezze be vagy cserélje ki a négy „ AAA ” típusú elemet úgy, hogy a + (pozitív) és a – (negatív...
Page 313 - Az elemek élettartama és cseréje
313 2.El ő készítés HU Az elemek élettartama és cseréje Amennyiben a kijelz ő n megjelenik a lemerült elem szimbólum ( ), cserélje ki mind a négy elemet! - Amikor a lemerült elem szimbólum ( ) elkezd villogni, a készülék egy rövid ideig még használható. Id ő ben cserélje ki az elemeket újakra! - Ami...
Page 314 - A dátum és az id
314 2.El ő készítés 2.2 A dátum és az id ő beállítása Az Ön által vásárolt vérnyomásmér ő automatikusan akár 21 mérés memóriában (dátummal és id ő ponttal együtt) való tárolására képes, emellett átlagot számít a három utolsó mérésb ő l, amennyiben azok 10 percen belül történtek. (Ha csak két mérés t...
Page 317 - Az üzemmódok beállítása; ”Hangjelzés” üzemmód
317 2.El ő készítés HU 2.3 Az üzemmódok beállítása A készülék különböz ő beállításaihoz tartozó opciók megváltoztathatók. Ehhez a SET gombbal ki kell választani az adott beállítást, majd a MEMORY gomb lenyomásával választhatók ki az adott beállításhoz tartozó opciók. Egy adott beállítás kiválasztása...
Page 318 - A készülék használata; A mérést mind a bal, mind a jobb karon elvégezheti.
318 3.A készülék használata 3. A készülék használata 3.1 A mérés alatti helyes testhelyzet A mérést mind a bal, mind a jobb karon elvégezheti. Megjegyzés: • A méréseket nyugodt körülmények között, kényelmes, ül ő helyzetben végezze! Gondoskodjon arról, hogy a helyiség ne legyen túl meleg vagy túl hi...
Page 320 - A mandzsetta használata
320 3.A készülék használata 3.2 A mandzsetta használata A pontos mérés érdekében ügyeljen a mandzsetta helyes felhelyezésére! A mérést elvégezheti vékony ruhán keresztül. A vastag ruházatot (pl. pulóvert) viszont vegye le mérés el ő tt. 1. Csatlakoztassa a mandzsetta és a pumpa leveg ő csövét a megf...
Page 321 - Mérés a jobb karon
321 3.A készülék használata HU 3. A mandzsetta helyes felhelyezése! Mérés a jobb karon Úgy helyezze fel a mandzsettát, hogy a leveg ő cs ő a könyöke mellett, a kisujjával párhuzamosan fusson!• Ne tegye karját a leveg ő cs ő re, mert ezzel akadályozza a leveg ő mandzsettába áramlását! • A mandzsettán...
Page 322 - Mérés végrehajtása
322 3.A készülék használata 3.3 Mérés végrehajtása 1. A készülék bekapcsolása. Megjegyzés: Nyomja meg a leveg ő leereszt ő gombot a mandzsetta légtelenítéséhez! 1) Nyomja meg a be- és kikapcsoló (I/O) gombot a készülék bekapcsolásához! 2) Rövid id ő re az összes szimbólum megjelenik a kijelz ő n. El...
Page 323 - Pontatlan mérések gyakori okai
323 3.A készülék használata HU • A mandzsetta felpumpálása közben az aktuális id ő továbbra is látható a kijelz ő n. Megjegyzés: Ne pumpálja fel a szükségesnél jobban a mandzsettát! 3. Megkezd ő dik a mérés. A mandzsetta felpumpálásának befejezése után automatikusan megkezd ő dik a mérés. Csökken ő ...
Page 326 - Mit nevezünk szabálytalan szívritmusnak?; Normális szívritmus
326 3.A készülék használata Mit nevezünk szabálytalan szívritmusnak? A szabálytalan szívritmus a készülék által érzékelt olyan szívritmus, amely a szisztolés és diasztolés vérnyomás mérése közben több mint 25%-kal eltér az átlagos szívritmustól.Amennyiben az ilyen szabálytalan ritmus kett ő nél több...
Page 327 - A memória funkció használata
327 3.A készülék használata HU 3.4 A memória funkció használata A készülék 21 mérés értékeinek tárolására alkalmas memóriával rendelkezik. Minden mérés alkalmával a készülék automatikusan tárolja memóriájában a vérnyomás és a pulzus értékeit.Amennyiben az utolsó mérést ő l számított 10 percen belül ...
Page 328 - az
328 3.A készülék használata Megjegyzés: Amennyiben nincsenek a memóriában tárolt mérési eredmények, a jobbra látható képerny ő jelenik meg. 3. Nyomja meg ismét a MEMORY gombot, miközben a kijelz ő az átlagértékeket mutatja. Ekkor megjelenik a legutóbbi mérés eredménye. Az egyes mérések dátuma és ide...
Page 329 - ket
329 3.A készülék használata HU Az összes érték memóriából való törléséhez tegye a következ ő ket A tárolt mérések egyesével nem törölhet ő k, törléskor az összes eredmény törl ő dik. 1. A tárolt mérések törléséhez el ő ször nyomja meg a MEMORY gombot! Miközben ezt lenyomva tartja, nyomja le egyidej ...
Page 330 - Rövid használati tájékoztató
330 4.Rövid használati tájékoztató 4. Rövid használati tájékoztató E fejezet csak rövid használati tájékoztatóként szolgál. Amennyiben el ő ször használja a készüléket, kérjük, olvassa el gondosan a jelen Használati útmutató 3. fejezetét!A megbízható eredmény érdekében kerülje az evést, dohányzást, ...
Page 331 - A használat során el
331 5.A használat során el ő forduló esetleges hibák és problémák HU 5. A használat során el ő forduló esetleges hibák és problémák 5.1 Hibaüzenetek Kijelzés Ok Megoldás A mandzsetta nincs eléggé felpumpálva. Nyomja meg a leveg ő leereszt ő gombot, majd kezdje elölr ő l a mérést magasabb értékre pum...
Page 333 - Hibakeresés
333 5.A használat során el ő forduló esetleges hibák és problémák HU 5.2 Hibakeresés Probléma Ok Megoldás A mért érték túl alacsony (vagy magas). A mandzsetta nincs megfelel ő helyzetben. Helyezze fel helyesen a mandzsettát. Lásd a 3.2. szakaszt. Mozgás vagy beszéd a mérés alatt. Mérés közben ne moz...
Page 335 - Karbantartás és tárolás; Karbantartás; • Ne végezzen semmiféle javítást a készüléken! Hiba esetén
335 6.Karbantartás és tárolás HU 6. Karbantartás és tárolás Karbantartás Azért, hogy megvédje készülékét a károsodástól, kérjük, tartsa be a következ ő ket: • Ne tegye ki a központi egységet és a mandzsettát széls ő séges h ő mérsékletnek, páratartalomnak, nedvességnek, illetve közvetlen napfénynek!...
Page 336 - Kalibrálás és szerviz
336 6.Karbantartás és tárolás Kalibrálás és szerviz • A vérnyomásmér ő pontosságát alapos vizsgálatokkal ellen ő rizték, a készülék hosszú élettartamú. • A megfelel ő és pontos m ű ködés érdekében a készüléket kétévente célszer ű megvizsgáltatni. Ehhez kérjük, vegye fel a kapcsolatot az OMRON forgal...
Page 337 - Tárolás
337 6.Karbantartás és tárolás HU Tárolás Amennyiben nem használja, tartsa a készüléket a tárolótáskájában! 1. Húzza ki a leveg ő csövet a leveg ő cs ő csatlakozójából! 2. Óvatosan hajtsa össze a leveg ő csövet és a mandzsettát! Megjegyzés: Ne hajlítsa meg túlzottan a leveg ő csövet! 3. Helyezze a ma...
Page 338 - alkatrészek; Normál mandzsetták
338 7.Rendelhet ő alkatrészek 7. Rendelhet ő alkatrészek Normál mandzsetták 22–32 cm-es karkerülethez Extra mandzsetta 32–42 cm-es karkerülethez Gyermek mandzsetta 17–22 cm-es karkerülethez Gyermek mandzsetta és pumpa együtt 17–22 cm-es karkerülethez Normál pumpa CM1-7935058-8 CM-4997086-7 CL-499706...
Page 339 - szaki adatok; Vigyázat: A készülék használata el
339 8.M ű szaki adatok HU 8. M ű szaki adatok Megjegyzés: A készüléken el ő zetes értesítés nélkül m ű szaki változtatások történhetnek. • A készüléket és a lemerült elemeket az elektronikus eszközök ártalmatlanítására vonatkozó nemzeti szabályozásokkal összhangban kell ártalmatlanítani / elhelyezni...
Page 341 - Néhány hasznos tudnivaló a vérnyomásról; Miért jó dolog az otthoni vérnyomásmérés?
341 9.Néhány hasznos tudnivaló a vérnyomásról HU 9. Néhány hasznos tudnivaló a vérnyomásról Mi a vérnyomás? A vérnyomás annak az er ő nek a nagysága, mellyel az áramló vér az üt ő erek (artériák) falára hat. Az artériás vérnyomás a szívciklus alatt folyamatosan változik. A ciklus legmagasabb nyomásé...
Page 342 - helyzetben mért vérnyomásértékein alapszik.
342 9.Néhány hasznos tudnivaló a vérnyomásról A vérnyomás osztályozása az Egészségügyi Világszervezet szerint Az alábbi ábrán látható vérnyomás-osztályozást az Egészségügyi Világszervezet (WHO) és a Nemzetközi Hipertónia Társaság (ISH) fejlesztette ki. Ez az osztályozás kórházi ambulanciákon megjele...