Page 2 - Table of Contents; Introduction
Table of Contents Introduction Intended Use ......................................................................................... 1 Exemptions ............................................................................................ 2 Notes on Safety .............................................
Page 3 - Intended Use; circumference ranging from 12 cm to 50 cm (from 5 inches to 20 inches).
1 EN Introduction Intended Use Medical Purpose The device is a digital monitor intended for use in measuring blood pressure and pulse rate in adult and pediatric patient population with arm circumference ranging from 12 cm to 50 cm (from 5 inches to 20 inches). Intended User This device should be us...
Page 4 - Exemptions
2 Exemptions OMRON will not bear any responsibilities on the following matters. 1. When a problem or damage occurs caused by the maintenance and/or repair conducted by a person other than OMRON or the dealer specified by OMRON 2. The problem or damage of OMRON product caused by the product of other ...
Page 5 - Notes on Safety; Safety Symbols used in this Instruction Manual; Warning; General Information; Setup
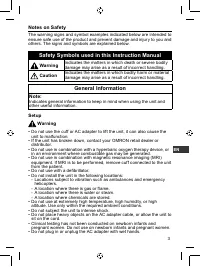
3 EN Notes on Safety The warning signs and symbol examples indicated below are intended to ensure safe use of the product and prevent damage and injury to you and others. The signs and symbols are explained below. Safety Symbols used in this Instruction Manual Warning Indicates the matters in which ...
Page 7 - • Before use, visually inspect the unit to make sure there are no; Cleaning; • When cleaning the unit, turn off the power and disconnect the AC; Caution; • Do not use thinner, benzene, or other solvents to clean the unit.
5 EN Caution • Before using the unit, verify that none of the following apply to the patient: - Poor peripheral circulation, noticeably low blood pressure, or low body temperature (there will be low blood flow to the measurement position) - The patient uses an artificial heart and lung (there will b...
Page 10 - • Read and understand the manual for each optional accessory.; Before use / during use; • Check the following after turning on the power:; • Non-Invasive Blood Pressure measurement (NIBP) is performed by
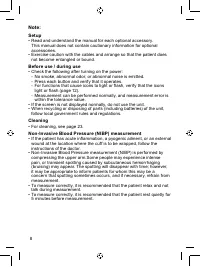
8 Note: Setup • Read and understand the manual for each optional accessory. This manual does not contain cautionary information for optional accessories. • Exercise caution with the cables and arrange so that the patient does not become entangled or bound. Before use / during use • Check the followi...
Page 11 - Using the Unit; Components of the Product; Main unit; Options; Adapter S
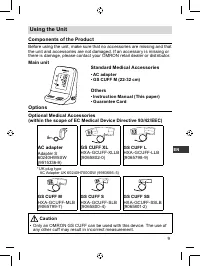
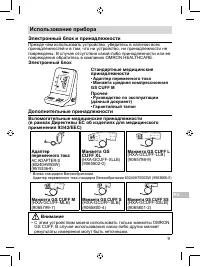
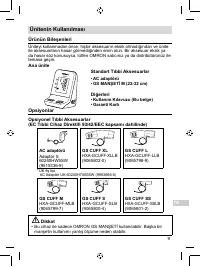
9 EN Using the Unit Components of the Product Before using the unit, make sure that no accessories are missing and that the unit and accessories are not damaged. If an accessory is missing or there is damage, please contact your OMRON retail dealer or distributor. Main unit Standard Medical Accessor...
Page 12 - Features of the Product; to use, the HBP-1100 is intended for use by medical professionals.
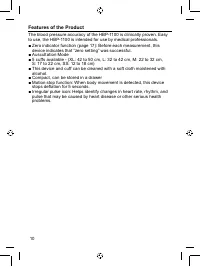
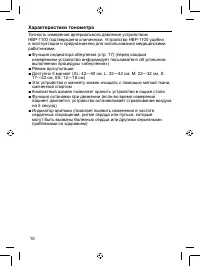
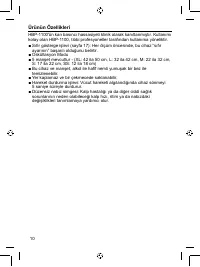
10 Features of the Product The blood pressure accuracy of the HBP-1100 is clinically proven. Easy to use, the HBP-1100 is intended for use by medical professionals. ■ Zero indicator function (page 17): Before each measurement, this device indicates that “zero setting” was successful. ■ Auscultation ...
Page 13 - Features / Functions of Unit; Front and bottom of unit
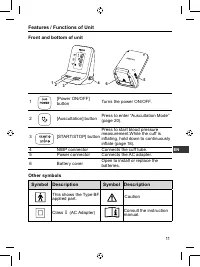
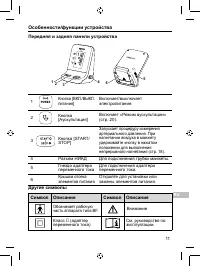
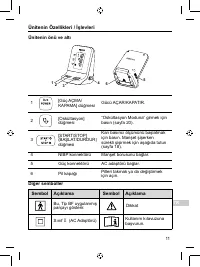
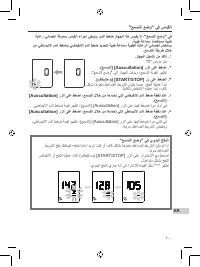
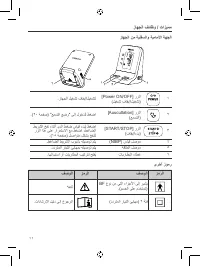
11 EN Features / Functions of Unit Front and bottom of unit 1 [Power ON/OFF] button Turns the power ON/OFF. 2 [Auscultation] button Press to enter “Auscultation Mode” (page 20). 3 [START/STOP] button Press to start blood pressure measurement.While the cuff is inflating, hold down to continuously inf...
Page 14 - LCD Display; synchronization
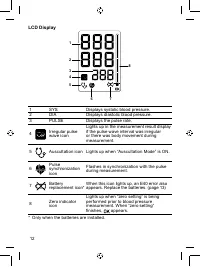
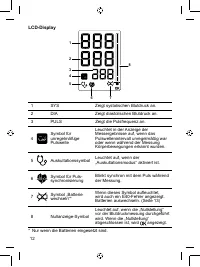
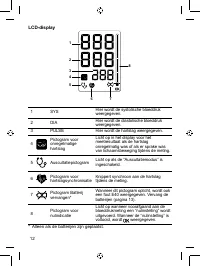
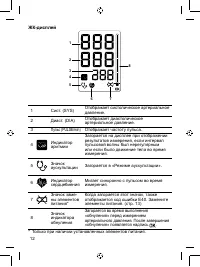
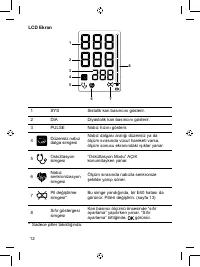
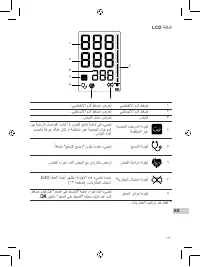
12 LCD Display 3 2 1 7 5 4 6 8 1 SYS Displays systolic blood pressure. 2 DIA Displays diastolic blood pressure. 3 PULSE Displays the pulse rate. 4 Irregular pulse wave icon Lights up in the measurement result display if the pulse wave interval was irregular or there was body movement during measurem...
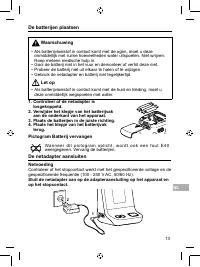
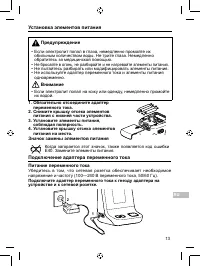
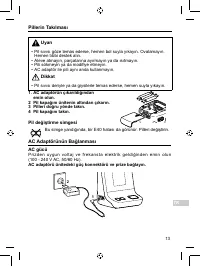
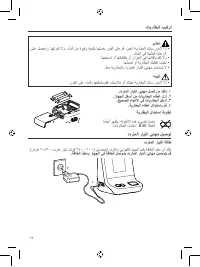
Page 15 - Installing the Batteries; • If battery fluid comes in contact with the eye, immediately flush; Make sure the AC adapter has been; Battery replacement icon; When this icon lights up, an E40 error also appears. Replace the; Connecting the AC Adapter; AC power; Connect the AC adapter to the power connector on the unit and the
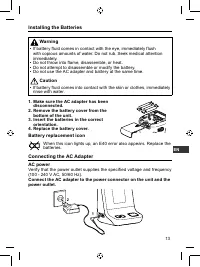
13 EN Installing the Batteries Warning • If battery fluid comes in contact with the eye, immediately flush with copious amounts of water. Do not rub. Seek medical attention immediately. • Do not throw into flame, disassemble, or heat. • Do not attempt to disassemble or modify the battery. • Do not u...
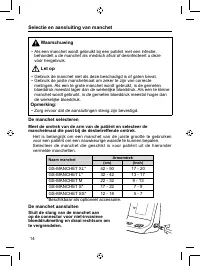
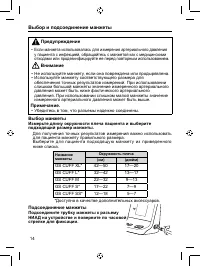
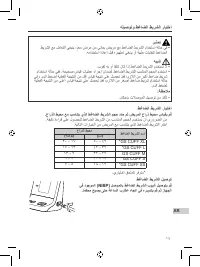
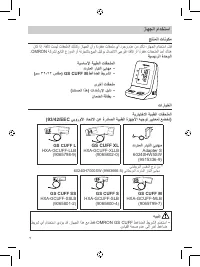
Page 16 - Cuff Selection and Connection; • Do not use the cuff if it is damaged or has holes.; Selecting the cuff; Measure the circumference of the patient’s arm and select the cuff; Cuff name; GS CUFF M; Connecting the cuff; Connect the cuff tube to the NIBP connector
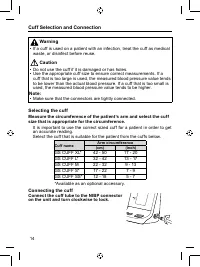
14 Cuff Selection and Connection Warning • If a cuff is used on a patient with an infection, treat the cuff as medical waste, or disinfect before reuse. Caution • Do not use the cuff if it is damaged or has holes. • Use the appropriate cuff size to ensure correct measurements. If a cuff that is too ...
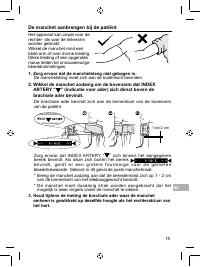
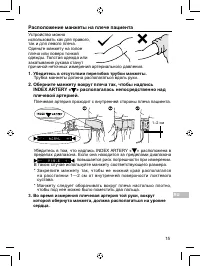
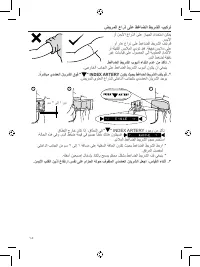
Page 17 - Applying the Cuff to the Patient; Wrap the cuff so that the INDEX ARTERY “ ” is directly over; During measurement, keep the brachial artery on which the cuff
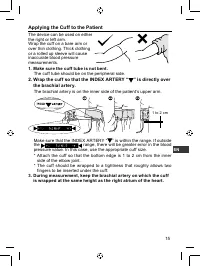
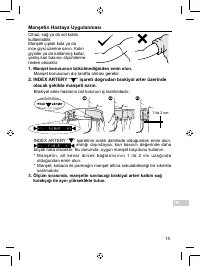
15 EN Applying the Cuff to the Patient The device can be used on either the right or left arm. Wrap the cuff on a bare arm or over thin clothing. Thick clothing or a rolled up sleeve will cause inaccurate blood pressure measurements. 1. Make sure the cuff tube is not bent. The cuff tube should be on...
Page 18 - • If the patient has acute inflammation, a pyogenic ailment, or an
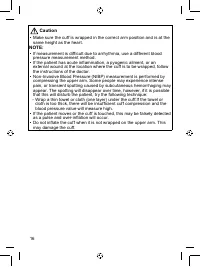
16 Caution • Make sure the cuff is wrapped in the correct arm position and is at the same height as the heart. NOTE: • If measurement is difficult due to arrhythmia, use a different blood pressure measurement method. • If the patient has acute inflammation, a pyogenic ailment, or an external wound a...
Page 19 - Zero Indicator Function; ■ When the power is already on, measurement is started, then “zero
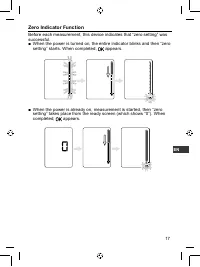
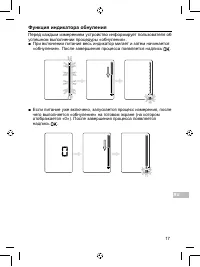
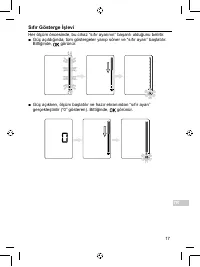
17 EN Zero Indicator Function Before each measurement, this device indicates that “zero setting” was successful. ■ When the power is turned on, the entire indicator blinks and then “zero setting” starts. When completed, appears. ■ When the power is already on, measurement is started, then “zero sett...
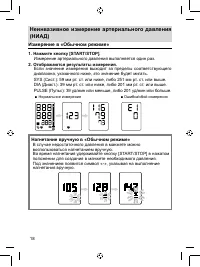
Page 20 - Measurement in “Normal Mode”; Blood pressure measurement is performed once.; The measurement results are displayed.; Manual inflation in “Normal Mode”; “-” appears below the value to indicate that manual inflation is in
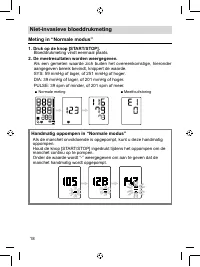
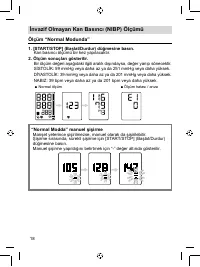
18 Non-Invasive Blood Pressure (NIBP) Measurement Measurement in “Normal Mode” 1. Press the [START/STOP] button. Blood pressure measurement is performed once. 2. The measurement results are displayed. If a measurement value is outside the corresponding range below, the value will flash. SYS: 59 mmHg...
Page 21 - • The accuracy of a flashing measurement value that is outside the; Irregular pulse wave detection function; • When the body movement detection function has been activated, the
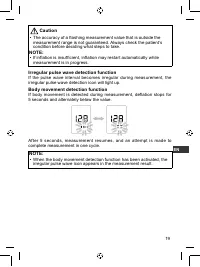
19 EN Caution • The accuracy of a flashing measurement value that is outside the measurement range is not guaranteed. Always check the patient’s condition before deciding what steps to take. NOTE: • If inflation is insufficient, inflation may restart automatically while measurement is in progress. I...
Page 22 - Measurement in “Auscultation Mode”; Manual inflation in “Auscultation Mode”
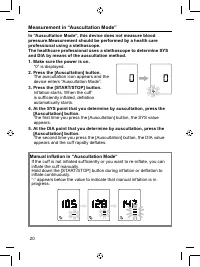
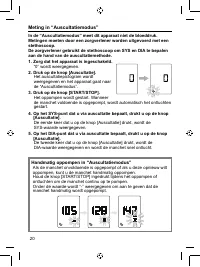
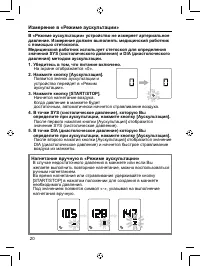
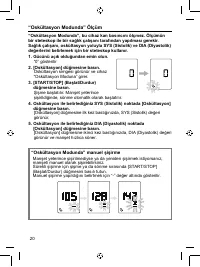
20 Measurement in “Auscultation Mode” In “Auscultation Mode”, this device does not measure blood pressure.Measurement should be performed by a health care professional using a stethoscope. The healthcare professional uses a stethoscope to determine SYS and DIA by means of the auscultation method.1. ...
Page 23 - • In “Auscultation Mode”, the pulse rate is not measured and does not; Stopping the Measurement; To stop measurement while measurement is in progress, press [START/
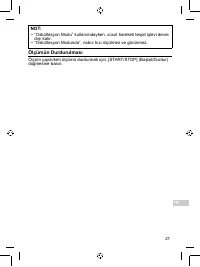
21 EN NOTE: • The body movement detection function is disabled while “Auscultation Mode” is in use. • In “Auscultation Mode”, the pulse rate is not measured and does not appear. Stopping the Measurement To stop measurement while measurement is in progress, press [START/ STOP] button.
Page 24 - Non-Invasive Pressure Measurement Principles; Oscillometric method; oscillation decreases from its peak.
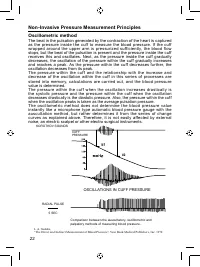
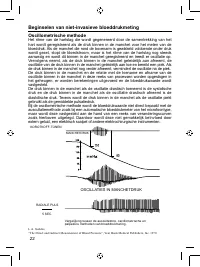
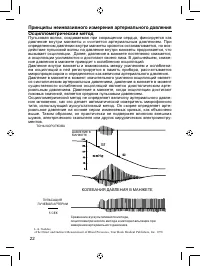
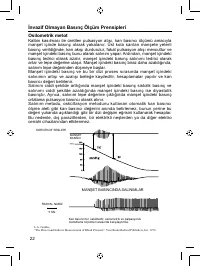
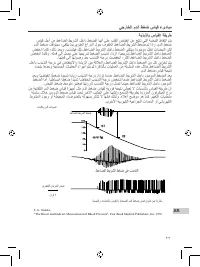
22 Non-Invasive Pressure Measurement Principles Oscillometric method The beat in the pulsation generated by the contraction of the heart is captured as the pressure inside the cuff to measure the blood pressure. If the cuff wrapped around the upper arm is pressurized suf ficiently, the blood flow st...
Page 25 - Maintenance; Maintenance Inspection and Safety Management; safety of patients and operators.; Cleaning of the Device; facility’s infection control practice.; Accessory Care
23 EN Maintenance Maintenance Inspection and Safety Management The HBP-1100 must be maintained to ensure functionality and to secure the safety of patients and operators. Daily checks and maintenanc e should be per formed by the operator.In addition, qualified personnel are necessar y to maintain th...
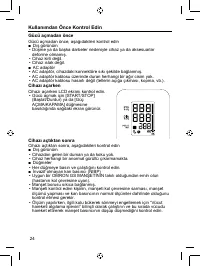
Page 26 - Check before Use; Before turning on the power; Before turning on the power, check for the following; When turning on the power; When you turn on the power, check the; After turning on the power; After turning on the power, check for the following
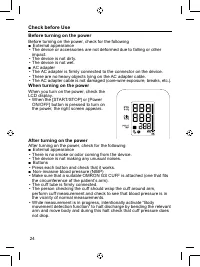
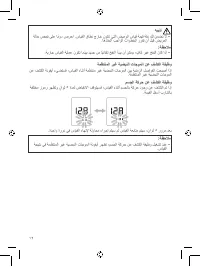
24 Check before Use Before turning on the power Before turning on the power, check for the following ■ External appearance • The device or accessories are not deformed due to falling or other impact. • The device is not dirty. • The device is not wet. ■ AC adapter • The AC adapter is firmly connecte...
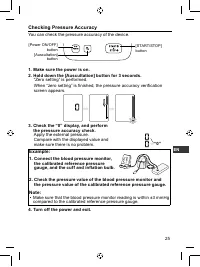
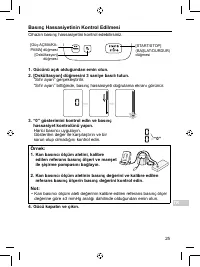
Page 27 - Checking Pressure Accuracy; the pressure accuracy check.; • Make sure that the blood pressure monitor reading is within ±3 mmHg
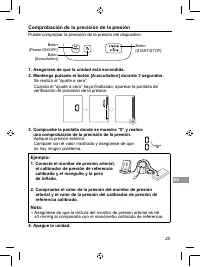
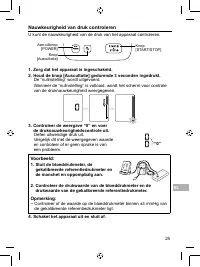
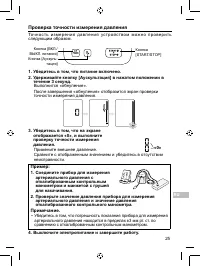
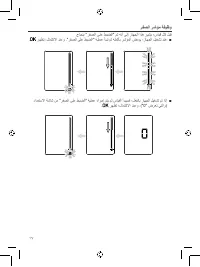
25 EN Checking Pressure Accuracy You can check the pressure accuracy of the device. 1. Make sure the power is on. 2. Hold down the [Auscultation] button for 3 seconds. “Zero setting” is performed. When “zero setting” is finished, the pressure accuracy verification screen appears. 3. Check the “0” di...
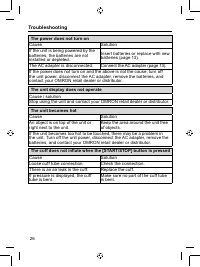
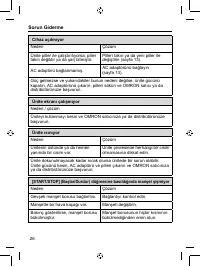
Page 28 - Troubleshooting; The power does not turn on
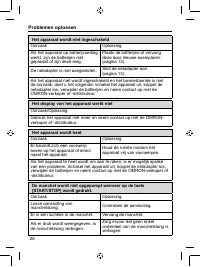
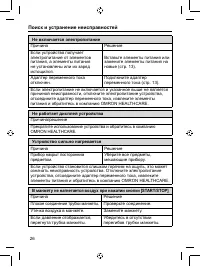
26 Troubleshooting The power does not turn on Cause Solution If the unit is being powered by the batteries, the batteries are not installed or depleted. Insert batteries or replace with new batteries (page 13). The AC adapter is disconnected. Connect the AC adapter (page 13). If the power does not t...
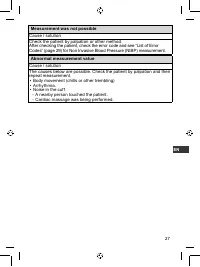
Page 29 - • Body movement (chills or other trembling)
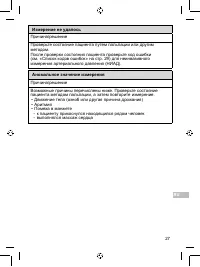
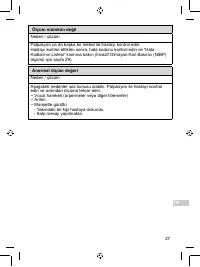
27 EN Measurement was not possible Cause / solutionCheck the patient by palpation or other method. After checking the patient, check the error code and see “List of Error Codes” (page 29) for Non Invasive Blood Pressure (NIBP) measurement. Abnormal measurement value Cause / solutionThe causes below ...
Page 30 - The measurement value is questionable
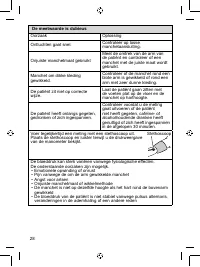
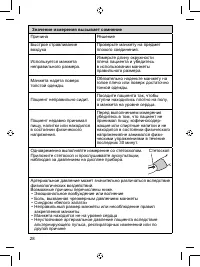
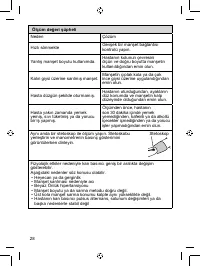
28 The measurement value is questionable Cause Solution Deflates quickly Check for a loose cuff connection. Incorrect cuff size used. Measure circumference of patient’s arm and ensure correct sized cuff is used. Cuff wrapped over thick clothing. Ensure cuff is applied to a bare arm, or very thin clo...
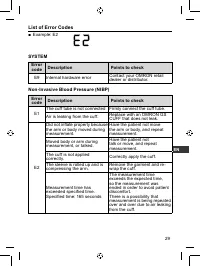
Page 31 - List of Error Codes; SYSTEM; Error; Replace with an OMRON GS
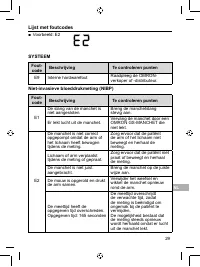
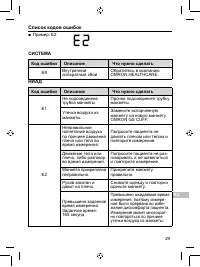
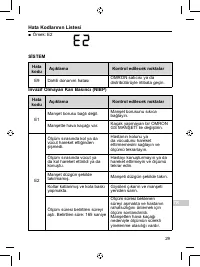
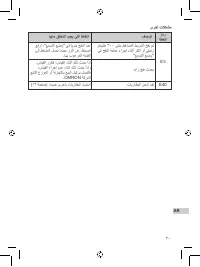
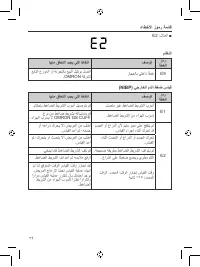
29 EN List of Error Codes ■ Example: E2 SYSTEM Error code Description Points to check E9 Internal hardware error Contact your OMRON retail dealer or distributor. Non-Invasive Blood Pressure (NIBP) Error code Description Points to check E1 The cuff tube is not connected Firmly connect the cuff tube.A...
Page 32 - Other problems
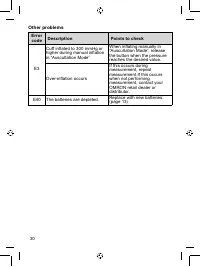
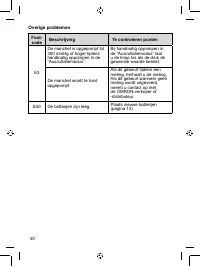
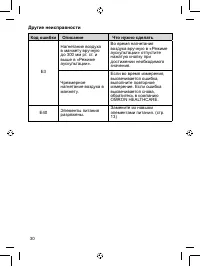
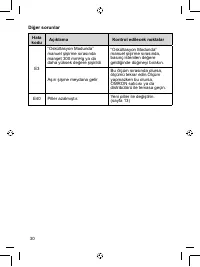
30 Other problems Error code Description Points to check E3 Cuff inflated to 300 mmHg or higher during manual inflation in “Auscultation Mode” When inflating manually in “Auscultation Mode”, release the button when the pressure reaches the desired value. Over-inflation occurs If this occurs during m...
Page 33 - Disposal; Item; General electronic components
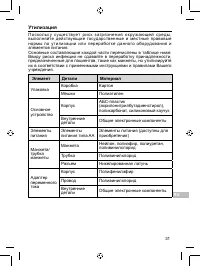
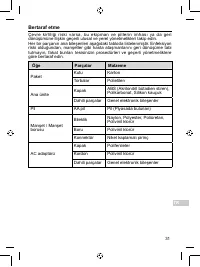
31 EN Disposal As there is a risk of environmental pollution, follow your applicable national and local legal regulations regarding disposal or recycling of this equipment and batteries. The main constituents of each part are listed in the table below. As there is a risk of infection, do not recycle...
Page 34 - Specifications; • Measurement conditions
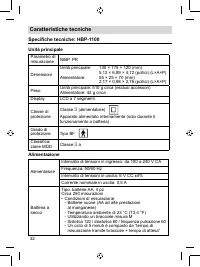
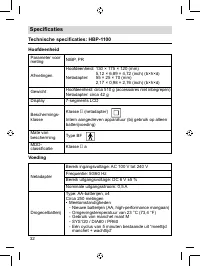
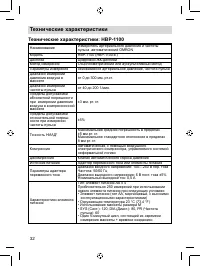
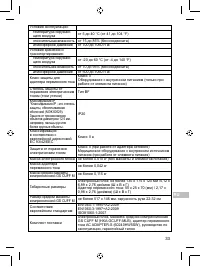
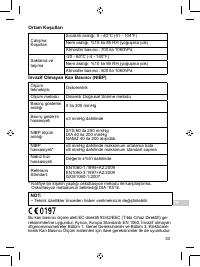
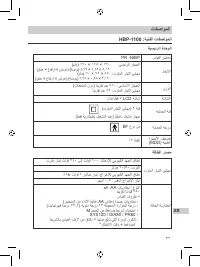
32 Specifications Technical Specifications: HBP-1100 Main unit Measurement Parameter NIBP, PR Dimension Main unit: 130 × 175 × 120 (mm) 5.12 × 6.89 × 4.72 (inch) (W×H×D) AC adapter: 55 × 25 × 70 (mm) 2.17 × 0.98 × 2.76 (inch) (W×H×D) Weight Main unit: Approx. 510 g (not including accessories) AC ada...
Page 35 - Environmental Conditions; Within ±3 mmHg
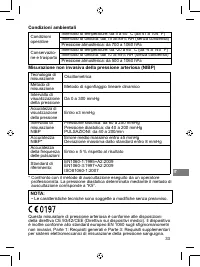
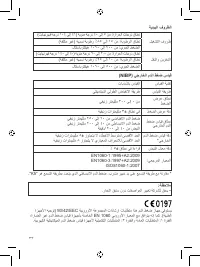
33 EN Environmental Conditions Operating Conditions Temperature range: 5 to 40°C (41 to 104°F)Humidity range: 15 to 85%RH (not condensed)Atmospheric pressure: 700 to 1060hPa Storage and transportation Temperature range: -20 to 60°C (-4 to 140°F)Humidity range: 10 to 95%RH (not condensed)Atmospheric ...
Page 36 - Correct Disposal of This Product
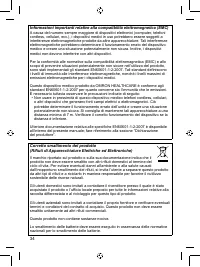
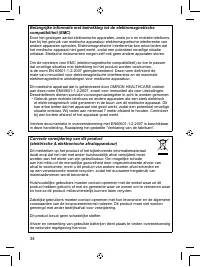
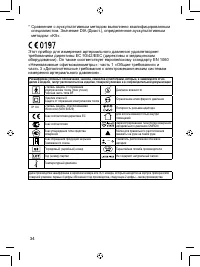
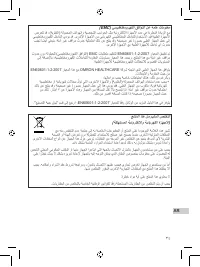
34 Important information regarding Electro Magnetic Compatibility (EMC) With the increased number of electronic devices such as PC’s and mobile (cellular) telephones, medical devices in use may be susceptible to electromagnetic interference from other devices. Electromagnetic interference may result...
Page 37 - Manufacturer’s Declaration; Emission Test
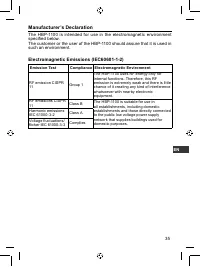
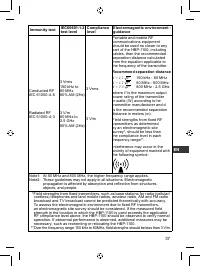
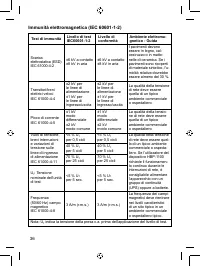
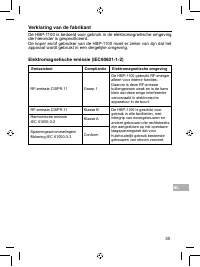
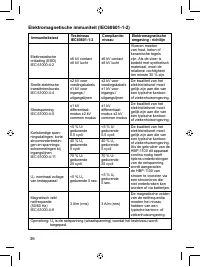
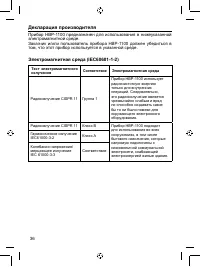
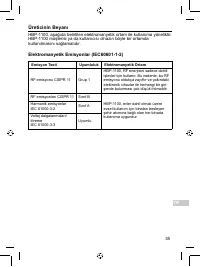
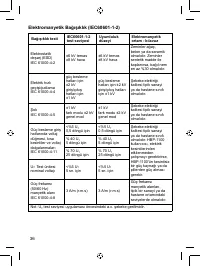
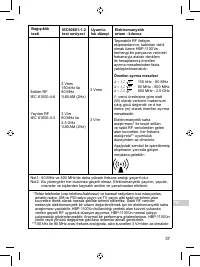
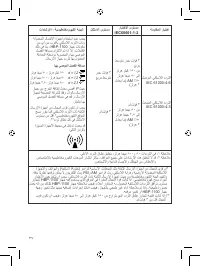
35 EN Manufacturer’s Declaration The HBP-1100 is intended for use in the electromagnetic environment specified below. The customer or the user of the HBP-1100 should assure that it is used in such an environment. Electromagnetic Emissions (IEC60601-1-2) Emission Test Compliance Electromagnetic Envir...
Page 40 - Recommended Separation Distances:; Recommended separation distance between portable and mobile RF
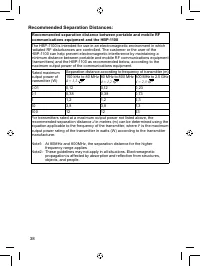
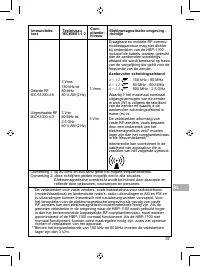
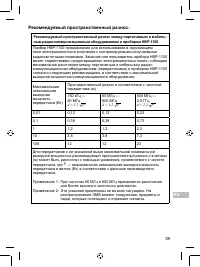
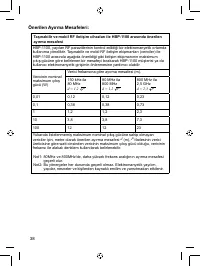
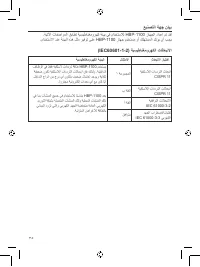
38 Recommended Separation Distances: Recommended separation distance between portable and mobile RF communications equipment and the HBP-1100 The HBP-1100 is intended for use in an electromagnetic environment in which radiated RF disturbances are controlled. The customer or the user of the HBP-1100 ...
Page 43 - Tensiomètre professionnel
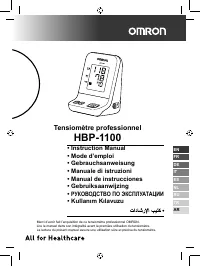
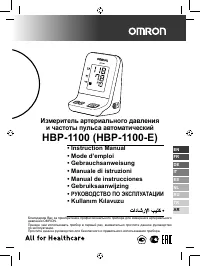
Tensiomètre professionnel HBP-1100 • Instruction Manual • Mode d’emploi • Gebrauchsanweisung • Manuale di istruzioni • Manual de instrucciones • Gebruiksaanwijzing • РУКОВОДСТВО ПО ЭКСПЛУАТАЦИИ • Kullanım Kılavuzu Merci d’avoir fait l’acquisition de ce tensiomètre professionnel OMRON. Lire le manuel...
Page 44 - Table des matières; Vérification de la précision des mesures de tension; Caractéristiques techniques
Table des matières Introduction Domaine d’utilisation.............................................................................. 1 Exceptions ............................................................................................. 2 Remarques sur la sécurité ....................................
Page 45 - Domaine d’utilisation; du bras est comprise entre 12 cm et 50 cm.
1 FR Introduction Domaine d’utilisation Usage médical Cet appareil est un tensiomètre numérique servant à mesurer la tension artérielle et le pouls chez les adultes et les enfants dont la circonférence du bras est comprise entre 12 cm et 50 cm. Utilisateur Cet appareil doit être utilisé par un profe...
Page 46 - Exceptions; OMRON décline toute responsabilité dans les cas suivants.
2 Exceptions OMRON décline toute responsabilité dans les cas suivants. 1. En cas de problèmes ou de dégâts dus à des travaux de maintenance et/ou de réparation n’ayant pas été effectués par du personnel OMRON ou par le distributeur spécifié par OMRON 2. En cas de problèmes ou de dégâts subis par un ...
Page 47 - Remarques sur la sécurité; Symboles de sécurité utilisés dans le présent mode; Avertissement; Informations générales; Installation
3 FR Remarques sur la sécurité Les exemples de symboles et de signaux d’avertissement indiqués ci- dessous sont fournis afin de garantir une utilisation sûre du produit et de prévenir tous dégâts et blessures pour l’utilisateur ou des tiers. Les signaux et symboles sont expliqués ci-dessous. Symbole...
Page 49 - • Ne pas relier un même patient à plusieurs tensiomètres.; • Avant de nettoyer l’appareil, le mettre hors tension et débrancher; Attention; • Ne pas stériliser en autoclave ou au gaz (EOG, gaz de formaldéhyde,
5 FR • Ne pas relier un même patient à plusieurs tensiomètres. • Ne pas brancher l’appareil sur une prise de courant commandée par un interrupteur mural. Attention • Avant d’utiliser l’appareil, s’assurer qu’aucune des conditions suivantes ne s’applique au patient : - Mauvaise circulation périphériq...
Page 52 - • Si l’affichage à l’écran n’est pas normal, ne pas utiliser l’appareil.; Nettoyage; • Pour le nettoyage, se reporter à la page 23.; invasive de la tension artérielle); • La mesure non invasive de la pression artérielle (NIBP) s’effectue
8 Remarque : Installation • Lire attentivement le manuel de chaque accessoire en option. Le présent mode d’emploi ne contient pas de précautions relatives aux accessoires en option. • Disposer les câbles avec soin, de sorte que le patient ne se retrouve pas enchevêtré ou attaché. Avant / pendant l’u...
Page 53 - Utilisation de l’appareil; Composants du produit; votre revendeur OMRON.; Unité principale; Accessoires en option; Accessoires médicaux en option; Adaptateur S; • Avec cet appareil, utiliser exclusivement les BRASSARDS OMRON
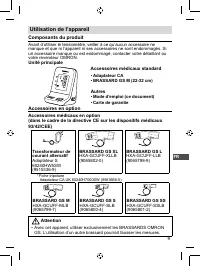
9 FR Utilisation de l’appareil Composants du produit Avant d’utiliser le tensiomètre, veiller à ce qu’aucun accessoire ne manque et que ni l’appareil ni ses accessoires ne sont endommagés. Si un accessoire manque ou est endommagé, contacter votre détaillant ou votre revendeur OMRON. Unité principale...
Page 54 - Fonctions du produit; ■ Mode auscultation
10 Fonctions du produit La précision de la mesure de la pression artérielle par le HBP-1100 est cliniquement prouvée. L’appareil HBP-1100, qui est simple à utiliser, est destiné aux professionnels de la santé. ■ Indicateur de zéro (page 17) : avant chaque mesure, cet appareil indique que la mise à z...
Page 55 - Caractéristiques / Fonctions de l’appareil; Parties avant et inférieure de l’appareil
11 FR Caractéristiques / Fonctions de l’appareil Parties avant et inférieure de l’appareil 1 Bouton [Power ON/OFF] Met l’appareil sous/hors tension. 2 Bouton [Auscultation] Permet d’entrer en « mode auscultation » (page 20). 3 Bouton [START/STOP] Permet de lancer la mesure de la pression artérielle....
Page 56 - Écran LCD
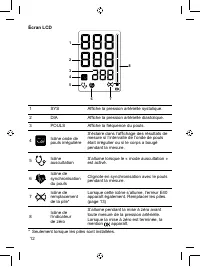
12 Écran LCD 3 2 1 7 5 4 6 8 1 SYS Affiche la pression artérielle systolique. 2 DIA Affiche la pression artérielle diastolique. 3 POULS Affiche la fréquence du pouls. 4 Icône onde de pouls irrégulière S’éclaire dans l’affichage des résultats de mesure si l’intervalle de l’onde de pouls était irrégul...
Page 57 - Installation des piles; • Si le liquide de la pile entre en contact avec les yeux, rincer; • En cas de contact entre le liquide de la pile et la peau ou les; Vérifier que l’adaptateur CA a été; Icône de remplacement de la pile; Lorsque cette icône s’allume, l’erreur E40 apparaît également.; Branchement du transformateur de courant alternatif; Alimentation CA
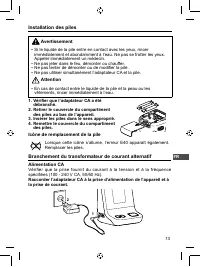
13 FR Installation des piles Avertissement • Si le liquide de la pile entre en contact avec les yeux, rincer immédiatement et abondamment à l’eau. Ne pas se frotter les yeux. Appeler immédiatement un médecin. • Ne pas jeter dans le feu, démonter ou chauffer. • Ne pas tenter de démonter ou de modifie...
Page 58 - Choix du brassard et raccordement; de l’utiliser à nouveau.; • Ne pas utiliser un brassard endommagé ou troué.; Choix du brassard; brassard dont la taille est bien adaptée au patient.; Nom du brassard; BRASSARD GS M; Raccordement du brassard; Raccorder le tube du brassard au connecteur
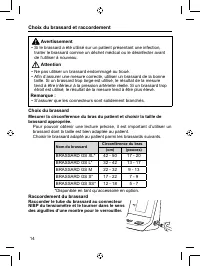
14 Choix du brassard et raccordement Avertissement • Si le brassard a été utilisé sur un patient présentant une infection, traiter le brassard comme un déchet médical ou le désinfecter avant de l’utiliser à nouveau. Attention • Ne pas utiliser un brassard endommagé ou troué. • Afin d’assurer une mes...
Page 59 - Application du brassard au patient; Vérifier que la tubulure du brassard n’est pas pliée.; Placer le brassard de sorte que le repère INDEX ARTERY; Pendant la mesure, garder l’artère brachiale du bras portant le
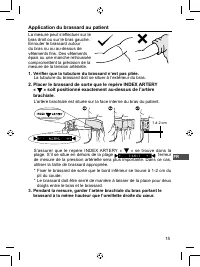
15 FR Application du brassard au patient La mesure peut s’effectuer sur le bras droit ou sur le bras gauche. Enrouler le brassard autour du bras nu ou au-dessus de vêtements fins. Des vêtements épais ou une manche retroussée compromettent la précision de la mesure de la tension artérielle. 1. Vérifi...
Page 60 - • Veiller à enrouler le brassard correctement autour du bras et à la
16 Attention • Veiller à enrouler le brassard correctement autour du bras et à la même hauteur que le cœur. REMARQUE : • Si la mesure est difficile à cause d’une arythmie, employer une méthode différente pour la mesure de la pression artérielle. • Si le patient présente une inflammation aiguë, une a...
Page 61 - Indicateur de zéro; ■ Après la mise sous tension, l’indicateur clignote et la mise à zéro
17 FR Indicateur de zéro Avant chaque mesure, cet appareil indique que la mise à zéro a réussi. ■ Après la mise sous tension, l’indicateur clignote et la mise à zéro commence. Lorsqu’elle est terminée, la mention apparaît. ■ Lorsque l’appareil est déjà sous tension et qu’une mesure est lancée, la mi...
Page 62 - non invasive de la tension artérielle); Mesure en « mode normal »; Les résultats de la mesure sont affichés.; Gonflage manuel en « mode normal »
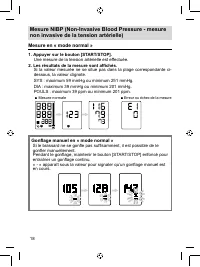
18 Mesure NIBP (Non-Invasive Blood Pressure - mesure non invasive de la tension artérielle) Mesure en « mode normal » 1. Appuyer sur le bouton [START/STOP]. Une mesure de la tension artérielle est effectuée. 2. Les résultats de la mesure sont affichés. Si la valeur mesurée ne se situe pas dans la pl...
Page 63 - • La précision d’une valeur de mesure clignotante située en dehors; Fonction de détection d’onde de pouls irrégulière; • Lorsque la fonction de détection des mouvements du corps est
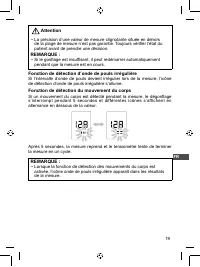
19 FR Attention • La précision d’une valeur de mesure clignotante située en dehors de la plage de mesure n’est pas garantie. Toujours vérifier l’état du patient avant de prendre une décision. REMARQUE : • Si le gonflage est insuffisant, il peut redémarrer automatiquement pendant que la mesure est en...
Page 64 - Mesure en « mode auscultation »; En « mode auscultation », cet appareil ne mesure pas la pression; Gonflage manuel en « mode auscultation »
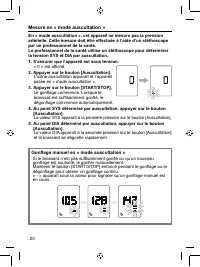
20 Mesure en « mode auscultation » En « mode auscultation », cet appareil ne mesure pas la pression artérielle. Cette mesure doit être effectuée à l’aide d’un stéthoscope par un professionnel de la santé. Le professionnel de la santé utilise un stéthoscope pour déterminer la tension SYS et DIA par a...
Page 65 - Arrêt de la mesure
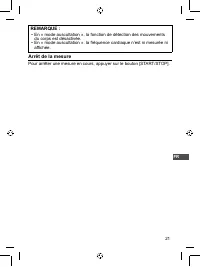
21 FR REMARQUE : • En « mode auscultation », la fonction de détection des mouvements du corps est désactivée. • En « mode auscultation », la fréquence cardiaque n’est ni mesurée ni affichée. Arrêt de la mesure Pour arrêter une mesure en cours, appuyer sur le bouton [START/STOP].
Page 66 - Principes de la mesure non invasive de la tension artérielle; Méthode oscillométrique; continue à diminuer, l’oscillation diminue par rapport à son pic.
22 Principes de la mesure non invasive de la tension artérielle Méthode oscillométrique Le battement de la pulsation générée par la contraction du cœur est enregistré en tant que la pression à l’intérieur du brassard, pour mesurer la tension artérielle. Si la pression dans le brassard enroulé autour...
Page 67 - Inspection d’entretien et sécurité; Ne pas nettoyer ou mouiller la prise d’alimentation.; Entretien des accessoires; Brassard/tubulure du brassard
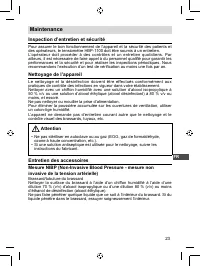
23 FR Maintenance Inspection d’entretien et sécurité Pour assurer le bon fonctionnement de l’appareil et la sécurité des patients et des opérateurs, le tensiomètre HBP-1100 doit être soumis à un entretien. L’opérateur doit procéder à des contrôles et un entretien quotidiens. Par ailleurs, il est néc...
Page 68 - Contrôle avant utilisation; Avant de mettre l’appareil sous tension
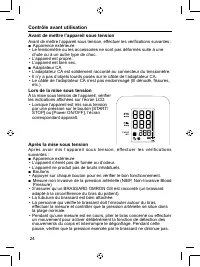
24 Contrôle avant utilisation Avant de mettre l’appareil sous tension Avant de mettre l’appareil sous tension, effectuer les vérifications suivantes : ■ Apparence extérieure • Le tensiomètre ou les accessoires ne sont pas déformés suite à une chute ou à un autre type de choc. • L’appareil est propre...
Page 69 - • S’assurer que la lecture du tensiomètre se situe à ±3 mmHg de la
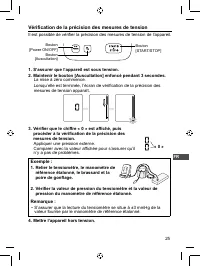
25 FR Vérification de la précision des mesures de tension Il est possible de vérifier la précision des mesures de tension de l’appareil. 1. S’assurer que l’appareil est sous tension. 2. Maintenir le bouton [Auscultation] enfoncé pendant 3 secondes. La mise à zéro commence. Lorsqu’elle est terminée, ...
Page 70 - Dépannage; L’appareil ne s’allume pas
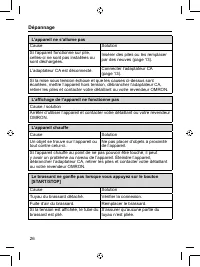
26 Dépannage L’appareil ne s’allume pas Cause Solution Si l’appareil fonctionne sur pile, celles-ci ne sont pas installées ou sont déchargées. Insérer des piles ou les remplacer par des neuves (page 13). L’adaptateur CA est déconnecté. Connecter l’adaptateur CA (page 13). Si la mise sous tension éch...
Page 71 - Mesure impossible; la section « Liste des codes d’erreur » (page 29) relative à la mesure; Valeur de mesure anormale; par palpation puis effectuer une nouvelle mesure.
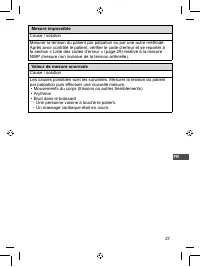
27 FR Mesure impossible Cause / solutionMesurer la tension du patient par palpation ou par une autre méthode. Après avoir contrôlé le patient, vérifier le code d’erreur et se reporter à la section « Liste des codes d’erreur » (page 29) relative à la mesure NIBP (mesure non invasive de la tension art...
Page 72 - La valeur mesurée est douteuse; • Excitation émotionnelle ou agitation
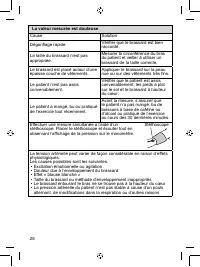
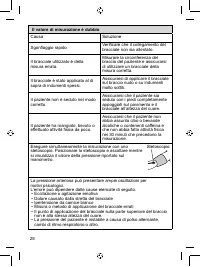
28 La valeur mesurée est douteuse Cause Solution Dégonflage rapide Vérifier que le brassard est bien raccordé. La taille du brassard n’est pas appropriée. Mesurer la circonférence du bras du patient et veiller à utiliser un brassard de la taille correcte. Le brassard est placé autour d’une épaisse c...
Page 73 - Liste des codes d’erreur; SYSTÈME; BRASSARD OMRON GS ne
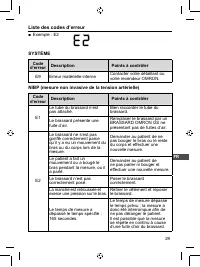
29 FR Liste des codes d’erreur ■ Exemple : E2 SYSTÈME Code d’erreur Description Points à contrôler E9 Erreur matérielle interne Contacter votre détaillant ou votre revendeur OMRON. NIBP (mesure non invasive de la tension artérielle) Code d’erreur Description Points à contrôler E1 Le tube du brassard...
Page 74 - Autres problèmes; Code
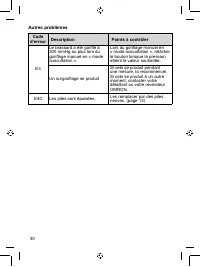
30 Autres problèmes Code d’erreur Description Points à contrôler E3 Le brassard a été gonflé à 300 mmHg ou plus lors du gonflage manuel en « mode auscultation ». Lors du gonflage manuel en « mode auscultation », relâcher le bouton lorsque la pression atteint la valeur souhaitée. Un surgonflage se pr...
Page 75 - Mise au rebut; Élément
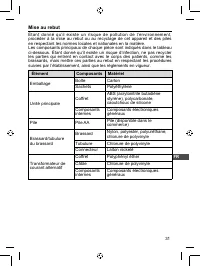
31 FR Mise au rebut Étant donné qu’il existe un risque de pollution de l’environnement, procéder à la mise au rebut ou au recyclage de cet appareil et des piles en respectant les normes locales et nationales en la matière. Les composants principaux de chaque pièce sont indiqués dans le tableau ci-de...
Page 76 - • Conditions de mesure
32 Caractéristiques techniques Caractéristiques techniques : HBP-1100 Unité principale Paramètre de mesure NIBP, PR Dimensions Unité principale : 130 × 175 × 120 (mm) 5,12 × 6,89 × 4,72 (pouces) (L×H×P) Adaptateur CA : 55 × 25 × 70 (mm) 2,17 × 0,98 × 2,76 (pouces) (L×H×P) Poids Unité principale : en...
Page 77 - ±3 mmHg
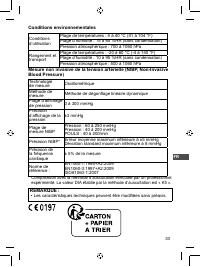
33 FR Conditions environnementales Conditions d’utilisation Plage de températures : 5 à 40 °C (41 à 104 °F) Plage d’humidité : 15 à 85 %HR (sans condensation) Pression atmosphérique : 700 à 1060 hPa Rangement et transport Plage de températures : -20 à 60 °C (-4 à 140 °F) Plage d’humidité : 10 à 95 %...
Page 79 - Comment éliminer correctement ce produit
35 FR Informations importantes sur la compatibilité électromagnétique (CEM) Avec l’accroissement du nombre d’appareils électroniques comme les PC et les téléphones mobiles (cellulaires), les dispositifs médicaux utilisés peuvent être soumis aux interférences électromagnétiques dégagées par d’autres ...
Page 80 - Déclaration du fabricant; Test d’émission
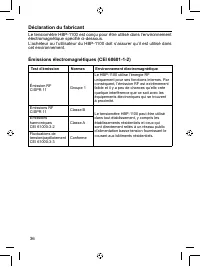
36 Déclaration du fabricant Le tensiomètre HBP-1100 est conçu pour être utilisé dans l’environnement électromagnétique spécifié ci-dessous. L’acheteur ou l’utilisateur du HBP-1100 doit s’assurer qu’il est utilisé dans cet environnement. Émissions électromagnétiques (CEI 60601-1-2) Test d’émission No...
Page 82 - Test
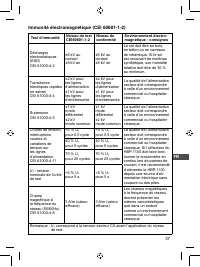
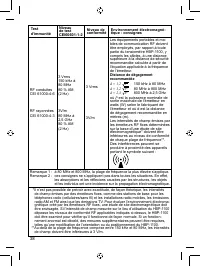
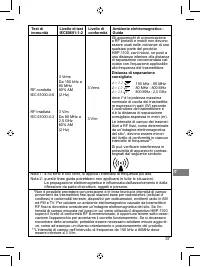
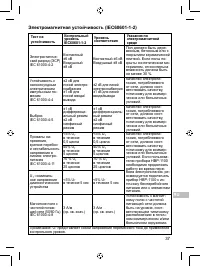
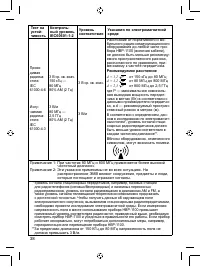
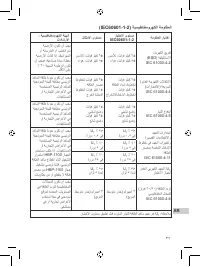
38 Test d’immunité Niveau de test CEI60601-1-2 Niveau de conformité Environnement électromagné - tique - consignes RF conduites CEI 61000-4-6 RF rayonnées CEI 61000-4-3 3 Vrms 150 kHz à 80 MHz 80 % AM (2 Hz) 3V/m 80 MHz à 2,5 GHz 80 % AM (2 Hz) 3 Vrms 3V/m Les équipements portables et mo- biles de c...
Page 83 - Distances de dégagement recommandées :; cations RF portables et mobiles et le HBP-1100
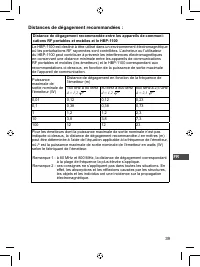
39 FR Distances de dégagement recommandées : Distance de dégagement recommandée entre les appareils de communi - cations RF portables et mobiles et le HBP-1100 Le HBP-1100 est destiné à être utilisé dans un environnement électromagnétique où les perturbations RF rayonnées sont contrôlées. L’acheteur...
Page 85 - Professionelles Blutdruckmessgerät
Professionelles Blutdruckmessgerät HBP-1100 • Instruction Manual • Mode d’emploi • Gebrauchsanweisung • Manuale di istruzioni • Manual de instrucciones • Gebruiksaanwijzing • РУКОВОДСТВО ПО ЭКСПЛУАТАЦИИ • Kullanım Kılavuzu Vielen Dank, dass Sie sich für das professionelle OMRON Blutdruckmessgerät en...
Page 86 - Inhalt; Einführung; Pflege des Zubehörs; Technische Daten
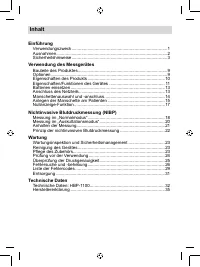
Inhalt Einführung Verwendungszweck ............................................................................... 1 Ausnahmen............................................................................................ 2 Sicherheitshinweise ..............................................................
Page 87 - Verwendungszweck; Das Gerät ist zur Verwendung durch eine medizinische Fachkraft
1 DE Einführung Verwendungszweck Medizinische Verwendung Das Gerät ist ein digitales Messgerät zur Messung von Blutdruck und Pulsfrequenz bei erwachsenen und pädiatrischen Patienten mit einem Armumfang von 12 cm bis 50 cm (von 5 Zoll bis 20 Zoll). Vorgesehene Benutzer Das Gerät ist zur Verwendung du...
Page 88 - Ausnahmen; OMRON haftet nicht in den folgenden Situationen.; Probleme und Beschädigungen, die durch höhere Gewalt wie zum
2 Ausnahmen OMRON haftet nicht in den folgenden Situationen. 1. Wenn Probleme oder Beschädigungen durch eine Wartung und/ oder Reparatur, die nicht von OMRON oder von einem von OMRON angegebenen Händler ausgeführt wurden, verursacht werden 2. Probleme oder Beschädigungen des OMRON-Produkts, die durc...
Page 89 - Sicherheitshinweise; In dieser Gebrauchsanweisung verwendete; Warnhinweis; Allgemeine Informationen; Aufstellung
3 DE Sicherheitshinweise Die unten aufgeführten Warnhinweise und -symbole helfen bei der sicheren Verwendung des Produkts und verhindern Sachschäden und schützen Sie und andere vor Verletzungen. Die Hinweise und Symbole werden im Folgenden erläutert. In dieser Gebrauchsanweisung verwendete Sicherhei...
Page 93 - Achtung
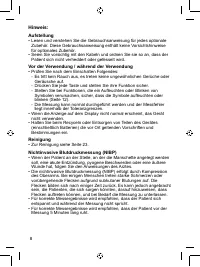
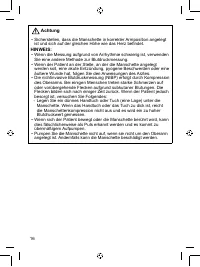
7 DE • Die Manschette nicht um die folgenden Körperteile anlegen: - Oberarm, der an einen intravenöser Tropf angeschlossen ist oder der für eine Bluttransfusion verwendet wird. - Oberarm, an dem ein SpO 2 -Sensor, IBP-Katheter oder ein anderes Instrument befestigt ist. - Oberarm mit einem Shunt für ...
Page 94 - für optionales Zubehör.; Vor der Verwendung / während der Verwendung; • Prüfen Sie nach dem Einschalten Folgendes:; Reinigung; • Zur Reinigung siehe Seite 23.
8 Hinweis: Aufstellung • Lesen und verstehen Sie die Gebrauchsanweisung für jedes optionale Zubehör. Diese Gebrauchsanweisung enthält keine Vorsichtshinweise für optionales Zubehör. • Seien Sie vorsichtig mit den Kabeln und ordnen Sie sie so an, dass der Patient sich nicht verheddert oder gefesselt ...
Page 95 - Verwendung des Messgerätes; Bauteile des Produktes; fehlt oder das Gerät beschädigt ist, wenden Sie sich an Ihren OMRON-; Hauptgerät; Andere; Gebrauchsanweisung; Optionen; Medizinisches optionales Zubehör; Netzteil; Netzteil S; • Es können ausschließlich OMRON GS-MANSCHETTEN mit diesem
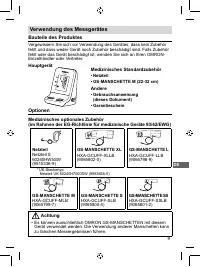
9 DE Verwendung des Messgerätes Bauteile des Produktes Vergewissern Sie sich vor Verwendung des Gerätes, dass kein Zubehör fehlt und dass weder Gerät noch Zubehör beschädigt sind. Falls Zubehör fehlt oder das Gerät beschädigt ist, wenden Sie sich an Ihren OMRON- Einzelhändler oder Vertreter. Hauptge...
Page 96 - Eigenschaften des Produkts; durch medizinisches Fachpersonal konzipiert.
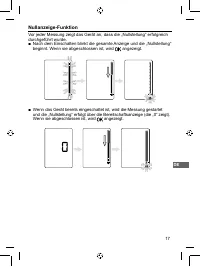
10 Eigenschaften des Produkts Die Genauigkeit der Blutdruckmesswerte des HBP-1100 wurde klinisch bewiesen. Das benutzerfreundliche HBP-1100 wurde für die Verwendung durch medizinisches Fachpersonal konzipiert. ■ Nullanzeige-Funktion (Seite 17): Vor jeder Messung zeigt das Gerät an, dass die „Nullste...
Page 97 - Eigenschaften/Funktionen des Gerätes; Vorder- und Unterseite des Gerätes; Zum Anschließen des; Weitere Symbole; Zeigt ein Anwendungsteil
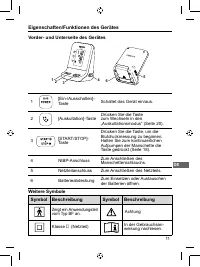
11 DE Eigenschaften/Funktionen des Gerätes Vorder- und Unterseite des Gerätes 1 [Ein-/Ausschalten]- Taste Schaltet das Gerät ein/aus. 2 [Auskultation]-Taste Drücken Sie die Taste zum Wechseln in den „Auskultationsmodus“ (Seite 20). 3 [START/STOP]- Taste Drücken Sie die Taste, um die Blutdruckmessung...
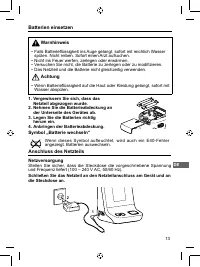
Page 99 - Batterien einsetzen; • Nicht ins Feuer werfen, zerlegen oder erwärmen.; Netzteil abgezogen wurde.; Symbol „Batterie wechseln“; Wenn dieses Symbol aufleuchtet, wird auch ein E40-Fehler; Anschluss des Netzteils; Netzversorgung
13 DE Batterien einsetzen Warnhinweis • Falls Batterieflüssigkeit ins Auge gelangt, sofort mit reichlich Wasser spülen. Nicht reiben. Sofort einen Arzt aufsuchen. • Nicht ins Feuer werfen, zerlegen oder erwärmen. • Versuchen Sie nicht, die Batterie zu zerlegen oder zu modifizieren. • Das Netzteil un...
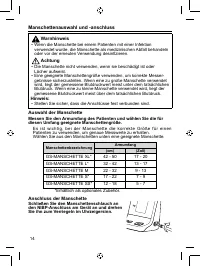
Page 100 - Manschettenauswahl und -anschluss; • Wenn die Manschette bei einem Patienten mit einer Infektion; Die Manschette nicht verwenden, wenn sie beschädigt ist oder; Auswahl der Manschette; Messen Sie den Armumfang des Patienten und wählen Sie die für; Es ist wichtig, bei der Manschette die korrekte Größe für einen; Manschettenbezeichnung; Anschluss der Manschette; Schließen Sie den Manschettenschlauch an
14 Manschettenauswahl und -anschluss Warnhinweis • Wenn die Manschette bei einem Patienten mit einer Infektion verwendet wurde, die Manschette als medizinischen Abfall behandeln oder vor der erneuten Verwendung desinfizieren. Achtung • Die Manschette nicht verwenden, wenn sie beschädigt ist oder Löc...
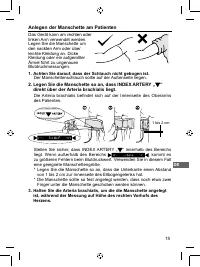
Page 101 - Anlegen der Manschette am Patienten; Legen Sie die Manschette so an, dass INDEX ARTERY „ “; eine geeignete Manschettengröße.; ist, während der Messung auf Höhe des rechten Vorhofs des
15 DE Anlegen der Manschette am Patienten Das Gerät kann am rechten oder linken Arm verwendet werden. Legen Sie die Manschette um den nackten Arm oder über leichte Kleidung an. Dicke Kleidung oder ein aufgerollter Ärmel führt zu ungenauen Blutdruckmessungen. 1. Achten Sie darauf, dass der Schlauch n...
Page 102 - ist und sich auf der gleichen Höhe wie das Herz befindet.
16 Achtung • Sicherstellen, dass die Manschette in korrekter Armposition angelegt ist und sich auf der gleichen Höhe wie das Herz befindet. HINWEIS: • Wenn die Messung aufgrund von Arrhythmie schwierig ist, verwenden Sie eine andere Methode zur Blutdruckmessung. • Wenn der Patient an der Stelle, an ...
Page 104 - Messung im „Normalmodus“; Manuelles Aufpumpen im „Normalmodus“
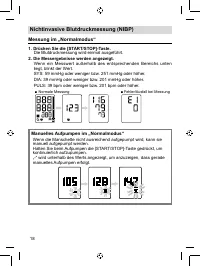
18 Nichtinvasive Blutdruckmessung (NIBP) Messung im „Normalmodus“ 1. Drücken Sie die [START/STOP]-Taste. Die Blutdruckmessung wird einmal ausgeführt. 2. Die Messergebnisse werden angezeigt. Wenn ein Messwert außerhalb des entsprechenden Bereichs unten liegt, blinkt der Wert. SYS: 59 mmHg oder wenige...
Page 105 - • Wenn das Aufpumpen nicht ausreicht, wird während der Messung; Funktion zur Erkennung von unregelmäßigen Pulswellen; leuchtet das Symbol für eine unregelmäßige Pulswelle auf.; Funktion zur Erkennung von Körperbewegungen; S e k u n d e n l a n g u n d u n t e r h a l b d e s We r t s b l i n k e n a b w e c h s e l n d
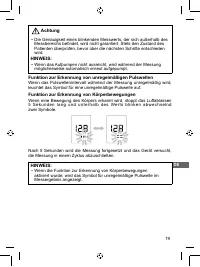
19 DE Achtung • Die Genauigkeit eines blinkenden Messwerts, der sich außerhalb des Messbereichs befindet, wird nicht garantiert. Stets den Zustand des Patienten überprüfen, bevor über die nächsten Schritte entschieden wird. HINWEIS: • Wenn das Aufpumpen nicht ausreicht, wird während der Messung mögl...
Page 106 - Messung im „Auskultationsmodus“; Im „Auskultationsmodus“ misst nicht das Gerät den Blutdruck. Die; Manuelles Aufpumpen im „Auskultationsmodus“; aufpumpen möchten, können Sie die Manschette manuell aufpumpen.
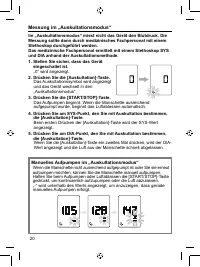
20 Messung im „Auskultationsmodus“ Im „Auskultationsmodus“ misst nicht das Gerät den Blutdruck. Die Messung sollte dann durch medizinisches Fachpersonal mit einem Stethoskop durchgeführt werden. Das medizinische Fachpersonal ermittelt mit einem Stethoskop SYS und DIA anhand der Auskultationsmethode....
Page 107 - Anhalten der Messung
21 DE HINWEIS: • Im „Auskultationsmodus“ ist die Funktion zur Erkennung von Körperbewegungen deaktiviert. • Im „Auskultationsmodus“ wird die Pulsfrequenz nicht gemessen und nicht angezeigt. Anhalten der Messung Um eine laufende Messung anzuhalten, drücken Sie die [START/STOP]- Taste.
Page 108 - Prinzip der nichtinvasiven Blutdruckmessung; Oszillometrische Methode; der Manschette nimmt die Oszillation nach ihrem Höhepunkt ab.
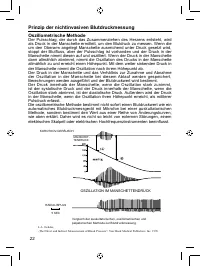
22 Prinzip der nichtinvasiven Blutdruckmessung Oszillometrische Methode Der Pulsschlag, der durch das Zusammenziehen des Herzens entsteht, wird als Druck in der Manschette ermittelt, um den Blutdruck zu messen. Wenn die um den Oberarm angelegt Manschette ausreichend unter Druck gesetzt wird, stoppt ...
Page 109 - Wartung; Wartungsinspektion und Sicherheitsmanagement; • Bei Verwendung einer antiseptischen Lösung zur Reinigung die; verdünntem Desinfektionsalkohol (Ethylalkohol) getränkt wurde.
23 DE Wartung Wartungsinspektion und Sicherheitsmanagement Das HBP-1100 muss gewartet werden, um dessen Funktion und die Sicherheit der Patienten und Bediener zu gewährleisten. Es sollten täglich Überprüfungen und Instandhaltung durch den Bediener durchgeführt werden. Darüber hinaus sind Fachkräfte ...
Page 110 - Prüfung vor der Verwendung; Vor dem Einschalten
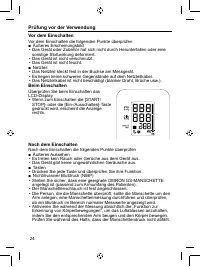
24 Prüfung vor der Verwendung Vor dem Einschalten Vor dem Einschalten die folgenden Punkte überprüfen ■ Äußeres Erscheinungsbild • Das Gerät oder Zubehör hat sich nicht durch Herunterfallen oder eine sonstige Stoßwirkung deformiert. • Das Gerät ist nicht verschmutzt. • Das Gerät ist nicht feucht. ■ ...
Page 111 - Überprüfung der Druckgenauigkeit; Sie können die Druckgenauigkeit des Gerätes überprüfen.
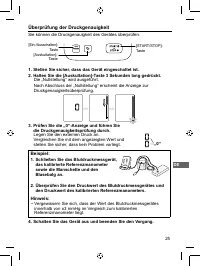
25 DE Überprüfung der Druckgenauigkeit Sie können die Druckgenauigkeit des Gerätes überprüfen. 1. Stellen Sie sicher, dass das Gerät eingeschaltet ist. 2. Halten Sie die [Auskultation]-Taste 3 Sekunden lang gedrückt. Die „Nullstellung“ wird ausgeführt. Nach Abschluss der „Nullstellung“ erscheint die...
Page 112 - Fehlersuche und -behebung; Das Gerät lässt sich nicht einschalten; Das Gerätedisplay funktioniert nicht.; Lösung
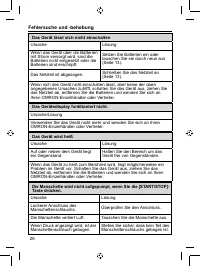
26 Fehlersuche und -behebung Das Gerät lässt sich nicht einschalten Ursache Lösung Wenn das Gerät über die Batterien mit Strom versorgt wird, sind die Batterien nicht eingesetzt oder die Batterien sind erschöpft. Setzen Sie Batterien ein oder tauschen Sie sie durch neue aus (Seite 13). Das Netzteil ...
Page 113 - Messung war nicht möglich; Prüfen Sie nach der Überprüfung des Patienten den Fehlercode und; Abnormaler Messwert; durch Palpation und wiederholen Sie dann die Messung.
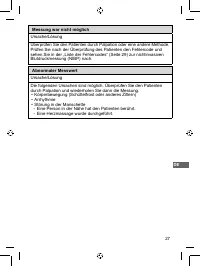
27 DE Messung war nicht möglich Ursache/Lösung Überprüfen Sie den Patienten durch Palpation oder eine andere Methode. Prüfen Sie nach der Überprüfung des Patienten den Fehlercode und sehen Sie in der „Liste der Fehlercodes“ (Seite 29) zur nichtinvasiven Blutdruckmessung (NIBP) nach. Abnormaler Messw...
Page 114 - Der Messwert ist zweifelhaft
28 Der Messwert ist zweifelhaft Ursache Lösung Luftablassen erfolgt schnell Überprüfen Sie auf lockeren Manschettenanschluss. Falsche Manschettengröße verwendet. Messen Sie den Armumfang des Patienten und stellen Sie sicher, dass eine Manschette der richtigen Größe verwendet wird. Manschette über di...
Page 115 - Liste der Fehlercodes; code; Körper während der Messung
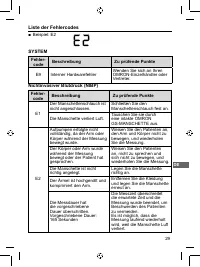
29 DE Liste der Fehlercodes ■ Beispiel: E2 SYSTEM Fehler - code Beschreibung Zu prüfende Punkte E9 Interner Hardwarefehler Wenden Sie sich an Ihren OMRON-Einzelhändler oder Vertreter. Nichtinvasiver Blutdruck (NIBP) Fehler - code Beschreibung Zu prüfende Punkte E1 Der Manschettenschlauch ist nicht a...
Page 116 - Andere Probleme; Fehler; Die Batterien sind erschöpft.
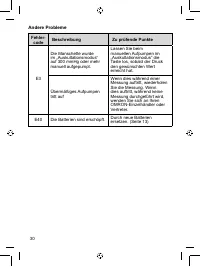
30 Andere Probleme Fehler - code Beschreibung Zu prüfende Punkte E3 Die Manschette wurde im „Auskultationsmodus“ auf 300 mmHg oder mehr manuell aufgepumpt. Lassen Sie beim manuellen Aufpumpen im „Auskultationsmodus“ die Taste los, sobald der Druck den gewünschten Wert erreicht hat. Übermäßiges Aufpu...
Page 117 - Entsorgung; Option
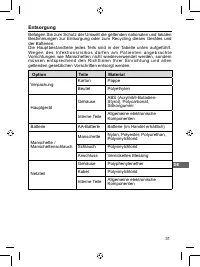
31 DE Entsorgung Befolgen Sie zum Schutz der Umwelt die geltenden nationalen und lokalen Bestimmungen zur Entsorgung oder zum Recycling dieses Gerätes und der Batterien. Die Hauptbestandteile jedes Teils sind in der Tabelle unten aufgeführt. We g e n d e s I n f e k t i o n s r i s i k o s d ü r f e...
Page 118 - Betrieb über Batterie); Stromversorgung; • Messbedingungen
32 Technische Daten Technische Daten: HBP-1100 Hauptgerät Messparameter NIBP, PR Abmessungen Hauptgerät: 130 × 175 × 120 (mm) 5,12 × 6,89 × 4,72 (Zoll) (B×H×T) Netzteil: 55 × 25 × 70 (mm) 2,17 × 0,98 × 2,76 (Zoll) (B×H×T) Gewicht Hauptgerät: Ca. 510 g (ohne Zubehör) Netzteil: Ca. 42 g Anzeige Displa...
Page 119 - Umgebungsbedingungen
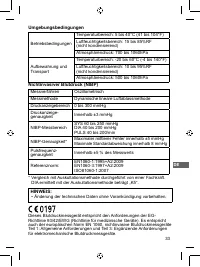
33 DE Umgebungsbedingungen Betriebsbedingungen Temperaturbereich: 5 bis 40°C (41 bis 104°F) Luftfeuchtigkeitsbereich: 15 bis 85%RF (nicht kondensierend) Atmosphärendruck: 700 bis 1060hPa Aufbewahrung und Transport Temperaturbereich: -20 bis 60°C (-4 bis 140°F) Luftfeuchtigkeitsbereich: 10 bis 95%RF ...
Page 120 - Korrekte Entsorgung dieses Produkts
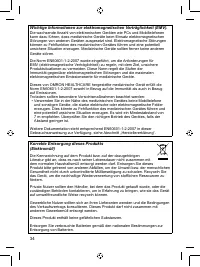
34 Wichtige Informationen zur elektromagnetischen Verträglichkeit (EMV). Die wachsende Anzahl von elektronischen Geräten wie PCs und Mobiltelefonen kann dazu führen, dass medizinische Geräte beim Einsatz elektromagnetischen Störungen von anderen Geräten ausgesetzt sind. Elektromagnetische Störungen ...
Page 121 - Herstellererklärung; Das HBP-1100 ist für die Verwendung in der unten angegebenen; Emissionsprüfung
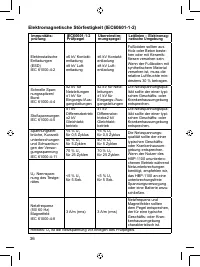
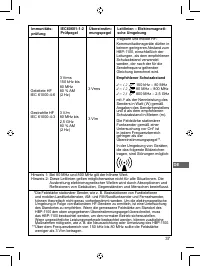
35 DE Herstellererklärung Das HBP-1100 ist für die Verwendung in der unten angegebenen elektromagnetischen Umgebung bestimmt. Der Kunde oder der Nutzer des HBP-1100 sollte sicherstellen, dass es in solch einer elektromagnetischen Umgebung verwendet wird. Elektromagnetische Emissionen (IEC60601-1-2) ...
Page 124 - Empfohlene Schutzabstände:; munikationsgeräten und dem HBP-1100
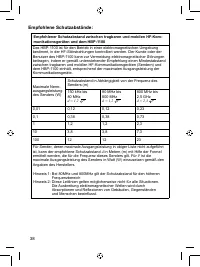
38 Empfohlene Schutzabstände: Empfohlener Schutzabstand zwischen tragbaren und mobilen HF-Kom - munikationsgeräten und dem HBP-1100 Das HBP-1100 ist für den Betrieb in einer elektromagnetischen Umgebung bestimmt, in der HF-Störstrahlungen kontrolliert werden. Der Kunde oder der Benutzer des HBP-1100...
Page 127 - Misuratore professionale della pressione arteriosa
Misuratore professionale della pressione arteriosa HBP-1100 • Instruction Manual • Mode d’emploi • Gebrauchsanweisung • Manuale di istruzioni • Manual de instrucciones • Gebruiksaanwijzing • РУКОВОДСТВО ПО ЭКСПЛУАТАЦИИ • Kullanım Kılavuzu Grazie per aver acquistato un misuratore professionale della ...
Page 128 - Indice; Introduzione
Indice Introduzione Destinazione d’uso ................................................................................ 1 Dichiarazioni esonerative....................................................................... 2 Note sulla sicurezza..............................................................
Page 129 - Destinazione d’uso; altre strutture sanitarie.
1 IT Introduzione Destinazione d’uso Scopi medicali Il dispositivo è un misuratore digitale destinato all’utilizzo per la misurazione della pressione arteriosa e della frequenza delle pulsazioni in pazienti adulti e pediatrici che presentano una circonferenza del braccio compresa tra 12 cm e 50 cm (...
Page 130 - Dichiarazioni esonerative; OMRON non può essere considerata responsabile per nessuna
2 Dichiarazioni esonerative OMRON non può essere considerata responsabile per nessuna delle circostanze riportate di seguito. 1. Problemi o danni causati da attività di manutenzione e/o riparazione eseguite da personale diverso da OMRON o da un rivenditore autorizzato OMRON. 2. Il prodotto OMRON pre...
Page 131 - Note sulla sicurezza; Simboli di sicurezza utilizzati nel presente; Attenzione; Informazioni di carattere generale; Impostazione
3 IT Note sulla sicurezza I segni e i simboli di avvertenza illustrati di seguito hanno lo scopo di garantire l’utilizzo sicuro del prodotto e di prevenire danni e lesioni all’utente e a terzi. I segni e i simboli sono spiegati di seguito. Simboli di sicurezza utilizzati nel presente manuale di istr...
Page 132 - • In caso di errori o dubbi riguardo al risultato di una misurazione,
4 Avvertenza • Non installare l’apparecchio negli ambienti specificati di seguito. - Luoghi in cui sia presente polvere, sale o zolfo. - Luoghi esposti a lungo alla luce diretta del sole (in particolare, non lasciare a lungo l’apparecchio alla luce diretta del sole o in prossimità di una sorgente di...
Page 135 - Avvertenza
7 IT • Non piegare il tubo del bracciale durante le operazioni di gonfiaggio e sgonfiaggio, in particolare dopo un cambio di posizione del corpo. • Non applicare il bracciale in corrispondenza dei punti indicati di seguito: - Parte superiore del braccio su cui viene eseguita un’infusione endovenosa ...
Page 136 - • Dopo aver acceso l’alimentazione, controllare quanto segue:; Pulizia
8 Nota: Impostazione • Leggere e assicurarsi di aver compreso il manuale relativo a ognuno degli accessori opzionali. Questo manuale non contiene informazioni sulle precauzioni relative agli accessori opzionali. • Prestare la dovuta attenzione per quanto concerne i cavi e fare in modo che il pazient...
Page 137 - Uso dell’apparecchio; Componenti del prodotto; rivenditore o il distributore OMRON.; Altro; Accessori opzionali; Alimentatore S; OMRON GS. L’utilizzo di bracciali di altro tipo può determinare
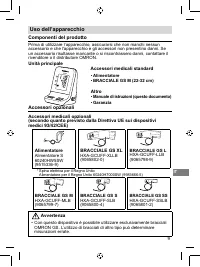
9 IT Uso dell’apparecchio Componenti del prodotto Prima di utilizzare l’apparecchio, assicurarsi che non manchi nessun accessorio e che l'apparecchio e gli accessori non presentino danni. Se un accessorio risultasse mancante o si riscontrassero danni, contattare il rivenditore o il distributore OMRO...
Page 138 - Caratteristiche del prodotto; ■ Modalità auscultazione
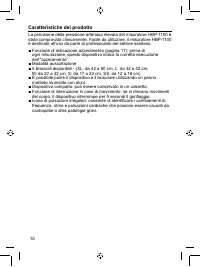
10 Caratteristiche del prodotto La precisione della pressione arteriosa rilevata del misuratore HBP-1100 è stata comprovata clinicamente. Facile da utilizzare, il misuratore HBP-1100 è destinato all’uso da parte di professionisti del settore sanitario. ■ Funzione di indicazione azzeramento (pagina 1...
Page 139 - Caratteristiche/Funzioni dell’apparecchio; Lato anteriore e posteriore dell’apparecchio; Connettore NIBP; Altri simboli; applicata di tipo BF.
11 IT Caratteristiche/Funzioni dell’apparecchio Lato anteriore e posteriore dell’apparecchio 1 Pulsante [Accensione/ Spegnimento] Per accendere/spegnere l’apparecchio. 2 Pulsante [Auscultazione] Premere il pulsante per accedere alla “modalità Auscultazione” (pagina 20). 3 Pulsante [START/STOP] Preme...
Page 140 - Display LCD; Quando questa icona si illumina, viene
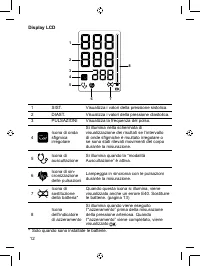
12 Display LCD 3 2 1 7 5 4 6 8 1 SIST. Visualizza i valori della pressione sistolica. 2 DIAST. Visualizza i valori della pressione diastolica. 3 PULSAZIONI Visualizza la frequenza del polso. 4 Icona di onda sfigmica irregolare Si illumina nella schermata di visualizzazione dei risultati se l’interva...
Page 141 - Installazione delle batterie; lavare immediatamente e a lungo con acqua. Non strofinare.; con gli abiti, lavare immediatamente con acqua.; Icona di sostituzione della batteria; Quando questa icona si illumina, viene visualizzato anche un; Collegamento dell’alimentatore; Alimentazione CA
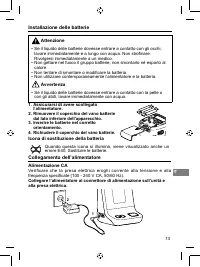
13 IT Installazione delle batterie Attenzione • Se il liquido delle batterie dovesse entrare a contatto con gli occhi, lavare immediatamente e a lungo con acqua. Non strofinare. Rivolgersi immediatamente a un medico. • Non gettare nel fuoco il gruppo batterie, non smontarlo né esporlo al calore. • N...
Page 142 - Scelta e collegamento del bracciale; • Non utilizzare il bracciale se presenta danni o perforazioni.; Scelta del bracciale; bracciale della misura adeguata per la circonferenza.; paziente, allo scopo di ottenere un risultato preciso.; Nome del bracciale; BRACCIALE GS M; Collegamento del bracciale; Collegare il tubo del bracciale al connettore
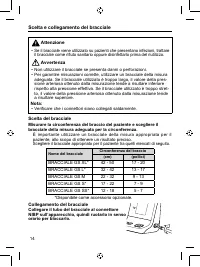
14 Scelta e collegamento del bracciale Attenzione • Se il bracciale viene utilizzato su pazienti che presentano infezioni, trattare il bracciale come rifiuto sanitario oppure disinfettarlo prima del riutilizzo. Avvertenza • Non utilizzare il bracciale se presenta danni o perforazioni. • Per garantir...
Page 143 - Applicazione del bracciale al paziente; Il dispositivo può essere utilizzato; Assicurarsi che il tubo del bracciale non sia piegato.; Avvolgere il bracciale in modo che INDEX ARTERY “; Assicurarsi che INDEX ARTERY “
15 IT Applicazione del bracciale al paziente Il dispositivo può essere utilizzato indifferentemente sul braccio destro o sinistro. Applicare il bracciale sul braccio nudo o su indumenti sottili. Gli indumenti spessi o le maniche rimboccate possono determinare risultati imprecisi nella misurazione de...
Page 144 - tecnica illustrata di seguito:
16 Avvertenza • Assicurarsi che il bracciale sia applicato nella posizione corretta e si trovi alla stessa altezza del cuore. NOTA: • Se la misurazione risulta difficoltosa per la presenza di aritmia, utilizzare un metodo differente per la misurazione della pressione arteriosa. • Se il paziente pres...
Page 145 - Funzione di indicazione azzeramento; visualizzato
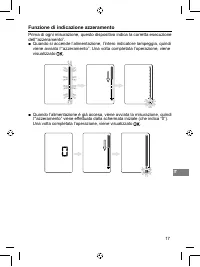
17 IT Funzione di indicazione azzeramento Prima di ogni misurazione, questo dispositivo indica la corretta esecuzione dell’“azzeramento”. ■ Quando si accende l’alimentazione, l’intero indicatore lampeggia, quindi viene avviato l’“azzeramento”. Una volta completata l’operazione, viene visualizzato . ...
Page 146 - Misurazione non invasiva della pressione arteriosa (NIBP); Misurazione in “modalità Normale”; Viene visualizzato il risultato della misurazione.; S e i l v a l o r e o t t e n u t o d a l l a m i s u r a z i o n e e s u l a d a l l a g a m m a; Gonfiaggio manuale in “modalità Normale”; effettuare il gonfiaggio continuo.
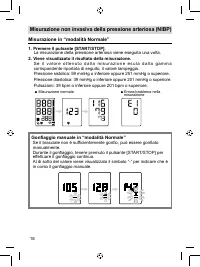
18 Misurazione non invasiva della pressione arteriosa (NIBP) Misurazione in “modalità Normale” 1. Premere il pulsante [START/STOP]. La misurazione della pressione arteriosa viene eseguita una volta. 2. Viene visualizzato il risultato della misurazione. S e i l v a l o r e o t t e n u t o d a l l a m...
Page 147 - • Se il gonfiaggio è insufficiente, è possibile che venga riavviato; Funzione di rilevamento onda sfigmica irregolare
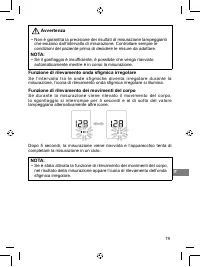
19 IT Avvertenza • Non è garantita la precisione dei risultati di misurazione lampeggianti che esulano dall’intervallo di misurazione. Controllare sempre le condizioni del paziente prima di decidere le misure da adottare. NOTA: • Se il gonfiaggio è insufficiente, è possibile che venga riavviato auto...
Page 148 - Misurazione in “modalità Auscultazione”; Nella “modalità Auscultazione”, il dispositivo non misura la; Gonfiaggio manuale in “modalità Auscultazione”
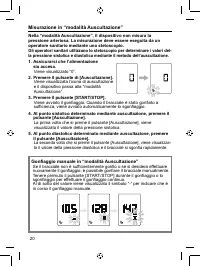
20 Misurazione in “modalità Auscultazione” Nella “modalità Auscultazione”, il dispositivo non misura la pressione arteriosa. La misurazione deve essere eseguita da un operatore sanitario mediante uno stetoscopio. Gli operatori sanitari utilizzano lo stetoscopio per determinare i valori del - la pres...
Page 149 - Interruzione della misurazione; Per interrompere la misurazione in corso, premere il pulsante
21 IT NOTA: • Quando si utilizza la “modalità Auscultazione”, la funzione di rilevamento dei movimenti del corpo non è attiva. • In “modalità Auscultazione”, la frequenza delle pulsazioni non viene misurata e non viene visualizzata. Interruzione della misurazione Per interrompere la misurazione in c...
Page 150 - Principi di misurazione non invasiva della pressione; Metodo oscillometrico
22 Principi di misurazione non invasiva della pressione Metodo oscillometrico Il battito nella pulsazione generato dalla contrazione cardiaca viene acquisito come pres - sione all’interno del bracciale allo scopo di misurare la pressione arteriosa. Se il bracciale applicato sulla parte superiore del...
Page 151 - Manutenzione; Controlli di manutenzione e gestione della sicurezza; Cura degli accessori; Bracciale/Tubo del bracciale
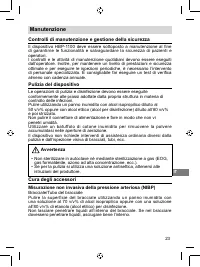
23 IT Manutenzione Controlli di manutenzione e gestione della sicurezza Il dispositivo HBP-1100 deve essere sottoposto a manutenzione al fine di garantirne le funzionalità e salvaguardare la sicurezza di pazienti e operatori. I controlli e le attività di manutenzione quotidiani devono essere eseguit...
Page 152 - Controlli prima dell’uso; Prima di accendere l’apparecchio
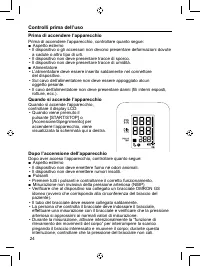
24 Controlli prima dell’uso Prima di accendere l’apparecchio Prima di accendere l’apparecchio, controllare quanto segue: ■ Aspetto esterno • Il dispositivo o gli accessori non devono presentare deformazioni dovute a cadute o altro tipo di urti. • Il dispositivo non deve presentare tracce di sporco. ...
Page 153 - Controllo della precisione della misurazione; Viene eseguito l’“Azzeramento”.
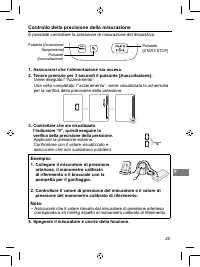
25 IT Controllo della precisione della misurazione È possibile controllare la precisione di misurazione del dispositivo. 1. Assicurarsi che l’alimentazione sia accesa. 2. Tenere premuto per 3 secondi il pulsante [Auscultazione]. Viene eseguito l’“Azzeramento”. Una volta completato l’“azzeramento”, v...
Page 154 - Risoluzione dei problemi; L’apparecchio non si accende
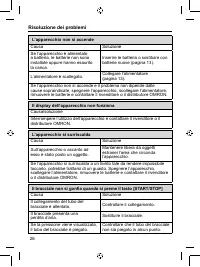
26 Risoluzione dei problemi L’apparecchio non si accende Causa Soluzione Se l’apparecchio è alimentato a batteria, le batterie non sono installate oppure hanno esaurito la carica. Inserire le batteria o sostituire con batterie nuove (pagina 13). L’alimentatore è scollegato. Collegare l’alimentatore ...
Page 155 - Non è stato possibile eseguire la misurazione; la “Lista dei codici di errore” (pagina 29) per la misurazione non; Valore di misurazione anomalo; paziente mediante palpazione, quindi ripetere la misurazione.
27 IT Non è stato possibile eseguire la misurazione Causa/soluzioneControllare il paziente mediante palpazione o altro metodo. Una volta controllato il paziente, controllare il codice di errore e vedere la “Lista dei codici di errore” (pagina 29) per la misurazione non invasiva della pressione arter...
Page 156 - Il valore di misurazione è dubbio
28 Il valore di misurazione è dubbio Causa Soluzione Sgonfiaggio rapido Verificare che il collegamento del bracciale non sia allentato. Il bracciale utilizzato è della misura errata. Misurare la circonferenza del braccio del paziente e assicurarsi di utilizzare un bracciale della misura corretta. Il...
Page 157 - Lista dei codici di errore; SISTEMA; errore; parlare né muoversi, quindi
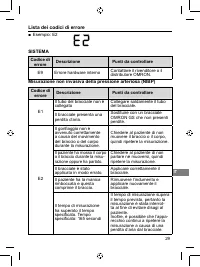
29 IT Lista dei codici di errore ■ Esempio: E2 SISTEMA Codice di errore Descrizione Punti da controllare E9 Errore hardware interno Contattare il rivenditore o il distributore OMRON. Misurazione non invasiva della pressione arteriosa (NIBP) Codice di errore Descrizione Punti da controllare E1 Il tub...
Page 158 - Altri problemi; Codice di; fino al valore di 300 mmHg
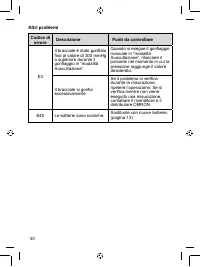
30 Altri problemi Codice di errore Descrizione Punti da controllare E3 Il bracciale è stato gonfiato fino al valore di 300 mmHg o superiore durante il gonfiaggio in “modalità Auscultazione”. Quando si esegue il gonfiaggio manuale in “modalità Auscultazione”, rilasciare il pulsante nel momento in cui...
Page 159 - Smaltimento; Parametro
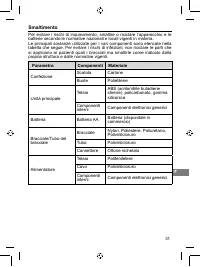
31 IT Smaltimento Per evitare i rischi di inquinamento, smaltire o riciclare l’apparecchio e le batterie secondo le normative nazionali e locali vigenti in materia. Le principali sostanze utilizzate per i vari componenti sono elencate nella tabella che segue. Per evitare i rischi di infezioni, non r...
Page 160 - Caratteristiche tecniche; Unità principale
32 Caratteristiche tecniche Specifiche tecniche: HBP-1100 Unità principale Parametro di misurazione NIBP, PR Dimensioni Unità principale: 130 × 175 × 120 (mm) 5,12 × 6,89 × 4,72 (pollici) (L×A×P) Alimentatore: 55 × 25 × 70 (mm) 2,17 × 0,98 × 2,76 (pollici) (L×A×P) Peso Unità principale: 510 g circa ...
Page 163 - Dichiarazione del produttore; specificato di seguito.; Prova di emissione
35 IT Dichiarazione del produttore Il dispositivo HBP-1100 è destinato all’utilizzo nell’ambiente elettromagnetico specificato di seguito. Il cliente e/o l’utilizzatore del dispositivo HBP-1100 deve assicurarsi che venga utilizzato nell’ambiente descritto. Emissioni elettromagnetiche (IEC 60601-1-2)...
Page 166 - Distanze di separazione consigliate:; portatili e mobili e il dispositivo HBP-1100
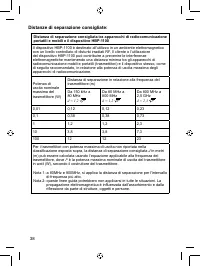
38 Distanze di separazione consigliate: Distanza di separazione consigliata tra apparecchi di radiocomunicazione portatili e mobili e il dispositivo HBP-1100 Il dispositivo HBP-1100 è destinato all’utilizzo in un ambiente elettromagnetico con un livello controllato di disturbi irradiati RF. Il clien...
Page 169 - Monitor de presión arterial profesional
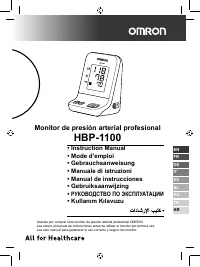
Monitor de presión arterial profesional HBP-1100 • Instruction Manual • Mode d’emploi • Gebrauchsanweisung • Manuale di istruzioni • Manual de instrucciones • Gebruiksaanwijzing • РУКОВОДСТВО ПО ЭКСПЛУАТАЦИИ • Kullanım Kılavuzu Gracias por comprar este monitor de presión arterial profesional OMRON. ...
Page 170 - Índice; Introducción
Índice Introducción Uso previsto ........................................................................................... 1 Exenciones ............................................................................................ 2 Advertencias de seguridad ............................................
Page 171 - Uso previsto; un perímetro de brazo que va de 12 cm a 50 cm (de 5 a 20 pulgadas).
1 ES Introducción Uso previsto Fines médicos El dispositivo es un monitor digital que mide la presión arterial y la frecuencia cardíaca en la población de pacientes adultos y pediátricos con un perímetro de brazo que va de 12 cm a 50 cm (de 5 a 20 pulgadas). Usuario al que está destinado este produc...
Page 172 - Exenciones; OMRON no aceptará ninguna responsabilidad en los siguientes; las Advertencias de seguridad o el método de funcionamiento
2 Exenciones OMRON no aceptará ninguna responsabilidad en los siguientes casos. 1. Cuando ocurre un problema o hay algún daño causado por el mantenimiento o la reparación realizados por alguien que no sea de OMRON o un distribuidor especificado por OMRON. 2. El problema o daño en un producto OMRON o...
Page 173 - Advertencias de seguridad; Símbolos de seguridad utilizados en este manual; Advertencia; Información general; Configuración
3 ES Advertencias de seguridad Las señales de advertencia y los ejemplos de los símbolos que se indican a continuación están diseñados para garantizar el uso seguro del producto y prevenir los daños y lesiones a usted y a otras personas. Las señales y los símbolos se explican a continuación. Símbolo...
Page 174 - de la unidad cuando evalúe el estado del paciente.
4 • No se han realizado pruebas clínicas en bebés recién nacidos y mujeres em- barazadas. No la utilice con bebés recién nacidos y mujeres embarazadas. • No enchufe ni desenchufe el adaptador de CA con las manos mojadas. Precaución • No instale la unidad en los siguientes lugares: - Lugares con polv...
Page 177 - Precaución
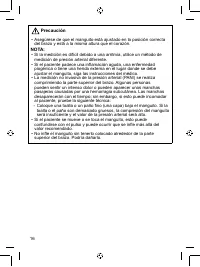
7 ES • No ajuste el manguito alrededor de las siguientes partes del cuerpo: - Un brazo en el que haya colocado un goteo intravenoso o se esté realizando una transfusión de sangre. - Un brazo en el que haya colocado un sensor SpO 2 , un catéter de presión arterial invasiva (PAI) u otro instrumento. -...
Page 179 - Uso del monitor de presión arterial; Componentes del producto; o está dañado, póngase en contacto con el establecimiento donde; Unidad principal; Otros; Accesorios opcionales; Accesorios médicos opcionales; Adaptador de CA; Adaptador S; • Con este dispositivo, sólo puede utilizarse el MANGUITO OMRON GS.
9 ES Uso del monitor de presión arterial Componentes del producto Antes de utilizar la unidad, asegúrese de que no falta ningún accesorio y de que ni la unidad ni los accesorios están dañados. Si falta un accesorio o está dañado, póngase en contacto con el establecimiento donde adquirió la unidad o ...
Page 180 - Características del producto; humedecido en alcohol.
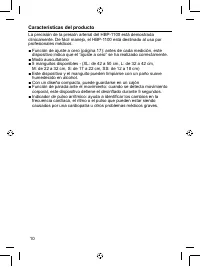
10 Características del producto La precisión de la presión arterial del HBP-1100 está demostrada clínicamente. De fácil manejo, el HBP-1100 está destinado al uso por profesionales médicos. ■ Función de ajuste a cero (página 17): antes de cada medición, este dispositivo indica que el “ajuste a cero” ...
Page 181 - Características/Funciones de la unidad; Parte delantera y trasera de la unidad
11 ES Características/Funciones de la unidad Parte delantera y trasera de la unidad 1 Botón [Power ON/OFF] Enciende y apaga el dispositivo. 2 Botón [Auscultation] Pulse este botón para entrar en el modo auscultatorio (página 20). 3 Botón [START/STOP] Pulse este botón para comenzar la medición de la ...
Page 182 - Pantalla LCD; Cuando el indicador se ilumina, aparece el
12 Pantalla LCD 3 2 1 7 5 4 6 8 1 SYS Muestra la presión arterial sistólica. 2 DIA Muestra la presión arterial diastólica. 3 PULSO Muestra la frecuencia cardíaca. 4 Icono de pulso arrítmico Se ilumina al mostrar los resultados de la medición si el intervalo entre latidos es arrítmico o ha habido mov...
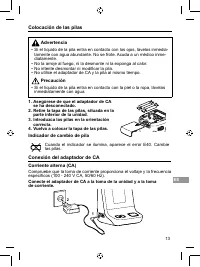
Page 183 - Colocación de las pilas; tamente con agua abundante. No se frote. Acuda a un médico inme-; inmediatamente con agua.; Indicador de cambio de pila; Cuando el indicador se ilumina, aparece el error E40. Cambie; Conexión del adaptador de CA
13 ES Colocación de las pilas Advertencia • Si el líquido de la pila entra en contacto con los ojos, lávelos inmedia- tamente con agua abundante. No se frote. Acuda a un médico inme- diatamente. • No la arroje al fuego, ni la desmonte ni la exponga al calor. • No intente desmontar ni modificar la pi...
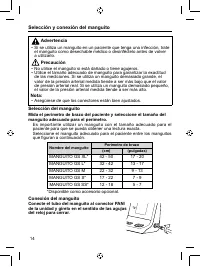
Page 184 - Selección y conexión del manguito; • No utilice el manguito si está dañado o tiene agujeros.; Selección del manguito; Mida el perímetro de brazo del paciente y seleccione el tamaño del; Es importante utilizar un manguito con el tamaño adecuado para el; Nombre del manguito; MANGUITO GS M; Conexión del manguito; Conecte el tubo del manguito al conector PANI
14 Selección y conexión del manguito Advertencia • Si se utiliza un manguito en un paciente que tenga una infección, trate el manguito como desechable médico o desinféctelo antes de volver a utilizarlo. Precaución • No utilice el manguito si está dañado o tiene agujeros. • Utilice el tamaño adecuado...
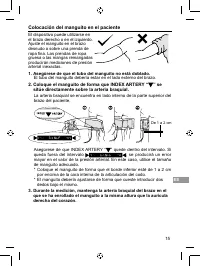
Page 185 - Colocación del manguito en el paciente; Asegúrese de que el tubo del manguito no está doblado.; Coloque el manguito de forma que INDEX ARTERY “; Asegúrese de que INDEX ARTERY “; Durante la medición, mantenga la arteria braquial del brazo en el
15 ES Colocación del manguito en el paciente El dispositivo puede utilizarse en el brazo derecho o en el izquierdo. Ajuste el manguito en el brazo desnudo o sobre una prenda de ropa fina. Las prendas de ropa gruesa o las mangas remangadas producirán mediciones de presión arterial inexactas. 1. Asegú...
Page 187 - Función de ajuste a cero; ha realizado correctamente.
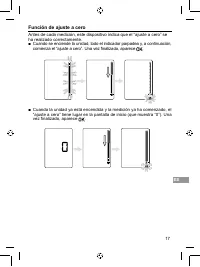
17 ES Función de ajuste a cero Antes de cada medición, este dispositivo indica que el “ajuste a cero” se ha realizado correctamente. ■ Cuando se enciende la unidad, todo el indicador parpadea y, a continuación, comienza el “ajuste a cero”. Una vez finalizado, aparece . ■ Cuando la unidad ya está enc...
Page 188 - Medición no invasiva de la presión arterial (PANI); Medición en modo normal; La medición de la presión arterial se realiza una vez.; Se muestran los resultados de la medición en pantalla.; aparece a continuación, el valor parpadeará.; Inflado manual en modo normal; Si el manguito no está lo suficientemente inflado, puede inflarse
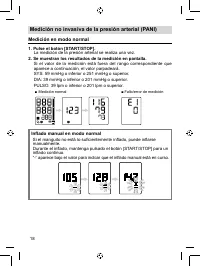
18 Medición no invasiva de la presión arterial (PANI) Medición en modo normal 1. Pulse el botón [START/STOP]. La medición de la presión arterial se realiza una vez. 2. Se muestran los resultados de la medición en pantalla. Si el valor de la medición está fuera del rango correspondiente que aparece a...
Page 189 - • No se garantiza la exactitud de un valor de medición que parpadea; Función de detección de pulso arrítmico; icono de detección de pulso arrítmico se ilumina.; Función de detección de movimiento corporal; valor alternativamente.
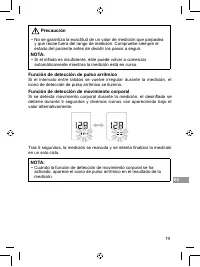
19 ES Precaución • No se garantiza la exactitud de un valor de medición que parpadea y que recae fuera del rango de medición. Compruebe siempre el estado del paciente antes de decidir los pasos a seguir. NOTA: • Si el inflado es insuficiente, éste puede volver a comenzar automáticamente mientras la ...
Page 190 - Medición en modo auscultatorio; Aparece el icono de auscultación y; En el punto de presión sistólica que usted determine mediante la; y el manguito se desinfla rápidamente.; Inflado manual en modo auscultatorio; puede hacerlo manualmente.
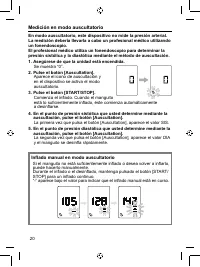
20 Medición en modo auscultatorio En modo auscultatorio, este dispositivo no mide la presión arterial. La medición debería llevarla a cabo un profesional médico utilizando un fonendoscopio. El profesional médico utiliza un fonendoscopio para determinar la presión sistólica y la diastólica mediante e...
Page 191 - Detención de la medición; Para detener la medición mientras está en curso, pulse el botón
21 ES NOTA: • La función de detección de movimiento corporal está desactivada mientras el modo auscultatorio se está utilizando. • En el modo auscultatorio, la frecuencia cardíaca no se mide y no aparece. Detención de la medición Para detener la medición mientras está en curso, pulse el botón [START...
Page 192 - Principios de la medición de la presión arterial no invasiva; Método oscilométrico; se toma como presión arterial media.
22 Principios de la medición de la presión arterial no invasiva Método oscilométrico El latido en la pulsación generada por la contracción del corazón se captura en forma de presión dentro del manguito para medir la presión arterial. Si el manguito ajustado alrededor de la parte superior del brazo t...
Page 193 - Mantenimiento; Revisión de mantenimiento y gestión de seguridad; menos una vez al año.; Limpieza del dispositivo; control de infecciones en sus instalaciones.; • No esterilice con autoclave ni con gas de esterilización (EOG,; Cuidado de los accesorios; Manguito/Tubo del manguito
23 ES Mantenimiento Revisión de mantenimiento y gestión de seguridad Deben realizarse tareas de mantenimiento del HBP-1100 para garantizar el correcto funcionamiento y la seguridad de los pacientes y de los operadores. El operador debe realizar comprobaciones y mantenimiento diarios. Además, es nece...
Page 194 - Comprobación previa al uso; Antes de encender la unidad; otro tipo de impacto.; Al encender la unidad; adecuado (uno que se ajuste al perímetro de brazo del paciente).
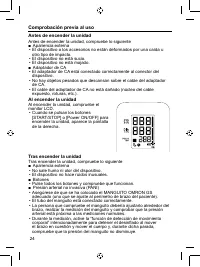
24 Comprobación previa al uso Antes de encender la unidad Antes de encender la unidad, compruebe lo siguiente ■ Apariencia externa • El dispositivo o los accesorios no están deformados por una caída u otro tipo de impacto. • El dispositivo no está sucio. • El dispositivo no está mojado. ■ Adaptador ...
Page 195 - Comprobación de la precisión de la presión; Cuando el “ajuste a cero” haya finalizado, aparece la pantalla de
25 ES Comprobación de la precisión de la presión Puede comprobar la precisión de la presión del dispositivo. 1. Asegúrese de que la unidad está encendida. 2. Mantenga pulsado el botón [Auscultation] durante 3 segundos. Se realiza el “ajuste a cero”. Cuando el “ajuste a cero” haya finalizado, aparece...
Page 196 - Resolución de problemas; El dispositivo no se enciende
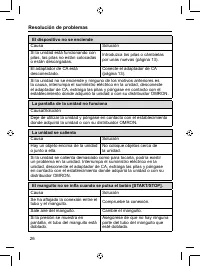
26 Resolución de problemas El dispositivo no se enciende Causa Solución Si la unidad está funcionando con pilas, las pilas no están colocadas o están descargadas. Introduzca las pilas o cámbielas por unas nuevas (página 13). El adaptador de CA está desconectado. Conecte el adaptador de CA (página 13...
Page 197 - La medición no ha sido posible.; consulte “Lista de códigos de error” (página 29) para mediciones de; Valor de medición anormal; • Movimiento corporal (escalofríos u otros temblores)
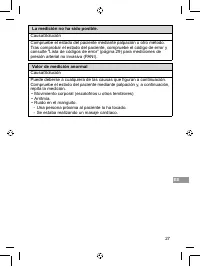
27 ES La medición no ha sido posible. Causa/Solución Compruebe el estado del paciente mediante palpación u otro método. Tras comprobar el estado del paciente, compruebe el código de error y consulte “Lista de códigos de error” (página 29) para mediciones de presión arterial no invasiva (PANI). Valor...
Page 198 - El valor de la medición es cuestionable
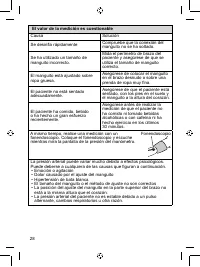
28 El valor de la medición es cuestionable Causa Solución Se desinfla rápidamente Compruebe que la conexión del manguito no se ha soltado. Se ha utilizado un tamaño de manguito incorrecto. Mida el perímetro de brazo del paciente y asegúrese de que se utiliza el tamaño de manguito correcto. El mangui...
Page 199 - Lista de códigos de error; de error; Tiene la manga remangada
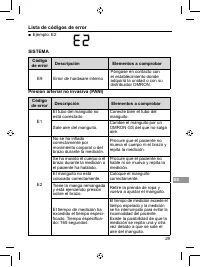
29 ES Lista de códigos de error ■ Ejemplo: E2 SISTEMA Código de error Descripción Elementos a comprobar E9 Error de hardware interno Póngase en contacto con el establecimiento donde adquirió la unidad o con su distribuidor OMRON. Presión arterial no invasiva (PANI) Código de error Descripción Elemen...
Page 200 - Otros problemas; Código; auscultatorio, suelte el botón
30 Otros problemas Código de error Descripción Elementos a comprobar E3 El manguito ha alcanzado los 300 mmHg o más durante el inflado manual en modo auscultatorio. Cuando infle el manguito manualmente en modo auscultatorio, suelte el botón cuando la presión alcance el valor deseado. Se ha inflado m...
Page 201 - Eliminación; Elemento; Bolsas
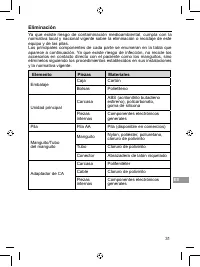
31 ES Eliminación Ya que existe riesgo de contaminación medioambiental, cumpla con la normativa local y nacional vigente sobre la eliminación o reciclaje de este equipo y de las pilas. Los principales componentes de cada parte se enumeran en la tabla que aparece a continuación. Ya que existe riesgo ...
Page 202 - Especificaciones
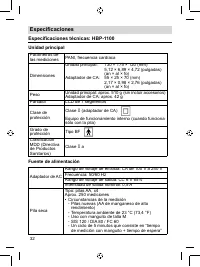
32 Especificaciones Especificaciones técnicas: HBP-1100 Unidad principal Parámetros de las mediciones PANI, frecuencia cardíaca Dimensiones Unidad principal: 130 × 175 × 120 (mm) 5,12 × 6,89 × 4,72 (pulgadas) (an × al × fo) Adaptador de CA: 55 × 25 × 70 (mm) 2,17 × 0,98 × 2,76 (pulgadas) (an × al × ...
Page 203 - Requisitos medioambientales
33 ES Requisitos medioambientales Requisitos de funcionamiento Rango de temperatura: de 5 a 40 °C (de 41 a 104 °F) Rango de humedad: de 15 a 85% de humedad relativa (no condensada) Presión atmosférica: de 700 a 1060 hPa Almacenamiento y transporte Rango de temperatura: de -20 a 60 °C (de -4 a 140 °F...
Page 204 - Eliminación correcta de este producto
34 Información importante sobre la Compatibilidad electromagnética (EMC) Debido al creciente número de dispositivos electrónicos existentes, como ordenadores y teléfonos móviles, es posible que los dispositivos médicos sean susceptibles a las interferencias electromagnéticas recibidas de otros dispo...
Page 205 - Declaración del fabricante; especificados a continuación.; Prueba de
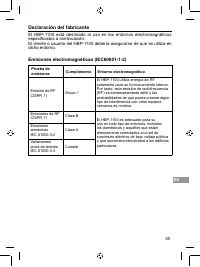
35 ES Declaración del fabricante El HBP-1100 está destinado al uso en los entornos electromagnéticos especificados a continuación. El cliente o usuario del HBP-1100 debería asegurarse de que se utiliza en dicho entorno. Emisiones electromagnéticas (IEC60601-1-2) Prueba de emisiones Cumplimiento Ento...
Page 208 - Distancia de separación recomendada:; por radiofrecuencia portátiles y móviles y el HBP-1100
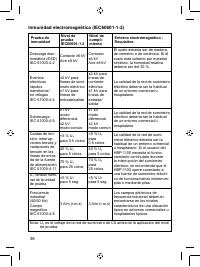
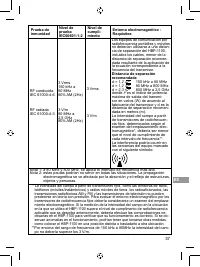
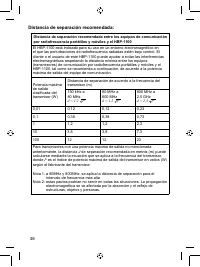
38 Distancia de separación recomendada: Distancia de separación recomendada entre los equipos de comunicación por radiofrecuencia portátiles y móviles y el HBP-1100 El HBP-1100 está indicado para su uso en un entorno electromagnético en el que las perturbaciones de radiofrecuencia radiadas estén baj...
Page 211 - Professionele bloeddrukmeter
Professionele bloeddrukmeter HBP-1100 • Instruction Manual • Mode d’emploi • Gebrauchsanweisung • Manuale di istruzioni • Manual de instrucciones • Gebruiksaanwijzing • РУКОВОДСТВО ПО ЭКСПЛУАТАЦИИ • Kullanım Kılavuzu Dank u voor de aankoop van deze professionele bloeddrukmeter van OMRON. Lees de hel...
Page 212 - Inhoudsopgave; Inleiding
Inhoudsopgave Inleiding Beoogd gebruik...................................................................................... 1 Vrijwaringen ........................................................................................... 2 Veiligheid ..........................................................
Page 213 - Beoogd gebruik; armomtrek van 12 tot 50 cm.
1 NL Inleiding Beoogd gebruik Medische doeleinden Dit apparaat is een digitale meter die is bedoeld voor gebruik bij het meten van de bloeddruk en hartslag bij volwassen patiënten en kinderen met een armomtrek van 12 tot 50 cm. Beoogde gebruikers Dit apparaat is bedoeld voor gebruik door een medisch...
Page 214 - Vrijwaringen; OMRON accepteert geen aansprakelijkheid voor de volgende
2 Vrijwaringen OMRON accepteert geen aansprakelijkheid voor de volgende zaken. 1. Als zich een probleem of schadegeval voordoet dat wordt veroorzaakt wanneer onderhoud en/of reparatie niet wordt uitgevoerd door OMRON-personeel of de door OMRON aangewezen dealer 2. Als het probleem met of de schade a...
Page 215 - Veiligheid; Gebruikte veiligheidssymbolen in deze; Waarschuwing; Algemene informatie; Instelling
3 NL Veiligheid De hieronder weergegeven waarschuwingssignalen en voorbeelden van symbolen zijn bedoeld om een veilig gebruik van het product te waarborgen en schade voor en letsel bij uzelf en anderen te voorkomen. De signalen en symbolen worden hieronder uitgelegd. Gebruikte veiligheidssymbolen in...
Page 217 - • Sluit niet meerdere meters aan op dezelfde patiënt.; Let op; • Voordat u het apparaat gaat gebruiken, moet u er zeker van zijn dat; Reiniging; • Reinig het apparaat regelmatig.
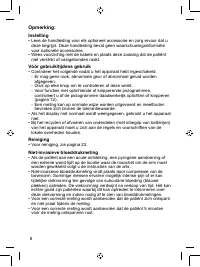
5 NL • Breng geen mobiele telefoons of transceivers in de ruimte waar het apparaat is geïnstalleerd of wordt gebruikt. • Sluit niet meerdere meters aan op dezelfde patiënt. • Sluit het apparaat niet aan op een stopcontact met een wandschakelaar. Let op • Voordat u het apparaat gaat gebruiken, moet u...
Page 220 - • Controleer het volgende nadat u het apparaat hebt ingeschakeld:; een externe wond lijdt op de locatie waar de manchet om de arm moet
8 Opmerking: Instelling • Lees de handleiding voor elk optioneel accessoire en zorg ervoor dat u deze begrijpt. Deze handleiding bevat geen waarschuwingsinformatie voor optionele accessoires. • Wees voorzichtig met de kabels en plaats deze zodanig dat de patiënt niet verstrikt of vastgebonden raakt....
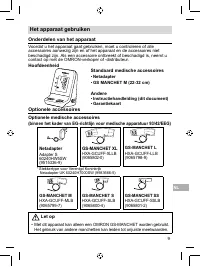
Page 221 - Het apparaat gebruiken; Onderdelen van het apparaat; Voordat u het apparaat gaat gebruiken, moet u controleren of alle; Hoofdeenheid; Netadapter; Garantiekaart; Optionele accessoires; Optionele medische accessoires; Met dit apparaat kan alleen een OMRON GS-MANCHET worden gebruikt.
9 NL Het apparaat gebruiken Onderdelen van het apparaat Voordat u het apparaat gaat gebruiken, moet u controleren of alle accessoires aanwezig zijn en of het apparaat en de accessoires niet beschadigd zijn. Als een accessoire ontbreekt of beschadigd is, neemt u contact op met de OMRON-verkoper of -d...
Page 222 - Kenmerken van het product; ■ Functie voor nulindicatie (pagina 17): voor elke meting geeft dit
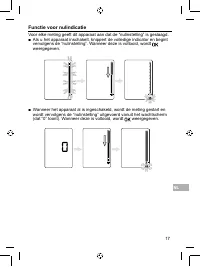
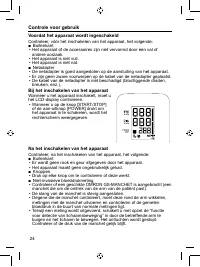
10 Kenmerken van het product De nauwkeurigheid voor bloeddrukmetingen van deze HBP-1100 is klinisch bewezen. De gebruiksvriendelijke HBP-1100 is bedoeld voor gebruik door medische professionals. ■ Functie voor nulindicatie (pagina 17): voor elke meting geeft dit apparaat aan dat de “nulinstelling” i...
Page 223 - Functies van het apparaat; Voorkant en onderkant van apparaat
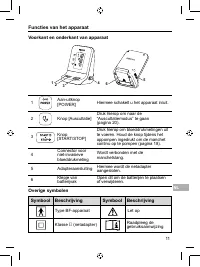
11 NL Functies van het apparaat Voorkant en onderkant van apparaat 1 Aan-uitknop [POWER] Hiermee schakelt u het apparaat in/uit. 2 Knop [Auscultatie] Druk hierop om naar de “Auscultatiemodus” te gaan (pagina 20). 3 Knop [START/STOP] Druk hierop om bloeddrukmetingen uit te voeren. Houd de knop tijden...
Page 225 - De batterijen plaatsen; • Als batterijvloeistof in contact komt met de ogen, moet u deze; deze onmiddellijk wegspoelen met water.; Controleer of de netadapter is; Pictogram Batterij vervangen; Wa n n e e r d i t p i c t o g r a m o p l i c h t , w o r d t o o k e e n f o u t E 4 0; De netadapter aansluiten; Netvoeding
13 NL De batterijen plaatsen Waarschuwing • Als batterijvloeistof in contact komt met de ogen, moet u deze onmiddellijk met ruime hoeveelheden water uitspoelen. Niet wrijven. Roep meteen medische hulp in. • Gooi de batterij niet in het vuur en demonteer of verhit deze niet. • Probeer de batterij nie...
Page 226 - Selectie en aansluiting van manchet; • Als een manchet wordt gebruikt bij een patiënt met een infectie,; • Gebruik de manchet niet als deze beschadigd is of gaten bevat.; De manchet selecteren; Meet de omtrek van de arm van de patiënt en selecteer de; voor een patiënt om een nauwkeurige waarde te kunnen bepalen.; Naam manchet; De manchet aansluiten; Sluit de slang van de manchet aan
14 Selectie en aansluiting van manchet Waarschuwing • Als een manchet wordt gebruikt bij een patiënt met een infectie, behandelt u de manchet als medisch afval of desinfecteert u deze vóór hergebruik. Let op • Gebruik de manchet niet als deze beschadigd is of gaten bevat. • Gebruik de juiste manchet...
Page 227 - De manchet aanbrengen bij de patiënt; Zorg ervoor dat de manchetslang niet gebogen is.; Wikkel de manchet zodanig om de bovenarm dat INDEX; Zorg ervoor dat INDEX ARTERY “; Houd tijdens de meting de brachiale ader waar de manchet
15 NL De manchet aanbrengen bij de patiënt Het apparaat kan zowel voor de rechter- als voor de linkerarm worden gebruikt. Wikkel de manchet rond een blote arm of over dunne kleding. Dikke kleding of een opgerolde mouw leiden tot onnauwkeurige bloeddrukmetingen. 1. Zorg ervoor dat de manchetslang nie...
Page 229 - Functie voor nulindicatie; vervolgens de “nulinstelling”. Wanneer deze is voltooid, wordt
17 NL Functie voor nulindicatie Voor elke meting geeft dit apparaat aan dat de “nulinstelling” is geslaagd. ■ Als u het apparaat inschakelt, knippert de volledige indicator en begint vervolgens de “nulinstelling”. Wanneer deze is voltooid, wordt weergegeven. ■ Wanneer het apparaat al is ingeschakeld...
Page 230 - Niet-invasieve bloeddrukmeting; Meting in “Normale modus”; Handmatig oppompen in “Normale modus”
18 Niet-invasieve bloeddrukmeting Meting in “Normale modus” 1. Druk op de knop [START/STOP]. Bloeddrukmeting vindt eenmaal plaats. 2. De meetresultaten worden weergegeven. Als een gemeten waarde zich buiten het overeenkomstige, hieronder aangegeven bereik bevindt, knippert de waarde. SYS: 59 mmHg of...
Page 231 - • Als de manchet onvoldoende is opgepompt, wordt het oppompen; Functie voor detectie van onregelmatige hartslag; • Wanneer de functie voor detectie van lichaamsbeweging is
19 NL Let op • De nauwkeurigheid van een knipperende meetwaarde die zich buiten het meetbereik bevindt wordt niet gegarandeerd. Controleer altijd de toestand van de patiënt voordat u beslist welke stappen u moet ondernemen. Opmerking: • Als de manchet onvoldoende is opgepompt, wordt het oppompen mog...
Page 232 - Meting in “Auscultatiemodus”; In de “Auscultatiemodus” meet dit apparaat niet de bloeddruk.; Handmatig oppompen in “Auscultatiemodus”
20 Meting in “Auscultatiemodus” In de “Auscultatiemodus” meet dit apparaat niet de bloeddruk. Metingen moeten door een zorgverlener worden uitgevoerd met een stethoscoop. De zorgverlener gebruikt de stethoscoop om SYS en DIA te bepalen aan de hand van de auscultatiemethode.1. Zorg dat het apparaat i...
Page 233 - De meting stoppen; U kunt een meting die bezig is stoppen door op de knop [START/STOP] te
21 NL Opmerking: • De functie voor detectie van lichaamsbeweging is uitgeschakeld terwijl “Auscultatiemodus” in gebruik is. • In de “Auscultatiemodus” wordt de hartslag niet gemeten en niet weergegeven. De meting stoppen U kunt een meting die bezig is stoppen door op de knop [START/STOP] te drukken.
Page 234 - Beginselen van niet-invasieve bloeddrukmeting; Oscillometrische methode; gebruikt als de gemiddelde pulsatiedruk.
22 Beginselen van niet-invasieve bloeddrukmeting Oscillometrische methode Het ritme van de hartslag die wordt gegenereerd door de samentrekking van het hart wordt geregistreerd als de druk binnen in de manchet voor het meten van de bloeddruk. Als de manchet die rond de bovenarm is gewikkeld voldoend...
Page 235 - Onderhoud; Onderhoudsinspectie en veiligheidsbeheer; Verzorging van accessoires
23 NL Onderhoud Onderhoudsinspectie en veiligheidsbeheer De HBP-1100 moet worden onderhouden om de werking te waarborgen en de veiligheid van patiënten en gebruikers te garanderen. Dagelijkse controles en onderhoud moeten door de gebruiker worden uitgevoerd. Daarnaast is bevoegd personeel nodig om d...
Page 236 - Controle voor gebruik; Voordat het apparaat wordt ingeschakeld
24 Controle voor gebruik Voordat het apparaat wordt ingeschakeld Controleer, vóór het inschakelen van het apparaat, het volgende: ■ Buitenkant • Het apparaat of de accessoires zijn niet vervormd door een val of andere oorzaak. • Het apparaat is niet vuil. • Het apparaat is niet nat. ■ Netadapter • D...
Page 237 - Nauwkeurigheid van druk controleren; • Controleer of de waarde op de bloeddrukmeter binnen ±3 mmHg van
25 NL Nauwkeurigheid van druk controleren U kunt de nauwkeurigheid van de druk van het apparaat controleren. 1. Zorg dat het apparaat is ingeschakeld. 2. Houd de knop [Auscultatie] gedurende 3 seconden ingedrukt. De “nulinstelling” wordt uitgevoerd. Wanneer de “nulinstelling” is voltooid, wordt het ...
Page 238 - Problemen oplossen; Het apparaat wordt niet ingeschakeld; deze door nieuwe exemplaren; Het display van het apparaat werkt niet; Zorg ervoor dat geen enkel
26 Problemen oplossen Het apparaat wordt niet ingeschakeld Oorzaak Oplossing Als het apparaat op batterijvoeding werkt, zijn de batterijen niet geplaatst of zijn deze leeg. Plaats de batterijen of vervang deze door nieuwe exemplaren (pagina 13). De netadapter is niet aangesloten. Sluit de netadapter...
Page 239 - Er was geen meting mogelijk; Nadat u de patiënt hebt onderzocht, controleert u de foutcode en; Abnormale meetwaarde; palpatie en herhaal vervolgens de meting.
27 NL Er was geen meting mogelijk Oorzaak/OplossingOnderzoek de patiënt met behulp van palpatie of een andere methode. Nadat u de patiënt hebt onderzocht, controleert u de foutcode en raadpleegt u “Lijst met foutcodes” (pagina 29) voor niet-invasieve bloeddrukmeting. Abnormale meetwaarde Oorzaak/Opl...
Page 240 - De meetwaarde is dubieus; • Emotionele opwinding of onrust
28 De meetwaarde is dubieus Oorzaak Oplossing Ontluchten gaat snel. Controleer op losse manchetaansluiting. Onjuiste manchetmaat gebruikt Meet de omtrek van de arm van de patiënt en controleer of een manchet met de juiste maat wordt gebruikt. Manchet om dikke kleding gewikkeld. Controleer of de manc...
Page 241 - Lijst met foutcodes; SYSTEEM; Zorg ervoor dat de patiënt
29 NL Lijst met foutcodes ■ Voorbeeld: E2 SYSTEEM Fout- code Beschrijving Te controleren punten E9 Interne hardwarefout Raadpleeg de OMRON- verkoper of -distributeur. Niet-invasieve bloeddrukmeting (NIBP) Fout- code Beschrijving Te controleren punten E1 De slang van de manchet is niet aangesloten. B...
Page 242 - Overige problemen
30 Overige problemen Fout- code Beschrijving Te controleren punten E3 De manchet is opgepompt tot 300 mmHg of hoger tijdens handmatig oppompen in de “Auscultatiemodus”. Bij handmatig oppompen in de “Auscultatiemodus” laat u de knop los als de druk de gewenste waarde bereikt. De manchet wordt te hard...
Page 243 - Verwijdering; Onderdeel; Zakken
31 NL Verwijdering Aangezien het risico van milieuverontreiniging bestaat, moet u de van toepassing zijnde nationale en lokale wettelijke voorschriften met betrekking tot verwijdering of recycling van deze apparatuur en van de bijbehorende batterijen volgen. De belangrijkste bestanddelen van elk ond...
Page 244 - Specificaties; Netadapter: circa 42 g; Voeding; • Meetomstandigheden
32 Specificaties Technische specificaties: HBP-1100 Hoofdeenheid Parameter voor meting NIBP, PR Afmetingen Hoofdeenheid: 130 × 175 × 120 (mm) 5,12 × 6,89 × 4,72 (inch) (b×h×d) Netadapter: 55 × 25 × 70 (mm) 2,17 × 0,98 × 2,76 (inch) (b×h×d) Gewicht Hoofdeenheid: circa 510 g (accessoires niet inbegrep...
Page 245 - binnen ±3 mmHg
33 NL Omgevingsomstandigheden Werkingsomstandigheden Temperatuurbereik: 5 tot 40 °C (41 tot 104 °F)Luchtvochtigheidsbereik: 15 tot 85 % RV (zonder condensvorming) Atmosferische druk: 700 tot 1060 hPa Opslag en vervoer Temperatuurbereik: -20 tot 60 °C (-4 tot 140 °F)Luchtvochtigheidsbereik: 10 tot 95...
Page 246 - Correcte verwijdering van dit product
34 Belangrijke informatie met betrekking tot de elektromagnetische compatibiliteit (EMC) Door het gestegen aantal elektronische apparaten, zoals pc’s en mobiele telefoons, kan bij het gebruik van medische apparatuur elektromagnetische interferentie van andere apparaten optreden. Elektromagnetische i...
Page 247 - Verklaring van de fabrikant; die hieronder is gespecificeerd.; Emissietest
35 NL Verklaring van de fabrikant De HBP-1100 is bedoeld voor gebruik in de elektromagnetische omgeving die hieronder is gespecificeerd. De koper en/of gebruiker van de HBP-1100 moet er zeker van zijn dat het apparaat wordt gebruikt in een dergelijke omgeving. Elektromagnetische emissie (IEC60601-1-...
Page 249 - test
37 NL Immuniteits - test Testniveau IEC60601-1-2 Com- pliantie- niveau Elektromagnetische omgeving - richtlijn Geleide RF IEC 61000-4-6 Uitgestraalde RF IEC 61000-4-3 3 Vrms 150 kHz tot 80 MHz 80 % AM (2 Hz) 3 V/m 80 MHz tot 2,5 GHz 80 % AM (2 Hz) 3 Vrms 3 V/m Draagbare en mobiele RF-commu- nicatiea...
Page 250 - Aanbevolen scheidingsafstanden:; Aanbevolen scheidingsafstanden tussen draagbare en mobiele
38 Aanbevolen scheidingsafstanden: Aanbevolen scheidingsafstanden tussen draagbare en mobiele RF-communicatieapparatuur en de HBP-1100 De HBP-1100 is bedoeld voor gebruik in een elektromagnetische omgeving waarin RF-stralingsstoringen beheerst worden. De klant of de gebruiker van de HBP-1100 kan bij...
Page 254 - Оглавление; Введение
Оглавление Введение Назначение ........................................................................................... 1 Ограничения ......................................................................................... 2 Правила техники безопасности .............................................
Page 255 - Назначение
1 RU Введение Назначение Медицинское назначение Устройство представляет собой цифровой прибор, предназначенный для измерения артериального давления и частоты пульса у взрослых и детей с длиной окружности плеча 12—50 см (5—20 дюймов). Назначение Это устройство предназначено для использования медицинс...
Page 256 - Ограничения
2 Ограничения Компания OMRON не будет нести никакой ответственности в нижеследующих случаях. 1. Если неисправность или повреждение вызваны техобслуживанием и/или ремонтом, выполненным не представителем компании OMRON или торговым агентом, назначенным компанией OMRON, а третьим лицом. 2. Если неиспра...
Page 257 - Правила техники безопасности; Предупреждающие символы, применяемые; Предупреждение; Общая информация; Устройство
3 RU Правила техники безопасности Указанные ниже примеры предупреждающих знаков и символов предназначены для обеспечения безопасного использования прибора и во избежание травм пользователя и других людей. Ниже поясняются значения знаков и символов. Предупреждающие символы, применяемые в данном руков...
Page 262 - Очистка; Неинвазивное измерение артериального давления (НИАД)
8 • Точность мигающего значения измерения, выходящего за пределы диапазона измерения, не гарантируется. Обязательно проверяйте состояние пациента, прежде чем решать, какие шаги предпринимать. • Не используйте манжету, если она повреждена или продырявлена. • С этим устройством можно использовать толь...
Page 263 - Использование прибора; Электронный блок и принадлежности
9 RU Использование прибора Электронный блок и принадлежности Прежде чем использовать устройство, убедитесь в наличии всех принадлежностей и в том, что ни устройство, ни принадлежности не повреждены. В случае отсутствия какой-либо принадлежности или ее повреждения обратитесь в компанию OMRON HEALTHCA...
Page 264 - Характеристики тонометра
10 Характеристики тонометра Точность измерения артериального давления устройством HBP-1100 подтверждена клинически. Устройство HBP-1100 удобно в эксплуатации и предназначено для использования медицинскими работниками. ■ Функция индикатора обнуления (стр. 17) (перед каждым измерением устройство инфор...
Page 265 - Особенности/функции устройства; Передняя и задняя панели устройства
11 RU Особенности/функции устройства Передняя и задняя панели устройства 1 Кнопка [ВКЛ./ВЫКЛ. питания] Включает/выключает электропитание. 2 Кнопка [Аускультация] Включает «Режим аускультации» (стр. 20). 3 Кнопка [START/ STOP] Запускает процедуру измерения артериального давления. При нагнетании возду...
Page 267 - Установка элементов питания; Подключение адаптера переменного тока; Питание переменного тока
13 RU Установка элементов питания Предупреждение • Если электролит попал в глаза, немедленно промойте их обильным количеством воды. Не трите глаза. Немедленно обратитесь за медицинской помощью. • Не бросайте в огонь, не разбирайте и не нагревайте элементы питания. • Не пытайтесь разбирать или модифи...
Page 268 - Выбор и подсоединение манжеты; Измерьте длину окружности плеча пациента и выберите; Название; Подсоединение манжеты; Подсоедините трубку манжеты к разъему
14 Выбор и подсоединение манжеты Предупреждение • Если манжета использовалась для измерения артериального давления у пациента с инфекцией, обращайтесь с манжетой как с медицинскими отходами или продезинфицируйте ее перед повторным использованием. Внимание • Не используйте манжету, если она поврежден...
Page 269 - Расположение манжеты на плече пациента; Убедитесь в отсутствии перегибов трубки манжеты.; Оберните манжету вокруг плеча так, чтобы надпись; Во время измерения плечевая артерия той руки, вокруг
15 RU Расположение манжеты на плече пациента Устройство можно использовать как для правого, так и для левого плеча. Оденьте манжету на голое плечо или поверх тонкой одежды. Толстая одежда или закатывание рукава станут причиной неточных измерений артериального давления. 1. Убедитесь в отсутствии пере...
Page 270 - Внимание
16 Внимание • Убедитесь в том, что манжета правильно закреплена на плече и находится на уровне сердца. ПРИМЕЧАНИЕ. • Если измерение затруднено аритмией, используйте другой метод измерения артериального давления. • Если пациент имеет острое воспаление, гнойное заболевание или наружную рану в месте на...
Page 271 - Функция индикатора обнуления
17 RU Функция индикатора обнуления Перед каждым измерением устройство информирует пользователя об успешном выполнении процедуры «обнуления». ■ При включении питания весь индикатор мигает и затем начинается «обнуление». После завершения процесса появляется надпись . ■ Если питание уже включено, запус...
Page 272 - Неинвазивное измерение артериального давления; Измерение в «Обычном режиме»; Нагнетание вручную в «Обычном режиме»
18 Неинвазивное измерение артериального давления (НИАД) Измерение в «Обычном режиме» 1. Нажмите кнопку [START/STOP]. Измерение артериального давления выполняется один раз. 2. Отображаются результаты измерения. Если значение измерения выходит за пределы соответствующего диапазона, указанного ниже, эт...
Page 274 - Измерение в «Режиме аускультации»; В «Режиме аускультации» устройство не измеряет артериальное; Нагнетание вручную в «Режиме аускультации»
20 Измерение в «Режиме аускультации» В «Режиме аускультации» устройство не измеряет артериальное давление. Измерение должен выполнять медицинский работник с помощью стетоскопа. Медицинский работник использует стетоскоп для определения значений SYS (систолического давления) и DIA (диастолоческого дав...
Page 275 - Остановка измерения
21 RU ПРИМЕЧАНИЕ. • При использовании «Режима аускультации» функция обнаружения движения тела отключается. • В «Режиме аускультации» частота пульса не измеряется и не отображается. Остановка измерения Для остановки процесса измерения нажмите кнопку [START/STOP].
Page 276 - Принципы неинвазивного измерения артериального давления; Осциллометрический метод
22 Принципы неинвазивного измерения артериального давления Осциллометрический метод Пульсовая волна, создаваемая при сокращении сердца, фиксируется как давление внутри манжеты и считается артериальным давлением. При определенном давлении внутри манжеты кровоток останавливается, но воз- действие пуль...
Page 277 - Уход; Осмотр при техобслуживании и управление безопасностью; Уход за принадлежностями
23 RU Уход Осмотр при техобслуживании и управление безопасностью Необходимо проводить техобслуживание прибора HBP-1100 для обеспечения его нормального функционирования, безопасности пациентов и пользователей. Е ж ед н е в н ы е п р о в е р к и и т ех н и ч е с к о е о б с л у ж и в а н и е д ол ж е ...
Page 278 - Проверка перед использованием; Перед включением электропитания
24 Проверка перед использованием Перед включением электропитания Перед включением электропитания проверьте следующее: ■ Внешний вид: • устройство или принадлежности не деформированы вследствие падения или другого удара; • устройство не загрязнилось; • устройство не намокло. ■ Адаптер переменного ток...
Page 279 - Проверка точности измерения давления
25 RU Проверка точности измерения давления Точ н о с т ь и з м е р е н и я д а вл е н и я ус т р о й с т во м м ож н о п р о ве р и т ь следующим образом. 1. Убедитесь в том, что питание включено. 2. Удерживайте кнопку [Аускультация] в нажатом положении в течение 3 секунд. Выполнится «обнуление». По...
Page 280 - Поиск и устранение неисправностей; Не включается электропитание
26 Поиск и устранение неисправностей Не включается электропитание Причина Решение Если устройство получает электропитание от элементов питания, а элементы питания не установлены или их заряд истощился. Вставьте элементы питания или замените элементы питания на новые (стр. 13). Адаптер переменного то...
Page 282 - Значение измерения вызывает сомнение
28 Значение измерения вызывает сомнение Причина Решение Быстрое стравливание воздуха Проверьте манжету на предмет плохого соединения. Используется манжета неправильного размера. Измерьте длину окружности плеча пациента и убедитесь в использовании манжеты правильного размера. Манжета надета поверх то...
Page 283 - Список кодов ошибок; СИСТЕМА
29 RU Список кодов ошибок ■ Пример: E2 СИСТЕМА Код ошибки Описание Что нужно сделать E9 Внутренний аппаратный сбой Обратитесь в компанию OMRON HEALTHCARE. НИАД Код ошибки Описание Что нужно сделать E1 Не подсоединена трубка манжеты Прочно подсоедините трубку манжеты. Утечка воздуха из манжеты. Замен...
Page 284 - Другие неисправности; Код ошибки Описание
30 Другие неисправности Код ошибки Описание Что нужно сделать E3 Нагнетание воздуха в манжету вручную до 300 мм рт. ст. и выше в «Режиме аускультации». Во время нагнетания воздуха вручную в «Режиме аускультации» отпустите нажатую кнопку при достижении необходимого значения. Чрезмерное нагнетание воз...
Page 285 - Утилизация; Элемент
31 RU Утилизация П о с к ол ь к у с у ще с т вует р и с к з а г ря з н е н и я о к ру ж а ю ще й с р ед ы , выполняйте действующие государственные и местные правовые нормы по утилизации или переработке данного оборудования и элементов питания. Основные составляющие каждой части перечислены в таблице...
Page 286 - Технические характеристики
32 Технические характеристики Технические характеристики: HBP-1100 Наименование Измеритель артериального давления и частоты пульса автоматический OMRON Модель HBP-1100 (HBP-1100-E) Дисплей Цифровой ЖК-дисплей Метод измерения Осциллометрический или аускультативный метод Параметры измерения неинвазивн...
Page 289 - Важная информация об электромагнитной совместимости (ЭМС); Надлежащая утилизация прибора
35 RU Важная информация об электромагнитной совместимости (ЭМС) Поскольку количество таких электронных устройств, как ПК и мобильные (со- товые) телефоны, увеличивается, используемые медицинские приборы могут быть чувствительными к электромагнитным помехам, создаваемым другими устройствами. Электром...
Page 290 - Декларация производителя; Прибор HBP-1100 предназначен для использования в нижеуказанной; Тест электромагнитного
36 Декларация производителя Прибор HBP-1100 предназначен для использования в нижеуказанной электромагнитной среде. Заказчик и/или пользователь прибора HBP-1100 должен убедиться в том, что этот прибор используется в указанной среде. Электромагнитная среда (IEC60601-1-2) Тест электромагнитного излучен...
Page 293 - Рекомендуемый пространственный разнос:; ным радио-коммуникационным оборудованием и прибором HBP-1100
39 RU Рекомендуемый пространственный разнос: Рекомендуемый пространственный разнос между портативным и мобиль - ным радио-коммуникационным оборудованием и прибором HBP-1100 Прибор HBP-1100 предназначен для использования в окружающем поле электромагнитного излучения с контролируемыми излучаемыми ради...
Page 295 - Profesyonel Kan Basıncı Ölçüm Aleti
Profesyonel Kan Basıncı Ölçüm Aleti HBP-1100 • Instruction Manual • Mode d’emploi • Gebrauchsanweisung • Manuale di istruzioni • Manual de instrucciones • Gebruiksaanwijzing • РУКОВОДСТВО ПО ЭКСПЛУАТАЦИИ • Kullanım Kılavuzu Bu OMRON Profesyonel Kan Basıncı Ölçüm Aletini satın aldığınız için teşekkür...
Page 296 - İçindekiler; Giriş
İçindekiler Giriş Kullanım Amacı ...................................................................................... 1 İstisnalar ................................................................................................ 2 Güvenlik Notları ......................................................
Page 297 - Kullanım Amacı
1 TR Giriş Kullanım Amacı Tıbbi Amaç Cihaz, kol çevresi 12 cm ile 50 cm (5 inç ila 20 inç) arasında değişen yetişkin ve çocuk hasta popülasyonunda kan basıncı ve nabız hızını ölçmeye yönelik bir dijital ölçüm aletidir. Hedeflenen Kullanıcı Bu cihaz, bir tıbbi uzman tarafından kullanılmalıdır. Hasta ...
Page 298 - İstisnalar; OMRON, aşağıdaki durumlarda hiçbir şekilde sorumlu tutulamaz.
2 İstisnalar OMRON, aşağıdaki durumlarda hiçbir şekilde sorumlu tutulamaz. 1. OMRON ya da OMRON'un belirttiği bayiye bağlı olmayan bir kişinin yaptığı bakım ve/veya onarımın neden olduğu sorun ya da hasarlar. 2. OMRON tarafından sağlanmayan başka bir üreticiye ait ürünün OMRON ürününde neden olduğu ...
Page 299 - Güvenlik Notları; Bu Kullanım Kılavuzunda kullanılan Güvenlik Sembolleri; Uyarı; Genel Bilgiler; Kurulum
3 TR Güvenlik Notları Aşağıda belirtilen uyarı işaretleri ve sembolleri, ürünün güvenli kullanımını sağlamaya, size ve diğer kişilere zarar vermeyi önlemeye yöneliktir. İşaretler ve semboller aşağıda açıklanmıştır. Bu Kullanım Kılavuzunda kullanılan Güvenlik Sembolleri Uyarı Yanlış kullanım sonucund...
Page 303 - Dikkat
7 TR • Manşeti aşağıdaki uzuvlara sarmayın: - İntravenöz damlatma ya da bir kan transfüzyonunun yapılmakta olduğu bir üst kol. - SpO 2 sensörü, IBP kateteri ya da başka bir cihazın bağlı olduğu bir üst kol. - Hemodiyaliz için şanta sahip bir üst kol • Vücudun mastektomi yapılan tarafına yakın olan k...
Page 305 - Ünitenin Kullanılması; Ürünün Bileşenleri; Ana ünite; Opsiyonlar; Opsiyonel Tıbbi Aksesuarlar; Adaptör S; • Bu cihaz ile sadece OMRON GS MANŞETİ kullanılabilir. Başka bir
9 TR Ünitenin Kullanılması Ürünün Bileşenleri Üniteyi kullanmadan önce, hiçbir aksesuarın eksik olmadığından ve ünite ile aksesuarların hasar görmediğinden emin olun. Bir aksesuar eksik ya da hasar söz konusuysa, lütfen OMRON satıcınız ya da distribütörünüz ile temasa geçin. Ana ünite Standart Tıbbi...
Page 306 - Ürünün Özellikleri
10 Ürünün Özellikleri HBP-1100'ün kan basıncı hassasiyeti klinik olarak kanıtlanmıştır. Kullanımı kolay olan HBP-1100, tıbbi profesyoneller tarafından kullanıma yöneliktir. ■ Sıfır gösterge işlevi (sayfa 17): Her ölçüm öncesinde, bu cihaz “sıfır ayarının” başarılı olduğunu belirtir. ■ Oskültasyon Mo...
Page 307 - Ünitenin Özellikleri / İşlevleri; Ünitenin önü ve altı
11 TR Ünitenin Özellikleri / İşlevleri Ünitenin önü ve altı 1 [Güç AÇMA/ KAPAMA] düğmesi Gücü AÇAR/KAPATIR. 2 [Oskültasyon] düğmesi “Oskültasyon Moduna” girmek için basın (sayfa 20). 3 [START/STOP] (BAŞLAT/DURDUR) düğmesi Kan basıncı ölçümünü başlatmak için basın. Manşet şişerken sürekli şişirmek iç...
Page 308 - LCD Ekran
12 LCD Ekran 3 2 1 7 5 4 6 8 1 SYS Sistolik kan basıncını gösterir. 2 DIA Diyastolik kan basıncını gösterir. 3 PULSE Nabız hızını gösterir. 4 Düzensiz nabız dalga simgesi Nabız dalgası aralığı düzensiz ya da ölçüm sırasında vücut hareketi varsa, ölçüm sonucu ekranındaki ışıklar yanar. 5 Oskültasyon ...
Page 309 - Pillerin Takılması; AC adaptörün çıkarıldığından; Pil değiştirme simgesi; AC Adaptörünün Bağlanması; AC gücü; AC adaptörü ünitedeki güç konnektörü ve prize bağlayın.
13 TR Pillerin Takılması Uyarı • Pil sıvısı göze temas ederse, hemen bol suyla yıkayın. Ovalamayın. Hemen tıbbi destek alın. • Aleve atmayın, parçalarına ayırmayın ya da ısıtmayın. • Pili sökmeyin ya da modifiye etmeyin. • AC adaptör ile pili aynı anda kullanmayın. Dikkat • Pil sıvısı deriyle ya da ...
Page 310 - Manşet Seçimi ve Bağlantısı; Hastanın kolunun çevresini ölçün ve çevre için uygun olan manşet; Manşet adı; Manşetin bağlanması; Manşet borusunu ünitedeki NIBP konnektörüne
14 Manşet Seçimi ve Bağlantısı Uyarı • Manşet enfeksiyonu olan bir hastada kullanılırsa, manşete tıbbi atık olarak davranın ya da kullanım öncesi dezenfekte edin. Dikkat • Hasarlı ya da delikleri varsa manşeti kullanmayın. • Doğru ölçümler sağlamak için uygun manşet boyutunu kullanın. Çok büyük bir ...
Page 311 - Manşetin Hastaya Uygulanması; Manşet borusunun bükülmediğinden emin olun.; INDEX ARTERY “ ” işareti doğrudan brakiyal arter üzerinde; kulakçığı ile aynı yükseklikte tutun.
15 TR Manşetin Hastaya Uygulanması Cihaz, sağ ya da sol kolda kullanılabilir. Manşeti çıplak kola ya da ince giysi üzerine sarın. Kalın giysiler ya da katlanmış kollar, yanlış kan basıncı ölçümlerine neden olacaktır. 1. Manşet borusunun bükülmediğinden emin olun. Manşet borusunun dış tarafta olması ...
Page 313 - Sıfır Gösterge İşlevi; ■ Güç açıkken, ölçüm başlatılır ve hazır ekranından “sıfır ayarı”
17 TR Sıfır Gösterge İşlevi Her ölçüm öncesinde, bu cihaz “sıfır ayarının” başarılı olduğunu belirtir. ■ Güç açıldığında, tüm göstergeler yanıp söner ve “sıfır ayarı” başlatılır. Bittiğinde, görünür. ■ Güç açıkken, ölçüm başlatılır ve hazır ekranından “sıfır ayarı” gerçekleştirilir (“0” gösteren). B...
Page 314 - İnvazif Olmayan Kan Basıncı (NIBP) Ölçümü; Ölçüm “Normal Modunda”; Kan basıncı ölçümü bir kez yapılacaktır.; “Normal Modda” manuel şişirme; Manşet yeterince şişirilmezse, manuel olarak da şişirilebilir.
18 İnvazif Olmayan Kan Basıncı (NIBP) Ölçümü Ölçüm “Normal Modunda” 1. [START/STOP] (Başlat/Durdur) düğmesine basın. Kan basıncı ölçümü bir kez yapılacaktır. 2. Ölçüm sonuçları gösterilir. Bir ölçüm değeri aşağıdaki ilgili aralık dışındaysa, değer yanıp sönecektir. SİSTOLİK: 59 mmHg veya daha az ya ...
Page 316 - “Oskültasyon Modunda” Ölçüm; “Oskültasyon Modunda”, bu cihaz kan basıncını ölçmez. Ölçümün; “Oskültasyon Modunda” manuel şişirme
20 “Oskültasyon Modunda” Ölçüm “Oskültasyon Modunda”, bu cihaz kan basıncını ölçmez. Ölçümün bir steteskop ile bir sağlık çalışanı tarafından yapılması gerekir. Sağlık çalışanı, oskültasyon yoluyla SYS (Sistolik) ve DIA (Diyastolik) değerlerini belirlemek için bir steteskop kullanır.1. Gücünü açık o...
Page 317 - • “Oskültasyon Modunda”, nabız hızı ölçülmez ve görünmez.; Ölçümün Durdurulması
21 TR NOT: • “Oskültasyon Modu” kullanımdayken, vücut hareketi tespit işlevi devre dışı kalır. • “Oskültasyon Modunda”, nabız hızı ölçülmez ve görünmez. Ölçümün Durdurulması Ölçüm yapılırken ölçümü durdurmak için, [START/STOP] (Başlat/Durdur) düğmesine basın.
Page 318 - İnvazif Olmayan Basınç Ölçüm Prensipleri; Osilometrik metot; salınım tepe değerinden düşmeye başlar.
22 İnvazif Olmayan Basınç Ölçüm Prensipleri Osilometrik metot Kalbin kasılması ile üretilen pulsasyon atışı, kan basıncı ölçümü amacıyla manşet içinde basınç olarak yakalanır. Üst kola sarılan manşete yeterli basınç verildiğinde, kan akışı durdurulur, fakat pulsasyon atışı mevcuttur ve manşet içinde...
Page 319 - Bakım; Bakım Kontrolü ve Güvenlik Yönetimi; Aksesuar Bakımı
23 TR Bakım Bakım Kontrolü ve Güvenlik Yönetimi Çalışmasını ve hastalar ile operatörlerin güvenliğini sağlamak için HBP-1100'ün bakımının yapılması gerekir. Günlük kontroller ve bakımın operatör tarafından yapılması gerekir. Ayrıca, performansı ve güvenliği korumak ve periyodik bakımları yapmak için...
Page 320 - Kullanımdan Önce Kontrol Edin; Gücü açmadan önce
24 Kullanımdan Önce Kontrol Edin Gücü açmadan önce Gücü açmadan önce, aşağıdakileri kontrol edin ■ Dış görünüm • Düşme ya da başka darbeler nedeniyle cihaz ya da aksesuarlar deforme olmamış. • Cihaz kirli değil. • Cihaz ıslak değil. ■ AC adaptör • AC adaptör, cihazdaki konnektöre sıkı şekilde bağlan...
Page 321 - Basınç Hassasiyetinin Kontrol Edilmesi
25 TR Basınç Hassasiyetinin Kontrol Edilmesi Cihazın basınç hassasiyetini kontrol edebilirsiniz. 1. Gücünü açık olduğundan emin olun. 2. [Oskültasyon] düğmesini 3 saniye basılı tutun. “Sıfır ayarı” gerçekleştirilir. “Sıfır ayarı” bittiğinde, basınç hassasiyeti doğrulama ekranı görünür. 3. “0” göster...
Page 322 - Sorun Giderme; Cihaz açılmıyor
26 Sorun Giderme Cihaz açılmıyor Neden Çözüm Ünite piller ile çalıştırılıyorsa, piller takılı değildir ya da şarj bitmiştir. Pilleri takın ya da yeni piller ile değiştirin (sayfa 13). AC adaptörü bağlanmamış. AC adaptörünü bağlayın (sayfa 13). Güç gelmezse ve yukarıdakiler bunun nedeni değilse, ünit...
Page 323 - Ölçüm mümkün değil; Hastayı kontrol ettikten sonra, hata kodunu kontrol edin ve “Hata; Anormal ölçüm değeri; edin ve ardından ölçümü tekrar edin.
27 TR Ölçüm mümkün değil Neden / çözümPalpasyon ya da başka bir metod ile hastayı kontrol edin. Hastayı kontrol ettikten sonra, hata kodunu kontrol edin ve “Hata Kodlarının Listesi” kısmına bakın (İnvazif Olmayan Kan Basıncı (NIBP) ölçümü için sayfa 29). Anormal ölçüm değeri Neden / çözümAşağıdaki n...
Page 324 - Ölçüm değeri şüpheli
28 Ölçüm değeri şüpheli Neden Çözüm Hızlı sönmekte Gevşek bir manşet bağlantısı kontrolü yapın. Yanlış manşet boyutu kullanımda. Hastanın kolunun çevresini ölçün ve doğru boyutta manşetin kullanıldığından emin olun. Kalın giysi üzerine sarılmış manşet. Manşetin çıplak kola ya da çok ince giysi üzeri...
Page 325 - Hata Kodlarının Listesi; SİSTEM
29 TR Hata Kodlarının Listesi ■ Örnek: E2 SİSTEM Hata kodu Açıklama Kontrol edilecek noktalar E9 Dahili donanım hatası OMRON satıcısı ya da distribütörüyle irtibata geçin. İnvazif Olmayan Kan Basıncı (NIBP) Hata kodu Açıklama Kontrol edilecek noktalar E1 Manşet borusu bağlı değil. Manşet borusunu sı...
Page 326 - Diğer sorunlar; Hata
30 Diğer sorunlar Hata kodu Açıklama Kontrol edilecek noktalar E3 “Oskültasyon Modunda” manuel şişirme sırasında manşet 300 mmHg ya da daha yüksek değere şişirildi “Oskültasyon Modunda” manuel şişirme sırasında, basınç istenilen değere geldiğinde düğmeyi bırakın. Aşırı şişme meydana gelir Bu ölçüm s...
Page 327 - Bertaraf etme; Öğe; Boru
31 TR Bertaraf etme Çevre kirliliği riski varsa, bu ekipman ve pillerin imhası ya da geri dönüşümüne ilişkin geçerli ulusal ve yerel yönetmelikleri takip edin. Her bir parçanın ana bileşenleri aşağıdaki tabloda listelenmiştir. Enfeksiyon riski olduğundan, manşetler gibi hasta ataşmanlarını geri dönü...
Page 328 - Özellikler
32 Özellikler Teknik Özellikler: HBP-1100 Ana ünite Ölçüm Parametresi NIBP, PR Boyut Ana ünite: 130 × 175 × 120 (mm) 5,12 × 6,89 × 4,72 (inç) (G×Y×D) AC adaptör: 55 × 25 × 70 (mm) 2,17 × 0,98 × 2,76 (inç) (G×Y×D) Ağırlık Ana ünite: Yakl. 510 g (aksesuarlar dahil değil) AC adaptör: Yaklaşık 42 g Ekra...
Page 329 - Ortam Koşulları; Referans
33 TR Ortam Koşulları Çalışma Koşulları Sıcaklık aralığı: 5 - 40°C (41 - 104°F)Nem aralığı: %15 ila 85 RH (yoğuşma yok)Atmosfer basıncı: 700 ila 1060hPa Saklama ve taşıma -20 - 60°C (-4 - 140°F)Nem aralığı: %10 ila 95 RH (yoğuşma yok)Atmosfer basıncı: 500 ila 1060hPa İnvazif Olmayan Kan Basıncı (NIB...
Page 330 - Elektro Manyetik Uyumluluk (EMC) ile ilgili önemli bilgiler; Ürünün Doğru Şekilde Elden Çıkarılması
34 Elektro Manyetik Uyumluluk (EMC) ile ilgili önemli bilgiler Kişisel bilgisayarlar ve mobil (cep) telefonlar gibi elektronik cihazların kullanımı arttıkça, kullanılan tıbbi cihazlar diğer cihazlardan gelen elektromanyetik parazitlerden etkilenebilir. Elektromanyetik parazitler, tıbbi cihazın yanlı...
Page 331 - Üreticinin Beyanı; HBP-1100 müşterisi ya da kullanıcısı cihazın böyle bir ortamda; Emisyon Testi
35 TR Üreticinin Beyanı HBP-1100, aşağıda belirtilen elektromanyetik ortam ile kullanıma yöneliktir. HBP-1100 müşterisi ya da kullanıcısı cihazın böyle bir ortamda kullanılmasını sağlamalıdır. Elektromanyetik Emisyonlar (IEC60601-1-2) Emisyon Testi Uyumluluk Elektromanyetik Ortam RF emisyonu CISPR 1...
Page 334 - Önerilen Ayırma Mesafeleri:; ayırma mesafesi
38 Önerilen Ayırma Mesafeleri: Taşınabilir ve mobil RF iletişim cihazları ile HBP-1100 arasında önerilen ayırma mesafesi HBP-1100, yayılan RF parazitlerinin kontrol edildiği bir elektromanyetik ortamda kullanıma yöneliktir. Taşınabilir ve mobil RF iletişim ekipmanları (vericiler) ile HBP-1100 arasın...
Page 342 - ةيسيطانغمورهكلا; ثاعبنلاا
٣٥ ﻊﻴﻨﺼﺘﻟﺍ ﺔﻬﺟ ﻥﺎﻴﺑ . ﺔﻴﺗﻵﺍ ﺕﺎﻔﺻﺍﻮﻤﻟﺍ ﻖﺑﺎﻄﺗ ﺔﻴﺴﻴﻃﺎﻨﻐﻣﻭﺮﻬﻛ ﺔﺌﻴﺑ ﻲﻓ ﻡﺍﺪﺨﺘﺳﻼﻟ HBP-1100 ﺯﺎﻬﺠﻟﺍ ﺩﺍﺪﻋﺇ ﻢﺗ ﺪﻘﻟ . ﻡﺍﺪﺨﺘﺳﻻﺍ ﺪﻨﻋ ﺔﺌﻴﺒﻟﺍ ﻩﺬﻫ ﻞﺜﻣ ﺮﻴﻓﻮﺗ ﻰﻠﻋ HBP-1100 ﺯﺎﻬﺟ ﻡﺪﺨﺘﺴﻣ ﻭﺃ ﻚﻠﻬﺘﺴﻤﻟﺍ ﺪﻛﺆﻳ ﻥﺃ ﺐﺠﻳ (IEC60601-1-2) ﺔﻴﺴﻴﻃﺎﻨﻐﻣﻭﺮﻬﻜﻟﺍ ﺕﺎﺛﺎﻌﺒﻧﻻﺍ ﺙﺎﻌﺒﻧﻻﺍ ﺭﺎﺒﺘﺧﺍ ﻝﺎﺜﺘﻣﻻﺍ ﺔﻴﺴﻴﻃﺎﻨﻐﻣﻭﺮﻬﻜﻟﺍ ﺔﺌﻴﺒﻟﺍ ﺔﻴﻜﻠﺳﻼﻟﺍ ﺕﺍﺩﺩﺮﺘﻟﺍ ﺙﺎﻌﺒﻧﺍ...
Page 345 - تافصاوملا; ةينفلا; ةيسيئرلا
٣٢ AR ﺕﺎﻔﺻﺍﻮﻤﻟﺍ HBP-1100 : ﺔﻴﻨﻔﻟﺍ ﺕﺎﻔﺻﺍﻮﻤﻟﺍ ﺔﻴﺴﻴﺋﺮﻟﺍ ﺓﺪﺣﻮﻟﺍ ﺱﺎﻴﻘﻟﺍ ﺮﻴﻳﺎﻌﻣ PR ، NIBP ﺩﺎﻌﺑﻷﺍ ( ﻢﻠﻣ ) ١٢٠ × ١٧٥ × ١٣٠ : ﻲﺴﻴﺋﺮﻟﺍ ﺯﺎﻬﺠﻟﺍ ( ﻖﻤﻋ × ﻉﺎﻔﺗﺭﺍ × ﺽﺮﻋ ) ( ﺔﺻﻮﺑ ) ٤٫٧٢ × ٦٫٨٩ × ٥٫١٢ ( ﻢﻠﻣ ) ٧٠ × ٢٥ × ٥٥ : ﺩﺩﺮﺘﻤﻟﺍ ﺭﺎﻴﺘﻟﺍ ﺊﻳﺎﻬﻣ ( ﻖﻤﻋ × ﻉﺎﻔﺗﺭﺍ × ﺽﺮﻋ ) ( ﺔﺻﻮﺑ ) ٢٫٧٦ × ٠٫٩٨ × ٢٫١٧ ﻥﺯﻮﻟﺍ ( ﺕﺎﻘﺤﻠﻤﻟﺍ ﻥﻭﺩ )...
Page 346 - رصنعلا; AA
٣١ ﺕﺎﻳﺭﺎﻄﺒﻟﺍﻭ ﺯﺎﻬﺠﻟﺍ ﻦﻣ ﺺﻠﺨﺘﻟﺍ ﺍﺬﻫ ﻦﻣ ﺺﻠﺨﺘﻟﺎﺑ ﻖﻠﻌﺘﻳ ﺎﻤﻴﻓ ﺎﻬﺑ ﻝﻮﻤﻌﻤﻟﺍ ﺔﻴﻠﺤﻤﻟﺍﻭ ﺔﻴﻨﻃﻮﻟﺍ ﻦﻴﻧﺍﻮﻘﻟﺍ ﻉﺎﺒﺗﺍ ﻰﺟﺮُﻳ ،ﺔﺌﻴﺒﻟﺍ ﺔﻣﻼﺳ ﻰﻠﻋ ﺎ ًﺻﺮﺣ . ﺎﻫﺮﻳﻭﺪﺗ ﺓﺩﺎﻋﺇ ﻭﺃ ﺔﻳﺭﺎﻄﺒﻟﺍﻭ ﺯﺎﻬﺠﻟﺍ ﺮﻳﻭﺪﺗ ﺓﺩﺎﻋﺈﺑ ﻢﻘﺗ ﻻ ،ﻯﻭﺪﻌﻟﺍ ﻞﻘﻨﻟ ﺎًﺒﻨﺠﺗﻭ . ﻲﻟﺎﺘﻟﺍ ﻝﻭﺪﺠﻟﺍ ﻲﻓ ﺔﺟﺭﺪﻣ ﺔﻌﻄﻗ ﻞﻜﻟ ﺔﻴﺳﺎﺳﻷﺍ ﺕﺎﻧﻮﻜﻤﻟﺍ ﺪﺠﺘﺳ ﺎﻬﺑ ﻝﻮﻤﻌﻤﻟﺍ ﻦﻴﻧﺍﻮﻘﻟﺍﻭ ﺔﻌﺒﺘﻤﻟﺍ ﺕﺍءﺍﺮﺟﻺ...
Page 348 - ماظنلا; OMRON GS CUFF
٢٩ ءﺎﻄﺧﻷﺍ ﺯﻮﻣﺭ ﺔﻤﺋﺎﻗ E2 : ﻝﺎﺜﻤﻟﺍ ■ ﻡﺎﻈﻨﻟﺍ ﺰﻣﺭ ﺄﻄﺨﻟﺍ ﻒﺻﻮﻟﺍ ﺎﻬﻨﻣ ﻖﻘﺤﺘﻟﺍ ﺐﺠﻳ ﻲﺘﻟﺍ ﻁﺎﻘﻨﻟﺍ E9 ﺯﺎﻬﺠﻟﺎﺑ ﻲﻠﺧﺍﺩ ﺄﻄﺧ ﻊﺑﺎﺘﻟﺍ ﻉﺯﻮﻤﻟﺍ ﻭﺃ ﺔﺋﺰﺠﺘﻟﺎﺑ ﻊﻴﺒﻟﺍ ﻞﻴﻛﻮﺑ ﻞﺼﺗﺍ .OMRON ﺔﻛﺮﺸﻟ (NIBP) ﻲﺟﺭﺎﺨﻟﺍ ﻡﺪﻟﺍ ﻂﻐﺿ ﺱﺎﻴﻗ ﺰﻣﺭ ﺄﻄﺨﻟﺍ ﻒﺻﻮﻟﺍ ﺎﻬﻨﻣ ﻖﻘﺤﺘﻟﺍ ﺐﺠﻳ ﻲﺘﻟﺍ ﻁﺎﻘﻨﻟﺍ E1 . ﻞﺼﺘﻣ ﺮﻴﻏ ﻂﻏﺎﻀﻟﺍ ﻂﻳﺮﺸﻟﺍ ﺏﻮﺒﻧﺃ . ﻡﺎﻜﺣﺈﺑ ﻂﻏﺎﻀﻟﺍ ﻂﻳﺮﺸﻟﺍ ﺏﻮﺒﻧﺃ ﻞ...
Page 352 - لاثم
٢٥ ﻂﻐﻀﻟﺍ ﺔﻗﺩ ﻦﻣ ﻖﻘﺤﺘﻟﺍ . ﺯﺎﻬﺠﻟﺍ ﻪﺴﻴﻘﻳ ﻱﺬﻟﺍ ﻂﻐﻀﻟﺍ ﺔﻗﺩ ﻦﻣ ﻖﻘﺤﺘﻟﺍ ﻚﻨﻜﻤﻳ . ﺯﺎﻬﺠﻟﺍ ﻞﻴﻐﺸﺗ ﻦﻣ ﺪﻛﺄﺗ . ١ . ٍﻥﺍﻮﺛ ٣ ﺓﺪﻤﻟ ( ﻊﻤﺴﺘﻟﺍ ) [Auscultation] ﺭﺰﻟﺍ ﻰﻠﻋ ﺭﺍﺮﻤﺘﺳﻻﺍ ﻊﻣ ﻂﻐﺿﺍ . ٢ ." ﺮﻔﺼﻟﺍ ﻰﻠﻋ ﻂﺒﻀﻟﺍ " ﺔﻴﻠﻤﻋ ءﺍﺮﺟﺇ ﻢﺘﻳ . ﻂﻐﻀﻟﺍ ﺔﻗﺩ ﻦﻣ ﻖﻘﺤﺘﻟﺍ ﺔﺷﺎﺷ ﺮﻬﻈﺗ ، " ﺮﻔﺼﻟﺍ ﻰﻠﻋ ﻂﺒﻀﻟﺍ " ﺔﻴﻠﻤﻋ ءﺎﻬﺘﻧﺍ ﺪﻨﻋ . ﻂﻐﻀﻟﺍ ﺔ...
Page 354 - ةنايصلا; هيبنت
٢٣ ﺔﻧﺎﻴﺼﻟﺍ ﺔﻣﻼﺴﻟﺍ ﺓﺭﺍﺩﺇﻭ ﺔﻧﺎﻴﺼﻟﺍ ﺺﺤﻓ . ﻦﻴﻠﻐﺸﻤﻟﺍﻭ ﻰﺿﺮﻤﻟﺍ ﺔﻣﻼﺳ ﻦﻴﻣﺄﺘﻟﻭ ﻪﻔﺋﺎﻇﻮﻟ ﻪﺋﺍﺩﺃ ﻥﺎﻤﻀﻟ HBP-1100 ﺯﺎﻬﺠﻟﺍ ﺔﻧﺎﻴﺻ ﺐﺠﻳ ﻦﻴﻠﻫﺆﻤﻟﺍ ﺩﺍﺮﻓﻷﺍ ﻰﻠﻋ ﻦﻴﻌﺘﻳ ،ﻚﻟﺫ ﻰﻠﻋ ًﺓﻭﻼﻋ . ﺔﻴﻣﻮﻴﻟﺍ ﺔﻧﺎﻴﺼﻟﺍﻭ ﺕﺎﺻﻮﺤﻔﻟﺍ ءﺍﺮﺟﺈﺑ ﻞﻐﺸﻤﻟﺍ ﻡﻮﻘﻳ ﻥﺃ ﻲﻐﺒﻨﻳ ﺓﺮﻣ ﻖﻘﺤﺗ ﺭﺎﺒﺘﺧﺍ ءﺍﺮﺟﺈﺑ ﻲﺻﻮﻧ ﺎﻤﻛ . ﺔﻳﺭﻭﺪﻟﺍ ﺕﺎﺻﻮﺤﻔﻟﺍ ءﺍﺮﺟﺇ ﺐﻧﺎﺟ ﻰﻟﺇ ،ﺔﻣﻼﺴﻟﺍﻭ ءﺍﺩﻷﺍ ﻰﻠﻋ ﻅﺎﻔ...
Page 355 - ةبذبذلاب
٢٢ AR ﻲﺟﺭﺎﺨﻟﺍ ﻡﺪﻟﺍ ﻂﻐﺿ ﺱﺎﻴﻗ ءﻯﺩﺎﺒﻣ ﺔﺑﺬﺑﺬﻟﺎﺑ ﺱﺎﻴﻘﻟﺍ ﺔﻘﻳﺮﻃ ﺱﺎﻴﻗ ﻞﺟﺃ ﻦﻣ ﻂﻏﺎﻀﻟﺍ ﻂﻳﺮﺸﻟﺍ ﻞﺧﺍﺩ ﻂﻐﻀﻟﺍ ﺎﻬﻧﺃ ﻰﻠﻋ ﺐﻠﻘﻟﺍ ﺽﺎﺒﻘﻧﺍ ﻦﻋ ﺞﺘﻨﺗ ﻲﺘﻟﺍ ﺔﻀﺒﻨﻟﺍ ﻁﺎﻘﺘﻟﺍ ﻢﺘﻳ ﻡﺪﻟﺍ ﻂﻐﺿ ﻒﻗﻮﺘﻴﺳ ،ﻲﻔﻜﻳ ﺎﻤﺑ ﻱﻮﻠﻌﻟﺍ ﻉﺍﺭﺬﻟﺍ ﻝﻮﺣ ﻑﻮﻔﻠﻤﻟﺍ ﻂﻏﺎﻀﻟﺍ ﻂﻳﺮﺸﻟﺍ ﻂﻐﺿ ﻢﺗ ﺍﺫﺇﻭ . ﻡﺪﻟﺍ ﻂﻐﺿ ﺾﻔﺨﻧﺍ ﺎﻤﻠﻛ ،ﻚﻟﺫ ﺪﻌﺑﻭ . ﺏﺬﺑﺬﺘﻴﻓ ﻚﻟﺫ ﻂﻏﺎﻀﻟﺍ ﻂﻳﺮﺸﻟﺍ ﻞﺧﺍﺩ ﻂﻐﻀﻟﺍ ﻰﻘﻠﺘ...
Page 356 - ةظحلام; سايقلا
٢١ : ﺔﻈﺣﻼﻣ ." ﻊﻤﺴﺘﻟﺍ ﻊﺿﻭ " ﻡﺍﺪﺨﺘﺳﺍ ءﺎﻨﺛﺃ ﻢﺴﺠﻟﺎﺑ ﺔﻛﺮﺣ ﺩﻮﺟﻭ ﻦﻋ ﻒﺸﻜﻟﺍ ﺔﻔﻴﻇﻭ ﻞﻴﻄﻌﺗ ﻢﺘﻳ • . ﺯﺎﻬﺠﻟﺍ ﻰﻠﻋ ﺮﻬﻈﻳ ﻻﻭ ﺾﺒﻨﻟﺍ ﻝﺪﻌﻣ ﺱﺎﻴﻗ ﻢﺘﻳ ﻻ ، " ﻊﻤﺴﺘﻟﺍ ﻊﺿﻭ " ﻲﻓ • ﺱﺎﻴﻘﻟﺍ ﻑﺎﻘﻳﺇ .( ﻑﺎﻘﻳﺇ / ءﺪﺑ ) [START/STOP] ﺭﺰﻟﺍ ﻰﻠﻋ ﻂﻐﺿﺍ ،ﻪﺋﺍﺮﺟﺇ ءﺎﻨﺛﺃ ﺱﺎﻴﻘﻟﺍ ﻑﺎﻘﻳﻹ
Page 357 - عمستلا
٢٠ AR " ﻊﻤﺴﺘﻟﺍ ﻊﺿﻭ " ﻲﻓ ﺱﺎﻴﻘﻟﺍ ﺔﻳﺎﻋﺭ ﻲﺋﺎﺼﺧﺃ ﺔﻓﺮﻌﻤﺑ ﺱﺎﻴﻘﻟﺍ ءﺍﺮﺟﺇ ﻲﻐﺒﻨﻳﻭ . ﻡﺪﻟﺍ ﻂﻐﺿ ﺯﺎﻬﺠﻟﺍ ﺍﺬﻫ ﺲﻴﻘﻳ ﻻ ، " ﻊﻤﺴﺘﻟﺍ ﻊﺿﻭ " ﻲﻓ . ﺔﻴﺒﻃ ﺔﻋﺎﻤﺳ ﺎ ًﻣﺪﺨﺘﺴﻣ ﺔﻴﺒﻃ ﻦﻣ ﻲﻃﺎﺴﺒﻧﻻﺍ ﻡﺪﻟﺍ ﻂﻐﺿﻭ ﻲﺿﺎﺒﻘﻧﻻﺍ ﻡﺪﻟﺍ ﻂﻐﺿ ﺪﻳﺪﺤﺘﻟ ﺔﻴﺒﻃ ﺔﻋﺎﻤﺳ ﺔﻴﺒﻄﻟﺍ ﺔﻳﺎﻋﺮﻟﺍ ﻲﺋﺎﺼﺧﺃ ﻡﺪﺨﺘﺴﻳ . ﻊﻤﺴﺘﻟﺍ ﺔﻘﻳﺮﻃ ﻝﻼﺧ . ﺯﺎﻬﺠﻟﺍ ﻞﻴﻐﺸﺗ ﻦﻣ ﺪﻛﺄﺗ . ١ .&#...
Page 359 - يداعلا
١٨ AR (NIBP) ﻲﺟﺭﺎﺨﻟﺍ ﻡﺪﻟﺍ ﻂﻐﺿ ﺱﺎﻴﻗ " ﻱﺩﺎﻌﻟﺍ ﻊﺿﻮﻟﺍ " ﻲﻓ ﺱﺎﻴﻘﻟﺍ .( ﻑﺎﻘﻳﺇ / ءﺪﺑ ) START/STOP ﺭﺯ ﻰﻠﻋ ﻂﻐﻀﻟﺍ . ١ . ﺓﺪﺣﺍﻭ ﺓﺮﻣ ﻡﺪﻟﺍ ﻂﻐﺿ ﺱﺎﻴﻗ ءﺍﺮﺟﺇ ﻢﺘﻳ . ﺱﺎﻴﻘﻟﺍ ﺞﺋﺎﺘﻧ ﺽﺮﻋ ﻢﺘﻳ . ٢ . ﺔﻤﻴﻘﻟﺍ ﺾﻣﻮﺘﺳ ،ﻲﻟﺎﺘﻟﺍ ﻕﺎﻄﻨﻟﺍ ﺝﺭﺎﺧ ﺱﺎﻴﻘﻟﺍ ﺔﻤﻴﻗ ﺖﻧﺎﻛ ﺍﺫﺇ . ﻰﻠﻋﺃ ﻭﺃ ﺎًﻴﻘﺒﺋﺯ ﺍ ًﺮﺘﻤﻴﻠﻠﻣ ٢٥١ ﻭﺃ ﻞﻗﺃ ﻭﺃ ﺎًﻴﻘﺒﺋﺯ ﺍ ًﺮﺘﻤﻴﻠﻠﻣ ٥٩ :...
Page 366 - BF
١١ ﺯﺎﻬﺠﻟﺍ ﻒﺋﺎﻇﻭ / ﺕﺍﺰﻴﻤﻣ ﺯﺎﻬﺠﻟﺍ ﻦﻣ ﺔﻴﻠﻔﺴﻟﺍﻭ ﺔﻴﻣﺎﻣﻷﺍ ﺔﻬﺠﻟﺍ ١ [Power ON/OFF] ﺭﺰﻟﺍ ( ﻞﻴﻐﺸﺗ ﻑﺎﻘﻳﺇ / ﻞﻴﻐﺸﺗ ) . ﺯﺎﻬﺠﻟﺍ ﻞﻴﻐﺸﺗ ﻑﺎﻘﻳﺇ / ﻞﻴﻐﺸﺘﻟ ٢ [Auscultation] ﺭﺰﻟﺍ ( ﻊﻤﺴﺘﻟﺍ ) .( ٢٠ ﺔﺤﻔﺻ ) " ﻊﻤﺴﺘﻟﺍ ﻊﺿﻭ " ﻰﻟﺇ ﻝﻮﺧﺪﻠﻟ ﻂﻐﺿﺍ ٣ [START/STOP] ﺭﺰﻟﺍ ( ﻑﺎﻘﻳﺇ / ءﺪﺑ ) ﻂﻳﺮﺸﻟﺍ ﺦﻔﻧ ءﺎﻨﺛﺃ . ﻡﺪﻟﺍ ﻂﻐﺿ ﺱﺎﻴﻗ ءﺪﺒﻟ ﻂﻐﺿﺍ ﺭﺰ...
Page 368 - جتنملا; GS CUFF XL; GS CUFF L
٩ ﺯﺎﻬﺠﻟﺍ ﻡﺍﺪﺨﺘﺳﺍ ﺞﺘﻨﻤﻟﺍ ﺕﺎﻧﻮﻜﻣ ﻥﺎﻛ ﺍﺫﺇ . ﺔﻔﻟﺎﺗ ﺖﺴﻴﻟ ﺕﺎﻘﺤﻠﻤﻟﺍ ﻚﻟﺬﻛﻭ ﺯﺎﻬﺠﻟﺍ ﻥﺃﻭ ﺓﺩﻮﻘﻔﻣ ﺕﺎﻘﺤﻠﻣ ﻱﺃ ﺩﻮﺟﻭ ﻡﺪﻋ ﻦﻣ ﺪﻛﺄﺗ ،ﺯﺎﻬﺠﻟﺍ ﻡﺍﺪﺨﺘﺳﺍ ﻞﺒﻗ .OMRON ﺔﻛﺮﺸﻟ ﻊﺑﺎﺘﻟﺍ ﻉﺯﻮﻤﻟﺍ ﻭﺃ ﺔﺋﺰﺠﺘﻟﺎﺑ ﻊﻴﺒﻟﺍ ﻞﻴﻛﻮﺑ ﻝﺎﺼﺗﻻﺍ ﻰﺟﺮُﻴﻓ ،ﺎًﻘﻟﺎﺗ ﻭﺃ ﺍًﺩﻮﻘﻔﻣ ﺕﺎﻘﺤﻠﻤﻟﺍ ﺪﺣﺃ ﻙﺎﻨﻫ ﺔﻴﺴﻴﺋﺮﻟﺍ ﺓﺪﺣﻮﻟﺍ ﺔﻴﺳﺎﺳﻷﺍ ﺔﻴﺒﻄﻟﺍ ﺕﺎﻘﺤﻠﻤﻟﺍ ﺩﺩﺮﺘﻤﻟﺍ ﺭﺎﻴﺘﻟﺍ ﺊﻳﺎﻬﻣ • ( ﻢ...
Page 372 - SpO; فيظنتلا
٥ ﻪﻴﺒﻨﺗ : ﺯﺎﻬﺠﻟﺍ ﻡﺍﺪﺨﺘﺳﺍ ﻞﺒﻗ ﺔﻴﻟﺎﺘﻟﺍ ﺕﻻﺎﺤﻟﺍ ﻦﻣ ﻱﺃ ﻪﻴﻠﻋ ﻖﺒﻄﻨﻳ ﻻ ﺾﻳﺮﻤﻟﺍ ﻥﺃ ﻦﻣ ﻖﻘﺤﺘﻟﺍ ﻰﺟﺮُﻳ • ﻢﺴﺠﻟﺍ ﺓﺭﺍﺮﺣ ﺔﺟﺭﺩ ﺽﺎﻔﺨﻧﺍ ﻭﺃ ﻡﺪﻟﺍ ﻂﻐﺿ ﻲﻓ ﻅﻮﺤﻠﻣ ﺽﺎﻔﺨﻧﺍ ﻭﺃ ﻑﺍﺮﻃﻷﺍ ﻲﻓ ﺔﻔﻴﻌﺿ ﻡﺩ ﺓﺭﻭﺩ - ( ﺎ ًﻀﻔﺨﻨﻣ ﺱﺎﻴﻘﻟﺍ ﺔﻘﻄﻨﻣ ﻰﻟﺇ ﻡﺪﻟﺍ ﻖﻓﺪﺗ ﻥﻮﻜﻴﺳ ) ( ﺾﺒﻧ ﻙﺎﻨﻫ ﻥﻮﻜﻳ ﻦﻟ ) ﻦﻴﻴﻋﺎﻨﺻ ﺔﺋﺭﻭ ﺎًﺒﻠﻗ ﺾﻳﺮﻤﻟﺍ ﻡﺪﺨﺘﺴﻳ - ﺎﻬﺴﻔﻧ ﻉﺍﺭﺬﻟﺎﺑ ﻦﻴﻠﺻﻮﻣ ﻂﻏﺎﻀﻟ...
Page 373 - OMRON
٤ AR ﻪﻴﺒﻨﺗ : ﺔﻴﻟﺎﺘﻟﺍ ﻦﻛﺎﻣﻷﺍ ﻲﻓ ﺯﺎﻬﺠﻟﺍ ﺐﻴﻛﺮﺘﺑ ﻢﻘﺗ ﻻ • . ﺖﻳﺮﺒﻛ ﻭﺃ ﺡﻼﻣﺃ ﻭﺃ ﺭﺎﺒﻏ ﺎﻬﺑ ﻲﺘﻟﺍ ﻦﻛﺎﻣﻷﺍ - ﺲﻤﺸﻟﺍ ﺔﻌﺷﺃ ﻲﻓ ﻙﺮﺘُﻳ ﻻ ،ﺺﺧﻷﺎﺑﻭ ) ﺔﻠﻳﻮﻃ ﺔﻴﻨﻣﺯ ﺕﺍﺮﺘﻔﻟ ﺓﺮﺷﺎﺒﻤﻟﺍ ﺲﻤﺸﻟﺍ ﺔﻌﺷﻷ ﺔﺿﺮﻌﻤﻟﺍ ﻦﻛﺎﻣﻷﺍ - ﺖﺤﺗ ﺔﻌﺷﻷﺍ ﻥﻷ ﺍ ًﺮﻈﻧ ﺔﻠﻳﻮﻃ ﺔﻴﻨﻣﺯ ﺕﺍﺮﺘﻔﻟ ﺔﻴﺠﺴﻔﻨﺒﻟﺍ ﻕﻮﻓ ﺔﻌﺷﻸﻟ ﺭﺪﺼﻣ ﻦﻣ ﺔﺑﺮﻘﻣ ﻰﻠﻋ ﻭﺃ ﺓﺮﺷﺎﺒﻤﻟﺍ .(LCD ﺔﺷﺎﺸﻟﺍ ﺓﺩﻮﺟ ﺭﻮﻫﺪﺗ ﻰﻟﺇ ...
Page 374 - ريذحت; ةماع; بيكرتلا
٣ ﺔﻣﻼﺴﻟﺍ ﻝﻮﺣ ﺕﺎﻈﺣﻼﻣ ﻪﻔﻠﺗ ﺐﻨﺠﺗﻭ ﺞﺘﻨﻤﻠﻟ ﻦﻣﻵﺍ ﻡﺍﺪﺨﺘﺳﻻﺍ ﻥﺎﻤﻀﻟ ﻩﺎﻧﺩﺃ ﺎﻬﻴﻟﺇ ﺭﺎﺸﻤﻟﺍ ﺔﻳﺮﻳﺬﺤﺘﻟﺍ ﺯﻮﻣﺮﻟﺍﻭ ﺕﺎﻣﻼﻌﻟﺍ ﺝﺫﺎﻤﻧ ﻡﺪﺨﺘﺴُﺗ . ﻩﺎﻧﺩﺃ ﺓﺮﺴﻔﻣ ﺯﻮﻣﺮﻟﺍﻭ ﺕﺎﻣﻼﻌﻟﺍ ﺪﺠﺘﺳ . ﺔﺑﺎﺻﻺﻟ ﻦﻳﺮﺧﻵﺍ ﻭﺃ ﺖﻧﺃ ﻚﺿﺮﻌﺗﻭ ﺍﺬﻫ ﺕﺍﺩﺎﺷﺭﻹﺍ ﻞﻴﻟﺩ ﻲﻓ ﺔﻣﺪﺨﺘﺴﻤﻟﺍ ﺔﻣﻼﺴﻟﺍ ﺯﻮﻣﺭ ﺮﻳﺬﺤﺗ ﻝﺎﻤﻌﺘﺳﻻﺍ ﺔﺠﻴﺘﻧ ﺔﻐﻟﺎﺑ ﺔﻴﻧﺪﺑ ﺭﺍﺮﺿﺃ ﻭﺃ ﺓﺎﻓﻭ ﺎﻬﻴﻓ ﺙﺪﺤﺗ ﺪﻗ ﻲﺘﻟﺍ ﺭﻮﻣﻷﺍ ﻰﻟﺇ ...
Page 375 - تاءانثتسا
٢ AR ﺕﺍءﺎﻨﺜﺘﺳﺍ . ﺔﻴﻟﺎﺘﻟﺍ ﺕﻻﺎﺤﻟﺍ ﻰﻠﻋ ﺔﻴﻟﻭﺆﺴﻣ ﺔﻳﺃ OMRON ﻞﻤﺤﺘﺗ ﻻ ﻑﻼﺨﺑ ﺺﺨﺷ ﺔﻄﺳﺍﻮﺑ ﺯﺎﻬﺠﻠﻟ ﺡﻼﺻﺇ ﻭﺃ / ﻭ ﺔﻧﺎﻴﺻ ءﺍﺮﺟﺇ ﺐﺒﺴﺑ ﻒﻠﺗ ﻭﺃ ﺔﻠﻜﺸﻣ ﺙﻭﺪﺣ ﺔﻟﺎﺣ ﻲﻓ . ١ OMRON ﻞﺒِﻗ ﻦﻣ ﺪﻤﺘﻌﻤﻟﺍ ﻞﺜﻤﻤﻟﺍ ﻭﺃ OMRON ﻑﻼﺨﺑ ﻯﺮﺧﺃ ﻊﻴﻨﺼﺗ ﺔﻬﺟ ﻦﻣ ﺞﺘﻨﻣ ﻡﺍﺪﺨﺘﺳﺍ ﺐﺒﺴﺑ OMRON ﺕﺎﺠﺘﻨﻣ ﺪﺣﻷ ﻒﻠﺗ ﻭﺃ ﺔﻠﻜﺸﻣ ﺙﻭﺪﺣ . ٢ OMRON ﻦﻣ ﺓﺪﻤﺘﻌﻣ ﺮﻴﻏ ﺭﺎﻴﻏ ﻊﻄﻗ ﻡﺍﺪﺨﺘﺳﺎﺑ ...
Page 376 - ةمدقم; مادختسلاا
١ ﺔﻣﺪﻘﻣ ﻡﺍﺪﺨﺘﺳﻻﺍ ﻲﻋﺍﻭﺩ ﺔﻴﺒﻄﻟﺍ ﺽﺍﺮﻏﻷﺍ ﻦﻣ ﻰﺿﺮﻤﻟﺍﻭ ﻦﻳﺪﺷﺍﺮﻟﺍ ﺪﻨﻋ ﺾﺒﻨﻟﺍ ﻝﺪﻌﻣﻭ ﻡﺪﻟﺍ ﻂﻐﺿ ﺱﺎﻴﻗ ﺽﺍﺮﻏﺃ ﻲﻓ ﻡﺍﺪﺨﺘﺳﻼﻟ ﺪﻌﻣ ﻲﻤﻗﺮﻟﺍ ﺯﺎﻬﺠﻟﺍ ﺍﺬﻫ ﻥﺇ .( ﺔﺻﻮﺑ ٢٠ ﻰﺘﺣﻭ ﺕﺎﺻﻮﺑ ٥ ) ﻢﺳ ٥٠ﻭ ﻢﺳ ١٢ ﻦﻴﺑ ﻢﻬﻳﺪﻟ ﻉﺍﺭﺬﻟﺍ ﻂﻴﺤﻣ ﺡﻭﺍﺮﺘﻳ ﻦﻤﻣ ﻝﺎﻔﻃﻷﺍ ﻑﺪﻬﺘﺴﻤﻟﺍ ﻡﺪﺨﺘﺴﻤﻟﺍ . ﺔﻴﺒﻄﻟﺍ ﺔﻳﺎﻋﺮﻟﺍ ﻲﺋﺎﺼﺧﺃ ﺔﻄﺳﺍﻮﺑ ﻻﺇ ﺯﺎﻬﺠﻟﺍ ﺍﺬﻫ ﻡﺪﺨﺘﺴُﻳ ﻻ ﻰﺿﺮﻤﻟﺍ . ﺮﺜﻛﺃ ﻭﺃ ﺕ...