Mikrotik Wire Dish - User Manual
Mikrotik Wire Dish Access Point – User Manual, read for free online in PDF format. We hope this helps you resolve any issues you may have. If you have further questions, please contact us through the contact form.
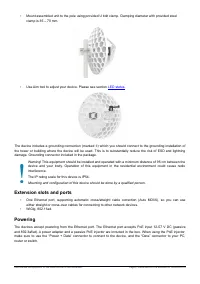


Table of Contents:
- Page 2 – Extension slots and ports
- Page 3 – Connecting to a POE Adapter:; Maximum power consumption 5 W.; Configuration; Full RouterOS documentation is located here:; Buttons and jumpers; LED on when link established.
- Page 4 – Accessories; Gigabit POE injector.; Specifications
- Page 5 – Federal Communication Commission interference statement; Reorient or relocate the receiving antenna.; Industry Canada; MPORTANT NOTE: IC Radiation Exposure Statement:
- Page 6 – Frequency bands terms of use
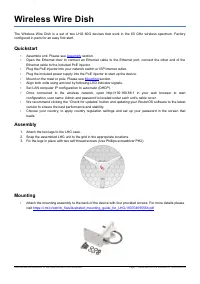
Wireless Wire Dish
The Wireless Wire Dish is a set of two LHG 60G devices that work in the 60 GHz wireless spectrum. Factory
configured in pairs for an easy first start.
Quickstart
•
•
Open the Ethernet door to connect an Ethernet cable to the Ethernet port, connect the other end of the
Ethernet cable to the included PoE injector.
•
Plug the PoE injector into your network switch or ISP internet outlet.
•
Plug the included power supply into the PoE injector to start up the device.
•
Mount on the mast or pole. Please see
•
Align both units using aim tool by following LED indicator signals.
•
Set LAN computer IP configuration to
automatic
(DHCP).
•
Once connected to the wireless network, open http://192.168.88.1 in your web browser to start
configuration, user name: Admin and password is located under each unit's cable cover.
•
We recommend clicking the “Check for updates” button and updating your RouterOS software to the latest
version to ensure the best performance and stability.
•
Choose your country, to apply country regulation settings and set up your password in the screen that
loads.
Assembly
1. Attach the two legs to the LHG case.
2. Snap the assembled LHG unit to the grid in the appropriate locations.
3. Fix the legs in place with two self thread screws (Use Phillips screwdriver PH2).
Mounting
•
Attach the mounting assembly to the back of the device with four provided screws. For more details please
visit
https://i.mt.lv/cdn/rb_files/Ilustrated_mounting_guide_for_LHG-180704095554.pdf
See mikrotik.com/products for the latest version of this document.
Page 1, Document #51319 Modified on: 08.AUG.2019
"Loading the manual" means you need to wait until the file loads and becomes available for online reading. Some manuals are very large, and the time they take to appear depends on your internet speed.
Summary
• Mount assembled unit to the pole using provided U bolt clamp. Clamping diameter with provided steel clamp is 35 – 70 mm. • Use Aim tool to adjust your device. Please see section LED status. The device includes a grounding connection (marked ) ⏚ which you should connect to the grounding installatio...
Connecting to a POE Adapter: 1. Connect the Ethernet cable from the device to the POE+DATA port of the POE adapter.2. Connect an Ethernet cable from your local network (LAN) to the POE adapter.3. Connect the power cord to the adapter, and then plug the power cord into a power outlet. Maximum power c...
Accessories Package includes the following accessories that come with the device: • K-LHG screw set/fastening set. • Gigabit POE injector. • LHG-5G-390 mm Dish (mesh size 0.5 t x1.0 wx1.4 mm ). • EU/US Switching Power Supply 24 V , 0.38 A, 9 W, Level VI, cable:1.5 m. ⎓ • Hose Clamp SUS304 (Philips t...