Mikrotik cAP ac (RBCAPGI-5ACD2ND) - User Manual
Mikrotik cAP ac (RBCAPGI-5ACD2ND) Access Point – User Manual, read for free online in PDF format. We hope this helps you resolve any issues you may have. If you have further questions, please contact us through the contact form.
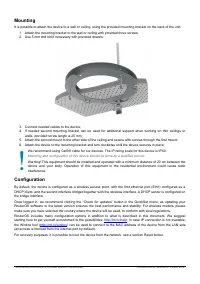

Table of Contents:
- Page 2 – . In case IP connection is not available,
- Page 4 – . Other operating systems have not been tested.; MikroTik mobile app; configuration settings in a couple of easy steps.
- Page 5 – Federal Communication Commission Interference Statement; Reorient or relocate the receiving antenna.
- Page 6 – Innovation, Science and Economic Development Canada
- Page 7 – Frequency bands terms of use
cAP ac
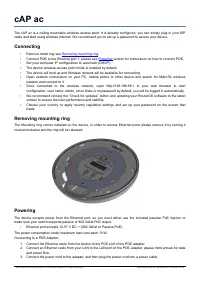
The cAP ac is a ceiling mountable wireless access point. It is already configured, you can simply plug in your ISP
cable and start using wireless Internet. We recommend you to set up a password to secure your device.
Connecting
•
•
Connect POE to the Ethernet port 1, please see
section for instructions on how to connect POE.
•
Set your computer IP configuration to
automatic
(DHCP).
•
The device wireless access point mode is enabled by default.
•
The device will boot up and Wireless network will be available for connecting.
•
Open network connections on your PC, mobile phone or other device and search for MikroTik wireless
network and connect to it.
•
Once connected to the wireless network, open http://192.168.88.1 in your web browser to start
configuration, user name: admin, since there is no password by default, you will be logged in automatically.
•
We recommend clicking the “Check for updates” button and updating your RouterOS software to the latest
version to ensure the best performance and stability.
•
Choose your country, to apply country regulation settings and set up your password on the screen that
loads.
Removing mounting ring
The Mounting ring comes installed on the device, in order to access Ethernet ports please remove it by turning it
counterclockwise and the ring will be released.
Powering
The device accepts power from the Ethernet port, so you must either use the included passive PoE injector or
make sure your switch supports passive or 802.3af/at PoE output.
•
Ethernet port accepts 12-57 V DC
⎓
(802.3af/at or Passive PoE).
The power consumption under maximum load can reach 13 W.
Connecting to a POE Adapter:
1. Connect the Ethernet cable from the device to the POE port of the POE adapter.
2. Connect an Ethernet cable from your LAN to the LAN port of the POE adapter, please mind arrows for data
and power flow.
3. Connect the power cord to the adapter, and then plug the power cord into a power outlet.
See mikrotik.com/products for the latest version of this document.
Document #50187 Modified on: 05.NOV.2019
"Loading the manual" means you need to wait until the file loads and becomes available for online reading. Some manuals are very large, and the time they take to appear depends on your internet speed.
Summary
Mounting It is possible to attach the device to a wall or ceiling, using the provided mounting bracket on the back of the unit: 1. Attach the mounting bracket to the wall or ceiling with provided three screws;2. Use 5 mm drill bid if necessary with provided dowels; 3. Connect needed cables to the de...
Specifications For more information about this product, specification and pictures please visit our web page: https://mikrotik.com/product/cap_ac Operating system support The device supports RouterOS software version 6. The specific factory-installed version number is indicated in theRouterOS menu /...
Federal Communication Commission Interference Statement FCC ID:TV7CPGI5ACD2NDThis equipment has been tested and found to comply with the limits for a Class B digital device,pursuant to Part 15 of the FCC Rules. These limits are designed to provide reasonable protectionagainst harmful interference in...