Mikrotik cAP lite RBcAPL-2nD (RBCAPL-2ND) - User Manual
Mikrotik cAP lite RBcAPL-2nD (RBCAPL-2ND) Access Point – User Manual, read for free online in PDF format. We hope this helps you resolve any issues you may have. If you have further questions, please contact us through the contact form.
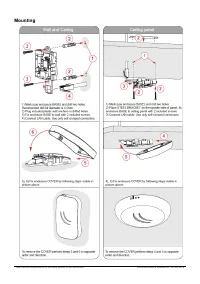

Table of Contents:
- Page 2 – Reset; button; The reset button has three functions:; Expansion slots and ports; One USB type AB slot.; Accessories; DC; Specifications; . Other operating systems have not been tested.; MikroTik mobile app
- Page 3 – Mounting
- Page 4 – Federal Communication Commission Interference Statement; Reorient or relocate the receiving antenna.; Industry Canada
- Page 5 – Frequency bands terms of use
cAP lite
Included with the product are two different casings, which can easily be swapped out, or, if you really like to fit the
design with the environment, we are providing 3D printer friendly design files.
Connecting
Connect POE to the Ethernet port, please see
section for instructions on how to connect POE.
Set your computer IP configuration to
automatic
(DHCP).
The device wireless access point mode is enabled by default.
The device will boot up and Wireless network will be available for connecting.
Open network connections on your PC, mobile phone or other device and search for MikroTik wireless
network and connect to it.
Once connected to the wireless network, open http://192.168.88.1 in your web browser to start
configuration, since there is no password by default, you will be logged in automatically.
We recommend clicking the “Check for updates” button and updating your RouterOS software to the latest
version to ensure the best performance and stability.
Choose your country, to apply country regulation settings and set up your password in the screen that
loads.
Powering
The device accepts power from the Ethernet port and USB port, so you must either use the included passive PoE
injector or make sure your switch supports passive or 802.3af/at PoE output.
•
Ethernet port accepts 12-57 V DC
⎓
(802.3af/at or Passive PoE).
•
MicroUSB DC
⎓
5 V.
The power consumption under maximum load can reach 4 W.
Connecting to a POE Adapter:
1. Connect the Ethernet cable from the device to the POE port of the POE adapter.
2. Connect an Ethernet cable from your LAN to the LAN port of the POE adapter, please mind arrows for data
and power flow.
3. Connect the power cord to the adapter, and then plug the power cord into a power outlet.
Configuration
Once logged in, we recommend clicking the “Check for updates” button in the QuickSet menu, as updating your
RouterOS software to the latest version ensures the best performance and stability. For wireless models, please
make sure you have selected the country where the device will be used, to conform with local regulations.
RouterOS includes many configuration options in addition to what is described in this document. We suggest
starting here to get yourself accustomed to the possibilities:
. In case IP connection is not available,
the Winbox tool (
) can be used to connect to the MAC address of the device from the LAN side
(all access is blocked from the Internet port by default).
For recovery purposes, it is possible to boot the device from the network, see a section
See mikrotik.com/products for the latest version of this document.
Document #50202 Modified on: 19.JUN.2019
"Loading the manual" means you need to wait until the file loads and becomes available for online reading. Some manuals are very large, and the time they take to appear depends on your internet speed.
Summary
Reset button The reset button has three functions: • Hold this button during boot time until LED light starts flashing, release the button to reset RouterOSconfiguration (total 5 seconds). • Keep holding for 5 more seconds, LED turns solid, release now to turn on CAP mode. The device will nowlook fo...
Mounting See mikrotik.com/products for the latest version of this document. Document #50202 Modified on: 19.JUN.2019
Federal Communication Commission Interference Statement FCC ID:TV7RBCM2NDThis equipment has been tested and found to comply with the limits for a Class B digital device,pursuant to Part 15 of the FCC Rules. These limits are designed to provide reasonable protectionagainst harmful interference in a r...