Page 2 - Contents
Contents 2 Warning and Safety instructions .......................................................................... 4 Caring for the environment ................................................................................ 15 Overview .............................................................
Page 4 - Warning and Safety instructions
Warning and Safety instructions 4 This appliance conforms to current safety requirements.Inappropriate use can, however, lead to personal injury anddamage to property. To avoid the risk of accidents and damage tothe appliance, please read these instructions carefully before usingit for the first tim...
Page 5 - Correct application; This cooktop is designed for domestic use and for use in similar
Warning and Safety instructions 5 Correct application This cooktop is designed for domestic use and for use in similar environments by guests in hotel or motel rooms, bed & breakfastsand other typical living quarters. This does not include common/shared facilities or commercial facilities with...
Page 6 - Safety with children
Warning and Safety instructions 6 Safety with children Young children must not be allowed to use this appliance. Older children may only use the appliance when its operation has been clearly explained to them and they are able to use it safely,recognising the dangers of misuse. Cleaning may on...
Page 7 - Technical safety
Warning and Safety instructions 7 Technical safety Repairs and other work by unqualified persons could be dangerous. Installation, maintenance work and repairs to electricalappliances must only be carried out by a Miele approved servicetechnician. A damaged appliance is dangerous. Check it for a...
Page 9 - In areas which may be subject to infestation by cockroaches or
Warning and Safety instructions 9 If the cooktop is installed behind a furniture panel (e.g. a door), ensure that the door is never closed whilst the cooktop is in use.Heat and moisture can build up behind a closed furniture panel andcause subsequent damage to the cooktop, the housing unit and the...
Page 10 - Correct use
Warning and Safety instructions 10 Correct use The cooktop gets hot when in use and remains hot for a while after being switched off. There is a danger of burning until theresidual heat indicators go out. Due to the high temperatures radiated, objects left near the cooktop when it is in use coul...
Page 11 - When the appliance is switched on either deliberately or by
Warning and Safety instructions 11 When the appliance is switched on either deliberately or by mistake, or when there is residual heat present, there is the risk ofany metal items left on the cooktop heating up, with the danger ofburning. Depending on the material, other items left on the cooktopc...
Page 13 - Do not use two pans on a cooking zone, extended zone or
Warning and Safety instructions 13 Do not use two pans on a cooking zone, extended zone or PowerFlex zone at the same time. If the pan only partially covers the cooking zone, the handle could become very hot.Ensure that you always place the pan in the middle of the cookingzone.
Page 14 - Cleaning and care; Do not use a steam cleaning appliance to clean this appliance.
Warning and Safety instructions 14 Cleaning and care Do not use a steam cleaning appliance to clean this appliance. The steam could reach the electrical components and cause a shortcircuit. If the cooktop is built in over a pyrolytic oven, the cooktop should not be used whilst the pyrolytic proc...
Page 15 - Caring for the environment
Caring for the environment 15 Disposal of the packingmaterial The transport and protective packaginghas been selected from materials whichare environmentally friendly fordisposal, and can normally be recycled. Recycling the packaging reduces theuse of raw materials in themanufacturing process and al...
Page 16 - Overview; Cooktop; ab
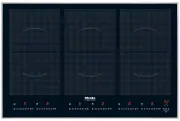
Overview 16 Cooktop a PowerFlex cooking zone with TwinBooster b PowerFlex cooking zone with TwinBooster ab can be combined to form PowerFlex cooking area c PowerFlex cooking zone with TwinBooster cf can be combined to form PowerFlex cooking area d PowerFlex cooking zone with TwinBooster de can be co...
Page 17 - Controls / Indicators; Sensor controls
Overview 17 Controls / Indicators 8 8 0 0 a b c min d e f g h i j k l m Sensor controls a For switching the cooktop on/off b For activating/deactivating Stop & Go ab For activating/deactivating the system lock c TimerSwitching on and off- For switching between timer functions- For selecting a co...
Page 18 - Indicator lights
Overview 18 e For switching the keeping warm function on and off f For selecting the power setting g For switching the PowerFlex cooking area on/off Indicator lights h The system lock has been activated k Timer i Cooking zone display Cooking zone ready for use Keeping warm setting to Power l...
Page 19 - Cooking zone data; Cooking zone
Overview 19 Cooking zone data Cooking zone Ø in cm* Rating in watts for 230 V** 15–23 NormalTwinBooster, level 1TwinBooster, level 2 210030003650 15–23 NormalTwinBooster, level 1TwinBooster, level 2 210030003650 15–23 NormalTwinBooster, level 1TwinBooster, level 2 210033003650 15–23 NormalT...
Page 20 - Using for the first time
Using for the first time 20 Please stick the extra data plate forthe appliance supplied with thisdocumentation in the space providedin the "After sales service, data plate,warranty" section of this booklet.Alternatively, the additional label canbe stuck near the appliance if theappliance m...
Page 21 - Induction; The induction principle
Induction 21 The induction principle An induction coil is located under eachcooking zone. When a cooking zone isswitched on, this coil creates amagnetic field which impacts directlyon the base of the pan and heats it up.The cooking zone itself is heated upindirectly by the heat given off by thepan. ...
Page 22 - Noises
Induction 22 Noises When using an induction cooking zone,the following noises can occur in thepan, depending on what it is made ofand how it has been constructed. On the higher power settings, it mightbuzz. This will decrease or ceasealtogether when the power setting isreduced. If the pan base is ma...
Page 23 - Pans
Induction 23 Pans Suitable pans: – Stainless steel pans with a base that can be magnetised. – Enamelled steel pans. – Cast iron pans. Unsuitable pans: – Stainless steel pans without a magnetic base. – Aluminium and copper pans. – Glass, ceramic or earthenware pots and pans. To test whether a pot or ...
Page 24 - Tips on saving energy; – Use a lid whenever possible to
Tips on saving energy 24 – Use a lid whenever possible to minimise heat loss. – Select a smaller pan when cooking small quantities. A smaller pan usesless energy than a larger pan withvery little in it. – Cook with as little water as possible. – Once food has come to the boil or the oil in the pan i...
Page 25 - Power level range; Settings
Power level range 25 Settings Melting butterDissolving gelatine 1–2 Making milk puddings 2 Warming small quantities of liquidCooking riceDefrosting frozen vegetablesCooking pulses 3 Warming liquid and semi-solid foodsMaking omelettes or lightly frying eggsSteaming fruitCooking pasta 4 Steaming veget...
Page 26 - Operation; Operating principles; sensor needs to be
Operation 26 Operating principles The glass ceramic cooktop is equippedwith electronic sensor controls whichreact to finger contact. For safetyreasons, in order to switch the cooktopon, the On/Off sensor needs to be touched for a little longer than the othersensors. A tone sounds each time a sens...
Page 27 - Switching on; Touch the; Switching off; Danger of burning! Do not touch
Operation 27 Fire hazard! Do not leave the cooktop unattendedwhilst it is being used.Please note that the heating up timeon induction cooktops is very muchshorter than on conventionalcooktops. Switching on Touch the sensor. appears in each of the cooking zone indicators. If no further entry ...
Page 28 - PowerFlex cooking area
Operation 28 PowerFlex cooking area The PowerFlex cooking zones can becombined to form a PowerFlex cookingarea (see "Overview - Cooktop").Settings for the cooking area arecontrolled by the front or left PowerFlexcooking zone. Switching on Touch the or sensor. will light up in the d...
Page 29 - Activating
Operation 29 Auto heat-up When Auto heat-up has been activated,the cooking zone switches onautomatically at the highest setting andthen switches to the continued cookingsetting which you have previouslyselected. The heat-up time depends onwhich continued cooking setting hasbeen chosen (see chart). A...
Page 30 - Booster; – no setting has been selected, the
Operation 30 Booster The cooking zones are equipped with aBooster or TwinBooster (see "Overview– Cooktop"). You can use the Boosterfunction for a maximum of two cookingzones at the same time. When activated, the power is boostedfor a maximum of 15 minutes so thatlarge quantities can be heate...
Page 31 - Switching on the Booster
Operation 31 Switching on the Booster Touch the 9 sensor twice for thecooking zone you wish. will appear in the cooking zone display. Switching on the TwinBooster, level 1 Touch the 9 sensor twice for thecooking zone you wish to use. will appear in the cooking zone display. Switching on the ...
Page 32 - Keeping warm; – Only use pans for keeping food
Operation 32 Keeping warm The keeping warm function is notdesigned to reheat food from the coldstate. It is only for keeping food warmdirectly after cooking. If the keeping warm function has beenactivated, the cooking zone will switchoff automatically after a maximum of 2hours. – Only use pans for k...
Page 33 - Timer; Minute minder; Setting the minute minder
Timer 33 You can select a time up to amaximum of 99 minutes. The timer can be used for two differentfunctions: – For setting the minute minder. – To set a cooking zone to switch off automatically. Minute minder Setting the minute minder Touch the sensor. Select the time you want with the - or ...
Page 35 - Additional functions; Activation / Deactivation; Recall; Switch the cooktop on again.
Additional functions 35 Stop & Go When Stop & Go is activated, the powerof all cooking zones in use is reduced topower setting 1.The cooking zone power settings andthe timer settings cannot be altered andthe cooktop can only be switched off. Aset minute minder time will continue tocount down...
Page 36 - Safety features; System lock
Safety features 36 System lock The system lock is deactivated ifthere is an interruption to the powersupply. Your cooktop is equipped with a systemlock to prevent it being switched on bymistake. If an unavailable sensor is touchedwhilst the system lock is activated, will appear in the timer displ...
Page 37 - symbol will appear in the relevant
Safety features 37 Safety switch-off Safety switch-off with an overlongcooking time The safety switch-off mechanism istriggered automatically if one of thecooking zones is heated for anunusually long period of time. Thisperiod of time depends on the powersetting selected. Once exceeded, thecooking z...
Page 38 - Overheating protection
Safety features 38 Overheating protection All the induction coils and coolingelements for the electronics are fittedwith an overheating protectionmechanism. Before the induction coilsor cooling elements get too hot, theoverheating protection mechanism cutsin in one of the following ways: – Any Boost...
Page 39 - Unsuitable cleaning agents
Cleaning and care 39 Danger of burning! The cooking zones must be switchedoff. The cooktop needs to cooldown. Danger of injury! The steam from a steam cleaningappliance could reach electricalcomponents and cause a shortcircuit.Do not use a steam cleaner to cleanthe cooktop. The use of unsuitable...
Page 40 - Spots
Cleaning and care 40 Do not clean the area between theglass-ceramic surface and the frameor the frame and the worktop withsharp, pointed objects.This could damage the seals. Do not use washing-up liquid toclean the appliance as washing-upliquid will not remove all soiling anddeposits.It will also fo...
Page 41 - Problem solving guide; Problem
Problem solving guide 41 With the aid of the following guide, minor problems can be easily correctedwithout contacting Miele. If, after reading this guide, you can't remedy the problemyourself, please call Miele (see back cover for details).Please note, however, that a call-out charge will be applie...
Page 44 - Optional accessories; Saucepans and frying pans
Optional accessories 44 Miele offers a range of usefulaccessories, as well as cleaning andconditioning products for yourappliance. These can be ordered online at: or from Miele (see end of this bookletfor contact details). Saucepans and frying pans Miele offer a wide range of pans whichare perfect f...
Page 45 - ctivity is available on the internet
Con @ ctivity 45 Your cooktop is communicationenabled and via the dongle suppliedwith selected rangehoods cancommunicate with the rangehood(Con @ ctivity). The cooktop sends information on itsoperating status to the rangehood. Theoperation of the rangehood isautomatically controlled by the powersett...
Page 46 - Signing on; ctivity system, you will first
Con @ ctivity 46 Signing on If you want to sign on your cooktop tothe Con @ ctivity system, you will first need to sign on the rangehood. Disconnect the cooktop from themains electricity supply. Connect the dongle to the cooktop(see the installation instructions forthe dongle). Reconnect the c...
Page 47 - Safety instructions for installation; All dimensions in this instruction booklet are given in mm.
Safety instructions for installation 47 The appliance must only be installed and connected to the electricity supply by a suitably qualified and competent person in strict accordance with currentnational and local safety regulations. Fit the wall units and rangehood before fitting the cooktop to a...
Page 48 - Safety distances
Safety distances 48 Safety distance above thecooktop A minimum safety distance must bemaintained between the cooktop andthe rangehood above it. See therangehood manufacturer's operatingand installation instructions for details. If the manufacturer's instructions arenot available for the rangehood, a...
Page 49 - Interim shelf
Safety distances 49 Safety distances to the sidesand back of the cooktop Ideally the cooktop should be installedwith plenty of space on either side.There may be a wall at the rear or a tallunit or wall on one side (right or left), taking into account the distancesbelow. On the other side, however, n...
Page 50 - Cooktops with frame or bevelled edge; Installation notes; Tiled worktop
Cooktops with frame or bevelled edge 50 Installation notes Seal between the cooktop and theworktop Do not use sealant between thecooktop and the worktop. This couldresult in damage to the cooktop orthe worktop if the cooktop everneeds to be removed for servicing.The sealing strip under the edge ofth...
Page 51 - Building-in dimensions; Front
Cooktops with frame or bevelled edge 51 Building-in dimensions KM 6366-1 a Front b Building-in depth c Mains connection box d Con @ ctivity connection The mains connection cable (1440 mm long) is supplied separately with thecooktop.
Page 52 - Installation; Preparing the worktop
Cooktops with frame or bevelled edge 52 Installation Preparing the worktop Make the worktop cut-out as shownin "Building-in dimensions". Observethe safety distances (see "Safetydistances"). Seal the cut surfaces on woodenworktops with a suitable sealant toavoid swelling caused by...
Page 53 - Flush-fitted cooktops; The cooktop can be installed
Flush-fitted cooktops 53 Installation notes Flush fit cooktops are only suitable forinstallation in natural stone (granite,marble), tiled or solid wood worktops.Certain models are suitable forbuilding into glass worktops - pleasesee advice under "Building-indimensions". When using a worktopm...
Page 55 - Granite and marble worktops
Flush-fitted cooktops 55 Installation Granite and marble worktops a Worktop b Cooktop c Gap As the ceramic glass and the worktopcut-out have a certain dimensionaltolerance, the size of gap can vary (min. 1 mm). d Stepped cut-out Solid wood / tiled / glass worktops a Worktop b Cooktop c Gap d Woode...
Page 57 - Electrical connection; Connection
Electrical connection 57 Danger of injury! Incorrect installation, maintenance orrepair work is dangerous to users.Miele cannot be held liable fordamage or injury caused by incorrectinstallation, maintenance or repairwork, or by an inadequate or faultyearthing system (e.g. electric shock).All elec...
Page 58 - Danger of electrical shock!; Wiring diagram; a b c d e
Electrical connection 58 Replacing the mainsconnection cable Danger of electrical shock! The mains connection cable mustonly be replaced by a suitablyqualified and competent person inaccordance with current local andnational safety regulations.The earth lead must be connected tothe point marked ...
Page 59 - After sales service, data plate, warranty; After sales service; See back of this booklet for contact details.; Data plate; The manufacturer's warranty for this appliance is 2 years.
After sales service, data plate, warranty 59 After sales service In the event of any faults which you cannot easily remedy, please contact Miele. See back of this booklet for contact details. Please quote the model and serial number of your appliance when contactingMiele. Data plate Space in which t...
Page 63 - Miele New Zealand Limited
www.miele.com.au Miele Experience Centre and Head Office Melbourne: 1 Gilbert Park DriveKnoxfield, VIC 3180 Miele Experience Centre South Melbourne: 206-210 Coventry StreetSouth Melbourne, VIC 3205 Miele Experience Centre and Office Sydney: 3 Skyline PlaceFrenchs Forest, NSW 2086 Miele Experience Ce...


 Miele 04 950 470 Manual
 Miele 07 682 190 Manual
 Miele 09 798 350 Manual
 Miele 09 900 700 Manual
 Miele 10 014 160 Manual
 Miele 217 Manual
 Miele 2013 Manual
 Miele 2819i Manual
 Miele 10502220 User Manual
 Miele 10639470 User Manual
 Miele 11423630 User Manual
 Miele 11502710 User Manual
 Miele 11502940 User Manual
 Miele 11614040 User Manual