Page 3 - Contents
Guide to the appliance . . . . . . . . . . . . . . . . . . . . . . . . . . . . . . . . . . . . . . . . . . . . . 6 CS 1012-1 . . . . . . . . . . . . . . . . . . . . . . . . . . . . . . . . . . . . . . . . . . . . . . . . . . . . . . . . 6CS 1034-1 . . . . . . . . . . . . . . . . . . . . . . . . . . ...
Page 5 - In the UK you must now:
Gas-heated appliancesSafety precautions to take if you smell gas ß Turn off the gas emergency control valve immediately.This is usually located near the gas meter. ß Eliminate all sources of ignition in a safe manner.Do not smoke, light cigarette lighters or matches. ß Do not operate electrical ligh...
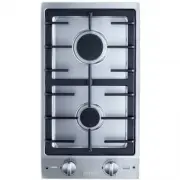
Page 6 - Display; Guide to the appliance
CS 1012-1 a Large burner b Medium burner c Pan support d Symbols to indicate which gasburner the control is for e Display Display l In-operation indicator m Residual heat indicator Controls: f rear g front Guide to the appliance 6
Page 8 - Burner
Burner n Burner cap o Burner head p Ignition safety device q Ignitor r Burner base Guide to the appliance 8
Page 9 - Warning and Safety instructions
This appliance complies with all current local andnational safety requirements. Improper use can,however, present a risk of both personal injury andmaterial damage. To avoid the risk of accidents and damage to theappliance, please read these instructions carefullybefore installation and before using...
Page 12 - Technical safety; Before installation, check the hob for visible signs of
Technical safety ~ Before installation, check the hob for visible signs of damage. Do not install and use a damaged appliance.It could be dangerous. ~ The electrical safety of the hob can only be guaranteed if correctly earthed. It is most important thatthis basic safety requirement is observed and ...
Page 13 - Connection to the gas supply must be carried out by; Gas Safe; registered technician in
~ Connection to the gas supply must be carried out by a suitably qualified and competent person in strictaccordance with current local and national safetyregulations, e.g. a Gas Safe registered technician in the U.K. The hob may be connected via a fused plug andswitched socket. If you wish to connec...
Page 20 - Disposal of your old appliance; Caring for the environment
Disposal of the packingmaterial The transport and protective packinghas been selected from materials whichare environmentally friendly fordisposal, and should be recycled. Ensure that any plastic wrappings,bags, etc. are disposed of safely andkept out of the reach of babies andyoung children. Danger...
Page 21 - Cleaning for the first time; Before using for the first time
Please stick the extra data plate for theappliance supplied with thisdocumentation in the space provided inthe "After sales service, data plate,guarantee" section of this booklet. Cleaning for the first time ^ Remove any protective foil andstickers. ^ Clean all removable parts of theburners ...
Page 22 - Rapid ignition system; cause damage; Operation
Rapid ignition system The appliance is supplied with a rapidignition system with the followingfeatures: – Rapid ignition without pressing und holding the control – Automatic re-ignition Should the flame be extinguished bya gust of air, the burner will re-igniteautomatically.If re-ignition is unsucce...
Page 23 - Switching on; Regulating the flame
Switching on ^ To ignite the burner press the controlknob down and turn it anti-clockwiseto the large flame symbol. The ignitorwill make a clicking sound and ignitethe gas. Operating a control will automaticallycreate a spark on every burner. Thisis quite normal and does not indicatea fault. If the ...
Page 25 - Suitable pans
Burner Min. pan base diameter in cm Small burner 10 Medium burner 12 Large burner 14 Max. diameter at top of pan in cm Small burner 20 Medium burner 22 Large burner 24 – Refer to the chart above and ensure that the pan diameter falls within theminimum and maximum diametersgiven for the burner you ar...
Page 27 - Thermo-electric ignition; Safety features
Thermo-electric ignition This appliance has a thermo-electricignition safety device. If the flame goesout, for example if food has boiled overor if there is a sudden draught, andautomatic re-ignition has beenunsuccessful, the supply of gas to theburner will be cut off. ^ To use the burner again, tur...
Page 28 - Remove any; Cleaning and care
Miele offer a range of branded cleaningand conditioning agents for your hob.See "Optional accessories". , Do not use a steam cleaning appliance to clean this appliance.The steam could reach electricalcomponents and cause a shortcircuit. The appliance should be cleaned aftereach use. Let it c...
Page 29 - Stainless steel surfaces; Printed surfaces; Pan supports, control knobs
Stainless steel surfaces Clean stainless steel surfaces using anE-Cloth or with a solution of warm waterand a little washing-up liquid appliedwith a soft sponge. In the case ofstubborn dried-on soiling, soak first.Finally, dry with a soft cloth. If necessary, the pad on the back of awashing-up spong...
Page 30 - Reassemble the burner
Burner Do not clean any parts of the burnerin a dishwasher. The burner should be dismantled andthen cleaned by hand using a solutionof warm water and a little washing-upliquid applied with a soft sponge. Parts of the burner that cannot beremoved should be wiped clean with adamp cloth only. The ignit...
Page 31 - Problem solving guide
, Repairs to the gas and electrical components of this appliance mustonly be carried out by a suitablyqualified and competent person toensure safety (Gas Safe registeredin the UK). Repairs and other workby unqualified persons could bedangerous. The manufacturercannot be held liable forunauthorised w...
Page 33 - Ceramic and stainless steel hob cleaner 250 ml; Optional accessories
Miele offer a comprehensive range of useful accessories aswell as cleaning and conditioning products for your Mieleappliances. These can be ordered online at: or from Miele (see back cover for contact details) Ceramic and stainless steel hob cleaner 250 ml Removes heavy soiling, limescale deposits a...
Page 34 - Safety instructions for installation
This appliance must be installed andconnected to services inaccordance with local and nationalsafety and building regulations. To avoid the risk of damaging thehob fit the wall units and extractorhood before installing it. ~ The room in which the gas hob is installed must be at least 20 m 3 in size ...
Page 35 - Safety distance above the appliance
Safety distance above the appliance A minimum safety distance must bemaintained between the appliance andthe cooker hood above it. See thecooker hood manufacturer's operatingand installation instructions for details. If the manufacturer's instructions arenot available for the cooker hood, aminimum s...
Page 38 - Appliance and building-in dimensions
CS 1012-1 a Spring clamps b Front c Casing depth d Casing depth including the mains connection box with mains connection cable,L = 1440 mm e Casing depth including the gas connection R 1/2 - ISO 7-1 (DIN EN 10226) Appliance and building-in dimensions 38
Page 40 - back wall; tall unit or side; Preparing the worktop
^ Make the worktop cut-out for one ormore appliances in accordance withthe building-in diagrams.Remember to maintain the minimum safety distance from the back wall , as well as from any tall unit or side wall to the right or left of the hob. See "Safety instructions forinstallation". ^ Seal ...
Page 41 - Appliance width in mm; Installation of several appliances
When installing two or more appliances next to each other a spacer bar b must be used between each one.See "Fixing the spring clamps and spacer bars". Worktop cut-out- two appliances Worktop cut-out- three appliances To calculate the cut-out width (D) required: Add up the widths of each appl...
Page 43 - Wooden worktops; Fixing the spring clamps and spacer bars
Wooden worktops ^ Position the spring clamps supplied a and spacer bars b on the top edge of the cut-out in the positionsmarked. ^ Secure the spring clamps andspacer bars with the 3.5 x 25 mmscrews supplied. Fixing the spring clamps and spacer bars 43
Page 44 - Granite and marble worktops
Granite and marble worktops The screws are not required forgranite or marble worktops. ^ Position and secure the springclamps a and spacer bars b using strong, double-sided adhesive tape c . ^ Apply silcone to the side edges andthe lower edges of spring clamps a and spacer bars b . ^ Then fill gap e...
Page 45 - accessible; Installing / removing the appliance
Installing the appliance ^ Feed the connection cable downthrough the cut-out. ^ Starting at the front, position theappliance in the worktop cut-out. ^ Using both hands, press downevenly on the sides of the applianceuntil it clicks into position. Whendoing this make sure that the sealunder the applia...
Page 46 - Tiled worktop; General installation tips
Seal between the appliance and theworktop The sealing strip under the edge of thetop part of the appliance provides asufficient seal for the worktop. The appliance must not be sealedwith sealant (e.g. silicone).This could result in damage to theappliance or the worktop if it everneeds to be removed ...
Page 47 - Electrical connection
All electrical work should be carriedout by a suitably qualified andcompetent person in strictaccordance with current local andnational safety regulations (BS 7671in the UK). If the connection cable is damaged,it must be replaced by a suitablyqualified electrician with a specialconnection cable of t...
Page 48 - Important
Important The electrical safety of this appliancecan only be guaranteed whencontinuity is complete between it andan effective earthing system, whichcomplies with current local and nationalsafety regulations. It is most importantthat this basic safety requirement ispresent and regularly tested and wh...
Page 49 - Gas connection
, Connection to the gas supply, or conversion from one type of gas toanother, should only be undertakenby an approved and registered gasinstaller in strict accordance withlocal and national safety andbuilding regulations (e.g. Gas Saferegistered in the UK). Every appliance should have its owneasily ...
Page 50 - Connection
Connection The gas connection must be installedso that connection can be made eitherfrom inside or outside the kitchen unit,and the isolating valve must be easilyaccessible and visible (by opening oneof the kitchen doors, if necessary). After installing the appliance the gasburners have to be set fo...
Page 51 - Conversion to another type of gas
, Connection to the gas supply, or conversion from one type of gas toanother, should only be undertakenby an approved and registered gasinstaller in strict accordance withlocal and national safety andbuilding regulations (e.g. Gas Saferegistered in the UK). When converting to a different type ofgas,...
Page 53 - Changing the jets; To change the main jets
Changing the jets Disconnect the gas hob from themains electricity supply. Turn off thegas supply. To change the main jets ^ Remove the pan support, burner cap n and burner head o . ^ Using an M7 socket spanner,unscrew main jet s . ^ Change the main jet. To change the small jets The upper section of...
Page 54 - Function test
Function test Check all gas fittings for leaks. ^ Reassemble the appliance. ^ Check the burner flame by operatingthe burner. The flame must not go out on thelowest setting, or when the control isturned quickly from a high to a lowsetting. On the highest setting, the flamemust have a distinctive and ...
Page 55 - Guarantee; After sales service, data plate, guarantee
In the event of any faults which you cannot remedy yourself, or if the appliance isunder guarantee, please contact: – Your Miele dealer, or – the Miele Service Department (see back cover for address). Please note that telephone calls may be monitored and recorded to improveour service. When contacti...


 Miele 04 950 470 Manual
 Miele 07 682 190 Manual
 Miele 09 798 350 Manual
 Miele 09 900 700 Manual
 Miele 10 014 160 Manual
 Miele 217 Manual
 Miele 2013 Manual
 Miele 2819i Manual
 Miele 10502220 User Manual
 Miele 10639470 User Manual
 Miele 11423630 User Manual
 Miele 11502710 User Manual
 Miele 11502940 User Manual
 Miele 11614040 User Manual